Midwest Classic Insurance

Visit our community sponsor

Thanks Thanks:  0
Likes Likes:  0
Results 1 to 19 of 19

Thread: Power steering rack fitting

  1. #1
    Senior Member chopthebass's Avatar
    Join Date
    Oct 2013
    Location
    Calgary, Canada
    Posts
    941
    Post Thanks / Like

    Power steering rack fitting

    I have removed my manual rack and am replacing it with power steering. I took the radiator shroud off to ease fitting, but I can't see how it can fit. Seems the cross member is stopping it. Its a 87-93 rack. Have I got the wrong one? Do I need to modify anything?
    Finally started my build the beginning July. 2015!

  2. #2
    Papa's Avatar
    Join Date
    Dec 2016
    Location
    Mexico, MO
    Posts
    5,602
    Post Thanks / Like
    On mine, I had to tilt the rack (raise the passenger end) and work the driver's side into the mount then lower the passenger side into the mount.
    My Build Thread: http://thefactoryfiveforum.com/showt...ter-Build-9754
    (Most viewed Roadster build thread on this forum!)

    Delivered: 6/17/2017
    First Start: 12/30/2017
    Completed: 12/7/2019
    Legal: 1/30/2020

    Member of the Mile-Hi Cobra Club
    Dave's Cobra YouTube Channel: https://www.youtube.com/channel/UCbk...npK1UZHj4R-bYQ
    Agora 1:8 Scale Cobra Build: https://thefactoryfiveforum.com/show...l-Build-Thread

  3. #3
    Carl carlewms's Avatar
    Join Date
    May 2012
    Location
    Nokesville, VA
    Posts
    1,125
    Post Thanks / Like
    Assuming you are talking about a Mk 4 ...

    1. Are you using Breeze's bushings? It makes adjusting the rack a lot easier.

    2. Here is the details from the installation of the Breeze supplied power steering rack ...

    After the struggle of finding the right steering rack ... I went back to the old reliable Mark Reynolds at Breeze Automotive.

    Here is the rack he sells ... it comes directly from the factory (Unisteer) ready for installation with the extenders mounted under larger boots. Unlike the AZ version the condition was excellent with a very nice power coated gloss black paint job ... not a single paint chip.

    I had also purchased is off set bushing kit (Part Number 70518) to mount the rack solidly to the frame.


    Since the rack comes powder coated with the regular rubber/steel bushings installed. After a little persuasion to get these out then I was challenged with getting the solid bushings installed ... between the tight fit and the powder coating I had to use a sanding drum on a drill to clean out the powder coat and get the bushings on the rack.

    The photo shows the rack during the mock up stage before the centering process.


    The instructions from Breeze are excellent and easily guide you through the centering process. Basically you extend the rack to the lock in each direction, measure the distance from the tip of the inner tie rod to the 2x3 from, take the difference and divide by 2. This is the distance you need to move the rack on the frame to center it. A couple of lessons learned here:

    1. Make sure that at least one bolt is tight enough to keep the rack from moving as you turn the rack from lock to lock to measure the distance between the 2 x3 vertical frame member and the tip of the inner tie rod.

    2. Remember to position the inner tie rods straight out from the rack to get the most accurate measurements. I found that if they were even a little off it made a big difference in the numbers;

    3. If you need to modify the mounting tabs to clear parts of the rack do it before going through the centering process (it sure makes getting the rack on and off the car easier).


    After the centering process I needed to move the rack body 1/8" DS to the PS. This is where the Breeze offsets come in very handy. A small flat blade screw driver in the slot on the bushings made it easy to do.

    To make future alignment easier if I had to remove the rack I painted a line on the rack to show where it should be centered relative to the x member.


    Connecting the steering shaft to the rack is tight ... I had to loosen up the DS foot box pillow bearing to allow just enough room to get the shaft on to the rack via the PS coupling supplied by FFR complicated by the fact that I wanted to the steering wheel to be properly centered as well.

    After all was installed and tightened up I check for tire rub on the F-Panels. After fiddling with it I had to add 3 steering limiters on each side to keep the rear inside of the tire from touching the panel.


    After installation ...


    After the initial rough alignment I may be able to eliminate one of the limiters.

    Carl
    Mk 4 Roadster
    October 25, 2012 - Kit Arrives
    April 8, 2013 - Build Starts
    August 23, 2015 - Rolling Chassis/Engine & Transmission Installed
    March 26, 2016 - Go Cart

  4. #4
    mburger's Avatar
    Join Date
    May 2017
    Location
    Punta Gorda FL
    Posts
    1,146
    Post Thanks / Like
    Quote Originally Posted by carlewms View Post
    Assuming you are talking about a Mk 4 ...

    Here is the rack he sells ... it comes directly from the factory (Unisteer) ready for installation with the extenders mounted under larger boots. Unlike the AZ version the condition was excellent with a very nice power coated gloss black paint job ... not a single paint chip.

    Carl
    I bought my power rack from Mark at Breeze shipped from Unisteer for my MK2. I didn't get the solid bushings but a bunch of washers. I elected to use the bushings from my manual rack. Also the outer tie rods had to be cut shorter. Definetnly not a plug and play in a Mark 2.

  5. #5
    Senior Member chopthebass's Avatar
    Join Date
    Oct 2013
    Location
    Calgary, Canada
    Posts
    941
    Post Thanks / Like
    It is a Mk4. I am using the bushings the original kit rack came with. I don't understand the purpose of centering. The rack only fits in one place.
    I just can't even get it close to the mounting location.
    Finally started my build the beginning July. 2015!

  6. #6
    Senior Member chopthebass's Avatar
    Join Date
    Oct 2013
    Location
    Calgary, Canada
    Posts
    941
    Post Thanks / Like
    Quote Originally Posted by Papa View Post
    On mine, I had to tilt the rack (raise the passenger end) and work the driver's side into the mount then lower the passenger side into the mount.
    I tried that, but all the tubes from the rack touch the cross member before I even get close to the mount.
    Finally started my build the beginning July. 2015!

  7. #7
    Senior Member chopthebass's Avatar
    Join Date
    Oct 2013
    Location
    Calgary, Canada
    Posts
    941
    Post Thanks / Like
    Quote Originally Posted by Papa View Post
    On mine, I had to tilt the rack (raise the passenger end) and work the driver's side into the mount then lower the passenger side into the mount.
    Tried this again Papa and got very close. I am about 2mm away from sliding it down into the mount. Almost like I need to remove the rubber that side of the bush
    Finally started my build the beginning July. 2015!

  8. #8
    Senior Member
    Join Date
    Jun 2015
    Location
    Ancaster, Ontario
    Posts
    244
    Post Thanks / Like
    Quote Originally Posted by chopthebass View Post
    It is a Mk4. I am using the bushings the original kit rack came with. I don't understand the purpose of centering. The rack only fits in one place.
    I just can't even get it close to the mounting location.
    Hi Chopthebass,

    It is confusing. You are not actually centering the rack body. It goes into a fixed position. Look up Karlos's definitive instructions on centering the steering, posted 10/18/2015.

    Joe

  9. #9
    Papa's Avatar
    Join Date
    Dec 2016
    Location
    Mexico, MO
    Posts
    5,602
    Post Thanks / Like
    Quote Originally Posted by chopthebass View Post
    Tried this again Papa and got very close. I am about 2mm away from sliding it down into the mount. Almost like I need to remove the rubber that side of the bush
    I fought with mine for a hour or two before it eventually dropped in. At one point I considered removing the installed 3/16th lines thinking it may go in easier. I'm glad I didn't do that.
    My Build Thread: http://thefactoryfiveforum.com/showt...ter-Build-9754
    (Most viewed Roadster build thread on this forum!)

    Delivered: 6/17/2017
    First Start: 12/30/2017
    Completed: 12/7/2019
    Legal: 1/30/2020

    Member of the Mile-Hi Cobra Club
    Dave's Cobra YouTube Channel: https://www.youtube.com/channel/UCbk...npK1UZHj4R-bYQ
    Agora 1:8 Scale Cobra Build: https://thefactoryfiveforum.com/show...l-Build-Thread

  10. #10
    Senior Member Itchief's Avatar
    Join Date
    Aug 2017
    Location
    Southern WV
    Posts
    376
    Post Thanks / Like
    The rack is a pain, I had mine on and off a couple of times before I was happy with the way the car drove.

    After fighting to get the rack installed a time or two.

    I bent the front mounting flange enough to install a shim/washer on the back side that gave me enough space to get the steering universal to slide in and the rack to go into the mount. I had to install the drivers side first, insert the bolt and then work on he passengers side.

    Hope this helps.

    Rick

  11. #11
    Senior Member chopthebass's Avatar
    Join Date
    Oct 2013
    Location
    Calgary, Canada
    Posts
    941
    Post Thanks / Like
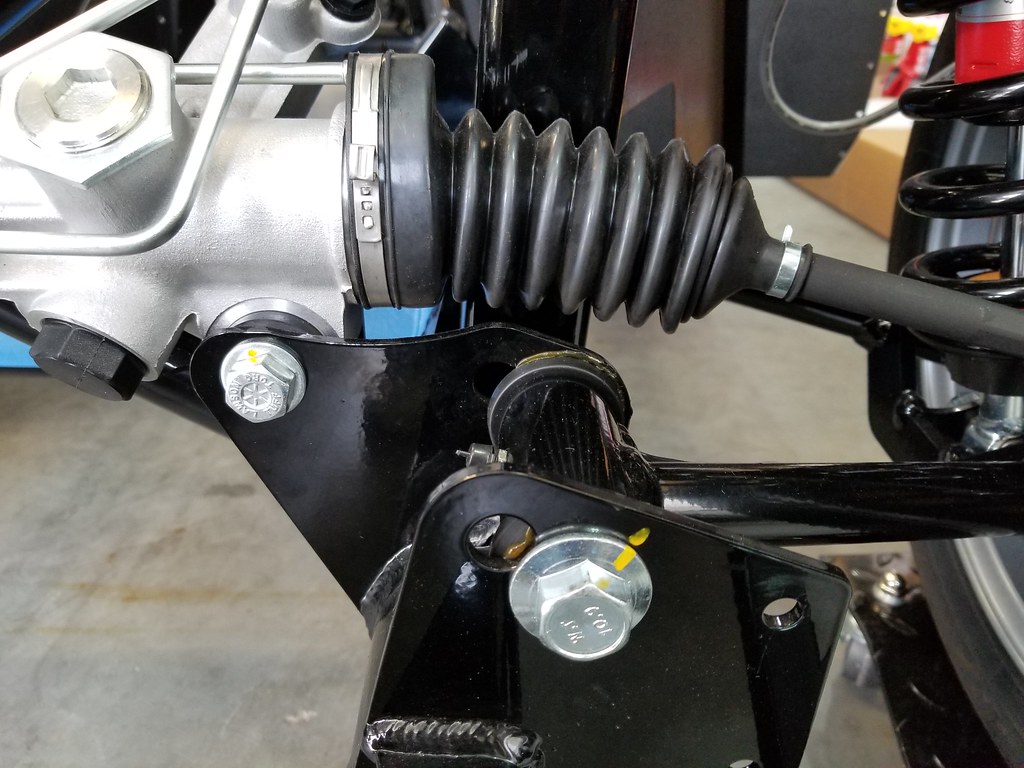
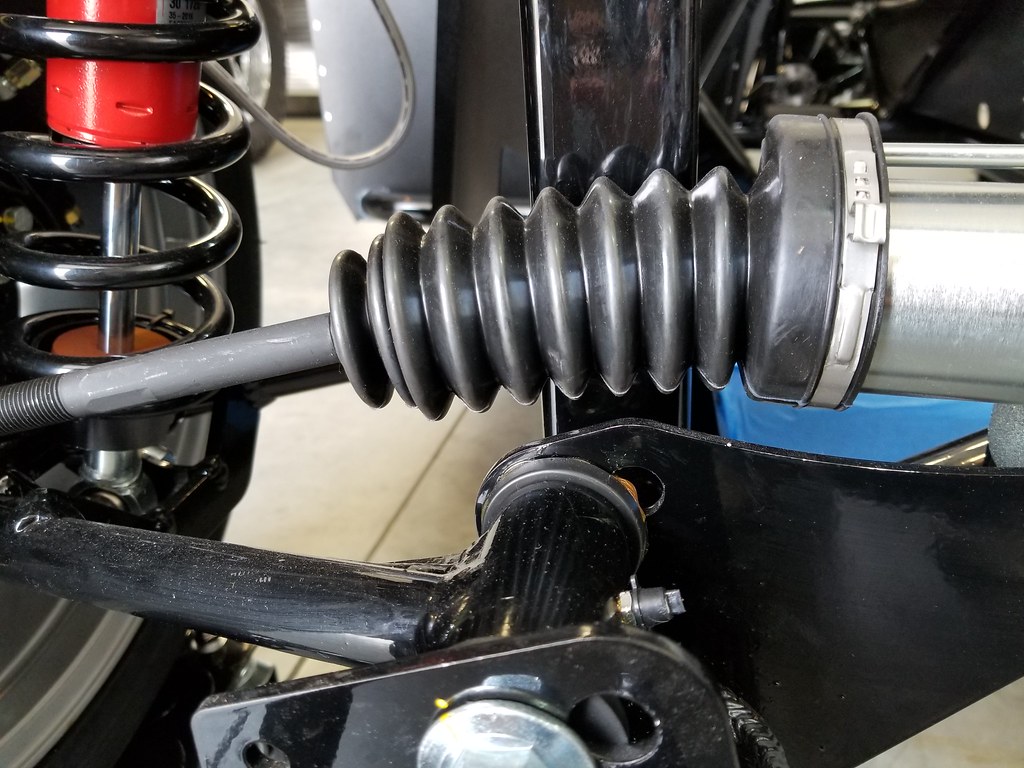
    I managed to get mine in using Papa's method. The boots are quite snug against the rectangular chassis tubes. Made worse as the rack extenders are in, and I am sure when turning the wheel I can feel resistance caused by them rubbing. Hopefully this won't be an issue once the pump is running.
    Finally started my build the beginning July. 2015!

  12. #12
    Senior Member phileas_fogg's Avatar
    Join Date
    Jun 2015
    Location
    Fairfax Station VA
    Posts
    1,235
    Post Thanks / Like
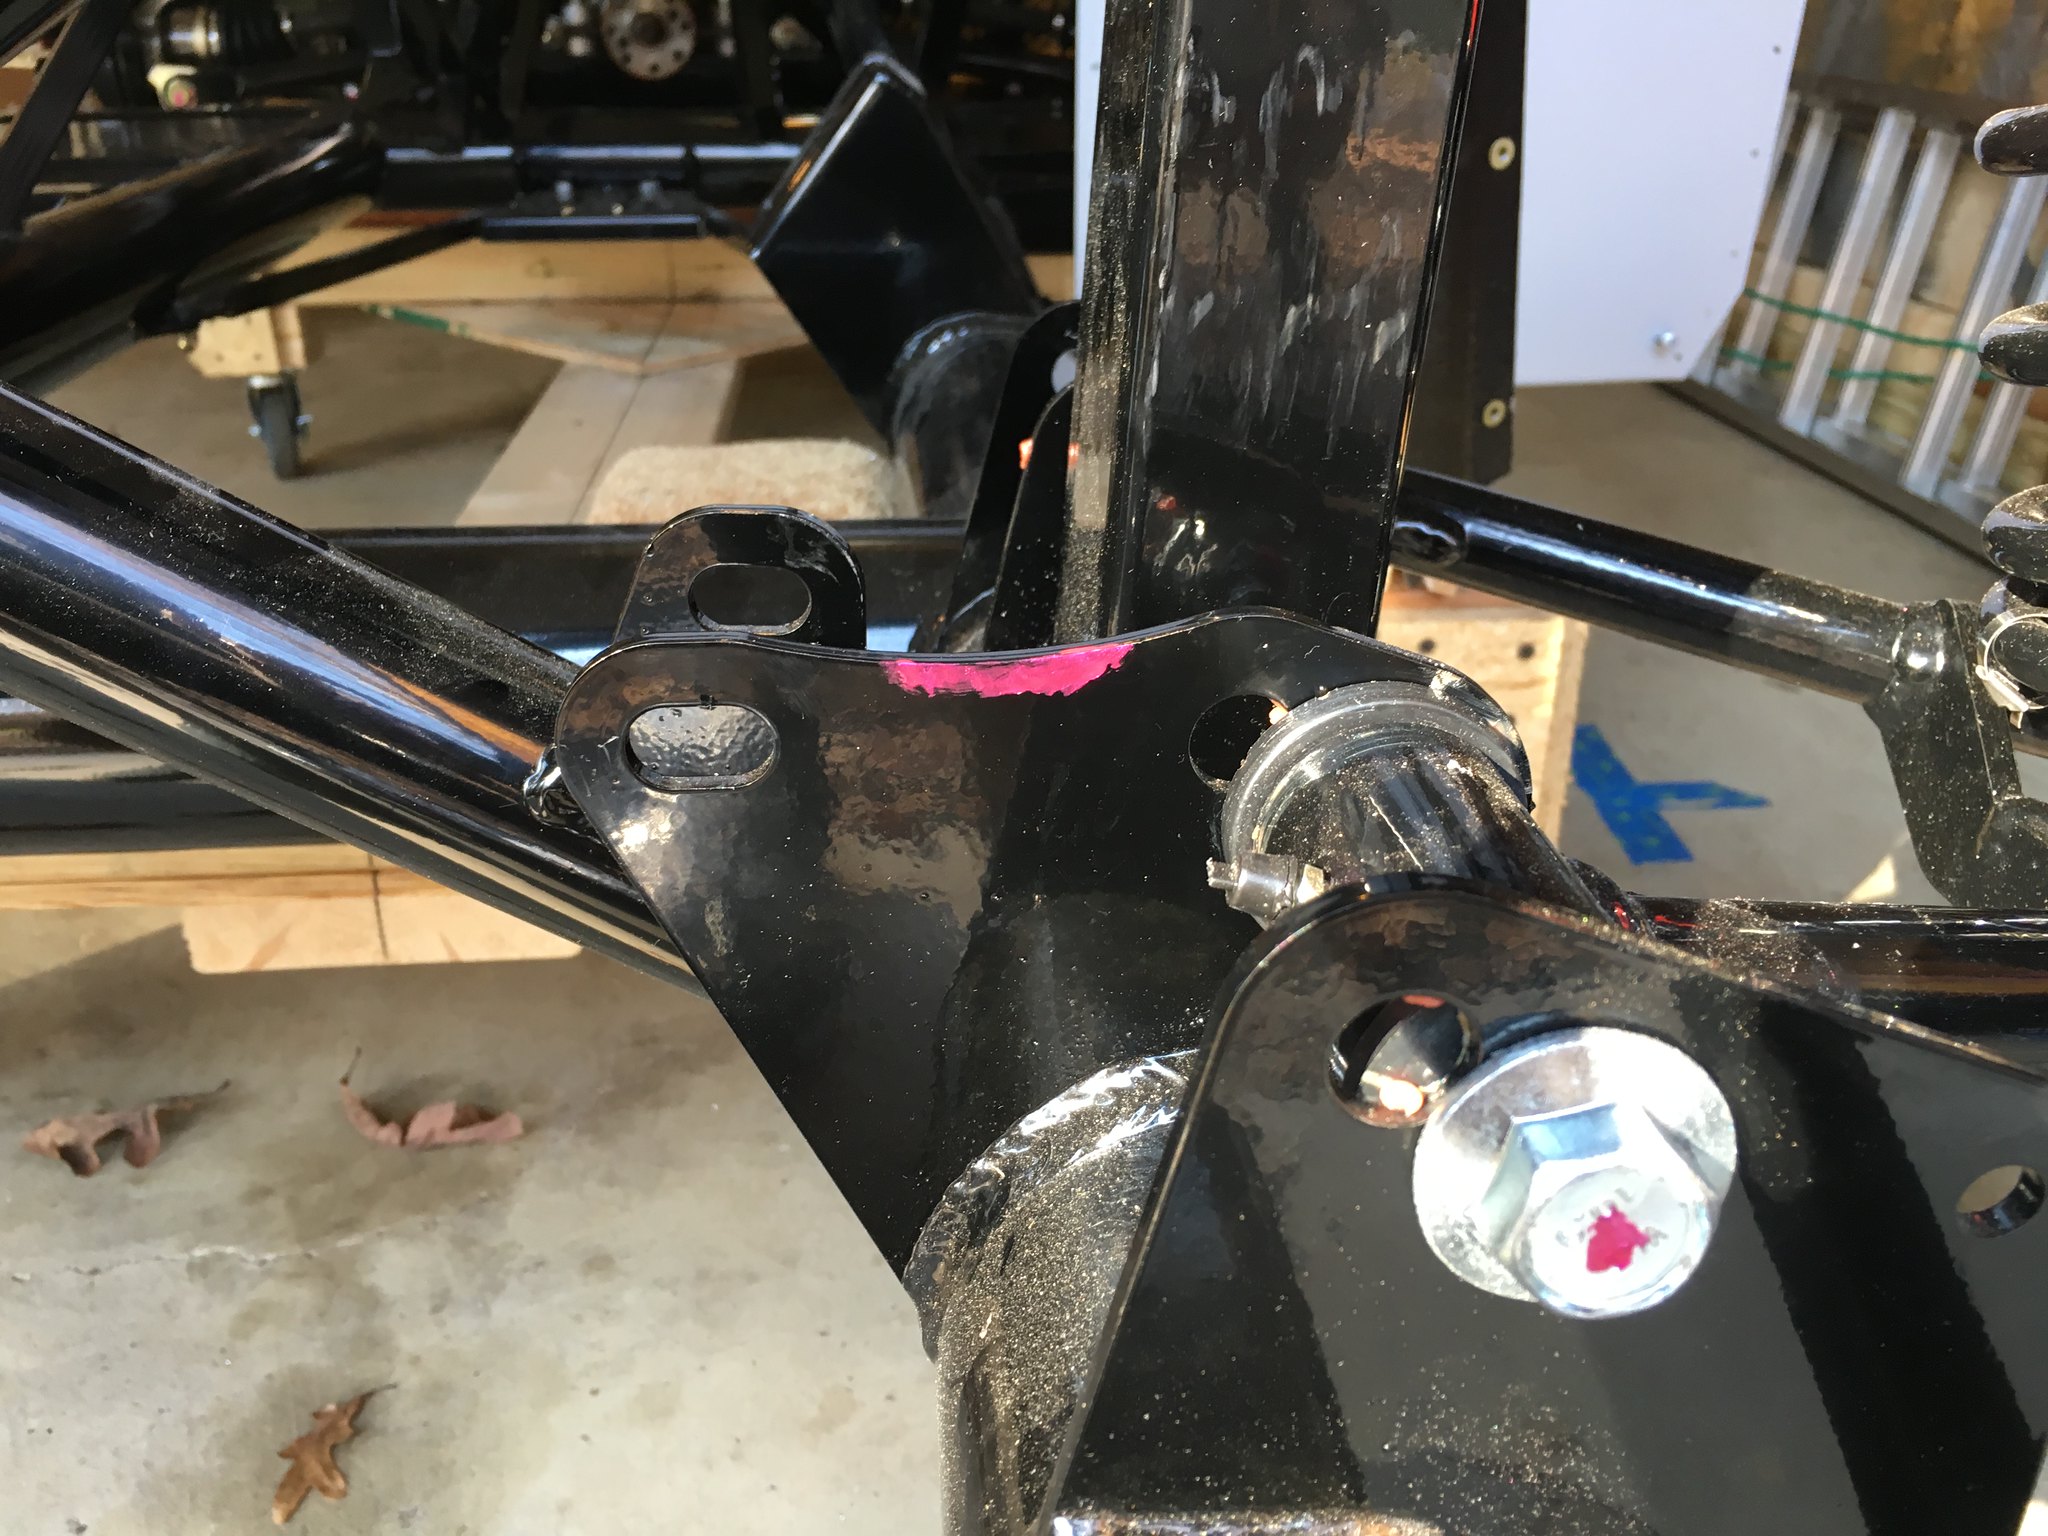
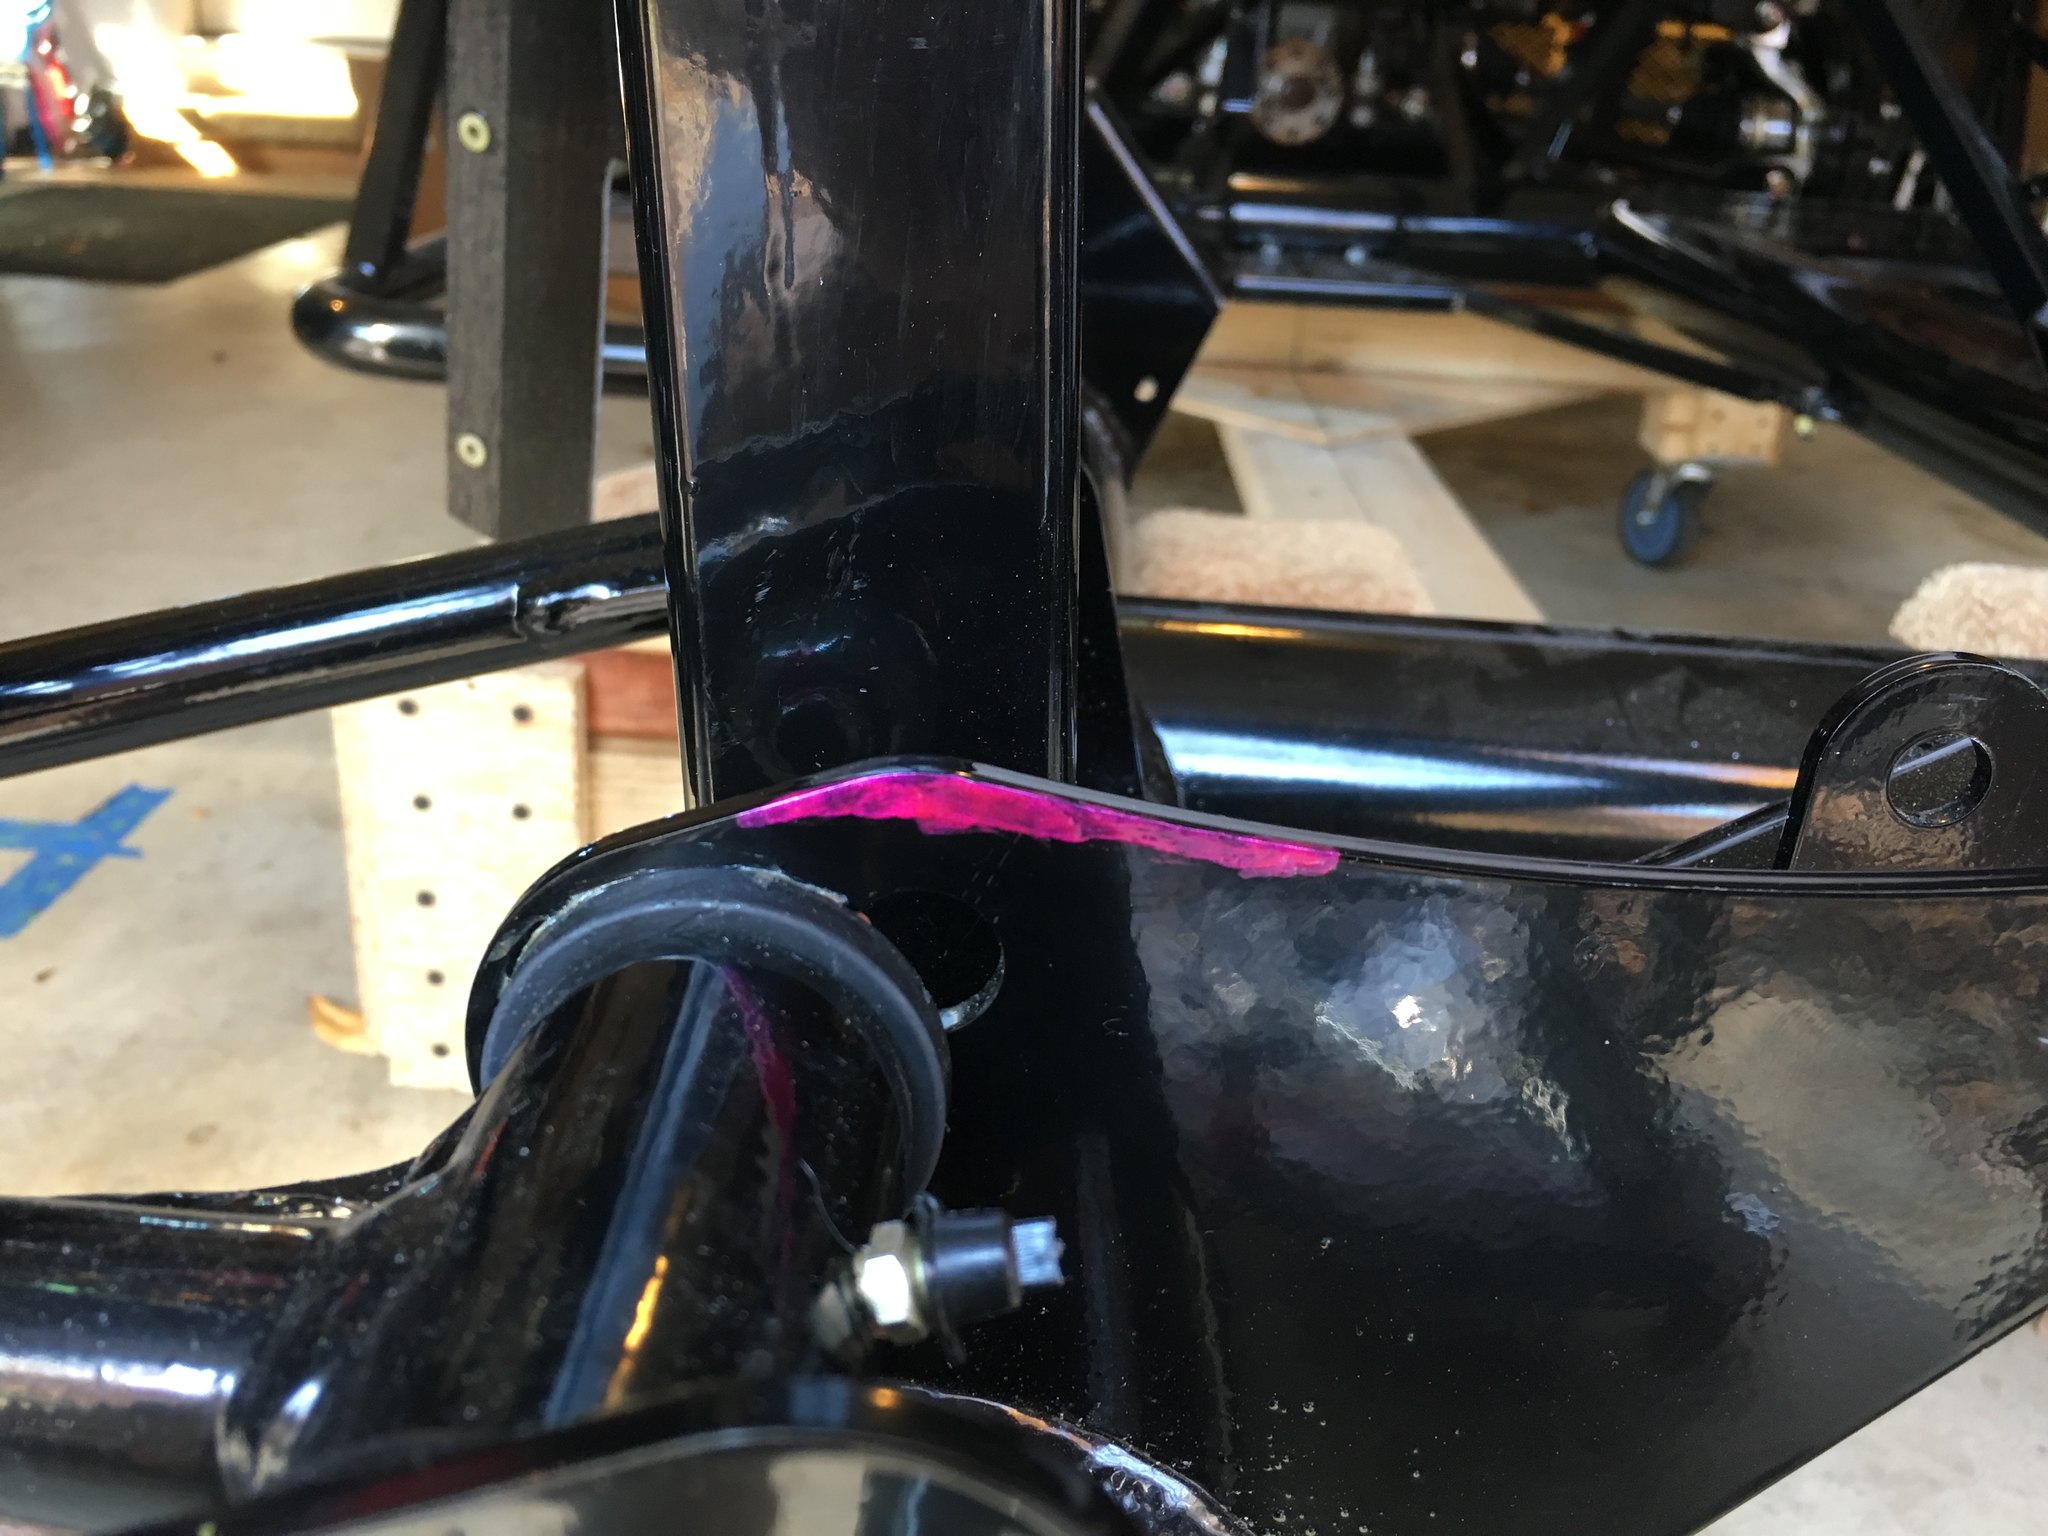
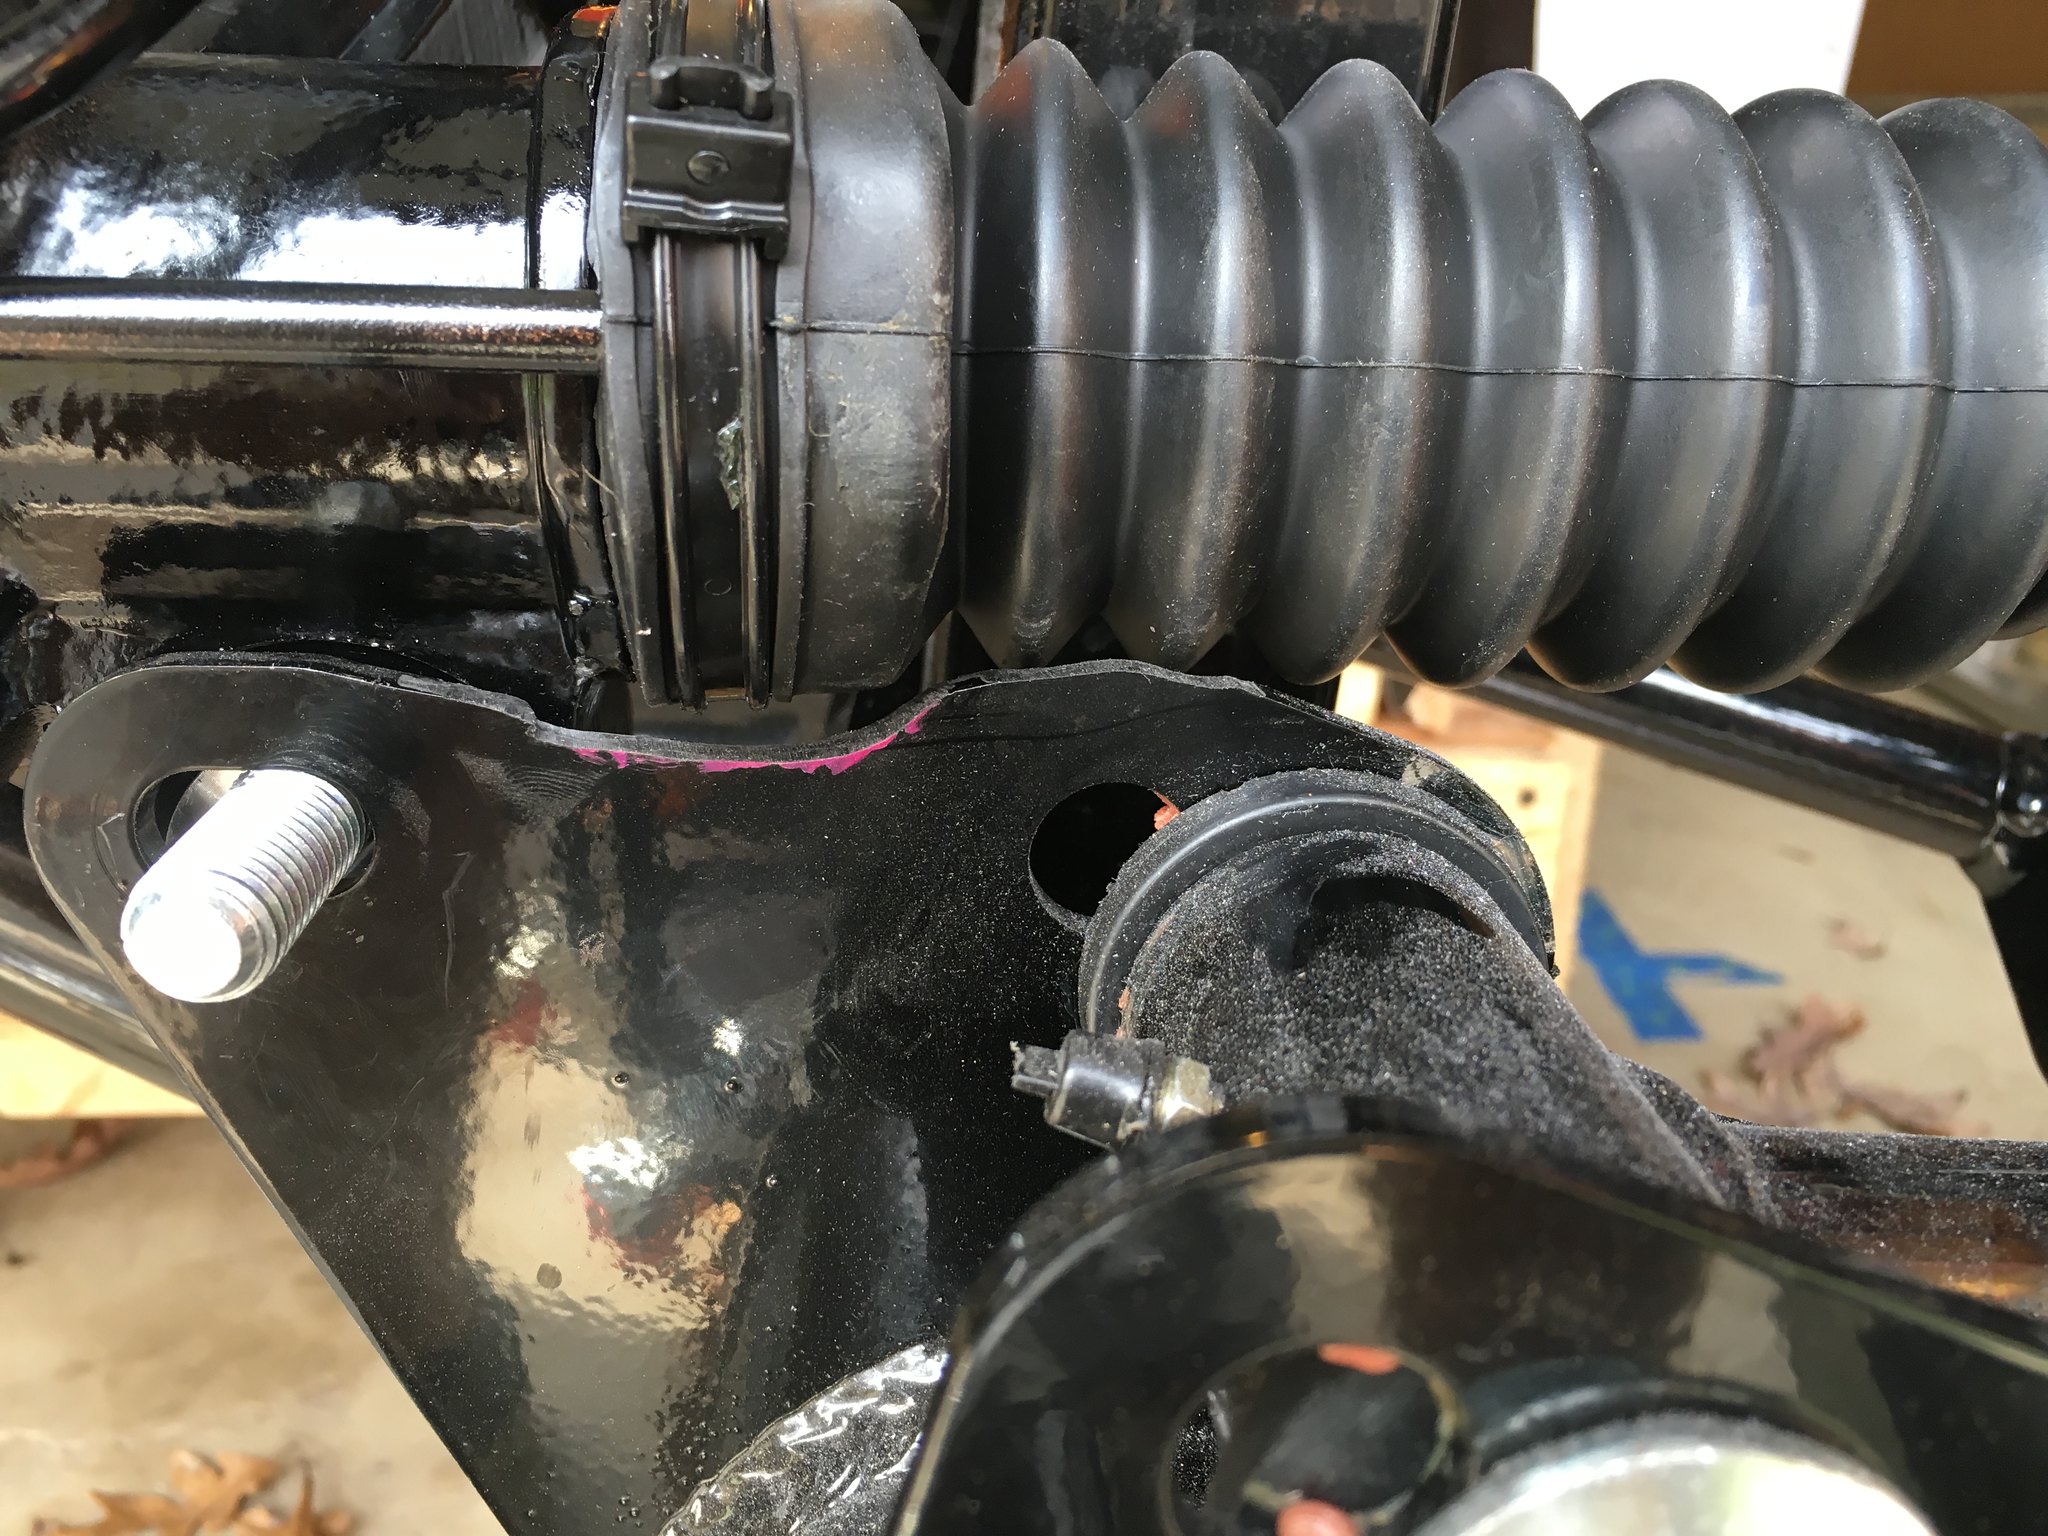
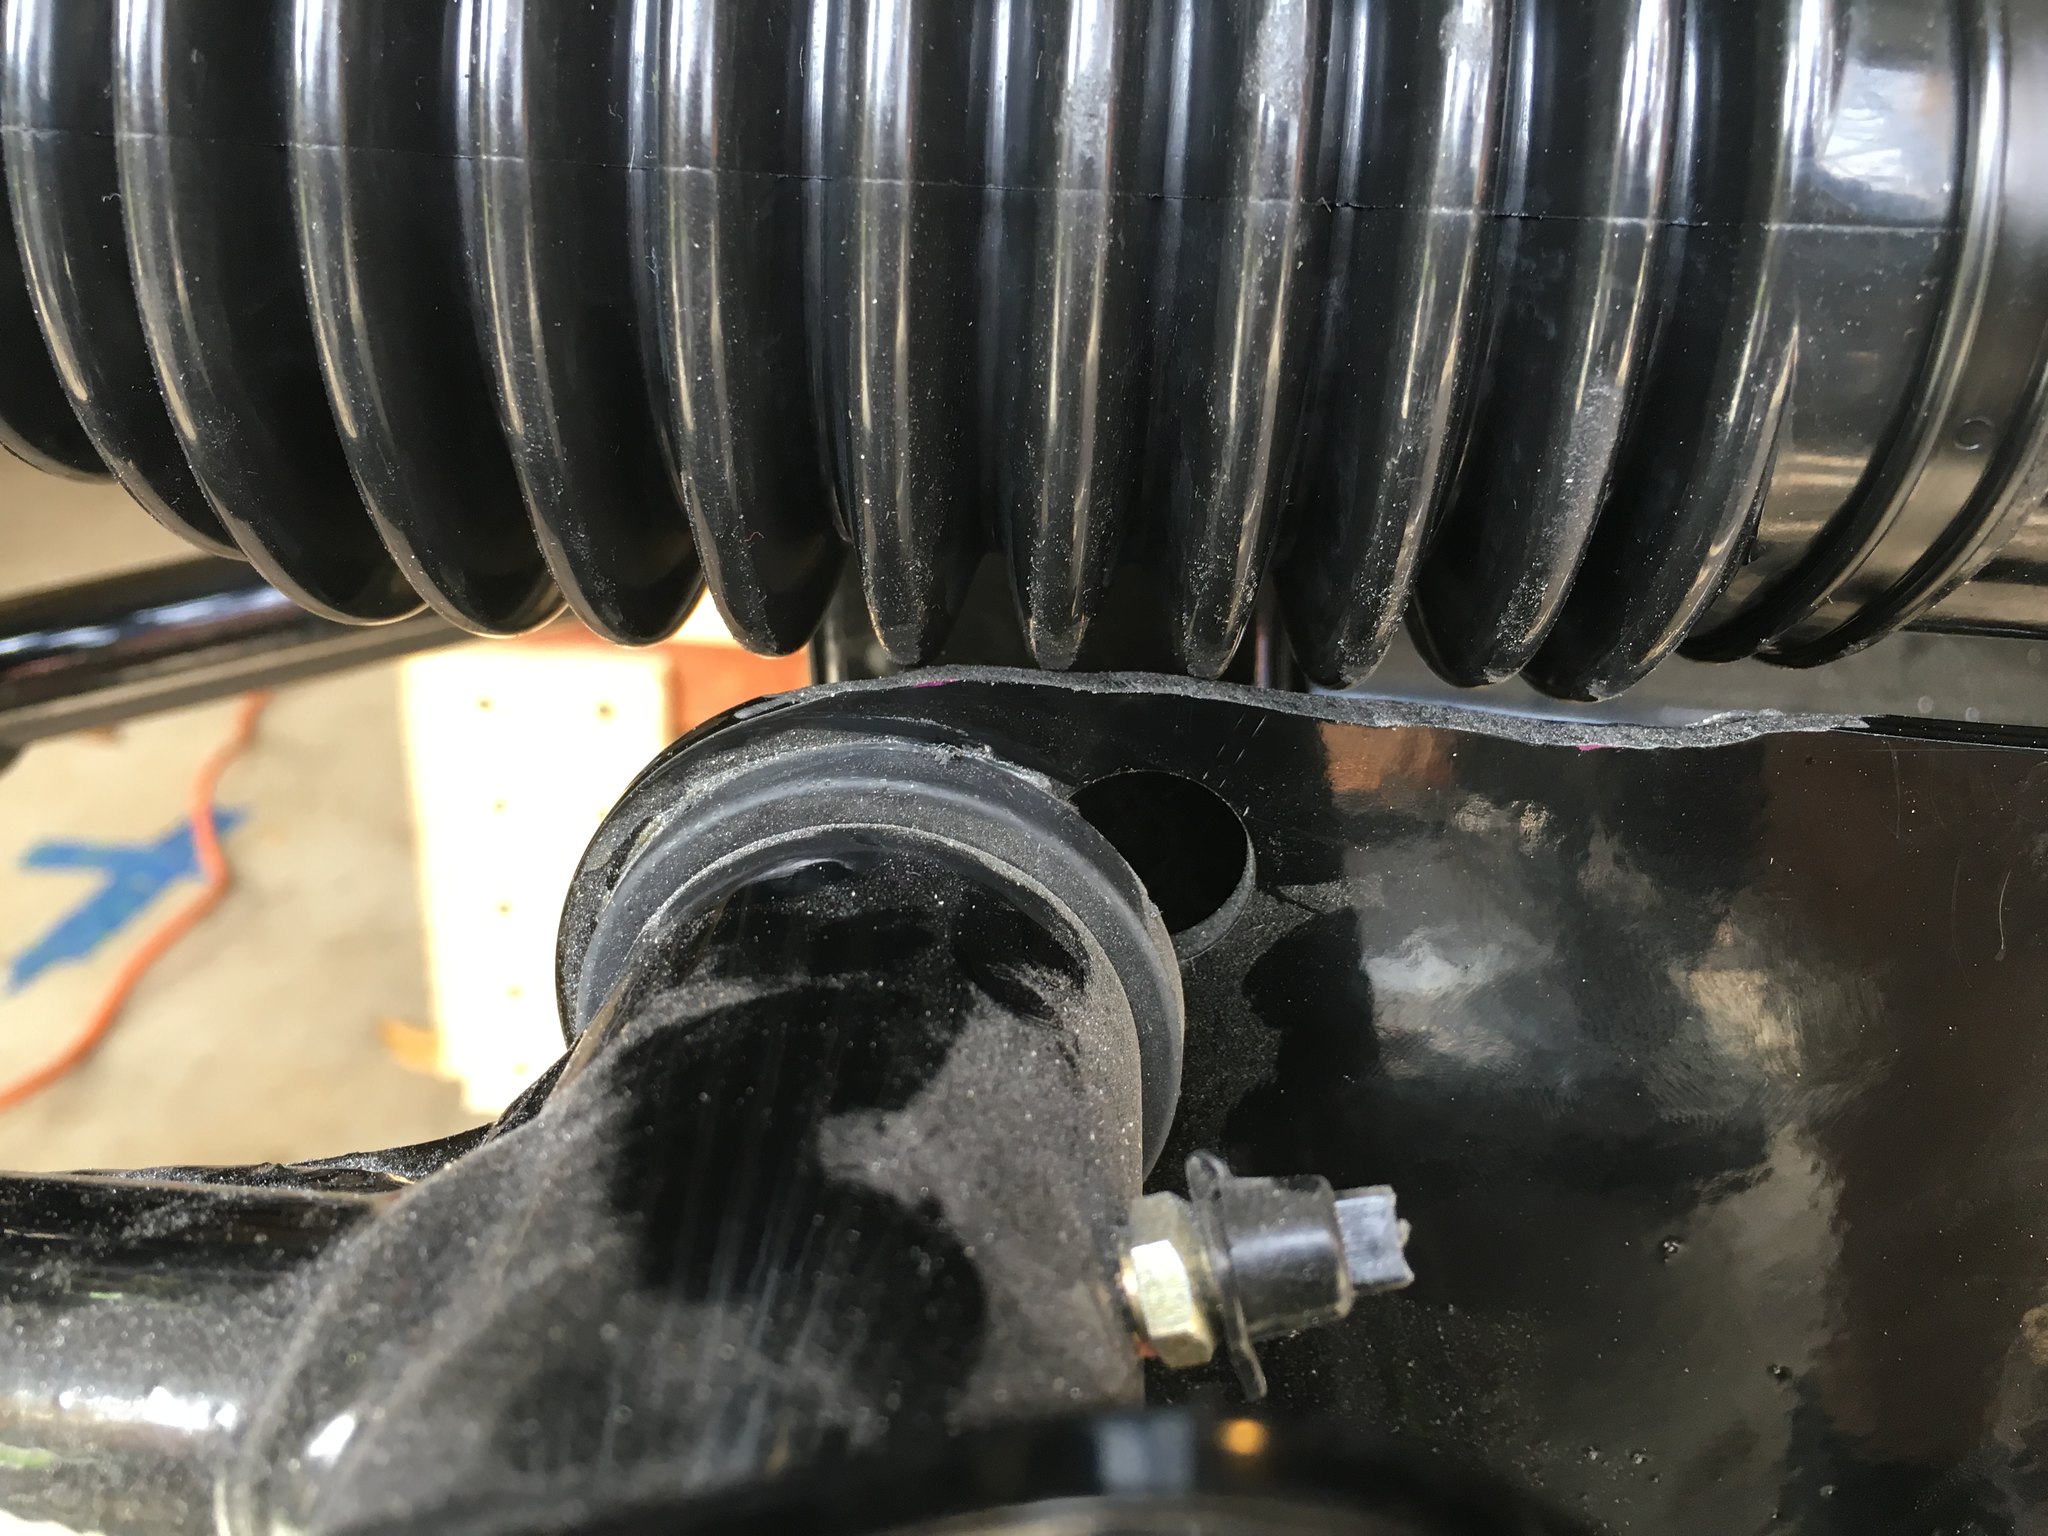
    The Breeze instructions tell you to grind down the mounts a bit so that the rubber boots don't rub; if you don't, you'll rub a hole in the boot.

    Here are some before & after pictures showing what I removed. It's WAY easier to grind material away BEFORE the lower control arms are installed, but I suspect you're past that. If you haven't mounted your spindles yet, I'd seriously consider taking the lower control arms out. Otherwise, just take your time (I used a Dremel).

    IMG_1690 by jhsitton, on Flickr

    IMG_1693 by jhsitton, on Flickr

    IMG_1694 by jhsitton, on Flickr

    IMG_1697 by jhsitton, on Flickr

    Cheers,


    John
    MK IV Roadster #8631
    Ford 302, Holley Terminator EFI, T5z, 3.55 Rear End, IRS, 17” Halibrand Replicas (9” front, 10.5” rear), Nitto 555 G2’s (275/40ZR17 front, 315/35ZR17 rear), Fast Freddie’s Power Steering, F5 Wilwood Brakes, FFMetal’s Firewall Forward, Forte’s Hydraulic Clutch & Throttle Linkage
    https://www.ffcars.com/threads/phile.../#post-4776313

  13. #13
    Carl carlewms's Avatar
    Join Date
    May 2012
    Location
    Nokesville, VA
    Posts
    1,125
    Post Thanks / Like
    I am not sure from the word descriptions ... but here are the words from Breeze's website about the benefits of the solid bushings.

    "These are billet aluminum solid offset bushings to lower and center the steering rack in Mk3-3.1-4 Factory Five Roadster chassis. The bushing offset is .35" allow lowering the rack or moving it to one side a full .35". All positions in between will allow a combination of lowering the rack and centering the rack travel in the chassis. According to Mott College lowering the rack in addition to installing the FFR rack extenders further reduces bump steer. Fits all racks, manual and power. The one piece bushings insert from rear to clamp rack to the rear face of the front mounting ear. This makes the rack an integral frame member and adds to the stiffness of the front of the frame. The position is about 1/4" further forward than when installing the rack with two piece poly bushings. Material is as-machined 6061 aluminum. Made in USA. Requires two each 1/2" × 4" bolts and nuts supplied with by FFR"

    They allow .35" of movement when adjusting the rack position, lower it to improve bump steer and move it 1/4" forward of the frame.

    Carl
    Mk 4 Roadster
    October 25, 2012 - Kit Arrives
    April 8, 2013 - Build Starts
    August 23, 2015 - Rolling Chassis/Engine & Transmission Installed
    March 26, 2016 - Go Cart

  14. #14
    Senior Member chopthebass's Avatar
    Join Date
    Oct 2013
    Location
    Calgary, Canada
    Posts
    941
    Post Thanks / Like
    Phileas, My boots touch the square chassis tube in your first photo.
    Finally started my build the beginning July. 2015!

  15. #15
    Senior Member phileas_fogg's Avatar
    Join Date
    Jun 2015
    Location
    Fairfax Station VA
    Posts
    1,235
    Post Thanks / Like
    Quote Originally Posted by chopthebass View Post
    Phileas, My boots touch the square chassis tube in your first photo.
    I see what you're saying now. The Breeze offset bushings will help with that by pushing the rack forward and away from the vertical square frame members. But because the rack will sit a bit lower, the boots will rub as I first described.


    John
    MK IV Roadster #8631
    Ford 302, Holley Terminator EFI, T5z, 3.55 Rear End, IRS, 17” Halibrand Replicas (9” front, 10.5” rear), Nitto 555 G2’s (275/40ZR17 front, 315/35ZR17 rear), Fast Freddie’s Power Steering, F5 Wilwood Brakes, FFMetal’s Firewall Forward, Forte’s Hydraulic Clutch & Throttle Linkage
    https://www.ffcars.com/threads/phile.../#post-4776313

  16. #16
    Senior Member chopthebass's Avatar
    Join Date
    Oct 2013
    Location
    Calgary, Canada
    Posts
    941
    Post Thanks / Like
    Thanks. I probably need to order the offset bushings. I can't visualize how they can work. The rack has a mounting hole, and the chassis bracket has a corresponding hole. How can it be made to offset?
    Finally started my build the beginning July. 2015!

  17. #17
    Senior Member phileas_fogg's Avatar
    Join Date
    Jun 2015
    Location
    Fairfax Station VA
    Posts
    1,235
    Post Thanks / Like
    The hole through the bushing is off center. Take a look at the large picture here http://www.breezeautomotive.com/details.php?prod_id=720.


    John
    MK IV Roadster #8631
    Ford 302, Holley Terminator EFI, T5z, 3.55 Rear End, IRS, 17” Halibrand Replicas (9” front, 10.5” rear), Nitto 555 G2’s (275/40ZR17 front, 315/35ZR17 rear), Fast Freddie’s Power Steering, F5 Wilwood Brakes, FFMetal’s Firewall Forward, Forte’s Hydraulic Clutch & Throttle Linkage
    https://www.ffcars.com/threads/phile.../#post-4776313

  18. #18
    Senior Member chopthebass's Avatar
    Join Date
    Oct 2013
    Location
    Calgary, Canada
    Posts
    941
    Post Thanks / Like
    Ah I see! I am going to order one. Sounds like its an essential piece.
    Finally started my build the beginning July. 2015!

  19. #19
    Papa's Avatar
    Join Date
    Dec 2016
    Location
    Mexico, MO
    Posts
    5,602
    Post Thanks / Like
    Quote Originally Posted by phileas_fogg View Post
    The Breeze instructions tell you to grind down the mounts a bit so that the rubber boots don't rub; if you don't, you'll rub a hole in the boot.

    Here are some before & after pictures showing what I removed. It's WAY easier to grind material away BEFORE the lower control arms are installed, but I suspect you're past that. If you haven't mounted your spindles yet, I'd seriously consider taking the lower control arms out. Otherwise, just take your time (I used a Dremel).

    IMG_1690 by jhsitton, on Flickr

    IMG_1693 by jhsitton, on Flickr

    IMG_1694 by jhsitton, on Flickr

    IMG_1697 by jhsitton, on Flickr

    Cheers,


    John
    I wonder if there is a source for the boots like the ones on the FFR rack. They are quite a bit smaller and don't have any rubbing issues.


    My Build Thread: http://thefactoryfiveforum.com/showt...ter-Build-9754
    (Most viewed Roadster build thread on this forum!)

    Delivered: 6/17/2017
    First Start: 12/30/2017
    Completed: 12/7/2019
    Legal: 1/30/2020

    Member of the Mile-Hi Cobra Club
    Dave's Cobra YouTube Channel: https://www.youtube.com/channel/UCbk...npK1UZHj4R-bYQ
    Agora 1:8 Scale Cobra Build: https://thefactoryfiveforum.com/show...l-Build-Thread

Posting Permissions

  • You may not post new threads
  • You may not post replies
  • You may not post attachments
  • You may not edit your posts
  •  

FFMetal

Visit our community sponsor