Forte's

Visit our community sponsor

Thanks Thanks:  0
Likes Likes:  0
Results 1 to 23 of 23

Thread: Mounting the Finish Line grill?

  1. #1
    Jacob's Avatar
    Join Date
    Jun 2016
    Location
    Rogers, AR
    Posts
    322
    Post Thanks / Like

    Mounting the Finish Line grill?

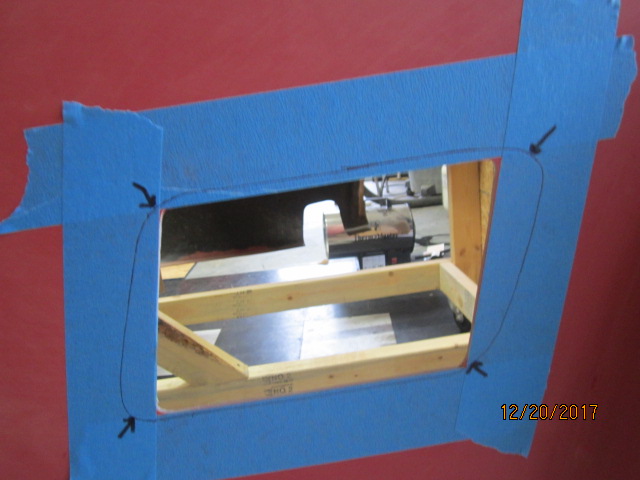
    I have a pic below that shows how much of the fiberglass I'd need to remove in order to mount the grills where they are flush with the outer body...I am assuming that is how most mount theirs? Seems like a fair amount? I'll be using the threaded mounts that will be secured with the HSRF, so the threads will allow adjustment. Is this how most mount theirs? thanks in advance!

    MK IV complete Kit - 1st time builder started Sept 2016
    Levy 306
    T5
    2015 Mustang IRS
    Power steering - Levy setup, Breeze roll bars, Thompson trunk box
    fuel injection, powder coating, sway bars, heater, wipers, 17 in wheels

  2. #2
    Senior Member BEAR-AvHistory's Avatar
    Join Date
    May 2015
    Location
    Raleigh NC, OIB NC
    Posts
    1,601
    Post Thanks / Like
    I have the studs but have never installed them, they are in the to-do box.


    Mounted with industrial Velcro since 2014. Like Chris using "L" tabs fabricated from some Home Depot aluminum
    Last edited by BEAR-AvHistory; 12-21-2017 at 09:14 AM.
    Kevin
    MKIV #8234
    Coyote '14/TKO-600/3-Link 3:55 Rear
    I love the smell of 100 octane in the morning.
    NITTO NT01 275X40X17ZR - 315X35ZRX17
    Delivered 2/7/14 - Plate "COYOTE NC1965" 3/25/15

  3. #3
    Out Drivin' Gumball's Avatar
    Join Date
    Feb 2011
    Location
    Blackberry Township, IL
    Posts
    2,653
    Post Thanks / Like
    Jacob,

    I also used the ********** louvers and mounted them using "L" tabs that I fabricated from some aluminum and then bonded those to the body using real automotive adhesive - not HSRF. Most who've used fillers have had luck with them, but I tried that and didn't like the bond as I felt it was too weak. As for fitment, mine are just inside the body and I rounded the fiberglass over to look like the original cars outer skin, which was folded in on itself at that point.

    Here are a few pics....

    Louvers with brackets installed before affixing to the inner body wall -


    Louvers held in place with wood scraps during curing process (note one piece inside and another on the outside) -


    Mixing gun and two-part adhesive -


    Finished installation -

    Later,
    Chris

    "There are no more monsters to fear, and so, we have to build our own."
    Mk3.1 #7074

  4. #4
    Senior Member Norm B's Avatar
    Join Date
    Mar 2012
    Location
    Head of St Margarets Bay, Nova Scotia
    Posts
    970
    Post Thanks / Like
    I too mounted them with industrial Velcro and have had no issues. They are mounted behind the fibreglass. The only change I made to the FFR prescribe hole in the body was to make the front of the hole parallel with the louvers. I believe the top needed to moved 1/8 inch forward.

    HTH

    Norm

  5. #5
    Jacob's Avatar
    Join Date
    Jun 2016
    Location
    Rogers, AR
    Posts
    322
    Post Thanks / Like
    thanks all!
    MK IV complete Kit - 1st time builder started Sept 2016
    Levy 306
    T5
    2015 Mustang IRS
    Power steering - Levy setup, Breeze roll bars, Thompson trunk box
    fuel injection, powder coating, sway bars, heater, wipers, 17 in wheels

  6. #6
    Master Builder
    Join Date
    Feb 2011
    Location
    Long Island, NY
    Posts
    724
    Post Thanks / Like
    Used brackets like Gumball but attached with velcro like Norm B. I like them removable to gain extra access to headers/flanges.

  7. #7
    Senior Member MPTech's Avatar
    Join Date
    Feb 2011
    Location
    St. Louis, MO
    Posts
    1,186
    Post Thanks / Like
    Blog Entries
    8
    Quote Originally Posted by Jacob View Post
    ..... to mount the grills where they are flush with the outer body...
    Maybe I'm mis-understanding this comment, but the louvers aren't flush mounted and I wouldn't make the opening that large. Don't use the louvers to directly mark the hole. They are mounted behind body.
    F5R #7446: MK4, 302, T5 midshift, 3.55 Posi IRS, 17" Halibrands
    Delivered 4/4/11, First start 9/29/12, Licensed 4/24/13, off to PAINT 2/15/14!! Wahoo!

  8. #8
    Senior Member RickP's Avatar
    Join Date
    Feb 2016
    Location
    Boyertown, PA
    Posts
    683
    Post Thanks / Like

    Do0'nt Cut that Glass!

    I'm going to second MPTech's misunderstanding. There should be no need to modify the glass for the Side Louver's. There are a number of ways to secure them to the inside of the body but the cut outs (assuming FFR cut the holes for you), should be darn near adequate enough to install the grills. Nothing close to what you are intending to open the holes up too.

    I have detailed EdwardB's method of installing the louvers with pics/descriptions in my build thread starting at post #95. If you choose this method, just be sure to rough up the glass before laying down any HSRF.


    http://thefactoryfiveforum.com/showt...l=1#post280414

  9. #9
    Jacob's Avatar
    Join Date
    Jun 2016
    Location
    Rogers, AR
    Posts
    322
    Post Thanks / Like
    Thanks again...you saved me some misery!
    MK IV complete Kit - 1st time builder started Sept 2016
    Levy 306
    T5
    2015 Mustang IRS
    Power steering - Levy setup, Breeze roll bars, Thompson trunk box
    fuel injection, powder coating, sway bars, heater, wipers, 17 in wheels

  10. #10
    Senior Member
    Join Date
    Sep 2017
    Location
    Alliston, Ontario, Canada
    Posts
    404
    Post Thanks / Like
    Look at the angles in the original poster’s pic. The angle of the finish line louvres are different than the FFR kit supplied ones, and different than the cut outs. You will at the very least want to adjust the angle of the cut outs to match the fins on the Louvres. I believe they are longer as well so you should expand the cut out to equally expose all fins.
    Hopefully someone with more experience with these will chime in, I’m just repeating what I have read on here before, cut outs need to be changed for these louvres.

  11. #11
    Senior Member RickP's Avatar
    Join Date
    Feb 2016
    Location
    Boyertown, PA
    Posts
    683
    Post Thanks / Like
    Quote Originally Posted by Murd View Post
    Look at the angles in the original poster’s pic. The angle of the finish line louvres are different than the FFR kit supplied ones, and different than the cut outs. You will at the very least want to adjust the angle of the cut outs to match the fins on the Louvres. I believe they are longer as well so you should expand the cut out to equally expose all fins.
    Hopefully someone with more experience with these will chime in, I’m just repeating what I have read on here before, cut outs need to be changed for these louvres.
    The kit supplied louvers are a stamped out aluminum piece where the fins need to be bent into place. The pre-assembled louvers from FFR and or finish line are one and the same.

    In my experience, there was no need to enlarge the side louver cut out. If the mounting technique allows for removal of the louvers (not adhesive), and you are using the pre-assembled louvre set, adjust the louver to the hole, not the hole to the louvre.

  12. #12
    Senior Member edwardb's Avatar
    Join Date
    Feb 2011
    Location
    Lake Orion, Michigan
    Posts
    10,577
    Post Thanks / Like
    Agreed the ********** and Factory Five pre-assembled louvers are the same. I've used both. Pretty sure the Whitby ones are the same as well. I use the threaded studs bonded to the inside with HSRF for mounting. It's easy to do, solid, and easy to remove for service. I agree that 3M HSRF is a kind of filler material ("High Strength Repair Filler") but it's glass reinforced and very strong if used properly. It's been used for many purposes in these builds, including bonding hidden body mounts. Plenty strong enough for the side louvers. Pretty sure the pre-cut openings from Factory Five are done free hand. They will need some clean-up or adjustment. This is the post from my #8674 build thread for installing the louvers. I'll post the actual content rather than just the link.

    I bought the assembled side louver set from Factory Five. These appear to be exactly the same as the ********** ones I used on the Mk3 build. I polished the last ones, which wasn't easy. So decided to have these powder coated, and chose a bright silver color. They turned out nice. I bolted the mounting brackets on each side as mentioned in a previous update. There is regular discussion on both forums about how best to mount these things to the body and always seems to draw lots of different opinions. Velcro, silicone, etc. I’m 3-for-3 mounting them with McMaster 10-32 perforated base studs, part number 97590A569, and bonding the studs to the inside of the body with 3M HSRF. Applied properly they will never come loose, it looks neat and clean, and they’re easy to install and remove once the studs are bonded to the body.

    I captured the studs on the mounting brackets with nuts on each side, determined where they would attach on the inside of the body centered in the pre-cut opening, roughed up the body with 60 grit paper, and bonded them in place. I used rubber bands looped around the louvers in two places and held in place by paint sticks while the HSRF cured. The clothes pins helped hold the rubber bands while I fed the paint sticks through. I only had used paint sticks on hand. Nice. One of the colors in our family room and not sure about the other one...


    Once cured, removed the louvers and the studs are bonded in place for good. Used a Dremel to clean things up a little and added a little more HSRF in any voids. Then trimmed the bolts to have a more reasonable length.


    Re-installed the louvers.


    Now for a very important part. The precut openings were reasonably close, but not finished products at all. Drew parallel lines top and bottom. Then drew lines on each side parallel with the angle of the louvers. This is a critical step and IMO makes the difference between a pro looking job and one that isn’t as much. Also, ideally the width between the last louver and the body on each side should the same as the width of the inner louvers. The louvers weren’t quite long enough, but got them close.


    While doing the final fitting, I noted that the louvers didn’t fit flush against the inside of the body. Further review showed the rear part of the louver is too high. I trimmed them on my disk sander until they were flat. Roughly in the area noted here. The sanding removed the powder coat on the edge, but it’s inside against the body and doesn’t show.


    With the body trimmed to the lines, a radius sanded all around, and the louvers trimmed so they fit flush, the final product.


    After paint and final assembly:

    Last edited by edwardb; 12-21-2017 at 04:58 PM.
    Build 1: Mk3 Roadster #5125. Sold 11/08/2014. Build 2: Mk4 Roadster #7750. Sold 04/10/2017. Build Thread
    Build 3: Mk4 Roadster 20th Anniversary #8674. Sold 09/07/2020. Build Thread and Video. Build 4: Gen 3 Type 65 Coupe #59. Gen 3 Coyote. Legal 03/04/2020. Build Thread and Video
    Build 5: 35 Hot Rod Truck #138. LS3 and 4L65E auto. Rcvd 01/05/2021. Legal 04/20/2023. Build Thread. Sold 11/9/2023.

  13. #13
    Master Builder
    Join Date
    Feb 2011
    Location
    Long Island, NY
    Posts
    724
    Post Thanks / Like
    Edward B WAY to go ! look great ! I have removed the louvers on Wastehaulers car like 4 times over the past 9 years and comes in handy to gain access to header bolts..

  14. #14
    Out Drivin' Gumball's Avatar
    Join Date
    Feb 2011
    Location
    Blackberry Township, IL
    Posts
    2,653
    Post Thanks / Like
    As shown in EdwardB's pics above, the key is to get the positioning and the shape of the openings right in comparison to your louvers. Done properly and the look is seamless - especially if painted body color.

    Later,
    Chris

    "There are no more monsters to fear, and so, we have to build our own."
    Mk3.1 #7074

  15. #15
    Jacob's Avatar
    Join Date
    Jun 2016
    Location
    Rogers, AR
    Posts
    322
    Post Thanks / Like
    Think I got it now. Since there is 1.5" spacing on the fins, the forward and rear area needs to have the fiberglass trimmed up to make the opening better to look at. The faint pen marks forward and rearward show the area I'll plan on trimming up. Following Edwardb's logic I agree the opening needs that trimming. Sheet metal screws used to hold the aluminum bracing on, will replace with SS button screws

    Driver side


    Driver side

    MK IV complete Kit - 1st time builder started Sept 2016
    Levy 306
    T5
    2015 Mustang IRS
    Power steering - Levy setup, Breeze roll bars, Thompson trunk box
    fuel injection, powder coating, sway bars, heater, wipers, 17 in wheels

  16. #16
    Out Drivin' Gumball's Avatar
    Join Date
    Feb 2011
    Location
    Blackberry Township, IL
    Posts
    2,653
    Post Thanks / Like
    Small drum sanders on a dremel work great for cutting the corner radius.

    Looks like you're on the right track - can't wait to see the finished product.
    Later,
    Chris

    "There are no more monsters to fear, and so, we have to build our own."
    Mk3.1 #7074

  17. #17
    Junior Member
    Join Date
    Mar 2011
    Posts
    18
    Post Thanks / Like
    Quote Originally Posted by first time builder View Post
    Used brackets like Gumball but attached with velcro like Norm B. I like them removable to gain extra access to headers/flanges.
    Ditto the industrial strength velcro. No problems.

  18. #18
    Jacob's Avatar
    Join Date
    Jun 2016
    Location
    Rogers, AR
    Posts
    322
    Post Thanks / Like
    I think this is much better. Possibly may finesse the opening just a bit (think the lower R line needs a little more off) but I think it looks better. Seems like its one of those things the more you look at it the more its off? Powder coated the grill with what's called a chrome, really it's more like ceramic coating with a clear coat, but I won't have to worry about oxidation.

    MK IV complete Kit - 1st time builder started Sept 2016
    Levy 306
    T5
    2015 Mustang IRS
    Power steering - Levy setup, Breeze roll bars, Thompson trunk box
    fuel injection, powder coating, sway bars, heater, wipers, 17 in wheels

  19. #19
    Senior Member
    Join Date
    Aug 2016
    Location
    Grand Rapids, MI
    Posts
    473
    Post Thanks / Like
    I did what Edward did with his. Works great and I have no worries about them coming loose, plus they are removable.

  20. #20
    Member MARIAH's Avatar
    Join Date
    Feb 2011
    Location
    Taylors, SC
    Posts
    72
    Post Thanks / Like
    Certainly, consider making them removable.
    There are a lot of mechanical items you can reach through those openings.
    PHILLIP, They call the wind MARIAH.
    "Against all enemies, foreign and domestic"
    Marines lend an air of dignity to what would otherwise be a vulgar brawl. FFR#3175, Wimbledon/Guardsman, 302 Carb, CobraEarl's Footbox & Touring Trunk, Snapless Tonneau Cover, fabricated Luggage Rack, Whitby Hardtop.

  21. #21
    Senior Member cgundermann's Avatar
    Join Date
    Feb 2011
    Location
    Chino Valley, Arizona
    Posts
    1,077
    Post Thanks / Like
    Quote Originally Posted by MARIAH View Post
    Certainly, consider making them removable.
    There are a lot of mechanical items you can reach through those openings.
    That is very true and a good point; now I’m curious if I can reach the passenger side windshield post bolts if needed.

    Semper Fi,

    Chris
    Generation 3 Type 65 Daytona Coupe Complete Kit #151885 received May 6, 2022. Gen 3 Coyote, IRS, Tremec TKX, American Powertrain hydraulic throwout bearing & Wilwood brakes.

    MK4 Basic Kit #7404, 347 EFI - Pro M Racing ECM, 30# injectors, 70 mm throttle body, 80 mm MAF, Edelbrock Performer aluminum heads & RPM II intake, all new G-Force T5, 3:55 gears, Pro 5.0 shifter, 3-link, carbon fiber dash/custom Speedhut gauges and paint by Da Bat.

  22. #22
    Senior Member edwardb's Avatar
    Join Date
    Feb 2011
    Location
    Lake Orion, Michigan
    Posts
    10,577
    Post Thanks / Like
    Quote Originally Posted by cgundermann View Post
    That is very true and a good point; now I’m curious if I can reach the passenger side windshield post bolts if needed.

    Semper Fi,

    Chris
    Yes, removing the PS louver makes it real easy to reach the windshield bolts. Although that side can be reached from inside the engine compartment as well.
    Build 1: Mk3 Roadster #5125. Sold 11/08/2014. Build 2: Mk4 Roadster #7750. Sold 04/10/2017. Build Thread
    Build 3: Mk4 Roadster 20th Anniversary #8674. Sold 09/07/2020. Build Thread and Video. Build 4: Gen 3 Type 65 Coupe #59. Gen 3 Coyote. Legal 03/04/2020. Build Thread and Video
    Build 5: 35 Hot Rod Truck #138. LS3 and 4L65E auto. Rcvd 01/05/2021. Legal 04/20/2023. Build Thread. Sold 11/9/2023.

  23. #23
    Member Scotty's65's Avatar
    Join Date
    May 2013
    Posts
    55
    Post Thanks / Like
    I'll second or third that tip. Speaking from experience I'd make them removable.
    You'd be surprised the difference how much easier accessing the windshield and door hinge bolts are.

    Scott
    2014 Mustang GT Track Pack
    F5 MKII (sold)
    MKIV soon
    "When in doubt go to full throttle, it may not solve the problem but it will end the suspense"

Posting Permissions

  • You may not post new threads
  • You may not post replies
  • You may not post attachments
  • You may not edit your posts
  •  

Martin's Dent and Collision Shop

Visit our community sponsor