-
Senior Member

Breeze Battery Box Install
Hello All, I can't get enough of reading this forum, sooo many talented people. I just got the Breeze Engine Bay Battery Box and the picture shows it being mounted to a square tube X member in the front between the main frame and the X member. My X member is round, I don't think there will be enough support mounting to a round X member. The box will likely be swinging with no support and quickly loose its mounting bolts. Is there any lower support to the box that mounts elsewhere on the frame to add support? Or did I miss something?
-
Senior Member

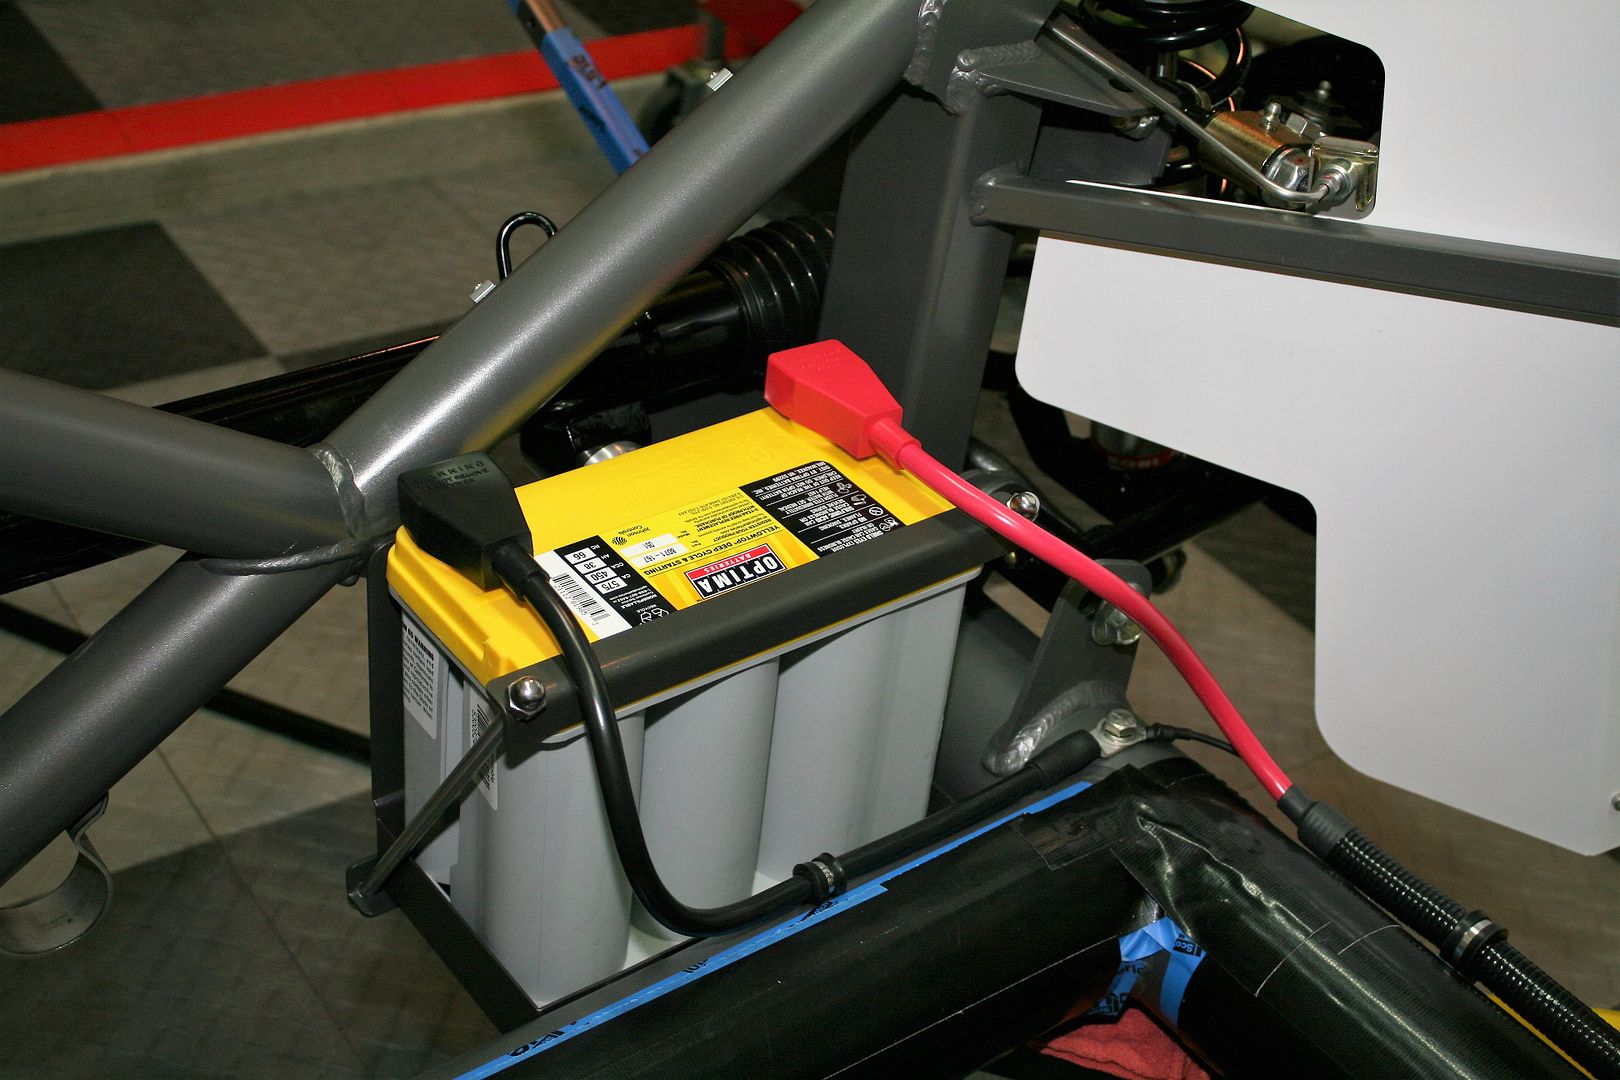
Until Mk4's, that front X-member was made from square tubes. Mk4's changed to a round tube. Looks better plus more authentic. Mark's pictures obviously still show the older version. The box mounts just fine to the round tubes following his instructions. It attaches to both the X-member tubes and the 4-inch chassis tube. Not going anywhere.
Build 1: Mk3 Roadster #5125. Sold 11/08/2014.
Build 2: Mk4 Roadster #7750. Sold 04/10/2017.
Build Thread
Build 3: Mk4 Roadster 20th Anniversary #8674. Sold 09/07/2020.
Build Thread and
Video.
Build 4: Gen 3 Type 65 Coupe #59. Gen 3 Coyote. Legal 03/04/2020.
Build Thread and
Video
Build 5: 35 Hot Rod Truck #138. LS3 and 4L65E auto. Rcvd 01/05/2021. Legal 04/20/2023.
Build Thread. Sold 11/9/2023.
-
Post Thanks / Like - 0 Thanks, 1 Likes
-
Senior Member

Dont try this at home...I went to jack my Mk4 up sometime ago at the center of the 4” tube. I positioned the jack and then got distracted, when I came back the jack had been moved and was under the battery tray instead. I gave the jack enough pumps to raise the car off the wheels by an inch. When I noticed the problem I carefully lowered the car and inspected for what I thought would be serious damage to the battery tray. To my surprise there was the slightest hickey on the bottom of the tray. So, X2 on what Paul said, it isn't going anywhere.
Bradley
Build thread - Mk4, Coyote, IRS, Wilwood brakes, old-style soft top and accessories.
The distance between "finished" and finished is literally infinite.
-
Senior Member
Excellent thanks, that's what I needed to know before I unpacked everything. As long as it has other attaching points it should be fine.
-
Senior Member
By the way, very nice looking install on the battery and cable routing.
-

Originally Posted by
GTBradley

Dont try this at home...I went to jack my Mk4 up sometime ago at the center of the 4” tube. I positioned the jack and then got distracted, when I came back the jack had been moved and was under the battery tray instead. I gave the jack enough pumps to raise the car off the wheels by an inch. When I noticed the problem I carefully lowered the car and inspected for what I thought would be serious damage to the battery tray. To my surprise there was the slightest hickey on the bottom of the tray. So, X2 on what Paul said, it isn't going anywhere.
My jack slipped off the 4" and did the same thing, bent it a little. Doh!
-
Senior Member
Installed the Breeze battery box over the weekend, It was a breeze.
-
Post Thanks / Like - 0 Thanks, 3 Likes
-
Senior Member

Originally Posted by
edwardb
Until Mk4's, that front X-member was made from square tubes. Mk4's changed to a round tube. Looks better plus more authentic. Mark's pictures obviously still show the older version. The box mounts just fine to the round tubes following his instructions. It attaches to both the X-member tubes and the 4-inch chassis tube. Not going anywhere.
I know it's over two years old, but thanks for this pic. I'm installing it now and the instructions are lacking in good, clear pictures.
Matt
My build thread
here
-
Post Thanks / Like - 0 Thanks, 2 Likes
-

I just received the Breeze battery relocation kit this week and last night went out to do some quick trial fitting. Initially looking at it it seems to be a bit... un-square... up front. I snapped a few pictures but really didn't have much time to mess with it.
When going to mount this, is it better to mount flush to the 4" round tube and make adjustments on the cross member, or the other way around?
IMG_0157.jpegIMG_0158.jpgIMG_0159.jpg
-
Senior Member

Originally Posted by
paynerc
I just received the Breeze battery relocation kit this week and last night went out to do some quick trial fitting. Initially looking at it it seems to be a bit... un-square... up front. I snapped a few pictures but really didn't have much time to mess with it.
When going to mount this, is it better to mount flush to the 4" round tube and make adjustments on the cross member, or the other way around?
IMG_0157.jpegIMG_0158.jpgIMG_0159.jpg
If I remember correctly, there are spacers or washers to take up the slack. I don't remember having that much space, but there was some.
Mark IV Gen 3 Coyote
Started 7/22.
-
Originally Posted by
Tooth
If I remember correctly, there are spacers or washers to take up the slack. I don't remember having that much space, but there was some.
There are washer included but that seems to be excessive. The box itself looks to be very square. I guess I really need to get up under there and see what is going on with it.
-
Senior Member

Originally Posted by
paynerc
There are washer included but that seems to be excessive. The box itself looks to be very square. I guess I really need to get up under there and see what is going on with it.
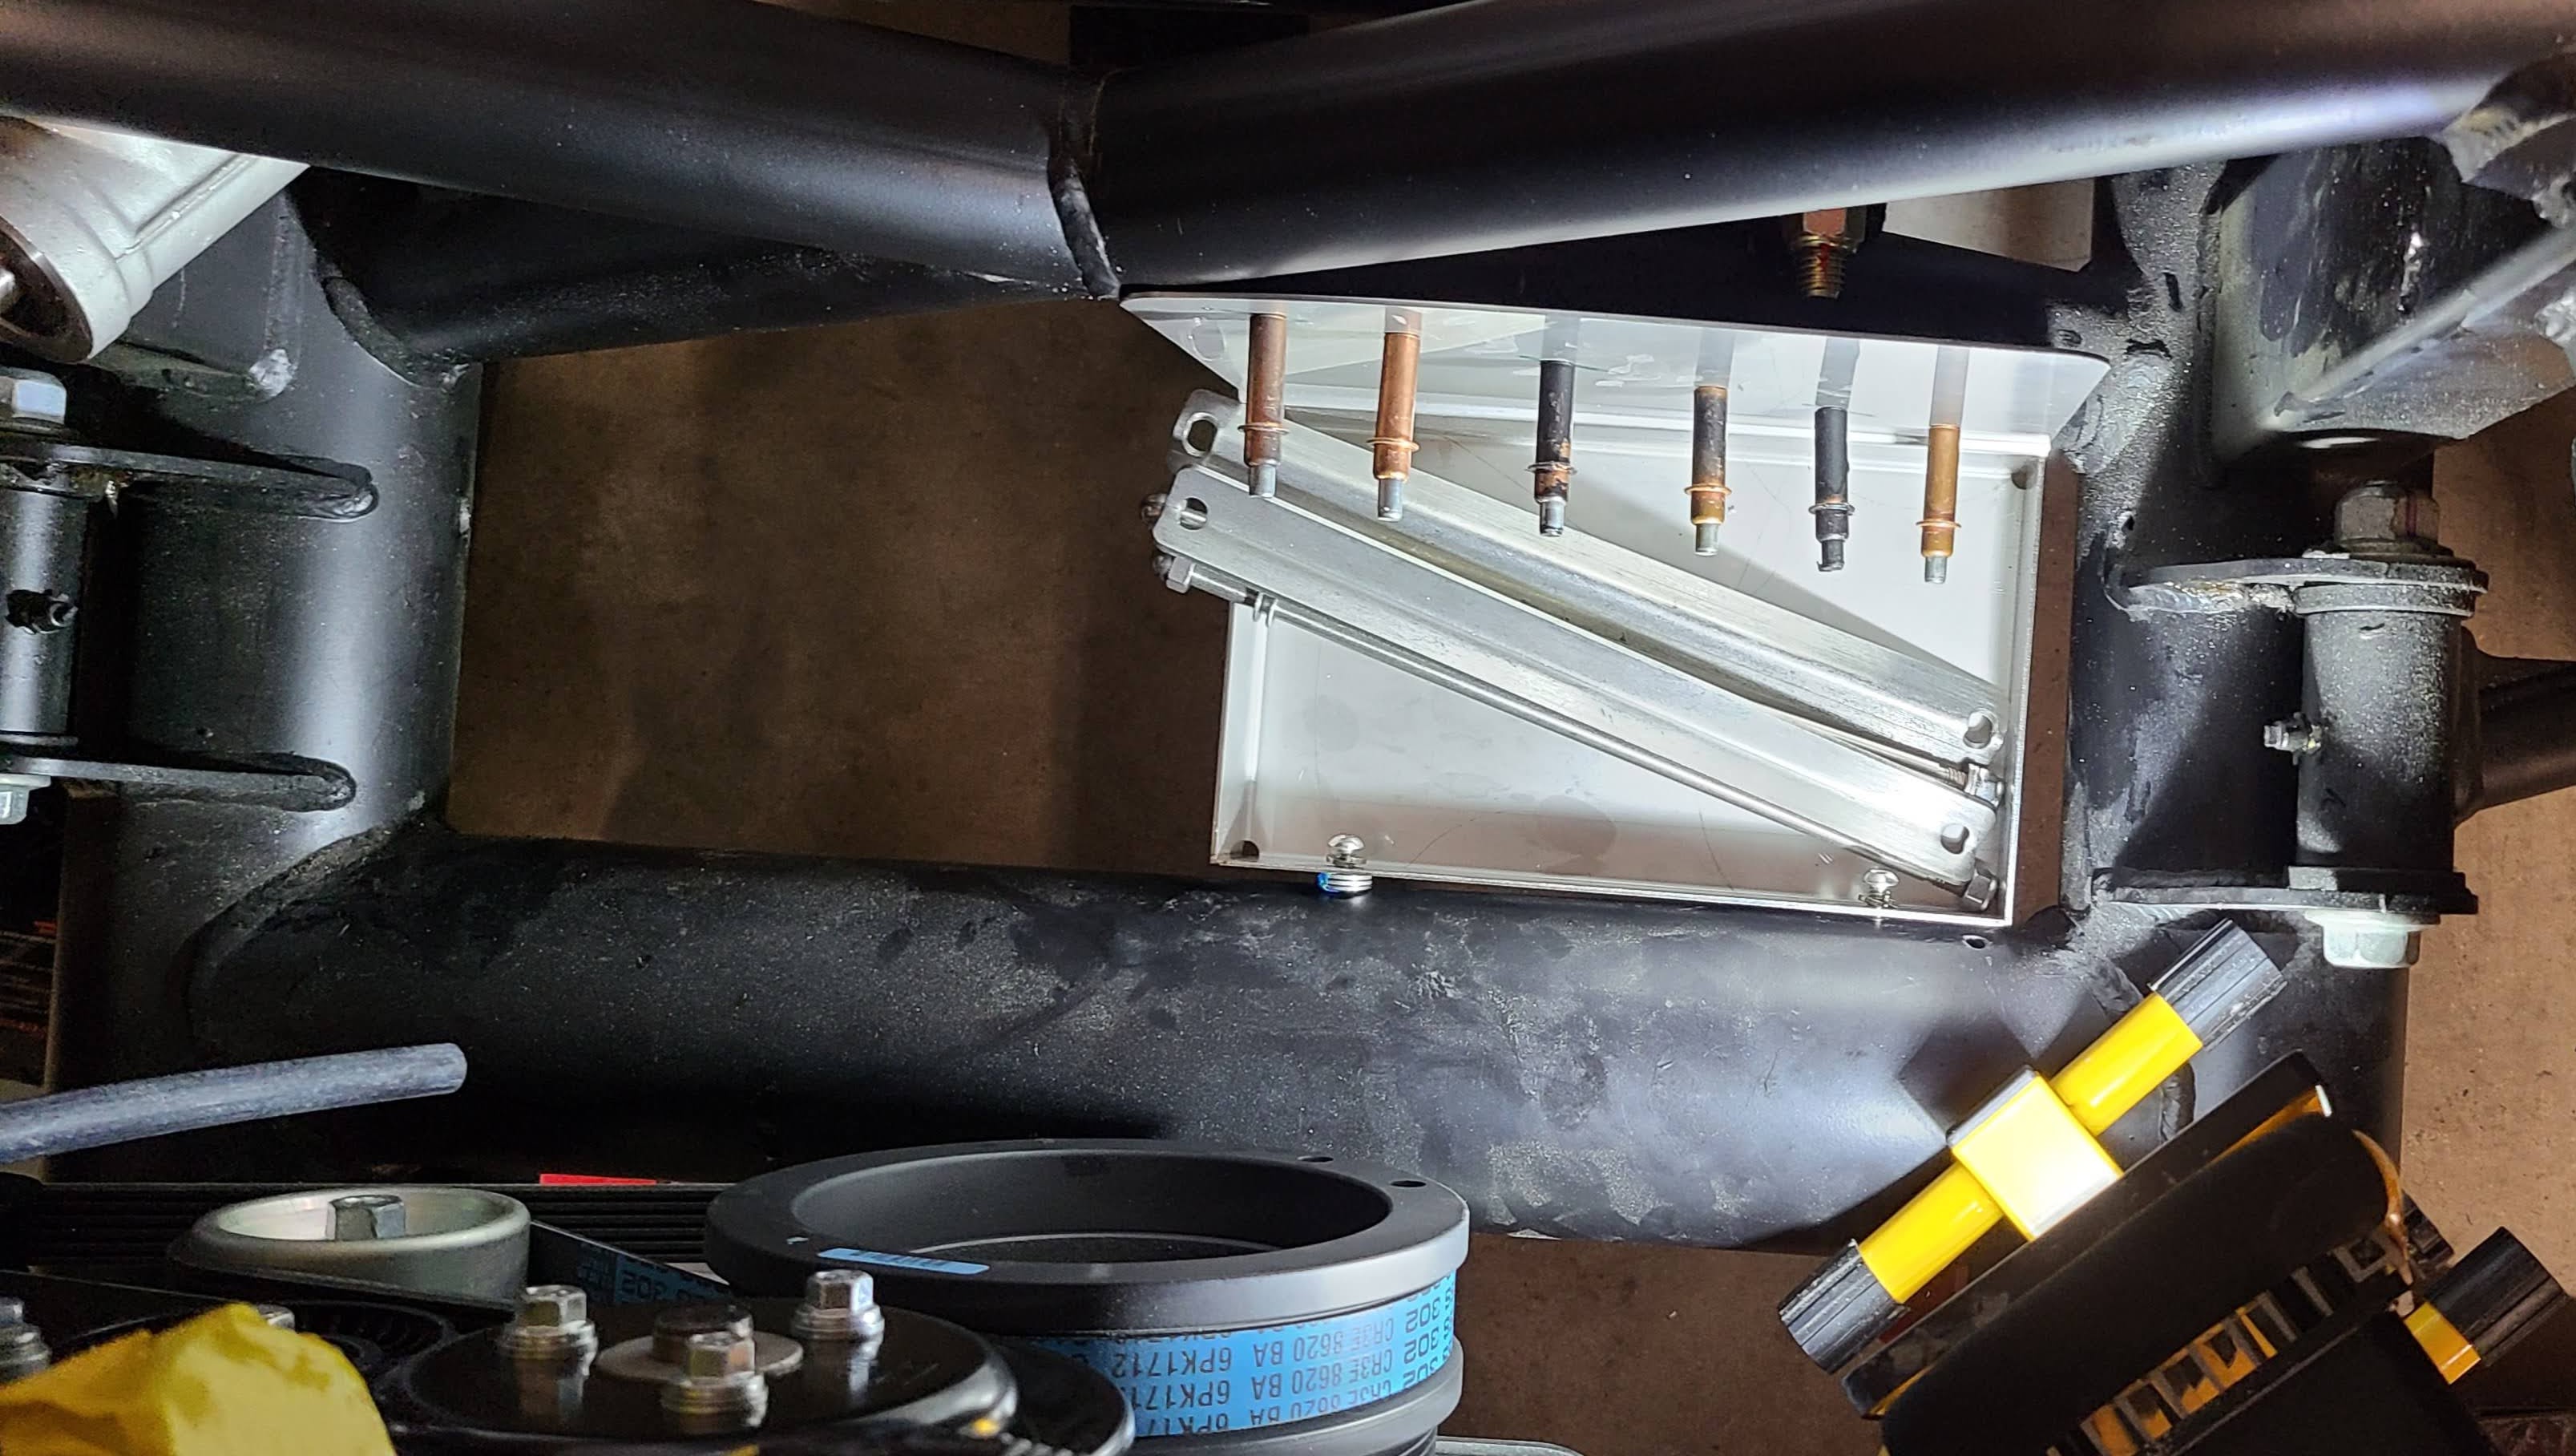
Rivet to the front X-member, then fill in any gaps to the horizontal 4" round frame using washers. It will be rock-solid after you tighten everything down. I had a similar large gap on mine and I used 3 or 4 washers to fill the gap. Here is a clear picture showing the washers during my install:
Last edited by dbo_texas; 04-02-2024 at 12:14 PM.
Darryl [dbo_texas]
MKIV #9644 (build thread) (Index)
MK4 Complete Kit | Gen2 crate Coyote | Tremec T56, 3.55 IRS | power steering | hydroboost | dual roll bars | FFR carbon fiber dash | 18" Halibrands + Wilwoods | RT drop trunk kit & turn signal | front battery mount | saddle leather Intatrim Stoneleigh seats + interior accents
-
Post Thanks / Like - 1 Thanks, 0 Likes
-
Senior Member

Originally Posted by
paynerc
I just received the Breeze battery relocation kit this week and last night went out to do some quick trial fitting. Initially looking at it it seems to be a bit... un-square... up front. I snapped a few pictures but really didn't have much time to mess with it.
When going to mount this, is it better to mount flush to the 4" round tube and make adjustments on the cross member, or the other way around?
IMG_0157.jpegIMG_0158.jpgIMG_0159.jpg
your gap seems larger than I recall mine looking. use washers to take up the gap. should be included in the kit. hardest part was trying to transfer the location of the hole you need to drill/tap into the frame. slotting the hole on the box helps.
I also taped the washers together after I was tired of dropping washers on the ground as I was trying to line up the bolt w/ the tapped hole in the frame.
-
Mine had the same gap, but I chose not to use washers. I mounted to the horizontal member first, then to the diagonal one. Cleaner look and a more direct connection. There's enough flex in the front plate to make up the gap. No, the front plate isn't perfectly square after doing this, but the only way to tell is by measuring or using a square to check. You'd never know there was a gap.

-
Post Thanks / Like - 1 Thanks, 0 Likes
-
Originally Posted by
OB6
Mine had the same gap, but I chose not to use washers. I mounted to the horizontal member first, then to the diagonal one. Cleaner look and a more direct connection. There's enough flex in the front plate to make up the gap.
So you just more or less "bent" the plate to touch? I was thinking that would look better but hadn't really gotten that far yet. Looks like you added a third screw to mount to the 4 inch tube?
-
Originally Posted by
paynerc
So you just more or less "bent" the plate to touch? I was thinking that would look better but hadn't really gotten that far yet. Looks like you added a third screw to mount to the 4 inch tube?
Yes, but "bend" is more aggressive than it really is. I did add an extra screw, although the need for it is debatable.
-
Post Thanks / Like - 1 Thanks, 0 Likes
-
Senior Member

It's been a few months since I installed mine, but if memory serves, the installation instructions talk about both the round x-member, and the unsquare geometry, and how to overcome it. I will concede that Mark's products, while excellent quality, do not have great instructions to match. 
Built an early MkIII years ago, sold years ago.
Got Corvettes out of my system, and now back after 18 years to build a MkIV.
MkIV Complete Kit Ordered 4/18/23, Delivered 7/11/23, 427 Stroker, Holley Sniper 2, Hyperspark, TKX, IRS, Wilwood Big Brakes
Here to learn, contribute, and have fun!
-
Originally Posted by
GTBradley
Dont try this at home...I went to jack my Mk4 up sometime ago at the center of the 4” tube. I positioned the jack and then got distracted, when I came back the jack had been moved and was under the battery tray instead. I gave the jack enough pumps to raise the car off the wheels by an inch. When I noticed the problem I carefully lowered the car and inspected for what I thought would be serious damage to the battery tray. To my surprise there was the slightest hickey on the bottom of the tray. So, X2 on what Paul said, it isn't going anywhere.
Yeah I don't know how Mark does it, but his engineering and fabrication makes up for my totally amateur build. Despite never tapping a screw before in my life, I've got it in there and it is solid.
MKIV Roadster - Complete Kit - Delivery 10/12/23
Build Thread


 Thanks:
  Likes:


 Reply With Quote

