-
-
Post Thanks / Like - 0 Thanks, 6 Likes
-
Senior Member

Very cool guys! We just got our 818S last week as well, and already have the engine installed! The previous build experience will help a lot on these projects.
EDIT: Just curious what your POL (back order list) consists of? Did you receive Box 6 which contains all of the aluminum panels?
Last edited by Scott Meyer; 12-06-2020 at 07:53 AM.
818 "S"pyder delivered 11/27/20, using 2007 Impreza 2.5l NA donor. Work mostly being done by my son Liam...body work and paint being done by dad (that's me)
MK3.1 #6583RD, built from 2008-2019, sold 11/2011
-
Post Thanks / Like - 0 Thanks, 1 Likes
-
Senior Member

Awesome Mark! Looking forward to following along.
-
Post Thanks / Like - 1 Thanks, 0 Likes
-
Senior Member

Love seeing these father son builds! What a great way to connect, teach valuable skills and life lessons along the way. Good luck with the build!
Adam _____ Instagram @PopesProjects____
YouTube Channel
818 SRX - #91
Arrived 01/02/2014
First Start 10/31/2016
First Drive 05/22/2017
Registered 10/25/2019 BRAP818
-
Post Thanks / Like - 1 Thanks, 0 Likes
-
Mark
Thats awesome that you and your son will be building his new car together. Time with the young kids sure seem to fly by way too fast. I’m sure those upcoming memories will forever be cherrished.
Stay safe
Eddie
build thread:
http://thefactoryfiveforum.com/showt...-USRRC-vspeeds
Build School: July 14-16, 2017
Kit purchased: July 25, 2017
Kit delivered: September 13, 2017
First Start: December 22, 2018
Body painted and kit completed and drivable: July 2019 (but still not done)
CA SB100 Registration: January 2020
Mk4 - 289 USRRC Roadster kit, Roush 427SR with Schneider Racing custom camshaft, Fitech EFI, TKO600 (.64-5th gear), 15" wheels, stock brake calipers, under car exhaust with Spintech 7000 muffler, no roll bar, Russ Thompson turn signal, removable steering wheel, and many other small upgrades and modifications
-
Post Thanks / Like - 1 Thanks, 0 Likes
-
Senior Member

This is going to be a great project for you guys. He'll be able to drive that car away to college and beyond with the memories and all. My son is 15 and is going to be looking for his first car soon, as he just earned his restricted license. I asked him about doing the same, and not really interested. Oh well, to each his own. Look forward to watching your build.
-
Post Thanks / Like - 1 Thanks, 0 Likes
-

Originally Posted by
Scott Meyer

Very cool guys! We just got our 818S last week as well, and already have the engine installed! The previous build experience will help a lot on these projects.
EDIT: Just curious what your POL (back order list) consists of? Did you receive Box 6 which contains all of the aluminum panels?
Box 6 did not make it. We spent almost 4 hours on inventory yesterday and only made it through box 3. ")
But I'm pretty sure all the other boxes are there. We are going pretty slow but having fun and not rushing. He won't be able to drive it until 3/2021 anyway.
-
Originally Posted by
cv2065
This is going to be a great project for you guys. He'll be able to drive that car away to college and beyond with the memories and all. My son is 15 and is going to be looking for his first car soon, as he just earned his restricted license. I asked him about doing the same, and not really interested. Oh well, to each his own. Look forward to watching your build.
I have a 17 yo son as well and gave him the option to build an FFR or restore something together but he is not interested.
-
Welcome to the Father-Son crowd! Our kit is scheduled for pickup 12/19, but oddly enough even though they say that date is still good, it is a Saturday and they do not do pickups on Saturdays. Hoping for that Monday as my company closes for 2 weeks and my son will be off from school, so we can be "full time" builders!
In the mean time, so much to prep in anticipation of the kit arriving! Looking forward to following your progress and sharing lessons learned!
-
Post Thanks / Like - 0 Thanks, 1 Likes
-
Thanks Rob, I'll be following your thread as well. Interestingly, a buddy of mine was encouraging me to build my own Power coating oven and your thread has inspired me as well! I'm thinking about the options...
-
Was actually very easy. I bought a use oven on Craig's list for $100, some square 1" tubing from my local ironworks shop. 20' pieces are $15. Spent a little more on Galvanized" steel, but didn't want to paint it to prevent rust. Made it 2'x2'x4' to minimize waste on the 4'x10' sheet metal. My son got practice with riveting the oven BEFORE he pops them in the car! I also got fancy and modified the window to fit in the 1" tubing, but that wasn't necessary. Just happened to be clean class in the used oven I found!
IMG_1268.jpgIMG_1280.jpgIMG_1256.jpgIMG_1262.jpg
I know some of these will display sideways, but you'll get the jist! ;-)
-
Post Thanks / Like - 1 Thanks, 1 Likes
-
-

Steve >> aka: GoDadGo

You Guys Caught The Build Bug Really Bad!
...................Congratulations!
-
Post Thanks / Like - 0 Thanks, 1 Likes
-
Senior Member

Originally Posted by
Mark Eaton
The right rear spindle/CV axle assembly is giving Nick and I a complete headache. We have been beating on it with a sledge hammer, heated it up with a torch, used an air hammer. I now have it in my press and soaking PB blaster. I think the knuckle will crack before the CV axle releases. Next step will either be a stick of dynamite or I'll just shred it up with my plasma cutter and throw it out in the road in a rant.

One of ours damn near exploded when it came loose. It was crazy. We used a press similar to your setup. When it finally gave, it knocked two of us over who were holding the hub and support steel. And it bent up my buddy's press table support - the C-channel piece that holds your work in place. I replaced it a few weeks later. So, first... be careful - don't get hurt. We were lucky.
Second, continue using the PB Blaster and heat. Do this periodically over a few days. Time makes a difference here, probably due to the PB Blaster penetrating.
-
Post Thanks / Like - 1 Thanks, 1 Likes
-
Mark -- so excited to follow this build! Also please keep us up to date on your powdercoating oven -- looks great.
Look forward to visiting you again in Medford once I'm further along in my project, i.e. actually order and take delivery 
-Chris
-
Post Thanks / Like - 1 Thanks, 0 Likes
-
We just picked up our kit yesterday, and as for the rear axles I have to say the $110 FFR gets for them pre-built is about the best bargain on the car! No mess, no fuss, like new! Two nice clean boxes just waiting to be installed... :-)
-
Post Thanks / Like - 0 Thanks, 2 Likes
-
Senior Member

Subscribed, looking forward to watching your build! Have fun with your son, great project for him!
-
-
Post Thanks / Like - 0 Thanks, 3 Likes
-
Looking good! You'll appreciate the size of the oven on some of the parts. Mine is 24x24x48-outside (tried to minimize sheet metal 4' widths. Wish i made inside 48"), and it took some advanced geometry skills to fit the rear anti-sway bar in it. I put some rivnuts in the ceiling of it so I can screw 1/4" eyebolts in at various locations. For small parts, the racks work, so I have rails for the two of them that came with the oven. How much stuff are you missing that's on the POL? Major items for us, as with others, is box 6 of the packaged aluminum and the IRS brackets.
IMG_1786.jpgIMG_1792.jpgIMG_1698.jpg
Last edited by roadrashrob; 01-20-2021 at 08:29 AM.
-
Post Thanks / Like - 1 Thanks, 0 Likes
-
Senior Member

Another exciting build! Way cool my friend...
Chris
Generation 3 Type 65 Daytona Coupe Complete Kit #151885 received May 6, 2022. Gen 3 Coyote, IRS, Tremec TKX, American Powertrain hydraulic throwout bearing & Wilwood brakes.
MK4 Basic Kit #7404, 347 EFI - Pro M Racing ECM, 30# injectors, 70 mm throttle body, 80 mm MAF, Edelbrock Performer aluminum heads & RPM II intake, all new G-Force T5, 3:55 gears, Pro 5.0 shifter, 3-link, carbon fiber dash/custom Speedhut gauges and paint by Da Bat.
-
Post Thanks / Like - 1 Thanks, 0 Likes
-


Originally Posted by
roadrashrob
Looking good! You'll appreciate the size of the oven on some of the parts. Mine is 24x24x48-outside (tried to minimize sheet metal 4' widths. Wish i made inside 48"), and it took some advanced geometry skills to fit the rear anti-sway bar in it. I put some rivnuts in the ceiling of it so I can screw 1/4" eyebolts in at various locations. For small parts, the racks work, so I have rails for the two of them that came with the oven. How much stuff are you missing that's on the POL? Major items for us, as with others, is box 6 of the packaged aluminum and the IRS brackets.
IMG_1786.jpgIMG_1792.jpgIMG_1698.jpg
Yes, we still have quite a bit on the POL list including box #6, but it won't be a problem. As you can see we are not setting any speed records for this build, we have plenty to do while waiting on the parts. I'm sure you can relate that working with a 14yo boy is sometimes like a comedy. We spend half our time looking for tools that he set down in the wrong place, and every time his phone tinkles he practically looses all focus.
Its ok though, for me its more about spending time with him than the build itself.
-
Originally Posted by
Mark Eaton
Yes, we still have quite a bit on the POL list including box #6, but it won't be a problem. As you can see we are not setting any speed records for this build, we have plenty to do while waiting on the parts. I'm sure you can relate that working with a 14yo boy is sometimes like a comedy. We spend half our time looking for tools that he set down in the wrong place, and every time his phone tinkles he practically looses all focus.
Its ok though, for me its more about spending time with him than the build itself.
Ha! I TOTALLY understand... Sounds exactly like my son, and yes, trying to make it more about the time together. Love the phone "tinkle" comment... I have the same issue if I need to just go to the toolbox to grab a different tool. Before I turn around he's whipped that phone out like quick draw McGraw! :-) But he's learning along the way, and we're communicating, so it's all worth it. Keep the posts up!
-
Post Thanks / Like - 0 Thanks, 1 Likes
-
-
Post Thanks / Like - 0 Thanks, 1 Likes
 Fman
Fman liked this post
-
-
Installing the new bearings is actually fairly easy. From your pictures, you have a bearing puller, so they literally will just "screw" right in. I didn't have a puller, and pressed them in, but learned the hard way that the OEM bearing is NOT completely "together". It can split apart if you don't hold it together, so on one of mine the bottom half fell out as I was putting it on the press, hit the ground, cracked the plastic that holds the bearings and little greasy pins were everywhere! Was much more careful with the second one, and the THIRD one I had to re-order.. :-( Won't happen with the threaded rod going through the bearing and hub.
-
Post Thanks / Like - 1 Thanks, 0 Likes
-
Just did my rear bushings as well - also with the help of a HF press. Not hard to do at all even though this was my first time. I literally lost track of how many times I re-watched YouTube videos on it. I found that writing out my own step-by-step guide helped me: "make a plan, work the plan."
Agreed: you got this! =)
Best,
-j
-
Post Thanks / Like - 1 Thanks, 0 Likes
-
Bigger Hammer
Nick had too much homework to go to the shop today so I went solo to continue my personal battle with the right rear outer CV axle/spindle assembly which has been frozen and resistant to all of our attempts of freeing it up. It has turned into my personal nemesis. Well, I bought the "Big Nasty" as it is called on youtube. I spent about 20 minutes beating on that damn CV axle with the "Big Nasty" and it is now my favorite tool. SUCCESS!!!!

I came home and told Nick and we were doing high fives in the kitchen.
-
Post Thanks / Like - 0 Thanks, 4 Likes
-
powder coating
We managed to get the left rear knuckle powder coated this weekend. This is Super Durable Flat Black powder from the Powder Coat Store. It is a polyester powder and should last well.

-
Post Thanks / Like - 0 Thanks, 1 Likes
-
Looks good! Smart job powder coating the entire knuckle. Do that on the fronts as well. I taped off where they OEM attachments connected and it was bare metal, only to realize the 818 IRS and IFS brackets don't cover "all" those locations. As bearings and seals were already in, just used POR on the exposed metal.
-
Post Thanks / Like - 1 Thanks, 0 Likes
-
-
Post Thanks / Like - 0 Thanks, 1 Likes
Fman liked this post
-
"Big Nasty" is that from south main auto?? That guy is hilarious! Nice progress!
-
Originally Posted by
Shawn818c
"Big Nasty" is that from south main auto?? That guy is hilarious! Nice progress!
It is!! And its awesome
-
Slow Progress but we're still at it
I think these will work

-
Post Thanks / Like - 0 Thanks, 1 Likes
-
PLATNUM Supporting Member


Looking good! keep up the great work.
16+ FFR kits and counting!
-
Post Thanks / Like - 1 Thanks, 0 Likes
-
-
Post Thanks / Like - 0 Thanks, 2 Likes
-
-
Post Thanks / Like - 0 Thanks, 3 Likes
-
-
Brake and Clutch master and OEM pedal box
The OEM pedal box went in first without much hassle. There was no way the OEM clutch master from my 2006 Impreza was going to fit without a modification. I looked on Rock Auto for a minute but they all looked similar. We had good momentum going in the shop that day and I didn't want to search around all over the internet figuring out a different Clutch master so we forged ahead and altered the chassis. It gave Nick a chance to work on his welding skills...
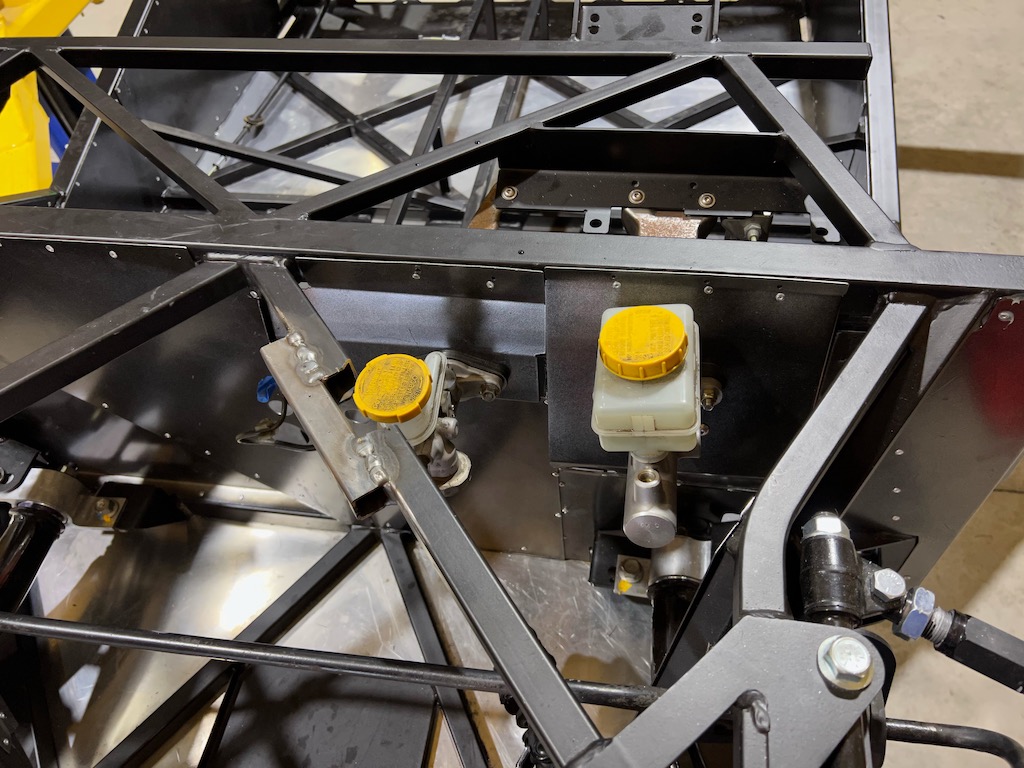
The steering column and accelerated pedal were next. In retrospect it would have been easier to put the accelerator pedal before the pedal box.

-
Post Thanks / Like - 0 Thanks, 1 Likes
-
-


 Thanks:
  Likes:


 Reply With Quote

