Forte's

Visit our community sponsor

Thanks Thanks:  0
Likes Likes:  0
Page 2 of 12 FirstFirst 1234 ... LastLast
Results 41 to 80 of 478

Thread: What did you do on your GTM today?

  1. #41
    Member spytech's Avatar
    Join Date
    Feb 2011
    Posts
    88
    Post Thanks / Like
    Quote Originally Posted by VD2021 View Post
    N,
    Is it too late in the season for a test run to see how it feels now?
    V-

    Unfortunately. The roads don't have snow, but tons of salt and don't want to get that crap on my car. Spring cant come soon enough now!

  2. #42
    Member kabacj's Avatar
    Join Date
    Mar 2011
    Location
    Long Island
    Posts
    1,103
    Post Thanks / Like
    Since I need to finish up welding on the frame, one of the things I did today was mount the AC accumulator. I needed to make sure none of my modifications interfered with the AC line routing as well as set the accumulator in place. I like when you mount something that I looks like it belongs there. I quickly fabricated a little bracket from some scrap 1 inch square tube. Its way stronger then it needs to be, but it holds the accumulator very nicely. And it was an excuse to fabricate something.


    This accumulator is just for mock up purposes. Ill put in the new one when I put the front together for the last time.


    john
    Last edited by kabacj; 12-18-2011 at 10:38 PM.
    XTF #2
    build start date June 19 2023

    GTM # 344
    Build Start December 2010
    First track day April 2013

  3. #43
    Senior Member Kempo's Avatar
    Join Date
    Feb 2011
    Location
    Cabo Rojo,PR. USA
    Posts
    723
    Post Thanks / Like
    Very nice work John. That weld is very clean too. I wish I could weld like that.
    GenII GTM #354
    Delivered (02/09/11)

  4. #44
    Senior Member The Stig's Avatar
    Join Date
    Feb 2011
    Location
    Charlotte, NC
    Posts
    2,004
    Post Thanks / Like
    I've been completely consumed by work (including weekends) since the middle of November. Since I got the GTM back into the Garage, I haven't had a chance to get started back on the tasks to finish it up. I did go out this weekend and "Start it up". The battery had drained down, so I had put the charger on it for an hour and then kick it over. After a few tries, it came back to life!

    This brought the neighbors out, and over to my house for a look. It was pretty cool to see the big grins as they walked up the driveway and saw the GTM sitting there. I talked to them for 20 - 30 minutes explaining what it was and letting them look around it. Then I took it out for another drive around the block.

    It's really cool to see the "double-takes" when people get their first glimpse of it coming around the corners. Lots of smiles, and thumbs up.

    Life is good.
    Last edited by The Stig; 12-19-2011 at 11:15 AM.
    The Stig

    Some say, that I only know two facts about ducks, (both being wrong); and that if I could be bothered, I could solve the "da Vinci Code" in 47 seconds...
    All I know is that I'm called "The Stig".
    GTM #0081

  5. #45
    LCD Gauges's Avatar
    Join Date
    Apr 2011
    Location
    Toronto, Ontario
    Posts
    1,545
    Post Thanks / Like
    Blog Entries
    3
    Bought a 5 inch tach, but it's not close enough to the ProComp series. Need to return it and wait for the back-ordered matching tach.

    5757b8m_20.jpeg
    Custom LCD Gauges , Data Loggers, Control Touch Screens
    www.LCDdash.com \\ 647-522-9953 \\ Voice & Text
    Proud new owner of GTM Gen 1., #105 - 08/27/11
    LQ9 Powered, G96.00 6 speed transaxle

  6. #46
    Mad Scientist mendo's Avatar
    Join Date
    Sep 2011
    Location
    Meadow Vista, CA
    Posts
    72
    Post Thanks / Like
    I purchased the doner parts. should have them mid Jan. only thing missing at this point is the transmission. you all remember this stage of the build?
    GTM #253 In Process

  7. #47
    LCD Gauges's Avatar
    Join Date
    Apr 2011
    Location
    Toronto, Ontario
    Posts
    1,545
    Post Thanks / Like
    Blog Entries
    3
    Not only do I remember that stage...I am AT that stage. I'll be taking notes to find out all that is needed, options, tips, etc.
    Custom LCD Gauges , Data Loggers, Control Touch Screens
    www.LCDdash.com \\ 647-522-9953 \\ Voice & Text
    Proud new owner of GTM Gen 1., #105 - 08/27/11
    LQ9 Powered, G96.00 6 speed transaxle

  8. #48
    Senior Member VD2021's Avatar
    Join Date
    Feb 2011
    Location
    Central, FL
    Posts
    958
    Post Thanks / Like
    Blog Entries
    2
    Installed rear anti-sway bar.
    Attached Images Attached Images
    R/s
    Vidal
    CURRENT STATUS: Interior Rework and Bodywork.
    GenII GTM #331. Delivered (23/9/10)
    BUILD LOG AND WEBSITE:
    http://gtmbuild.weebly.com/ .

  9. #49
    LCD Gauges's Avatar
    Join Date
    Apr 2011
    Location
    Toronto, Ontario
    Posts
    1,545
    Post Thanks / Like
    Blog Entries
    3
    Found a place to store my car for two and a half months.

    Getting specs on the motor, and chasing down a source for the transaxle.

    Going to pick up some materials to continue prepping the hood (tomorrow and Wednesday).

    It will be one of the last things I do before it goes away.

    P.S. The pic looks good Big V.
    Last edited by LCD Gauges; 01-02-2012 at 09:31 PM.
    Custom LCD Gauges , Data Loggers, Control Touch Screens
    www.LCDdash.com \\ 647-522-9953 \\ Voice & Text
    Proud new owner of GTM Gen 1., #105 - 08/27/11
    LQ9 Powered, G96.00 6 speed transaxle

  10. #50
    Senior Member sk7500's Avatar
    Join Date
    Feb 2011
    Posts
    377
    Post Thanks / Like

    Smile Finished the splitter and pulled the body

    I know it's progress, but pulling the body for paint sure feels like a step back in time. It was Christmas last year when we put the body on and it was at least all one color. We still have some glass reinforcement to to on the inside and lots of block sanding to do but the body mods are DONE!!
    Hopefully the next time I post there will be some red in the pictures.
    Attached Images Attached Images

  11. #51
    LCD Gauges's Avatar
    Join Date
    Apr 2011
    Location
    Toronto, Ontario
    Posts
    1,545
    Post Thanks / Like
    Blog Entries
    3
    Wow, nice shop space. May I have it?

    I'm liking the fixed hood mod more and more, I'm just too chicken to attempt it.
    Last edited by LCD Gauges; 01-03-2012 at 11:57 PM. Reason: fixed spelling of CHICKED to Chicken
    Custom LCD Gauges , Data Loggers, Control Touch Screens
    www.LCDdash.com \\ 647-522-9953 \\ Voice & Text
    Proud new owner of GTM Gen 1., #105 - 08/27/11
    LQ9 Powered, G96.00 6 speed transaxle

  12. #52
    Member kabacj's Avatar
    Join Date
    Mar 2011
    Location
    Long Island
    Posts
    1,103
    Post Thanks / Like
    My Ohlins shocks were delivered last week and it was time to mount them. I could have taken the easy way out and mounted them using the FFR supplied 1/2 inch bolt. However as usual I could not take the easy way out and decided that I would upgrade the solution and hopefully get something that both looks cool and works a bit better. I was able to get larger custom end eyes for the shocks that were designed to be used in euro spec cars. These have larger metric ID bearings of course. The bearings will support larger loads as well as allow for a greater off set angle.

    Because I was making each spacer or bushing from 303 stainless I could control the tolerances and managed to get the clearance down to .005 mm between the shock eye and the bushings. I then made up bushings to reduce the 1/2 inch FFR shock mount to 3/8ths and pressed in those spacers. I upgraded to extreme strength 450 stainless steel 12 point bolts . Mostly because I thought they looked cool, would be plenty strong, and of course since they are ARP are incredibly well made.

    Finally I made up new collars that limit the side to side movement of my front anti roll bar. I just could not bring my self to mount cheap Chinese made galvanized steel collars on my pride an joy. Of course billet aluminum collars both look nice and are lighter weight. As they say light makes right.

    Shown below is the shock upper mount with a set of bushings and reducers. I actually put a chamfer on the inside shoulder of the bushings to allow for full articulation of the shock eye. (not shown on the example bushing)


    Very proud of these tolerances on my 1945 logan lathe. This baby was well cared for and still can put out quality parts, however soon as the GTM is done ill pony up for a quality CNC mill. Something about programming a tool path and spitting out parts is rather attractive after spending a day making 16 of the 32 parts I need.


    Some billet locating collars for the ARB. Totally unnecessary but they make me happy.


    John
    XTF #2
    build start date June 19 2023

    GTM # 344
    Build Start December 2010
    First track day April 2013

  13. #53
    Member kabacj's Avatar
    Join Date
    Mar 2011
    Location
    Long Island
    Posts
    1,103
    Post Thanks / Like
    This weekend I mounted my adjustable seat brackets. I purchased the jegs units for 29 bucks then decided that I wanted to install them with the double locker. The annoying thing is they are not mirror image of each other . One locking mechanism lifts toward the front and one toward the back on the other when the seat mounting studs are facing inward.


    After a little bit of noodling i decided to reverse one of the locking mechanisms. I had to move the pivot and reverse the bends in the mechanism itself. I did my best to channel a black smith and this is how it came out.


    Next I wanted to cut off all the stuff on the latch that I would not use as it would hit the leather on the seat when I pulled the latch fully up. Sure its not a big deal but I was in it this deep why stop now


    I matched both sides and moved the spring attachment points to slightly decrease the pressure required to unlatch the locks.

    I mounted the seats in the car and was very happy with the adjust ability and the ease of the action of the locks. The final step is to mount a u shaped actuator that will located just under the front lip of the seat. This way with one hand I can unlock both tracks while holding the steering wheel to pull myself forward or push myself back.

    A minor convenience for sure, but it was a fun way to spend the day.

    John
    Last edited by kabacj; 01-25-2012 at 08:14 AM.
    XTF #2
    build start date June 19 2023

    GTM # 344
    Build Start December 2010
    First track day April 2013

  14. #54
    Senior Member Presto51's Avatar
    Join Date
    Feb 2011
    Location
    Catonsville, Maryland
    Posts
    578
    Post Thanks / Like
    Damn John your machine work is “wicked” cool. Nothing like “parts porn” to make the day go by

    Thanks for sharing

    Ron
    "May you be in heaven a full half hour before the Devil knows you're dead"

  15. #55
    Mad Scientist mendo's Avatar
    Join Date
    Sep 2011
    Location
    Meadow Vista, CA
    Posts
    72
    Post Thanks / Like
    Quote Originally Posted by mendo View Post
    I purchased the doner parts. should have them mid Jan. only thing missing at this point is the transmission. you all remember this stage of the build?


    Got a big box full of doner parts

    Got a motor in another box.

    will be unpacking and inventorying this weekend.

    here we go.
    GTM #253 In Process

  16. #56
    Senior Member rev2xs's Avatar
    Join Date
    Mar 2011
    Location
    Wysin, Poland
    Posts
    189
    Post Thanks / Like
    Mounted the doors in for the last time today. Installed my door seals in today. Seems like the door might be perfectly sealed too. Connected the headlights today and encounted a new problem while i was at it. My park lights both front and rear stopped working No idea whats caused it as the fuse is fine. So, i'll save myself a post in this thread and let you all guess what i will be doing tomorrow

  17. #57
    Senior Member VD2021's Avatar
    Join Date
    Feb 2011
    Location
    Central, FL
    Posts
    958
    Post Thanks / Like
    Blog Entries
    2
    Picked up some and ordered the remainder of the parts in preparation of the magnasteer power steering install.
    R/s
    Vidal
    CURRENT STATUS: Interior Rework and Bodywork.
    GenII GTM #331. Delivered (23/9/10)
    BUILD LOG AND WEBSITE:
    http://gtmbuild.weebly.com/ .

  18. #58
    Member
    Join Date
    Feb 2011
    Posts
    51
    Post Thanks / Like
    Put the napa pilot bearing in the crank need for the mendeola. Missed the socket that I was using and hit my finger with the hammer. ******* I think I!m number 15 on the waiting list.
    Leonard

  19. #59
    Senior Member mikespms's Avatar
    Join Date
    Apr 2011
    Location
    North Miami,FL
    Posts
    145
    Post Thanks / Like
    006.JPG005.JPG Made brackets to mount the seat belts with out having to modify the seat belt mechanism and switching sides also adapted corvette cover .

  20. #60
    Member kabacj's Avatar
    Join Date
    Mar 2011
    Location
    Long Island
    Posts
    1,103
    Post Thanks / Like
    As many have noted the way you mount the corvette column with two bolts in line allows the wheel to flex a bit when you pull down or push up on it. Not a major deal, but I wanted it to be firmer. First I cleaned up the column and cut a piece of 2x2 square stock so it fit exactly parallel with the section perpendicular to the column that currently has the two mounting bolts.


    I welded the square piece on and painted it up.


    Then installed it in the car. I had planned on welding in another slot on the frame to bolt the column to the frame but it was very firm without it. I might still go ahead and bolt it, but as long as the new support is parallel with the factory perch it really makes the wheel solid.


    John
    XTF #2
    build start date June 19 2023

    GTM # 344
    Build Start December 2010
    First track day April 2013

  21. #61
    Senior Member Kempo's Avatar
    Join Date
    Feb 2011
    Location
    Cabo Rojo,PR. USA
    Posts
    723
    Post Thanks / Like
    Great idea John. I'm not happy with the movement on the column. I will be removing mine for this same fix. Thanks for sharing.
    GenII GTM #354
    Delivered (02/09/11)

  22. #62
    Senior Member
    Join Date
    Apr 2011
    Posts
    641
    Post Thanks / Like
    Quote Originally Posted by Kempo View Post
    Great idea John. I'm not happy with the movement on the column. I will be removing mine for this same fix. Thanks for sharing.
    Yes, Thank you, for sharing. I like, and will use.

    Gene

  23. #63
    Senior Member mikespms's Avatar
    Join Date
    Apr 2011
    Location
    North Miami,FL
    Posts
    145
    Post Thanks / Like
    gtm dash.JPG001.JPG I mounted the HUD and IP and modified the dash pad. But I had to modify the steering colunm mount to fit IP in dash.

  24. #64
    Member kabacj's Avatar
    Join Date
    Mar 2011
    Location
    Long Island
    Posts
    1,103
    Post Thanks / Like
    Finally I am nearly complete with my seat track install.

    In order to have the seat perfectly centered relative to the wheel I needed to move the right hand side seat mounts inboard 1 inch to compensate for the width of the seat tracks. This allows you to move the seat right up to the tunnel in the same way as its designed by factory five without using seat tracks.

    First I made and installed steel mounts and attached them to the frame.


    Note when the seat track is fully back it goes into the stock aluminum panel so I needed to make a cut out and filler piece. I proceeded to bend up a few of these.


    I got those all mounted up and painted the bare steel.


    Got the stock panels trimmed and drilled


    Then proceeded to test the seat travel. First fully forward.


    Then fully back.


    By tipping the seat I can move the seat back over 8 inches. Ill test with some of my taller friends to see how they fit. I think tipping the seat really helps in the head room department. I find it more comfortable as well. I can raise the seat and tip it back so I have plenty of room for a helmet and good ergonomics with the pedals, shifter and wheel.


    To wrap up the shifter install I welded in the frame and painted it all up when it was done.


    John
    Last edited by kabacj; 02-13-2012 at 10:39 PM.
    XTF #2
    build start date June 19 2023

    GTM # 344
    Build Start December 2010
    First track day April 2013

  25. #65
    LCD Gauges's Avatar
    Join Date
    Apr 2011
    Location
    Toronto, Ontario
    Posts
    1,545
    Post Thanks / Like
    Blog Entries
    3
    Made arrangements to pickup my PCM and harness from the engine builder. I've also been sketching out some mods that I'd like to try (IE: reverse lights relocation, intake air box, push button start
    electronic circuit build).

    I'll post up some pics of the sketches and photos of the 'goods' after grabbing them tomorrow.
    Custom LCD Gauges , Data Loggers, Control Touch Screens
    www.LCDdash.com \\ 647-522-9953 \\ Voice & Text
    Proud new owner of GTM Gen 1., #105 - 08/27/11
    LQ9 Powered, G96.00 6 speed transaxle

  26. #66
    Senior Member
    Join Date
    Feb 2011
    Posts
    119
    Post Thanks / Like
    John (kabacj) - that is one heck of a job on the seat slider mounting. Solid and it looks great!

  27. #67
    Member kabacj's Avatar
    Join Date
    Mar 2011
    Location
    Long Island
    Posts
    1,103
    Post Thanks / Like
    Thanks Mmargos. It's funny when I look at the post I say. That should take a few hours. But that's the magic of the Internet. Sure it was a few hours of fab time but lots of head scratching and experimenting in between.

    I like to see what others are doing so hopefully my posts are entertaining.

    John
    XTF #2
    build start date June 19 2023

    GTM # 344
    Build Start December 2010
    First track day April 2013

  28. #68
    Senior Member VD2021's Avatar
    Join Date
    Feb 2011
    Location
    Central, FL
    Posts
    958
    Post Thanks / Like
    Blog Entries
    2

    Cool

    Quote Originally Posted by kabacj View Post
    Finally I am nearly complete with my seat track install.

    In order to have the seat perfectly centered relative to the wheel I needed to move the right hand side seat mounts inboard 1 inch to compensate for the width of the seat tracks. This allows you to move the seat right up to the tunnel in the same way as its designed by factory five without using seat tracks.

    First I made and installed steel mounts and attached them to the frame.


    Note when the seat track is fully back it goes into the stock aluminum panel so I needed to make a cut out and filler piece. I proceeded to bend up a few of these.


    I got those all mounted up and painted the bare steel.


    Got the stock panels trimmed and drilled


    Then proceeded to test the seat travel. First fully forward.


    Then fully back.


    By tipping the seat I can move the seat back over 8 inches. Ill test with some of my taller friends to see how they fit. I think tipping the seat really helps in the head room department. I find it more comfortable as well. I can raise the seat and tip it back so I have plenty of room for a helmet and good ergonomics with the pedals, shifter and wheel.


    To wrap up the shifter install I welded in the frame and painted it all up when it was done.


    John
    John,
    I'm impressed more with each post of your fabrication. Keep the post coming.

    Mid 70s to low 80s........................... I'll supply the gas and rods
    R/s
    Vidal
    CURRENT STATUS: Interior Rework and Bodywork.
    GenII GTM #331. Delivered (23/9/10)
    BUILD LOG AND WEBSITE:
    http://gtmbuild.weebly.com/ .

  29. #69
    Senior Member sk7500's Avatar
    Join Date
    Feb 2011
    Posts
    377
    Post Thanks / Like

    Just because it's Valentines day and this is the only thing I have that's RED

    And because it makes me feel good to just look at it.
    We got the body about 80% color sanded and polished. I burned holes in both doors and the hood. I repainted the hood and polished it inside and out to about 70%. Will have to respray the doors after the touch ups. but I think I'll color sand and polish the rear hatch, wing, mirrors and front splitter first. Maybe if I wait long enough the doors will fix themselves? probably not.

    IMG_2068.JPGIMG_2070.JPGIMG_2067.JPGIMG_2063.JPGIMG_2062.JPG

  30. #70
    LCD Gauges's Avatar
    Join Date
    Apr 2011
    Location
    Toronto, Ontario
    Posts
    1,545
    Post Thanks / Like
    Blog Entries
    3
    Quote Originally Posted by sk7500 View Post
    And because it makes me feel good to just look at it.
    IMG_2068.JPG


    Oh my gaaaaaaaawwwwwwwd!

    Look at that finish.
    Custom LCD Gauges , Data Loggers, Control Touch Screens
    www.LCDdash.com \\ 647-522-9953 \\ Voice & Text
    Proud new owner of GTM Gen 1., #105 - 08/27/11
    LQ9 Powered, G96.00 6 speed transaxle

  31. #71
    Member kabacj's Avatar
    Join Date
    Mar 2011
    Location
    Long Island
    Posts
    1,103
    Post Thanks / Like
    Quote Originally Posted by sk7500 View Post
    And because it makes me feel good to just look at it.
    WOW

    Beautiful. That is surely work to be proud of.

    Nice job.

    John
    XTF #2
    build start date June 19 2023

    GTM # 344
    Build Start December 2010
    First track day April 2013

  32. #72
    Senior Member VD2021's Avatar
    Join Date
    Feb 2011
    Location
    Central, FL
    Posts
    958
    Post Thanks / Like
    Blog Entries
    2
    Reset the front shocks, completed the fix for the fix and reinstalled the front shocks in the correct orientation.
    Attached Images Attached Images
    R/s
    Vidal
    CURRENT STATUS: Interior Rework and Bodywork.
    GenII GTM #331. Delivered (23/9/10)
    BUILD LOG AND WEBSITE:
    http://gtmbuild.weebly.com/ .

  33. #73
    Senior Member VD2021's Avatar
    Join Date
    Feb 2011
    Location
    Central, FL
    Posts
    958
    Post Thanks / Like
    Blog Entries
    2
    C5 Donor Magnasteer Variable Assist Power Rack installed and wired into the Active handling traction control system.
    Attached Images Attached Images
    R/s
    Vidal
    CURRENT STATUS: Interior Rework and Bodywork.
    GenII GTM #331. Delivered (23/9/10)
    BUILD LOG AND WEBSITE:
    http://gtmbuild.weebly.com/ .

  34. #74
    Member kabacj's Avatar
    Join Date
    Mar 2011
    Location
    Long Island
    Posts
    1,103
    Post Thanks / Like
    Rebuilt my Corvette CV joints.


    Modified the Mendiola transaxle mount.

    The mount sits right on top of the allen stud and lock nut that are used to adjust where reverse engages relative to the 1-5 pattern. With the mount installed there is no way to get an allen key in to make an adjustment. You can see ont this picture in between the green marks the little relief that was made to allow the mount to slip over the adjuster lock nut.


    Then I measured how much room I would need to fit a 90 degree allen wrench fully into the nut. The cutout trace allows for the clearance. Unfortunately I have now chopped half of the width of my transaxle mount. I doubled it up in order to recover the strength. I think this mount is overbuilt anyway so im just restoring the fortitude of the mount. If you can I think its always better to have a stronger part then you need. I welded all the way around the brace.


    This is how it looks installed on the transaxle.


    John
    XTF #2
    build start date June 19 2023

    GTM # 344
    Build Start December 2010
    First track day April 2013

  35. #75
    Senior Member Edgeman's Avatar
    Join Date
    Feb 2011
    Location
    Medicine Hat, Alberta Canada
    Posts
    220
    Post Thanks / Like
    Installed the kooks, ISIS Master cell, powercell and mega fues block. Had to move the front rad hose on the drivers side to fit the front powercell.
    Last edited by Edgeman; 03-05-2012 at 10:05 PM.

  36. #76
    Senior Member
    Join Date
    Feb 2011
    Location
    San Diego
    Posts
    1,961
    Post Thanks / Like
    Quote Originally Posted by kabacj View Post
    The mount sits right on top of the allen stud and lock nut that are used to adjust where reverse engages relative to the 1-5 pattern. With the mount installed there is no way to get an allen key in to make an adjustment.
    I don't have details about the Mendeola FFR SDR box, but do you need to make these adjustments? Is this what Mendeola recommends you do, as far as messing with adjustment screws?

    Just wondering, as our boxes are pretty much ready to go right from Mendeola.
    www.myraceshop.com

    GTM solution kits
    Corvette and Race parts

  37. #77
    Member kabacj's Avatar
    Join Date
    Mar 2011
    Location
    Long Island
    Posts
    1,103
    Post Thanks / Like
    Quote Originally Posted by crash View Post
    I don't have details about the Mendeola FFR SDR box, but do you need to make these adjustments? Is this what Mendeola recommends you do, as far as messing with adjustment screws?

    Just wondering, as our boxes are pretty much ready to go right from Mendeola.
    Hey Crash,

    It is not recommended to mess with this adjustment out of the box.

    My mod is only to allow for future adjustment without removing the FFR mounting bracket. With my luck I will be at the track 55 hours away from my house. I ll have just come in off the track and the motor and exhaust will be blazing hot and ill need to make this adjustment or miss the last run of the day. ( I know I don’t go in reverse on the track but humor me) To make the adjustment with just the square relief cut that allows the bracket to connect to the transaxle but covers the allen stud, ill break out the drill /air saw and what ever else to thrash my way to access while sweating and cussing as I burn myself on the kooks exhaust. Remember the kooks exhaust are supported off of a stud welded to this bracket. Over active imagination.. maybe, however I know you have been there when you are at the track, and you had the chance to make something easier but you said hell Ill NEVER need to mess with that. Ill just leave it alone. I know its happened to me.

    Well this little mod will allow me to cut down a normal allen key (even if I am in the middle of the Mojave desert on some runway I can find a normal allen wrench) and slip it down into the stud fully engaging the facets of the hex. (which is important because when its most critical to not strip something is when you strip it) and make this adjustment in 30 seconds. Ill be back out on the track disaster averted.

    I thought about other ways to access the stud (one of those hex ball end wrenches or a custom tool that I make or changing the allen stud to a male square drive stud and this was the easiest way I could think of. This solution does not mess with the transaxle. The FFR bracket is roughly as strong as it was before I relieved the access area and if I need to make an adjustment is is a drama free process.

    John
    Last edited by kabacj; 03-06-2012 at 04:32 PM.
    XTF #2
    build start date June 19 2023

    GTM # 344
    Build Start December 2010
    First track day April 2013

  38. #78
    Member kabacj's Avatar
    Join Date
    Mar 2011
    Location
    Long Island
    Posts
    1,103
    Post Thanks / Like
    This weekend I finished up my cooling system including the heater bypass upgrade offered by Crash. I tested the valve that promotes recirculation of coolant even when the heat is off using a miti vac pump and it looks like it will work fine. Even though I know there are plenty of GTMs running without the kit, I think it makes lots of sense to do this upgrade.

    Next I spent a ton of time getting near 20 gallons in a single tank on the passenger side. As others have realized there is no other way to put the tank of this size behind the passenger seat then to remove two of the supporting bars from the frame.

    It made me sad, but I cut out the two square tubes.


    after putting the motor in to confirm clearances i will weld in new cross bracing for the vertical hoop behind the passenger and driver as well as for the rear suspension pick up points that should more then account for the loss of these supports.

    Next I mocked up my the fuel tank I drew in Google sketch up. It fits well with plenty of clearance all around the tank and the tank is fully inside the cage.


    Finally I laid out the fill plate on the top of the tank inside the car. Ill need to modify the FFR supplied fill cap so it can take a 2.25 inch fill tube which matches the fill plate, but that should be easy enough.

    I just wanted to show you guys how cool these fill plates are. This rubber flapper valve seals against the support structure behind it in the event of a roll over. A few years back it was common to use a large ball in a channel that would block the fuel flow like many shop vacs have. It turns out in a high G situation that ball would bend the cage that it rides in and render the valve useless.

    XTF #2
    build start date June 19 2023

    GTM # 344
    Build Start December 2010
    First track day April 2013

  39. #79
    Member JCHRacer's Avatar
    Join Date
    Feb 2011
    Posts
    54
    Post Thanks / Like

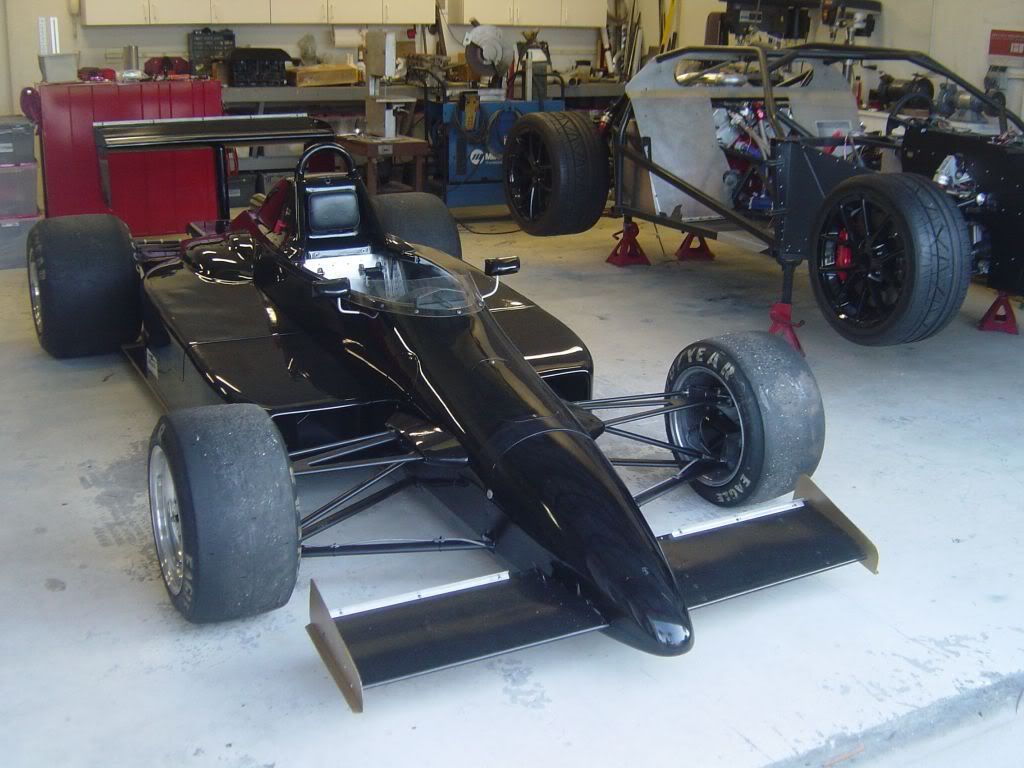
    New Toy

    Got tired of how long the GTM was taking and bought a new toy to play with while I complete the GTM:

    Attached Images Attached Images
    Ciao,

    Joel

    Working ever so slowly on GTM #269, Twin Turbo SBC, Ricardo, Kit arrived April 5, 2009

    http://photobucket.com/JCHRacer_GTM_Build

  40. #80
    Senior Member The Stig's Avatar
    Join Date
    Feb 2011
    Location
    Charlotte, NC
    Posts
    2,004
    Post Thanks / Like
    Ok... Now that's just cheating; plain and simple...

    Wish I could get one, and had somewhere to put it.


    Quote Originally Posted by JCHRacer View Post
    Got tired of how long the GTM was taking and bought a new toy to play with while I complete the GTM:

    The Stig

    Some say, that I only know two facts about ducks, (both being wrong); and that if I could be bothered, I could solve the "da Vinci Code" in 47 seconds...
    All I know is that I'm called "The Stig".
    GTM #0081

Page 2 of 12 FirstFirst 1234 ... LastLast

Tags for this Thread

Posting Permissions

  • You may not post new threads
  • You may not post replies
  • You may not post attachments
  • You may not edit your posts
  •  

FFMetal

Visit our community sponsor