-
Hey Hank, I see that you are looking at "Stack EFI (looking at the new Speedmaster downdraft EFI with the “fast” computer)." I was down at Laguna Seca and looked at the Superperformance Cobra that they had - it had Roush motor with some sort of stack EFI. I'm starting with a 302 that has been donated to me by a good friend and I think I want something like this EFI option - I'm googling around and am confused by what I need in addition to the manifold, which seems to run at about $2400. I realize I could keep researching but I figure you have already been down this path!
-
Senior Member


Originally Posted by
jgray

Hey Hank, I see that you are looking at "Stack EFI (looking at the new Speedmaster downdraft EFI with the “fast” computer)." I was down at Laguna Seca and looked at the Superperformance Cobra that they had - it had Roush motor with some sort of stack EFI. I'm starting with a 302 that has been donated to me by a good friend and I think I want something like this EFI option - I'm googling around and am confused by what I need in addition to the manifold, which seems to run at about $2400. I realize I could keep researching but I figure you have already been down this path!
Hey jgray, when I initially posted that I had just decided to not go with the ultra-reliable and nicely revving sniper setup for my 347 (from everything I hear the sniper is bulletproof and is very smooth at low revs, likely the benchmark). But then I was looking at pictures of the original cars with 8-stacks and just decided I need to live out my childhood matchbox-car dream and just put an 8 stack on it. Speedmaster was the first I came across and was about to order one but they were all backordered everywhere. Turns out the company has redesigned them and upgrading them to a "fast" computer, and would be late 2022 before they estimated they'd be available (this was based on a phone call to the company)...also found out that support for that computer (either their old one or their new ones) is essentially nonexistent and if you have a problem tuning it, good luck...So did more research and found this thread: http://https://thefactoryfiveforum.com/showthread.php?43322-weber-carbs-or-EFI...PM'ed with Papa a bit and watched his video of a drive with a lot of low revs, as well as Bob (LateApex) and his looks gorgeous in his "go cart" video.
So I called Jim Inglese. Going with an 8 stack EFI system from him, more money but in this area I do believe you get what you pay for, and they look the part. He is building an 8 stack EFI with short horns for the coupe and a Holley Terminator X computer. I am also picking up the distributer, wires, replica vintage valve covers from him. He says the low rev performance with this setup is excellent. As for what else is needed - My engine is at an engine builder, I supplied the 302 block, rear sump champ pan, valve covers, and now EFI 8-stack intake and other bits he recommended that work well with the Holley Terminator (Jim estimated 6 weeks for the 8-stack as he builds them per order, not just sitting on a shelf). It will have a cage, forged internals, roller rockers, and AFR headers that I left up to the builder to source given the current parts shortages. Seems the cam shaft is the hard-to-source part at the moment and as soon as that is here he is going to start compression testing. I was worried that he would need the intake to dyno the engine, but he just uses a sniper to run the dyno, then when the 8 stack is here, switch out and tune. As for the front end I have no AC compressor from FFR so waiting on that which could show up today (box from FFR out for delivery today but hoping for CV axles) or in a year seeing some of the stories on here about missing parts and timing. So when the builder is close to ready I may just need to buy another compressor and have him build the front end....I'm just using compressor and alternator, as going to use electric steering.
-
Enjoying reading and learning from your build. Our builds have a lot in common. Keep up the good work!
Shakey
-
Post Thanks / Like - 1 Thanks, 1 Likes
-
Senior Member
Originally Posted by
Shakey
Enjoying reading and learning from your build. Our builds have a lot in common. Keep up the good work!
Thanks! You as well!
CV Axles arrived!!!…which means can get painting the suspension bits, knuckles and hubs. Axles came as bare steel….only thing that concerns me is no paperwork with them, no markings on the boxes and they are both exactly the same…worried I have 2 lefts or 2 rights and not one of each….we will see in the coming weeks! Also found 3 more panels in my cockpit bent wrong from FFR. I salvaged 2 as bend in right place but wrong direction, but the 3rd is a very long bend and my 6” HF brake is a boy on a man’s mission…but I will try as it’s the front center transmission tunnel cover and that re-bend won’t be seen if not pretty.
Otherwise not much progress to report, visitors in town…hoping I get some parts from one of the vendors here that I ordered from 7 months ago as well so I can get to fuel lines / gas tank / brakes as will be ready for them shortly now that I have all the parts from FFR to get all 4 corners together…
Build has been fun, but certainly has been frustrating as of late (“supply chain” issues, not the build), imagine that’s the nature of the beast. Patience grasshopper, plenty to work on!
Last edited by rhk118; 08-28-2022 at 08:50 PM.
-
Senior Member

Originally Posted by
rhk118
CV Axles arrived!!!… Axles came as bare steel….only thing that concerns me is no paperwork with them, no markings on the boxes and they are both exactly the same…worried I have 2 lefts or 2 rights and not one of each….we will see in the coming weeks...
Normal for the CV axles to be bare steel. You can paint them. Or spray clear on them. That's what I did. But they are definitely different. CV joint to CV joint they're the same. But the axle end stub on the left side is 1" longer than on the right side. Pictures and dimensions in your manual. Otherwise page 21 here https://www.factoryfive.com/wp-conte...2015-REV-D.pdf.
Build 1: Mk3 Roadster #5125. Sold 11/08/2014.
Build 2: Mk4 Roadster #7750. Sold 04/10/2017.
Build Thread
Build 3: Mk4 Roadster 20th Anniversary #8674. Sold 09/07/2020.
Build Thread and
Video.
Build 4: Gen 3 Type 65 Coupe #59. Gen 3 Coyote. Legal 03/04/2020.
Build Thread and
Video
Build 5: 35 Hot Rod Truck #138. LS3 and 4L65E auto. Rcvd 01/05/2021. Legal 04/20/2023.
Build Thread. Sold 11/9/2023.
-
Post Thanks / Like - 1 Thanks, 1 Likes
-
Senior Member
Thanks Paul, I remember reading the difference between left and right axles and read the thread ensuring they are "clicked in" just remember that they are different due to the diff...visually they look exactly the same....but you know what happens when Hank thinks ( )...and the wife keeps insisting on a glasses check...haha...will measure.
You used the same clear on the differential cover, that holding up well?
EDIT: I'm good, have a left and a right, the foam protector on the left was covering the stub so I was seeing the spline sections only on that end...
Last edited by rhk118; 08-29-2022 at 01:30 PM.
-
Hi Hank, It’s me again trying to take advantage of your research and get your insight. Last Sunday I drove down to San Fran and met Greg and Dave at the Lotus Club’s auto cross. It was awesome to meet them, see and hear there Daytonas in action, and most of all Dave took me for a ride in his. He has a 302 and it is plenty fast - it was a blast driving through the hills above the old Cow Palace and set off car alarms!
To the question part for you; Greg suggested a torsen diff, and a 3.73. Also, Dave has a fuel cell which appeals to me because the whole gas/fire thing scares me. I see you are getting a 3.55 diff and not from FFR? Did you consider a fuel cell? Interested in your and other’s input.
And I can say after riding in one of these I am so hooked. It was loud, raw, but what an experience. With that 302 with a carb the throttle response is crazy. I have a 500 hp C8 vette and it is not even close.
-
Post Thanks / Like - 0 Thanks, 1 Likes
-
Senior Member
Originally Posted by
jgray
Hi Hank, It’s me again trying to take advantage of your research and get your insight. Last Sunday I drove down to San Fran and met Greg and Dave at the Lotus Club’s auto cross. It was awesome to meet them, see and hear there Daytonas in action, and most of all Dave took me for a ride in his. He has a 302 and it is plenty fast - it was a blast driving through the hills above the old Cow Palace and set off car alarms!
To the question part for you; Greg suggested a torsen diff, and a 3.73. Also, Dave has a fuel cell which appeals to me because the whole gas/fire thing scares me. I see you are getting a 3.55 diff and not from FFR? Did you consider a fuel cell? Interested in your and other’s input.
And I can say after riding in one of these I am so hooked. It was loud, raw, but what an experience. With that 302 with a carb the throttle response is crazy. I have a 500 hp C8 vette and it is not even close.
Man I wish I could have been there with you guys (would have been a bit of a trip for me though worth it!)...
I went with the 3.55 and short ratio Tremec T-56 for the following 3 reasons:
1. Mike Forte suggested it
2. Gordon Levy suggested it
3. 3.55 is easily available, the 3.73 I'd have to find used somewhere.
I didn't go with the FFR 3.55 simply because I was able to bundle purchasing it, the transmission with cut-off Quicktime bell housing for the 302, and some suspension pieces from Mike Forte and picked them up at his shop. Saved a few bucks doing that, had a great time chatting with Mike and have used him for some more parts as well. I have no issues with the FFR 3.55 differential (likely the same exact thing as the Ford performance one he sold me). At the time I didn't want to do a search for a 3.73, or have concern that there was something wrong with it if salvaged from a crashed car.
However now compare the Torsen part of the 3.73 with a true mechanical system vs clutch plates in the 3.55. Torsen is better. How much better?  ...If someone with real world experience between the Torsen rear and the 3.55 clutch plate rear end can shed light on significant differences between the 2 on a road course track I'd appreciate your input because I truly don't know. There is also a kit to convert the 3.55 internals to a torsen setup so perhaps I'd consider that if it was significantly better, my diff isn't in the car yet so there is still time.
As for the ratios. I am not the kind of driver who enjoys breaking traction unless I am intending on doing so (EDIT: you can also substitute "sphincter tone" in there for the word traction... ") ) . Sure I can catch an oversteer, that isn’t this issue. It’s the 2nd and occasional 3rd rebound snaps that catches the most people out. 3.55 is taller than 3.73 so in each gear it will be a slightly faster top speed. That also means slightly less acceleration than the 3.73 and my thought with that perhaps slightly less likely to break traction inadvertently. I know the tire compound, temperature, surface, and *right foot* have way more to do with that than gearing, but this car is going to have plenty of power so I don’t suspect gearing will slow it down as much as breaking traction might.
) . Sure I can catch an oversteer, that isn’t this issue. It’s the 2nd and occasional 3rd rebound snaps that catches the most people out. 3.55 is taller than 3.73 so in each gear it will be a slightly faster top speed. That also means slightly less acceleration than the 3.73 and my thought with that perhaps slightly less likely to break traction inadvertently. I know the tire compound, temperature, surface, and *right foot* have way more to do with that than gearing, but this car is going to have plenty of power so I don’t suspect gearing will slow it down as much as breaking traction might.
Here are some calculated final drive speeds at 2500 RPM and 6000 RPM with the 3.55 and 3.73 diffs using the close gear ratio T-56 and a 26.5 inch tall tires (looked at Logans tire thread, 26.5 looks fairly common):
3.55 @ 2500 RPM

3.73 @ 2500 RPM

3.55 @ 6000 RPM
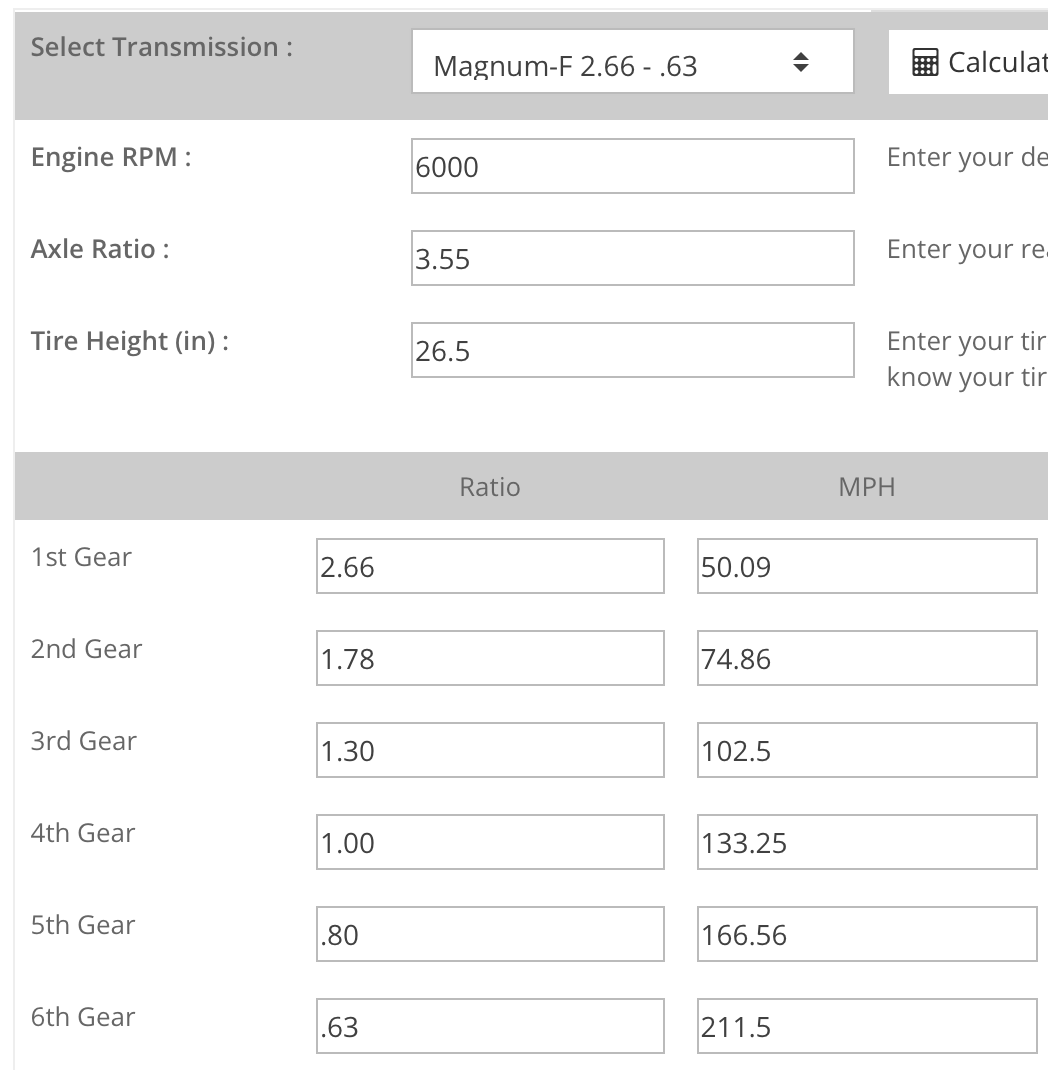
3.73 @ 6000 RPM
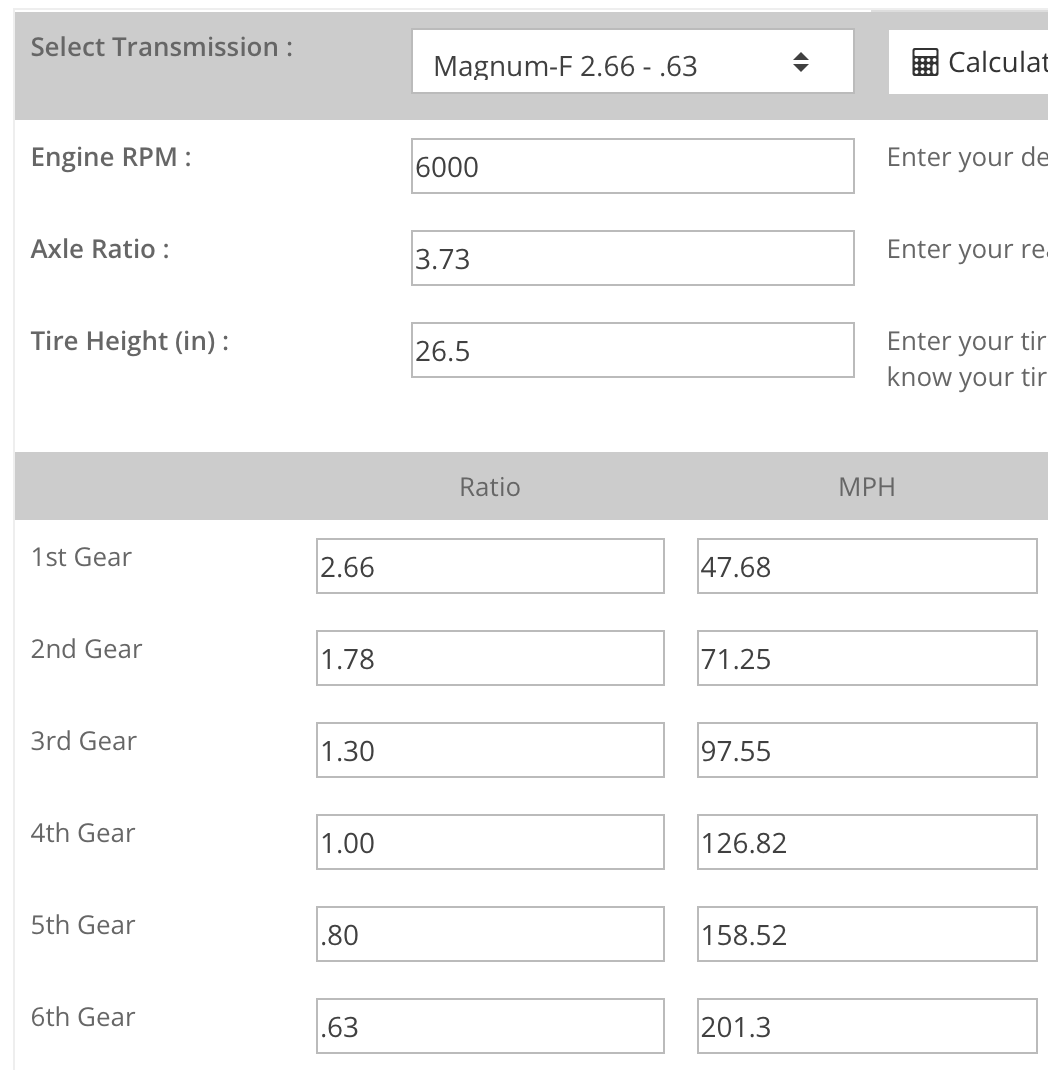
Based on this, fewer shifts here and there on a track with 3.55 vs 3.73. The 3.73 looks more fun for regular street driving though. Interesting thing is I plugged in 6000 RPM with a 3.55 and the tall geared T-56 and top speed in 6th comes out to 266 MPH!....I think the close ratio will work well.
Other thing to consider for traction is where is the engine’s “sweet spot” in its powerband? For me with a 3.55 diff looks like will need to be in the 2500 RPM range for “highway speeds”. For someone with a 3.73 looks like somewhere closer to 3000 RPM. Tuning the engine is obviously another component, I know with modern turbo engines you can trade off some high end power for much more usable mid-range power (did this with my M3 which I sold to fund the FFR Type 65). With a 347 and EFI I’m not sure how much of the power curve can be massaged….that may be more up to the cam you select. Hence an engine builder is doing this part for me (he has a specialized cam he’s waiting on for my engine).
When it comes down to it I have NO IDEA what I’m doing...just some knucklehead on the internet who worked in a bakery when in high school and college and is “talking a lot of Danish to the donut man” on here (as we used to say). Obviously I am getting a lot of help from a lot of different folks and posts and I’m trying to be thoughtful in my build of the engine and gears as well as the car…but in the end the overall performance might just come down to the tires on the thing…It seems that is the achilles heel with that bracket in the back preventing use of wider tires…and I want mine to have tall-ish sidewalls for the more vintage look (my goal is to stay as close to the original 6 as possible, trackable street car...but for the vintage look the tires and driving lights are tough finds)…so that will be an issue to tackle down the road. Thinking set of streets and a set for track.
Fuel cell: My understanding is if the tank is ½ full or more you don’t need to worry about fuel pickup on track. Fuel cell bladders need to be replaced every number of years. Not sure any are compatible with the stock filling system and therefore need to be filled from the trunk. After talking to some folks decided not to do it on mine, but I will have fire suppression in the cabin...but please anyone chime in here on anything I've said.
Last edited by rhk118; 09-04-2022 at 12:11 PM.
-
Post Thanks / Like - 1 Thanks, 0 Likes
 jgray
jgray thanked for this post
-
As I expected you are a fount of knowledge along with humility! You understate what you have learned and I appreciate all the feedback and data. Regarding the diff I think I am at the point of overthinking it and will get a 3.55.
I been reading up on engines and transmissions and feel pretty good there. A “hot” 302 with a T56 is where my head is at currently but that might change when I talk to my engine builder but I doubt it after that ride in Dave’s car
I’m probably going with a fuel cell because it will make me feel more comfortable which will lead to me having a lot more fun
I’ve been reading a bit on unsprung weight and rotational inertia so the next thing for me to geek out on is wheels, tires, and brakes. Brakes, I had convinced myself to get the strongest wilwoods but i’ll now look at the weight. Like you, I want to be thoughtful, but I will reach a point where I make a decision and move on. No doubt the biggest limiting factor when I go out on track will be the idiot behind the wheel. I do think I will be tracking it quite a bit; i initially just auto crosses but we have Thunderhill, Laguna Seca, and Sears Point all within a couple of hours or so. Fun!!
-
Post Thanks / Like - 1 Thanks, 1 Likes
-
Senior Member
Originally Posted by
jgray
As I expected you are a fount of knowledge along with humility! You understate what you have learned and I appreciate all the feedback and data. Regarding the diff I think I am at the point of overthinking it and will get a 3.55.
I been reading up on engines and transmissions and feel pretty good there. A “hot” 302 with a T56 is where my head is at currently but that might change when I talk to my engine builder but I doubt it after that ride in Dave’s car
Yes the overthinking part. You can spend a day researching nicopp versus stainless brake lines. Stainless looks cool but what if you develop a leak at a junction in a few years, what a pain....etc etc etc...I've also never built a car or used a lot of these tools like a cutting wheel shooting sparks 20 feet across the garage...so there is the decision making and just having to "cut bait" as it were and make a decision so you can focus on the build. I've made some decisions, now just have to not screw up the build as well....and the build is FUN! I'm having a blast. You won't know what its like to drive it until you've built it. Maybe then you will kick yourself and think you should have gotten the 3.73...etc. But hey - those are projects for another day to keep your right brain busy and satisfied...I think, like watching Greg's build on his youtube channel that this car will have "iterations" and not be built and done...pursuing your own perfection. Heck even the original 6 coupes were the same way.
Originally Posted by
jgray
I’m probably going with a fuel cell because it will make me feel more comfortable which will lead to me having a lot more fun
I had the same thought on the fuel cell. It will be in the back of my head. Fortunately this isn't an old 911 with the pendulum in the rear, but you can't stop what the other guy does, and if the swaybar/spring rates are wrong in the rear its going to destabilize things and snap around on you. Also something you won't know until you play with it a bit and feel how the weight shifts. The rear swaybar scares me a bit TBH...not sure a lot of research was done on this other than it "needs one," miata bar fits so put it on....I know it isn't the case but I'm going to ease into this car...not sure if there is a race shop nearby that can do dynamic corner weights and adjust the swaybar rates...
Originally Posted by
jgray
I’ve been reading a bit on unsprung weight and rotational inertia so the next thing for me to geek out on is wheels, tires, and brakes. Brakes, I had convinced myself to get the strongest wilwoods but i’ll now look at the weight. Like you, I want to be thoughtful, but I will reach a point where I make a decision and move on. No doubt the biggest limiting factor when I go out on track will be the idiot behind the wheel.
Brakes - bigger stronger more steel better. There is fixed unsprung mass and there is rotating unsprung mass, big brakes with heavy unsprung and sprung mass are good for track as you know, less fade. I haven't looked into ceramic options nor will I. Rubber weighs more than Rim. Wheel weight penalizes you r^2 and I've heard the analogy that 1# on the tire or rim is like adding 4# to the car. So it is important theoretically but it isn't *that* important. If you have a wheel/tire combo that's 45# per corner and you cut that down to 40# per corner you won't really feel it. If you cut it down to 35# per corner then you'll start to feel it. But for me I don't want to break traction and this car will be a bear to keep rung in (english?)...So here heavier wheels might actually help you...Lightweight car with lightweight wheels and lots of power = spinning wheels. Great if that's what you want.
I will get booed here but on the other end of the spectrum I think this car would be a total hoot with a 120 HP NA Miata engine, drive it 11/10ths....
Originally Posted by
jgray
I do think I will be tracking it quite a bit; i initially just auto crosses but we have Thunderhill, Laguna Seca, and Sears Point all within a couple of hours or so. Fun!!
There is no drool emoji here but just 
Last edited by rhk118; 09-04-2022 at 01:58 PM.
-
Senior Member
OK so I typed all that above and theres a thread 2 days ago on the topic, with another sub-thread...covers it pretty well. Going to use Skuzzy's tool to help with my tire size!
http://thefactoryfiveforum.com/showt...typical-builds
-

Following the build with intrest
great work so far pal
-
Post Thanks / Like - 1 Thanks, 0 Likes
-
Senior Member
Haven't made any progress in the past 2-3 weeks, work getting in the way of my new hobby 
-
-
Senior Member
Originally Posted by
LateApex
Great discussion!
OK I can add I mounted the upper radiator tunnel "extension" piece this weekend...I think I drilled 7 holes...gradual forward progress...
But have been doing a lot of research on fuel system and brake lines and all the extra little connectors and hangers / benders required. Bunch of little things ordered....but I'm always trying to think ahead and troubleshoot the build from the real tool in all of this (will let you all figure that out )...Fortunately I have someone building a coupe 4 miles from me and a Roadster 6.4 miles from me and has been tremendously helpful to see their builds and just talk. Its one thing to see the builds, its another to appreciate the thought and time it takes to get there.
-
Any progress is progress! Glad to hear you have local builders to huddle with - I am sure that really helps. I know there is someone around here building a roadster; I need to follow-up with the local FFR club.
Thanks for all the feedback - I am pretty much settled on the T56 close ratio and 3:55. My engine choice has evolved a little since the friend that was donating a 302 has another friend with a different 302 with a quad twin weber setup that he was going to put in to a De Tomaso - this certainly has my interest!
Also, with respect to unsprung weight your feedback was very helpful - I'm going to stop overthinking that topic and just by some "starter" wheels and tires that I like the look o which are not too expensive and see if I like them.
Your point about putting a Miata engine in was somewhat poignant to me; I had been thinking about how the Daytona basically weighs the same as a Miata yet we are thinking that 300hp is underpowered!
last week I was on vacation and I always wake up hours before my wife. So I decided I was going to read Paul's build thread from end-to-end; I'm a slow reader because I always ended up researching stuff. However, the outcome was me ordering a whole bunch of tools and some parts! I must have ordered most of the tools Paul describes including the three tube benders and Eastwood flaring tool. LOL - I now have a bunch of packages arriving and my wife is giving me the look.
My idea is to get used to using these tools by bending some stainless tubes and see if I can learn the double flare. Also I want to play around with riveting and threading into tubing and generally get a feel for the different steps along with testing some things.
I think I saw someone use the term they were "nesting" in their garage in some of the months while they were waiting - I was doing this on Sunday, pulling my garage apart and doing some dumpster runs trying to figure out where all the boxes and body will go. Decided to get rid of whole bunch of stuff I have accumulated in the last couple of years - I hate clutter and this is a good excuse to declutter.
I'll be interested to hear how your brake lines and fuel lines progress - I just got done watching Greg's videos on these two topics - the bending looks fairly involved.
Keep up the good work!
-
Post Thanks / Like - 0 Thanks, 1 Likes
-
Senior Member
Originally Posted by
jgray
Any progress is progress! Glad to hear you have local builders to huddle with - I am sure that really helps. I know there is someone around here building a roadster; I need to follow-up with the local FFR club.
Thanks for all the feedback - I am pretty much settled on the T56 close ratio and 3:55. My engine choice has evolved a little since the friend that was donating a 302 has another friend with a different 302 with a quad twin weber setup that he was going to put in to a De Tomaso - this certainly has my interest!
Also, with respect to unsprung weight your feedback was very helpful - I'm going to stop overthinking that topic and just by some "starter" wheels and tires that I like the look o which are not too expensive and see if I like them.
Your point about putting a Miata engine in was somewhat poignant to me; I had been thinking about how the Daytona basically weighs the same as a Miata yet we are thinking that 300hp is underpowered!
last week I was on vacation and I always wake up hours before my wife. So I decided I was going to read Paul's build thread from end-to-end; I'm a slow reader because I always ended up researching stuff. However, the outcome was me ordering a whole bunch of tools and some parts! I must have ordered most of the tools Paul describes including the three tube benders and Eastwood flaring tool. LOL - I now have a bunch of packages arriving and my wife is giving me the look.
My idea is to get used to using these tools by bending some stainless tubes and see if I can learn the double flare. Also I want to play around with riveting and threading into tubing and generally get a feel for the different steps along with testing some things.
I think I saw someone use the term they were "nesting" in their garage in some of the months while they were waiting - I was doing this on Sunday, pulling my garage apart and doing some dumpster runs trying to figure out where all the boxes and body will go. Decided to get rid of whole bunch of stuff I have accumulated in the last couple of years - I hate clutter and this is a good excuse to declutter.
I'll be interested to hear how your brake lines and fuel lines progress - I just got done watching Greg's videos on these two topics - the bending looks fairly involved.
Keep up the good work!
Engine sounds fantastic! Yes I did the same with Paul's build. I tried to find that little 3/16 bender he mentions and it is normally around $40 but isn't available anywhere that I can find except from some gouger on Amazon selling them for $140! So didn't get that one. If you have a source for it let me know.
I have packages arriving 1-2 times a week and am still "nesting." Work and life is busy this month so not much work on the car but do have time here and there to think further down the line and order things I pushed off like the driving lights and rear lights I'm going to use. EPAS Performance electric steering just came this weekend, so will need to mock that up before the drivers footbox gets to busy. Got a bunch of things from Levy Racing as well that I'm quite happy with and still need to paint some parts...Tons to do, little or no time at the moment!
-
Senior Member

A note on the fuel cell, you can get remote fill, may take some figuring but should be able to route the hose to the normal fill location, most have a flapper on the fill inlet for rollover protection. Also they should be good for 10 years. I just recently pulled one that was 20 years old and still fully functional. Funny about the Miata, I tried to explain to my dad a Cobra was about the same footprint and weight of my Miata and I wanted to put in a 427. He already thought the 180 hp was pretty spirited.
-
Post Thanks / Like - 0 Thanks, 1 Likes
-
Senior Member
Originally Posted by
F500guy
A note on the fuel cell, you can get remote fill, may take some figuring but should be able to route the hose to the normal fill location, most have a flapper on the fill inlet for rollover protection. Also they should be good for 10 years. I just recently pulled one that was 20 years old and still fully functional. Funny about the Miata, I tried to explain to my dad a Cobra was about the same footprint and weight of my Miata and I wanted to put in a 427. He already thought the 180 hp was pretty spirited.
Thank you for that input...the threads I looked at early on all converted to an in-trunk fill which I wasn't interested in...something else to look into, although I suspect wouldn't work with the trunk storage box I'm planning on using...however, nothing welded or riveted to the thing yet.
-
Originally Posted by
rhk118
Engine sounds fantastic! Yes I did the same with Paul's build. I tried to find that little 3/16 bender he mentions and it is normally around $40 but isn't available anywhere that I can find except from some gouger on Amazon selling them for $140! So didn't get that one. If you have a source for it let me know.
I have packages arriving 1-2 times a week and am still "nesting." Work and life is busy this month so not much work on the car but do have time here and there to think further down the line and order things I pushed off like the driving lights and rear lights I'm going to use. EPAS Performance electric steering just came this weekend, so will need to mock that up before the drivers footbox gets to busy. Got a bunch of things from Levy Racing as well that I'm quite happy with and still need to paint some parts...Tons to do, little or no time at the moment!
I bought the small 3/16 bender from Inline tube for $39. It was delivered over the weekend. Here is the URL: https://www.inlinetube.com/products/tlb00
I have been looking in detail at powered steering - watched a great youtube where a guy literally tore and cut apart an old unit - it really helped me understand the inner workings. I am concerned because I was down in San Francisco at the autocross where Greg's (rsnake) powersteering failed. I think he has a separate post going on this topic. From what I heard fluid leaked out into the rubber covers that go over the end of the rack. A friend of mine has electric power steering on his 64 Vette and is waiting to get it for a 69 Mustang. So that brings me to my next question (since I know you have deeply researched everything you are doing!) - why are you going with electric and why EPAS?
-
Post Thanks / Like - 0 Thanks, 1 Likes
-
Senior Member
Originally Posted by
jgray
I bought the small 3/16 bender from Inline tube for $39. It was delivered over the weekend. Here is the URL:
https://www.inlinetube.com/products/tlb00
I have been looking in detail at powered steering - watched a great youtube where a guy literally tore and cut apart an old unit - it really helped me understand the inner workings. I am concerned because I was down in San Francisco at the autocross where Greg's (rsnake) powersteering failed. I think he has a separate post going on this topic. From what I heard fluid leaked out into the rubber covers that go over the end of the rack. A friend of mine has electric power steering on his 64 Vette and is waiting to get it for a 69 Mustang. So that brings me to my next question (since I know you have deeply researched everything you are doing!) - why are you going with electric and why EPAS?
Intersting, that bender was backordered on InLine Tube as of this weekend...will grab one now.
EPAS simply because the car likely doesn't need a lot of assist and you can literally turn up or down the assist with a rheostat with the electric. Read a lot of posts where folks felt that even with the "lowest setting" or most restrictive valve, or even with a racing power steering unit there was still too much assist. I like my steering stiff. However I have a side by side that I tear around it and plow my driveway with and it doesn't have power steering. Its fine when going but with a lot of tight maneuvering I get tendonitis in my forearm which takes 5 weeks to calm down if I flare it up. So I don't want just a manual rack in this, but I really don't want the steering assist in this to be like a toyota camry and be too easy either - I'd rather no assist than too easy if that makes sense, personal preference...less assist I find easier to drive quickly as well, faster = less driver input needed and less likely to be turning the wheel too much when you get on washboarded sections or bumps...I addition I don't have to worry about the steering pump, lines and rack down the road.
-
Originally Posted by
rhk118
Intersting, that bender was backordered on InLine Tube as of this weekend...will grab one now.
EPAS simply because the car likely doesn't need a lot of assist and you can literally turn up or down the assist with a rheostat with the electric. Read a lot of posts where folks felt that even with the "lowest setting" or most restrictive valve, or even with a racing power steering unit there was still too much assist. I like my steering stiff. However I have a side by side that I tear around it and plow my driveway with and it doesn't have power steering. Its fine when going but with a lot of tight maneuvering I get tendonitis in my forearm which takes 5 weeks to calm down if I flare it up. So I don't want just a manual rack in this, but I really don't want the steering assist in this to be like a toyota camry and be too easy either - I'd rather no assist than too easy if that makes sense, personal preference...less assist I find easier to drive quickly as well, faster = less driver input needed and less likely to be turning the wheel too much when you get on washboarded sections or bumps...I addition I don't have to worry about the steering pump, lines and rack down the road.
I too like the steering stiff rather than light - the issue I have with various friends' muscle cars is the lightness/lack-of-feel in the steering combined with being overpowered and having unrefined suspension. When I rode in Dave's Daytona down in San Francisco it felt very assured in cornering - it "hunkered" down which is similar to the feeling I get in the C8 which inspires a lot of confidence. So next thing for me to research is electric power assist. And I agree, not having to deal with all that plumbing will be a good thing.
I am also thinking of not putting in windshield wipers and just using RainX - after all it hardly ever rains out here in California and a car with this much power in the wet with no traction control will be a little intimidating - but I certainly will be taking it somewhere that I can slide around and see how it handles, which is why I will put less expensive tires on initially.
-
Post Thanks / Like - 0 Thanks, 1 Likes
-
Senior Member
Lots going on, not much physical progress on the build, but a lot of mental progress…if that’s a thing.
I finished the door for the trunk box, and got hardware installed on the removable panels over the foot boxes using Paul’s build as the template for both. Happy with each of these, thank you Paul for your example and your help here. Outside of the door will be carpeted, compartment-side of the door will have some sound proofing.

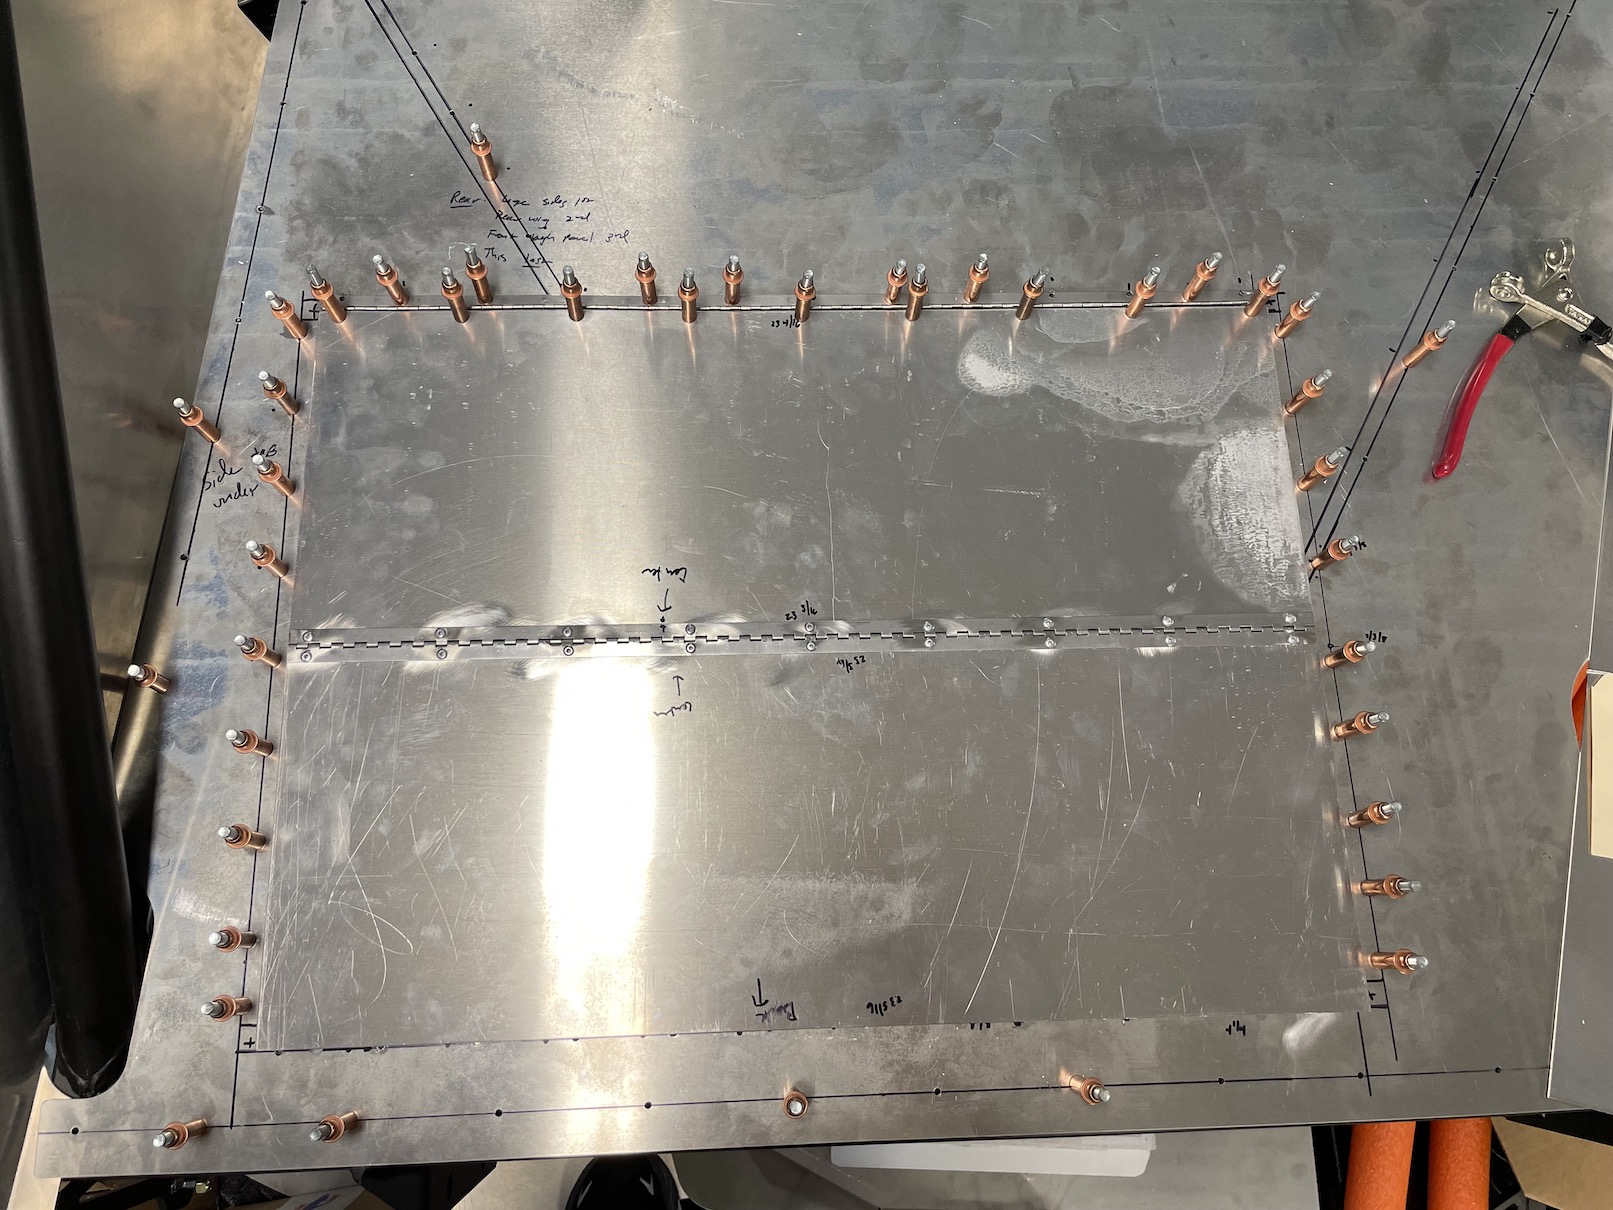
Cleco Toxicity:
And Paul was correct, I used the cutout portion of the trunk floor for the floor of my storage box which includes the access panel to the fuel tank and it isn’t centered enough over the fuel sending unit to really be able to troubleshoot anything other than connect and disconnect the harness. Any issues with the tank, easiest to drop the tank with any issues down the road.
-
Senior Member
It was a GREAT weekend. Received a box from FFR on Friday with A LOT off parts…I sincerely hope their new software system makes a huge difference for all, as they are some incredibly hard working and busy people at FFR. I received just about all the parts on my POL except for pressed mesh (won’t need that for quite a while), some weatherstrip of some sort, and the 14 flanged distorted locknuts that I need to put in the rear diff and complete the IRS (will need those soon).

Saturday I received my front and rear brakes (Wilwood 6 pot front, 4 pot rears), brake bias adjuster, and electronic parking brake from Levy Racing. I also received my fuel pump, vent and upgraded fuel tank gaskets/vent from LR as well the prior week. So with the arrival of my fuel tank cover from FFR Friday I was able to install the fuel tank. The only annoyance was the tank straps from FFR didn’t seem to be bent enough (and I had long on the right, and short on the left per the manual) and the powder coating on them cracked and is flaking off where I had to adjust bends to get them to fit. The mock up leaves me with some questions (mostly around the fuel filler pipe brace/holder), but they don’t need answers yet.
Cracked and flaking off powder coat, both of the straps, it seems they don’t even fit the tank at all, lots of gap. Don’t know if this can be re-powder coated (suspect not easily) or just scuff it all up and re-paint.
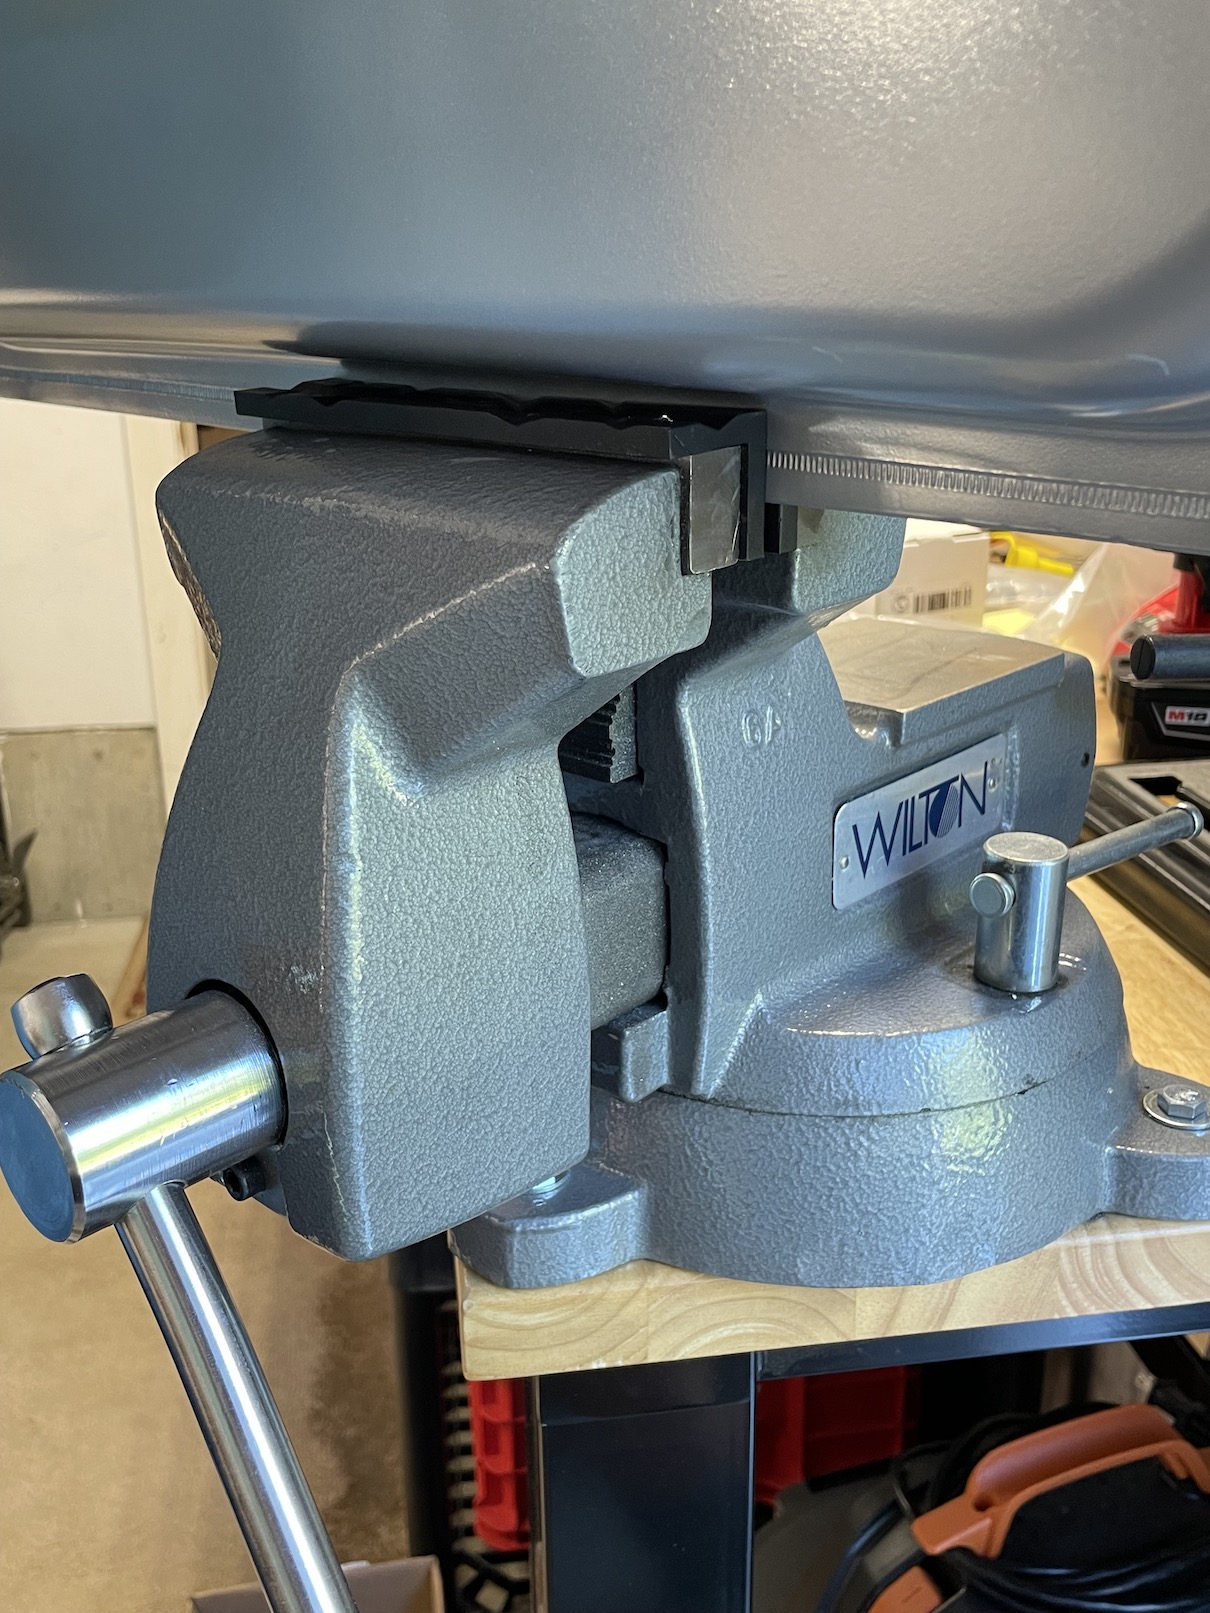
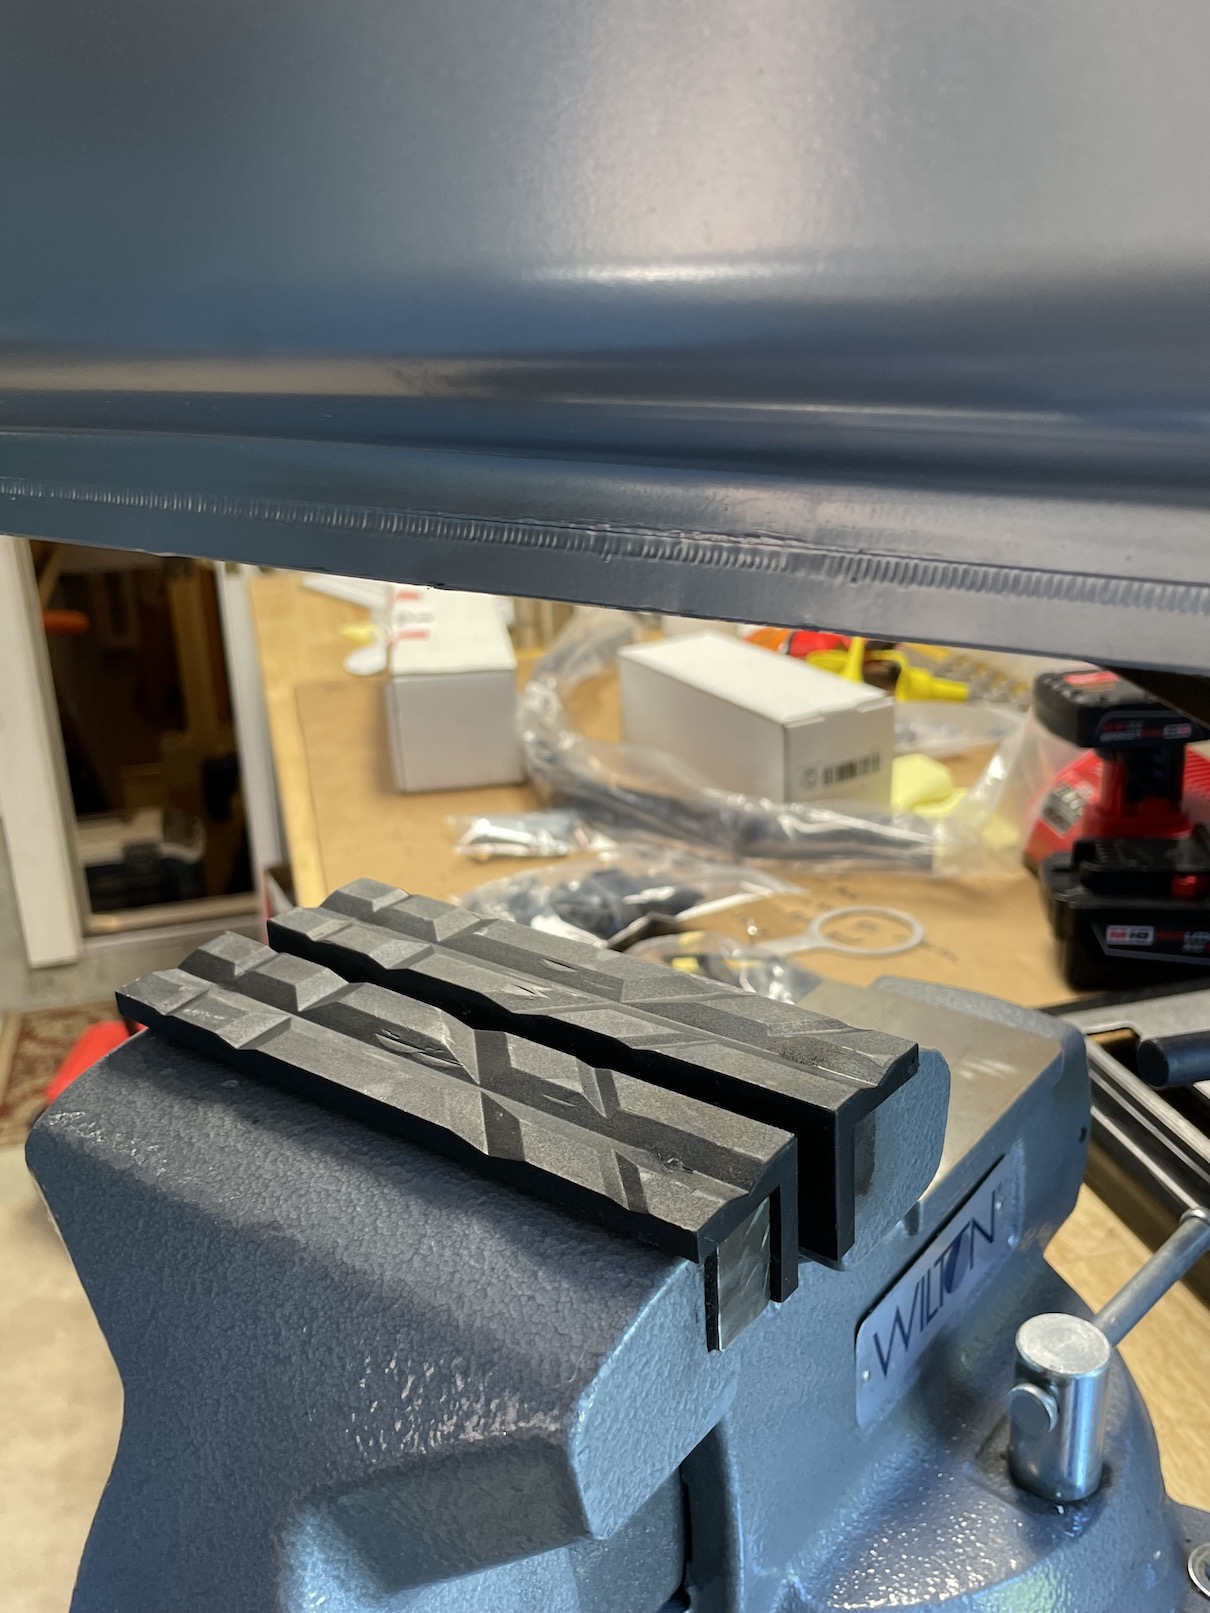
Flattening the tabs on the tank…I have nylon inserts for my vise so put them on and used the vise to press out the 3 tabs on the tank and flatten them. Much easier than I thought this task would be, worked well.
Aeromotive 340 l/hr pump. Has female -6 AN connections and is all ready to drop in the tank out of the box. The wiring harness is big and was a bit of a pain, but it is in.

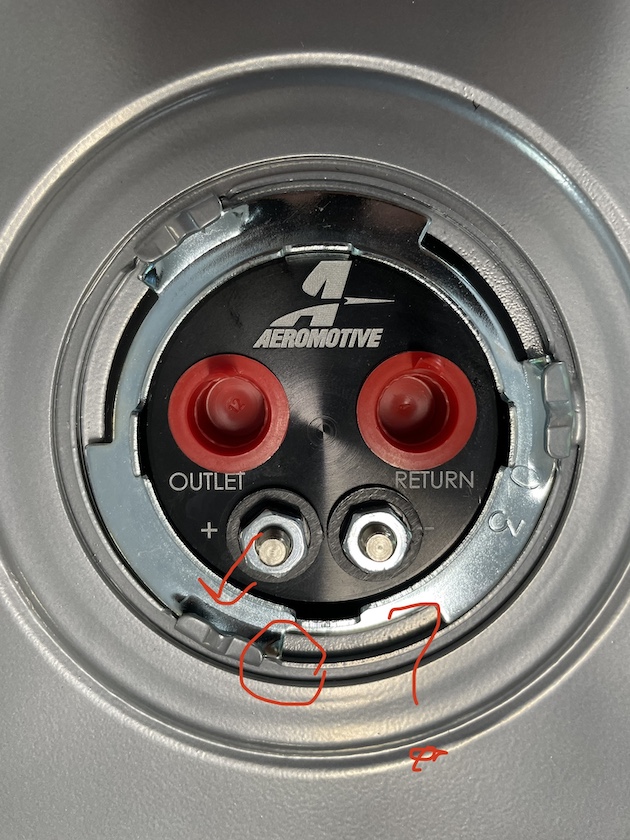
Question – Does the locking ring just need to go to where it is sitting, or does it tap it in so the end of the lip that sticks up (circled) goes under the mounting tabs center (arrow)???
Now that I have just about all my parts (no engine for a while though) I spent today performing a thorough “second inventory.” Put all the POL items I’ve received into their respective boxes and removed the things I know I will not be using into their own pile and was able to empty 6 boxes. Labeled everything very clearly on my inventory sheets so there is no question where things are. Ready to go. Well except 3/8” annealed stainless tubing is near impossible to find in lengths greater than 3 feet….haha!
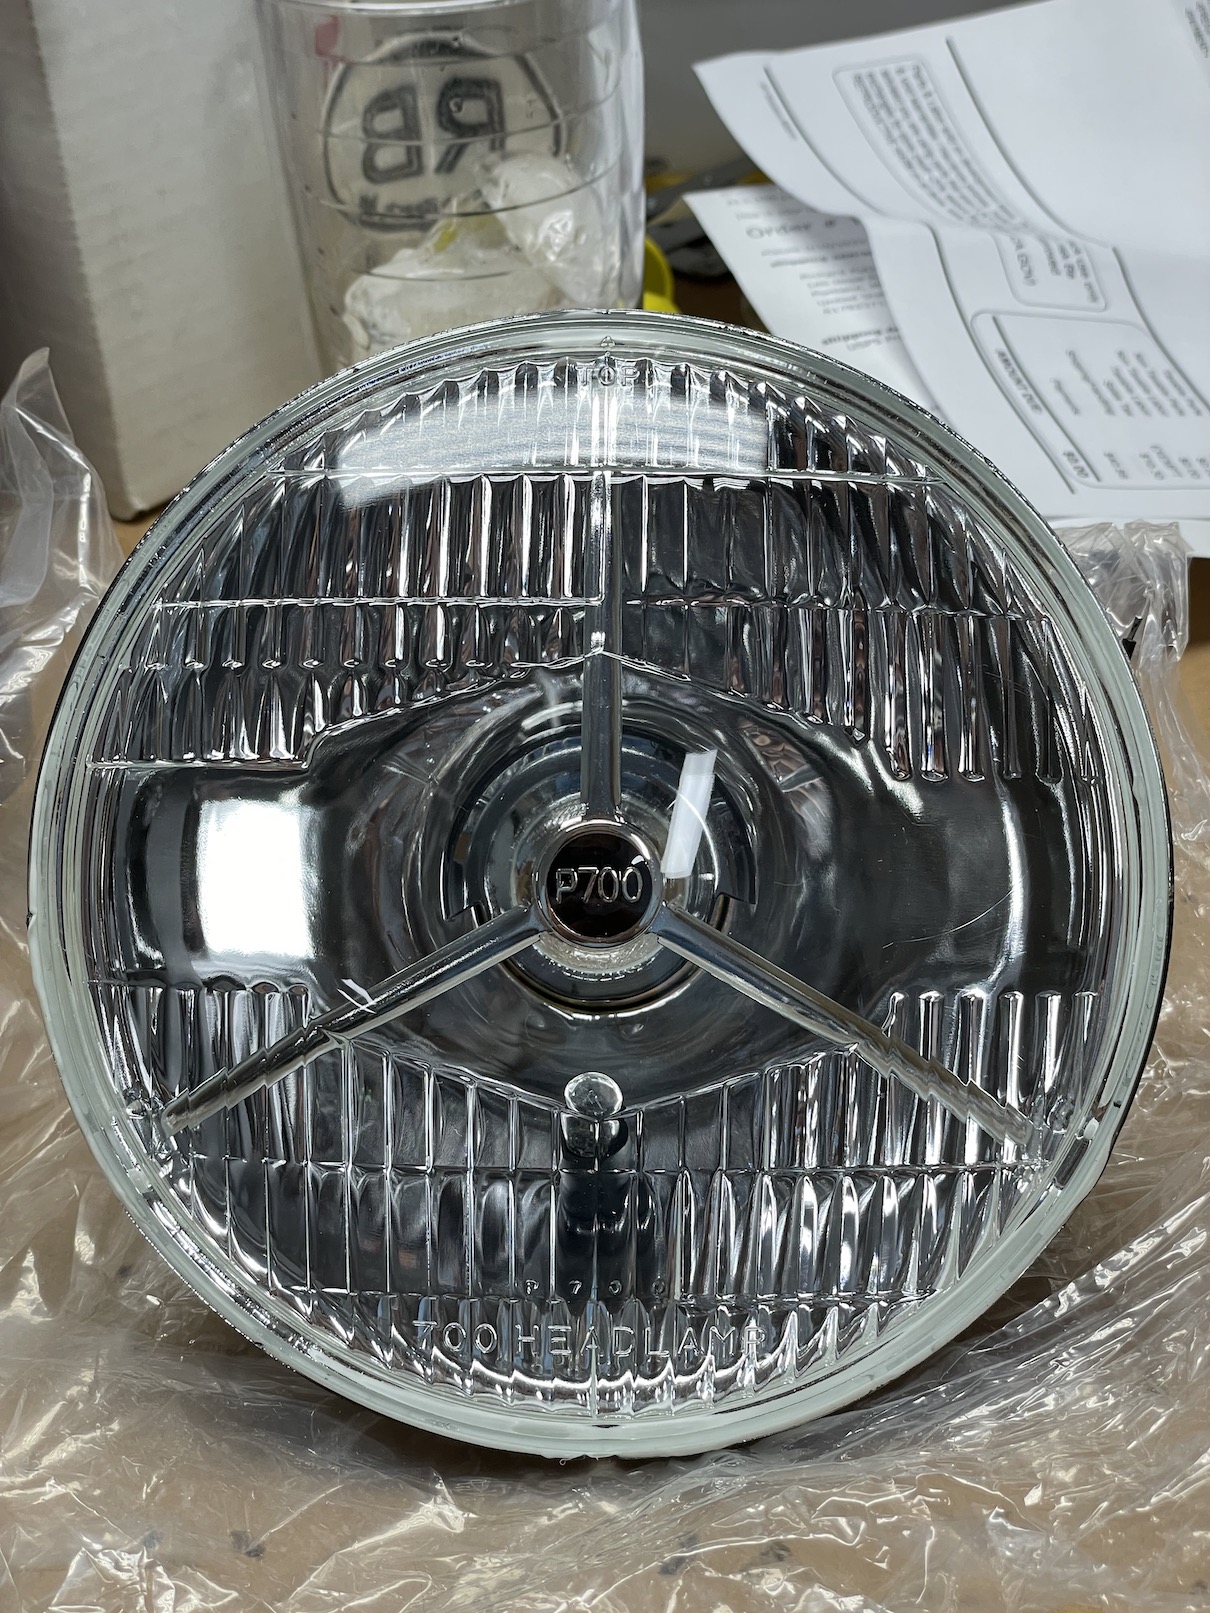
On a final note, these gems showed up on my stoop as well over the weekend and I am thrilled with them. I realize they are an acquired taste and not for everybody, but they are a very clean replica of Lucas tri-bar 7 inch headlights. Have seen some pictures of the original Daytona Coupes racing with tri-bar lights and personally I like the look. The H4 LED bulbs I have fit them. Only hitch is there is a pilot light in them and will either use it as a switchable “daytime running light” or put in an orange bulb and use it with blinkers. Very happy with these.
-
Senior Member
Nice progress. Looks like you have the fuel tank retainer ring installed properly. Those tabs fit against the stops pictured. There should be a dimple underneath those raised areas that also locks it into place. Those tank straps are strange. I've never received any with that much coating. Whatever it is. Not surprised it cracked. You want that steel material protected. No place for rust. Had a buddy lose a strap on a tank and it was a close call. Personally, I'd replace them. Not expensive and widely available. Like these https://www.amazon.com/Dorman-578-06.../dp/B0049DR5PC.
Build 1: Mk3 Roadster #5125. Sold 11/08/2014.
Build 2: Mk4 Roadster #7750. Sold 04/10/2017.
Build Thread
Build 3: Mk4 Roadster 20th Anniversary #8674. Sold 09/07/2020.
Build Thread and
Video.
Build 4: Gen 3 Type 65 Coupe #59. Gen 3 Coyote. Legal 03/04/2020.
Build Thread and
Video
Build 5: 35 Hot Rod Truck #138. LS3 and 4L65E auto. Rcvd 01/05/2021. Legal 04/20/2023.
Build Thread. Sold 11/9/2023.
-
Post Thanks / Like - 1 Thanks, 0 Likes
-
Nice progress Hank - great looking headlights - where di you get them feom?
-
Post Thanks / Like - 1 Thanks, 0 Likes
-
Senior Member
Originally Posted by
edwardb
Paul - thanks for that link, was thinking these were a specific FFR part, glad that is not the case. Replacement cost definitely worth it over all the work it would take to repaint these.
Originally Posted by
jgray
Nice progress Hank - great looking headlights - where di you get them feom?
Thanks jgray. I found them at the link below, but if you search for P700 you will find them everywhere with prices all over the map. Careful that they come in sets for Right- and Left-hand drive (you want left hand drive, seems simple until you read where left hand drive sometimes means you drive on the left hand side of the road which is usually a right hand drive car  . Reminds me of the quote: "Dyslexics of the world...UNTIE!" haha). It is an interesting site to go thorough as well as they have new in box old stock parts, and just neat to see it all - I love that stuff. I like the look of these as the 60's Jaguars used them and the front of the coupe has that similar gorgeous long hood, plus these were used in Europe and I suspect when the team needed to replace some headlights in Europe these were everywhere there so there are some pictures of the original 6 with tri-bar lights, just an interesting to look at detail for those that notice...OK enough waxing philosophical...
https://jollyrogersmotors.com/store/...-Pair-New.html
Last edited by rhk118; 09-19-2022 at 08:49 AM.
-
Hank, When you get to the brake bias adjuster please post a lot of pictures. I can not for the life of me figure out how that is installed in the coupe. It has stumped a couple of others also. Good luck and I hope you figure it out.
-
Senior Member
Originally Posted by
Namrups
Hank, When you get to the brake bias adjuster please post a lot of pictures. I can not for the life of me figure out how that is installed in the coupe. It has stumped a couple of others also. Good luck and I hope you figure it out.
Will do Scott. Was given a couple hints that I haven't investigated yet including a right angle adapter for the balance adjuster cable allowing it to connect to the engine side of the balance bar. Thats all I know for now!
In the meantime was able to get my front transmission tunnel bent in the proper direction and suspension bits hanging for paint.
-
Senior Member

The bias adjuster will attach to the right side of the pedal assy and come out the side of the foot box. You can turn it and mount it somewhere on the forward tunnel above the trans tunnel and below the dash. Make sure you have a smooth curve in the cable and it can be shortened to whatever length you need for proper fit.
99/2000 NASA PSO Champion-2005 west coast FFR challenge series Champions
Sponsor Tony B's 2007 ST2 National Championship
2009 NASA TTC runner up-2010 NASA TTB runner up
-
Post Thanks / Like - 1 Thanks, 1 Likes
-
Senior Member
Originally Posted by
Gordon Levy
The bias adjuster will attach to the right side of the pedal assy and come out the side of the foot box. You can turn it and mount it somewhere on the forward tunnel above the trans tunnel and below the dash. Make sure you have a smooth curve in the cable and it can be shortened to whatever length you need for proper fit.
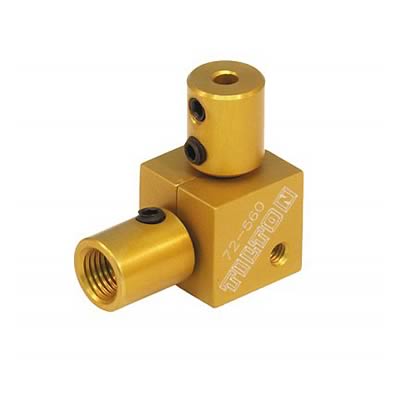
Thanks Gordon. Have you ever seen someone use one of these? Not cheap but found a nearby coupe builder and he mounted one of these between the brake and clutch pedals and it works on the left hand side (facing forward) of the balance bar. It does limit him going to 100% full rear bias (it crashes into the clutch pedal at extreme rear bias), but presumably one would never need that. Allows the knob to be mounted on the left side of the dash. Appreciate your thoughts on it (will be calling at some point anyway with some questions but want to get suspension and brakes hung first).
https://www.summitracing.com/parts/til-72-560
Here is the mounting location (he's fitting his doors, fiberglass dust all over):

-
Check out this thread. It's a roadster, but pretty much the same thing applies. He's using a 90 degree adapter like the one shown. Posts #442 and #444.
https://thefactoryfiveforum.com/showthread.php?36627-460-465USMC-s-MK4-Build-9890-Four-Wheel-Alignment/page12#post500196
FFR MKIV 8309, FMS 306 Crate w/Edelbrock EFI, T5, 3.55 Three Link, Wilwood Brakes
-
Post Thanks / Like - 0 Thanks, 1 Likes
-
Originally Posted by
rhk118
Will do Scott. Was given a couple hints that I haven't investigated yet including a right angle adapter for the balance adjuster cable allowing it to connect to the engine side of the balance bar. Thats all I know for now!
In the meantime was able to get my front transmission tunnel bent in the proper direction and suspension bits hanging for paint.
I did spend the money for the 90* adapter. As in the other post the adapter will hit the clutch if put on the DS and there is a steel brace that would have to be modified on the PS to use it. BYW the cable is to big to fit into the adapter and will have to be ground down a little. I think the brace will also have to be altered some if you used the cable on the PS without the adapter. Still looking into it.
-
Senior Member
Originally Posted by
Namrups
I did spend the money for the 90* adapter. As in the other post the adapter will hit the clutch if put on the DS and there is a steel brace that would have to be modified on the PS to use it. BYW the cable is to big to fit into the adapter and will have to be ground down a little. I think the brace will also have to be altered some if you used the cable on the PS without the adapter. Still looking into it.
Yes, looking at the car there is a brace there on the PS but it might not get in the way once the cable is attached to the bar, worst case is a little will need to be ground away/trimmed to fit it. Gordon's location certainly is the most direct. Looks like in the link Chopper sent above he was able to get that 90 degree adapter fitted no problem. Ordered one and will play around with it. Also considering using that lock nut to prevent myself from overly rear-biasing the brakes with the knob....one more thing to put on the "list" of preferences
-
For what it's worth, I mounted the adjuster in the same location (roughly) as the photo above on my coupe. I did not use a 90-degree adapter, just a straight section of the provided cable. A zip tie (or wiring loom bracket) can be used to lift the cable just a smidgen, and it clears the clutch arm quite nicely. Note I have arranged my brake master cylinders such that the front brakes are served by the DS master cylinder and the rear by the PS master cylinder - this was done in part for more straight forward brake line routing to front and rear brakes from the cylinders (at least in the plan I implemented). I have also offset the master cylinder to clevis adjustment such that the balance bar is cocked, similar to the Wilwood balance bar lever adjustment illustration, where the front brakes have a longer "throw" (if you will). This also creates some additional clearance between cable and clutch.
Hope this helps.
Note my footbox is buttoned up at the moment - I can remove the top and provide a photo if that would be useful
-
Post Thanks / Like - 1 Thanks, 0 Likes
-
Senior Member
Bob, If you have to go in there for any reason yes a photo would help me, but don't go taking it apart for just that picture. I looked at the brake bias adjuster a little bit the other night but need to study it more. My plan is to obviously have more front bias than the rear, and am planning on putting a lock nut along the bar so I can't accidentally give myself more than 50% rear brake bias if that makes sense. Have to in my own mind do the mental gymnastics of bar angle and how much extra or less force it applied to the particular master cylinder so I don't do this backwards accidentally!
Question from your description - did you run a single brake reservoir with a "Y-" adapter to the 2 masters or did you use 2 separate reservoirs? So your brake line comes out of master cylinder, likely down inside of DS of transmission tunnel then out back?
Second Question - With the bar "bias" you built in to the install so the adjuster cable doesn't mess with the clutch pedal top, are your pedals even? I need to have my brake and clutch pedals level with each other just out of preference...
I imagine all these revelations will happen for me as I build regardless haha!
Last edited by rhk118; 09-22-2022 at 11:22 AM.
-
Here you go:
The first image shows 8-32 rivnuts for the foot box top, and the location of my reservoirs. I can lower the reservoirs to top them off as needed, and I can lift them up for good gravity feed. There are two reservoirs, the leftmost being for brakes and the right most for the clutch. You can also see the "Y" connection for sharing the brake reservoir.
IMG_1688.JPG
This next image looks straight down on the balance bar. You can see about 1/4" more reservoir shaft on the left most (front) master cylinder and the cocking of the bar - this is with no pressure applied. At the bottom of the photo, one can also see the coupler for the adjuster cable.
IMG_1690.JPG
This photo is perhaps a better shot, as you can see how the cable is slightly above the clutch pedal clevis. I route the cable to the outside square upper frame and loosely tie it to my front electrical harness loom.
IMG_1691.JPG
Last, an interior shot of the foot box. You can see that my clutch pedal is maybe 1/4" - 3/8" proud of my brake pedal. It is even with my dead pedal. There is more clutch travel than brake travel, I use the right foot for braking and the brake pedal is aligned with the accelerator pedal for heel to toe. All of this can be adjusted as I get this baby on the road and rack up a few miles. Note also that driver's seating position is a little leftward (must be waiting for that next turn at Daytona ...)
IMG_1693.JPG
Hope this helps !
-
Post Thanks / Like - 1 Thanks, 1 Likes
-
Senior Member
Originally Posted by
LateApex
Here you go:
The first image shows 8-32 rivnuts for the foot box top, and the location of my reservoirs. I can lower the reservoirs to top them off as needed, and I can lift them up for good gravity feed. There are two reservoirs, the leftmost being for brakes and the right most for the clutch. You can also see the "Y" connection for sharing the brake reservoir.
IMG_1688.JPG
This next image looks straight down on the balance bar. You can see about 1/4" more reservoir shaft on the left most (front) master cylinder and the cocking of the bar - this is with no pressure applied. At the bottom of the photo, one can also see the coupler for the adjuster cable.
IMG_1690.JPG
This photo is perhaps a better shot, as you can see how the cable is slightly above the clutch pedal clevis. I route the cable to the outside square upper frame and loosely tie it to my front electrical harness loom.
IMG_1691.JPG
Last, an interior shot of the foot box. You can see that my clutch pedal is maybe 1/4" - 3/8" proud of my brake pedal. It is even with my dead pedal. There is more clutch travel than brake travel, I use the right foot for braking and the brake pedal is aligned with the accelerator pedal for heel to toe. All of this can be adjusted as I get this baby on the road and rack up a few miles. Note also that driver's seating position is a little leftward (must be waiting for that next turn at Daytona ...)
IMG_1693.JPG
Hope this helps !
INCREDIBLY helpful Bob. Looks like a great install, thanks so much!....would love to see an overview shot of your engine compartment as well with front of engine and how you laid things out (OK so mostly want to see that 8-stack )....
Question about the balance bar and your driver-most side master cylinder - you still have the set screw and lock nut installed on the pushrod mount...I assume you loosened that so that the brake bias adjuster will actually turn the balance bar? I had read instructions to remove that set screw and locknut completely when using the bias adjuster....And I like that position for mounting the bias adjuster knob, out of the way but easy to get to.
Also your dead pedal - Russ Thompson? What did you secure it to? Looks nice. I learn so much looking at others' builds...
Last edited by rhk118; 09-22-2022 at 04:49 PM.
-
I still have the set screw and lock nut in place, but not securing the balance bar. I saw no reason to remove those completely - it is a good a place to store those bits as any box of parts on my shelves :-) To be honest, I deferred my decision on the balance bar adjuster purchase to some point mid-build when I was waiting for kit parts to arrive to make forward progress. Such is the peril of delayed part delivery !
Dead pedal was from Mark Reynolds (Breeze). It secures quite well to the frame upright just left of the clutch pedal, and offers good adjust-ability. I have it snugged left to that foot box sidewall, as there is precious little foot space in the foot box :-). To that point, I have a pair of LEMS, which is a flat bottom narrow set of gym shoes for driving. 1/10th the cost of some Ferrari shoe, and much smaller than a pair of hiking boots - Haha. Half serious actually: When one gets in the coupe for their first go-kart, they will be fishing around for the pedals with their feet, or at least for the correct pedal :-) Spacing of the pedals is something to consider carefully IMO.
On my kit accelerator pedal, I actually turned the whole thing around, bent the down-stay appropriately, and sent the cable through the frame upright on the right side of the foot box. That was a little puzzle to solve. I like puzzles, as I suppose we all do :-) Seriously tho, routing the accelerator cable is not that trivial: there is a steering column in the mix, and one is trying to keep all the bends between pedal and induction to the largest radius possible :-)
The adjuster knob, unless you are wearing out tires on the track in a matter of hours, is something one rarely needs to tweak. Think about it. You buy a high performance sedan or coupe from a factory, where is the brake bias adjustment knob? The brake balance is all designed in, considering brake rotor sizes, vehicle weight balance, yadda, yadda. Unless one is pushing this vehicle hard at the track, the bias is set and forget methinks. I guess this explains my earlier comment about deferring the adjuster purchase until I was bored ... :-)
'Nuff for now ...
-
Post Thanks / Like - 1 Thanks, 0 Likes
-
post #9 in this thread may also be helpful:
https://thefactoryfiveforum.com/show...in-Gen-3-Coupe
I tweak brake bias quite a bit- at the track- especially under trail-braking (braking around to the corner apex before rolling on the throttle) if the back end starts to come around too much- you want it to come around somewhat - sort of the complement to oversteer under throttle. Also good to be able to adjust at autocross events where the pads/tires are not fully heated- or if you are playing around with brake pad choices.
Dave
Gen III #17
-
Post Thanks / Like - 1 Thanks, 1 Likes


 Thanks:
  Likes:


 Reply With Quote

