Well, spent the big money today, to late to turn back at this point! Not sure how well I will keep up with a build thread, but should have some info to add to the group knowledge as the process goes on. Kit is scheduled to be completed first week June. Below is my ordered/purchased parts, thanks to all that helped me spend my money, when the wife kicks me out I will be calling for a couch to sleep on Hope to be able to track the car when done, may have to ditch the Miata....
Breeze Parts
Radiator Shroud
Radiator Cowl
Battery Box
Oil Cooler Kit
Grill Set (brakes, oil cooler, rad grill) -Plan on Black Powder coat
Gas Pedal
Lower Rad Support
Lower Cooling Tube Support
Lower Radiator Tube
Wilwood balance adjust
Forte Parts
Throttle linkage
Cobra seat heaters (2)
F5 options
Leather/diamond stich seat and door panel
Wilwood brake set up
IRS Set up
Chrome Headers and side pipe
Dual chrome roll bars
Vintage gauges
Powder coated frame
18 Inch Halibrands- (will figure out tires later)
Carbon Fiber Dash (A variation of the 427 Comp lay out)
Leather steering wheel
Wipers
Sun Visors
Wind Wing
Sway bars front/rear
Assembled side louvers
Bumpers
Floor mats
Trunk Struts
Wipers
Other Stuff
DCE E-power steering system (auto/manual controller)
Wilwood 140-15978-RD Electronic Rear Park Brake System (plan to keep the brake handle, maybe hook a spring to make it feel funtional)
Drive Shaft Safety loop, FF Kit
Plan to Shark Hide the Al panels, and I am sure make some changes along the way. Some Items I really need to get my hands on to ensure I want to go that route, like bumpers and things.
Garage is ready, body storage area is ready so I am ready to get moving along.
Delivery scheduled for June 28-30. As usual, I have a scheduled item I need to attend to on June 29. Hopefully can work around it as the time closes in. ready to put some paws on parts...
1 Week Until delivery. Got the motor un-crated and on a stand I got from Speedway. good to have the crate out of the way and be able to roll the motor around.
Got a call from the delivery driver yesterday, "How about I bring your car by tomorrow around noon?" So here it is, 2 days ahead of the original schedule from last week. Can't say enough about how easy the delivery was with Stewart Transportation. Highly recommend as others have, driver was new to the process (3 months) but had it down, less than 40 minutes to unload from the time he arrived. I provided a nice tip and a sandwich and soft drinks for everyone. Had a couple neighbors help. Pretty light POL list, one shipment actually arriving tomorrow, a extra box with a bunch of small parts, and several boxes actually made the truck at the last minute. Only concern is not really knowing what fasteners you actually got, but that can be sorted and sourced later as needed. IRS has a good "fastener" box that I hope is better than some have experienced. So far very pleased. Looks like inventory will only take a day at most.
Pretty good inventory as I think I know. Touched every part (except Radiator) Notes below:
1) Only 5 items outstanding on POL list at this time, nothing critical for starting the build
2) Only 3 items Missing -front turn signals (x2) said they were in a box but ?, 1 5/16 brass barbed fitting-supposed to be 2 only had 1,
3) You don't know what you may not have...I did not have a small panel lid (driver footbox cover in the engine bay Item #51521) did not see and could not find on inventory.
4) Box 11 Carpet-a bit of a mess, really not sure what I got there a bunch of pieces! without spending all day laying them out in the car to figure where each one goes, guess I wing that one and i hope they are over sized cause the edges are pretty rough!
5) got all the body panels off and stuffed somewhere on my city lot, be like an Easter egg hunt finding where I hid everything.
There is a carpet inventory in the build manual that shows all of the pieces you should have. Just lay the carpet pieces out and match them to the layout in the manual. I ended up not having any of the trunk pieces.
Got the Body to the new Home for the next 9-12 months. A few friends and a few beers is all it took. had to turn the body side ways to get thru the opening and on the body stand.
And completed the Safety wire of the brake rotors. probably not needed but done. I was a Navy nuke and did Mil spec safety wire years, and years ago, but this was a challenge. No Oscars were expected with this performance.
Some slow progress, but better than nothing. Some may be basic updates, but hopefully some one will get something.
Shocks are built-I did check the setting, and what a PITA it will be after they are installed. I have heard to set them full soft, I went 1 click from full firm, time will tell, guess I am kind of a rebel that way! 4 shocks assembled.JPG Shock parts.JPG
F-Panels Fitted and will coat tomorrow. Bed liner wheel side, brushed Al inside with rustoleum clear coat. I figured if I did not like the coating on these, easy do over, maybe with fat tire panels from FF Metal. Both sides panels had issues in 3 spots that required trimming or barely got the hole in the frame due alignment. I did not want to push to far forward, so Driver side got 1/8 inch forward only enough to catch the front angled tubing. Forward corner, both panels got trimmed so they were not on the weld. Passenger side had to trim 1/4 inch off the front angle, did not like it over hanging the frame that much. Both passenger and driver side got trimmed above the lower rivet line, again to much frame over hang, nearly 1/4 inch. Added holes for 10-24 nut-serts on the elephant ears, will install after coating. Rivet spacing is closer than the manual, I liked it better after measuring the distance. Sometimes I wish they did not mount the panels, trying to cover the pre-mount holes makes the rivets not line up. But, no need to be OCD yet! Driver Side F panel Trim.jpg Passenger Side F Panel ready for Paint (1).jpg
Got some progress this past few days. Reminding myself to be patient (had to redo the clear coat on F panels-Taped to early), with all the tools I have, I still need some more! My socket set does not cover some of the large suspension bolts so for official torque, I will need a couple sockets and some crows feet.
Got the F panels finished and mounted. For me, this was hard because it is the "forever" decision of coatings. Hope there will not be a "should done that differently", at least for a couple years of driving, then may not care. Light spray on bed liner (herculiner) on the wheel side and brushed aluminum with Rustoleum clear coat (which I will do on all the engine compartment Aluminum). and, first rivet and I did not have good control of the rivet tool, so a 3 inch long scratch...Touched that up. Patience, patience, patience...
Also got most of the way thru the front suspension. Still need to torque some stuff. Could not find any hardware for the steering arm, so ran to ACE for some grade 8.8 12 mm x 1.5 x 60 mm, but ended up cutting 10 mm off. I like having the un-threaded parts of bolts crossing the transition between pieces of metal, and associated Nylocks and washers. Also noticed that FFR sent a flange nylock nut for attaching the upper A arm to the frame, so the rear nut needed a little shoulder trimming to fit, the manual says to not put a washer in there, but...not what was provided. I Also trimmed the rear link for the upper a-arm to get higher caster and set per the measurements in the manual. Driver Side Front Suspension 90 percent.jpgrear Front Upper Arm Nut Trim.JPG Passenger side front Suspension 90 Percent.jpgF Panel Inside driver.jpg
I also did some work on the rear suspension components. Swapped out studs-Used air gun, grease, hard washer and flange nut and a BFH for popping old ones out. I froze the studs, heated the hubs in the oven 200'ish deg Stud install 2.jpg
I also prepped the rear knuckles, chased the hole 1/2, then the required 5/8 inch. Another run to Lowe's as I did not have a big enough drill bit. Cut the ear off, used my small porta band, a little to big so the cut was nice for about 3/4 of the way, then stuff was getting in the way of the saw, so got a little wonky, but the cleaned up ok on the sander. Another note, they do not need to be trimmed as far back as the manual says. Look a little ahead and you can see both of those holes are still visible. Drilling Rear knuckle 1.jpgTriming Rear knuckle 1.JPGKnuckles and hubs ready to go.jpg
I also assembled the rear suspension components and got all the bolts and nuts checked out. Only issue was FFR sent Left hand Jam nuts but the toe link needed Right hand jam nuts, ordered a pack from Summit. (note-I should have ordered a bunch of stuff cause the shipping was more than the part.
I think we are almost exactly at the same place. I got the differential installed tonight. One thing to check if you have power steering, FFR didn't send me the power steering mounting bolts and it wasn't included on the pack list. I sent them a note and they fixed it right away to their credit. None the less, check if you got your power steering mounting bolts...
Fun watching your build and I envy your metal saw....
----
Mk4 complete kit arrived 10 May 23 Current BOM
Installed manual steering rack. A couple note from a young builder Jeti-There was no sleeves to put inside the bushings in my kit, nor did I see any on the steering rack inventory. Not sure I missed it or not, had stuff on hand to make my own, so I did. Also the manual recommends putting the driverside bolt in first and then the passenger side. I found I need a small amount of rotation, and it worked best to have the passenger side in first, use the steering shaft to assist with the slight rotation. No major torque, just a bit of solid pressure and bolts went right in. Set to recommended length per the manual. Steering rack.JPG
Got the Differential installed today, not quite a "Here Hold My Beer" moment, but "Sketchy" could be my middle name! I pondered waiting and scheduling some friends to help, do a little man bonding, I know a week will not make or break my time line. But, in the end curiosity and get 'er done won out. Put the frame back up on jacks and used my skate board to get the diff under the car. Used the engine hoist and leveler to work it in to place. There will be a little chassis touch up after this, but it is complete. Diff Install Hoist.jpgDiff Install Progress.JPG
I see you were the last delivery on his truck. Mine arrived 5/29 and mine was right in the middle, so I could see a Roadster, another Hot Rod, and a Daytona in the back (front?) and even a kit airplane waaaay in the front he said. Customers are not allowed to climb into the trailer, so I could not get a closer look.
I see you were the last delivery on his truck. Mine arrived 5/29 and mine was right in the middle, so I could see a Roadster, another Hot Rod, and a Daytona in the back (front?) and even a kit airplane waaaay in the front he said. Customers are not allowed to climb into the trailer, so I could not get a closer look.
Deepest in isn't necessary the last stop, surprisingly.
I've seen video of them (Stewart Delivery) digging a roadster+frame out of the truck and gliding it over one or more other vehicles on the way to the extenders hanging off of the open door.
Got a couple supplies and filled up the Differential. I have 1/2 QT of diff fluid available, local delivery handout only. That stuff is expensive, be nice if they packaged it in half quarts, since seems there is always plenty left over, and always some spilled in the catch can. Added the friction modifier, all got at the ford dealer. Diff Fluid.JPG
Picked up some grease and lubed the front end joints, did have to back off one nut on the upper A-Arm because it was to tight and would not accept any grease. There is a note in the manual about that, so check that before you pull the Zirk fitting, don't pull the fitting first, then realize it still does not work until you back the nut off a bit. Save your self a step. There is a lot of little "odds and ends" in the manual, so I have been double checking my work thru the manual, even If I think I know what the end goal is. GOOD SAFETY TIP!
I ended up Trimming the bushing shoulders-Front side of the front, rear of the back. I also trimmed the metal sleeve in the front bushing 1/16 inch. I then added washers on front side of rear attachment and back side of the front attachment. I did do a little spreading of the rear brace, but really did not achieve much with that as it is to stiff and sprung back. I am happy with the final results, I will do the same to the other side but it took a bit of work a couple hours for sure.
Got the front Suspension all wrapped up. I found a steering rack bushing and extra cotter pins that I was short in a bag that was with some steering parts and POL shipment parts, not sure why I did not see it earlier, as I was looking thru that box numerous times. With new torque wrench, the Hub nut was a breeze!
Couple questions for others:
1) I am a washer fan, not sure how else to say it but a nut or bolt with out a washer bugs me. I found some bolts are not the best length to accommodate washers, insufficient final thread sticking out of the nut. I have a bunch of AN washers, thick and thin that I am using, am I over engineering this?
2) There is a mis-drilled mounting hole in the pedal box front Al panel, would that be an option to ask for a replacement. Not building a garage queen, but that is the first place the eyes will go when the hood is up. Just thinking it would be nice to be clean, otherwise I will have to do a unique rivet pattern to cover. Panel Guber 2.JPGpanel Gubber 1.JPG
2) There is a mis-drilled mounting hole in the pedal box front Al panel, would that be an option to ask for a replacement. Not building a garage queen, but that is the first place the eyes will go when the hood is up. Just thinking it would be nice to be clean, otherwise I will have to do a unique rivet pattern to cover. Panel Guber 2.JPGpanel Gubber 1.JPG
Are you referring to one of the holes drilled for the self-tapping screws? If so, you'll find several among most panels that are not in an ideal place. I'd just use a rivet there and move on. I'm sure FFR would sell you a new panel.
I would just put a rivet in that spot and move on wit the build. I am not so sure you will be able to see that spot once the body is on and the engine is in place. It is pretty tight in that area.
Started foot box Aluminum. Driver side is a bit of a challenge, but I don't mind sheet metal stuff to much. Fire wall drilled, inside done, working thru the remaining parts. Ordered more Clecos 50 is my magic number, I only had 30, with so many interlocking panels in the driver side at odd angles I want to keep them secure as I worked thru it. I will make and install a brace in the middle of the fire wall as others have done and I think that will add a lot of stiffness to the fire wall. I was contemplating making one out of a bunch of .063 stuff I have around, but don't think it will be necessary and pretty satisfied with the kit part with the extra brace. I have the Forte throttle set up, I will brace that if needed. Plan to get them all drilled so I can finish them.
Nearly done drilling and fitting Driver side foot box panels. As others have mentioned, had to trim a fair amount from the inboard panel-to-A panel, it overhung almost 1/2 inch. I call this a slog, mainly because I am taking my time and determining what each panel will need as I get it set up. I plan to do some bed liner stuff on the road/tire exposed sides as they come up. I also replaced the bolts on the footbox front with chrome button heads
Got the pedals installed-Note to self-clean out the 14-20 threads on the pedal cross brace before you put it in, much easier as they were mucked up from powder coating. I added some red flair to the bare parts.
Got the steering shaft mocked up, I will need to figure the EPS location and mounting. I did have to buy 2 unique knuckles and parts for my steering- 1) 3/4 weld-on round to the 9/16-36 manual steering rack (from Speedway)
2) 11/16 36 teeth to 3/4 DD to connect the shaft to the motor input side (direct from Borgeson)
3) 3/4 round metal 12 inch stock that I will cut down to connect the steering rack knuckle to the EPS motor out put shaft knuckle (McMaster car)
Will submit pictures when I make that up. I hope to weld on a bracket to the lower 3/4 tube and connect to the main 4 inch frame tube. This thought process is still in the works, so subject to change.
Progress, with some mis-steps along the way. If I can save 1 person the headache, then I will be happy. All is good in the end, but took twice as long for these items.
Breeze Battery box:missed the part in the instructions that said to leave 11/16 inch between the passenger side frame tube and the box. So after first install, I tried to put the the battery hold down thru and it would not fit. So, I slotted the mounting holes in the box to allow it to slide over and fit the battery hold down. I did have trouble drilling the lowest hole, did not get square up with the tube, so that rivnut is epoxied in. The other 4 are rock solid, so not to worried about it, the Rivnuts are 1/4-20. I know some have gust tapped the holes or used rivits provided, I want as much auxiliary items removable as possible so I chose the RivNuts Breeze Battery box installed.JPGFinished inserts for battery box 2.JPGFinished inserts for battery box.JPG
Next Up, the Brake Bias adjuster install. Thought I had that nailed, but reviewing build threads I saw the location of the fuse panel, I had thought it was the other side of the foot box. Oh? Sure enough my first install was where the fuse panel went. So further review and found a new location. All, is good!. Note for others, if you buy a adjuster knob, I would go with Tilton and the Tilton 90 deg adapter, I had to drill out the tilton adapter to fit the wilwood cable.
Real life is getting in the way of fun, and soon other types fun (Hunting, Fishing)and real life will be getting more in the way of progress. Today I got the back wall of the cockpit finished, not happily and not pleased with the fit, will I be screwed down the road?
Real struggle started with the driver rear quarter, tough to line up. then the back wall would not go low enough unless I cut the bottom bend off, which I did not want to do. So I mounted it about 1/4 plus inches high to maintain the the bend lines to mach the rear quarter panels. But then that left the contours not matching the actual frame. Big gap and unable to rivet to the small vertical 3/4" tube at the top and when i put the rear side panel on, gaps everywhere. I can make filler panels to clean up the gaps, but I am worried about the overall height and the fact that the rear side panel does not even come close to matching.
1) Should I just run with it and make filler panels
2) make a new rear side panel to better match the cockpit wall
3) Am i screwed when I put the body on because the wall is now to tall.
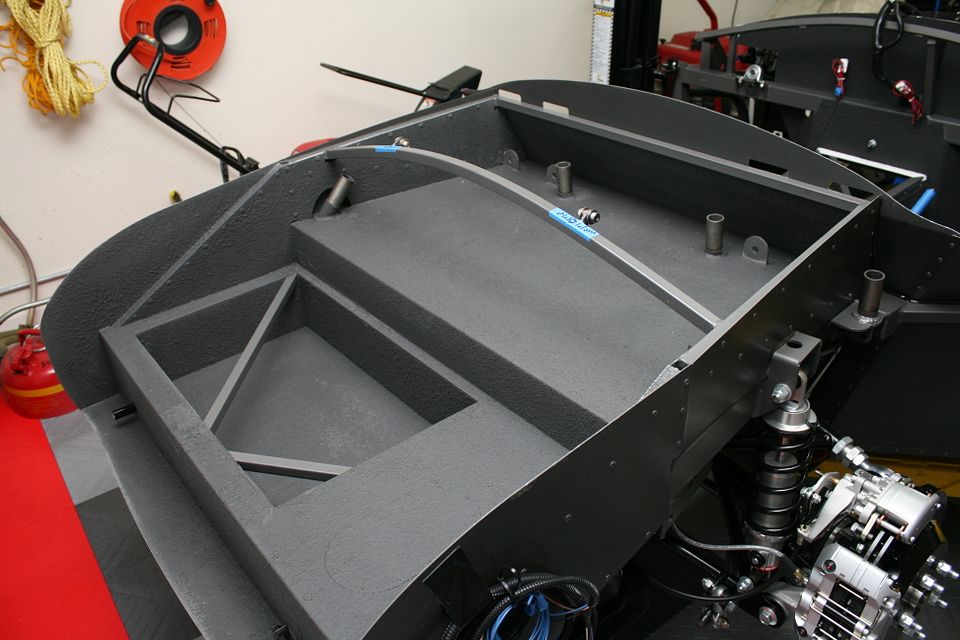
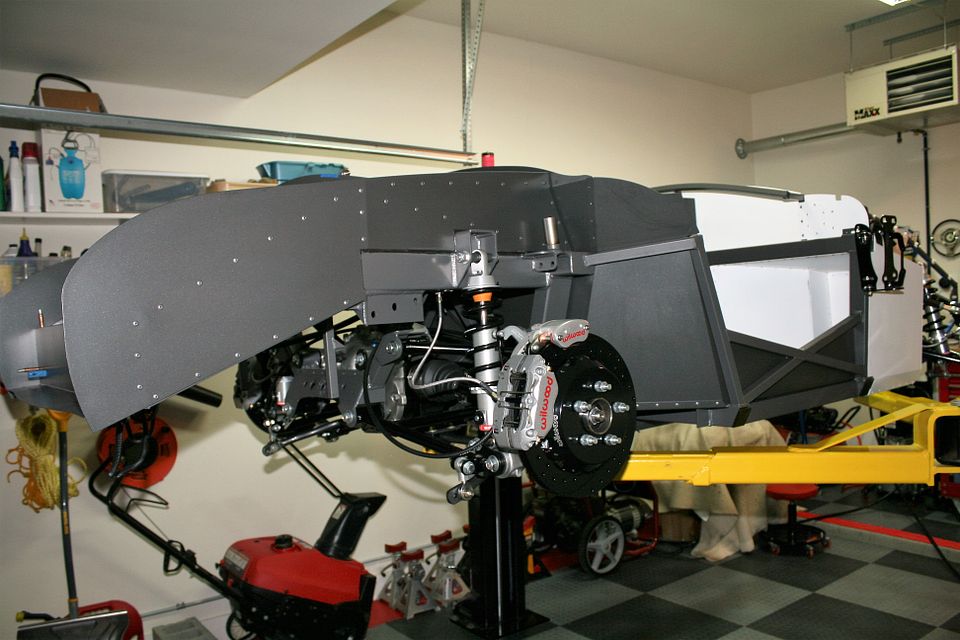
It's a little hard to tell a lot because your pictures are pretty dark. But you need those quarter panels properly located for the body to sit correctly on the bulb seal. What you have now -- with the big gaps, etc. -- seems problematic to me. The cockpit back wall should be located so that the bottom edge of the harness slots are slightly below the the top edge of the 3/4" tube behind. That's intentional and indicates the right height. Then your quarter panels should align into that with the lower edge along the upper trunk floor and the upper edge slightly above the upper 3/4" tube going to the back. Here are a couple pictures which maybe help. Don't be confused by the filler panels on the inside of the upper trunk floor. That's something several of us have done. Not required at all. Sorry I don't have a picture without those.
Build 1: Mk3 Roadster #5125. Sold 11/08/2014. Build 2: Mk4 Roadster #7750. Sold 04/10/2017. Build Thread Build 3: Mk4 Roadster 20th Anniversary #8674. Sold 09/07/2020. Build Thread and Video. Build 4: Gen 3 Type 65 Coupe #59. Gen 3 Coyote. Legal 03/04/2020. Build Thread and Video Build 5: 35 Hot Rod Truck #138. LS3 and 4L65E auto. Rcvd 01/05/2021. Legal 04/20/2023. Build Thread. Sold 11/9/2023.
I just went out again and played with it and without cutting some off the bottom, (like the bent tap plus some) that panel is not going to sit much lower. In order to make it similar height to the rear quarter panel and match that contour, I have most of the square tube across the top for the belt feed thru exposed.
Looks like I will probably look at body fit time and expect to do a lot of trimming on that panel. I will keep the profile of the quarter panel as delivered so as not to create a cascade of problems.
Any others have that kind of issue where the rear panel sits to tall?
I know, you asked for response from those who may have a similar problem, not those who didn't. But I did find the sort of picture Paul referred to , which is a shot of the trunk without a (user-fabricated) inner panel in place. It also gives you a decent reference to the frame in multiple spots. You should be able to click on the photo and zoom in if desired. Everything Paul mentions matches what you see in my photo as well. The puzzle for me is your third photo, which appears to suggest that the cockpit rear is positioned more or less correctly, and doesn't have more material above the seat belt cutouts than it should. But perhaps these photos will help you sort through to find the source of the problem. Hope that helps, good luck.
Thanks John, I will move on and trim as needed when body fit time arrives. Unfortunately my body is stored and not east to get for a quick check.
I'd probably spend some time finding out where the issue is versus trimming later. When one thing changes, so does a host of other things. How were the panels affixed from FFR? These panels fit pretty close as is, and as Paul told me long ago early in my build thread, they shouldn't need trimming. If you took pics before removing everything, maybe that can help out as well?
Thanks, for the idea I just review that and the tape residue lines up exactly as shipped on the parts, but you can see in the picture the panel as shipped is extending out into the cockpit about 4 inches, when it is pushed into final place, it pops up the whole wall about 1/2 inch.
Moving slowly forward with some sheet metal work. mapped out the cubby, still staring at it waiting for the "Go Big" flare to shoot out. I originally wanted a smaller 1, will see what Ideas I have to maybe make it removable before I decide the size. Cubby mapped out.JPG
Mapped out the drop trunk as well, staring at that as well before I cut it. Drop trunk maped out.JPG
Also, did temporary gas tank install. no joke the passenger side strap is kind of a bear, after all the bending, still not ready for final tightening and a bunch of powder coat has popped off. Both straps would not take the 3/8 bolt, had to pound a punch in to open the holes. Had to BFH the 3/4 tube on the passenger side to fit the tank in.
I have noted that my open boxes list has increased, and my parts sitting around for final install is growing. Seems every time I turn around I have to open a box for 1or 2 items to test, then they never make it back to the original box and end up in tote on the shelf and hope I find them later
After thinking on it for a couple days, decided to go big on the drop trunk, I will take it all the way back to the step in the trunk and make a smaller removable cubby behind the seat. Thanks John for the pictures on the "What Size Cubby" thread, it was the look I was thinking I would like.
while you're cutting out the drop trunk, consider making the hole over your fuel pickup/pump larger as well. My AN fittings were significantly forward to the precut hole and it would have been impossible to get a wrench on them if I ever need to undo them.
Today I was able to put together a McMansion for my trunk monkey. Ended up with 14 1/2" x 24" x 5" deep. Tried to minimize the work of the metal and minimize the shipping of parts.
1) 24"x6" sheets for the front no bends and it rivets to the step down wall, overlapping 1 inch
2) 24"x6" , 1 inch bend at the top to mount to the floor at the back, trimmed around the "V" Frame
3) 24"x 16 " floor bent 3/4" lip for front and back to mount to the 2 pieces
4) (2) 6.5" x 16" Bent top 3/4" to catch the slip under the bottum tray, and then 3/4" to catch the top and 3/4" each end to catch both front and back pieces
Pretty happy, still need to finish drilling for rivets, I did not cut the area around the frame bars so well, so I will need a little filler.
Also added a mod to my HF sheet metal brake-Notice the bolts in the ends, really helps hold the material and mostly keeps the bar from sliding when bending 24 inch long sheets. I also love the sheet metal shear, this was a HF dream tool-35 bucks about 13 years ago, have cut as thick as .090 aluminum, never even changed the cutting tip yet. A little WD40 and it cuts thru .040 like butter. The Milwaukee skill saw is pretty handy for cuts that are not as convenient for the shear. Also the round file to round off the inside of the bend corners.
nice progress, you were the next delivery after mine, same truck I believe. Eric was the driver. I like that you are equipping with trunk monkey, a forgotten feature.
Delivery Date 6-24-23 Build thread Living the Dream
SBF 427 564hp/576tq Holley Sniper with Hyperspark by Smeding Performance. Tremec TKX .68 OD. IRS . Wilwood 12.88 brakes. Wilwood EPB. First start 11-17-23. First go cart 11-20-23.


 Thanks:
  Likes:


Hope to be able to track the car when done, may have to ditch the Miata....


 Reply With Quote