-
On a roll

Garage Renovation question
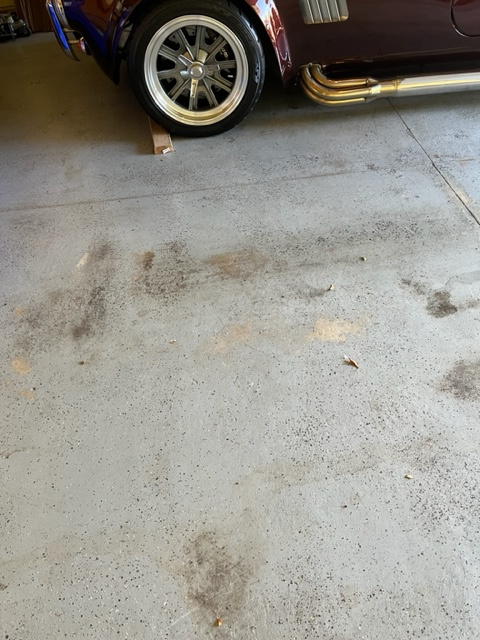
Earlier this year I decided that my garage needed a makeover. It hadn't been painted since the house was built and the floor was last done in 2013. The walls are patched and painted and look pretty good. Now it's the floor's turn.
I did the 2013 paint job using the DIY (Rustoleum) 2 part epoxy paint and process. I think it lasted pretty well, but it's wearing off in spots and it's starting to peel around the seams in the concrete.
My original thought was to hire a garage floor contractor, have them grind it and finish it. I thing the estimate I got was reasonable, but frankly, I don't want to spend that much. The downside of doing it myself is that I don't want to deal with a concrete grinder. They tend to be heavy and unwieldy and if I can avoid that I'd like to. So, I asked Rustoleum customer support what I should do and they said I didn't need to grind, just get it clean, scrape the peeling spots, sand to rough things up, and repaint.
The people in the Home Depot paint department had a similar approach. The lady there said "use 220 grit sandpaper and a pole sander". I have a pole sander, and it's great for drywall. It seems like I'd be expending a lot of physical effort to use that thing on the whole floor. Wait! I have a two-pad floor polisher (that we haven't used in years...). So I go into the tool rental department seeking sanding pads that would fit on my old polisher and accomplish the same thing as a pole sander with less effort.
The guy in the tool rental department thought I was crazy. "You don't use sandpaper on concrete. You use sandpaper on wood, or maybe on some automotive applications." He wasn't going to sell me any sandpaper pads. Instead he wants me to rent a floor tool (much more manageable than a grinder) along with a diamond pad that will prep the concrete floor. I believe it will remove all of the existing paint along the way, not that that is a bad thing.
So now, I am utterly confused. I have paint people telling me to clean and sand, and I have tool people telling me to use this diamond machine.
Finally we get to the reason for this post: what's your experience? Take a look at my existing floor. How would you deal with it? What do you think about sanding vs. using the diamond machine? I appreciate your input!

Mk IV Roadster - #8650 - delivered 7-17-2015 - first start 7-28-2018 - first go-kart 10-13-2018 - licensed and on the road 9-9-19: body/paint completed 3-17-2020.
Complete kit / 2015 Coyote / TKO600 / IRS / Wilwood brakes / Mid-Shift mod / Power Steering / Heater and Seat Heaters / RT turn signal / Breeze radiator shroud and mount
-
Not a waxer

I know "a little" about sanding  and after having done tens of thousands of square feet of ceramic tile installation using diamond cutters I know "a little" about them too. Sandpaper or pads lose their abrasiveness as they wear with use. Diamonds stay sharp and keep cutting until they are completely worn away.
Jeff
PS: Nice lookin' car!
-
Post Thanks / Like - 1 Thanks, 0 Likes
 Al_C
Al_C thanked for this post
-
Senior Member

The first mistake was listening to anyone at home depot. You absolutely need to grind that floor and get it to bare concrete if you’re going to make it last. Even if you buy just the big box store stuff AND grind, it’s going to be much more durable than “sanding”. That’s probably not what you want to hear, but do it right the first time. You’d be surprised how much footage you can cover with a simple 7in grinder also.
-
Post Thanks / Like - 1 Thanks, 0 Likes
Al_C thanked for this post
-
I thought this is what Etching Solution does to some extent?
-
Post Thanks / Like - 1 Thanks, 0 Likes
Al_C thanked for this post
-
Why not just cover the floor with garage floor tiles like Race Deck?
They snap together and come in a multitude of colors and patterns.
-
Curmudgeon

Have some experience with my home and multiple commercial use refinish "attempts".
Concrete is porous and no amount of grinding, sanding, or cleaning will produce a good bond on a contaminated surface. Where it's stuck now will continue to stick and where it is peeling will peel again. I've seen some grind significant amounts off a contaminated floor and it did no better than a light grinding.
Agree with those saying you need a grinder, but would only concern myself with knocking off what isn't stuck well, knocking off any high spots, and getting a generally clean surface. Your new epoxy will stick just as well to old epoxy as the concrete, probably better. Would then use whatever prep product is available to you. At this point the only thing that will make much difference is how thick you put it on, but only somewhat. Any floor finish company saying that they can make epoxy stick to contaminated concrete is either lying or doesn't know better. Can't trust any warranty for longer than they have been in business, and any well written warranty will exclude your old contaminated floor anyway. Looking at your pictures I would go significantly thicker.
IMO this is a good job to DIY for best cost and results. Suggest that you consider the spiked shoes a must have for a good job. Also suggest no flakes (aka dropped part camouflage).
MKII "Little Boy". 432CI all aluminum Windsor. .699 solid roller, DA Koni shocks, aluminum IRS, Straight cut dog ring T-5, 13" four piston Brembos, Bogart wheels. BOOM!
-
Post Thanks / Like - 1 Thanks, 0 Likes
Al_C thanked for this post
-
Senior Member

I did mine a several years ago. I'm a total hack and 100% don't know squat about concrete. I watched a few Youtube videos then went for it.
My floor looked like yours only much worse with cracks and contamination. I rented a diamond concrete grinder and got it all as even as I could. The sections that were still coming through as contaminated after grinding I took a concrete cutter and cut squares around them and hammered them out. I then mixed concrete in a home depot bucket after bucket after another bucket and poured it in. It's been 5 years now and it's still perfectly smooth and no cracks. I did it start to finish over a long 3 day weekend. I should also state it was a single stall garage. It's basically 1 and 1/2 car.
Last edited by john42; 08-17-2023 at 07:09 AM.
MK3 Challenge Car, Boss 347, Sniper 2 EFI
-
Post Thanks / Like - 1 Thanks, 0 Likes
Al_C thanked for this post
-
On a roll

Originally Posted by
Dgc333

Why not just cover the floor with garage floor tiles like Race Deck?
They snap together and come in a multitude of colors and patterns.
Interesting idea. Less expensive than a flooring contractor, but way more than DIY. I'll check it out.
Mk IV Roadster - #8650 - delivered 7-17-2015 - first start 7-28-2018 - first go-kart 10-13-2018 - licensed and on the road 9-9-19: body/paint completed 3-17-2020.
Complete kit / 2015 Coyote / TKO600 / IRS / Wilwood brakes / Mid-Shift mod / Power Steering / Heater and Seat Heaters / RT turn signal / Breeze radiator shroud and mount
-
On a roll
Originally Posted by
mikeinatlanta
Have some experience with my home and multiple commercial use refinish "attempts".
Concrete is porous and no amount of grinding, sanding, or cleaning will produce a good bond on a contaminated surface. Where it's stuck now will continue to stick and where it is peeling will peel again. I've seen some grind significant amounts off a contaminated floor and it did no better than a light grinding.
Agree with those saying you need a grinder, but would only concern myself with knocking off what isn't stuck well, knocking off any high spots, and getting a generally clean surface. Your new epoxy will stick just as well to old epoxy as the concrete, probably better. Would then use whatever prep product is available to you. At this point the only thing that will make much difference is how thick you put it on, but only somewhat. Any floor finish company saying that they can make epoxy stick to contaminated concrete is either lying or doesn't know better. Can't trust any warranty for longer than they have been in business, and any well written warranty will exclude your old contaminated floor anyway. Looking at your pictures I would go significantly thicker.
IMO this is a good job to DIY for best cost and results. Suggest that you consider the spiked shoes a must have for a good job. Also suggest no flakes (aka dropped part camouflage).
If I interpret this correctly, you may be suggesting I just use the floor tool on the bare spots and leave the rest of it alone.
Mk IV Roadster - #8650 - delivered 7-17-2015 - first start 7-28-2018 - first go-kart 10-13-2018 - licensed and on the road 9-9-19: body/paint completed 3-17-2020.
Complete kit / 2015 Coyote / TKO600 / IRS / Wilwood brakes / Mid-Shift mod / Power Steering / Heater and Seat Heaters / RT turn signal / Breeze radiator shroud and mount
-
Senior Member
Ya I’m going to disagree with some of these posts. The reason it’s coming up in certain areas is a combination of hot pick up from tires, chemicals and just high traffic in general. Just because it is stuck down still in other places doesn’t mean it has a good hold. Do things right. Grind it all off. Power wash, degrease several times. You’ll get the mechanical bond you’re looking for and it will never come up.
Check out concrete floor solutions for some good product.
-
Senior Member

Al, this is the type of work I did for around 40 years commercially. The areas where the coating has peeled off the surface could have been caused by a few things. Improper prep initially, oil contamination in the concrete, and/or moisture that is coming up through the concrete. As mikeinatlanta said, concrete is extremely porous. When it cures the water escapes through the surface causing pores that go all the way through the slab. We had some old auto shop floors that we did that had oil all the way through the slab and had saturated the base soil under the slab. A home garage will not typically have that issue. Just be sure to use degreaser on any areas that are stained. Allow the slab to COMPLETELY DRY before you start coating! If you want to check to see if the slab has a moisture vapor issue you can take a 3 ft.x 3 ft. piece of 6 mil visqueen, tape it to the floor and allow it to sit for a day or two if you can. If you notice any darkening of the slab or moisture on the back of the visqueen you may have a moisture issue. Residential garages typically don't have a vapor barrier under the slab like you would find inside the home with a slab floor. Anyhow, definitely use the diamond grinder and take as much of the existing coating off as you can. If after spending a reasonable amount of time some of the coating remains don't worry about it because the epoxy will stick to itself as well as anything else. You just want to make sure you've removed every bit of suspect coating or you're just wasting your time and money because the old coating will peel if it's not stuck and will take the new coating with it.
Sorry if this post got too long. Actually, there's more that can be done, but I'm sure you don't want to spend a fortune to do this. Just remember that 90% of the success of the coating is determined by the prep.
Rick
Mk4 with Mr. Bruce FIA body, 331 w/ Speedmaster Stack Injection, Full Width Roll Bar with high brake lights by i.e.427, IRS, ABS, PS, PB, FAST FI, First start 3/30/20, First go-kart 7/5/20, paint by Ken Pike
-
Post Thanks / Like - 1 Thanks, 2 Likes
Al_C thanked for this post
-
On a roll
Originally Posted by
EZ$
Al, this is the type of work I did for around 40 years commercially. The areas where the coating has peeled off the surface could have been caused by a few things. Improper prep initially, oil contamination in the concrete, and/or moisture that is coming up through the concrete. As mikeinatlanta said, concrete is extremely porous. When it cures the water escapes through the surface causing pores that go all the way through the slab. We had some old auto shop floors that we did that had oil all the way through the slab and had saturated the base soil under the slab. A home garage will not typically have that issue. Just be sure to use degreaser on any areas that are stained. Allow the slab to COMPLETELY DRY before you start coating! If you want to check to see if the slab has a moisture vapor issue you can take a 3 ft.x 3 ft. piece of 6 mil visqueen, tape it to the floor and allow it to sit for a day or two if you can. If you notice any darkening of the slab or moisture on the back of the visqueen you may have a moisture issue. Residential garages typically don't have a vapor barrier under the slab like you would find inside the home with a slab floor. Anyhow, definitely use the diamond grinder and take as much of the existing coating off as you can. If after spending a reasonable amount of time some of the coating remains don't worry about it because the epoxy will stick to itself as well as anything else. You just want to make sure you've removed every bit of suspect coating or you're just wasting your time and money because the old coating will peel if it's not stuck and will take the new coating with it.
Sorry if this post got too long. Actually, there's more that can be done, but I'm sure you don't want to spend a fortune to do this. Just remember that 90% of the success of the coating is determined by the prep.
Thanks everyone! It looks like the majority opinion is to get the floor machine with the diamond disk and grind it down. Please keep in mind that what HD recommended and I'm leaning towards is NOT a concrete grinder, but rather a floor machine using a 16 or 18" diamond disc. The grinder is heavier and has a smaller head. I'm looking to prep the floor, not take it down.
The only remaining question is the order of things. I know the disc has to be used wet. Do I work the machine first and then clean (by hand) with the degreaser, or the other way around? My original thought was to pressure wash, then use a brush with the cleaner/degreaser, grind, then pressure wash again. However, it will save time if I don't need to do all of those steps. Thanks for all your input!
Mk IV Roadster - #8650 - delivered 7-17-2015 - first start 7-28-2018 - first go-kart 10-13-2018 - licensed and on the road 9-9-19: body/paint completed 3-17-2020.
Complete kit / 2015 Coyote / TKO600 / IRS / Wilwood brakes / Mid-Shift mod / Power Steering / Heater and Seat Heaters / RT turn signal / Breeze radiator shroud and mount
-
Sorry to interject another question, but do any of you have experience with the polyurea/polyaspartic coatings? Do these have similar durability and pull-up issues as epoxy?
-
Senior Member
Al, I would start with the diamond disc to remove as much of the existing coating as you can so that there are no "loose" edges. Then do your degreasing with as aggressive a brush as you can get. Maybe a brush that will fit on the floor machine that will be driving the diamond disc. Then pressure wash and allow it to completely dry. There's no reason to rinse the floor after grinding it, especially if you're grinding it wet. Just push the wet dust aside when you go to degrease, scrub it, wet and dry vacuum it if you have one, then rinse with the pressure washer, and pick up the excess water with the vacuum.
Jim, the polyureas/polyaspartics have excellent durability in comparison to the epoxies. They also tend to have better UV resistance than the epoxies. They do still have the same delamination and pull up issues, and the other consideration is that the pot life of these products are typically quite a bit shorter than the Rustoleum epoxy. I actually had a manufacturer in SoCal that made a kit of flexible polyurea that could be placed in the deep tooled joints in garages and shaved off smooth with the surface using a four inch wallpaper scraper, the one with the razor blade. Then you could coat over it and not have that dirt trap.
Rick
Mk4 with Mr. Bruce FIA body, 331 w/ Speedmaster Stack Injection, Full Width Roll Bar with high brake lights by i.e.427, IRS, ABS, PS, PB, FAST FI, First start 3/30/20, First go-kart 7/5/20, paint by Ken Pike
-
Post Thanks / Like - 1 Thanks, 1 Likes
Al_C thanked for this post
 Al_C
Al_C liked this post
-
Curmudgeon
Originally Posted by
Al_C
If I interpret this correctly, you may be suggesting I just use the floor tool on the bare spots and leave the rest of it alone.
No sir, saying that I would hit it all, but only roughen up what stays stuck. Wouldn't spend much effort removing what is stuck well.
Edit: If you have pullup from tires, most likely would be from a car sitting for extended periods not moving, especially if parked shortly after the work. Don't have an answer beyond stay off of it with a long term park for as long as possible. Also, thicker coating is a bit tougher, but when it lets go it lets go big.
Last edited by mikeinatlanta; 08-17-2023 at 09:09 PM.
MKII "Little Boy". 432CI all aluminum Windsor. .699 solid roller, DA Koni shocks, aluminum IRS, Straight cut dog ring T-5, 13" four piston Brembos, Bogart wheels. BOOM!
-
Post Thanks / Like - 1 Thanks, 0 Likes
Al_C thanked for this post
-
On a roll
Originally Posted by
EZ$
Al, I would start with the diamond disc to remove as much of the existing coating as you can so that there are no "loose" edges. Then do your degreasing with as aggressive a brush as you can get. Maybe a brush that will fit on the floor machine that will be driving the diamond disc. Then pressure wash and allow it to completely dry. There's no reason to rinse the floor after grinding it, especially if you're grinding it wet. Just push the wet dust aside when you go to degrease, scrub it, wet and dry vacuum it if you have one, then rinse with the pressure washer, and pick up the excess water with the vacuum.
Thanks, Rick!
Mike - the wear is greater on the side where my wife's car is, as it is in and out much more than the roadster. I think the prep you all recommended will work well!
I'll post a couple of pics when it's all done, hopefully sometime next week.
Mk IV Roadster - #8650 - delivered 7-17-2015 - first start 7-28-2018 - first go-kart 10-13-2018 - licensed and on the road 9-9-19: body/paint completed 3-17-2020.
Complete kit / 2015 Coyote / TKO600 / IRS / Wilwood brakes / Mid-Shift mod / Power Steering / Heater and Seat Heaters / RT turn signal / Breeze radiator shroud and mount
-
25th Anniversary #9772


I bit the bullet and paid for my floor to be done, was a few years back and about $3.50 sq/ft - it's been absolutely wonderful!
took 2 days, they diamond roughed the floor and epoxy/flaked then the next day came and cleaned up after things set...
https://cobradreams.com/2019/12/28/prepping-the-garage/
C043F95F-AD88-4A49-B3CB-BD153BED8C3A.jpg
-
Senior Member

Considered all these options. I had a cracked floor with failing epoxy. Went racedeck and never looked back. Sign up at garage journal and Jorgen (Race deck CEO) will give you a discount.
IMG_0701.JPG
FFR 5385 MKIII. 302, 3-Link. All legal in MA 1/7/2012.
-
David aka Ducky2009

Thanks for posting this Al. I want to do the same thing to my garage. Lots of good info here.
MK4 Build #9035 Delivered 2/17/17, First Start & Go-Kart 6/2/17, Licensed 9/1/17
Paint - Lightning Blue Metallic, No Hood Scoop, No Stripes
Gen 2 Coyote Engine & TKO-600. Solid Axle, 8.8-3.55, Power Steering, Power Brakes, Dual Roll Bars
Heater and Glove Box, Drop Trunk, Wipers, Radio, FFR Vintage Gauges, Custom Dash
Build Thread:
http://thefactoryfiveforum.com/showt...MK4-Build-9035
-
On a roll
It's done!
For those interested, here's what I did. I'm not speaking authoritatively, I'm just reporting on what I did.
Based on a lot of input from a number of people - including respondents here, and especially EZ$ (!), I rented a floor maintainer machine and a diamond concrete prep tool. Boy that was fun. And a mess.
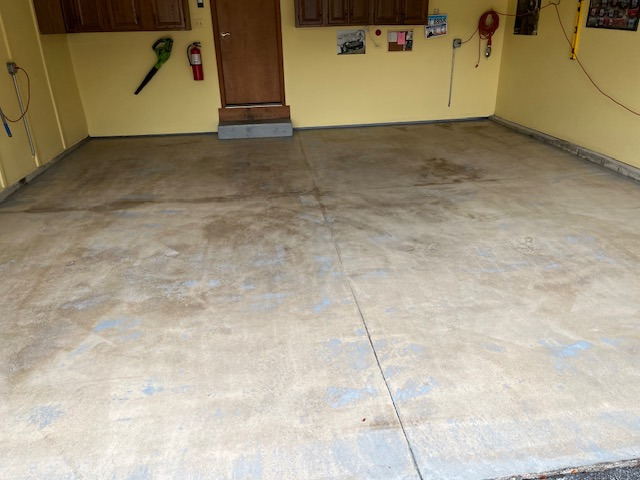
Here's the before photo:

It was pretty warm so I got started pretty early. It still took all day, between the concrete prep tool and pressure washing. Here's the after:
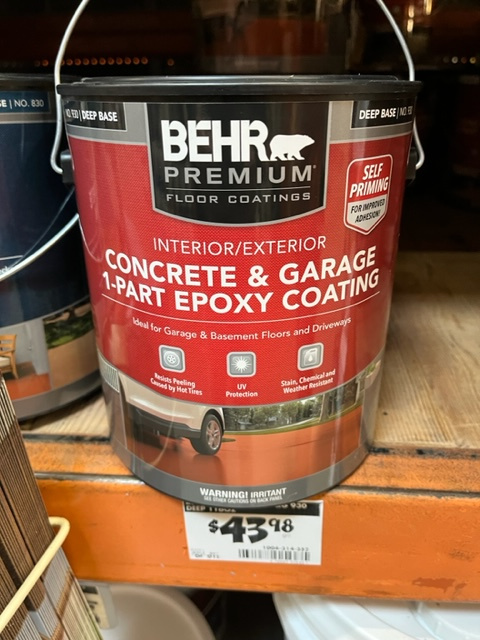
Not perfect, but I think it's OK for a 36 year old floor. I used the Behr one part epoxy paint. This isn't an endorsement - I'm just reporting on what I used. I chose it because it didn't require mixing different parts and all that nonsense. This was easy. Open the can, stir, add the ant-slip and roll it on. The can in the photo actually says "deep base", but I used the slate gray version. I also ended up priming the floor before I painted. Hadn't planned on that, but the directions on the can were pretty vague so I went with the Behr concrete primer. It had a 4 hour dry time before I could paint, so it wasn't a problem. It took less than an hour to prime and probably closer to 2 to do the paint (the sprinkles take time).
Here's my progress photo: Halfway there!

And done:

Now I just have to clean up all the crap on the driveway. It's the residue from the concrete prep tool. I vacuumed as much of the slurry as I could, but ended up getting some on the blacktop anyway. I'll deal with that when the garage floor is completely dry.
So there you have it.
Mk IV Roadster - #8650 - delivered 7-17-2015 - first start 7-28-2018 - first go-kart 10-13-2018 - licensed and on the road 9-9-19: body/paint completed 3-17-2020.
Complete kit / 2015 Coyote / TKO600 / IRS / Wilwood brakes / Mid-Shift mod / Power Steering / Heater and Seat Heaters / RT turn signal / Breeze radiator shroud and mount
-
Post Thanks / Like - 0 Thanks, 2 Likes
-
In many pictures of car builds the garage has beautiful tile floors. There are several brands, is Race Deck the best? There are several tile types, some being Diamond, Circletrac and Freeflow. What do those with these floors recommend? Is any style better, easier to clean, less slippery, etc? The freeflow looks like dirt will get into the openings but if water enters the garage it will better evaporate and not get mold under the tile. Thanks for any recommendation.
-
Honestly, if I had to do it over, I would NOT put epoxy on my garage floor. It looks great and keeps oil stains from developing, but when the weather is wet, the water just lingers on top of the floor. If it was just my Cobra, that would be fine since I never drive that in the rain. But I also park my Jeep in there and I hate the standing water that the epoxy holds.
ted
-
I’ve used the 2 part epoxy on my last 2 garages and our son’s garage.
We don’t get a lot of rain here but when it does rain I get the mop out and clean it up.
Every 2 week I use a push broom, then a mop wash if it needs it.
94D5495C-AEDD-4B98-82CA-875D0E6716B8.jpeg
'33 Hotrod, #1047 Gen 1, delivered on 2/27/18, go cart on 9/24/18.
LS3 w/Gearstar Level 3 4L65e Tranny, Yank converter, Lokar shifter, Electric PS, Vintage AC/Heat/Def, 8.8" 3.55
TorqThrust II Wheels w/Toyo Proxy T1 Sport Tires, F 235/45ZR17 R 295/35ZR18
Garage Built, Driveway Painted.
-
Senior Member

I'v had my epoxy floors for 10yrs. Caution is when you work/weld, put something down to protect it from "pits". Otherwise, excellent even when it rains. My floor doesn't puddle so I'm not concerned with standing water. Easy to clean and find things. When putting the "sprinkles" down, remember about how rough or soft you want the surface. As for the mats, RaceDeck etc. I'm not a fan of them, and you still have to think about the "hot" items that may hit the material.
-
Post Thanks / Like - 0 Thanks, 1 Likes
-


I'm happy with Race Deck. I installed mine when my car was off getting painted. I think tiles are better suited for when the build is complete because the raised patterns of the tile will somewhat impede the movement of items with small wheels like shop cranes, wheel dollies, creepers, etc. Not a show stopper - just be aware.
Using jacks and jack stands may also cause indentations in the tile so I use thin planks of plywood under them when jacking up the car. Other than that, love the look, easy to install, easy to clean, and easy on the feet - I get a lot of compliments from the neighbors.
C650FB12-E41D-4035-B1F3-B1F4A2093B47.jpeg
DE9F248C-59ED-4D36-920D-F917CEBDA62E.jpeg
Last edited by RJD; 12-23-2023 at 03:34 PM.
MKIV complete kit w/powder coating and cut outs, serial #9189 delivered 10/10/17, first start - 10/5/18, legal - 10/08/20. Blueprint 306 w/Holley Sniper EFI, TKO 600, power steering, Breeze fan shroud, trunk cubby, & engine compartment battery kit, CNC brake reservoirs, RT turn signal & gas pedal, mechanical throttle linkage, METCO safety loop, GASN side pipes, drop trunk, dual chrome roll bars, vintage gauges, glove box, custom center console, cup holders, and speakers.
-
Post Thanks / Like - 1 Thanks, 0 Likes
-
An FYI on using the Sprinkles. Don’t throw/drop them on the floor, you won’t get and even distribution.
Throw them up in the air and let them drop to the floor.
'33 Hotrod, #1047 Gen 1, delivered on 2/27/18, go cart on 9/24/18.
LS3 w/Gearstar Level 3 4L65e Tranny, Yank converter, Lokar shifter, Electric PS, Vintage AC/Heat/Def, 8.8" 3.55
TorqThrust II Wheels w/Toyo Proxy T1 Sport Tires, F 235/45ZR17 R 295/35ZR18
Garage Built, Driveway Painted.
-
On a roll
Originally Posted by
JimLev
An FYI on using the Sprinkles. Don’t throw/drop them on the floor, you won’t get and even distribution.
Throw them up in the air and let them drop to the floor.
You are correct! Why didn't you post this back in August before I did mine?
Mk IV Roadster - #8650 - delivered 7-17-2015 - first start 7-28-2018 - first go-kart 10-13-2018 - licensed and on the road 9-9-19: body/paint completed 3-17-2020.
Complete kit / 2015 Coyote / TKO600 / IRS / Wilwood brakes / Mid-Shift mod / Power Steering / Heater and Seat Heaters / RT turn signal / Breeze radiator shroud and mount
-
Post Thanks / Like - 0 Thanks, 1 Likes
-
Member

Originally Posted by
RJD
I'm happy with Race Deck. I installed mine when my car was off getting painted. I think tiles are better suited for when the build is complete because the raised patterns of the tile will somewhat impede the movement of items with small wheels like shop cranes, wheel dollies, creepers, etc. Not a show stopper - just be aware.
Using jacks and jack stands may also cause indentations in the tile so I use thin planks of plywood under them when jacking up the car. Other than that, love the look, easy to install, easy to clean, and easy on the feet - I get a lot of compliments from the neighbors.
C650FB12-E41D-4035-B1F3-B1F4A2093B47.jpeg
DE9F248C-59ED-4D36-920D-F917CEBDA62E.jpeg
With Race Deck or other tiles is there any problem with moisture getting under the tiles and mold/mildew forming?
Geoff Harlow
Build School: 12/8/17 - 12/10/17
Complete Kit - delivered April 21, 2023
Dart 363 by Forte, IRS, Pwr Steering
-
In the three years I've had mine, I have yet to pull up the tiles to see if there's any moisture issues. So far, there's no mildew smells and the garage never feels musty, damp, or clammy. Here in Virginia though, we don't have snowy winters either so mostly just rainwater dripping off the car.
But I do recall in one of Edward B's posting (of Michigan) that he took up the tiles in the spring to clean out winter residue - not sure if it's an annual ritual.
MKIV complete kit w/powder coating and cut outs, serial #9189 delivered 10/10/17, first start - 10/5/18, legal - 10/08/20. Blueprint 306 w/Holley Sniper EFI, TKO 600, power steering, Breeze fan shroud, trunk cubby, & engine compartment battery kit, CNC brake reservoirs, RT turn signal & gas pedal, mechanical throttle linkage, METCO safety loop, GASN side pipes, drop trunk, dual chrome roll bars, vintage gauges, glove box, custom center console, cup holders, and speakers.
-
Post Thanks / Like - 1 Thanks, 0 Likes


 Thanks:
  Likes:


 Reply With Quote

