-
Type 65 fuel tank removal
Quick question if i may.
I don't have the body with me at the moment so i can't check it myself.. Is it possible to remove the fuel tank from the car with the body on?
I plan on putting fuel foam inside the tank to prevent fuel starvation since I don't have a baffle in my tank, but since that stuff degrades, I will inevitably have to replace it.
-
Senior Member

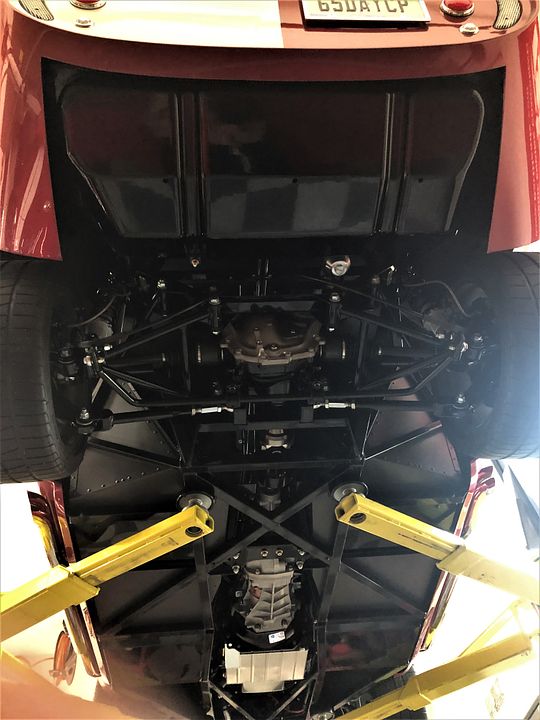
Yes. The body wraps under a bit in the back. But the tank is fully exposed.
Build 1: Mk3 Roadster #5125. Sold 11/08/2014.
Build 2: Mk4 Roadster #7750. Sold 04/10/2017.
Build Thread
Build 3: Mk4 Roadster 20th Anniversary #8674. Sold 09/07/2020.
Build Thread and
Video.
Build 4: Gen 3 Type 65 Coupe #59. Gen 3 Coyote. Legal 03/04/2020.
Build Thread and
Video
Build 5: 35 Hot Rod Truck #138. LS3 and 4L65E auto. Rcvd 01/05/2021. Legal 04/20/2023.
Build Thread. Sold 11/9/2023.
-
Curious how you would get foam in and out of that style tank?
Mike
-
@edwardb - thank you very much!
@michael everson - in my case, since i am running a Holley 12-132 fuel pump i had to make a larger opening for it. My plan is to stuff the large foam cubes (30x30x30cm) through that opening. Since Holley fuel pump comes with Hydramat which supposedly can pull enough fuel for the fuel pump even when it is barely touching the fuel through its corner etc. my plan is to see how the Hydramat performs, before experimentig with foam.
Foam also degrades within 5-10 years, hence why i am reluctant to put it in right now as there is a chance that Hydramat will be sufficient to feed the fuel pump. Also, foam is most efficient when used in the fuel tank in the form of many small cubes, rather than a few large ones, but this leaves the issue of fuel level sender not being able to float freely to give a reading. Encasing the fuel level sender would help solve this issue.
-
The rear roll pan on my Gen 3 coupe is a little bigger than Paul's (7") and the tank is tucked up behind it.

-

Originally Posted by
Namrups

The rear roll pan on my Gen 3 coupe is a little bigger than Paul's (7") and the tank is tucked up behind it.
Hmm, i think we have the same style of tub and as far as i can remember mine does have the longer roll pan too. Do you reckon it would be possible to remove the fuel tank with the longer pan too? I am worried that i will need access to the rear of the tub as well as the tank after i mount the body and the aluminum panels, but by the looks of it, doesn't look like that will be possible.. How are others accessing the tail lights after everything is mounted?
-
Senior Member

It’s possible. I put my tank in with the body on and the straps attached at the aft end. And I have the new style body with the longer diffuser. You’ll just have to bend the straps a bit, longer tank mounting bolts would help too.
-
Post Thanks / Like - 1 Thanks, 1 Likes
-
What KBL7TD said! I am goint to figure out a way to make the back aluminum panel removable to be able to get at the wiring for the rear lights.
-
Senior Member
Interesting change by Factory Five. The rear roll plan on my now 6+ year old Gen 3 Coupe kit (#59) measures just under 3 inches. So certainly different than what Namrups posted with his newer kit. But just eyeballing it, I think the tank would still go in/out since the straps are bolted at the front and it would tip out. Once finished, taking the body off the Coupe should be considered a very last option and IMO shouldn't even be attempted. It's very different than the Roadster, starting with the glued in windshield. The rear lights are accessible from inside the hatch area with the inside rear cover removed, as was already mentioned. I can't reach up there from the bottom even with the shorter roll pan.
Last edited by edwardb; 01-29-2024 at 09:57 AM.
Build 1: Mk3 Roadster #5125. Sold 11/08/2014.
Build 2: Mk4 Roadster #7750. Sold 04/10/2017.
Build Thread
Build 3: Mk4 Roadster 20th Anniversary #8674. Sold 09/07/2020.
Build Thread and
Video.
Build 4: Gen 3 Type 65 Coupe #59. Gen 3 Coyote. Legal 03/04/2020.
Build Thread and
Video
Build 5: 35 Hot Rod Truck #138. LS3 and 4L65E auto. Rcvd 01/05/2021. Legal 04/20/2023.
Build Thread. Sold 11/9/2023.
-
Post Thanks / Like - 0 Thanks, 2 Likes
-
Originally Posted by
Namrups
What KBL7TD said! I am goint to figure out a way to make the back aluminum panel removable to be able to get at the wiring for the rear lights.
I am in the same boat.. My plan is to use rivet nuts on the rear frame and also on the top of the rear cover and using bolts instead of rivets to hold it in place. In theory that should work, but i'm sure it's not as simple as it seems 
-
Originally Posted by
nick729
I am in the same boat.. My plan is to use rivet nuts on the rear frame and also on the top of the rear cover and using bolts instead of rivets to hold it in place. In theory that should work, but i'm sure it's not as simple as it seems
First, I agree with Paul's coments above. Second, the only issue I see with makine the back panel removable is going to be the how the carpet is installed.You will have to get under the carpet to remove whatever fasteners are holding the back panel in place. I'm thinking Velcro?
-
Originally Posted by
Namrups
First, I agree with Paul's coments above. Second, the only issue I see with makine the back panel removable is going to be the how the carpet is installed.You will have to get under the carpet to remove whatever fasteners are holding the back panel in place. I'm thinking Velcro?
Yup, that's the plan, although velcro is quite thick, so the carpet might be raised up too much in relation to the hatch floor carpet and seeing that the rear hatch wall goes on top of the floor panel won't help either... I haven't looked at the carpets yet, but in theory, it will be held in place at the top once you bolt the top of the rear hatch wall and it would sort of fall into place at the bottom so maybe you could get away with not using anything else to hold it in place?! Or just use a bit of double sided tape?
I also plan on using velcro for the trans tunnel middle piece (the one with the handbrake) since i want it removable.
Last edited by nick729; 01-29-2024 at 01:23 PM.
-
I'm putting 2 6x9 speakers in appropriate places so that they can be removed to gain access to the rear lights etc.
Then again, not a lot of people are gonna put in a stereo for that!! Just some access panels is what I've seen others do. Carpet shouldn't be too hard - just use less adhesive (then peel off when needed to gain access.... re-install. Or you could always go with some double sided tape?
Rian


 Thanks:
  Likes:


 Reply With Quote


