Midwest Classic Insurance

Visit our community sponsor

Thanks Thanks:  0
Likes Likes:  0
Results 1 to 18 of 18

Thread: How to install vintage Ford degas tank on small block - aka overflow or fill tank

  1. #1
    Out Drivin' Gumball's Avatar
    Join Date
    Feb 2011
    Location
    Blackberry Township, IL
    Posts
    2,653
    Post Thanks / Like

    How to install vintage Ford degas tank on small block - aka overflow or fill tank

    UPDATED 5/4/16 - Here's a very popular mod for giving your engine bay a period-correct look while providing a functional way to fill your cooling system and to allow for expansion. Back when I did this mod originally (2012), these tanks were available on E-bay for around $30 - $50. They were typically found on big-block Ford sedans back in the day and should still be plentiful out there at swap meets and such.

    Quite a few members contacted me asking for more information on the process of modifying and installing a vintage (early '60s) Ford degas tank on a smallblock, so I thought I'd write this up for those contemplating this idea. I started with a couple of tanks bought on ebay a couple years ago for $30 - 35 each, figuring I'd ruin one in the process. After noodling this idea over for a couple of years and looking at many other versions of this mod, I came up with the following. After pressure testing both tanks, I started with the one that only had a small pin-hole in an existing soldered seam that was easily repaired - much to my surprise the mod ended-up being so easy that the second tank stayed on the shelf for use as a spare someday.

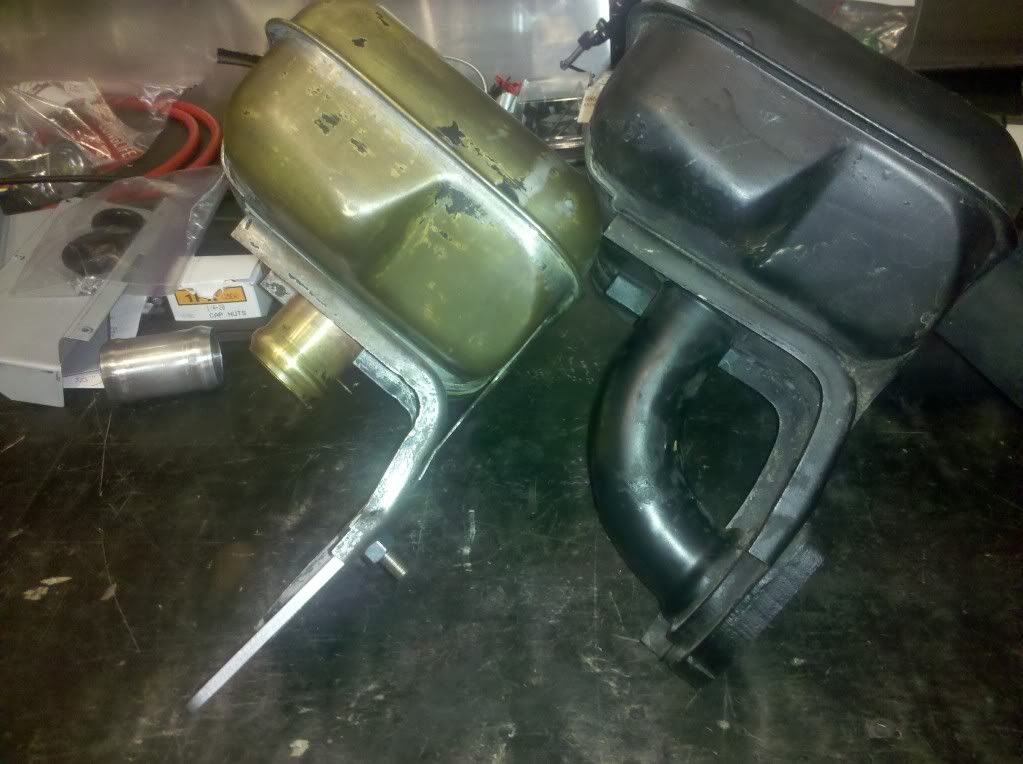
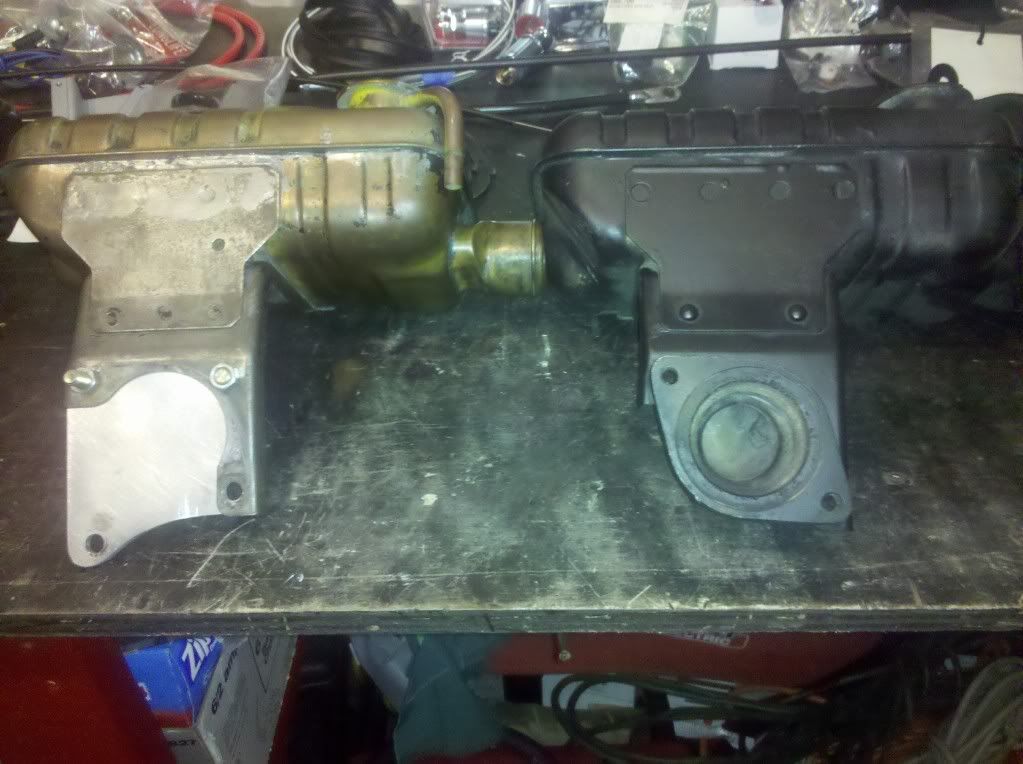
    1) Note that the bigblock degas tank thermostat housing mounting holes are off by ninety degrees, requiring the removal of that part or an adapter for the smallblock thermostat housing. I chose to remove the housing and most of the tube from the degas tank. This is done first by drilling out the pressed-over bracket metal in the thermostat housing holes to free it from the tank bracket, then by cutting the 1 1/2" tube approximately 2" from the bottom of the tank. Pictures of a modified and OEM tank for a "before and after" view:


    2) After mocking it up with a piece of thick cardboard, I fabricated an adapter bracket out of some 3/16" thick aluminum scrap that I had laying around to mount the tank to two of the top waterpump bolts using one of the original brackets on the tank. The adapter bracket covers the two original holes in the tank's original bracket - the other upper hole in the adapter was used to mark a spot on the original tank bracket so it could be drilled and the forth hole - the other lower hole, is just through the adapter bracket and is the lowest hole on that part. This mounting worked well from a hood clearance standpoint, but puts the tank very close to the distributor. If you're using a large head / cap distributor, you may need to move the tank to the forward point on the waterpump. To facilitate this mounting location, I used two longer bolts for those positions on the waterpump, but had to thread the bolts a bit higher up the shank as the majority of the bolt shank is not threaded, so that the bolts would fully seat in the water pump and timing cover and leave enough threads protruding out the back of the engine front cover to act as a mounting point. Pictures of mounted tank and of the mounting bolts - note that these photos were at the mock-up stage so the bolts holding the tank to the adapter bracket were only temporary - the permanent ones are sized appropriately.


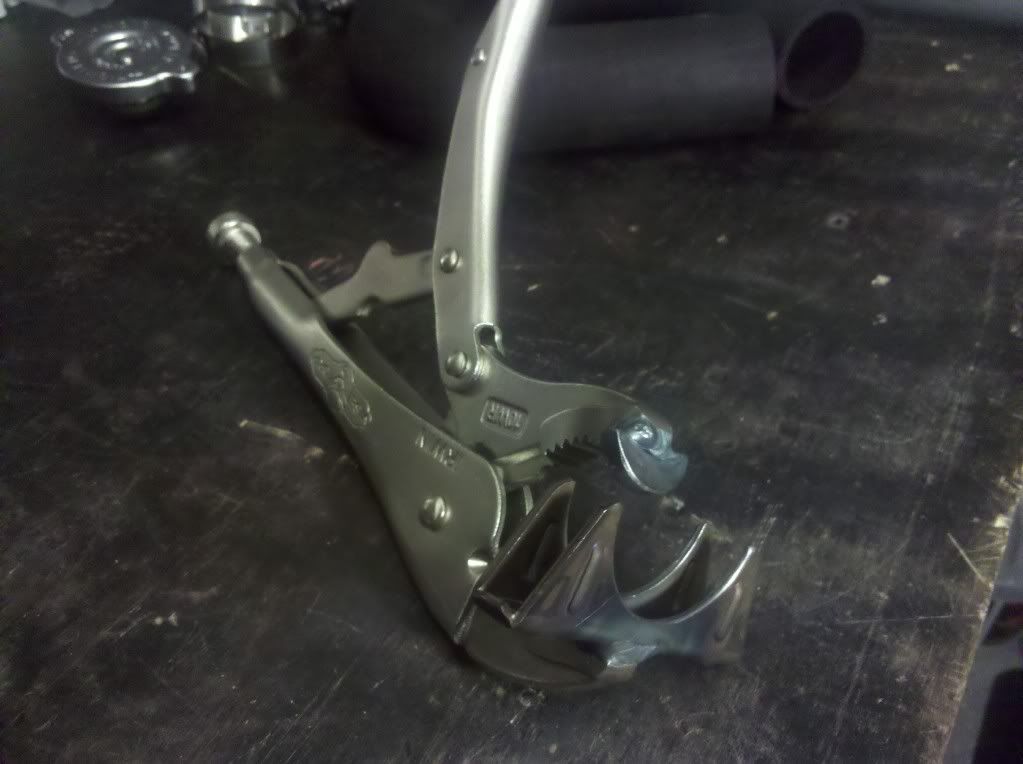
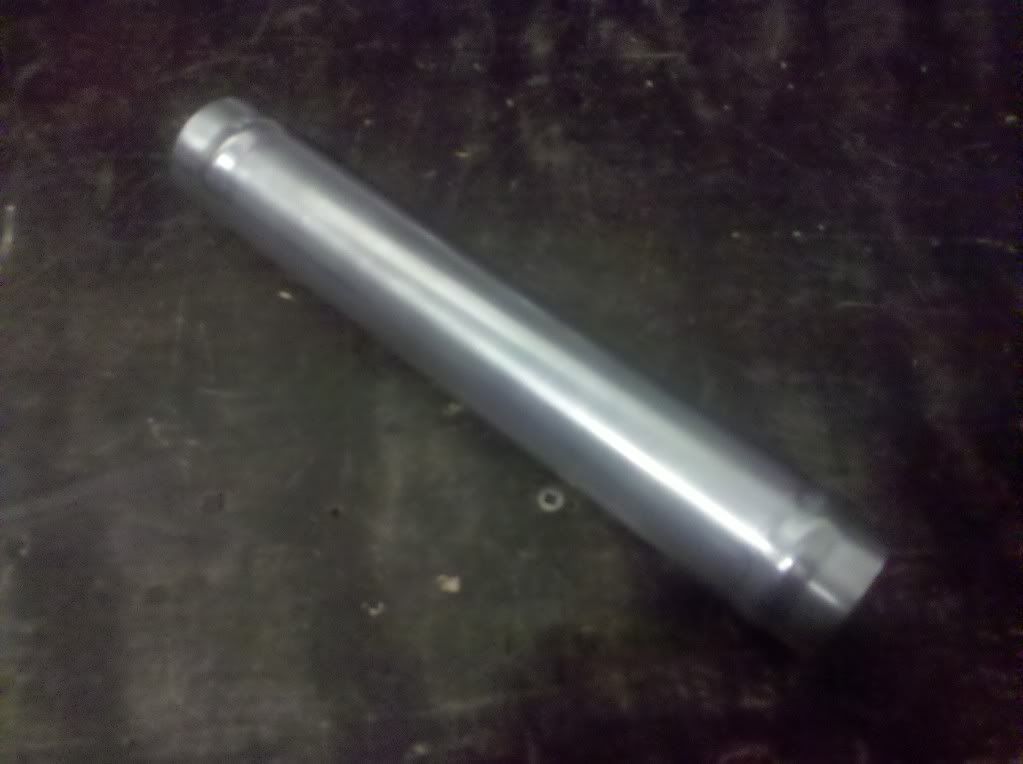
    3) I made a bead tool using instructions found on-line so that I could put a raised bead in both the stub of tubing on the bottom of the tank and at each end of the two 1 1/2" aluminum tubes that are used to piece together the upper radiator hose and the hose that spans from the lower tank to the thermostat housing. Pictures of tubes with beads (see bead on lower tank tube in pictures above) and bead making tool - 10" vice grip with woodruff key and 1 1/2" carriage for a muffler clamp welded to jaws.


    CONTINUES BELOW
    Last edited by Gumball; 05-04-2016 at 11:14 AM.
    Later,
    Chris

    "There are no more monsters to fear, and so, we have to build our own."
    Mk3.1 #7074

  2. #2
    Out Drivin' Gumball's Avatar
    Join Date
    Feb 2011
    Location
    Blackberry Township, IL
    Posts
    2,653
    Post Thanks / Like
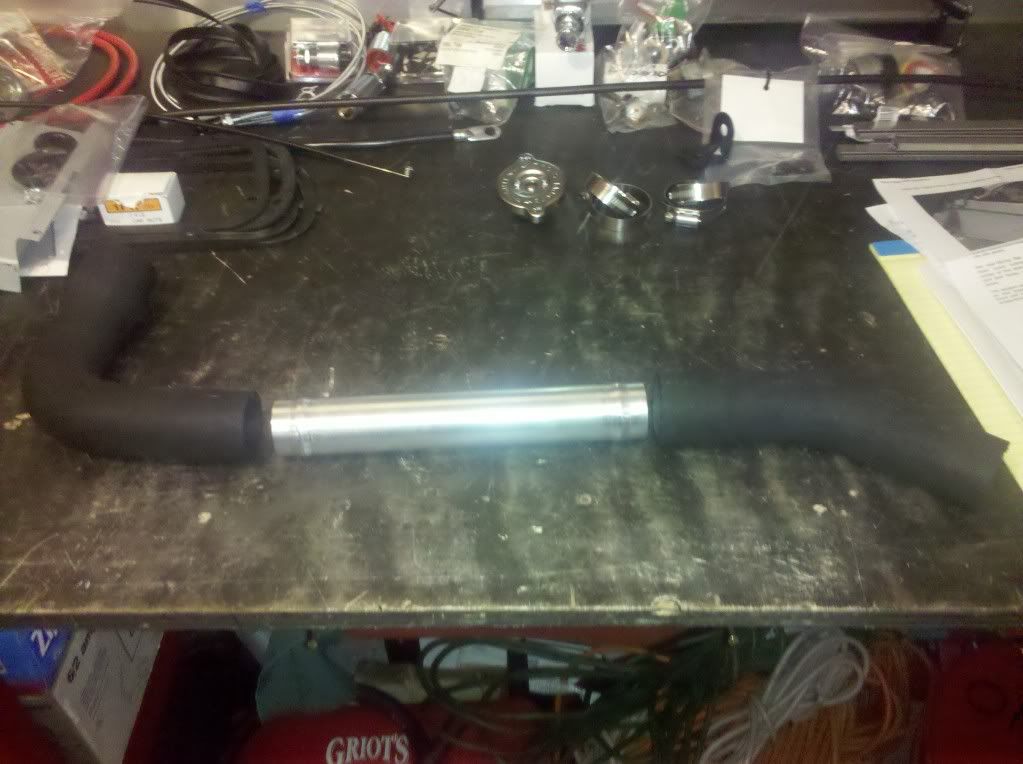
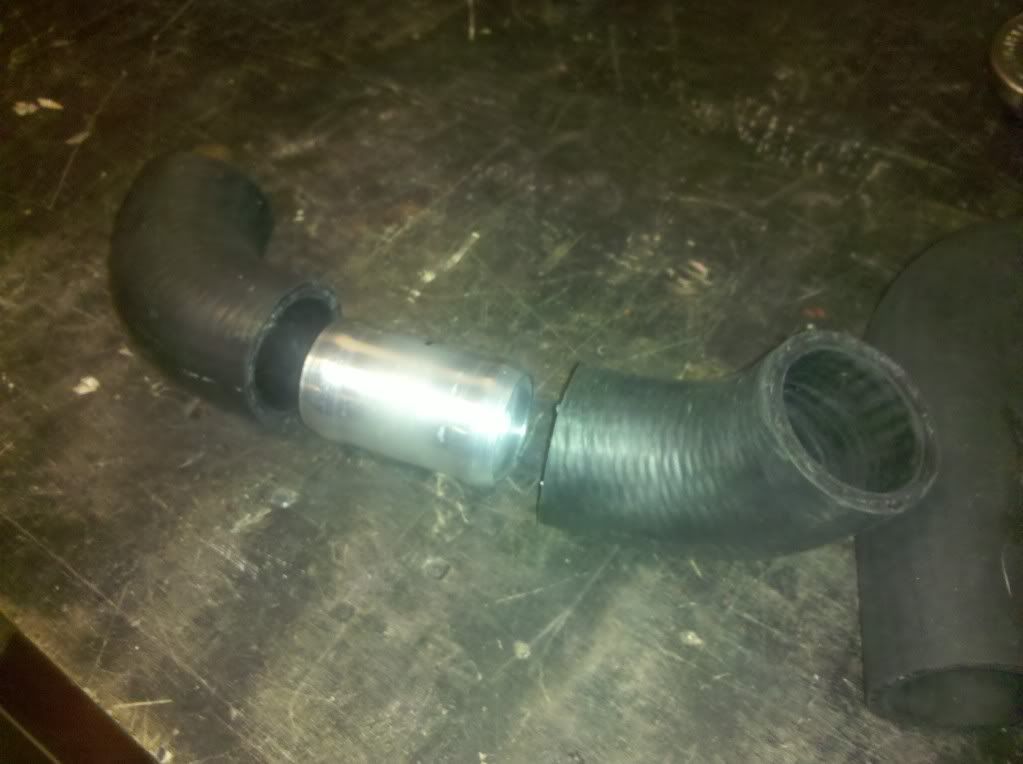
    4) The final step was to fabricate the hoses. I'm using the FFR supplied AFCO radiator. To connect the tank to the radiator (upper rad hose), I used a 90 degree elbow that is 1 3/4" at the tank and 1 1/2" at the other end. To connect to the radiator, I used a 45 degree elbow that is 1 1/2" at both ends. To connect the two, I used the long 1 1/2" aluminum tube in the picture above. I made this tube long on purpose so that it extends well into the elbows (up to the curve) to add rigidity to the upper hose. To make the hose that connects the lower tube on the tank to the thermostat housing (which is a Canton billet housing from Summit Racing with a straight outlet), I used two small 45 degree elbows that are 1 1/2" at both ends. This will all be tied together using OEM style Ford tower hose clamps for a true vintage look. Pics of the hose assemblies:


    When combined with the adapter bracket, original bracket structure, under tank hose assembly, and upper radiator hose assembly, this is an extremely rigid mount.

    Hoses were sourced from the wall of hoses at the local auto parts store and Farm & Fleet - just be creative and you'll be able to find something that will work exactly for your project.

    I'll post pictures of the final product once everything is painted and all the hoses, clamps, overflow, etc. are in place. In the mean time, good luck on doing this super easy mod to give your FFR a true vintage flavor under the hood!!!
    Last edited by Gumball; 05-04-2016 at 11:16 AM.
    Later,
    Chris

    "There are no more monsters to fear, and so, we have to build our own."
    Mk3.1 #7074

  3. #3
    Out Drivin' Gumball's Avatar
    Join Date
    Feb 2011
    Location
    Blackberry Township, IL
    Posts
    2,653
    Post Thanks / Like
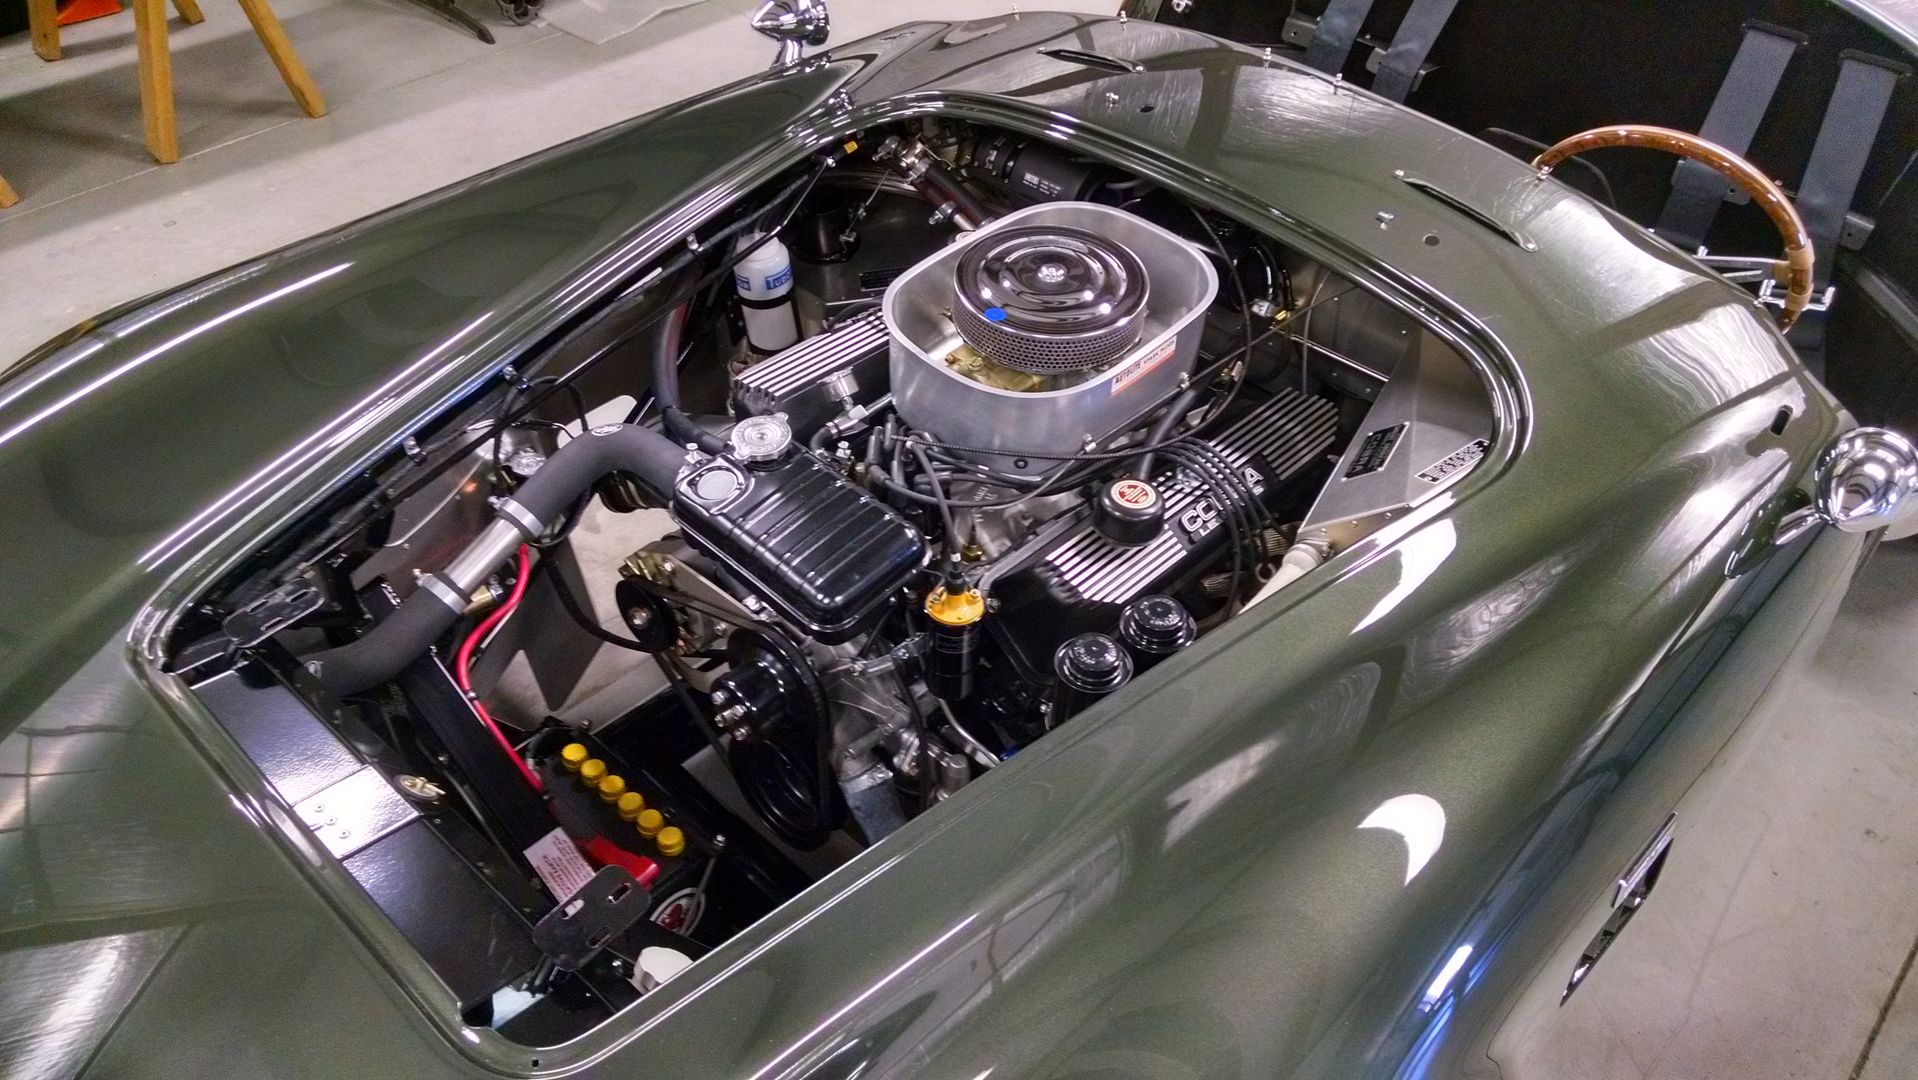
    Just a couple of overall shots of the installed tank:


    Last edited by Gumball; 05-04-2016 at 11:20 AM.
    Later,
    Chris

    "There are no more monsters to fear, and so, we have to build our own."
    Mk3.1 #7074

  4. #4
    Senior Member luvaz's Avatar
    Join Date
    Feb 2011
    Location
    Scottsdale, AZ
    Posts
    157
    Post Thanks / Like
    Chris, I'm planning this mod w/my BBF degas tank, too. Thanks for sharing and posting some really good photos.

    Thanks,
    Will
    FFR MK III picked up 9/24/05 Roller 9/28/05 First start & go-cart 11/28/05 red w/white stripes, PC Chassis, heat/defrost, FFR 15's, pwr footbox vents, radio delete, dual quad 427W, 4 link w/3.27's, Koni's all around, Gen 1 rag top, snapless tonneau, Herb's door panels, NRC rear discs, Breeze head rest, ********** emblems, Paint by Gino's in Rowley, MA
    2011 ffcars.com calendar Cover Car Yes, that's me in the avatar with Dave Smith in front of my roadster at the '06 FFR Open House!

  5. #5
    Bill_VA's Avatar
    Join Date
    Feb 2011
    Location
    Manassas, VA
    Posts
    230
    Post Thanks / Like
    I found the billet themostat housing: http://www.summitracing.com/parts/CTR-80-026/
    Non-donor - Engine Factory 351w/400hp - TKO500 - 3-Link - Cobra brakes - FFmetal - Wilwood pedals - FR500 wheels - NCPainter

    Owner of FFmetal.com

  6. #6
    Out Drivin' Gumball's Avatar
    Join Date
    Feb 2011
    Location
    Blackberry Township, IL
    Posts
    2,653
    Post Thanks / Like
    Bill - that's the one. Sorry, I should have provided the part number.
    Later,
    Chris

    "There are no more monsters to fear, and so, we have to build our own."
    Mk3.1 #7074

  7. #7
    Senior Member CraigS's Avatar
    Join Date
    Feb 2011
    Location
    Blacksburg, Va
    Posts
    4,730
    Post Thanks / Like
    Excellent work. Now that you have done all the engineering it ends up being a pretty simple mod. Sure wish there was a source for those tanks. One thing I like about this system is it should make bleeding air from the coolant very easy. Just let the engine idle and keep topping up that tank til the level quits dropping. Great job!
    FFR MkII, 408W, Tremec TKO 500, 2015 IRS, DA QA1s, Forte front bar, APE hardtop.

  8. #8
    Out Drivin' Gumball's Avatar
    Join Date
    Feb 2011
    Location
    Blackberry Township, IL
    Posts
    2,653
    Post Thanks / Like
    Just did an ebay search on "Ford coolant tank" and quite a few came up. They look to be going for around $100 or less. Once I know the one that I modded will work, I'll probably put my spare up for sale on this site, too.
    Later,
    Chris

    "There are no more monsters to fear, and so, we have to build our own."
    Mk3.1 #7074

  9. #9
    Junior Member Modtour's Avatar
    Join Date
    Feb 2011
    Location
    Mystic, CT
    Posts
    3
    Post Thanks / Like
    Great write up!!!!

    Here is another I'm going to try:
    http://home.comcast.net/~superhart/cobra4.htm

    Russ

  10. #10
    FFR6671 Fifty-Two's Avatar
    Join Date
    Feb 2011
    Location
    Thousand Oaks, CA
    Posts
    115
    Post Thanks / Like
    Awesome job with the documentation Chris!!!
    Your homemade tubing beader is slick!

    Kudos and thanks for taking the time to put this together for everyone.
    - John
    Mk 3.1 - FFR6671 - "Trying" to recreate a Semi-Comp 427...
    427ci FE Big-Block / Pin-Drive IRS / TKO600 / Smiths Gauges / SC Dash / 15" Goodyear Billboards
    Fabrication (the fun stuff): 427 Throttle Pedal (SS) : AC Pedals on Wilwood Arms : CSX E-Brake Lever : CSX-Style Footbox Vents (SS) : CSX-Style Dash Support Tubes & Recessed Dash : CSX-Style F-Panels : Firewall Forward 4" : "Full" Rear Drop : Recessed Bulkhead & Exposed Rollbar ... hopefully the list continues!

  11. #11
    Senior Member riptide motorsport's Avatar
    Join Date
    Feb 2011
    Location
    Fort Lauderdale Fl.
    Posts
    3,296
    Post Thanks / Like
    Kudos fpr the tutorial...
    FFR Daytona Type 65 Coupe
    67 427 Cobra
    57' Belair
    72 Pinto Wagon ,306" 1/4 miler
    34 5 window coupe Ford
    2003 Mustang GT
    99' ZX9
    85 Goldwing

    All toys still in the Scuderia!


    Every Saint has a past..................every sinner a future

    Don't take yourself so seriously........no one else does.

    You never see a motorcycle parked outside a Psychiatrists office.

  12. #12
    Out Drivin' Gumball's Avatar
    Join Date
    Feb 2011
    Location
    Blackberry Township, IL
    Posts
    2,653
    Post Thanks / Like
    Today's TTT for a oldie but a goody - anyone using a carb and looking for an old-school appearance should consider this mod.
    Later,
    Chris

    "There are no more monsters to fear, and so, we have to build our own."
    Mk3.1 #7074

  13. #13
    Senior Member
    Join Date
    Feb 2016
    Posts
    110
    Post Thanks / Like
    I have always loved the look of that tank no matter what hood it is under. I grew up with my Dads 66 T-Bird, spent days just looking under that huge hood. Are those vise grips available for rent???? i see this mod on my build.....

  14. #14

    Join Date
    Feb 2011
    Location
    Greeley, CO
    Posts
    51
    Post Thanks / Like
    Do you find the turkey pan restricts airflow into the intake? I remember seeing a thread at one point in time about the lack of airflow that actually comes through the scoop.
    Rick
    Lodestone Bililetworks
    Custom Fluid Line Clamping Systems and Custom Coatings
    http://www.lsbilletworks.com

    FFR5308R

  15. #15
    Out Drivin' Gumball's Avatar
    Join Date
    Feb 2011
    Location
    Blackberry Township, IL
    Posts
    2,653
    Post Thanks / Like
    Rick,

    I removed the turkey pan last summer after a couple thousand miles because I had to do some carb tuning and haven't put it back on. Part of the reason for leaving it off is that I also had issues with the adapter plates for the big block valve covers (leaks - go figure) and swapped over to more traditional valve covers. So, as part of all that, I went with a repop version of the 289 Hi-Po air cleaner. The engine is certainly making more power, but I'm sure it's due to the changes I made to the carb and ignition as part of my de-bugging process.

    Current engine pic.....

    Later,
    Chris

    "There are no more monsters to fear, and so, we have to build our own."
    Mk3.1 #7074

  16. #16

    Join Date
    Feb 2011
    Location
    Greeley, CO
    Posts
    51
    Post Thanks / Like
    I am thinking making a couple changes as well now that I have been on the road for a few years. I am dreading it, but I need to pull out one of the gear boxes for the wipers and fix that. Those are just a horrible design so I might try to re-invent them on them and build something better.
    Rick
    Lodestone Bililetworks
    Custom Fluid Line Clamping Systems and Custom Coatings
    http://www.lsbilletworks.com

    FFR5308R

  17. #17
    Senior Member Raceral's Avatar
    Join Date
    Feb 2011
    Location
    Stoneville NC
    Posts
    374
    Post Thanks / Like
    That vice grip bead maker is the coolest thing I have seen in a while. I must make one of those. I want to make me a one piece hose out of aluminum on the bottom and top
    Thanks,
    Al Adkins
    Certified "Kool Aid" drinker

  18. #18
    Senior Member OttawaFFRer's Avatar
    Join Date
    Feb 2011
    Location
    Ottawa, Canada
    Posts
    219
    Post Thanks / Like
    Quote Originally Posted by Gumball View Post
    Today's TTT for a oldie but a goody - anyone using a carb and looking for an old-school appearance should consider this mod.
    I tracked down a degas tank and am going to attempt this, thanks!
    10 years after my roadster build....
    289 FIA (pickup 28/08/20 if covid permits)
    currently building a 289 and accumulating parts needed to finish a Canadian Kit.

Posting Permissions

  • You may not post new threads
  • You may not post replies
  • You may not post attachments
  • You may not edit your posts
  •  

Breeze

Visit our community sponsor