Very Cool Parts

Visit our community sponsor

Thanks Thanks:  0
Likes Likes:  5
Page 34 of 51 FirstFirst ... 24323334353644 ... LastLast
Results 1,321 to 1,360 of 2016

Thread: More progress made on the body : )

  1. #1321
    Senior Member The Stig's Avatar
    Join Date
    Feb 2011
    Location
    Charlotte, NC
    Posts
    2,004
    Post Thanks / Like


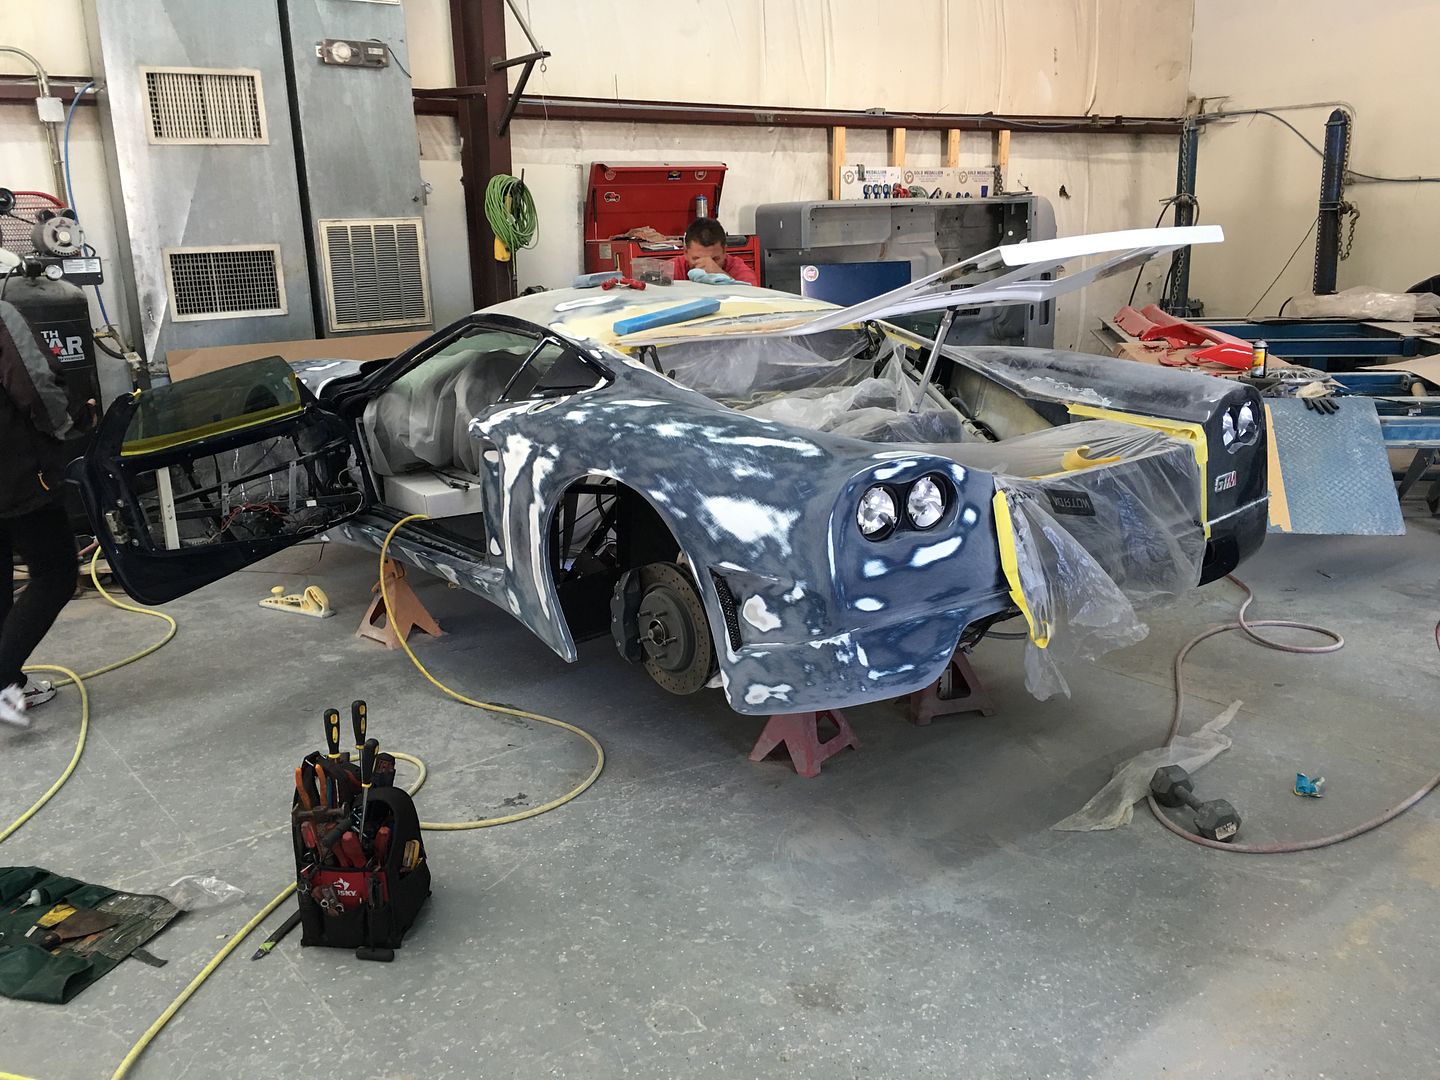
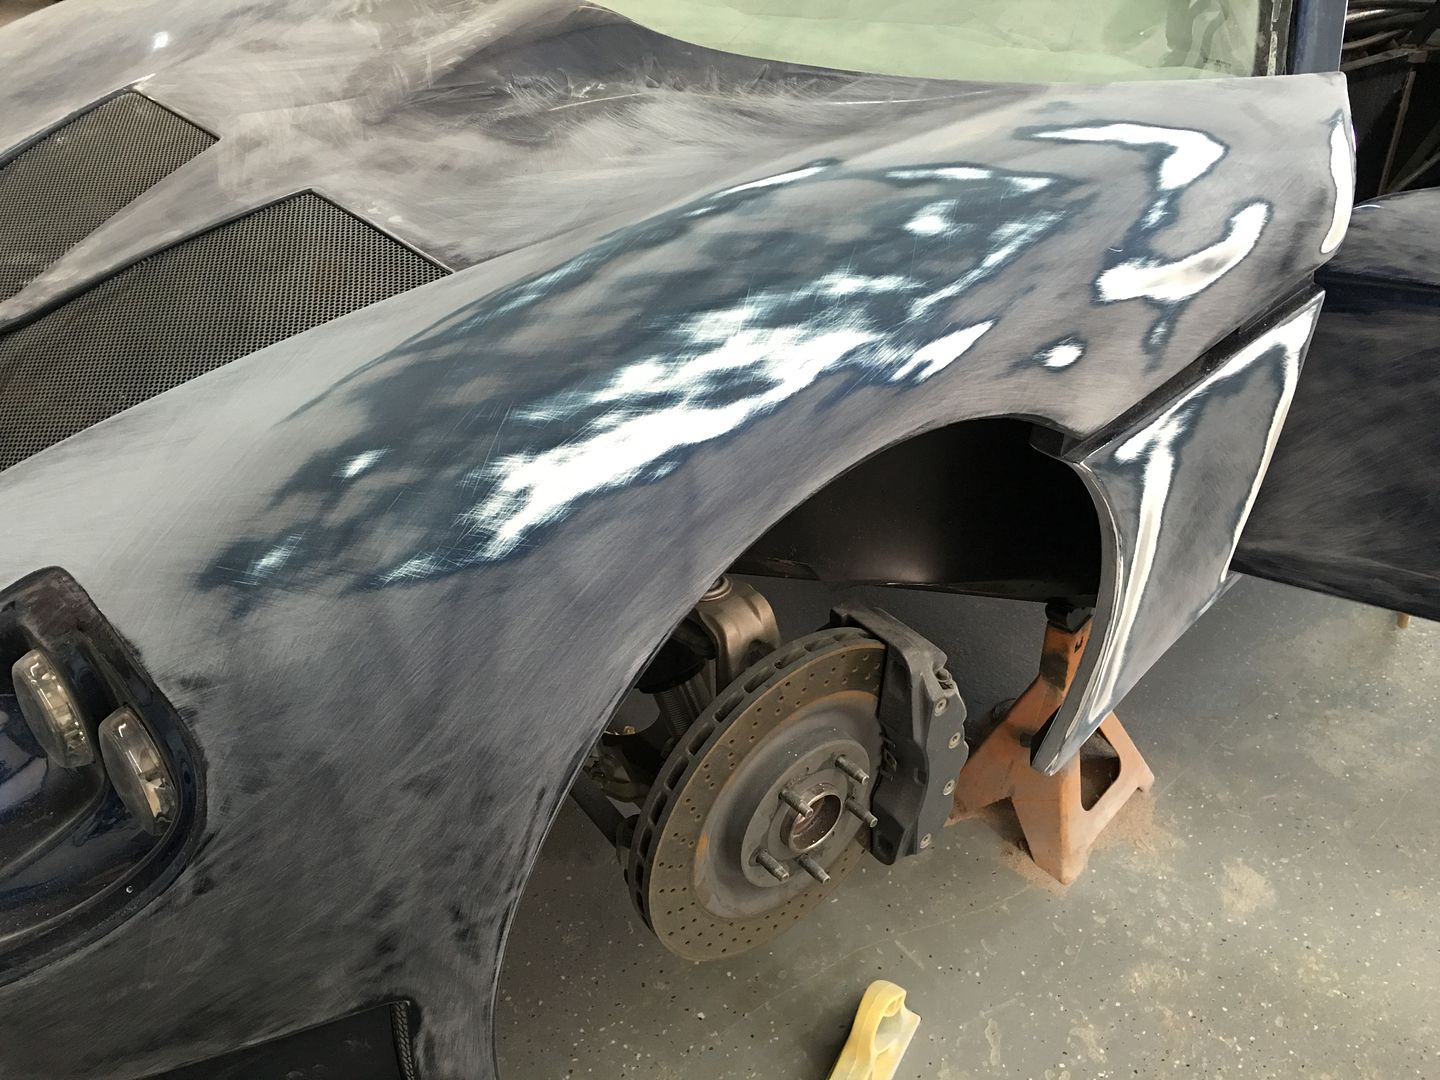
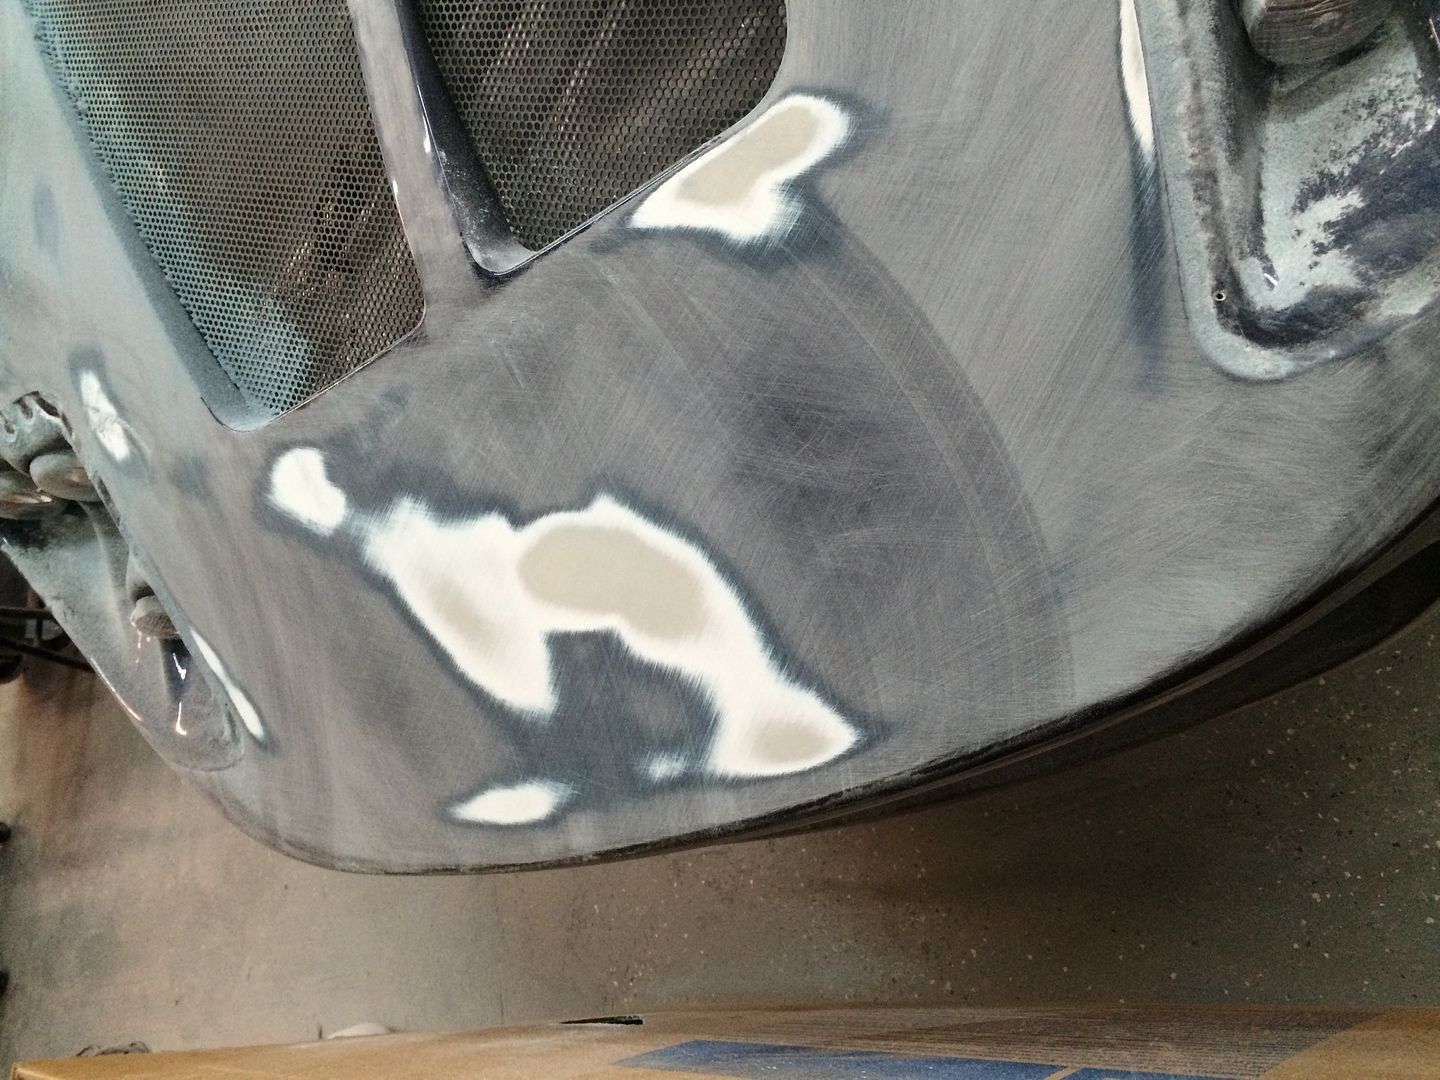
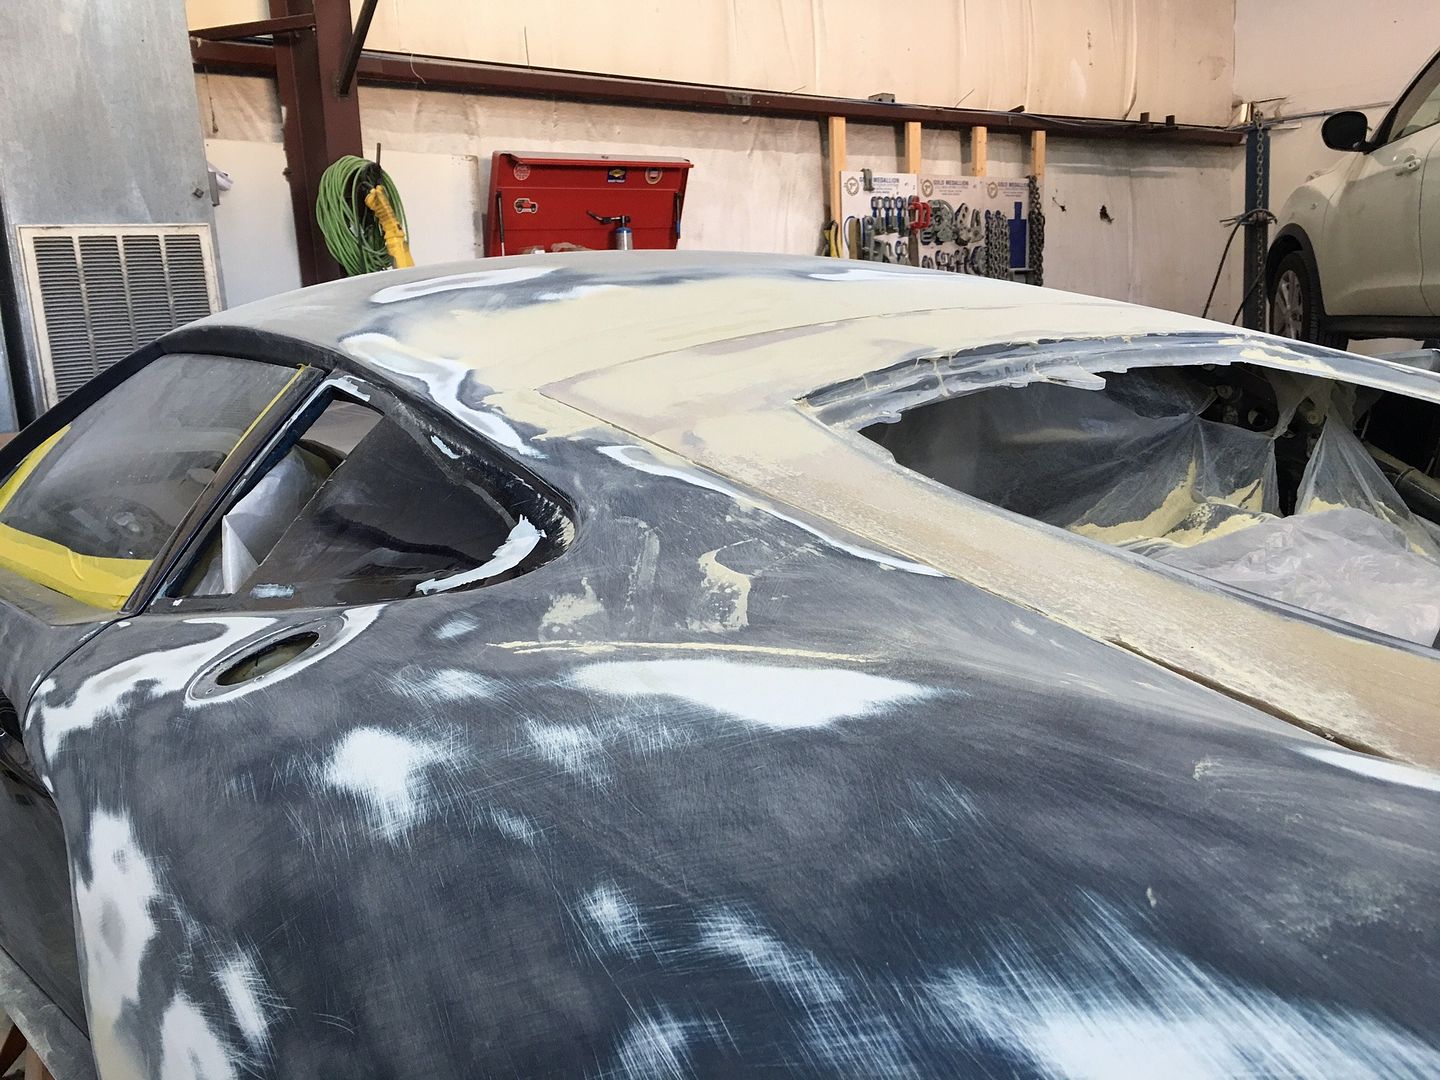
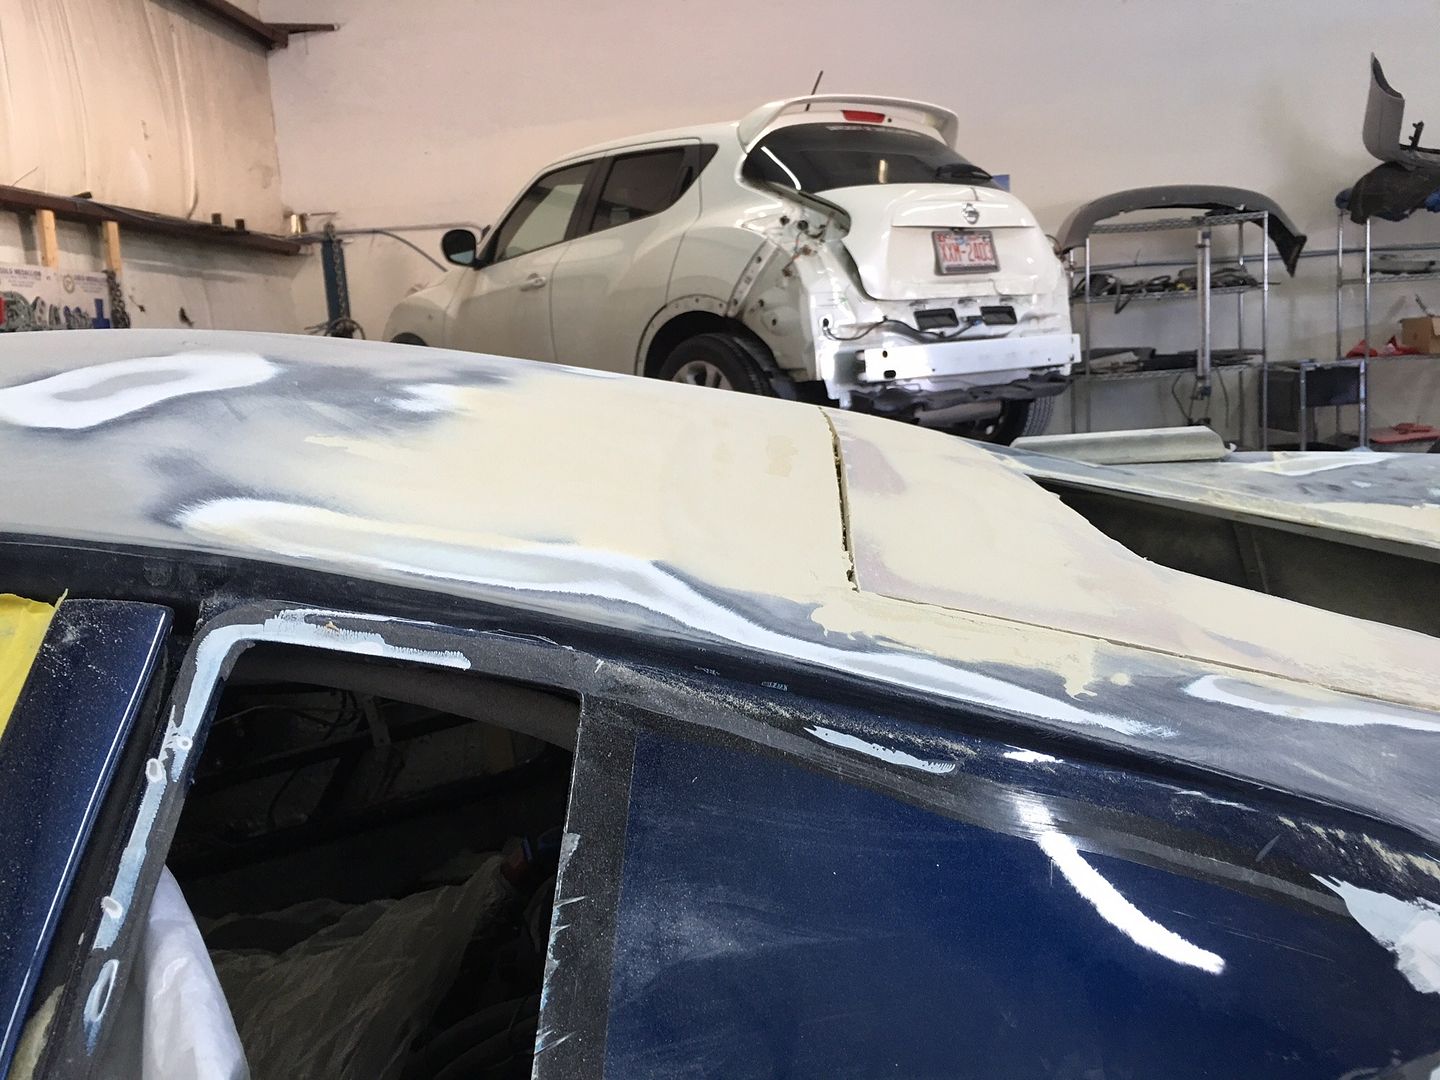
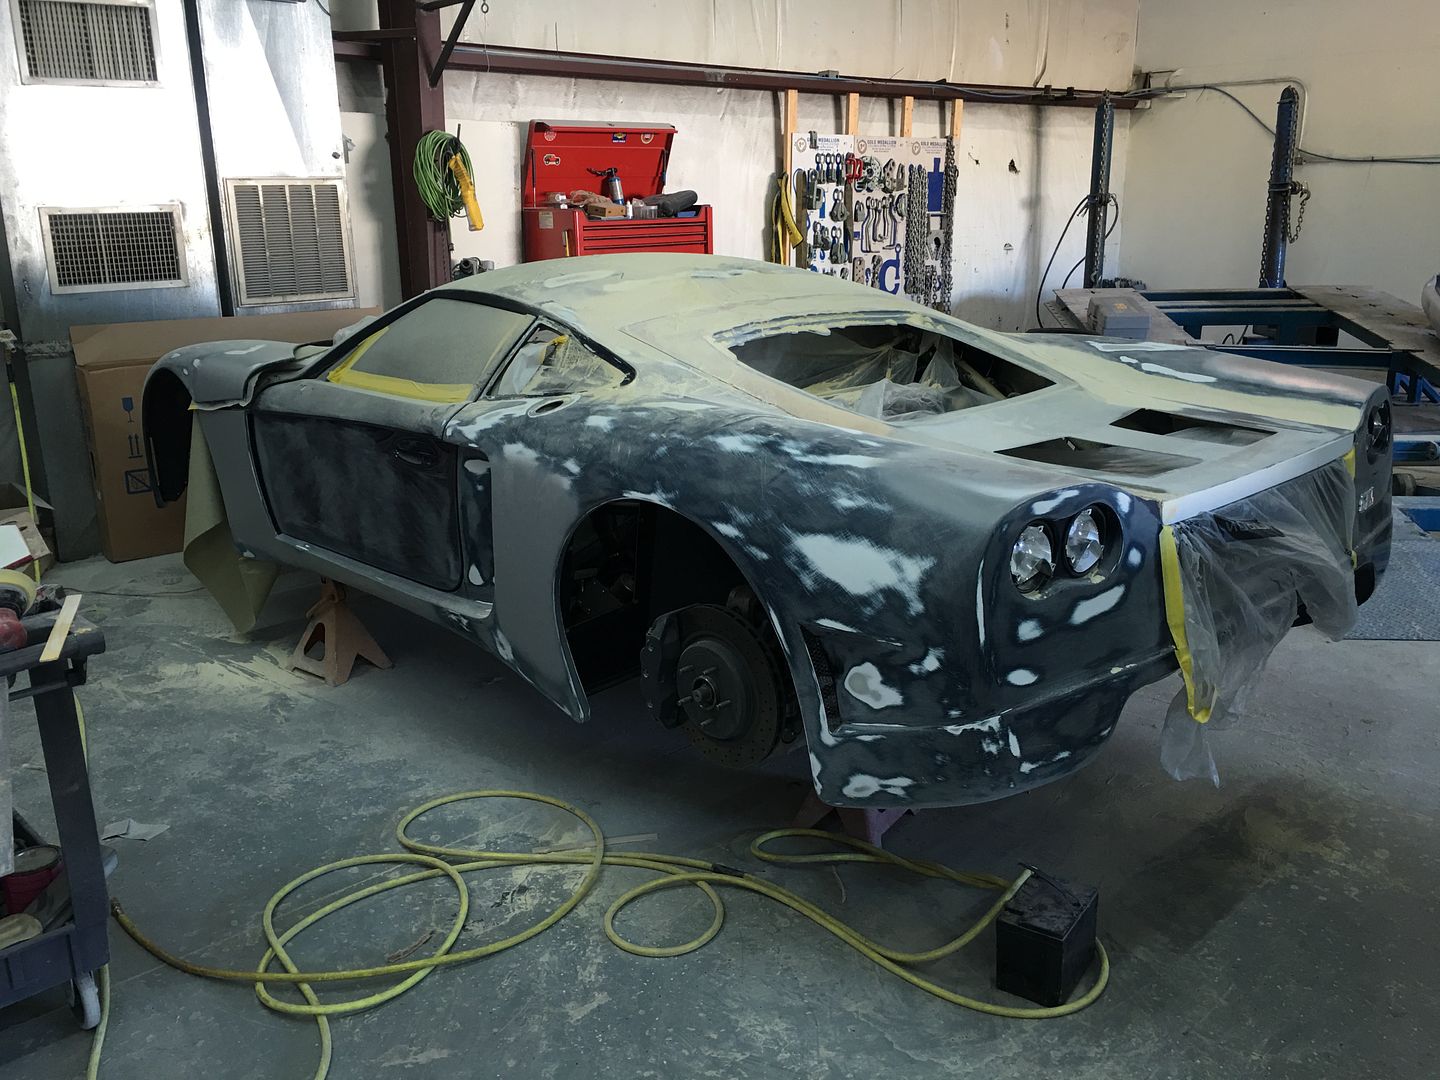
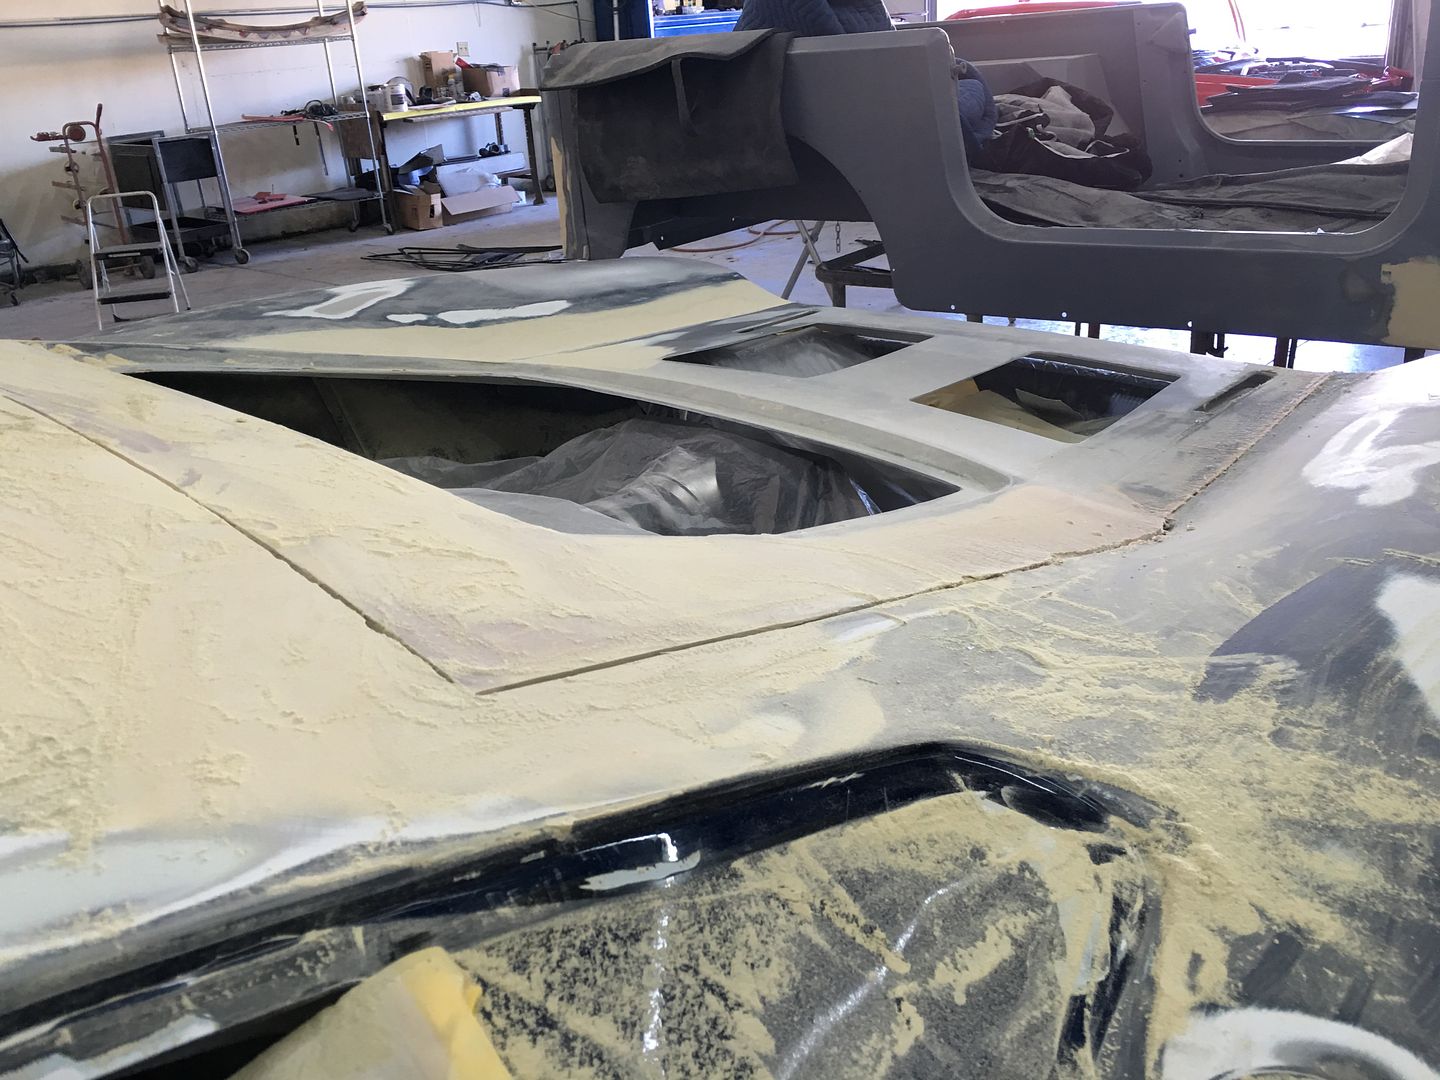
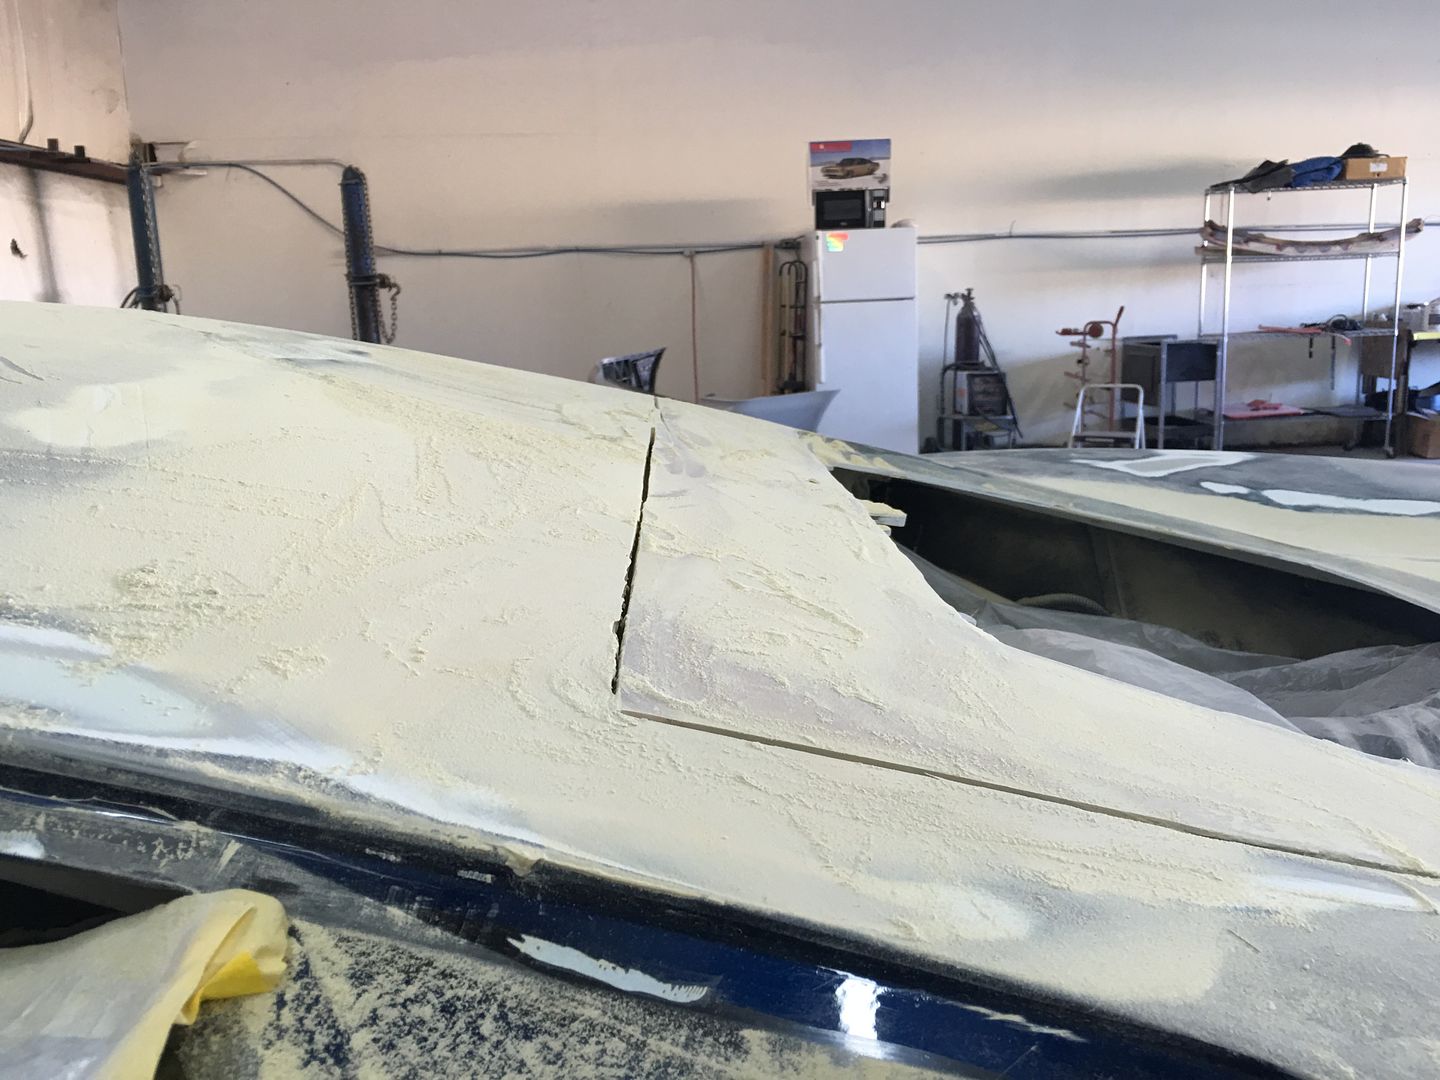
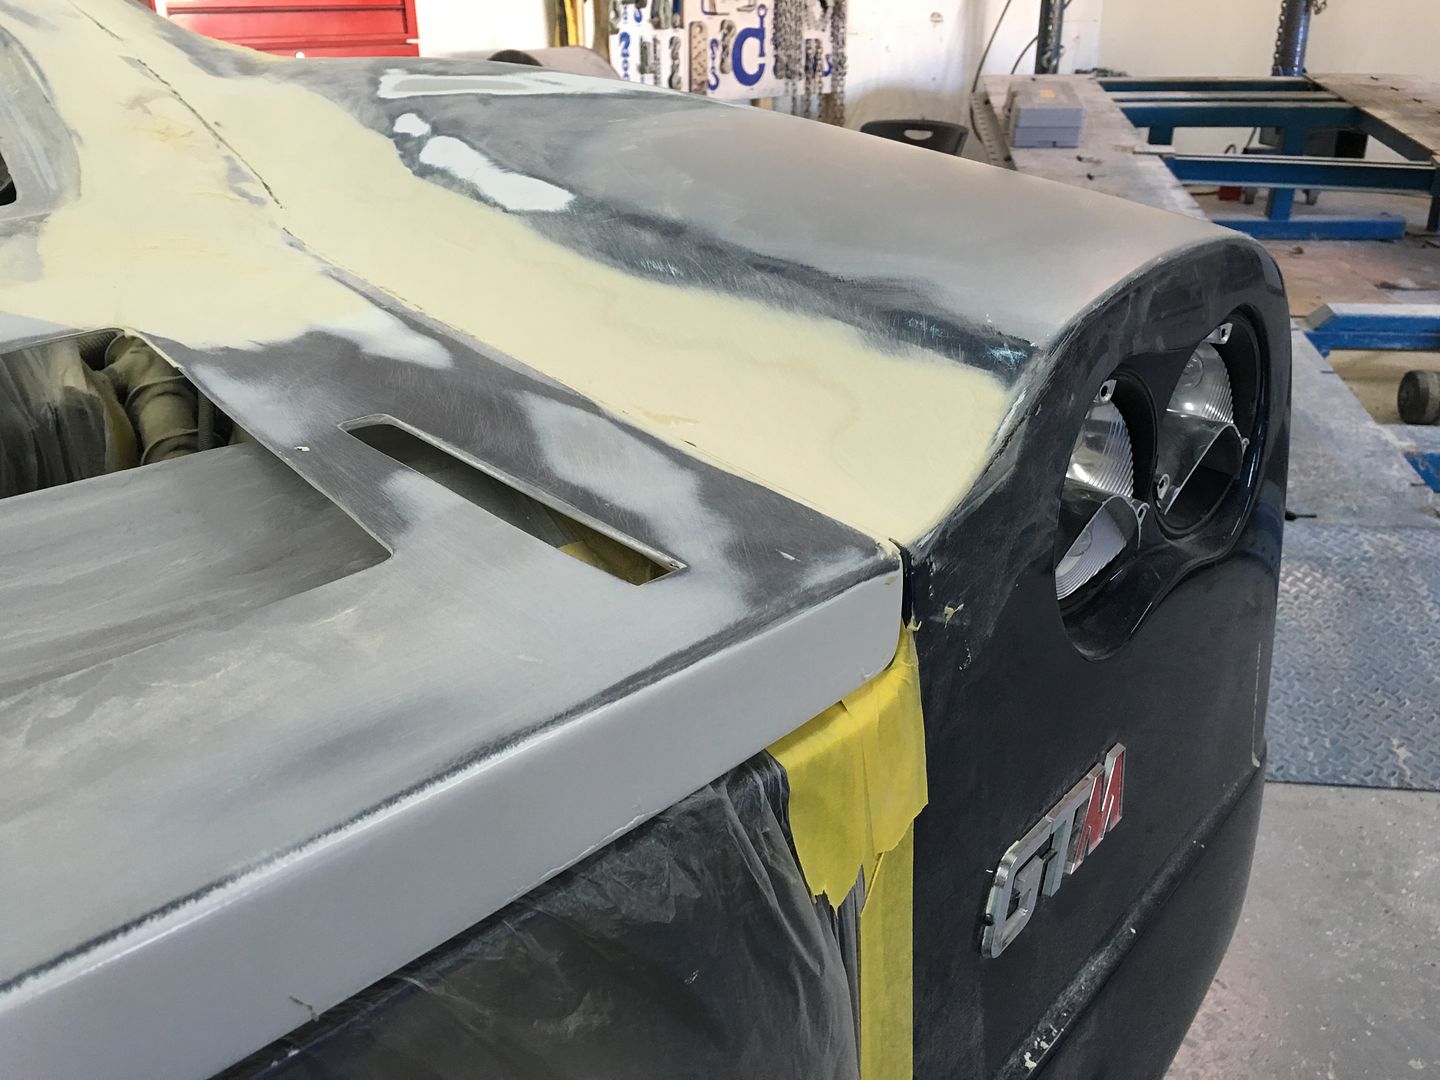
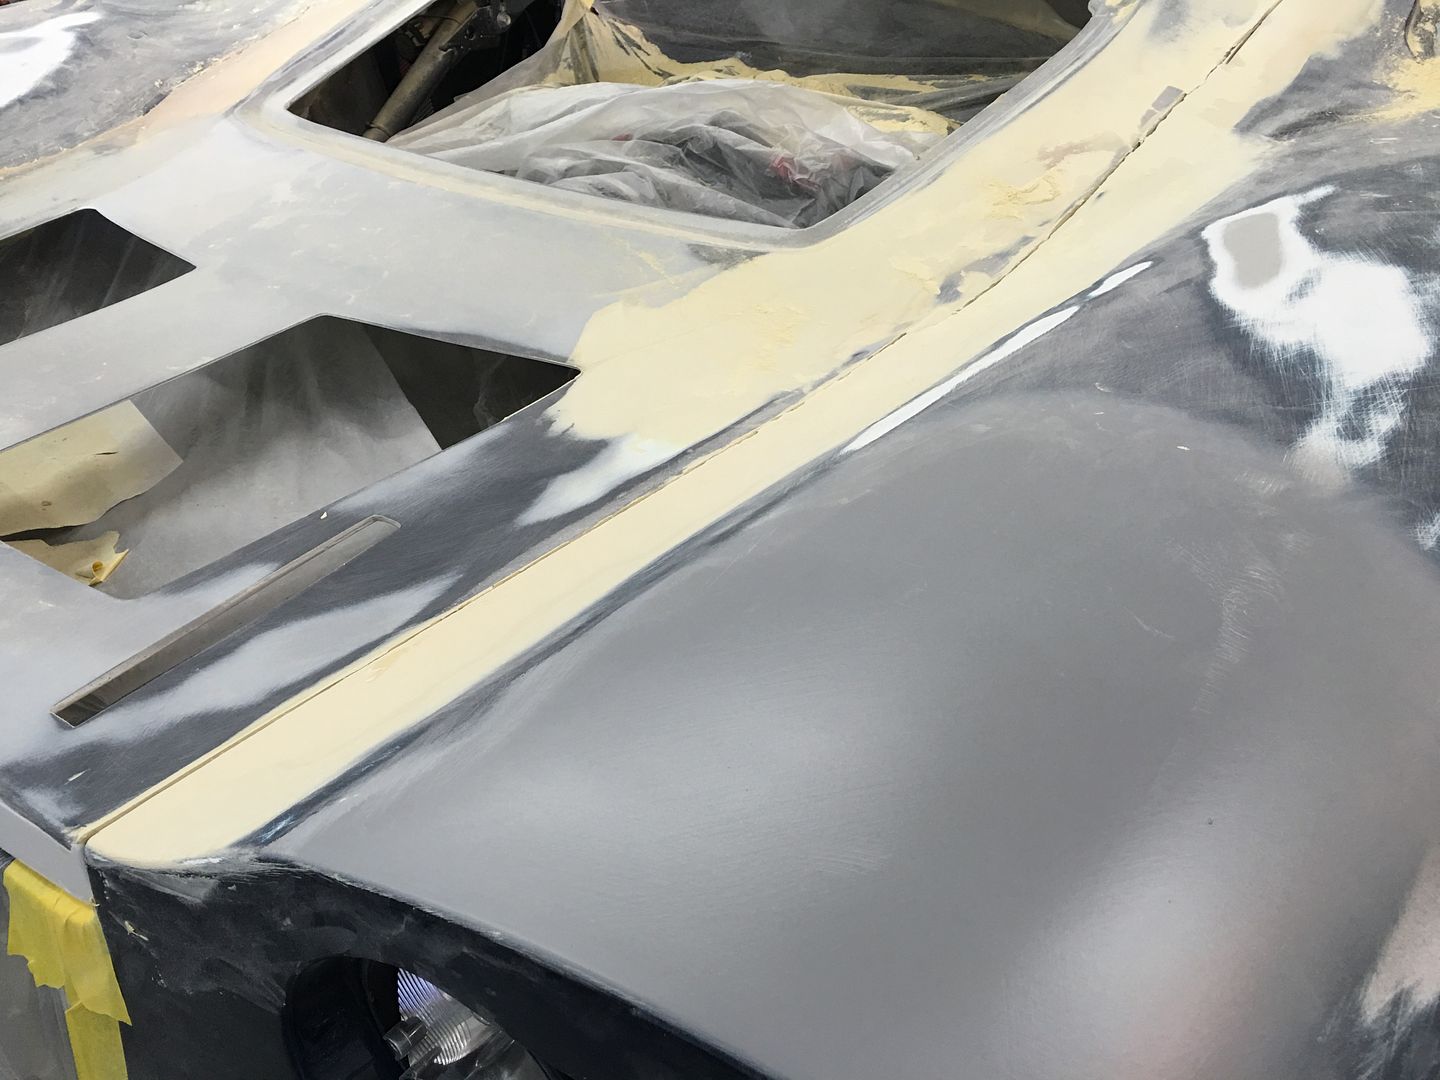
    It's not hard to see that the decision strip the $14,500.00 paint job was the right decision. The entire car is covered in high and low spots that should never have been there.

    As they say, "a picture speaks a thousand words"...


    Last edited by The Stig; 11-09-2015 at 03:59 PM.
    The Stig

    Some say, that I only know two facts about ducks, (both being wrong); and that if I could be bothered, I could solve the "da Vinci Code" in 47 seconds...
    All I know is that I'm called "The Stig".
    GTM #0081

  2. #1322
    Senior Member
    Join Date
    Feb 2011
    Location
    Myrtle Beach, SC
    Posts
    2,108
    Post Thanks / Like
    Mike-

    My goodness that's a lot of body work for a car that was already "done!" The sad part is that it looks like it was really necessary, given the number and variety of high spots that were uncovered. Either that, or she is wearing a halloween costume...

    I give you all the credit in the world for seeing this through. I admire your tenacity, as well as your vision. I know your patience was challenged myriad times, but you remained focused on the end product.

    I know I speak for many others when I say that I can't wait to see her truly finished!! Thank you for sharing!

    Regards,

    Steve

  3. #1323
    Senior Member The Stig's Avatar
    Join Date
    Feb 2011
    Location
    Charlotte, NC
    Posts
    2,004
    Post Thanks / Like
    Quote Originally Posted by WIS89 View Post
    Mike-

    My goodness that's a lot of body work for a car that was already "done!" The sad part is that it looks like it was really necessary, given the number and variety of high spots that were uncovered. Either that, or she is wearing a Halloween costume...

    I give you all the credit in the world for seeing this through. I admire your tenacity, as well as your vision. I know your patience was challenged myriad times, but you remained focused on the end product.

    I know I speak for many others when I say that I can't wait to see her truly finished!! Thank you for sharing!

    Regards,

    Steve
    Thank you Steve.

    I have to tell you that it was pretty hard to see it stripped down. But when it's all said and done, it'll be right, the body panels will be "straight", and it will look awesome.

    I'll tell you something else: I absolutely can't wait to see Jason's rear hatch all finished and flush with the body. The body line/curve from the roof will be blended straight through the hatch with no breaks in the line. It is going to look fantastic. This is the main section of the car that always had me twisted up.

    Yesterday afternoon my wife and I were at an intersection waiting to make the turn into our community, when a new 6 series BMW painted "Carbon Black Metallic" drove across in front of us. Man did that ever light me up for the GTM. It really is a unique look and I can't wait to see it on the car.

    At some point, we'll be there.

    Take care,

    Mike
    Last edited by The Stig; 10-31-2015 at 10:39 AM.
    The Stig

    Some say, that I only know two facts about ducks, (both being wrong); and that if I could be bothered, I could solve the "da Vinci Code" in 47 seconds...
    All I know is that I'm called "The Stig".
    GTM #0081

  4. #1324
    Senior Member dallas_'s Avatar
    Join Date
    Feb 2011
    Location
    Dallas, TX
    Posts
    449
    Post Thanks / Like
    Blog Entries
    2
    Quote Originally Posted by The Stig View Post
    I have to tell you that it was pretty hard to see it stripped down. But when it's all said and done, it'll be right, the body panels will be "straight", and it will look awesome.
    I can't imagine. But clearly this guy knows his stuff and the finished product will be stunning. Can't wait to see it done.
    FFR 7123 tilt front, Levy 5link/wilwoods/LCA's, webers.
    SL-C, LS3 525, Mendeola SDR5,

  5. #1325
    Senior Member
    Join Date
    Feb 2011
    Location
    Clarksville, MD
    Posts
    232
    Post Thanks / Like
    Mike,

    Whose Gen II GTM is in the shop next to yours?

    -Michael

  6. #1326
    Senior Member The Stig's Avatar
    Join Date
    Feb 2011
    Location
    Charlotte, NC
    Posts
    2,004
    Post Thanks / Like
    Quote Originally Posted by RumRunner View Post
    Mike,

    Whose Gen II GTM is in the shop next to yours?

    -Michael
    Hi Michael,

    I'm not sure that I'm at Liberty to say... He called me a little while back and asked who I would recommend, so I gave him Tony's contact info. He called and asked to be put in the schedule. So now Tony has two GTMs to work. Looks like he's (Tony) getting tossed straight into the frying pan.

    Mike
    Last edited by The Stig; 11-01-2015 at 07:24 PM.
    The Stig

    Some say, that I only know two facts about ducks, (both being wrong); and that if I could be bothered, I could solve the "da Vinci Code" in 47 seconds...
    All I know is that I'm called "The Stig".
    GTM #0081

  7. #1327
    Senior Member The Stig's Avatar
    Join Date
    Feb 2011
    Location
    Charlotte, NC
    Posts
    2,004
    Post Thanks / Like


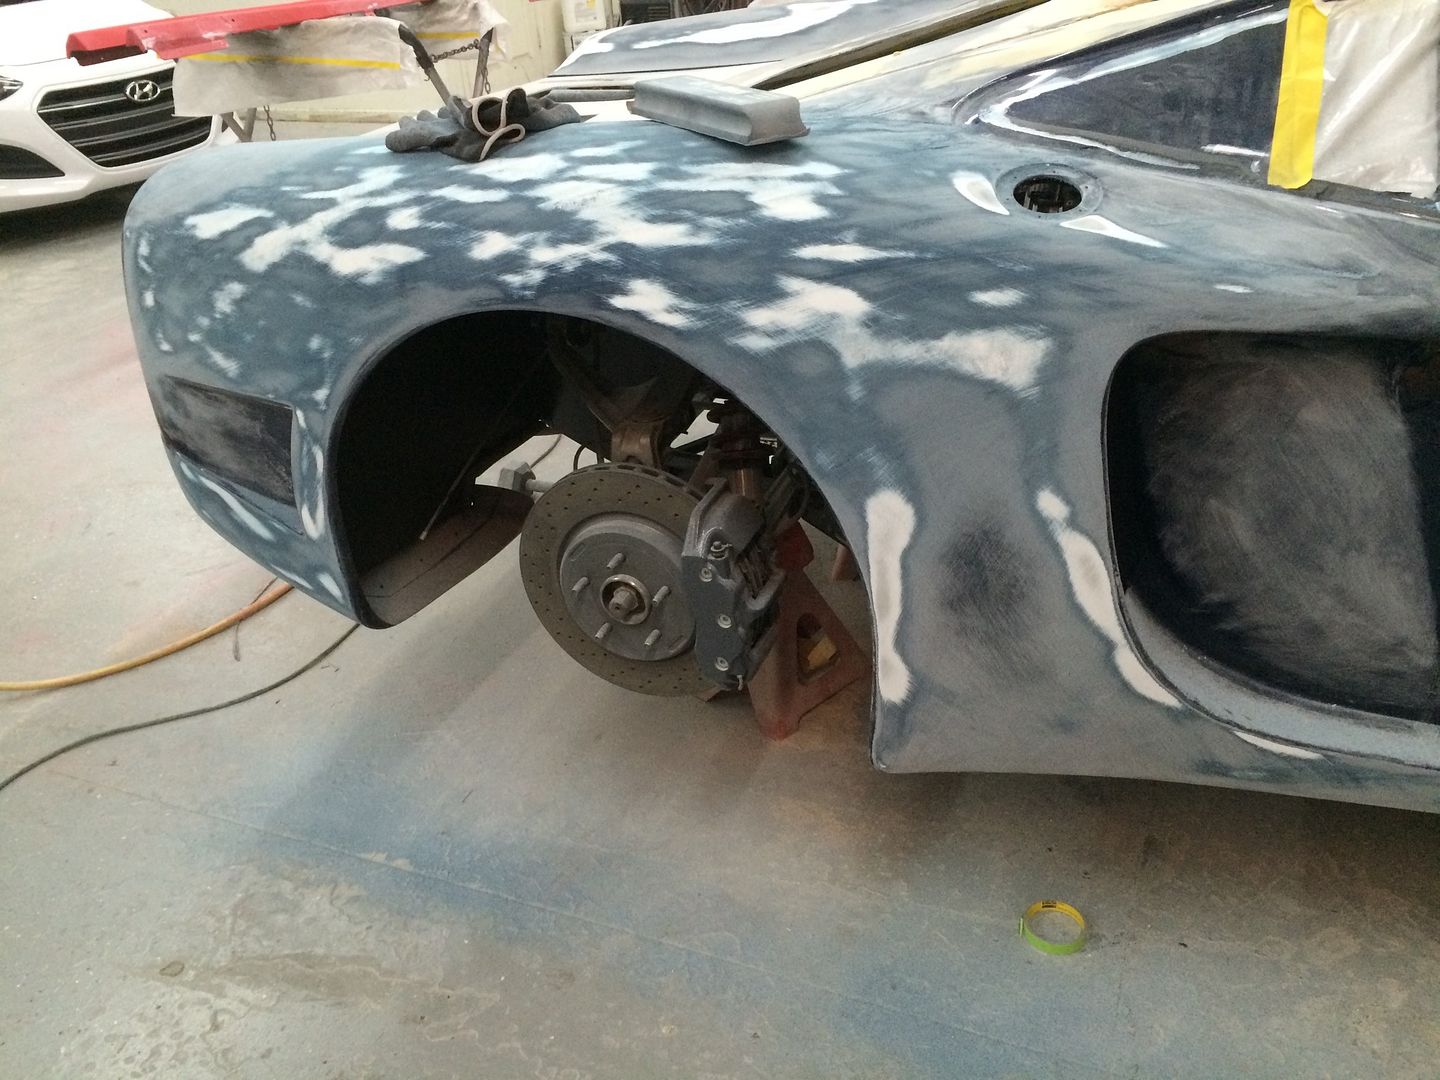
    The front of the nose also had some serious highs and lows; along with both fenders and the section around the wiper bump. Unbelievable.

    It's official. Every panel of this car was in sad shape. The paint was shiny and the color was nice enough. But if you pay for a show finish for dark paint, you would think that at least a little attention might be paid towards making sure that the body was flat, and not full of highs and lows. Granted, there was some flex in the body when it was mounted that may have caused gradual waves. But these spots all over the body cause ripples. The end result being that there was no chance of a straight line on this car under the lights. Isn't it amazing what you can get for an extraordinary amount money...?

    Again, pictures truly are worth a thousand words.

    Mike
    Last edited by The Stig; 11-03-2015 at 09:20 PM.
    The Stig

    Some say, that I only know two facts about ducks, (both being wrong); and that if I could be bothered, I could solve the "da Vinci Code" in 47 seconds...
    All I know is that I'm called "The Stig".
    GTM #0081

  8. #1328
    Senior Member
    Join Date
    Feb 2011
    Location
    Myrtle Beach, SC
    Posts
    2,108
    Post Thanks / Like
    Mike-

    If you didn't have the pictures, I don't think any of us could believe you! I feel sure you must feel the same. I am truly shocked that there are so many defects that are being uncovered. However, I hope she ends up beyond perfect -- if there is such a thing!!

    I appreciate the updates, and I remain jealous of the quality and details of your build. Way to stick with it!

    Regards,

    Steve

  9. #1329
    Senior Member The Stig's Avatar
    Join Date
    Feb 2011
    Location
    Charlotte, NC
    Posts
    2,004
    Post Thanks / Like
    Quote Originally Posted by WIS89 View Post
    Mike-

    If you didn't have the pictures, I don't think any of us could believe you! I feel sure you must feel the same. I am truly shocked that there are so many defects that are being uncovered. However, I hope she ends up beyond perfect -- if there is such a thing!!

    I appreciate the updates, and I remain jealous of the quality and details of your build. Way to stick with it!

    Regards,

    Steve
    That is exactly why I've decided to post the pictures of the body as the paint is sanded back off. People here have allowed me the latitude to rant from time to time when frustration gets the best of me. Not only do these photos show the extent of the crap work that I was charged heavily for, but it also gives a first hand visual.

    I have people calling quite often to talk about body work and paint. As well, they ask for recommendations for quality shops in the area. I've gotten to the point where I won't recommend anyone or any shop any more. I'll tell people who I am using, but all I do is give them contact info, and let them make their decisions based on how they come out the conversation.

    I like to to give credit where credit is due. And I'll go out of my way to do so. And the other side of the coin is when I don't get the quality of work that I paid for. These pictures document that work.

    With that said, yes, the car will arrow straight when we get done with it. I think the paint choice and the quality of work going into the prep, is going to generate a result that I'll be very happy with.

    I'm definitely looking forward to seeing it.

    Mike
    Last edited by The Stig; 11-04-2015 at 10:04 PM.
    The Stig

    Some say, that I only know two facts about ducks, (both being wrong); and that if I could be bothered, I could solve the "da Vinci Code" in 47 seconds...
    All I know is that I'm called "The Stig".
    GTM #0081

  10. #1330
    LCD Gauges's Avatar
    Join Date
    Apr 2011
    Location
    Toronto, Ontario
    Posts
    1,545
    Post Thanks / Like
    Blog Entries
    3
    I would cry if I had to paint my car twice. That's an incredible amount of rework for "Pandora"; I can only imagine the cost for all of the body work, materials, and labour.

    If not a Veyron, an Aventador might have been cheaper!
    Custom LCD Gauges , Data Loggers, Control Touch Screens
    www.LCDdash.com \\ 647-522-9953 \\ Voice & Text
    Proud new owner of GTM Gen 1., #105 - 08/27/11
    LQ9 Powered, G96.00 6 speed transaxle

  11. #1331
    Senior Member The Stig's Avatar
    Join Date
    Feb 2011
    Location
    Charlotte, NC
    Posts
    2,004
    Post Thanks / Like
    Quote Originally Posted by Procision-Auto View Post
    I would cry if I had to paint my car twice. That's an incredible amount of rework for "Pandora"; I can only imagine the cost for all of the body work, materials, and labour.

    If not a Veyron, an Aventador might have been cheaper!
    I prefer the Murcielago. I like the Aventador, but I'm not a billionaire. The Murcielago is more of a defining "moment" for Lamborghini than the Aventador. The Aventador is incredible. But the Murcielago marks a definite spot in the company's history.

    At the time, I felt like I was stepping up to pay $14,500 for paint for the GTM. In my mind, that's a lot of money to pay for paint, for anyone. But I also felt that in the end it would be done right, and look the way I had hoped. Doing it (paint) a second time doesn't make it any cheaper. So, to have paint on the car, that looks like it should, is costing me just shy of $30,000.00.

    A real bargain, right?

    I will say again, that in no way do I feel that I am the only person here who has been screwed intentionally by shops of one form or another. And that what I have gone through is not unique to me by any stretch. Most people that have dealt with it, call Bull-Sh!t, and go through a quick spat, and that's about it. Because the companies know that they have been able to get away with it in the past. But how many people have stripped the paint back off, and documented what was done? Not many, because there aren't many that can really afford to. And they know it.

    There is one statement that was made to my wife, that I don't think I will ever forget. Mainly because they had the balls to say it so openly... They said, that anyone who could afford to build a GTM, can afford paid a good bit more to have work done to it. When she told me this, I said that I'm sure he was kidding. I later found out that he was not kidding.

    This sort of stuff should be made public when it happens. People should not be ripped off, just because the owners of these places believe that they can get away with it.

    I feel as though I've gotten through my "newbie" initiation, and have paid my dues in full for the next build... And yes, there will be one.


    Mike
    Last edited by The Stig; 11-05-2015 at 12:16 PM.
    The Stig

    Some say, that I only know two facts about ducks, (both being wrong); and that if I could be bothered, I could solve the "da Vinci Code" in 47 seconds...
    All I know is that I'm called "The Stig".
    GTM #0081

  12. #1332
    Senior Member The Stig's Avatar
    Join Date
    Feb 2011
    Location
    Charlotte, NC
    Posts
    2,004
    Post Thanks / Like
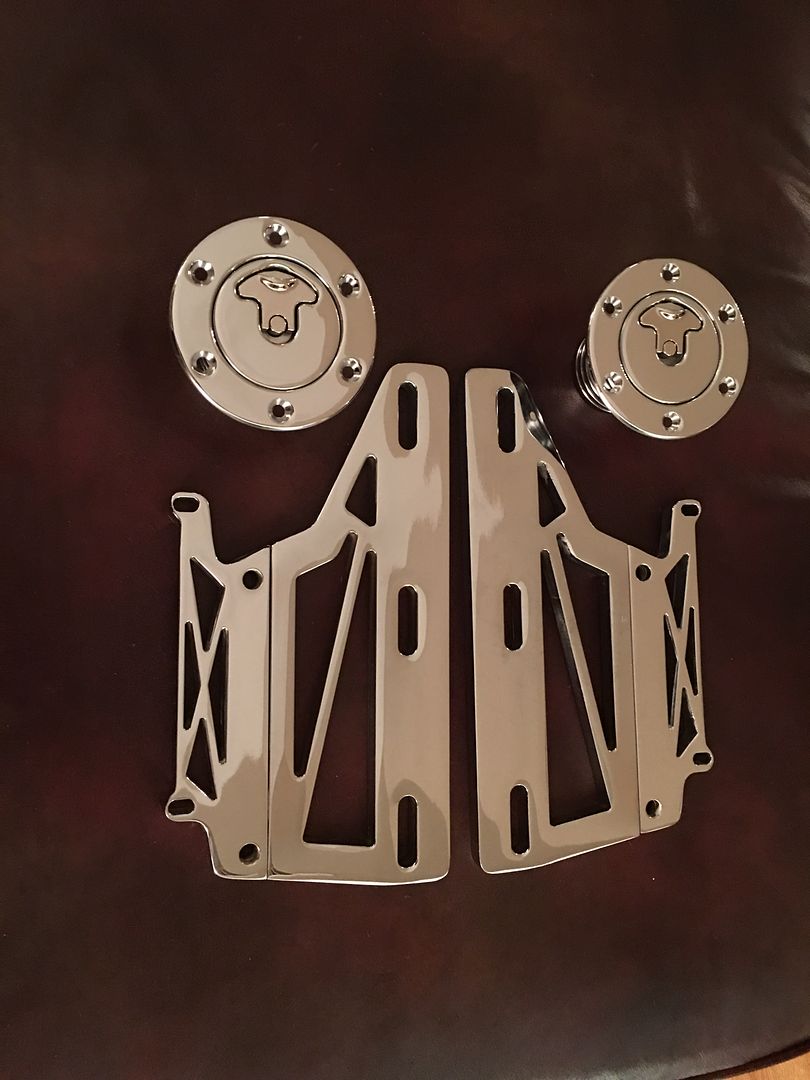
    I got a few of the chrome pieces back, that I sent out.

    I had the gas filler assemblies, and the wing brackets (that would be exposed) chromed and polished. I think they turned out well.


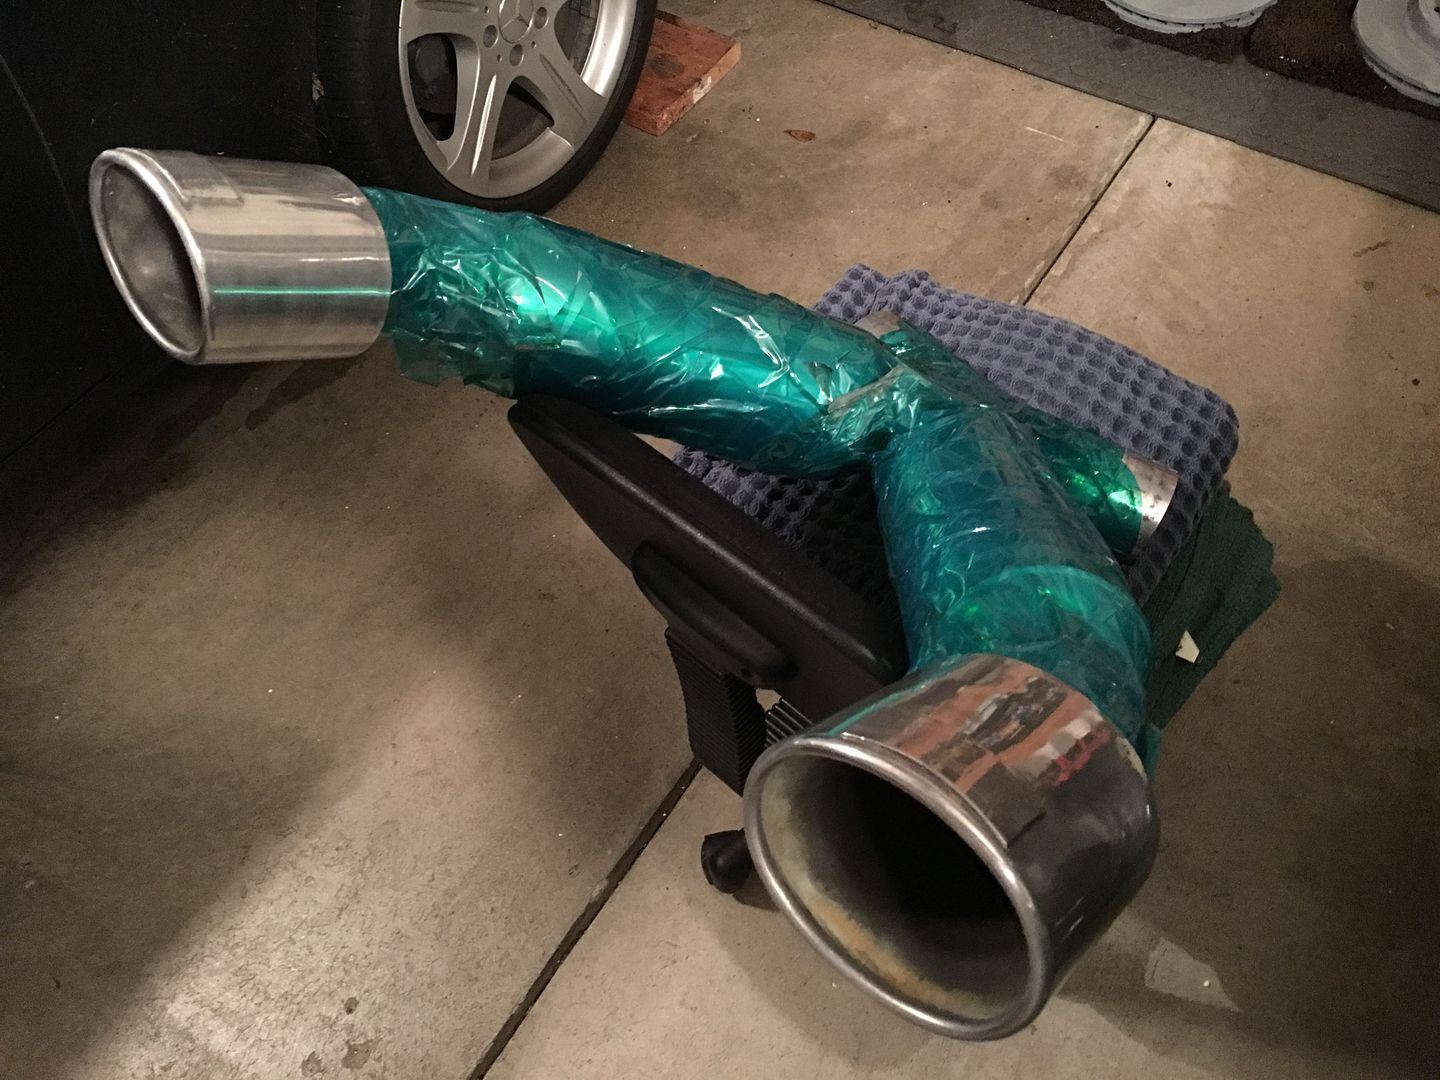
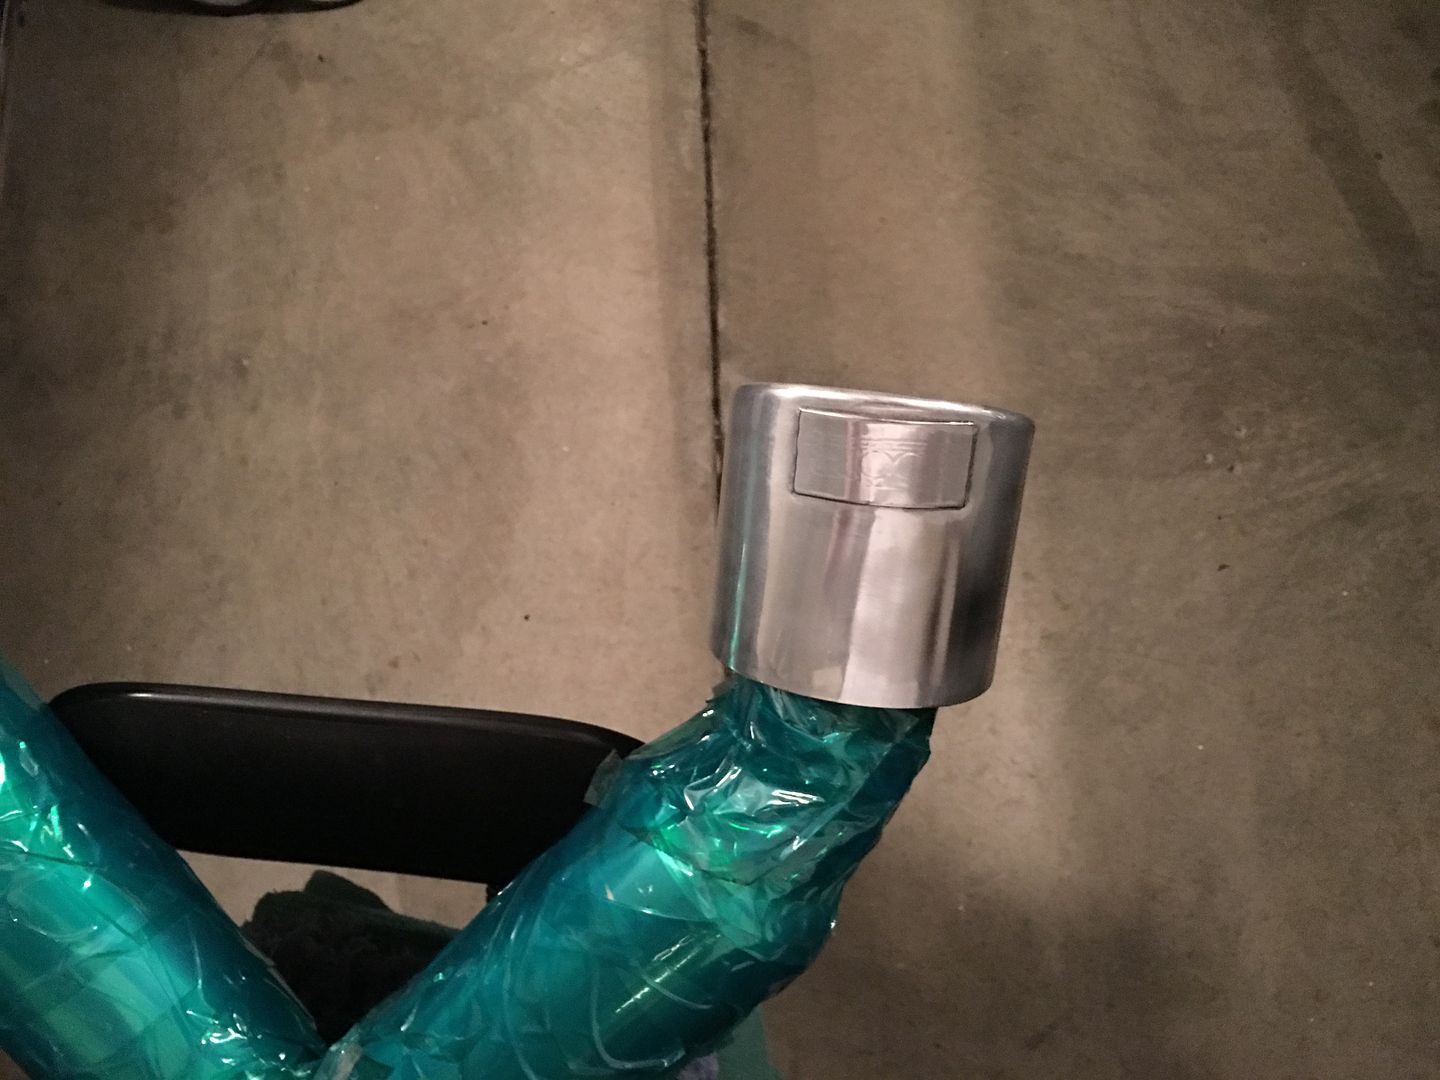
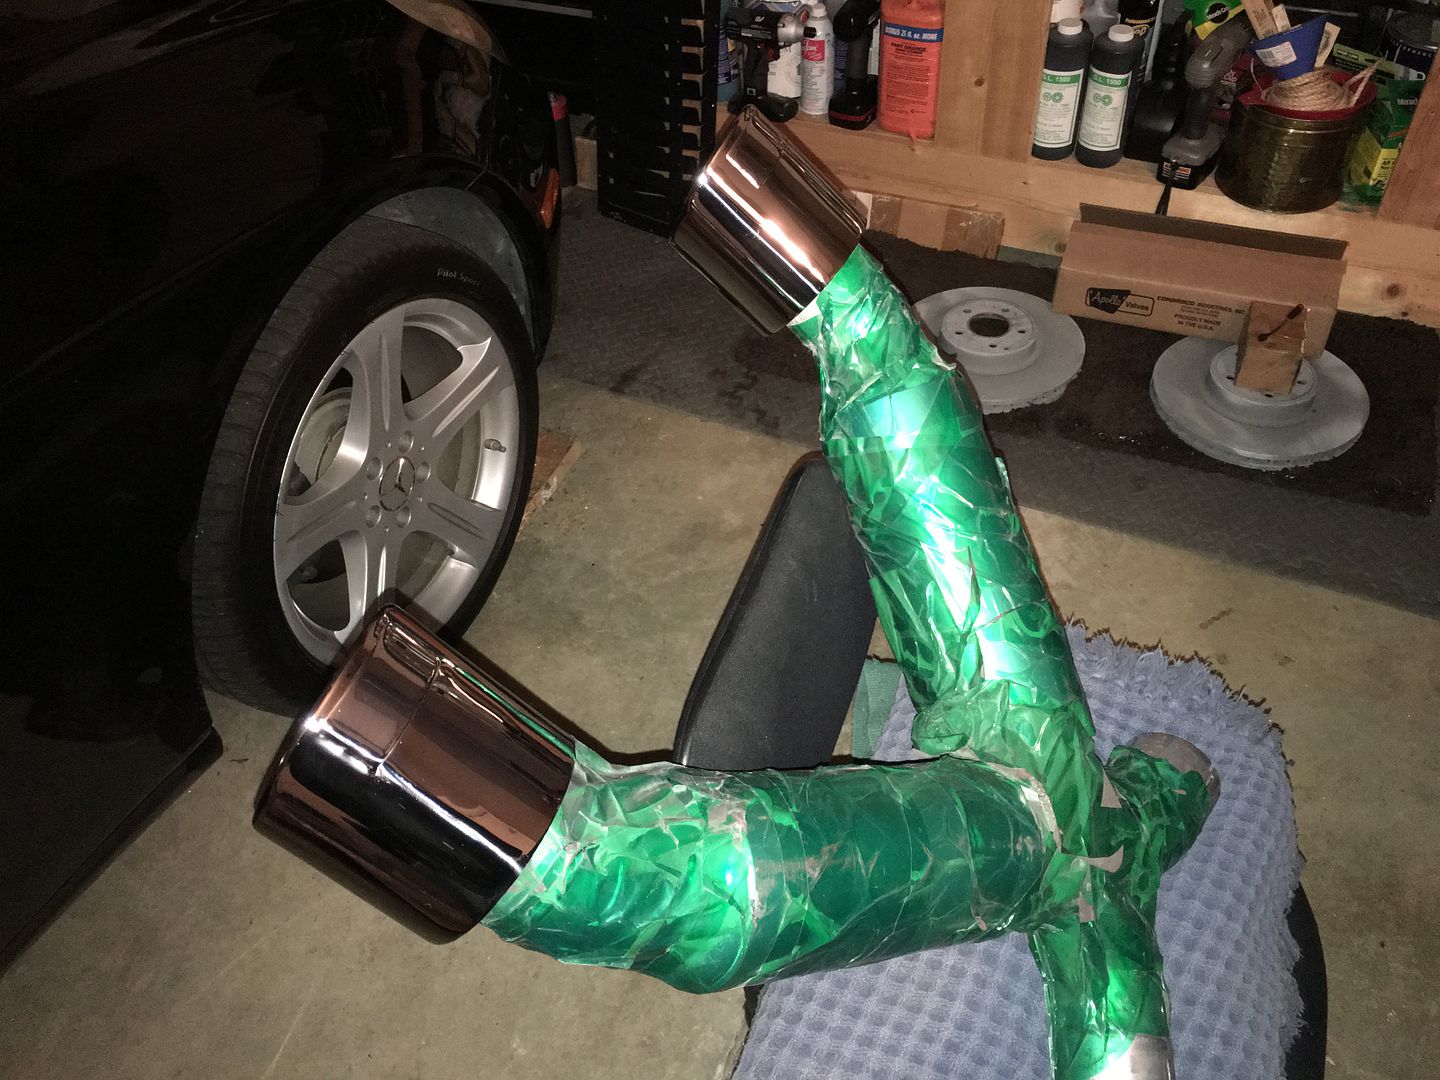
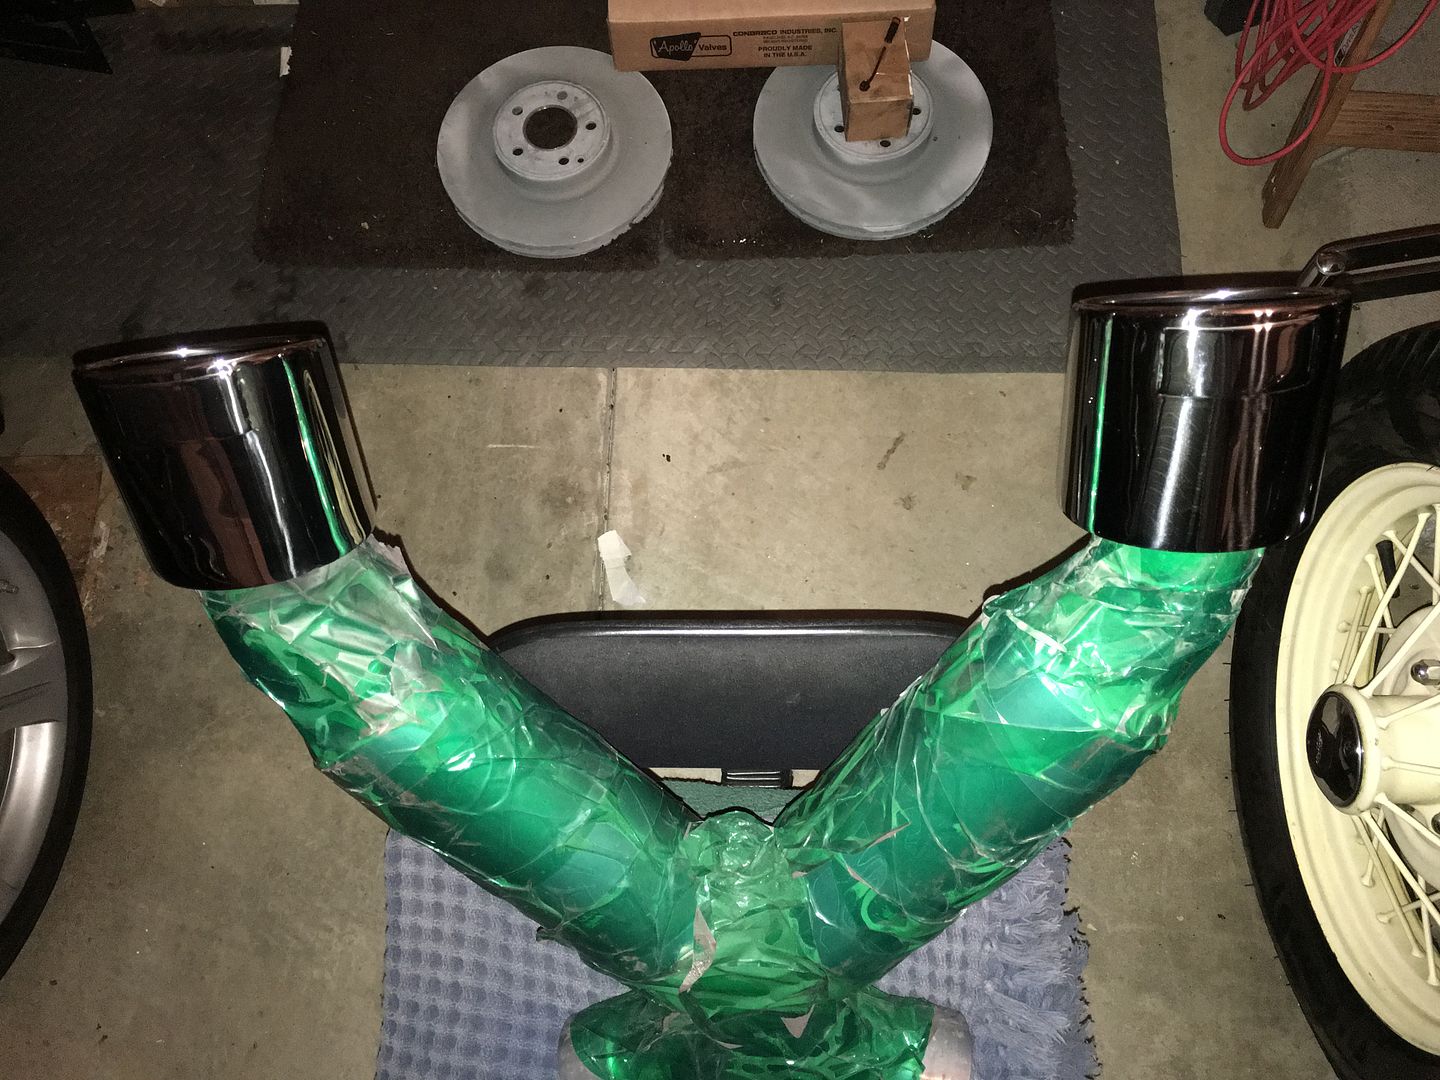
    I also had the exhaust tips polished. I had hoped that these would turn out a little better, but they said up front that they may not polish out as well as the other pieces. Something to do with the type of stainless steel used for the tips. They couldn't chrome them because they don't use the type of chemical that is supposedly needed in order to prep the stainless to allow the chrome to bond... I don't know.


    I'll probably take it with me to Ohio, and have them done there.

    Mike
    The Stig

    Some say, that I only know two facts about ducks, (both being wrong); and that if I could be bothered, I could solve the "da Vinci Code" in 47 seconds...
    All I know is that I'm called "The Stig".
    GTM #0081

  13. #1333
    Senior Member The Stig's Avatar
    Join Date
    Feb 2011
    Location
    Charlotte, NC
    Posts
    2,004
    Post Thanks / Like
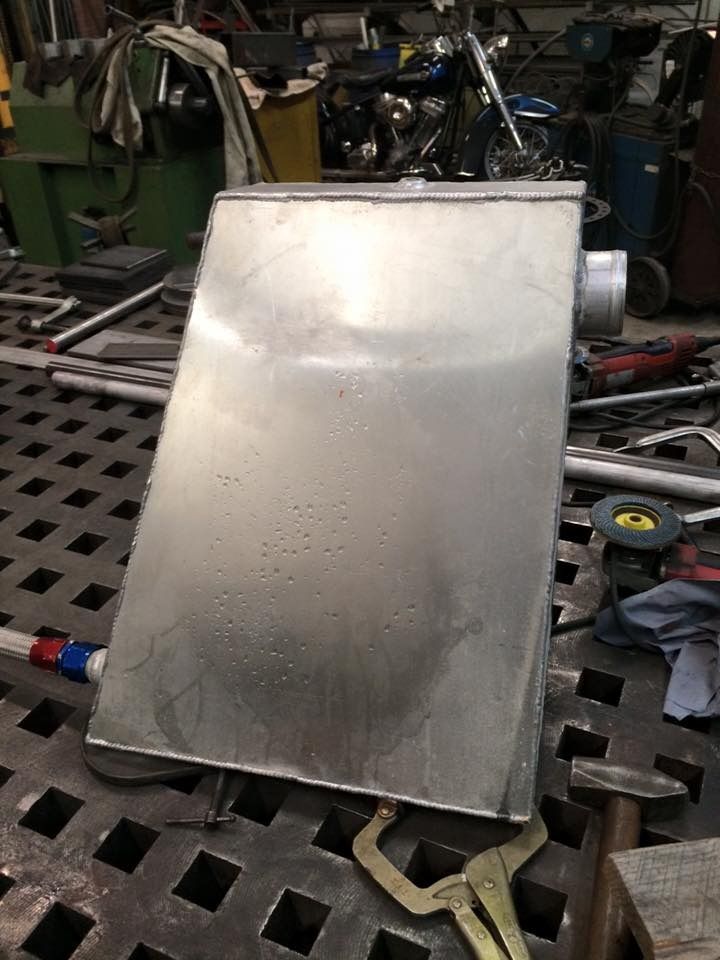
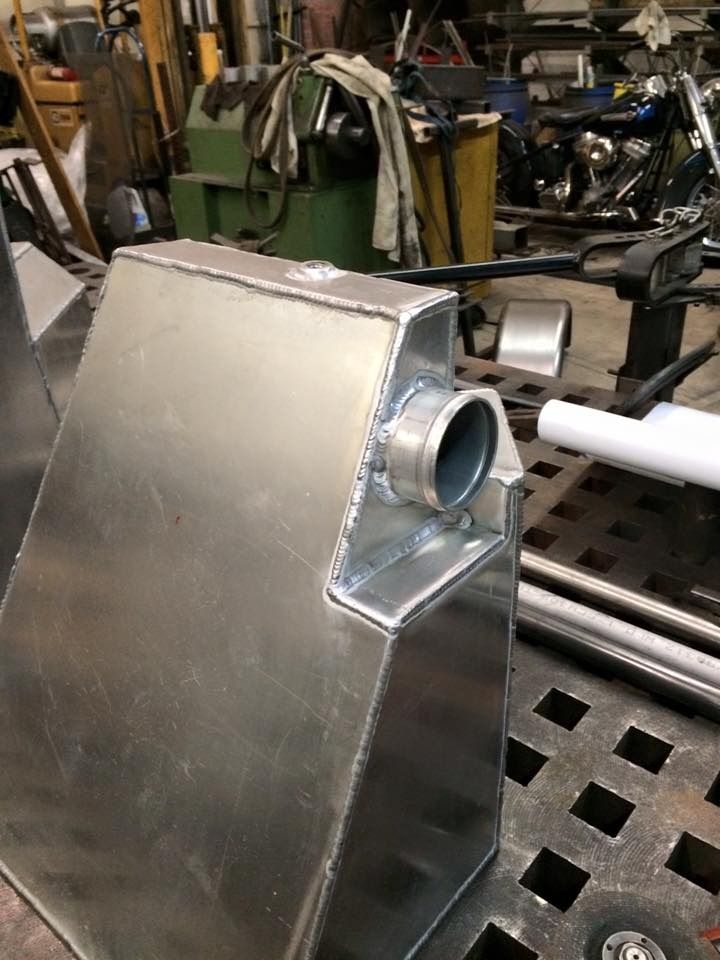
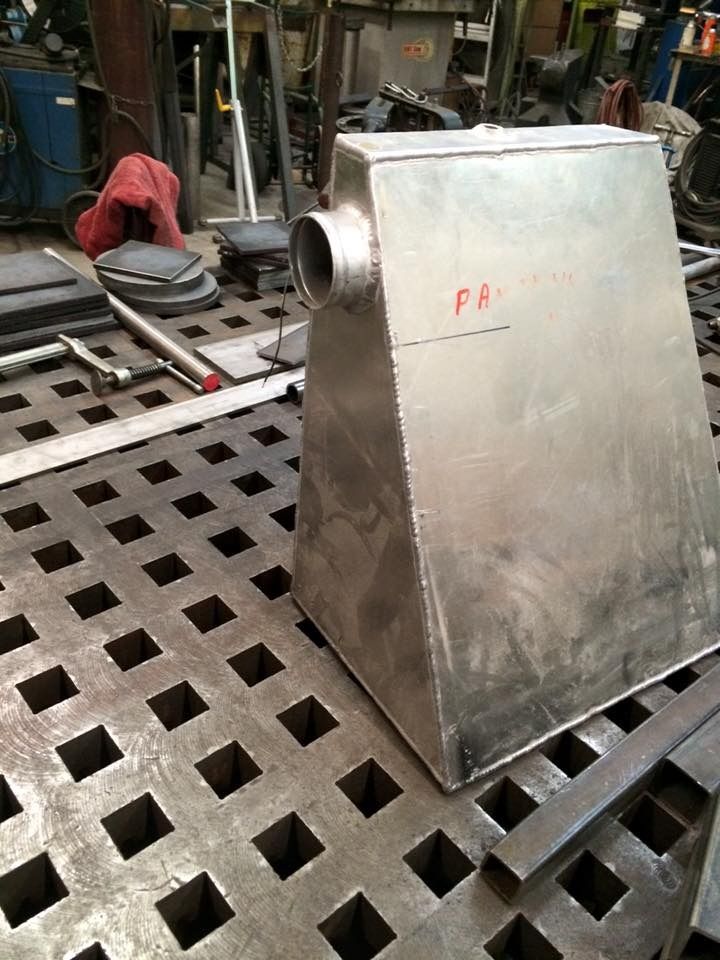
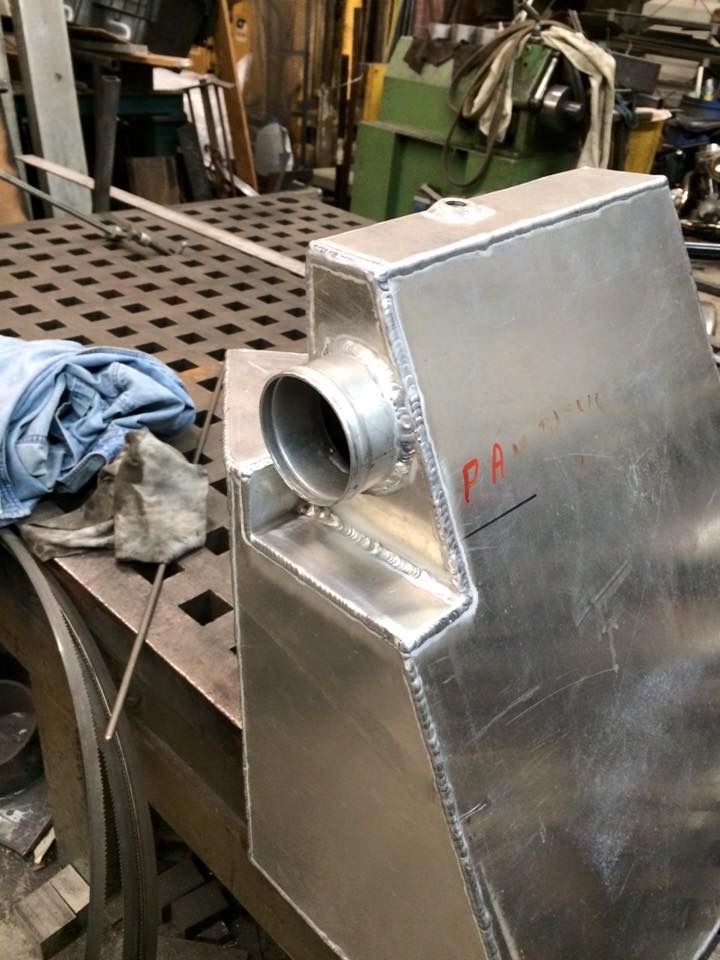
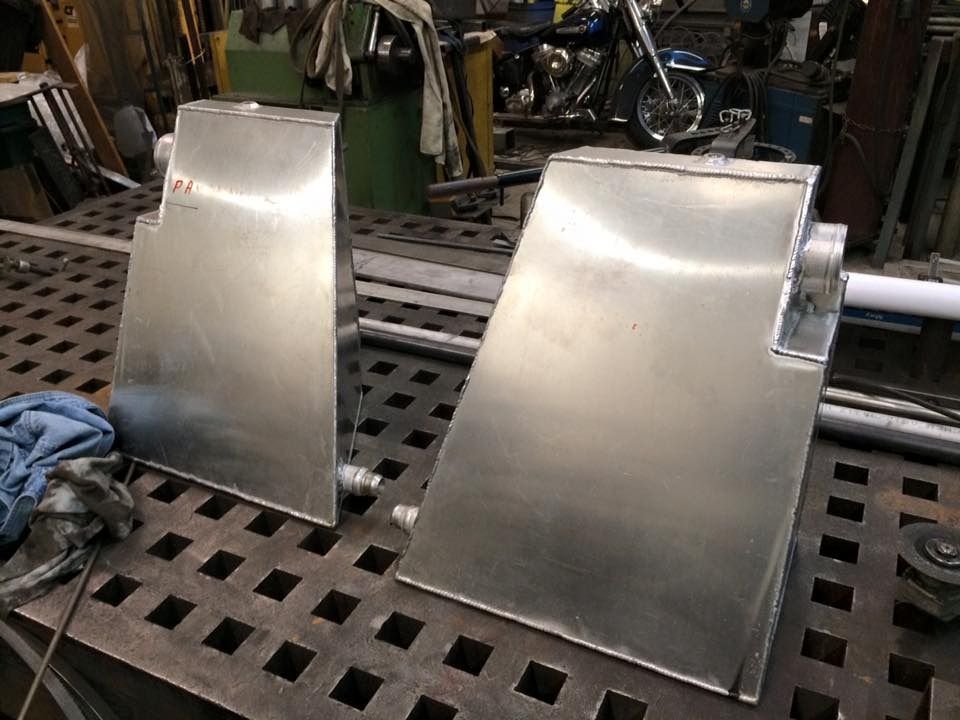
    We took the opportunity to notch the fuel tanks in order to allow the fuel filler hose to make the 90 degree turn without being pinched.
    The hoses on both sides of the car were pinched to the point, that I'm not really sure how I was able to get gas into the tanks at all. By notching the tanks in a little, the hose can be attached without being pinched shut. I should be able to fill the car at the station without needing to drip it in drop by drop...


    The original tank (before) cutting, notching, and re-welding.


    The finished tank after notching and welding. At most I may have lost a half gallon of capacity from each tank; if that.


    We will also be adding some way to "mount" the tanks so they are held in place, as opposed to having them sit freely in place. In the event of a front impact, I really don't want to take the chance of one or both tanks coming through the firewall, and potentially spraying fuel into the cockpit. It may be a little overkill, or not. But it is definitely insurance in the right direction.


    Mike
    Last edited by The Stig; 11-11-2015 at 05:57 PM.
    The Stig

    Some say, that I only know two facts about ducks, (both being wrong); and that if I could be bothered, I could solve the "da Vinci Code" in 47 seconds...
    All I know is that I'm called "The Stig".
    GTM #0081

  14. #1334
    Senior Member
    Join Date
    Apr 2011
    Posts
    641
    Post Thanks / Like
    Thinking of you,
    Keep it up!

  15. #1335
    Senior Member The Stig's Avatar
    Join Date
    Feb 2011
    Location
    Charlotte, NC
    Posts
    2,004
    Post Thanks / Like
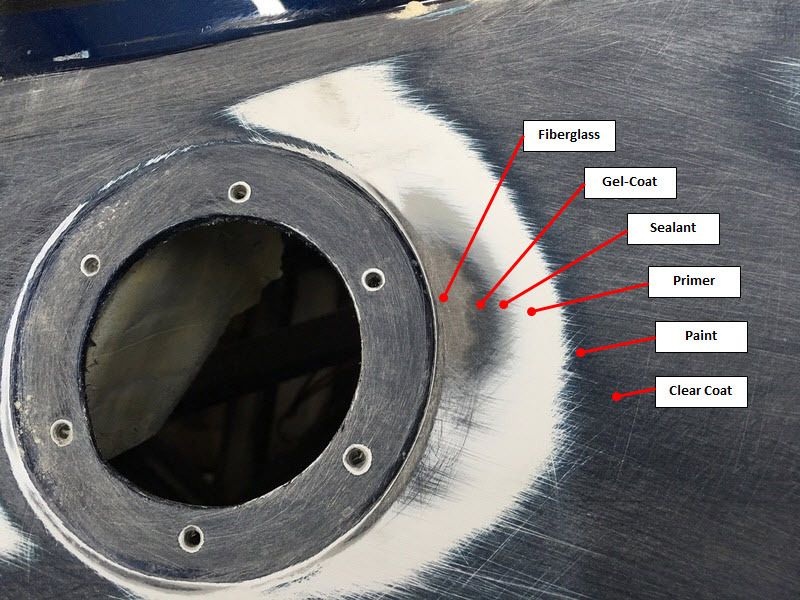
    I spent a little time at Tony's shop today, and I am very happy with how it's coming along.


    If you look closely, you'll see the layers of materials... Fiberglass, Gelcoat, Sealant (1 coat), Primer (1 coat), Paint (1 coat), and a thin coat of clear.


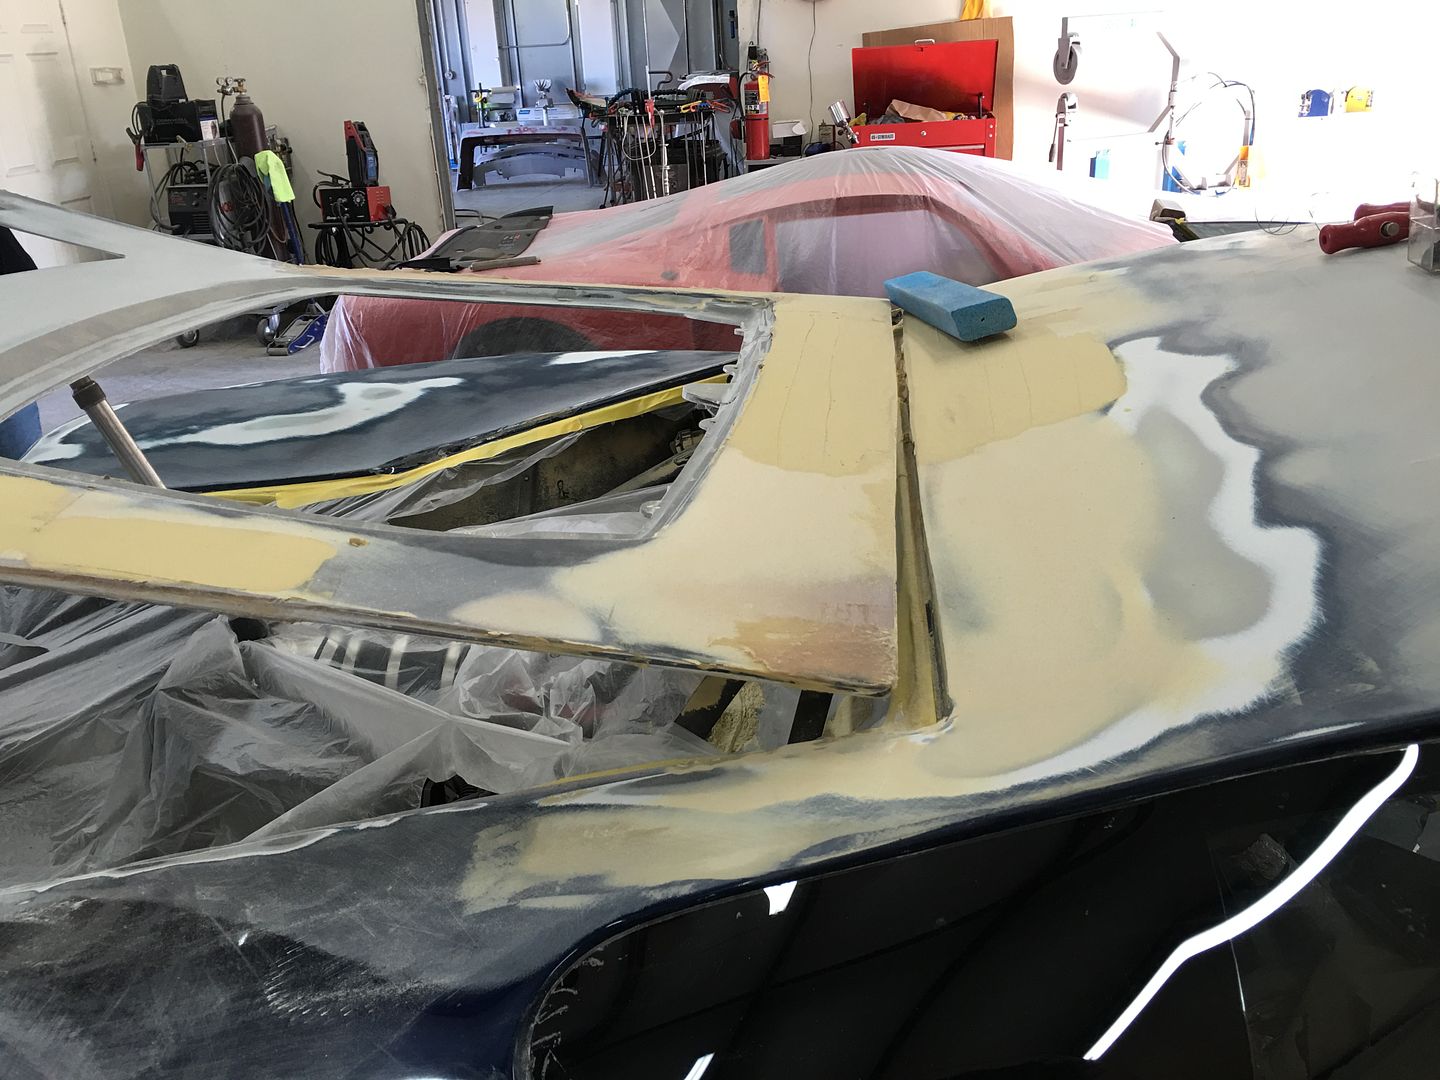
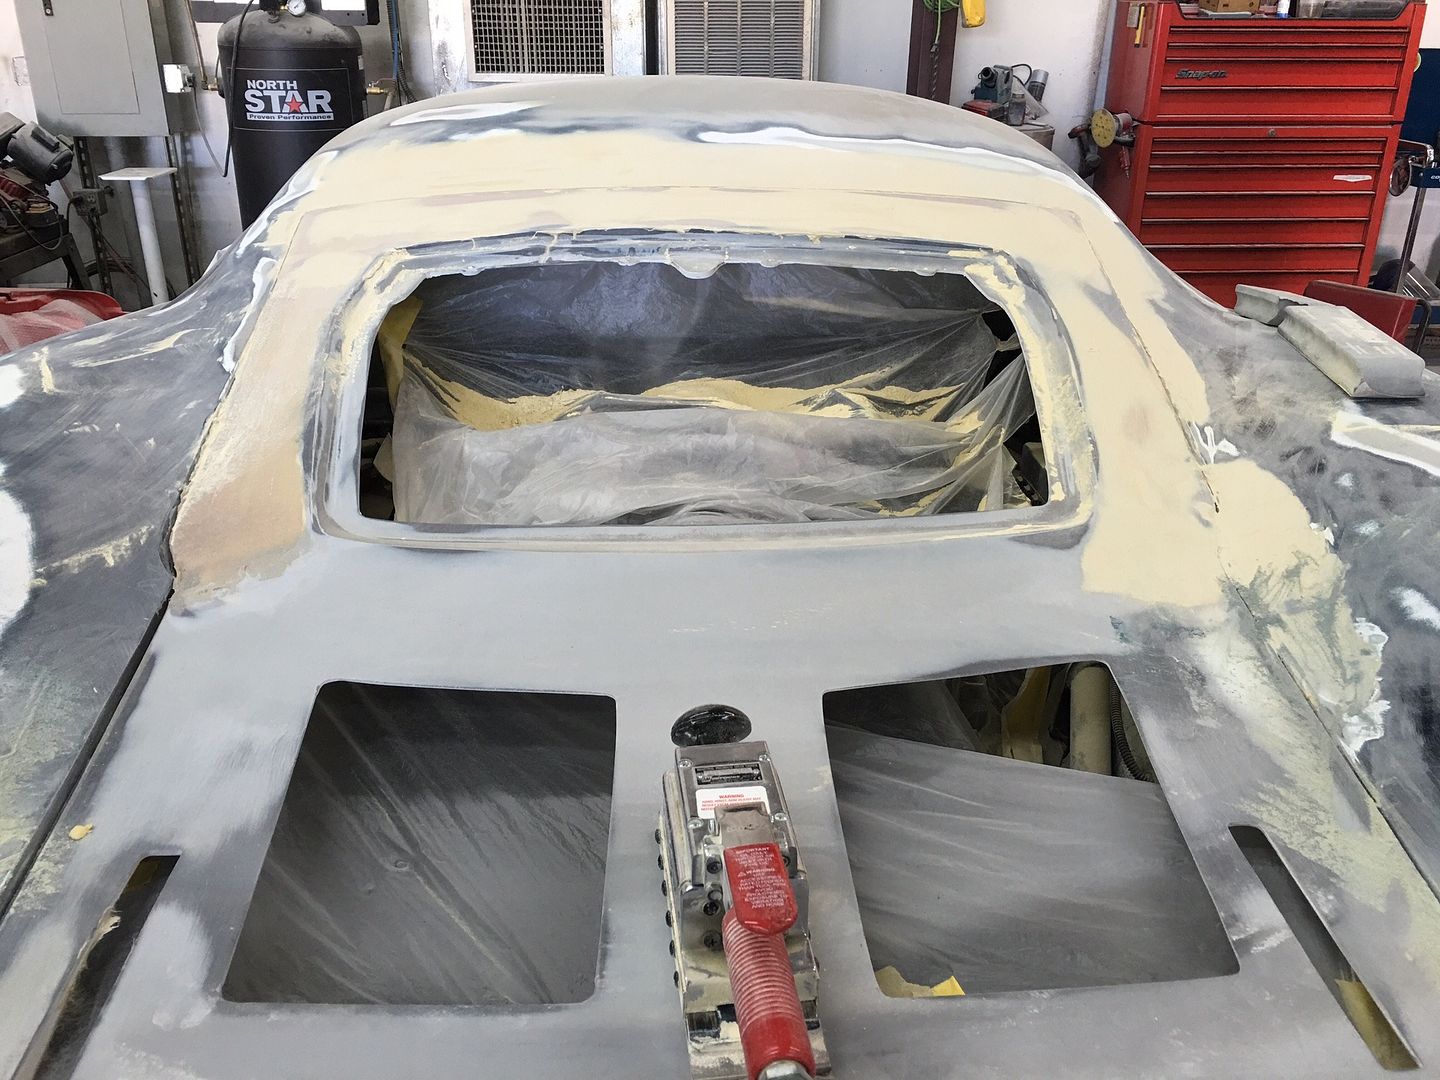
    Tony has been working the hatch, and though you can't really tell by the pictures, it's very close to being buried in primer. It is fitting very flush with the body and quarters. It's getting there.


    The material on the sides and top look like filler, but it isn't it fiberglass that was used to build up the hatch to match the body edges. it has been sanded smooth. If you look closely, you will see a couple of areas that are a little lighter in color. That is filler. So we're adding filler to the surface, only to make the fiberglass flat and straight. Most of it is sanded back off.


    The picture above starts to give a little better perspective of how the hatch is lining up with the roof and quarters. You can see the lower section of the hatch that still needs to be built up. It will be, and the lines will be as tight as what you see in the upper sections. They're still a bit rough right now, but they'll be cleaned up and ready for primer very soon.


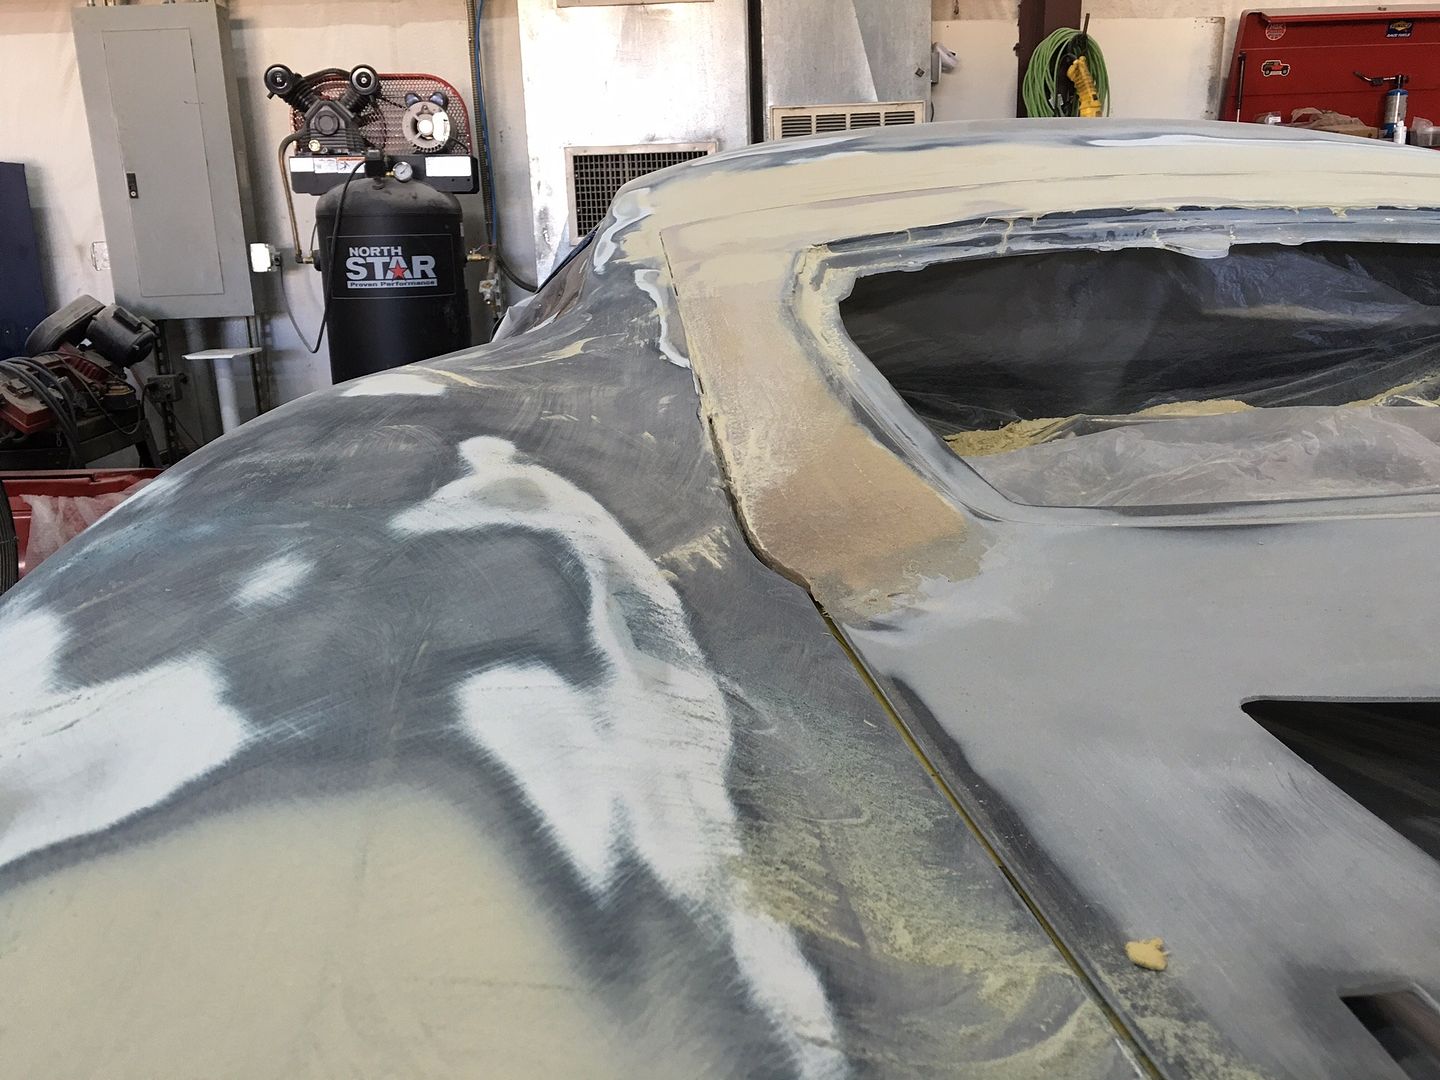
    In the picture below you can see the smooth transition from the roof to the hatch. Tony's working to blend all of the surfaces of the roof, hatch, pillars, and quarters so that they don't just fit next to each other, but actually flow from one to the other. This is exactly what I was after when Jason and I set out to build a hatch that fits.


    Now that I've seen the "Why" in terms of stripping the car and re-painting it, now we're about to get into the process of putting paint back on the car. The hood, roof, hatch, and the quarters are close to being ready for the first round of primer. There will be a little more work making sure that the hood lines up as it should, and that the gaps between it and the body (behind the wheels) fits like the rest of the car.

    Once everything is straight, and fits, and the gaps are correct, he's going to put the wheels back on the care and put it back on the ground. The wheel openings around the front tires will then be made round, instead of oval.

    Then everything gets disassembled for primer. The hood, hatch, and doors will come off.

    Tony told me today that the car will have about 5 coats of primer sprayed in total, and then through the blocking processes will more than likely be sanded back to two when it prep is completed. As I said earlier, I'm very happy with how this is coming along.

    Mike


    Last edited by The Stig; 11-14-2015 at 02:11 PM.
    The Stig

    Some say, that I only know two facts about ducks, (both being wrong); and that if I could be bothered, I could solve the "da Vinci Code" in 47 seconds...
    All I know is that I'm called "The Stig".
    GTM #0081

  16. #1336
    Senior Member Taz Rules's Avatar
    Join Date
    Dec 2012
    Location
    BC, Canada
    Posts
    738
    Post Thanks / Like
    I'm so glad you found a shop where they know what they're doing. I think you'll find this one is worth the money. You know what they say...if you think it's expensive to hire a professional, just try hiring an amateur and see what it ends up costing.

    Seriously, this is going to be one incredible piece of art when it's done.

  17. #1337
    Banned
    Join Date
    Aug 2011
    Posts
    669
    Post Thanks / Like
    That's the way the hatch was designed, to build up to match the body. Just a reminder too, the bottom of the FFR hatch doesn't need the relief cuts that Mike's paint guy did. The hatch insert can be built up on top to get the smooth lines. Looking forward to seeing it finished, and the new color will look great.
    Last edited by carbon fiber; 11-14-2015 at 09:28 AM.

  18. #1338
    Senior Member The Stig's Avatar
    Join Date
    Feb 2011
    Location
    Charlotte, NC
    Posts
    2,004
    Post Thanks / Like
    Hi Jason,

    I think the hatch is going to look awesome!

    Part of the issue with the roof and the hatch has to do with the way that the body is mounted to the chassis.

    If there is any flex in the roof, then you'll have a little to make up for; either on the hatch or the roof. That's why we had to work the hatch in order to get a little more arch in it, to match the body.

    He really didn't need to build it up much after that. It was close, and we added a little fiberglass to get it even. Then a bit of filler it make it perfect.

    What you see in the picture, is glass smooth.

    Mike
    Last edited by The Stig; 11-15-2015 at 07:14 PM.
    The Stig

    Some say, that I only know two facts about ducks, (both being wrong); and that if I could be bothered, I could solve the "da Vinci Code" in 47 seconds...
    All I know is that I'm called "The Stig".
    GTM #0081

  19. #1339
    Senior Member The Stig's Avatar
    Join Date
    Feb 2011
    Location
    Charlotte, NC
    Posts
    2,004
    Post Thanks / Like
    Quote Originally Posted by Taz Rules View Post
    I'm so glad you found a shop where they know what they're doing. I think you'll find this one is worth the money. You know what they say...if you think it's expensive to hire a professional, just try hiring an amateur and see what it ends up costing.

    Seriously, this is going to be one incredible piece of art when it's done.
    Thanks Ash! You're right, Pandora is going to come out of all this, looking the way she was always meant to.

    Mike
    The Stig

    Some say, that I only know two facts about ducks, (both being wrong); and that if I could be bothered, I could solve the "da Vinci Code" in 47 seconds...
    All I know is that I'm called "The Stig".
    GTM #0081

  20. #1340
    Senior Member Steven K's Avatar
    Join Date
    Feb 2011
    Location
    Denver, NC
    Posts
    140
    Post Thanks / Like
    I've been watching your posts since my wife and I met you and your wife at cars and coffee at Northlake a couple of years ago. All I can say is "wow". I am anxious to see it when it is done.
    Steve K
    FFR 3906

  21. #1341
    Junior Member
    Join Date
    Nov 2015
    Posts
    2
    Post Thanks / Like
    Hi,

    Glad to see such a following for Mike's GTM. The chrome parts look great and cant wait to see them in person.

  22. #1342
    Senior Member The Stig's Avatar
    Join Date
    Feb 2011
    Location
    Charlotte, NC
    Posts
    2,004
    Post Thanks / Like
    Quote Originally Posted by Charlotte Speed Shop View Post
    Hi,

    Glad to see such a following for Mike's GTM. The chrome parts look great and cant wait to see them in person.
    Hi Tony. Speaking of Chrome: I dropped the exhaust by the chrome shop here in Oh. They said that they shouldn't have any trouble getting the tips triple plated and looking show perfect.

    They also said that since they had been polished a bit, that it wouldn't take that long to turn them around once they start working on them. So maybe we'll have the exhaust back soon. He's supposed to call me tomorrow to confirm. It was a nice shop. Pretty impressive.

    I'll let you know what they say about it.

    Mike
    Last edited by The Stig; 11-16-2015 at 05:55 PM.
    The Stig

    Some say, that I only know two facts about ducks, (both being wrong); and that if I could be bothered, I could solve the "da Vinci Code" in 47 seconds...
    All I know is that I'm called "The Stig".
    GTM #0081

  23. #1343
    Senior Member The Stig's Avatar
    Join Date
    Feb 2011
    Location
    Charlotte, NC
    Posts
    2,004
    Post Thanks / Like
    Quote Originally Posted by Steven K View Post
    I've been watching your posts since my wife and I met you and your wife at cars and coffee at Northlake a couple of years ago. All I can say is "wow". I am anxious to see it when it is done.
    Hi Steve, It's nice to hear from you again. I well remember meeting you and your wife, standing next to that gorgeous White Lamborghini Murcielago. I also remember thinking that I was maybe a couple of months away from being done with my car... Who knew?

    I spoke to Steve Kurzman (my interior guy), who told me that Cars & Coffee had been put on hold until they find another venue. It seems that developers are building condos on the parking lot next to the Music Factory, where they were holding the event each month. Bummer.

    I haven't heard whether or not they have secured a new location yet. Hopefully it won't take long.

    Hope to see you guys, when they do! How is the Cobra coming along? Is it on the same time path that my car has been on?


    Take care Buddy!

    Mike
    Last edited by The Stig; 11-16-2015 at 05:54 PM.
    The Stig

    Some say, that I only know two facts about ducks, (both being wrong); and that if I could be bothered, I could solve the "da Vinci Code" in 47 seconds...
    All I know is that I'm called "The Stig".
    GTM #0081

  24. #1344
    Senior Member The Stig's Avatar
    Join Date
    Feb 2011
    Location
    Charlotte, NC
    Posts
    2,004
    Post Thanks / Like
    Well crap... I just heard back from the chrome shop (Jon Wright's Custom Chrome Plating) here in OH. Apparently, they can't plate the the tips. They were concerned with getting the chemicals down into the mufflers and clogging them. But they did say that they feel certain that they can polish them up a little better. They're going to block them to try to take some of the waves out of the surface, and then polish them again.

    They said that they think that they can have it done before I leave this week to go back to Charlotte. We'll see how it turns out. In any case, they should look a bit brighter when they're done.

    Mike
    Last edited by The Stig; 11-17-2015 at 07:49 PM.
    The Stig

    Some say, that I only know two facts about ducks, (both being wrong); and that if I could be bothered, I could solve the "da Vinci Code" in 47 seconds...
    All I know is that I'm called "The Stig".
    GTM #0081

  25. #1345
    Senior Member
    Join Date
    Feb 2011
    Location
    San Diego
    Posts
    1,961
    Post Thanks / Like
    I would be cautious about sanding/grinding/polishing on those tips too much. My guess is that the material started out pretty thin to begin with. Every time a machine or sander is taken to those pieces the wall thickness decreases. This is a part that sees quite a bit of vibration, so material thickness could become a problem.
    www.myraceshop.com

    GTM solution kits
    Corvette and Race parts

  26. #1346
    Senior Member The Stig's Avatar
    Join Date
    Feb 2011
    Location
    Charlotte, NC
    Posts
    2,004
    Post Thanks / Like
    Hi Mike,

    Thanks, and You're right. They said the same thing to me, when they called to say that they didn't think that they should plate the tips. They're cautious of getting too aggressive at all for that very reason. I think what they are actually doing is scuffing it, and then bringing it back to high polish from there. (Or at least that's the goal). These guys are pros, and have a good feel for what can or can't be done. So I'm going to trust them to do their thing.

    If they are able to make it look nicer than when I brought it to them, I'll be happy.

    Mike
    The Stig

    Some say, that I only know two facts about ducks, (both being wrong); and that if I could be bothered, I could solve the "da Vinci Code" in 47 seconds...
    All I know is that I'm called "The Stig".
    GTM #0081

  27. #1347
    Senior Member The Stig's Avatar
    Join Date
    Feb 2011
    Location
    Charlotte, NC
    Posts
    2,004
    Post Thanks / Like
    I spoke to Zachary at CCP. He told me that the reason the tips didn't polish out well the first time, was because they didn't strip the ceramic coating from them. Once they took that coating off, the tips polished up very nicely. He says that the grade of stainless that Kooks used was really nice. The tips are obviously made of thinner metal than the tubes, so he couldn't work them as much as he wanted, in order to make them perfect. But he did say that they're turning out very nice.

    When I left Cleveland today, they hadn't finished the second tip yet. He said it would either be later this afternoon or tomorrow morning. So they'll package it up, and ship it to me here in Charlotte, tomorrow. I was really pumped to hear that they were able to bring the exhaust tips to a nice shine. I can't wait to see them.

    I can't believe that they we're able to go ahead and get this done this week. I was expecting it to take a few weeks, as most chrome shops tend to run quite a ways out. Advanced Plating told me 18 weeks...

    So 3 days is unbelievable to me!

    I'll post a couple of pictures, (before / after), when I get the cross pipe back.

    Mike
    Last edited by The Stig; 11-19-2015 at 09:19 PM.
    The Stig

    Some say, that I only know two facts about ducks, (both being wrong); and that if I could be bothered, I could solve the "da Vinci Code" in 47 seconds...
    All I know is that I'm called "The Stig".
    GTM #0081

  28. #1348
    Senior Member The Stig's Avatar
    Join Date
    Feb 2011
    Location
    Charlotte, NC
    Posts
    2,004
    Post Thanks / Like


    The lows behind the front fenders and ahead of the rear fenders, were filled, blocked, and primed. (As a test). The door was blocked to check for highs and lows. You can see the waves after just a light blocking. The doors will be removed and blocked pretty soon. The hood will be removed in order to get to it a little easier. The car is getting close it the first primer and 600 > 800 grit block.

    It's still a wake up call, for me, to see this car taken back down to the level that it is in these pictures...


    Still working the hatch. The roof is finished, and ready to be primed.


    I couldn't resist another picture of the roof-to-hatch transition/line. I know it sounds strange, but this picture pretty much defines one of my best victories over the fight that this car has been throwing at me. It looks like it's supposed to. And it looks like I want it to.


    The body is being built up just a bit to match the deck height of the hatch. Smooth as silk. Creating straight and smooth gap lines is the next step.


    Another test shot of primer, to get a feel for the blocking that has been done so far on the quarters. I'm looking forward to seeing everything primed and ready for the next block sanding.

    It's getting there. Finally! And it's getting there right!


    Mike
    Last edited by The Stig; 11-21-2015 at 08:43 AM.
    The Stig

    Some say, that I only know two facts about ducks, (both being wrong); and that if I could be bothered, I could solve the "da Vinci Code" in 47 seconds...
    All I know is that I'm called "The Stig".
    GTM #0081

  29. #1349
    Banned
    Join Date
    Aug 2011
    Posts
    669
    Post Thanks / Like
    Looking good. I know it's not quite time for the window but, make sure the Lexan gets sanded really well around the perimeter where it gets painted black. The scratch resistant coating needs to get scuffed up well for the paint to grip. After seeing numerous photos of GTMs with the factory hatch glass, these pics really show the difference. The FFR hatch glass isn't even close to the curve of the body.

  30. #1350
    Member claybags's Avatar
    Join Date
    Feb 2011
    Location
    rio rico,az
    Posts
    93
    Post Thanks / Like
    Quote Originally Posted by carbon fiber View Post
    Looking good. I know it's not quite time for the window but, make sure the Lexan gets sanded really well around the perimeter where it gets painted black. The scratch resistant coating needs to get scuffed up well for the paint to grip. After seeing numerous photos of GTMs with the factory hatch glass, these pics really show the difference. The FFR hatch glass isn't even close to the curve of the body.
    You can say that again!! I'm amazed at how little care was exercised in producing the plugs and molds for the GTM.
    cheers, Jeff
    GTM 422, LS6, cam, heads, Mendeola trans

  31. #1351
    Senior Member The Stig's Avatar
    Join Date
    Feb 2011
    Location
    Charlotte, NC
    Posts
    2,004
    Post Thanks / Like
    I've had to remind myself a couple of times, that we buy the kits to get us started. I think what you get for the price of entry is a pretty good deal.

    I sent my car out for paint and body, because I don't have those skills. But I expect the person/shop that I'm paying, to have the the skills to bring the body and paint up to the level that I paid for.

    So now, the second time around, I've found a shop that really knows their stuff. I completely expect my car to match the mental picture that I've had since I first saw the GTM. My expectations may be high, but I believe that Tony is that good.

    Mike
    Last edited by The Stig; 11-30-2015 at 07:20 PM.
    The Stig

    Some say, that I only know two facts about ducks, (both being wrong); and that if I could be bothered, I could solve the "da Vinci Code" in 47 seconds...
    All I know is that I'm called "The Stig".
    GTM #0081

  32. #1352
    Senior Member The Stig's Avatar
    Join Date
    Feb 2011
    Location
    Charlotte, NC
    Posts
    2,004
    Post Thanks / Like
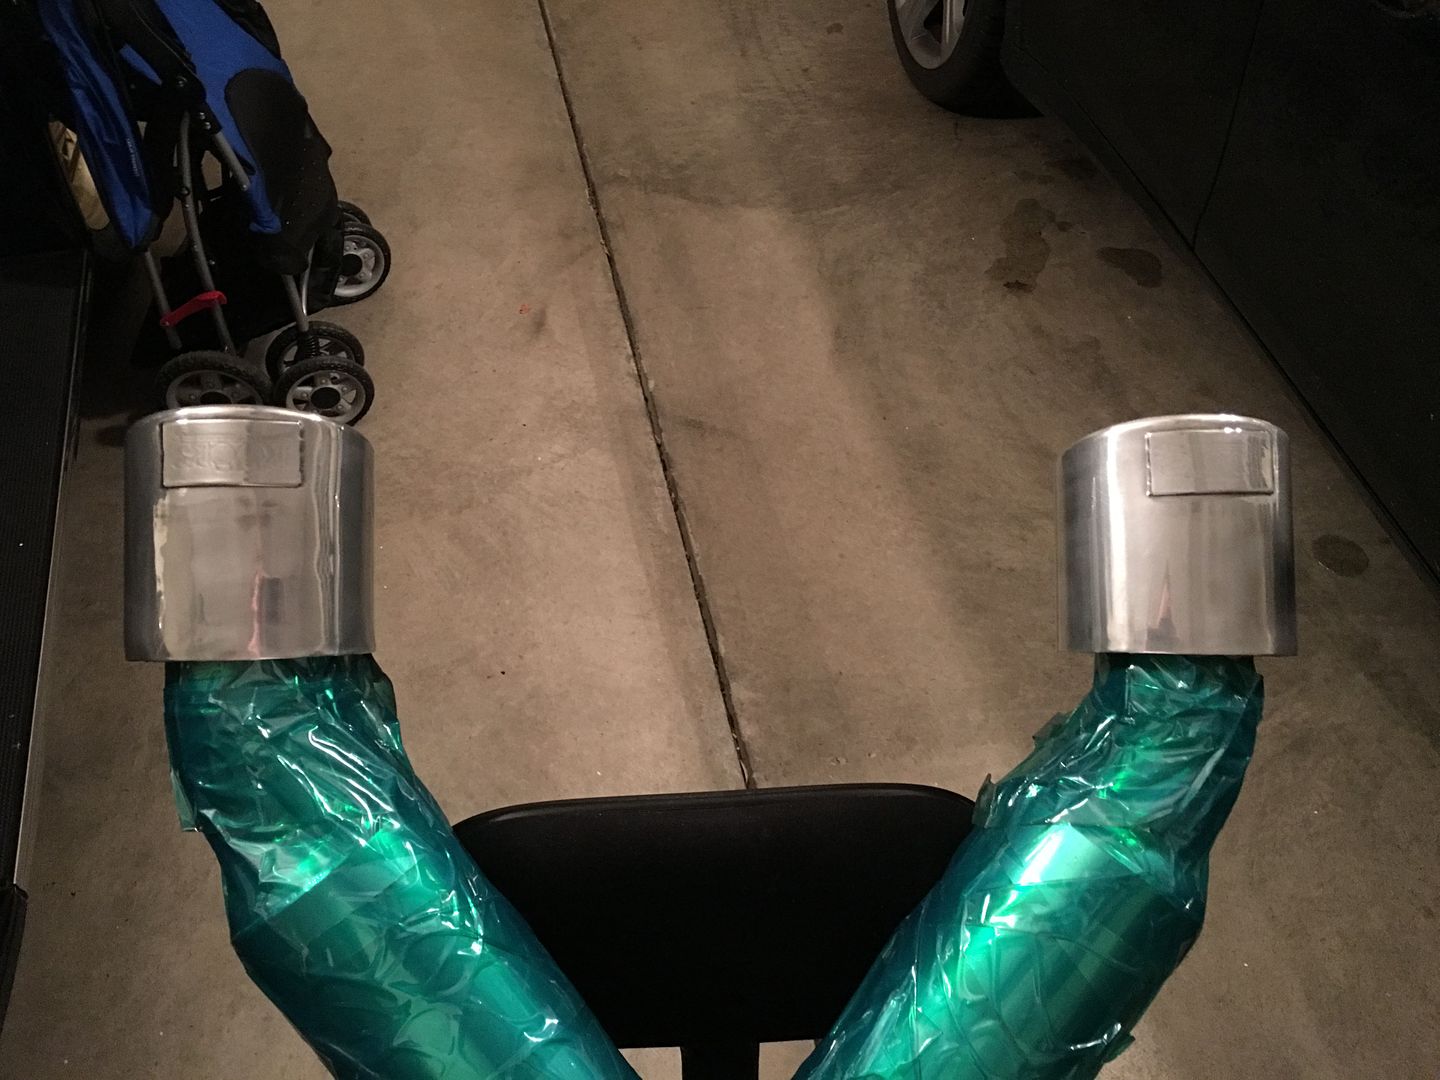
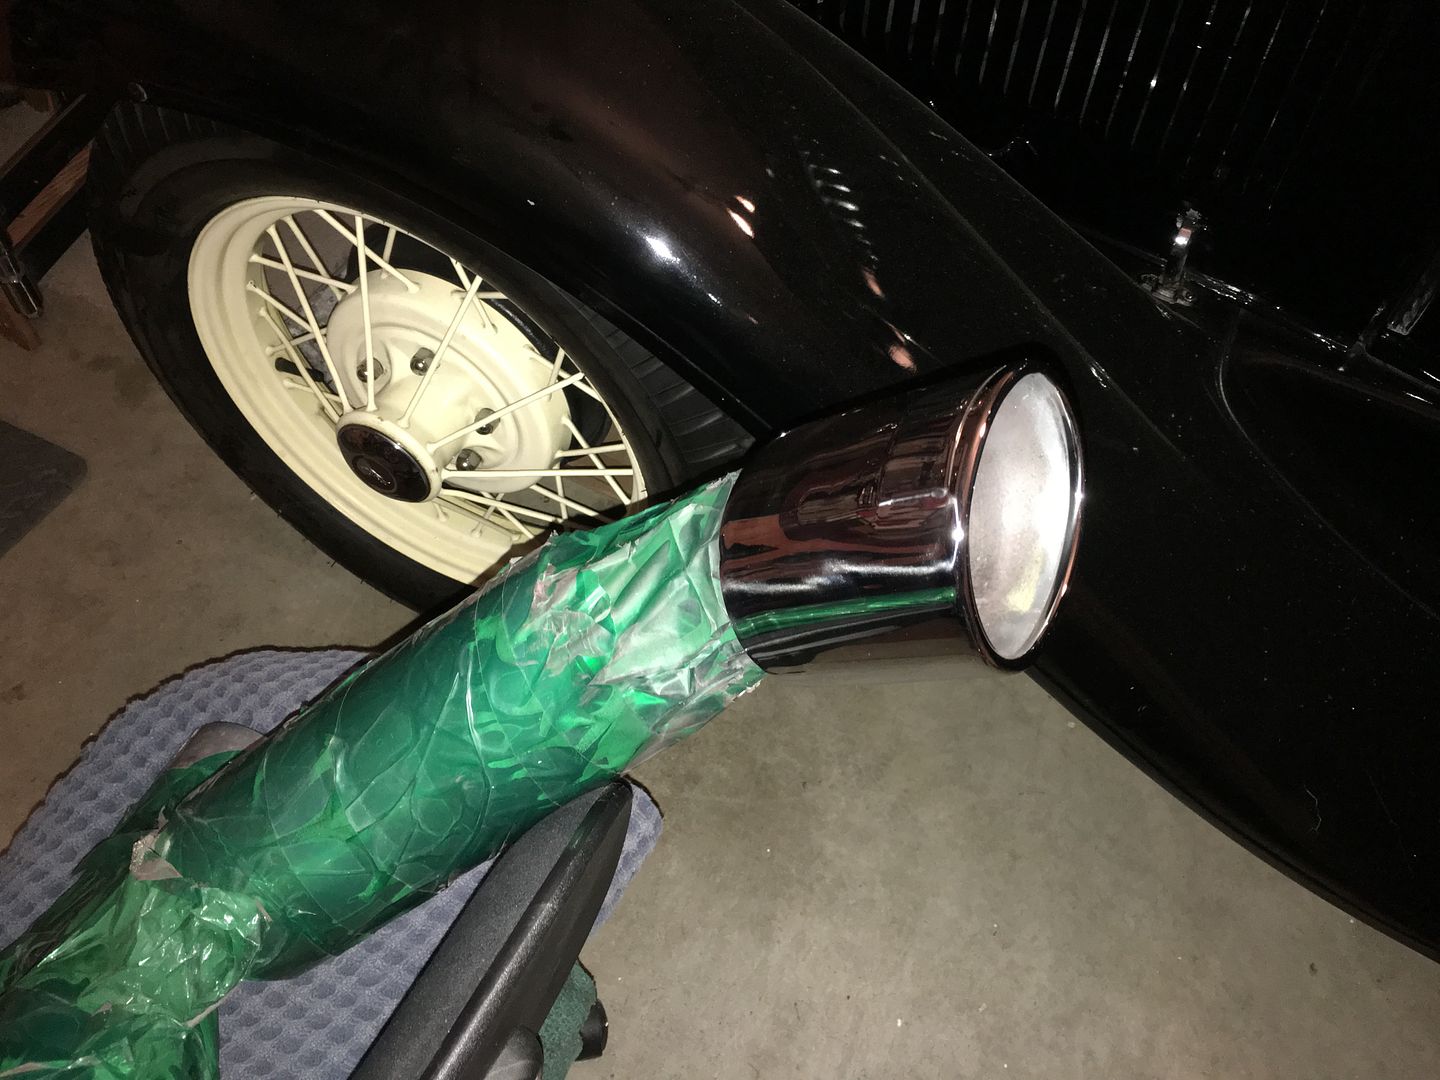
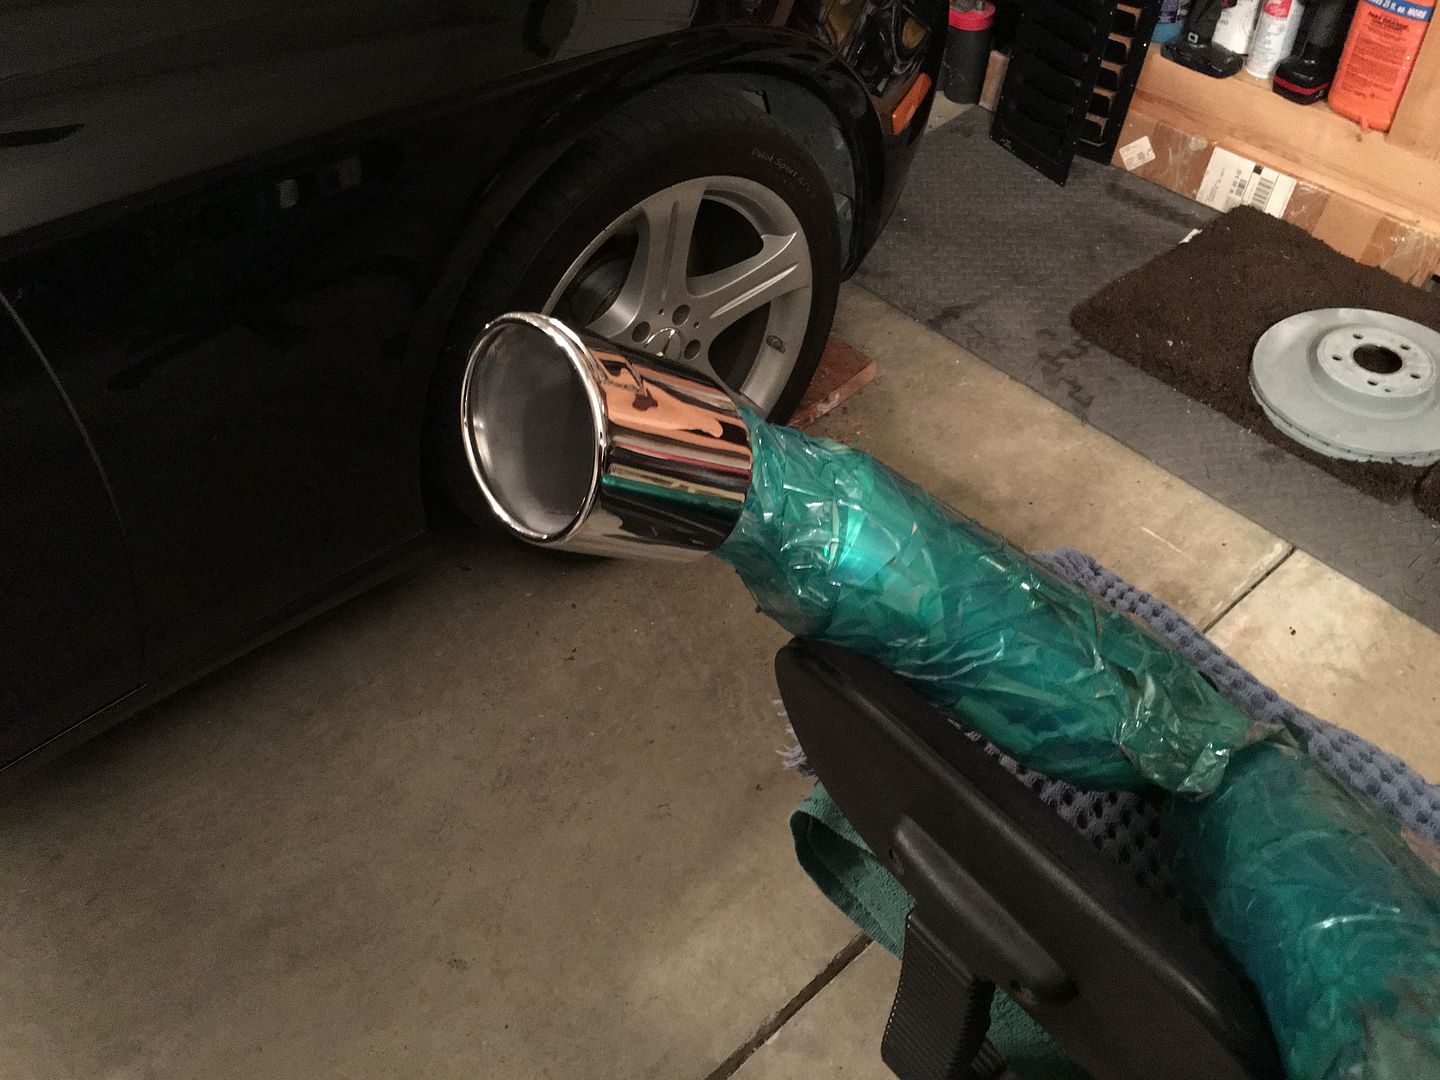
    I got the exhaust back from Custom Chrome Plating in Grafton, Oh. And in my oppinion, they look MUCH better!

    Before...


    After...


    These guys really did a great job!

    Mike
    Last edited by The Stig; 11-25-2015 at 09:23 PM.
    The Stig

    Some say, that I only know two facts about ducks, (both being wrong); and that if I could be bothered, I could solve the "da Vinci Code" in 47 seconds...
    All I know is that I'm called "The Stig".
    GTM #0081

  33. #1353
    Senior Member The Stig's Avatar
    Join Date
    Feb 2011
    Location
    Charlotte, NC
    Posts
    2,004
    Post Thanks / Like
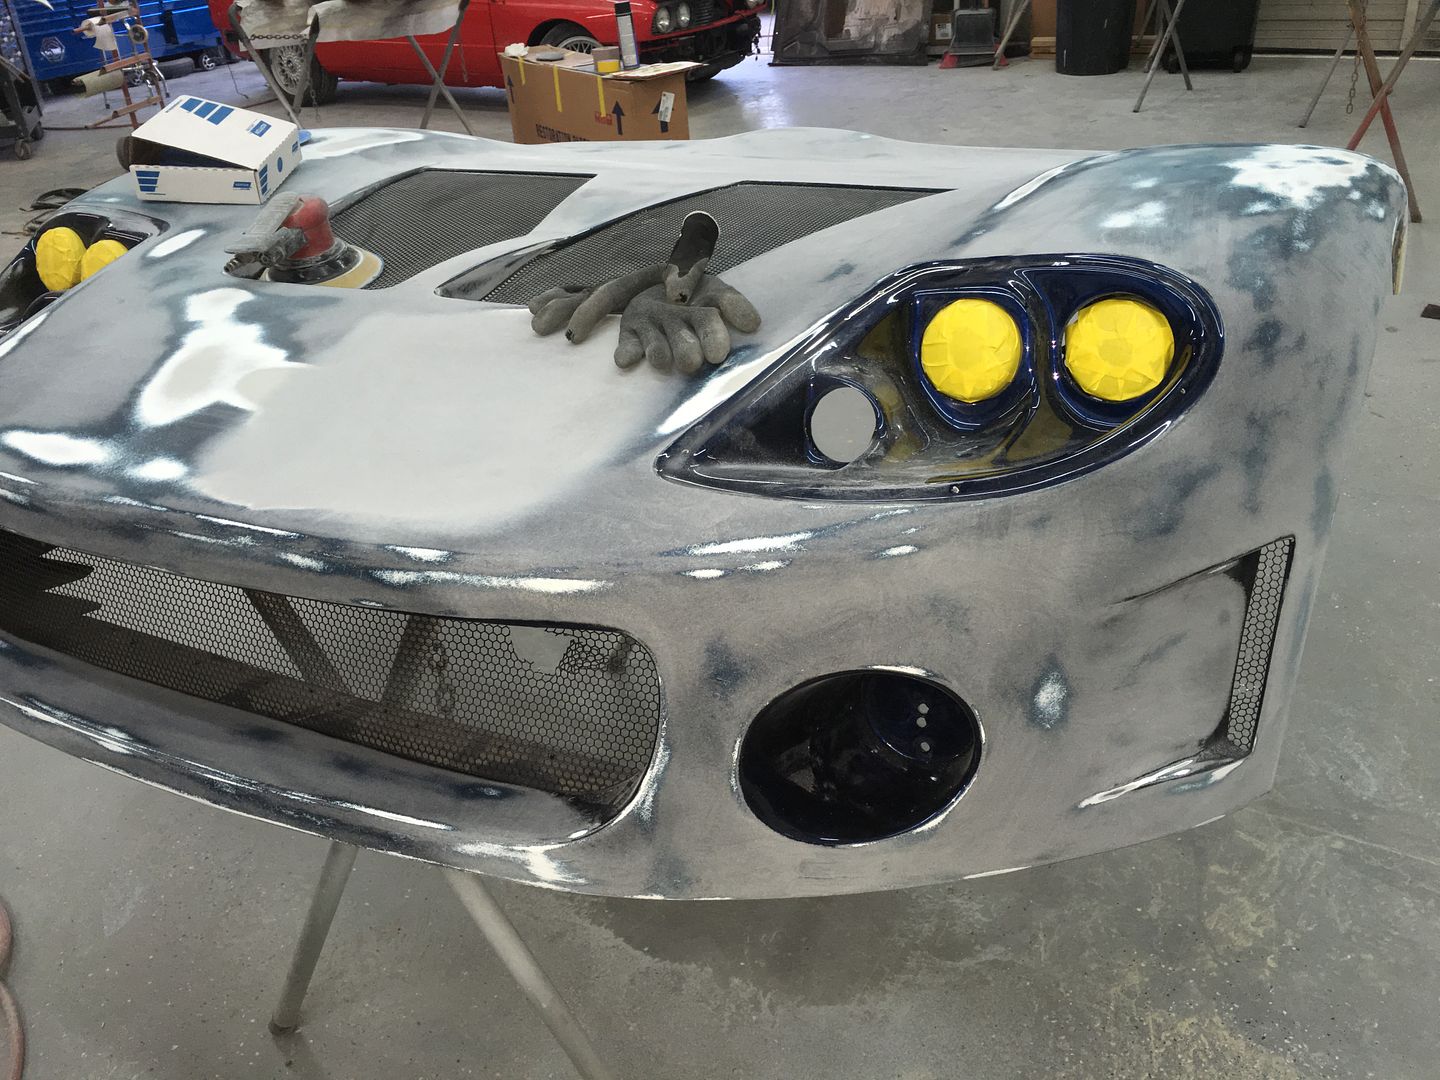
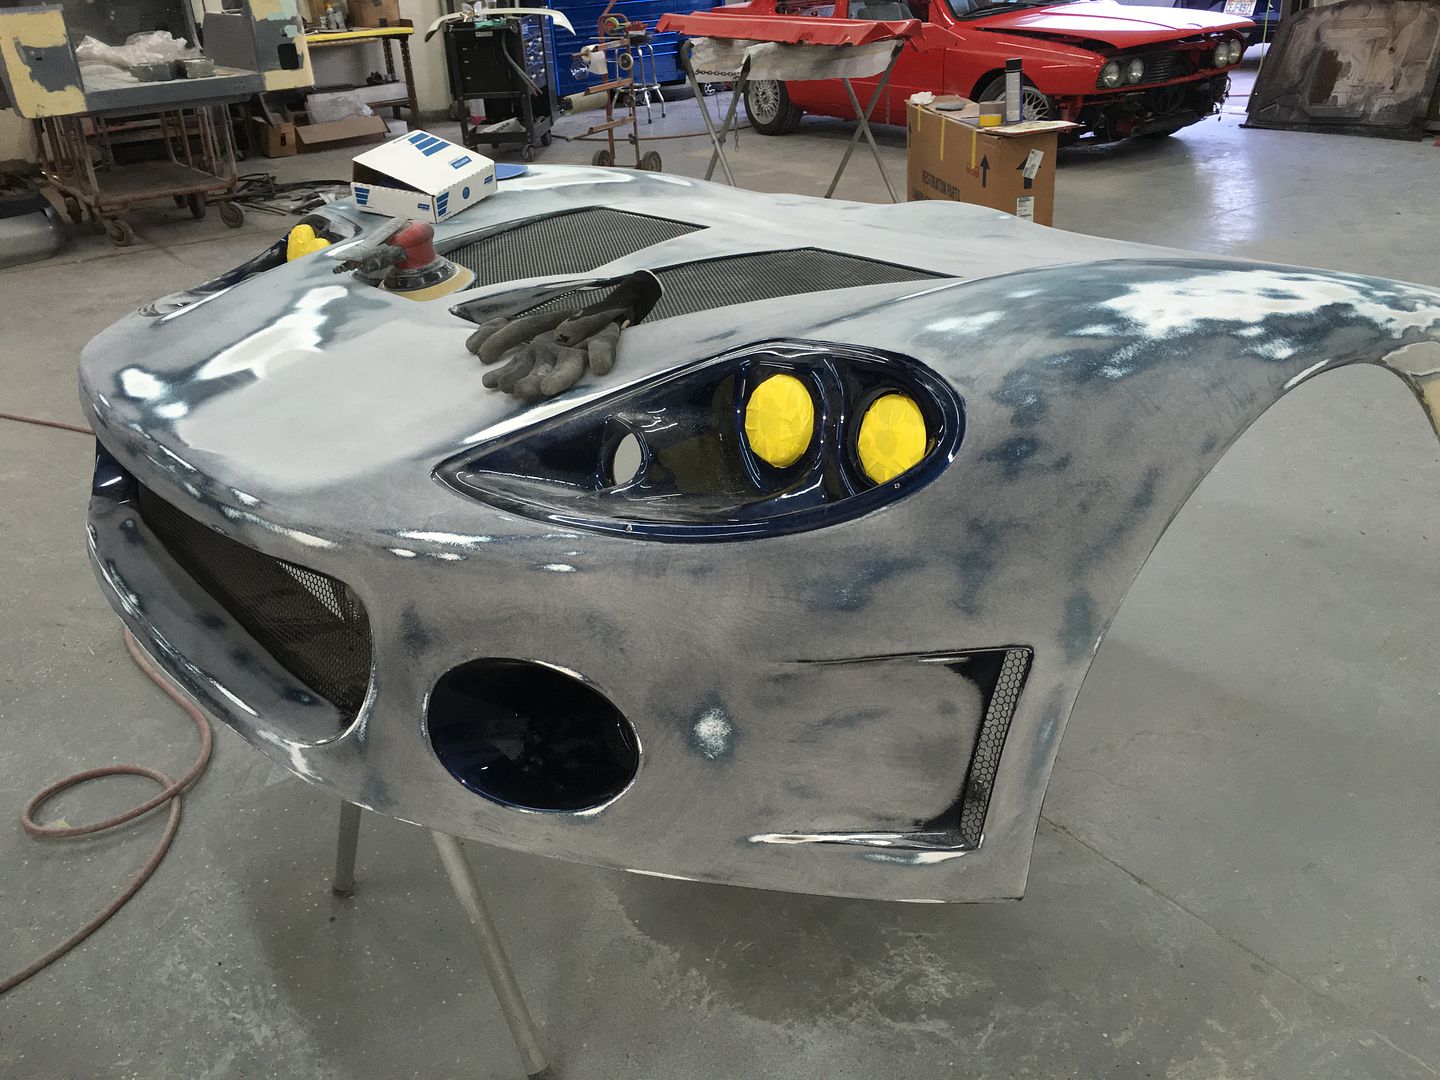
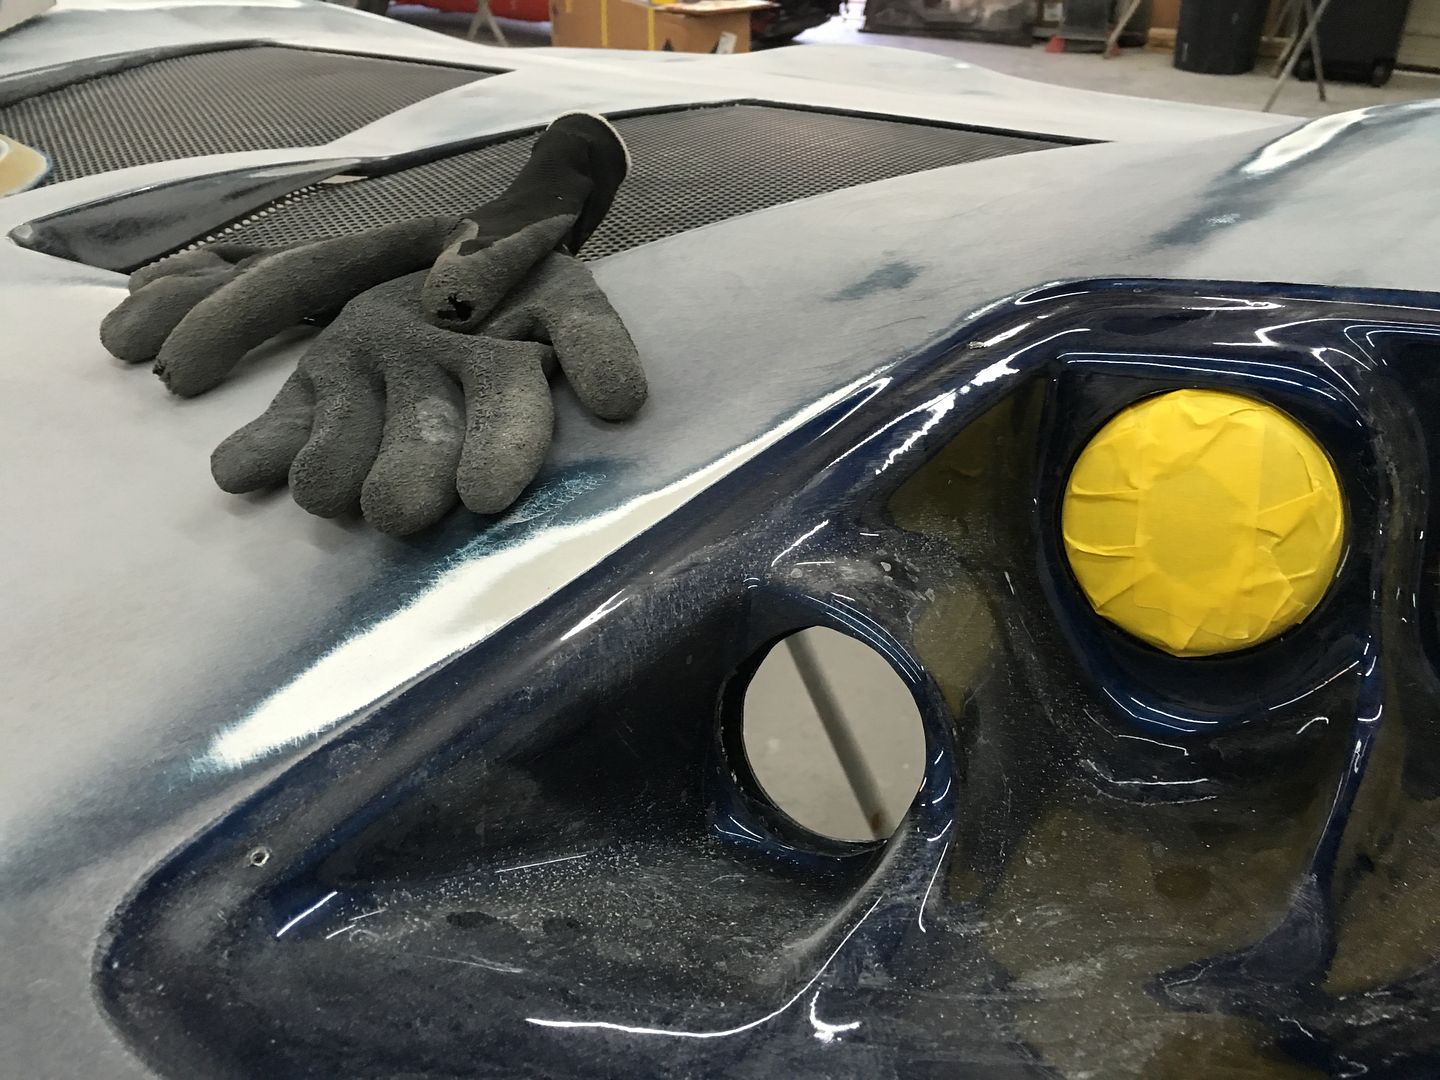
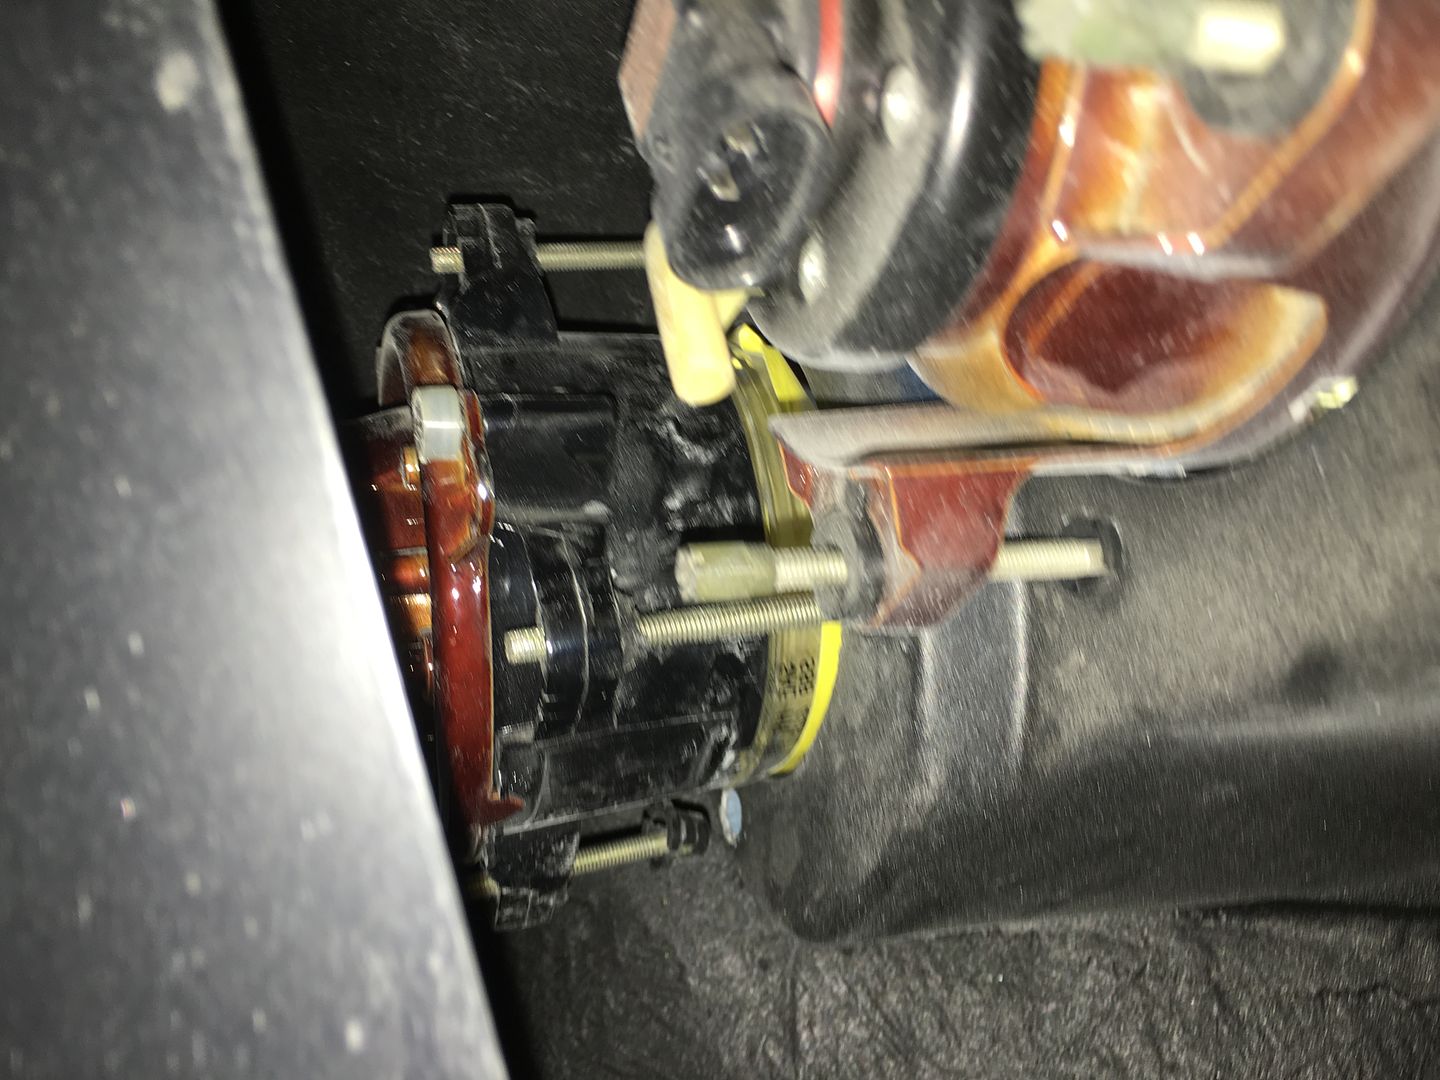
    The hood was off the car, and being blocked. We ran into a snag... We were trying to take the lights out of the hood, but it seems that the clips that they are mounted to, won't allow the screws to be backed out so the lights will come out.


    It didn't occur to me until I posted these pictures, but it looks like Pandora's giving us the "Evil Eye(s)".
    As Sheldon Cooper says on The Big Bang Theory, "Bit-ches Be Crazy!!!"


    Actually, if we can't figure out how to get the lights out without breaking something, they'll just need to be taped up and protected through primer and paint.


    I don't want to force it, and break it. Has anyone else tried to take the lights out after they were installed? I can't imagine that I'm the only one to have tried to take these things out. Would you mind sharing the secret? It would be much appreciated.

    Thanks,

    Mike
    Last edited by The Stig; 11-25-2015 at 12:23 AM.
    The Stig

    Some say, that I only know two facts about ducks, (both being wrong); and that if I could be bothered, I could solve the "da Vinci Code" in 47 seconds...
    All I know is that I'm called "The Stig".
    GTM #0081

  34. #1354
    Senior Member
    Join Date
    Feb 2011
    Location
    Clarksville, MD
    Posts
    232
    Post Thanks / Like
    Mike,

    The exhaust tips look great! They did a really nice job.

    As for the headlights, from my experience, they are very difficult to remove without breaking something. If I recall correctly, they do not unthread all the way out. Also, the plastic retainer clip installed on the body that holds the ball end of the adjustment screws is easy to break if you force the adjustment screws out of them. Ask me how I know . I ended up breaking several clips and the fiberglass mounting flange when I took them out to paint. I ended up ordering more of the adjustment screws/clips to replace the broken ones.

    My $0.02, just leave them in and tape them off.

    Have a good Thanksgiving!

    -Michael

  35. #1355
    Senior Member
    Join Date
    Feb 2011
    Location
    Houston TX
    Posts
    374
    Post Thanks / Like
    I have been successful by putting side load on the light in line with the adjuster that you want to remove then prying the plastic piece up while pushing the tabs in with a flat bladed screwdriver.
    It is a tedious process but I could remove each light within a minute by using this method for each adjustor.
    Cheers,
    Dave

    GTM # 294 Build Start Date 10/12/2009,
    2000 C5 Donor, LS-1 Twin Turbo, AC/Heat, G50-20.02 6 speed, Brandwood Cable shifter
    Build site. http://s679.photobucket.com/albums/vv153/dfraser/

  36. #1356
    Senior Member JL1958's Avatar
    Join Date
    Jul 2013
    Location
    Atlanta
    Posts
    159
    Post Thanks / Like
    Those tips look great.

  37. #1357
    Senior Member The Stig's Avatar
    Join Date
    Feb 2011
    Location
    Charlotte, NC
    Posts
    2,004
    Post Thanks / Like
    Quote Originally Posted by RumRunner View Post
    Mike,

    The exhaust tips look great! They did a really nice job.

    As for the headlights, from my experience, they are very difficult to remove without breaking something. If I recall correctly, they do not unthread all the way out. Also, the plastic retainer clip installed on the body that holds the ball end of the adjustment screws is easy to break if you force the adjustment screws out of them. Ask me how I know . I ended up breaking several clips and the fiberglass mounting flange when I took them out to paint. I ended up ordering more of the adjustment screws/clips to replace the broken ones.

    My $0.02, just leave them in and tape them off.

    Have a good Thanksgiving!

    -Michael
    Thanks Michael, much appreciated. I hope you have a nice Thanksgiving as well.

    I have a feeling that's what I'll need to do as well. But first I think I may try Fraser's method and see if it helps.

    Quote Originally Posted by Fraser D View Post
    I have been successful by putting side load on the light in line with the adjuster that you want to remove then prying the plastic piece up while pushing the tabs in with a flat bladed screwdriver.
    It is a tedious process but I could remove each light within a minute by using this method for each adjuster.
    I'm going to the shop in a couple of hours, and thought I would give this a try. Thank you!

    Quote Originally Posted by JL1958 View Post
    Those tips look great.
    Thanks JL. I think they really did a nice job as well. I said in a post a couple of weeks ago, that I won't make recommendations for vendor work any more; but I would honestly send anyone to these guys, if you ever need chrome work done. I saw a good bit of their plating work while I was there, and it is Fantastic. That's why I was bummed when they said that they couldn't plate the tips of the cross pipe. But as you can see, they do excellent metal polishing as well.

    Thanks guys!

    Mike
    The Stig

    Some say, that I only know two facts about ducks, (both being wrong); and that if I could be bothered, I could solve the "da Vinci Code" in 47 seconds...
    All I know is that I'm called "The Stig".
    GTM #0081

  38. #1358
    Senior Member The Stig's Avatar
    Join Date
    Feb 2011
    Location
    Charlotte, NC
    Posts
    2,004
    Post Thanks / Like
    I'm thinking of having my calipers painted a gun metal gray (metallic), Titanium Gray, or Mercedes Silver.
    But I'm up for suggestions.

    So what do you think?

    The "Battleship Gray" powder coat that is currently on them, was the powdercoater's version of gun metal gray...

    Mike
    The Stig

    Some say, that I only know two facts about ducks, (both being wrong); and that if I could be bothered, I could solve the "da Vinci Code" in 47 seconds...
    All I know is that I'm called "The Stig".
    GTM #0081

  39. #1359
    Senior Member Taz Rules's Avatar
    Join Date
    Dec 2012
    Location
    BC, Canada
    Posts
    738
    Post Thanks / Like
    Red!!!!!

  40. #1360
    Senior Member The Stig's Avatar
    Join Date
    Feb 2011
    Location
    Charlotte, NC
    Posts
    2,004
    Post Thanks / Like
    Quote Originally Posted by Taz Rules View Post
    Red!!!!!
    LOL...! That's what a lot of people have suggested. I like yellow calipers also.

    Mike
    The Stig

    Some say, that I only know two facts about ducks, (both being wrong); and that if I could be bothered, I could solve the "da Vinci Code" in 47 seconds...
    All I know is that I'm called "The Stig".
    GTM #0081

Page 34 of 51 FirstFirst ... 24323334353644 ... LastLast

Tags for this Thread

Posting Permissions

  • You may not post new threads
  • You may not post replies
  • You may not post attachments
  • You may not edit your posts
  •  

Breeze

Visit our community sponsor