Midwest Classic Insurance

Visit our community sponsor

Thanks Thanks:  0
Likes Likes:  0
Page 1 of 7 123 ... LastLast
Results 1 to 40 of 259

Thread: De-powering the steering rack, plus more to come on rebuilding wrx parts

  1. #1
    818 builder metalmaker12's Avatar
    Join Date
    Mar 2012
    Location
    Exeter R.I
    Posts
    2,834
    Post Thanks / Like
    Blog Entries
    1

    De-powering the steering rack, plus more to come on rebuilding wrx parts

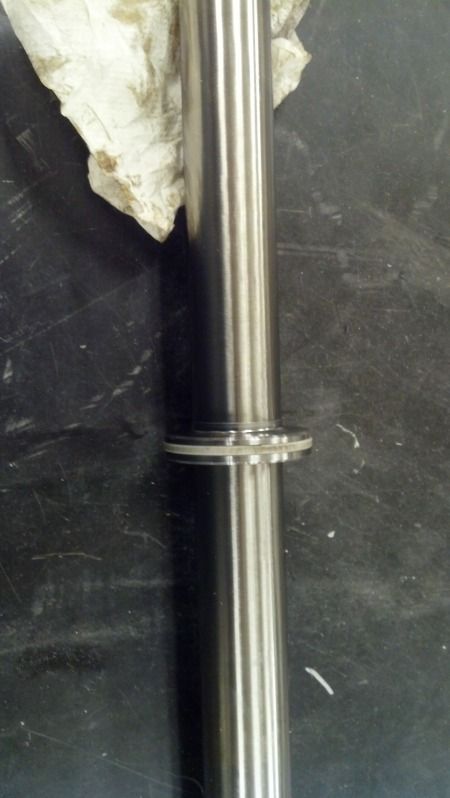
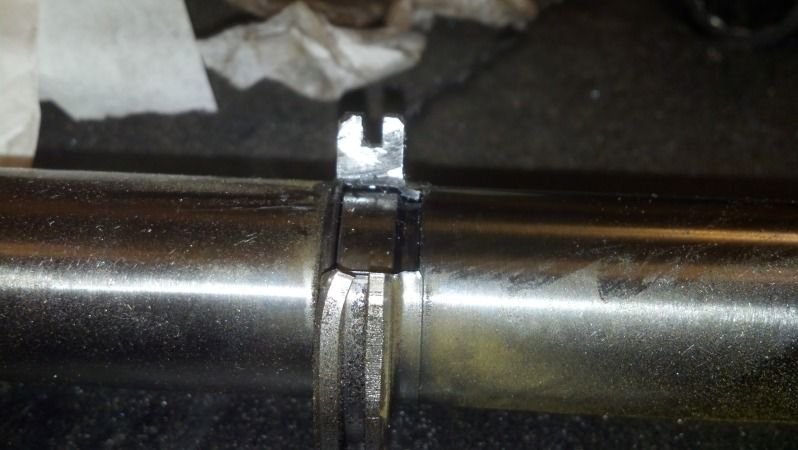
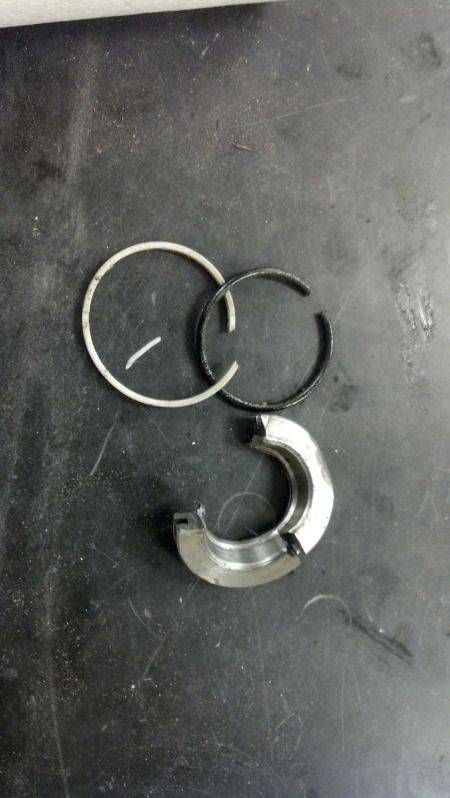
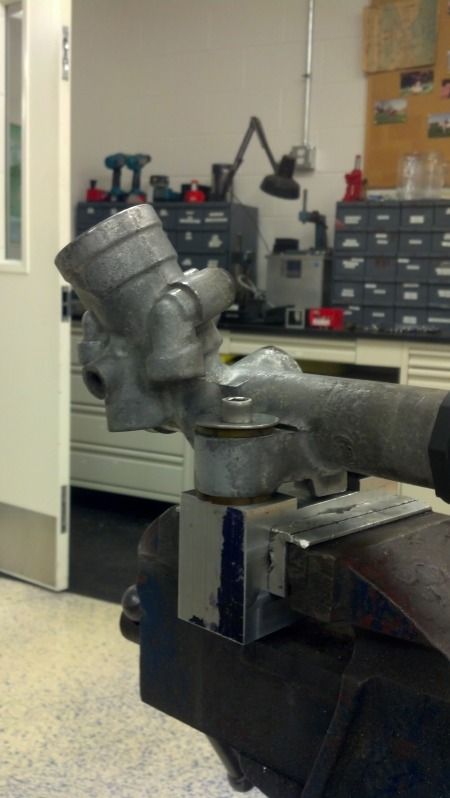
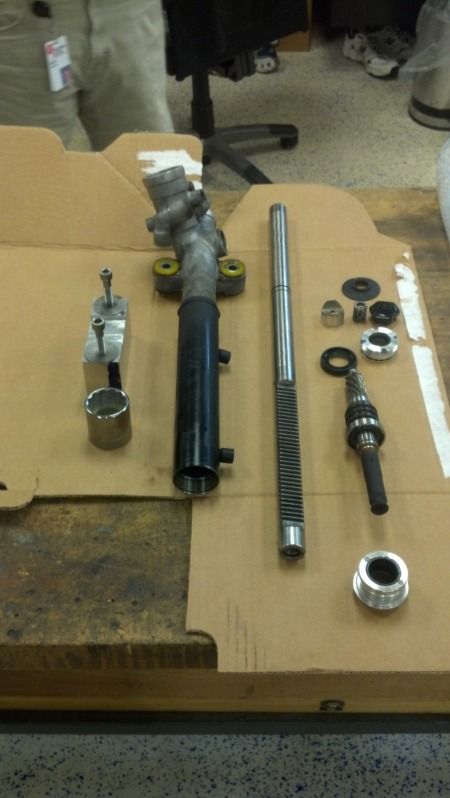
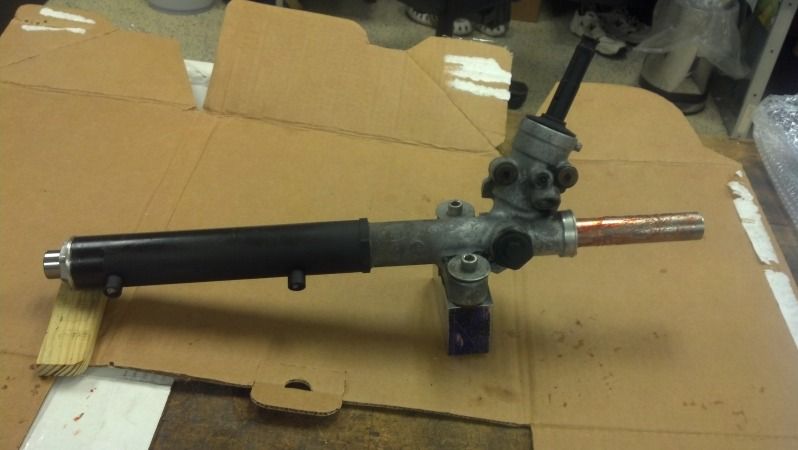
    I have an 02 and 06 rack that I am depowering. This means to remove the inner seals to free up the traped power steering fluid, which gets u back to the steering ratio that the rack was designed to produce. If you don't do this your steering input is going to be more difficult in quick transitions and your ratio will seem higher. Miata race guys do this often and it will benefit us 818 guys. Open for questions,

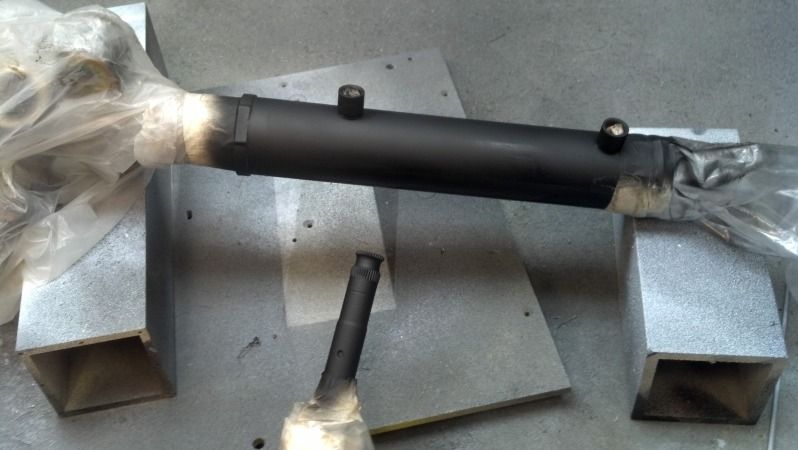
    In process of bead blasting, and powercoating spindles, brakes , control arms, sti wheels and various brackets etc to install the new bushings and seals. I have a set of brembos off a sti, but I am really think their overkill so I am rebuilding a set of wrx 4 pot brakes.
    securedownload-2.jpeg

    For you that do not know what depowering is, heres a slide show
    http://www.flyinmiata.com/tech/depower.php?x=1
    Last edited by metalmaker12; 03-19-2013 at 05:43 PM.

  2. #2
    Senior Member Rasmus's Avatar
    Join Date
    Mar 2012
    Location
    Las Vegas, USA
    Posts
    983
    Post Thanks / Like
    Quote Originally Posted by metalmaker12 View Post
    For you that do not know what depowering is, heres a slide show
    Seems straight forward.

    Modern Subarus come with Electronic Power Steering instead of Hydrolic, another route to consider.

  3. #3
    cobra Handler skullandbones's Avatar
    Join Date
    Jul 2011
    Location
    Superstition Mtn foothills 5 miles west of Gold Canyon AZ
    Posts
    2,686
    Post Thanks / Like
    Blog Entries
    19
    That will really help me. I don't like tearing into something like this without some clear instructions. It surprised me to see the bearing you had to remove. I was thinking o-rings. Also, the "torquing 3 times" at the end when adjusting the pinion was not quite clear to me but I guess you just do it. Anyway that will be very helpful and keep them coming. Thank you! WEK.
    FFR MkIII 302 (ATK), EFI 75mm TB with custom box plenum chamber, 24# injectors, 4 tube BBK ceramic, cold air sys, alum flywheel, crane roller rockers, T5, Wilwood pedals, custom five link with Watt's link, 4 rotors, coil overs, power steering with Heidt valve, alum FFR rad, driver's crash bar mod, mini dead pedal mod, quick release steering wheel hub #6046

  4. #4
    Senior Member Xusia's Avatar
    Join Date
    Oct 2011
    Location
    Eugene, OR, USA
    Posts
    2,343
    Post Thanks / Like
    Weren't those instructions specific to a Miata rack? I would imagine details like torque specifications could be different for a Subaru.

  5. #5
    Senior Member
    Join Date
    Feb 2011
    Location
    San Diego
    Posts
    1,961
    Post Thanks / Like
    Why would you want to de-power the steering rack?

    If it's an issue of different vehicle weight or line runs, you might want to try this setup...

    http://www.myraceshop.com/Power_Stee...ontroller.html
    www.myraceshop.com

    GTM solution kits
    Corvette and Race parts

  6. #6
    Senior Member Nuul's Avatar
    Join Date
    Sep 2011
    Location
    Indianapolis, IN
    Posts
    247
    Post Thanks / Like
    *wave*

    Hey Crash, I didn't know you ventured outside the GTM forums. Planning on adding an 818 to keep the GTM company?

  7. #7
    818 builder metalmaker12's Avatar
    Join Date
    Mar 2012
    Location
    Exeter R.I
    Posts
    2,834
    Post Thanks / Like
    Blog Entries
    1
    Quote Originally Posted by Nuul View Post
    *wave*

    Hey Crash, I didn't know you ventured outside the GTM forums. Planning on adding an 818 to keep the GTM company?
    Lol anyway yes this is the 818 forum.
    This site has almost everything you need for torque specs, I got a PDF file to but his is on the web and you can access it easily.
    And yes the electric power steering is a good route, a new one will have to have custom mounts, but no biggy. I was even thinking of a Honda fit rack cause it has a 12:7 ratio stock.
    But all in all I am staying with what I got and making it work well

    http://ken-gilbert.com/impreza-manuals

  8. #8
    Senior Member StatGSR's Avatar
    Join Date
    Apr 2011
    Location
    Duluth, MN
    Posts
    443
    Post Thanks / Like
    Quote Originally Posted by crash View Post
    Why would you want to de-power the steering rack?
    cause power steering is for Sallys....

    also, there additional work and cost associated with running new PS lines to and from the back of the car to the front of the car with the engine in the MR position.

    im not sure about the subaru world, but in the honda world we usually just loop the high and low pressure sides and splice a breather between them, this was standard practice for power steering deletion, even by professional race teams. compared to the miata way, you would still want to leave PS fluid in the rack to keep it lubricated.
    Last edited by StatGSR; 04-30-2012 at 04:29 PM.
    05 Outback XT - DD
    94 Integra GSR - Track Car
    97 Legacy Brighton - EG33 Swap Project
    03 Silverado 2500HD Duramax - Tow Rig
    97 Integra GS - Future Track Car

  9. #9
    Senior Member
    Join Date
    Feb 2011
    Location
    San Diego
    Posts
    1,961
    Post Thanks / Like
    Quote Originally Posted by Nuul View Post
    *wave*

    Hey Crash, I didn't know you ventured outside the GTM forums. Planning on adding an 818 to keep the GTM company?
    No. One project at a time.

    Just thought it might be helpful to those that didn't realize they could have their cake and eat it too as far as power steering was concerned.
    www.myraceshop.com

    GTM solution kits
    Corvette and Race parts

  10. #10
    Senior Member RM1SepEx's Avatar
    Join Date
    Jul 2011
    Location
    Freeport, ME
    Posts
    3,801
    Post Thanks / Like
    Quote Originally Posted by StatGSR View Post
    cause power steering is for Sallys....

    also, there additional work and cost associated with running new PS lines to and from the back of the car to the front of the car with the engine in the MR position.

    im not sure about the subaru world, but in the honda world we usually just loop the high and low pressure sides and splice a breather between them, this was standard practice for power steering deletion, even by professional race teams. compared to the miata way, you would still want to leave PS fluid in the rack to keep it lubricated.
    Doing it properly as originally described leaves a much lighter feel as un-necessary friction causing components are removed. I run with Miatas done both ways... It's very evident to the driver.

  11. #11
    Senior Member
    Join Date
    Apr 2012
    Posts
    156
    Post Thanks / Like
    Quote Originally Posted by RM1SepEx View Post
    Doing it properly as originally described leaves a much lighter feel as un-necessary friction causing components are removed. I run with Miatas done both ways... It's very evident to the driver.
    Are there any concerns about the lifespan of the rack without the power steering fluid being there to provide lubrication?

    Thanks,
    John

  12. #12
    818 builder metalmaker12's Avatar
    Join Date
    Mar 2012
    Location
    Exeter R.I
    Posts
    2,834
    Post Thanks / Like
    Blog Entries
    1
    Quote Originally Posted by Racebrewer View Post
    Are there any concerns about the lifespan of the rack without the power steering fluid being there to provide lubrication?

    Thanks,
    John

    It's more about feel and response, driver feedback. if you properly pack the inside with good assembly lube your rack will last forever. I have some autocross buddies that have ran their racks this way for at least ten years. One has a race spec Elise with no ps and it is got awesome response and 400 who lol, yea it would be nice to take him!!!

  13. #13
    Senior Member RM1SepEx's Avatar
    Join Date
    Jul 2011
    Location
    Freeport, ME
    Posts
    3,801
    Post Thanks / Like
    What metalmaker12 said, you don't depower it and run it dry, you lube it up and it has seals, just like a regular manual rack. With a Miata the de-powered rack has a slightly faster ratio too!

  14. #14
    Mechie3's Avatar
    Join Date
    May 2012
    Location
    Indianapolis
    Posts
    5,174
    Post Thanks / Like
    Is there a specific how to for Subarus, or just the Miata guide. I'm sure I can figure it out, but sometimes (often times) it's faster if someone has done it before and I can just copy it.
    Zero Decibel Motorsports
    Check out my new website!
    www.zerodecibelmotorsports.com
    www.facebook.com/zero.decibel.motorsports

  15. #15
    Senior Member RM1SepEx's Avatar
    Join Date
    Jul 2011
    Location
    Freeport, ME
    Posts
    3,801
    Post Thanks / Like
    I couldn't find one.

    I couldn't find a way to remove the end seal so mine isn't totally depowered yet. The Miata uses a circlip... There doesn't seem to be too much friction... I may leave a small amt of oil and loop the hoses on the rack. I did make a sweet little spanner to remove the pinion gear. Pins are 5/32 roll pins on 1 1/2 center. I drilled a large hole between them and cut away the edges with a band saw. I used some scrap 1/2 aluminum stock for the "handle"

  16. #16
    wrench slinger jdek's Avatar
    Join Date
    Feb 2011
    Posts
    8
    Post Thanks / Like
    Quote Originally Posted by Racebrewer View Post
    Are there any concerns about the lifespan of the rack without the power steering fluid being there to provide lubrication?

    Thanks,
    John

    Nope:
    Power steering fluid doesn't lubricate the rack and pinion. Here's a link to a fluid diagram how most power racks are set up. http://static.ddmcdn.com/gif/steering-power-rack.jpg
    The rack and pinion are lubricated with grease in power racks too. HTH

  17. #17
    Senior Member RM1SepEx's Avatar
    Join Date
    Jul 2011
    Location
    Freeport, ME
    Posts
    3,801
    Post Thanks / Like
    It appears that you just press the rack's seal out...

    http://ken-gilbert.com/wrx/04impreza..._chas_11-2.pdf

    I'll update tomorrow...

  18. #18
    Senior Member RM1SepEx's Avatar
    Join Date
    Jul 2011
    Location
    Freeport, ME
    Posts
    3,801
    Post Thanks / Like
    Nice Diagram jdek,

    very clear depiction! you can see that you reduce friction by removing the seal on the piston mounted to the rack in this diagram. If you choose not to you can see why you simply loop the two fluid connections. Use little to no fluid, it isn't needed, you can't just block them off, you need to relieve the pressure generated by movement of the rack

    I've spent 3-4 hrs searching Subaru forums for depowering the rack, I can't find any threads where they fully depower the Subaru rack, they all just loop the to rack fittings and block off the pinion fittings. I'd use very little fluid to minimize resistance... A small amt of fluid is needed, it does lubricate the piston's seal, just not the rack itself

  19. #19
    fasterer and furiouser longislandwrx's Avatar
    Join Date
    Aug 2012
    Location
    Long Island
    Posts
    2,540
    Post Thanks / Like
    Blog Entries
    6
    good info, shouldnt be hard to source the proper aeroquip npt fittings to make it look professional.

  20. #20
    Mechie3's Avatar
    Join Date
    May 2012
    Location
    Indianapolis
    Posts
    5,174
    Post Thanks / Like
    I just plan to put a weld bead on the inside of the existing fittings. Much cheaper.

    I printed out the manual and started to work. I got as far as "don't clamp it in the vice without this fixture" before I stopped. Got 1/2 of a fixture made up during lunch, but now it's time to do some real work.
    Zero Decibel Motorsports
    Check out my new website!
    www.zerodecibelmotorsports.com
    www.facebook.com/zero.decibel.motorsports

  21. #21
    fasterer and furiouser longislandwrx's Avatar
    Join Date
    Aug 2012
    Location
    Long Island
    Posts
    2,540
    Post Thanks / Like
    Blog Entries
    6
    does ken-gilbert have the LHD pages? i'm sure its just a mirror, but just askin'

  22. #22
    Mechie3's Avatar
    Join Date
    May 2012
    Location
    Indianapolis
    Posts
    5,174
    Post Thanks / Like
    IIRC, his manual is based on the 2004 USDM STI. They do have sections for routing of the hoses for the LHD setup, so maybe there isn't a LHD page? I have the full FSM manual for my 06 but it's at home, not at work. I can check it later.
    Zero Decibel Motorsports
    Check out my new website!
    www.zerodecibelmotorsports.com
    www.facebook.com/zero.decibel.motorsports

  23. #23
    Mechie3's Avatar
    Join Date
    May 2012
    Location
    Indianapolis
    Posts
    5,174
    Post Thanks / Like
    Got it all apart. After you remove the 36mm nut (supposed to be replaced after use since that dimple rips it apart, I'm going to try and clean up mine) and pop out the pinion it presses apart. I used a 1"OD plastic tube to press on the rack from the valve side. It was a really light press. Hammering once or twice didn't work, it does require a press. I had made a block that my rack bolted too (next to the valve) so I could support it by that in the press.

    After I pressed out the seal (be ready, the rack falls out!) it was easy enough to see the piston and cut it off.

    Here is the piston:


    Cutting it off. It has a lip that is roll formed onto the shaft, so cutting it is the only way to remove it.


    Here is what I cut off. There's the steel piston, a rubber backup o-ring, and then the surface seal:


    Thoroughly degreased everything, bagged and tapped sensitive components, wire wheeled problem spots, and hit it with some rustoleum.
    Zero Decibel Motorsports
    Check out my new website!
    www.zerodecibelmotorsports.com
    www.facebook.com/zero.decibel.motorsports

  24. #24
    Senior Member
    Join Date
    Jun 2011
    Posts
    241
    Post Thanks / Like
    ^good stuff...

    any pics of the reinstall?

  25. #25
    Mechie3's Avatar
    Join Date
    May 2012
    Location
    Indianapolis
    Posts
    5,174
    Post Thanks / Like
    Nope, because I left it how it was. Lunch break was over and I wanted to let the paint dry. Also left my good grease at home.
    Zero Decibel Motorsports
    Check out my new website!
    www.zerodecibelmotorsports.com
    www.facebook.com/zero.decibel.motorsports

  26. #26
    Mechie3's Avatar
    Join Date
    May 2012
    Location
    Indianapolis
    Posts
    5,174
    Post Thanks / Like
    The fixture I used. Those without the built in mounting tabs will need to make a top clamp piece.


    All parts laid out for reassembly:


    Back together:
    Zero Decibel Motorsports
    Check out my new website!
    www.zerodecibelmotorsports.com
    www.facebook.com/zero.decibel.motorsports

  27. #27
    Mechie3's Avatar
    Join Date
    May 2012
    Location
    Indianapolis
    Posts
    5,174
    Post Thanks / Like
    Interesting....


    I did some searching and found a few things:

    Subaru steering rack in a locost7: http://www.locostusa.com/forums/view...hp?f=36&t=9971

    RX7 guys depowering the rack and welding the spool/quill/pinion together.
    http://www.rx7club.com/3rd-generatio...g-rack-942543/

    Project Miatabusa also welded the spool/quill/pinion together:
    http://www.motoiq.com/magazine_artic...ring-rack.aspx

    Maybe I should take mine apart and weld it. Too bad I only have a stick welder. Good excuse to buy a tig perhaps? lol.
    Zero Decibel Motorsports
    Check out my new website!
    www.zerodecibelmotorsports.com
    www.facebook.com/zero.decibel.motorsports

  28. #28
    Senior Member
    Join Date
    Apr 2012
    Posts
    156
    Post Thanks / Like
    Thanks Mechie !

    Nice write-up and photos. What is your "good grease"?

    John

  29. #29
    Mechie3's Avatar
    Join Date
    May 2012
    Location
    Indianapolis
    Posts
    5,174
    Post Thanks / Like
    Just Valvoline synthetic automotive grease. The only stuff we have at the shop isn't automotive grease. it's mean more for bearings in relatively clean environments at low heat. We make automated medical and clinical research products at work. Doing car stuff (or any personal project) just happens to be allowed anytime you're not working.
    Zero Decibel Motorsports
    Check out my new website!
    www.zerodecibelmotorsports.com
    www.facebook.com/zero.decibel.motorsports

  30. #30
    fasterer and furiouser longislandwrx's Avatar
    Join Date
    Aug 2012
    Location
    Long Island
    Posts
    2,540
    Post Thanks / Like
    Blog Entries
    6
    Did you end up welding the quill?

    also what did you mean by "(supposed to be replaced after use since that dimple rips it apart)"

    I am getting ready to do this, thanks!
    A well stocked beverage fridge is the key to any successful project.

  31. #31
    Senior Member narkosys's Avatar
    Join Date
    May 2012
    Posts
    243
    Post Thanks / Like
    Quote Originally Posted by StatGSR View Post
    also, there additional work and cost associated with running new PS lines to and from the back of the car to the front of the car with the engine in the MR position.
    are there any other advantages/disadvantages other than the cost of re-routing/lengthening the lines?

    P

  32. #32
    Senior Member
    Join Date
    Feb 2011
    Posts
    607
    Post Thanks / Like
    Didn't want to start a new thread and thought this thread might be a good fit....Does anyone have any info on a quicker steering column? Here's a link to a company that sells them for the WRX: http://www.landefabrication.com/columninfo.html. They are a bit expensive, but this tied together with a manual rack would be awesome in an 818. Thoughts?

  33. #33
    Senior Member
    Join Date
    May 2012
    Location
    Suisun City, CA
    Posts
    851
    Post Thanks / Like

  34. #34
    Senior Member bromikl's Avatar
    Join Date
    Feb 2011
    Location
    Milwaukee, WI
    Posts
    378
    Post Thanks / Like
    What a clever idea! Does anyone have any experience with this? How would you account for the difference in the length of the steering wheel drive?

  35. #35
    Senior Member
    Join Date
    May 2012
    Location
    Suisun City, CA
    Posts
    851
    Post Thanks / Like
    Quote Originally Posted by bromikl View Post
    What a clever idea! Does anyone have any experience with this? How would you account for the difference in the length of the steering wheel drive?
    You would likely have to cut the steering column and shorten it. From my understanding, the L&E is a modified column using the Howe quickener.

  36. #36
    Senior Member Xusia's Avatar
    Join Date
    Oct 2011
    Location
    Eugene, OR, USA
    Posts
    2,343
    Post Thanks / Like
    Is it not possible to just change the pinion gear inside the rack? Increasing the number of teeth on the pinion gear should accomplish the same thing.

  37. #37
    Senior Member RM1SepEx's Avatar
    Join Date
    Jul 2011
    Location
    Freeport, ME
    Posts
    3,801
    Post Thanks / Like
    you can't just change the number of teeth on the pinion, the gears need to mesh properly. Both the rack and pinion would need to be changed

  38. #38
    Senior Member Xusia's Avatar
    Join Date
    Oct 2011
    Location
    Eugene, OR, USA
    Posts
    2,343
    Post Thanks / Like
    You can make larger gears with the same mesh - that's no problem at all. My guess is that if it's not possible, it's probably because there is no adjustability in the pinion shaft (column) to allow for the increased pinion gear diameter.

  39. #39
    Senior Member RM1SepEx's Avatar
    Join Date
    Jul 2011
    Location
    Freeport, ME
    Posts
    3,801
    Post Thanks / Like
    more teeth with same profile = larger dia. no adjustability in the aluminum case. rack meshes with pinion. to make it work in the same case the tooth profile needs to be different in both pieces.

    or:

    now if you want to add a tooth to the pinion and remachine the rack so the teeth are cut farther into the rack because the pinion is bigger... it could be done

    Until we drive the car...

  40. #40
    Senior Member bromikl's Avatar
    Join Date
    Feb 2011
    Location
    Milwaukee, WI
    Posts
    378
    Post Thanks / Like
    Do you suppose FFR has already designed the steering to be more responsive? Shortening the length of the control arms would have the same effect as a tighter steering rack.

Page 1 of 7 123 ... LastLast

Posting Permissions

  • You may not post new threads
  • You may not post replies
  • You may not post attachments
  • You may not edit your posts
  •  

Stewart Transport

Visit our community sponsor