Midwest Classic Insurance

Visit our community sponsor

Thanks Thanks:  0
Likes Likes:  0
Page 5 of 7 FirstFirst ... 34567 LastLast
Results 161 to 200 of 259

Thread: De-powering the steering rack, plus more to come on rebuilding wrx parts

  1. #161
    818 builder metalmaker12's Avatar
    Join Date
    Mar 2012
    Location
    Exeter R.I
    Posts
    2,834
    Post Thanks / Like
    Blog Entries
    1
    Power steering will make it turn even faster, not sure that is safer. A na build with abs would be safer man
    Last edited by metalmaker12; 06-07-2013 at 05:12 AM.

  2. #162
    fasterer and furiouser longislandwrx's Avatar
    Join Date
    Aug 2012
    Location
    Long Island
    Posts
    2,540
    Post Thanks / Like
    Blog Entries
    6
    Agreed, power steering may dampen the kickback slightly, but there's still a mechanical link. When you have sticky tires, firm bushings, stiff shocks/springs and a light car all that energy is going to be transferred to the wheel.

    Also as Wayne said, the R&T test was before several suspension changes, so perhaps FFR was able to tune some of the harshness out.
    A well stocked beverage fridge is the key to any successful project.

  3. #163
    Senior Member RM1SepEx's Avatar
    Join Date
    Jul 2011
    Location
    Freeport, ME
    Posts
    3,801
    Post Thanks / Like
    Quote Originally Posted by Hazelwwp View Post
    Why de-power the steering rack?

    The Motor Trend teaser article referenced in Dave's thread says the following ... "On Gingerman’s occasionally ragged track surface, the Factory Five tramlines and hunts out imperfections with an alacrity that is something alarming. Kickback through the steering wheel can be violent."

    It also says ... "This isn’t a car for novice drivers."

    It seems to me that the power steering may be safer for a young driver. Since I am building this car with/for my teenage son, I want to make it reasonably safe for him to drive. I plan to install the anti-lock brakes, keep the power steering that was on the donor, and perhaps add the Racelogic Traction Control System.

    I actually might think you will find the opposite to be true. My daughter much prefers her Miata with the depowered rack. Power steering makes it too easy to steer and "darty" when driving at speed etc... the manual steering gives you much better feel and feedback with the road.

    As far as traction control and ABS I would suggest that you and your son do some driver training... for a teen the StreetSurvival.org program could be a life saver.. The 818 power to weight mid engine, low polar moment of inertia all will make it a very capable machine but along with those traits comes the ability to go wrong very quickly.Develop skills to leave "novice" far behind!

    Beyond that many organizations provide driver skills programs, my wife and I have been very pleased with BMW CCA programs. Practice will dramatically improve performance and confidence. We all have traction control built in... don't push the gas pedal down so far! LOL

    My family practices skills every chance we get, so I'm going for raw performance, manual steering, no ABS, thin bottoms on shoes for better pedal feel.

  4. #164
    Member Hazelwwp's Avatar
    Join Date
    Jul 2011
    Posts
    51
    Post Thanks / Like
    Blog Entries
    1
    I sent my son to the 3-day "Advanced Teenage Driving" course at Bondurant driving school in Phoenix over spring break in March. He had a blast but I am not aware of any road course near where we live so that he can practice what he learned. There is a course near Indianapolis about 4 hours away but it is private and I cannot afford a $15,000 per year membership.

    After returning from Phoenix, I bought him a Porsche Boxter so he can get used to a mid-engine car but it doesn't have a lot of power.

  5. #165
    Senior Member Silvertop's Avatar
    Join Date
    Mar 2011
    Location
    Forest Lake MN
    Posts
    880
    Post Thanks / Like
    Quote Originally Posted by Hazelwwp View Post
    I sent my son to the 3-day "Advanced Teenage Driving" course at Bondurant driving school in Phoenix over spring break in March. He had a blast but I am not aware of any road course near where we live so that he can practice what he learned. There is a course near Indianapolis about 4 hours away but it is private and I cannot afford a $15,000 per year membership.

    After returning from Phoenix, I bought him a Porsche Boxter so he can get used to a mid-engine car but it doesn't have a lot of power.
    You don't say exactly where you are from, but in the Midwest, Road America at Elkhart Lake Wisconsin and Blackhawk Farms near Rockford Illinois both have Track Day events.

  6. #166
    Mechie3's Avatar
    Join Date
    May 2012
    Location
    Indianapolis
    Posts
    5,174
    Post Thanks / Like
    Quote Originally Posted by Hazelwwp View Post
    There is a course near Indianapolis about 4 hours away but it is private and I cannot afford a $15,000 per year membership.
    Putnam Park? You can go there with other clubs and don't need a membership to do so.
    Zero Decibel Motorsports
    Check out my new website!
    www.zerodecibelmotorsports.com
    www.facebook.com/zero.decibel.motorsports

  7. #167
    Senior Member
    Join Date
    Mar 2012
    Location
    Owensboro, KY
    Posts
    748
    Post Thanks / Like
    Quote Originally Posted by Silvertop View Post
    You don't say exactly where you are from, but in the Midwest, Road America at Elkhart Lake Wisconsin and Blackhawk Farms near Rockford Illinois both have Track Day events.
    Located in Owensboro, KY!
    FFR '33 #325 built with hazelwwp & FFR 818-S #11 Delivered on July 21, 2013
    Facebook 818-S/R Build Page: https://www.facebook.com/pages/Facto...78385198877613
    Forum 818-S/R Build Thread: http://thefactoryfiveforum.com/showt...-Build-Thread!
    FFR Project 818 Owner's Registry on Google Map

  8. #168
    Senior Member RM1SepEx's Avatar
    Join Date
    Jul 2011
    Location
    Freeport, ME
    Posts
    3,801
    Post Thanks / Like
    StreetSurvival.org

    Date Venue Location
    06/08/13 Maryland Driver Training Facility Sykesville, MD
    06/09/13 Wright State Univ. – Nutter Center Dayton, OH
    06/15/13 OLD VISTEON PLANT Connersville, IN
    06/15/13 Saratoga Auto Museum Saratoga, NY
    06/15/13 Sports Authority Field at Mile High Denver, CO
    06/15/13 Qualcomm Stadium San Diego, CA
    06/22/13 Keesler Air Force Base Biloxi,, MS
    06/22/13 Sun Motor Cars BMW Mechanicsburg, PA
    06/22/13 Tire Rack South Bend, IN
    06/22/13 Milton Frank Stadium Huntsville, AL
    06/23/13 Campgaw Ski Area Mahwah, NJ
    07/13/13 Monroe Community College Rochester, NY
    07/13/13 Tire Rack South Bend, IN
    07/27/13 Dakota Co. Tech. College Rosemount, MN
    07/28/13 Nassau County Veterans Memorial Col Uniondale,, NY
    08/03/13 Shelton State Community College Tuscaloosa, AL
    08/17/13 Milwaukee Area Technical College, O Oak Creek, WI
    08/17/13 Gwinnett County Fairgrounds-Sugarlo Lawrenceville, GA
    08/17/13 Tire Rack South Bend, IN
    08/18/13 Milwaukee Area Technical College, O Oak Creek, WI
    08/24/13 Faith Christian Assembly Melvindale, MI
    08/24/13 Family Arena St. Charles, MO
    09/07/13 Fresno Fairgrounds Fresno, CA
    09/14/13 New Hampshire Motor Speedway (NHMS) Loudon, NH
    09/21/13 Kansas Speedway Kansas City, KS
    09/21/13 Toledo Express Airport Swanton, OH
    09/22/13 Portland International Raceway Portland, OR
    09/29/13 Family Arena St. Charles, MO
    10/26/13 Richmond Raceway Complex Richmond, VA
    11/16/13 Gwinnett County Fairgrounds-Sugarlo Lawrenceville, GA
    11/23/13 Camarillo Airport Camarillo, CA

  9. #169
    Senior Member
    Join Date
    Feb 2011
    Posts
    607
    Post Thanks / Like
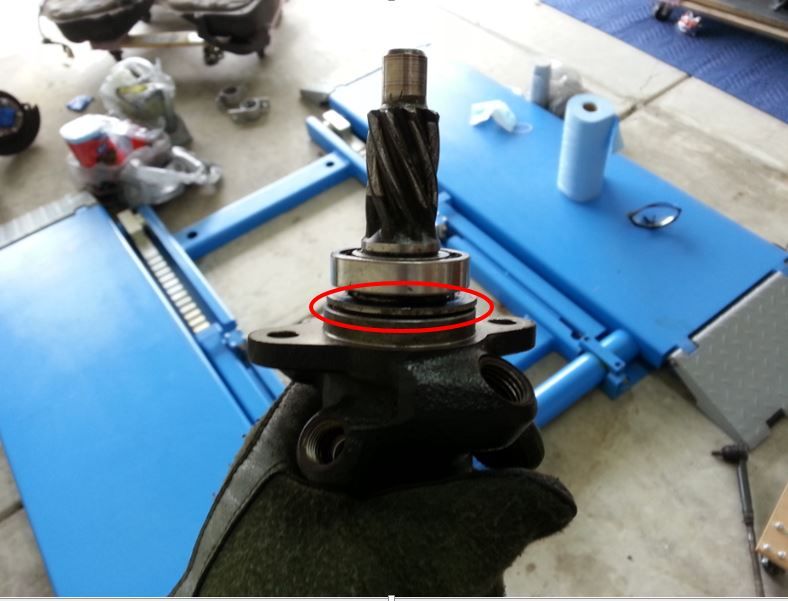
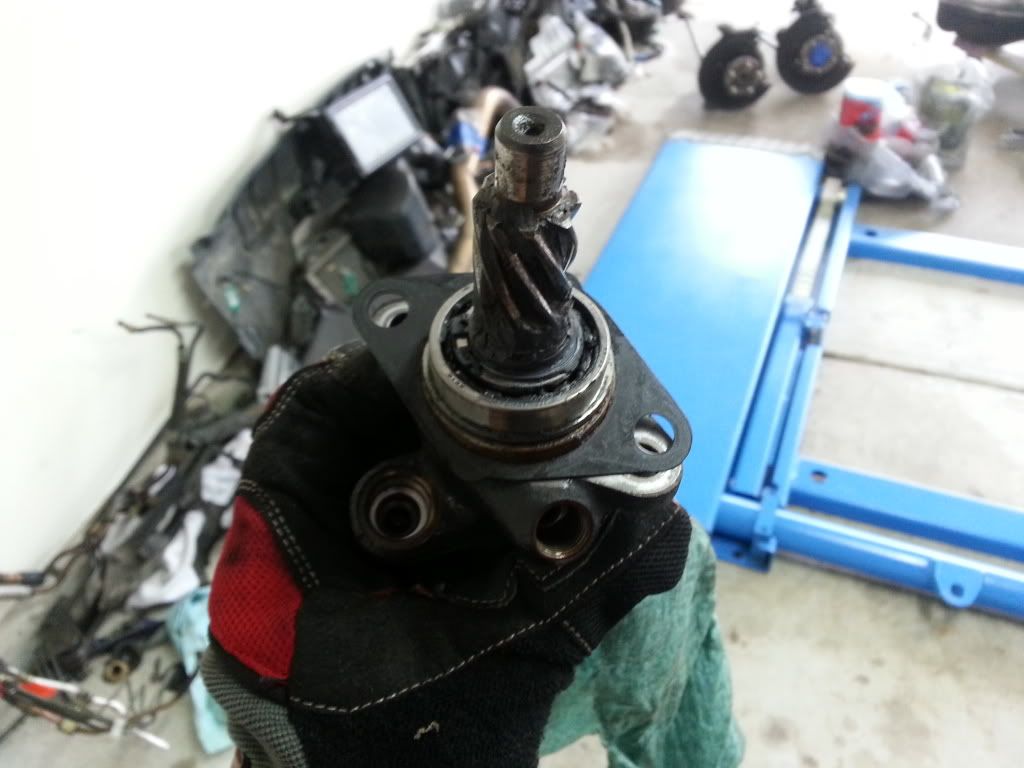
    Here' the pinion shaft from my 02, can anyone tell me where I need to weld this bad boy?


  10. #170
    818 builder metalmaker12's Avatar
    Join Date
    Mar 2012
    Location
    Exeter R.I
    Posts
    2,834
    Post Thanks / Like
    Blog Entries
    1
    Undo the snap ring and remove the bearing, clean the shaft and weld along the shaft twist seem, if I get time I will take mine apart to show you. Do you have a tig setup?

  11. #171
    Senior Member
    Join Date
    Feb 2011
    Posts
    607
    Post Thanks / Like
    Quote Originally Posted by metalmaker12 View Post
    Undo the snap ring and remove the bearing, clean the shaft and weld along the shaft twist seem, if I get time I will take mine apart to show you. Do you have a tig setup?
    Thanks for the quick reply. My buddy has a MIG and stick welder. I'm not an expert on welding, but I'm assuming those will work as well?

  12. #172
    Mechie3's Avatar
    Join Date
    May 2012
    Location
    Indianapolis
    Posts
    5,174
    Post Thanks / Like
    Stick would be a terrible idea, MIG might work. I'm not (anything close to) an expert welder, but TIG generally provides the most precise weld for a small area like that.
    Zero Decibel Motorsports
    Check out my new website!
    www.zerodecibelmotorsports.com
    www.facebook.com/zero.decibel.motorsports

  13. #173
    818 builder metalmaker12's Avatar
    Join Date
    Mar 2012
    Location
    Exeter R.I
    Posts
    2,834
    Post Thanks / Like
    Blog Entries
    1
    You could maybe mig short arc it with a stitch method, but you kinda should just tig it. Ask around someone must have one, worst case you could send it to me and I would send it back

  14. #174
    Senior Member
    Join Date
    Feb 2011
    Posts
    607
    Post Thanks / Like
    Thanks for all of the help guys. I'm dropping my tranny off at my local shop to have my LSD installed and while I'm there I'm going to have them TIG weld the twist seam. My only question is which part is actually the twist seam? I took the snap ring out and pulled it apart the bit and circled what my best guess as to which part the twist seam is. Is this correct, or am I out to lunch?


  15. #175
    818 builder metalmaker12's Avatar
    Join Date
    Mar 2012
    Location
    Exeter R.I
    Posts
    2,834
    Post Thanks / Like
    Blog Entries
    1
    Guns, you have to take the pinion shaft completely out, the seam is in the lower section, I been busy stripping other donors, I will try to go take it apart tonight and send you pics

  16. #176
    Senior Member
    Join Date
    Jan 2012
    Posts
    1,112
    Post Thanks / Like
    Post the pics up here for everyone to see plz.

  17. #177

    Join Date
    Feb 2011
    Location
    Norton, MA USA earth
    Posts
    3,346
    Post Thanks / Like
    Why is it I cannot seem to get my rack apart? I have the pinion out and the large nut but cannot remove the rack. Its a 2002
    Thanks Mike

  18. #178
    Senior Member RM1SepEx's Avatar
    Join Date
    Jul 2011
    Location
    Freeport, ME
    Posts
    3,801
    Post Thanks / Like
    you have to gently push it out with a press... I think it was earlier in this thread.... been a loooong time man!
    Dan

    818S #17 Picked up 8/1/13 First start 11/1/13 Go Kart 3/28/14

  19. #179

    Join Date
    Feb 2011
    Location
    Norton, MA USA earth
    Posts
    3,346
    Post Thanks / Like
    Never mind. Figured it out.
    Mike

  20. #180
    Senior Member AZPete's Avatar
    Join Date
    Feb 2011
    Location
    Scottsdale, AZ
    Posts
    2,374
    Post Thanks / Like
    Mike, can you let us know the answer, please?
    818S/C : Chassis #25 with 06 WRX 2.5 turbo, ABS, cruise, PS, A/C, Apple CarPlay, rear camera, power windows & locks, leather & other complexities. Sold 10/19 with 5,800 miles.
    Mk3 Roadster #6228 4.6L, T45, IRS, PS, PB, ABS, Cruise, Koni's, 17" Halibrands, red w/ silver - 9K miles then sold @ Barrett-Jackson Jan 2011 (got back cash spent).

  21. #181
    Senior Member
    Join Date
    Sep 2013
    Location
    Williamsburg VA
    Posts
    105
    Post Thanks / Like
    Hey does anyone have a steering rack pinion for an 05 Sti rack? I broke the bearing trying to press it off. Should have read the hole post before trying to press it off. lol Anyway if anyone has a spare hit me up. Thanks

  22. #182
    Senior Member Rasmus's Avatar
    Join Date
    Mar 2012
    Location
    Las Vegas, USA
    Posts
    983
    Post Thanks / Like
    Quote Originally Posted by Mechie3 View Post


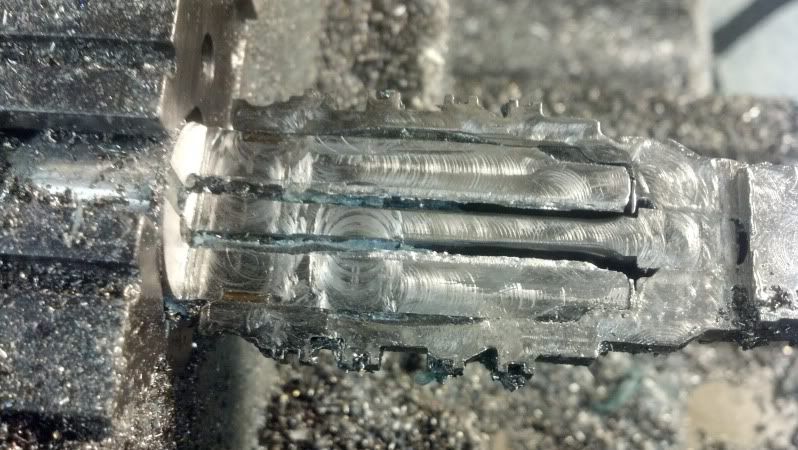
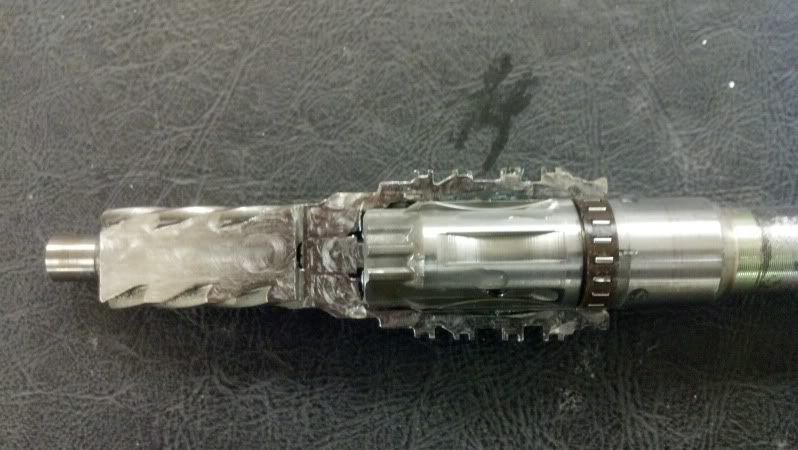
    Just wanted to thank Mechie and Freds. The above two photos do wonders for knowing exactly what to do to lock this in with a MIG welder. Now I don't have to worry about overheating a bearing race. Thank you.

  23. #183
    Senior Member Rasmus's Avatar
    Join Date
    Mar 2012
    Location
    Las Vegas, USA
    Posts
    983
    Post Thanks / Like

    Here's how I (MIG) welded up the steering rack quill based on Mechie and Freds discovery. Six plug welds altogether. Before pulling the trigger I used a drill press to sink a millimeter or two into the inner shaft on each of my 6 holes. I wanted better penetration and didn't want to worry about a surface weld shearing off the inner shaft. That outer shaft, with the hydraulic rings, is a case/tool hardened steel. Unless you've got super expensive bits don't try to drill or widen the holes on the outer shaft. You'll just break your drill bits.
    Last edited by Rasmus; 02-24-2014 at 02:41 PM.

  24. #184
    Senior Member metros's Avatar
    Join Date
    Jun 2013
    Location
    NoVA
    Posts
    1,064
    Post Thanks / Like
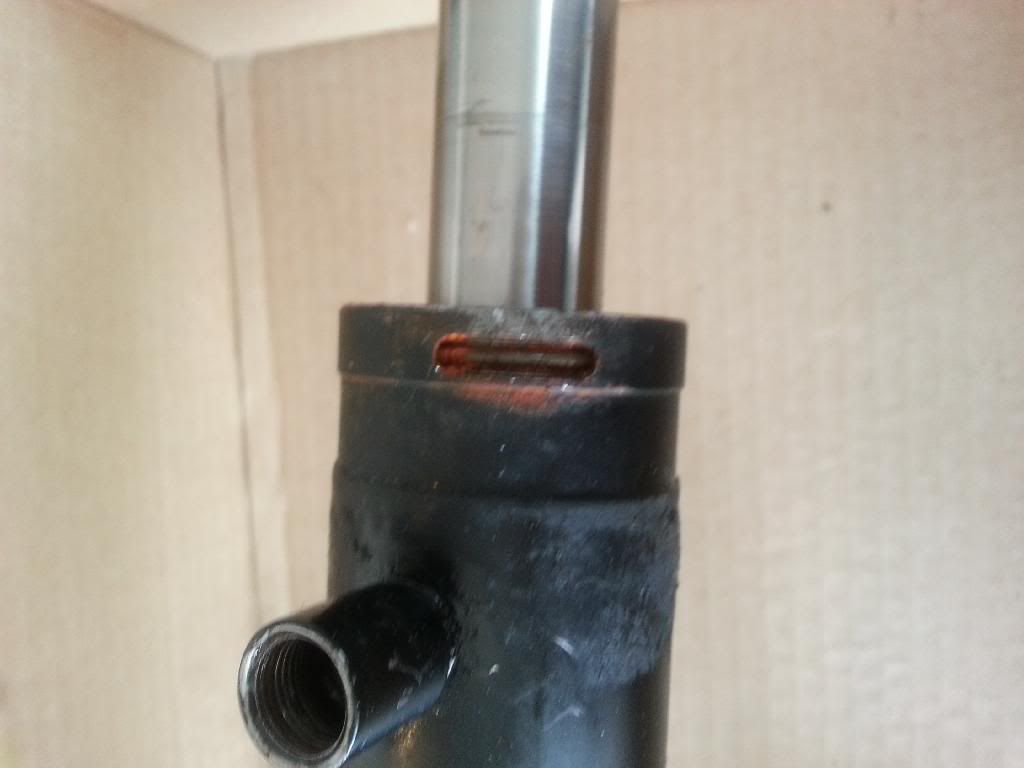
    Looking for some help fellas. I've got my steering rack almost completely apart, but I can figure out how to get the actual main shaft out of the steering rack body. What step am I missing?


  25. #185
    Senior Member Xusia's Avatar
    Join Date
    Oct 2011
    Location
    Eugene, OR, USA
    Posts
    2,343
    Post Thanks / Like
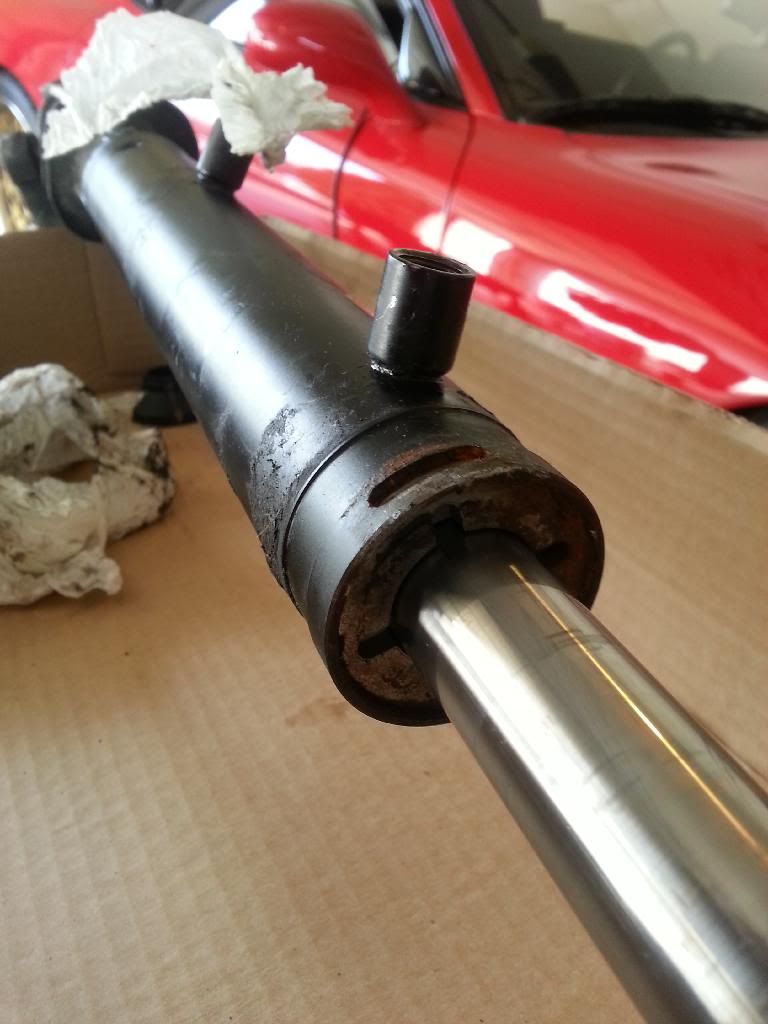
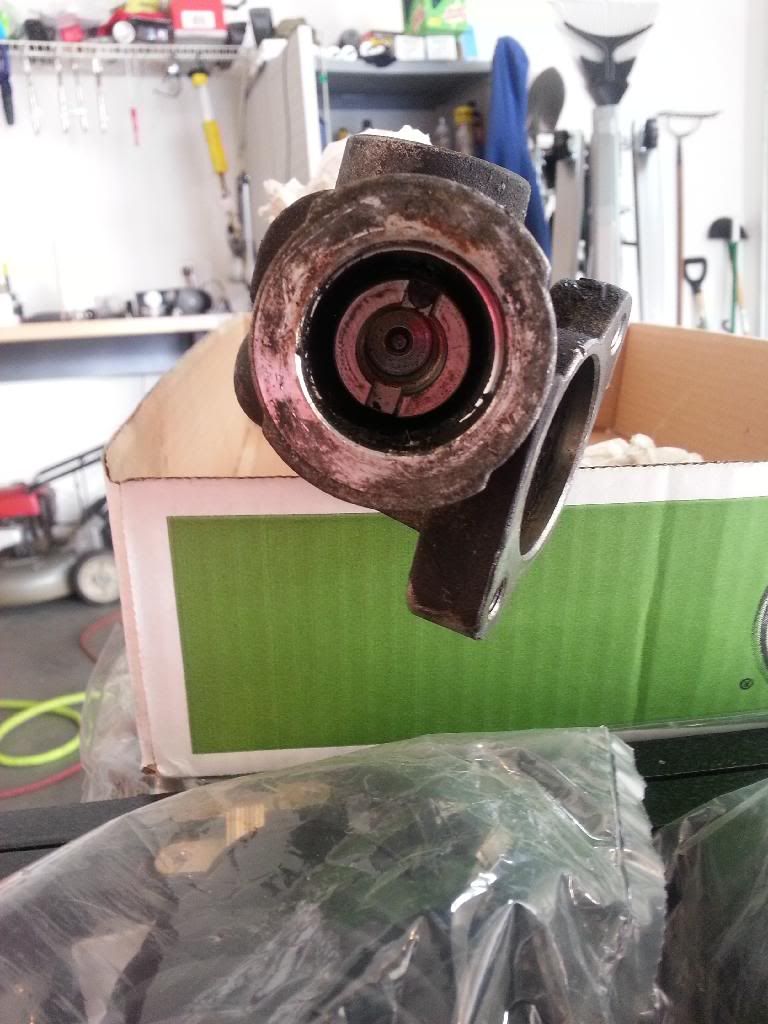
    Turn the end cap in picture 2 until you see the end of the retaining clip in the slot seen in picture 1. Use something small to get under the leading edge of the retaining clip (I used a small regular screwdriver), and simultaneiously twist the end cap so that the leading edge of the retaining clip is forced out through the slot. Keep rotating the end cap until the retaining clip is all the way out.

  26. #186
    Senior Member metros's Avatar
    Join Date
    Jun 2013
    Location
    NoVA
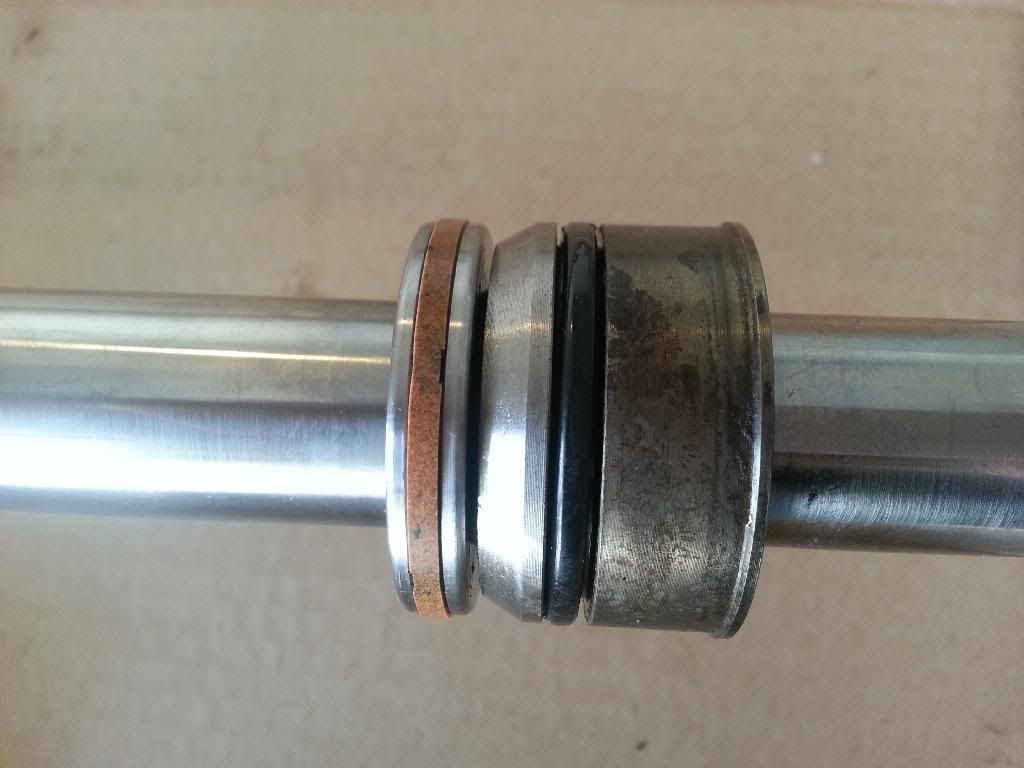
    Posts
    1,064
    Post Thanks / Like
    ^^^Thanks - that helped a lot. Now that I've got the rod out I'm assuming all 3 of these pieces are the seal that I should be removing? Most pictures in this thread only show one piece.


  27. #187
    Senior Member Xusia's Avatar
    Join Date
    Oct 2011
    Location
    Eugene, OR, USA
    Posts
    2,343
    Post Thanks / Like
    Mine didn't look like that. What year & model is the rack from?

    Assuming those parts are "stuck" in that position (i.e. not slid down from somewhere else), then yes, they need to be removed. I used a grinder with a cut-off disc. I didn't want to damage the rod, so I was very careful and stopped before I reached the rod. I repeated the process on the other side. This weakened it enough that I was able to break it the rest of the way off. I hope that makes sense.

    Also, are you welding the quill (rotary valve)?

  28. #188
    Senior Member metros's Avatar
    Join Date
    Jun 2013
    Location
    NoVA
    Posts
    1,064
    Post Thanks / Like
    That's why I was asking. I haven't seen any others have more than one seal. This is from a 2002 wrx. It does have a koyo sticker on it though. Maybe one of the previous owners replaced the rack at some point.

    I'm not planning on welding my rack. For some reason mine doesn't have any movement at all. It actually feels like one solid piece.

  29. #189
    Senior Member Xusia's Avatar
    Join Date
    Oct 2011
    Location
    Eugene, OR, USA
    Posts
    2,343
    Post Thanks / Like
    If it was powered, it's not a solid rod. It's a valve that sues a torsion rod, which is very stiff, so you'd have to put it in a vice in order to feel the play. All that said, NO ONE who has left it unwelded has indicated they actually felt that play with the rack installed in the car. You'll be fine leaving it alone.

  30. #190
    Senior Member metros's Avatar
    Join Date
    Jun 2013
    Location
    NoVA
    Posts
    1,064
    Post Thanks / Like
    ^^^Agreed.

    Cutting through those seals was actually pretty easy. A little work on the body of the steering rack and I'll be ready to re-assemble everything in like new condition. One thing I hadn't thought of is how is everyone else centering the rack? Line the center rod up so that equal distances are showing on each end?

  31. #191
    Senior Member Xusia's Avatar
    Join Date
    Oct 2011
    Location
    Eugene, OR, USA
    Posts
    2,343
    Post Thanks / Like
    No need. The bracket on the driver's side of the steering rack lines up with the mount on the frame, so physically, it only goes on 1 way. Because previous racks weren't centered, I took great pains to make sure the outer tie rods were the same length and that the rack travel was centered. Then I measured it and it was perfectly centered. So I'm pretty sure they fixed the issue.

    If you are talking about how to center the rod inside the rack, that's super easy. Just mount the rack (doesn't even have to be connected to the wheels), then mount the steering wheel (even if just temporarily; and don't boilt the U-joint!). If it's centered, you should have 1.5 turns in each direction before it locks. If it's not centered, you'll have more turns on 1 side and less on the other. In that case, disconnect the steering wheel, turn the pinion by hand as needed, re-connect the steering wheel, and test. Repeat as necessary.

    No need to worry too much about the outer tie rods. Those will be adjusted when you get (or do your own) alignment. I set mine to as close to straight as I could - just to make it easier to roll around.

  32. #192
    Senior Member Rasmus's Avatar
    Join Date
    Mar 2012
    Location
    Las Vegas, USA
    Posts
    983
    Post Thanks / Like
    Quote Originally Posted by metros View Post
    For some reason mine doesn't have any movement at all. It actually feels like one solid piece.
    Mine didn't feel like it had any movement either. Then i wrapped the pinion in a shop towel and put it in the vise. With a pair of vise grips on the shaft I could get it to twist.

  33. #193
    Senior Member metros's Avatar
    Join Date
    Jun 2013
    Location
    NoVA
    Posts
    1,064
    Post Thanks / Like
    Thanks for all the help xusia, that makes perfect sense now that I think about it.

    I tried that yesterday rasmus, most I could move it was like a millimeter. Moved just enough to make a noise.

  34. #194
    Senior Member Rasmus's Avatar
    Join Date
    Mar 2012
    Location
    Las Vegas, USA
    Posts
    983
    Post Thanks / Like
    Quote Originally Posted by metros View Post
    most I could move it was like a millimeter.
    I couldn't move it much either but assuming that 1 mm was the full movement of the shaft from fully loaded counterclockwise (CCW) to fully loaded clockwise (CW) thats only on an input shaft that measures 18mm in diameter. But, when you multiply that slop out to a full size steering wheel like an OMP Corsica 330 (330 mm diameter) the slop from CCW to CW is ~ 18.3 mm. That's almost 3/4 of an inch of dead input when switching directions in an AutoX slalom. That's almost 3/4 of an inch of dead input when correcting/catching your car as it goes into oversteer.

    Unless you meant 1mm of movement from rest to fully loaded going only one way. Then we're looking at ~ 36.6mm of of dead area, and 36.6mm of dead area is like watching the Duke Boys drive the General Lee straight while being filmed in the studio. Like lumberjacks, they sawed at it.

  35. #195
    Senior Member
    Join Date
    Oct 2013
    Posts
    322
    Post Thanks / Like
    Hi Guys, I can vouch in on this one. I installed a steering quickner in a low rider chevy pick up truck. The lock to lock when aligned and on the street was 2 1/4 turns, When driving aggressively the ratio was good, but when trying to drive a period of time as in a cruise, the steering was twitchy. Also steering effort as greatly increased and caused fatigue on a longer drive.
    a little bit of input made alot more output. Once the steering shaft is modified with all the ujoints and shortened, if undesirable everything gets replaced.
    I liked it before the mod. lighter and more spirited driving.
    It looked very similar to this one.
    http://www.summitracing.com/parts/brn-38050/overview/

  36. #196
    Senior Member Frank818's Avatar
    Join Date
    Jun 2013
    Location
    QC, Canada
    Posts
    5,732
    Post Thanks / Like
    Quote Originally Posted by metros View Post
    ^^^Thanks - that helped a lot. Now that I've got the rod out I'm assuming all 3 of these pieces are the seal that I should be removing? Most pictures in this thread only show one piece.

    I have the exact same setup on my 2003 NA.
    I have to cut the smaller one on the left side, but what do I do with the large one on the right side? It's totally free playing and slides on the rod. Do I need to put to it back when I re-assemble?

    And then the cap on the end I removed to get the rod out, do I need to put it back so that the rod will not get out of the housing?
    Frank
    818 chassis #181 powered by a '93 VW VR6 Turbo GT3582R
    Go-karted Aug 5, 2016 - Then May 19+21, 2017
    Tracked May 27/July 26, 2017
    Build time before being driveable on Sep 27, 2019: over 6000h
    Build Completed Winter 2021

  37. #197
    Senior Member RM1SepEx's Avatar
    Join Date
    Jul 2011
    Location
    Freeport, ME
    Posts
    3,801
    Post Thanks / Like
    all that you need to do is take a utility knife and cut/remove the O-ring. That's the seal.

    then you reuse the screw in end cap, it has a bushing in it.
    Dan

    818S #17 Picked up 8/1/13 First start 11/1/13 Go Kart 3/28/14

  38. #198
    Senior Member metros's Avatar
    Join Date
    Jun 2013
    Location
    NoVA
    Posts
    1,064
    Post Thanks / Like
    Frank - Mine, as pictured, were all stationary and wouldn't move at all. I removed all of them with a grinder. I found the easiest to make a cut 180* apart on either side of the shaft. Then use a chisel to finish the last amount of material remaining from the cut. After that the pieces basically fell off. The endcap gets re-used. When re-assembling be careful because there is nothing keeping the main shaft inside the steering rack any longer. That means if you tip it over to one end then the shaft will slide right out of the rack.

  39. #199
    Senior Member Xusia's Avatar
    Join Date
    Oct 2011
    Location
    Eugene, OR, USA
    Posts
    2,343
    Post Thanks / Like
    Frank, if it were me, I'd cut that other piece off as well. I would be worried it would contact the tube body. I don't know that would be a problem, I just wouldn't want to find out.

    Quote Originally Posted by metros View Post
    When re-assembling be careful because there is nothing keeping the main shaft inside the steering rack any longer.
    Except the pinion! (once you get it in)
    Have you seen the 818 Registry on Google Maps?? https://www.google.com/maps/ms?msid=...a=0&dg=feature

    Want your 818 added to the Registry? https://docs.google.com/forms/d/1zmF...rNCY4/viewform

  40. #200
    Senior Member Frank818's Avatar
    Join Date
    Jun 2013
    Location
    QC, Canada
    Posts
    5,732
    Post Thanks / Like
    Ok I see. I got pix, that may help.

    This is how my rod was (the big bearing-like is a moving part):

    Attachment 27624

    This is the sliding part. I don't keep that?


    2014-04-05 10.36.12-1.jpg

    So how do I put back the end cap if the clip looks like this?

    SteeringRack3.jpg


    And finally, what do I do with this small ring left from the piston I cut?

    2014-04-05 10.53.45.jpg
    Last edited by Frank818; 04-07-2014 at 04:46 PM.
    Frank
    818 chassis #181 powered by a '93 VW VR6 Turbo GT3582R
    Go-karted Aug 5, 2016 - Then May 19+21, 2017
    Tracked May 27/July 26, 2017
    Build time before being driveable on Sep 27, 2019: over 6000h
    Build Completed Winter 2021

Page 5 of 7 FirstFirst ... 34567 LastLast

Posting Permissions

  • You may not post new threads
  • You may not post replies
  • You may not post attachments
  • You may not edit your posts
  •  

Brown County Customs

Visit our community sponsor