Visit our community sponsor

Thanks:
1

Likes:
4
-
03-17-2014, 11:40 AM
#361
Member


Originally Posted by
mikespms

Hey John,
Very cool! It will be like riding a 4 wheel motorcycle. What is your first gear and final gear ratio,In your video it looked like you where going 150mph@6000rpm was that in 5th? Did the trans come with a rear mount or you have to make it,looks like the pad with the 4 holes on the side of the trans would line up with your rear frame mount with minor modification.Or is that for the shifter? Is there anything like this available for that trans or do think this may work(dynojet quick shifter)
http://www.dragspecialties.com/search/?ci[0]=204&ct1=3071&format=json&q=&offset=282&rows=6
That car is going to be a blast to drive.
Mike
Hey Mike
Ill need to dig up the ratios for you but when using the SDR I am going 150 at 6k in fourth. The motor makes power up to 7k and redlines at 7200.
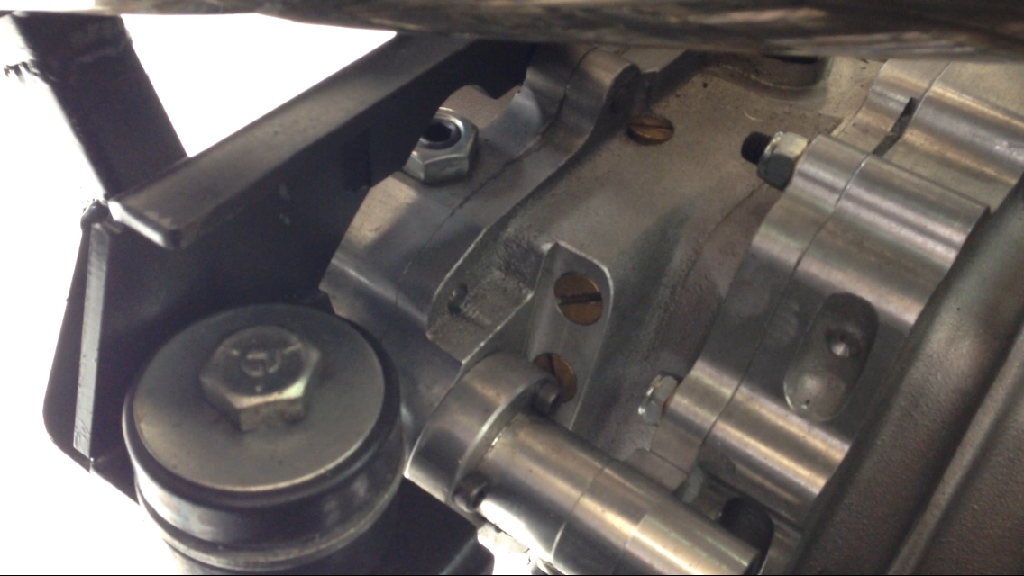
The pads you see on the side actually are for brackets that hold the shift cables. I took them off in order to try to get the stock subframe to fit on. Unfortunately the tail housing of the S4 is larger then the SDR. The gear actuators are also farther back so the stock hanger is not going to work. I designed a new hanger over the weekend that I will make out of aluminum, but I realized this am i might be able to modify the stock hanger. its going to be heavy, but it might be quick enough to justify.
I am not sure which shifter I am going with, but I was thinking about this one. http://hargettprecision.com/index.ph...equential.html
I was a little sad to take apart all the stuff that was working so well, but at the same time it gets me closer to my dream car.
John
XTF #2
build start date June 19 2023
GTM # 344
Build Start December 2010
First track day April 2013
-
03-17-2014, 11:51 AM
#362
Member
Originally Posted by
crash
As I have mentioned before, Team PDG uses the stock GTM shifter. We just changed the pivot points and U joints to make the entire setup much tighter. It took a little tuning, but it works very well. Just an option.
Good idea Crash. I dont have the factory five setup anymore as I traded most of it in when I got the cable shifted SDR. Since I want to be able to swap the SDR and S4 in and out... not that I will, but I wanted to be able to have a street friendly setup and a track friendly setup if the need arrises. Makes my life a bit more difficult short term, but its also a fun challenge to see if I can do it.
If I am successful I will be able to swap out the transaxle and shifter / cables between the SDR/ a Porsche Box/ and the S4 in an afternoon. Why would I ever want to do that you ask? I dont know  but maybe I would. I really hate when I could have made somthing easier if planned for it ahead of time. Im doing my best to plan for it !
John
XTF #2
build start date June 19 2023
GTM # 344
Build Start December 2010
First track day April 2013
-
03-17-2014, 04:46 PM
#363
Member
Originally Posted by
crash
As I have mentioned before, Team PDG uses the stock GTM shifter. We just changed the pivot points and U joints to make the entire setup much tighter. It took a little tuning, but it works very well. Just an option.
Crash on second thought. I might be able to rig up somthing using solid rod. That will take lots of brain power however. I want to just get it going with cables first.
I have enough fab work to do just to get the swap going.
I'll call you when I am ready to start that project.
Thanks for the suggestion.
John
XTF #2
build start date June 19 2023
GTM # 344
Build Start December 2010
First track day April 2013
-
03-17-2014, 08:41 PM
#364
Senior Member

Originally Posted by
kabacj
Hey Mike
Ill need to dig up the ratios for you but when using the SDR I am going 150 at 6k in fourth. The motor makes power up to 7k and redlines at 7200.
The pads you see on the side actually are for brackets that hold the shift cables. I took them off in order to try to get the stock subframe to fit on. Unfortunately the tail housing of the S4 is larger then the SDR. The gear actuators are also farther back so the stock hanger is not going to work. I designed a new hanger over the weekend that I will make out of aluminum, but I realized this am i might be able to modify the stock hanger. its going to be heavy, but it might be quick enough to justify.
I am not sure which shifter I am going with, but I was thinking about this one.
http://hargettprecision.com/index.ph...equential.html
I was a little sad to take apart all the stuff that was working so well, but at the same time it gets me closer to my dream car.
John
That's one awesome set up,you need a long straightaway for 5th gear. That Hagertt shifter looks good,the dynojet quick shift and others like it works in conjunction with your shifter. They work with a button shifting and momentarily interrupting the ignition allowing to shift with out the clutch instantly , used on bikes for drag racing and for people that don't know how to use the clutch . Don't know if dynojet makes something for the ls, but if there is a way to momentarily interrupt the ignition it would work like a paddle shifter.
Just an idea
Mike
Last edited by mikespms; 03-17-2014 at 08:45 PM.
-
03-18-2014, 05:14 AM
#365
Member
Originally Posted by
mikespms
That's one awesome set up,you need a long straightaway for 5th gear. That Hagertt shifter looks good,the dynojet quick shift and others like it works in conjunction with your shifter. They work with a button shifting and momentarily interrupting the ignition allowing to shift with out the clutch instantly , used on bikes for drag racing and for people that don't know how to use the clutch . Don't know if dynojet makes something for the ls, but if there is a way to momentarily interrupt the ignition it would work like a paddle shifter.
Just an idea
Mike
Hey Mike. The dynojet kill switch is a good idea. I have something like that on my 125 race bike. The benefit , for me at least, was energy savings over a long race. Just the little bit of mental and physical effort to chop the throttle on up shifts was significant. It allowed more time to relax instead of needing to concentrate on shifting. Sounds like a minor thing, but it was amazing how much of an advantage it offered.
I bet my ecu can take a momentary kill input. It has a boat load of features I have not even started to investigate. I'll find out.
The dynojet kill switch might be a good idea for team PDG. Endurance races were where I found the most benefit.
Re finding a track where I can use fifth gear. I can't wait. 4th pulls hard all the way to redline. You can see on the video I'm pulling longitudinal .3 G under acceleration in 4th. I will need to trim out the wing going much faster, but I figure road America or Daytona will be good places to test out 5th.
Those tracks are on my wish list.
John
XTF #2
build start date June 19 2023
GTM # 344
Build Start December 2010
First track day April 2013
-
03-18-2014, 05:07 PM
#366
Add VIR to your list if you want to wind the car out in 5th, along with Pocono. Some clubs do run the Long Course, using the North infield, front straight, and turns 1 and 2. Basically the North Course but with the other parts of the tri-oval. Some clubs run the full tri-oval in the afternoon; cars that go less than 140 find it a bit boring... Also, have you done Summit Point Main circuit? I bet you could take turn 11 at 80-85, and then you have 3/4 of a mile before turn 1 at about 50. Here is some old footage of turn 11 to 1:
Last edited by KeithBoden; 03-18-2014 at 05:12 PM.
Reason: Forgot pocono!
-
03-19-2014, 04:57 PM
#367
Member
Hey Keith!
I'll run Pocono this year hopefully VIR.
I have heard the same thing about running the trioval. It's only fun above 150. I have only driven an oval once in my life. It's actually fun. Driving up and down the banking as well as taking the turns as fast as possible is harder then it looks.
The turns that look the same on TV have a whole new meaning at speed on the track. Each turn has its own character.
Regarding the build. Parts and raw materials are starting to arrive. A new starter, lots of aluminum, tires, rims and some wiring supplies.
It's going to be a busy weekend.
John
XTF #2
build start date June 19 2023
GTM # 344
Build Start December 2010
First track day April 2013
-
03-20-2014, 09:17 AM
#368
Senior Member

Originally Posted by
kabacj
I was looking for some inspiration to get out in the garage and get the GTM ready for the track and I was reviewing videos. I thought I would share this one.
John
That is one cool video John!!!!!! Hadn't had time to see it till now. Just WOW!!!!!!!!!!!!!!!!! The sustained Gs you are pulling are awesome.
How accurate is your telemetry? I noticed that on high G turns and under heavy braking your oil pressure is really dropping. You might want to take a look at that. For example look at 2:56, 3:59, 4:57 under braking and 5:58 at 1.20 Gs. There are more but just wanted to point out a few instances.
GenII GTM #354
Delivered (02/09/11)
-
03-20-2014, 10:38 AM
#369
You can see that the wing is making some downforce because it flexes downward on the straight. All of ours do that too. Some more than others, but yours indicates that it is building a good amount of downforce.
Is this engine dry sumped?
-
03-20-2014, 07:43 PM
#370
Member
Originally Posted by
Kempo
That is one cool video John!!!!!! Hadn't had time to see it till now. Just WOW!!!!!!!!!!!!!!!!! The sustained Gs you are pulling are awesome.
How accurate is your telemetry? I noticed that on high G turns and under heavy braking your oil pressure is really dropping. You might want to take a look at that. For example look at 2:56, 3:59, 4:57 under braking and 5:58 at 1.20 Gs. There are more but just wanted to point out a few instances.
Hi Hugo. Glad you like the video.
I knew when I posted the video somebody would see the oil pressure fluctuation. Regarding the telemetry. I have confirmed the MPH, the G Meters are accurate. Those readings come from the STACK data logger and I have compared them to another data logger back to back. The Engine signals I record come via the CAN bus on the ECU. Since all the programming on the ECU is custom and the ECU decoding on the stack DVL is also custom, and I did not calibrate the two last year I am not sure that the ECU numbers are perfectly accurate. I was always more worried about car setup rather then camera/ data setup.
Thats a long way of saying I am not sure how accurate the readings are. You can see the throttle never hits 100% even tho I assure you I am flat on the floor. The temp seems a little low to me.... but yes the oil pressure is a concern.
Even if its just a relative number its clear that there i some oil starvation going on in the video. After this run I noticed the same thing and added more oil to the motor. That seemed to lessen the variation in oil pressure on later runs. Its also note worthy that I see negative oil pressure. That's a little weird. Maybe it can happen but seems unlikely.
Mast motorsports have a special extra deep high capacity oil pan they use that they claim solves the oil starvation problem commonly seen in LS3s. It is most likely true that the oil pan solves the issues in most cars but it looks like the GTM develops higher G loads longer then most cars.
For the short term the plan is to put in an accusump. Since I only seem to see the issues under hard braking and the 3 qt accusump is supposed to be able to provide up to 60 seconds of oil pressure. It might be a work around. I hope so anyway.
Thanks for the observation. Im glad people are watching my back.
John
XTF #2
build start date June 19 2023
GTM # 344
Build Start December 2010
First track day April 2013
-
03-20-2014, 08:15 PM
#371
Member
Originally Posted by
crash
You can see that the wing is making some downforce because it flexes downward on the straight. All of ours do that too. Some more than others, but yours indicates that it is building a good amount of downforce.
Is this engine dry sumped?
Crash you made my day. That is the coolest thing EVER! I have never heard about or seen a wing flex under load like that. Its pretty easy to see if you watch the space between the wing edge and the text. The space grows and shrinks as the speed changes. Its interesting that your wings do that too. I know you guys have a super down force configuration with a multi element wing. It would be nice to measure how much down force I am making I am going to work on that. Have you guys done that? I know my data logger has an input for linear potentiometers. Its just an expensive setup to find out facts that are cool but its not like I am racing for money and can justify it.
No unfortunately its not dry sump yet. As I said to Hugo, I am going to try to get by with the accusump and make sure to keep the motor very full of oil to avoid any starvation issues.
It depends on how things go this year, but dry sump is on the short list. I knew I would need one. I just did not think it would be this soon.
Thanks a lot for the observation on the wing I am not kidding that is so damn cool. I am going to put cameras all over that thing and on the rear suspension so I can see what is really happening back there.
John
XTF #2
build start date June 19 2023
GTM # 344
Build Start December 2010
First track day April 2013
-
03-21-2014, 09:33 AM
#372
We have not measured wing down force with an instrument other than the seasoned GM factory test driver we had in the car last year, Paul Edwards, and the rest of us amateur drivers. This is actually a test session where we were doing back to back wing tests. https://www.youtube.com/watch?v=eZ9vIUi7aRY We can change our wing in about 30 seconds, so we went out, ran a few laps to get things warm and get a base line, then came in, did a wing change and saw how the feel and lap times compared. This is why it looks like Paul is up to speed so quickly on the out lap in that video...everything is already warmed up.
We are at the point where small changes make a noticeable difference in lap times and with drivers like Paul we can be assured that what he is telling us(besides what the computer is telling us) is indeed what is happening.
EDIT: Almost forgot, that video will also wet your appetite for how the Mendeola S5 will shift. It's a beautiful thing.
Last edited by crash; 03-21-2014 at 10:06 AM.
-
03-21-2014, 11:55 AM
#373
Senior Member

Sheeee-Nikes Crash that is one of the best videos I have seen from you. I think I pulled a 1G in my chair just watching it, and the Mendy is sweet
Thanks
"May you be in heaven a full half hour before the Devil knows you're dead"
-
03-21-2014, 08:18 PM
#374
I have to agree with Ron - GREAT video! My wife laughed at me as I'm steering and leaning into turns while I watched it!
-
03-23-2014, 01:56 PM
#375
It is truly amazing of the infectious passion this car generates. Who would ever thought of a group of enthusiasts could build a car and attract world class drivers for the sheer enjoyment of the sport of road racing! NOT IN MY WILDEST dreams. There has been over 100 people work on this car and another 100 just offering advise. I might add worldwide! You might also take in the account of operating an a very limited (small) budget! As Mike indicated, having Paul join us, it has been very educational and raises the bar each time we take the car out. If you had not read any of our other stuff before the 25, Paul was runner up in the Red Bull F1 search, then went to GM for 11 years as a test driver and then won a Grand Am championship in a Pontiac GTO. Most of his experience came from the European circuits, winning The Grand Prix of Monaco in a vintage Penske F1. We are so honored to all the talent, behind the wheel and behind the scenes. BUT, let's not forget the PDG regulars that have put this project in the winner's circle time after time!
-
03-24-2014, 05:50 AM
#376
Member
-
03-24-2014, 07:11 PM
#377
that is some pretty crafty stuff! great work!~
R
-
03-25-2014, 07:33 AM
#378
very nice. those welds are super. looks like the right way to me.
-
03-27-2014, 08:08 PM
#379
Member
Originally Posted by
Cobra 61
that is some pretty crafty stuff! great work!~
R
Originally Posted by
carbon fiber
very nice. those welds are super. looks like the right way to me.
Thanks Richard and Jason,
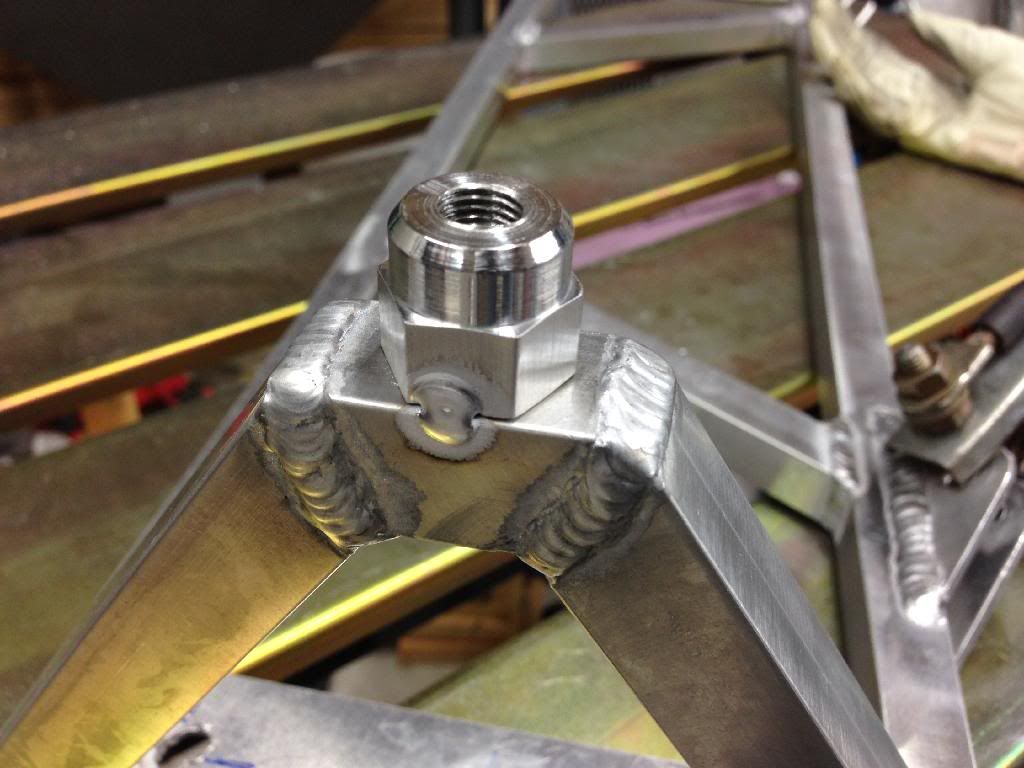
Last weekend I spent most of the time staring, drawing, modeling and measuring. After many mental iterations of the design i decided to make the parts of the design that I was happy with.
It took me two days to make this part even though the actual building only took a few hours.
I have spent the week building the remaining parts of the subframe and transaxle mount in my head. Imagining the stress loads and also the possible difficulty installing or removing the parts.
I hate when you put things together and in order to work on part A you need to take out B, C , D, E and F.
I want to be able to take out any part without messing with the other parts. I also wanted to take the rear subframe out without forcing the body out of the way to clear.
I want this car to be like my two stroke race bikes. you can take the whole thing apart rebuild it and put it back together in an hour.
Requirements
1)light weight but strong
2)stiff but not rigid attachment of the Transaxle to the subframe
3)easy installation and removal
4)transaxle bracket and subframe structure that can stand up to the fatigue loads of the track
I had a hard time with how I would design the attachment point between the transaxle hanger and rear subframe.
Factory five did a nice job with the mendiola SDR mount. You insert the bottom bolts and swing the mount up into position insert the top bolts and drop the transaxle down on the pads.
I wanted to carry the same idea, but of I could not rest the transaxle on the subframe like factory five did.
I have come up with this side view of how the bushing will connect with the subframe and transaxle hanger.
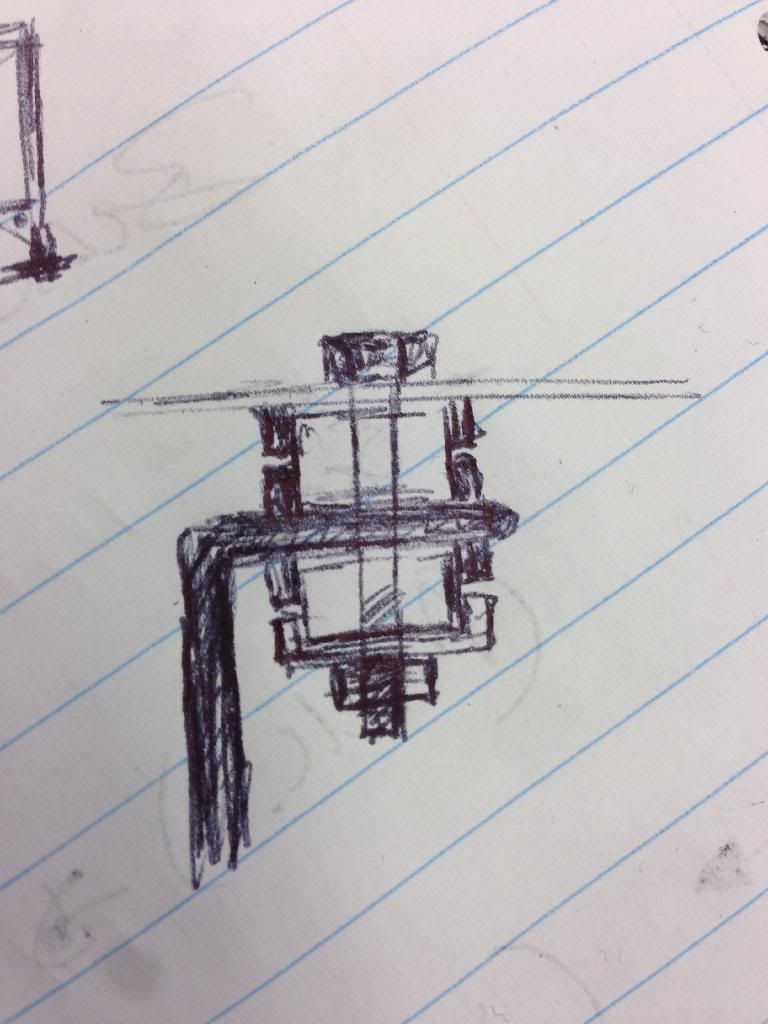
the bracket will hang from the subframe instead of resting on it. I figure i will weld rings that capture the bushings and that will stabilize the setup as well as limit some of the motion but still allow twist in compression.
here is a top down view of the subframe with bracing and mounts for the transaxle hanger.

I have a assortment of polyurethane bushings and hardware. It will be interesting to see how this all works out.
John
Last edited by kabacj; 03-27-2014 at 08:11 PM.
XTF #2
build start date June 19 2023
GTM # 344
Build Start December 2010
First track day April 2013
-
03-31-2014, 05:32 AM
#380
Member
-
04-14-2014, 05:16 AM
#381
Member
The family insisted that I attend the family vacation so my other child, the GTM, did not get much attention over the past two weekends. It was great to get some quality family time.
On the other hand I have a deadline to get the GTM back out on the track so I spent a few hours on it this weekend.
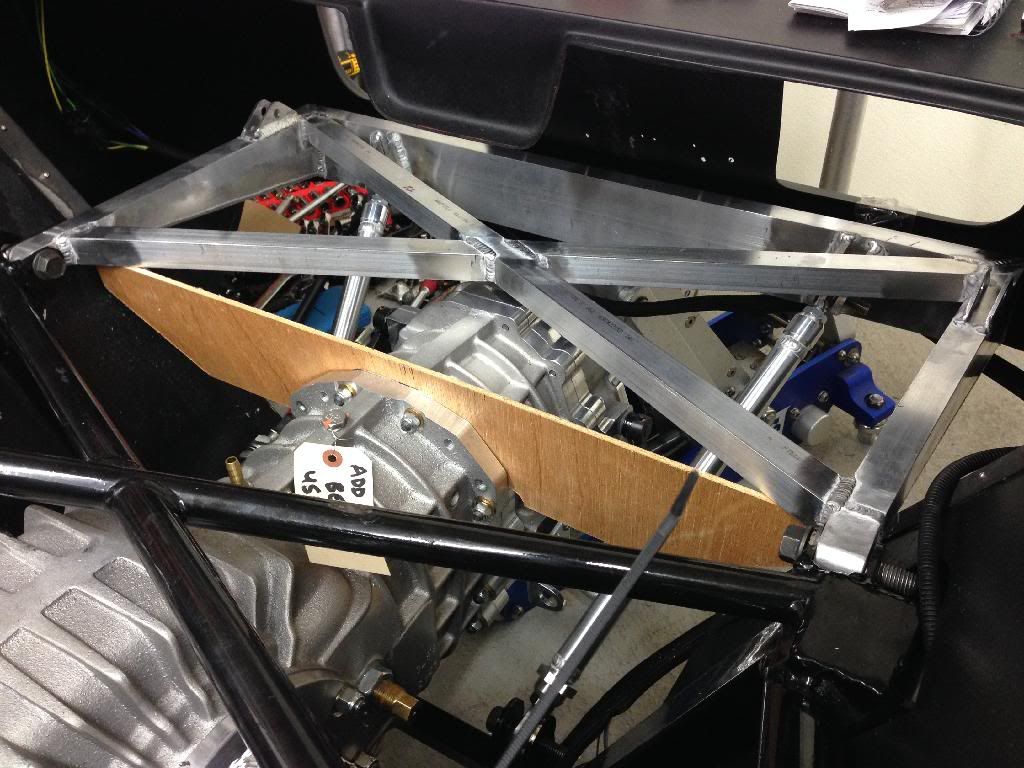
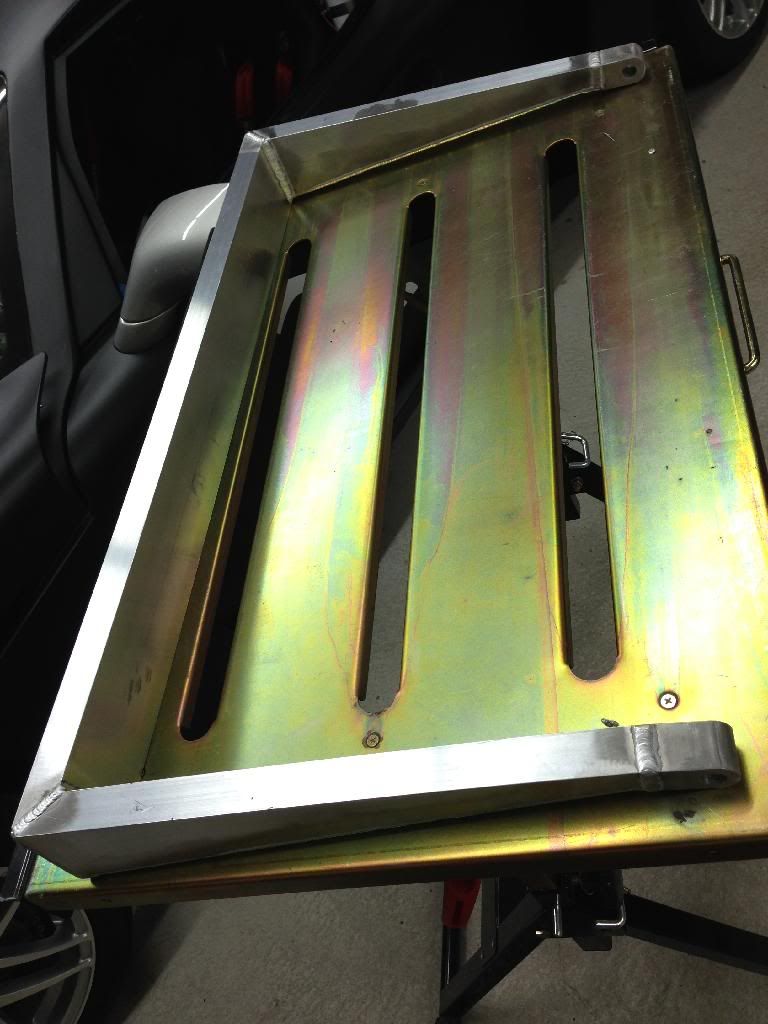
Two major points of progress. I installed an x brace in the rear sub frame. Boy it's stiff! I actually think it will play an active role stiffening the rear shock towers now.
You can also see the plywood template I made to pickup the mounting points on the transaxle and subframe. More refinements needed here but I'm close.
Finally I tipped the whole subframe down so it does not block the holes in the body where the exhaust pipes exit. My original idea was to run the frame perfectly level off the top mounting tabs like factory five does. The problem is my subframe is much wider and more visible from the rear. There is no reason it needs to be level in my application so I decided to tip it down.
Part of the adjustability I get with the left and right hand threaded links are changes like this one. I just made both links a half inch shorter and I am golden.
John
XTF #2
build start date June 19 2023
GTM # 344
Build Start December 2010
First track day April 2013
-
04-14-2014, 05:53 AM
#382
fasterer and furiouser

Looks awesome... Your craftsmanship is inspiring.
I ran my front brake lines this weekend, finished up the throttle cable/assembly and started building my custom axles. It was nice to be able to work with the garage door open.
A few neighbors stopped by so that's motivating in itself.
A well stocked beverage fridge is the key to any successful project.
-
04-15-2014, 04:52 PM
#383
Member
Originally Posted by
longislandwrx
Looks awesome... Your craftsmanship is inspiring.
I ran my front brake lines this weekend, finished up the throttle cable/assembly and started building my custom axles. It was nice to be able to work with the garage door open.
A few neighbors stopped by so that's motivating in itself.
I must agree working with the garage door open is great. Sadly I need to keep it shut when I'm tig welding so the breeze does not blow the shielding gas away and mess up my welds.
Hopefully I'll have the GTM street legal by June. I'll stop over so I can see a 818 under construction.
John
XTF #2
build start date June 19 2023
GTM # 344
Build Start December 2010
First track day April 2013
-
04-16-2014, 07:13 AM
#384
I learn alot watching guys like you. What is your background, what have you done that makes this stuff such a no brainer for you?
You have a tig welder, you have some kind of band saw, drill press, lathe, or a mill. I'm really thinking I need to open my eyes, I have been building cars off the floor of my garage for so many years. Using crude tools, making a bracket out of some other combination of metal that was in my bin. It all comes out good, but I'm missing the boat., too much work.
You really didn't need much to make that rear brace, did you?
-
04-17-2014, 04:51 AM
#385
Member
Originally Posted by
fastthings
I learn alot watching guys like you. What is your background, what have you done that makes this stuff such a no brainer for you?
You have a tig welder, you have some kind of band saw, drill press, lathe, or a mill. I'm really thinking I need to open my eyes, I have been building cars off the floor of my garage for so many years. Using crude tools, making a bracket out of some other combination of metal that was in my bin. It all comes out good, but I'm missing the boat., too much work.
You really didn't need much to make that rear brace, did you?
Ha thanks Gene you are too kind.
I have been very impressed with the metal parts you made, like your rear hatch supports. A whole lotta hand work to get them done but they looked GREAT. Of course a black car will highlight the beautiful bodywork you have done. Yes sometime tools make it easier but often they simply make your work faster and more accurate.
What experience do I have?
I sit at a desk all day. I have never built a car. I did'nt tig weld before I got the kit. I have no engineering training I have never raced cars. I just got all these tools in the past 3 years. I really have no idea what I am doing. I simply learn as I go.
I have a talent for building things in my head in 3D and imagining how they will work in the real world. I spend quite a bit of time thinking about how this stuff will work under stress loads before I start building. I test ideas/ prototype them if I can. I second guess myself until I have run out of things to second guess.
I am also a good copy cat. If you dont know what you are doing, copy somebody who does. You will probably end up in a good place. I study how race cars were made in the 60s and 70s and how they are made now. Lots of pictures on the internet to get ideas. Im sure the internet makes this stuff I make look like I just throw it together. But I really work at the design before I build anything.
Tools:
I have a good tig welder. I have a good band saw that is designed to chop angles and retrofitted it with a small table. I have a 1950s lathe and a ton of woodworking tools including the drill press. All of my metal working tools were purchased used for under $1k total so they are very affordable in the context of the GTM expense. I needed all of them to make the rear transaxle sub frame and hanger.
I ended up buying all these metal working tools so I could make the bits that stand between me and a successful custom project. Although I dont enjoy having to make stuff under pressure of a deadline like I am doing now with this transaxle hanger, I really love making stuff. When I retire thats all I will do.
I just try to make parts that are functional and pretty. I like to solve problems. Im glad to share them with you guys. Hopefully my solutions work. If they don't ill be sure to tell you so if you make parts like I have you can learn from my mistakes. Having the right tools for the job makes it a whole lot easier.
I have a little God given talent, TONS of determination and $1000 dollars worth of used tools and a welder. This work is not a "no brainer" for me. It just looks like it is
John
XTF #2
build start date June 19 2023
GTM # 344
Build Start December 2010
First track day April 2013
-
04-17-2014, 06:45 AM
#386
Senior Member
"I sit at a desk all day. I have never built a car. I did'nt tig weld before I got the kit. I have no engineering training I have never raced cars. I just got all these tools in the past 3 years. I really have no idea what I am doing. I simply learn as I go"
Sorry John I have to call BS on that statement.
I've seen, worked with rookies, and examples of your work is not that of a rookie. Unless.......
You got a pro doing all the work and then you come in behind and take the pictures, and try to "shine" us forum wingnuts. ")
Ron
"May you be in heaven a full half hour before the Devil knows you're dead"
-
04-17-2014, 08:18 AM
#387
Well, like I said, I'm missing the boat then. I haven't baught a tool in 20 years, I think I will look into some of that stuff when I get the GTM done.
Thanks man
-
04-17-2014, 12:07 PM
#388
Member
Originally Posted by
Presto51
"I sit at a desk all day. I have never built a car. I did'nt tig weld before I got the kit. I have no engineering training I have never raced cars. I just got all these tools in the past 3 years. I really have no idea what I am doing. I simply learn as I go"
Sorry John I have to call BS on that statement.
I've seen, worked with rookies, and examples of your work is not that of a rookie. Unless.......
You got a pro doing all the work and then you come in behind and take the pictures, and try to "shine" us forum wingnuts.
Ron
Very funny Ron and thank you for the compliment.
My mom says im not your average rookie. My wife says im borderline certifiable.
I keep working at something till I get it. Funny one definition of insanity is doing the same thing over and over and expecting a different outcome. Maybe my wife is right!
Scouts honor no BS. My statement is 100% true.
John
XTF #2
build start date June 19 2023
GTM # 344
Build Start December 2010
First track day April 2013
-
04-21-2014, 08:25 PM
#389
Member
-
04-21-2014, 08:40 PM
#390
Senior Member
Impressive work as usual John. Said it once and I'll say it again you really, really, really, have skills.
GenII GTM #354
Delivered (02/09/11)
-
04-23-2014, 05:19 AM
#391
Member
XTF #2
build start date June 19 2023
GTM # 344
Build Start December 2010
First track day April 2013
-
04-23-2014, 07:09 AM
#392
fasterer and furiouser
That is awesome. Good luck finishing it up this week.
A well stocked beverage fridge is the key to any successful project.
-
05-01-2014, 05:06 PM
#393
Member
Originally Posted by
longislandwrx
That is awesome. Good luck finishing it up this week.
Thanks. I finished ! But as you may have guessed. That's not the whole story.
My normal thrash to get all of my planned upgrades complete prior to the first weekend of the year ended 8.00pm Sunday night for Mondays track day.
I finished my punch list that includes new tires I mounted and balanced myself. (Both a first)with bigger 275s up front. New exhaust section from kooks without the cat section that roasts the cv joints at track temps. New sequential transaxle and sequential shifter and dual disk kennedy stage 2 clutch. A re designed, light weight rear sub frame that also acts as a rear bumper.
Testing things out at home I ran the transaxle through the gears on jack stands. I also checked out my modified shifter. It all worked. That was amazing in itself. The reverse setup was heavily modified and that even worked!
I drove it in the driveway in forward and reverse. All seemed great! It was a late night by the time we had packed up. Off to the track at 3am
We arrived at the track at 7am. A little tired I roll the car off the trailer
As usual it attracts some stares
I start it up and that turns heads. It sounds really good without the cats .
The I put it in gear which is still an odd experience pulling directly back for first
Let out the clutch. It barely grabs. Odd
I go back and adjust the slave cylinder till it's barely any travel moving the clutch fork to disengage the clutch. Still nothing.
I knew it was bad. This is not how a new clutch fails. You can't slip it or you can't get it out if there is a problem. Since it's a multi disk dry clutch you can hear when the pressure is off. It sort if rings. When I let out the clutch I hear pressure being applied but no drive.
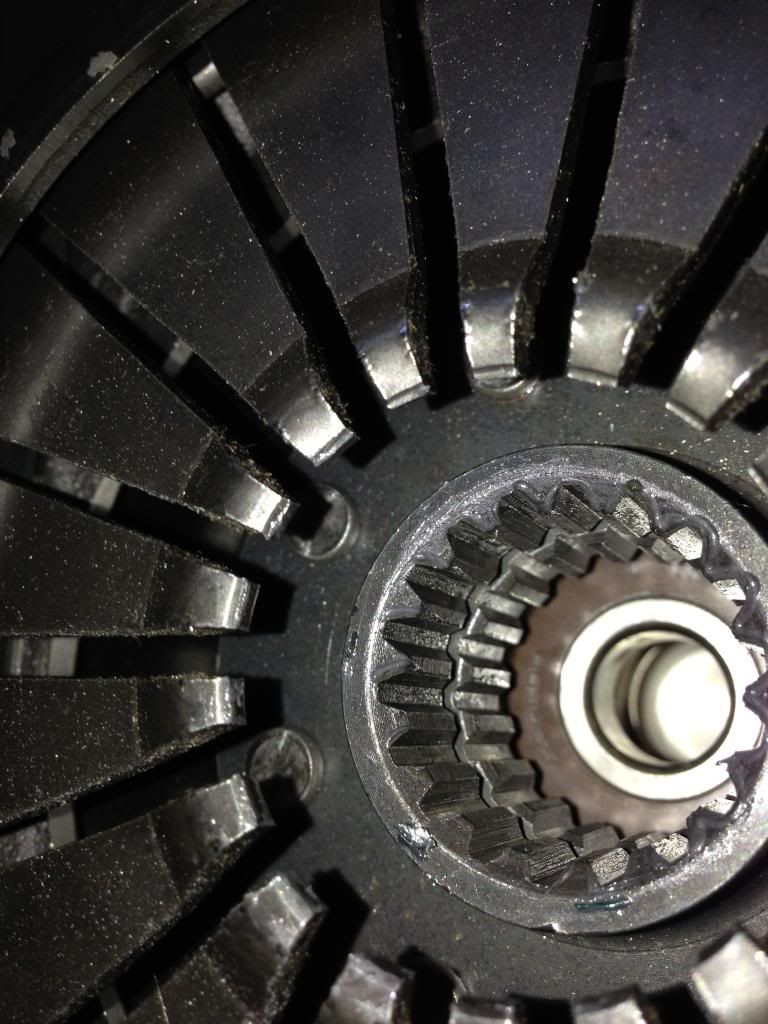
My gut said call Kennedy. It felt like I had the wrong friction disk or steels. Too thin or something like that. I waited till they got into the shop in California. In about 30 seconds he knew what the problem was. One of the clutch plates needs a small chamfer added to it. A few seconds with a dremel will fix it he said.
Turns out others had the same problem. Without the chamfer there is enough extra metal to keep the friction disk nearest the flywheel from touching the flywheel.

I was disappointed that I could not drive the car, but it comes with the territory. Low volume custom parts all mixed together. I expect some "tuning"
I wish i would have done some hard throttle test runs at home, but it was poring rain Saturday and Sunday night blasts at 8pm would not have been popular with the neighbors.
Good news is I'm back at the track on the 16th
I hope to get my nasa racing license. The neighbors are just going to have to deal with a few loud blasts up and down the street while I test out the clutch setup
Out comes the transaxle. Again! It's ok. My new multi part subframe should cut down on the time.
John
Last edited by kabacj; 05-01-2014 at 06:06 PM.
XTF #2
build start date June 19 2023
GTM # 344
Build Start December 2010
First track day April 2013
-
05-02-2014, 03:15 PM
#394
Good lesson in what happens regularly in racing...just about anything you can think of...and everything you haven't!
I would of had to pull it apart at the track. Even if I ended up towing it home in pieces. I figure I went through that much effort, I may as well add a little bit more.
-
05-02-2014, 03:38 PM
#395
Member
Originally Posted by
crash
Good lesson in what happens regularly in racing...just about anything you can think of...and everything you haven't!
I would of had to pull it apart at the track. Even if I ended up towing it home in pieces. I figure I went through that much effort, I may as well add a little bit more.
Don't think I didnt consider going to harbor freight and getting and engine crane and pulling it out. I went to bed at 12.30 after I finished loading up the trailer and doing other odds and ends. I just cant stop working on stuff if I have time. I woke up at 3am to drive to the track so I was working on only a few hours of sleep. The forcast was for heavy rain on Tueday so it was likely to be a wash out. AND altho I had brought enough parts and tools to rebuild almost anything I forgot one key thing. The stupid clutch alignment tool! The barriers kept adding up.
If I had anything like normal energy levels I would have done it, but yeah it was pretty hard to admit failure and go home.
XTF #2
build start date June 19 2023
GTM # 344
Build Start December 2010
First track day April 2013
-
05-02-2014, 04:18 PM
#396
In a pinch you can use a socket and a short extension for an alignment tool.
-
05-02-2014, 04:50 PM
#397
Member
Originally Posted by
crash
In a pinch you can use a socket and a short extension for an alignment tool.
Yep that's a good idea. I was going with the plan of going to Home Depot getting a pine dowel and turning it down to size then adding a strip of metal to align the splines on the multi disks. You know something quick and simple.
Course I could always call Ian and ask him what Porsche input shaft the Mendiola s4 uses. Do you happen to know what input shaft the Mendiola s4 uses? Getting that tool at autozone may be a problem tho
Needless to say the engine crane and clutch alignment tool will be in the trailer next time.
XTF #2
build start date June 19 2023
GTM # 344
Build Start December 2010
First track day April 2013
-
05-05-2014, 12:08 PM
#398
I believe the splines on the S5 are of something American made. Can't completely remember, but I'll see if I have a reference.
-
05-05-2014, 02:59 PM
#399
Senior Member
Hey John,
http://store.snapon.com/Clutch-Servi...r-P635965.aspx
I have one of these it works well when you don't have an old input shaft for alignment
-
05-05-2014, 05:15 PM
#400
Member
Originally Posted by
crash
I believe the splines on the S5 are of something American made. Can't completely remember, but I'll see if I have a reference.
Thanks Crash
Originally Posted by
mikespms
Thanks for the link Mike
Yes this clutch is tricky. I need to align both the plates with the pilot bearing and the splines of the disk.
Needless to say I will carry the tool at all times now.
XTF #2
build start date June 19 2023
GTM # 344
Build Start December 2010
First track day April 2013
Tags for this Thread
 Posting Permissions
- You may not post new threads
- You may not post replies
- You may not post attachments
- You may not edit your posts
-
Forum Rules

Visit our community sponsor


 Reply With Quote