Since your dancing with the AN lines and fittings I thought this might make your build life a little easier
Ron
Wow I wish I knew about that press before I started. The stainless braided lines are a bear! I ended up making wooden hose and hose end holders. They work but not as nicely as that press!
I have one more fitting to do. The tolerances are very tight so each hose must be just the correct length so the fittings all end up at the proper angle on the dry sump pump. It would be great to have this all plumbed with the motor out of the car, but since the frame is so close to the pump, I don't think I would have been able to get everything to clear if the motor was out.
I'm going to get one of those presses for the next project. Thanks for the link Ron.
John
XTF #2
build start date June 19 2023
GTM # 344
Build Start December 2010
First track day April 2013
As usual the final few days prior to a track day are a thrash.
It's 6.30am Sunday. My plan was to leave for New Jersey Motorsports park 3.30am Monday. It's a three hour drive without traffic driving around manhattan. There is almost never traffic that early. We roll into the track between 6.30 and 7am. Plenty of time to setup.
Well I'll have plenty of time to setup at the track if I have a working car. The car had not yet run with the dry sump and I still had to clear the cooling system of air.
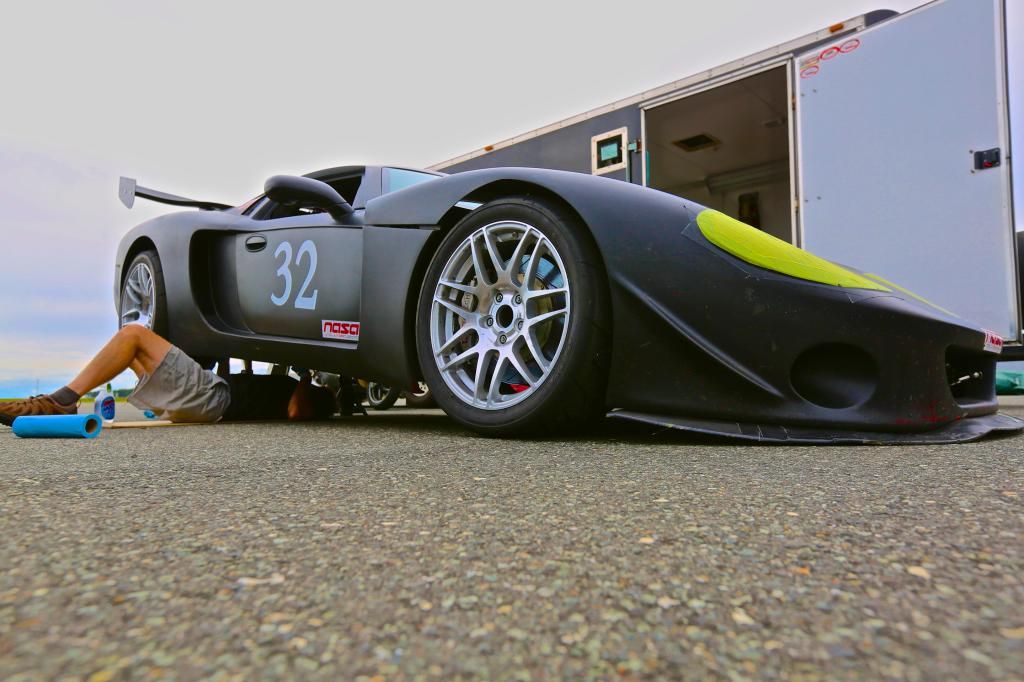
Sunday was not a good GTM work day. I had family stuff to do from 7.30am till around 1.I woke up early and made a temporary mount for the catch can and made my last hose with AN fittings and it was time to leave for the family stuff.
1.00 and I am back in the garage. I double checked the tightness of all the fittings mounted the belt and pulley on the dry sump pump and filled the system with oil. Next I need to prime the pump and build oil pressure before I start the motor. I pulled the spark plugs put 3 quarts in the motor and 6 quarts in the dry sump tank. I loosened the fittings on the pump allowing air to escape and supply oil to pump. I turned over the motor. After a few cranks. Nothing. I disconnected the supply line to the motor in order to see if anything was flowing. a few more cranks. Nothing was flowing out. Crap.
I had stuck the remote oil filter up into the cavity between wheel well area and the motor. And from that position I could not see the clearly marked in and out.
Whoops! Had the lines backwards.
I swapped them around. That's better. Instant flow on the first crank. Whew.
I started her up and wow I had oil pressure. 100psi. The directions are to adjust the pressure under track conditions at track temps.
Ok fine. I'm pretty sure that's too much pressure but probably better to blow oil out the main seal then to starve the motor.
Next was clearing out the air from the cooling system. I really wanted to have a setup where I could drain the system of air after a fresh fill up in one shot no waiting.
I have two air bleeds. One on the radiator and one installed on the water pump. I drilled and tapped the water pump housing and added a bleed screw like that found on the brake calipers.
This worked well. I simply filled system and expansion tank. After allowing the air to escape from both locations. I heated the car up to temp and allowed the water to escape from the radiator bleed fitting until the water got hot. All done in a few min without revving the motor. The kooks system is loud without cats installed. I did not want to annoy the neighbors revving the motor Sunday evening to try to force the air out as the water pump gains speed.
After attending to lots of little items it was midnight before I went to bed ... as usual. Three hours of sleep is plenty.
John
XTF #2
build start date June 19 2023
GTM # 344
Build Start December 2010
First track day April 2013
***SOLD!!! - NASA ST2 FFR#48 Gen3 Type65 Coupe R, Street legal.***
***SOLD!!! - NASA ST2 FFR#48 Challenge Car rolling chassis, Street legal.*** http://johngeorgeracing.com
I wake up to lots of phone vibrating in the alarm clock charger. I see the text messages rolling in. Ha ha it's my buddy out front harassing me that I'm late. My alarm did not go off. I had made the old am/pm mistake. Everything was ready to go so I grabbed my stuff and we were on the road 10 min later.
Fast forward to my first run. We were the second group out after the organizers did some sighting laps. Seems they found some debris on the track because the cleanup crew went out after they came in. That left us idling on pre grid. I'm watching the gauges like a hawk hoping that the oil pressure would be ok and the car would not over heat.
10 min later, Finally we went out for our session. Everything was good with temps and oil pressure. I ran about 5 laps then started to wick things up. All still good. Another few laps. still good. Great now let's do some fast laps. Hmm is that oil burning i smell?
After 3 more laps I see the black flag. I go right in. The last thing I want is to dump 3 gal of oil on the track.
Turns out at high rpm I was blowing oil out the main seal. That was spraying oil on the headers and making a nice plume of smoke.
Not a surprise with the high oil pressure.
The motor was too hot to work on between sessions.
I went out in the next session and smoked less as I started shifting at 5k rpm
During lunch I had the chance to let the car cool down enough to work on it . I was able to get to the pressure adjustment screw by disconnecting the pump from the block, but leaving all the hoses attached.
I ended up skipping the next session because rushing a job with little sleep the night before is a recipe for disaster.
Here I am under the car. I just wanted to grab a pillow and get some sleep.
Final session arrives and I am ready. I mount up my barely scuffed Hoosier slicks to heat cycle them just in case the forecast for rain tomorrow is correct.
My first few laps are cautious as I wanted to make sure the dry sump pump was ok as well as slowly heat up he tires.
I slowly increase the speeds until I am running as fast as I ever have on this track. It was awesome. I need to move my shift points a bit to optimize the new transaxle final drive ratios. But I'm ready to move on to the next phase of development. I'm very happy with the car. I dropped into he 1.29 second area for lap times. I have to setup the car to make the best use of all the new grip, but the driveline and suspension are done.
John
XTF #2
build start date June 19 2023
GTM # 344
Build Start December 2010
First track day April 2013
that all sounds so familiar. rushing to get ready, hope it works on the track, things go pretty well. You just left out the part where between sessions you are frantically checking/fixing things and 10 people stop by to ask you "what kind of car is that?" or tell you they have a buddy that has a kit cobra. Keep up the great work and telling us about your story.
One question, how many times have you changed brake pads, front and rear? I am starting to wonder if I even need front brakes!?! Does your car drop down on the front springs when you hit the brakes? I adjusted my bias bar last time at the track but still burning up the back much faster.
Yep. You are so right about the questions from folks. 99% of the time I enjoy it, even when im working on stuff. Just this past visit I was under the car and people stop by and have a conversation with me while I am working. It sure is a great car to meet people. The folks you meet are all very interested in what you have done and how it works. Its just another great part of going to the track.
Regarding the brakes. I did need to beef up my front springs to prevent bottoming the front suspension under braking. This would be a track only mod as you are rarely slowing down from 150 to 60 or so on the street. I think I ended up with 350 lb springs in the front.
My bias is adjusted so my fronts just lock up prior to the rear. You get a good amount of braking from the rear wheels on the GTM but I have found that its best to have slightly front bias.
Regarding the pads. I got a custom sized stoptec brake system with 6 piston fronts and 4 piston rears. 14 inch rotors on both front and rear. I get both great brake feel and also incredible brake life. I still have not changed the pads with way over 20 track days. By contrast my buddy running his C5 corvette has gone through 4 sets of pads and at least 3 rotors. I think you want to move the brake bias frontward you should not be wearing out the back pads before the fronts I don't think.
Originally Posted by Fraser D
Great news John.
Glad to hear that the dry sump upgrade went well with only a couple of inconveniences.
Yep thanks Dave. It was not too bad considering I have never done it before and really did not know anything about how to get it done prior to starting. Now I know that I should have dialed down the pressure a bit before I went to the track so cold pressures are about 25 lbs higher then my ideal hot pressure.
I am looking forward to starting the body aero mods.
John
XTF #2
build start date June 19 2023
GTM # 344
Build Start December 2010
First track day April 2013
You sure are having fun with your car John. Glad to see all the development and upgrades are paying off in lap times. Keep up the good work and the updates coming.
You sure are having fun with your car John. Glad to see all the development and upgrades are paying off in lap times. Keep up the good work and the updates coming.
Thanks Hugo.
I still have a long way to go to match the lap record times in the super unlimited class, but at the same time I am solidly in the hunt on any race day.
The good news is I have a reliable car under me now. All I need to do now is learn how to drive it.
Hope to see you at SEMA
John
XTF #2
build start date June 19 2023
GTM # 344
Build Start December 2010
First track day April 2013
My next track event is two weeks away. Three fun days with the Porsche Delaware club. It's a great event where they allow open passing and I can drive with my buddies who don't race.
Although I have a punch list of items I want to look over/ maintain or improve. I was inspired by an article in racecar engineering regarding generating down force using the flat bottom of the car.
I was thinking about how I will design the diffuser.
The first item was getting it to fit at all. The mendiola sequential trans axle is a bit longer then the standard porsche G50 or even the Mendiola S5. A little surgery was necessary to get the diffuser to fit even considering the fact that I wanted the lowest diffuser angle I could get with the factory five parts.
I needed to cut a hole to clearance the tail section of the transaxle.
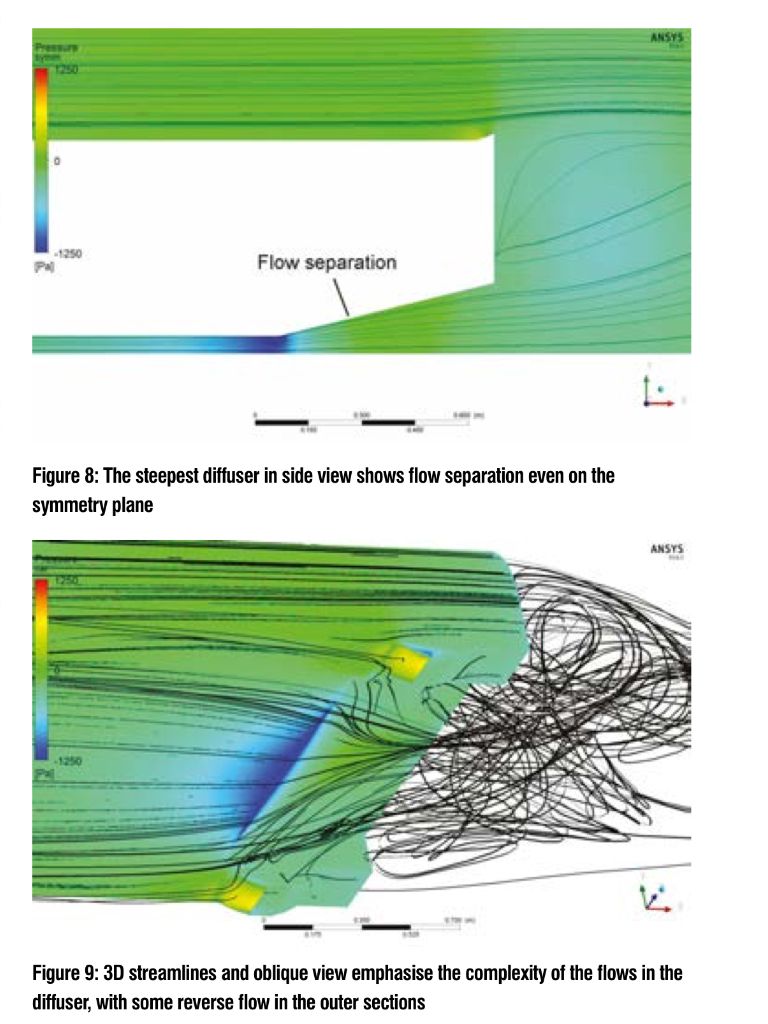
Then the next item was how many strakes should I add and how do they impact air flow. Well lucky for me racecar Engineering had the perfect article this month. Seems 4 is the ideal number of strakes as 6 no longer gives much benefit.
check out this cool graphic.
of course I need to seal up the hole I cut to clearance the transaxle and make the strakes, and that might not happen in time for me to test it out on the weekend of october 4th, but I thought it was pretty interesting data.
John
XTF #2
build start date June 19 2023
GTM # 344
Build Start December 2010
First track day April 2013
We had to ease a clearance hole in the defuser also. As I looked at your photo, it makes me want to redesign the whole thing into a flat chase and extend about 6 to 8 inches past the body. But it is not the rear down force these cars need, it is front and BALANCE. This has been our area noted for 8 years. WE are very close but not where the data shows we should be, even with the "platypus" canards up front. Our enemy has been the anti squat in the rear all along. As a mental note: we are now in position at setting up with a different shock set and 950 springs in the rear and a heavier sway bar. (this is what the drivers requested). We will see on Oct 4 endurance race.
We had to ease a clearance hole in the defuser also. As I looked at your photo, it makes me want to redesign the whole thing into a flat chase and extend about 6 to 8 inches past the body. But it is not the rear down force these cars need, it is front and BALANCE. This has been our area noted for 8 years. WE are very close but not where the data shows we should be, even with the "platypus" canards up front. Our enemy has been the anti squat in the rear all along. As a mental note: we are now in position at setting up with a different shock set and 950 springs in the rear and a heavier sway bar. (this is what the drivers requested). We will see on Oct 4 endurance race.
R
Yep very true Richard its not hard to add more rear downforce then the GTM needs. I was thinking that using the diffuser to gain the rear downforce instead of a big wing would be a lower drag solution. Using the diffuser and a thinner chord wing hung out past the rear deck lid could net the same downforce with lower drag. I'm going to play around with it, but it might be more useful for you guys. Over 25 hours a slight reduction in drag would equate to real gas mileage.
I still have lots of basic aero changes to make with a focus on the front end downforce, but the diffuser was one thing I could work on but not need to start cutting fiberglass.
Good luck with the endurance race. I can see how heavier rear springs and bar would help. I am also going to play with the spring preload and sway bar adjustment next weekend to adjust front / rear balance to see how that works.
John
XTF #2
build start date June 19 2023
GTM # 344
Build Start December 2010
First track day April 2013
My next track event is two weeks away. Three fun days with the Porsche Delaware club. It's a great event where they allow open passing and I can drive with my buddies who don't race.
Although I have a punch list of items I want to look over/ maintain or improve. I was inspired by an article in racecar engineering regarding generating down force using the flat bottom of the car.
I was thinking about how I will design the diffuser.
The first item was getting it to fit at all. The mendiola sequential trans axle is a bit longer then the standard porsche G50 or even the Mendiola S5. A little surgery was necessary to get the diffuser to fit even considering the fact that I wanted the lowest diffuser angle I could get with the factory five parts.
John
If you were running the rear open previously, pay careful attention to heat issues once you start to close it up. I have seen changes affect my coolant temps by 20 degrees. And, I'm on my third oil pressure sender this summer.
If you were running the rear open previously, pay careful attention to heat issues once you start to close it up. I have seen changes affect my coolant temps by 20 degrees. And, I'm on my third oil pressure sender this summer.
Good point thank you. I was wondering how much closing up the engine compartment would change the motor and transaxle temps.
Right now everything is open without panels directly under the motor, diffuser or hatch glass.
I plan to copy queues from this Audi R8.
Note the louvers on the hatch "glass". Note the 4 strake diffuser with swan neck wing mount. Wing hung out over the rear edge of the car. Also note the additions to the side scoops to pump air into the rear.
I figure Audi has nearly unlimited resources these days to figure out the best cooling/drag/downforce balanced solutions.
the R8 has a similar aero signature to the GTM. Copying somebody that has the resources to test tons of solutions will at least get me in the ball park.
John
XTF #2
build start date June 19 2023
GTM # 344
Build Start December 2010
First track day April 2013
Good point thank you. I was wondering how much closing up the engine compartment would change the motor and transaxle temps.
Right now everything is open without panels directly under the motor, diffuser or hatch glass.
I plan to copy queues from this Audi R8.
Note the louvers on the hatch "glass". Note the 4 strake diffuser with swan neck wing mount. Wing hung out over the rear edge of the car. Also note the additions to the side scoops to pump air into the rear.
I figure Audi has nearly unlimited resources these days to figure out the best cooling/drag/downforce balanced solutions.
the R8 has a similar aero signature to the GTM. Copying somebody that has the resources to test tons of solutions will at least get me in the ball park.
John
Great work as usual John. I think you are on the right path looking at the Audis. When designing the diffuser, it should be designed with the rear of the car and the wing as a system. The relative location of the wing to the diffuser (both height and longitudinal position) can greatly effect the performance of the diffuser. A well placed rear wing can make the diffuser way more effective.....that usually means a lower wing mounted further back......and that means a smaller, lower drag wing can be used. My somewhat educated guess is that the FFR diffuser angle is way too steep. If the rules are open, I would glass the hole back in, decrease the angle, lengthen the diffuser and add strakes and side plates. Do up some adjustable wing mounts (with your creativity, I know you can come up with something really slick) and go do some testing to find an optimum location of a smaller wing.
Also, the more effective the diffuser, the lower the pressure is under the entire length of the car so it effect on the balance is less that adding the same amount of downforce with rear wing.
Last edited by JCHRacer; 09-29-2014 at 03:39 PM.
Ciao,
Joel
Working ever so slowly on GTM #269, Twin Turbo SBC, Ricardo, Kit arrived April 5, 2009
My somewhat educated guess is that the FFR diffuser angle is way too steep. If the rules are open, I would glass the hole back in, decrease the angle, lengthen the diffuser and add strakes and side plates. Do up some adjustable wing mounts (with your creativity, I know you can come up with something really slick) and go do some testing to find an optimum location of a smaller wing.
Also, the more effective the diffuser, the lower the pressure is under the entire length of the car so it effect on the balance is less that adding the same amount of downforce with rear wing.
Thanks Joel for the input as always.
I agree the stock diffuser angle and height take into account clearance for road use, and were not primarily concerned with down force. The other thing I am looking into is the fact that the rake on the whole car with side skirts lowered slightly can make the entire flat bottom of the car into a diffuser of sorts. Ideally Ill be able to get down force closer to the CG of the car and maximize down force without creating a front rear imbalance.
Ill be at the track for three days this weekend and I am going to play with springs and roll bar rates to tune low speed grip. My current setup has gone from one where I was pushing the front to one where the rear is loose but with tons more total grip. I think some of the grip imbalance is setup related. But the car sure likes the hoosier slicks with 285 soft 80 compound on the front and 355 100 compound on the rear.
I cant wait to start testing the aero stuff. Hopefully ill be able to do some slow speed simulations using yarn tufts and possibly even smoke while driving on the street to figure out the airflow path. Ill have a few setups for the track and use the stopwatch / seat of the pants to evaluate if they work.
John
XTF #2
build start date June 19 2023
GTM # 344
Build Start December 2010
First track day April 2013
John, get yourself a GPS based datalogger! stop with this stop watch nonsense. Some loggers have shock travel, load sensors, ride height sensors, etc.. to better quantify the changes you start making.
***SOLD!!! - NASA ST2 FFR#48 Gen3 Type65 Coupe R, Street legal.***
***SOLD!!! - NASA ST2 FFR#48 Challenge Car rolling chassis, Street legal.*** http://johngeorgeracing.com
John, get yourself a GPS based datalogger! stop with this stop watch nonsense. Some loggers have shock travel, load sensors, ride height sensors, etc.. to better quantify the changes you start making.
Hey John
Very true. I have a gps data logger from stack called a clubman. It's good because it takes the CAN signal from my Bosch based ECU. The ecu will take CAN inputs like wheel speed steering rate and overlay 3 axis accelerometers with gps data.
It also allows for a secondary CAN input channel for the things that the ECU can't deal with.
And all of that is auto synchronized with up to 3 video feeds I use 2 now.
I get a reasonably good idea of what the car is doing at any point in time, however I'm a complete novice when it comes to data collection. That's another thing I will sort out over the off season.
It will be much easier to spend a day sorting all the systems on the street at legal speed. Instead of burning expensive and limited track time figuring out how to get the sensors all working.
I wish there was a killer data logger solution that was as easy and powerful as an iphone. But sadly we are back in the days of DOS and setting IRQs and interrupt values manually when you buy a data logger.
It's another project for the winter. I looked at AIM. Decided Stack was better for my purposes. Do you know of a data logger that's powerful but user friendly?
XTF #2
build start date June 19 2023
GTM # 344
Build Start December 2010
First track day April 2013
I wanted to add a few points relating to the diffuser, underbody, and what I believe is pretty important: the front inlet to the underbody. Stick with me, this got long, but I wanted to share
I'll start from the back since I don't have as much experience here, but do have some experimental data and a number of good references. Maximum diffuser angles seem dependent on how fast the air is flowing into them, how much leakage into the area is occurring, and how effectively the rear wing is helping to pump the air. (Race Car Aerodynamics: Designing for Speed, Joseph Katz) and the later cited book provide a maximum angle at around 7-9 degrees where there is a lot of leakage, or not much side sealing from vortexes, to 14 degrees for tunnels with good sealing. In the sedan-world, where there is a lot of leakage from the diffuser region to the sides, drag is at a minimum around 4 degrees, and grows by a fraction of a percent per degree up from there. Just from the looks of the Audi picture, I'd say a great deal of engineering went into the sealing of the tunnels, so borrowing elements may allow for steeper diffuser angles than with minimal strake/side plate designs. It sounds like Joel would agree, and probably has far more experience in that area than I.
Interestingly, from a number of references, the presence of the wing, angle of the diffuser, and even the length of the angled and flat sections of the underbody don't have much of an influence on the 'maximum' low pressure, either in magnitude or location. A poorly functioning diffuser or rear wing may balance the underbody-produced downforce more towards the front, but only because the rear underbody combination is performing poorly. One interesting thing to consider is that our speeds, even up to 200 mph, are relatively low mach numbers. (< .27) At these speeds, air can be considered incompressible, in the sense that that it doesn't 'back up' and become pressurized, or 'thin out' and become low pressure as a result of the shapes of the underbody. This seems to contradict some books on the matter (Competition Car Downforce, Simon McBeath, p93) "This is common sense really...if...the front was higher than the rear, then air would pack under the car at speed and give it a very unhealthy, and very unsafe, upwards lift" but this particular reference was really providing a simplification to which they correct later in stating that the rake is really to allow "the air to continue flowing rapidly - though gradually decelerating - towards the rear" and to "allow some interaction between the wake and the underbody flow, which will help to ensure that the pressure remains relatively low below the back of the car." What I believe to be important from this is: it is the relative speed of the air that is important in determining the pressure exerted on the surfaces. Returning to my comment about a poorly performing rear underbody, this equates to slow moving (or turbulent air, then causing slow moving air) in that region exerting a pressure on the underbody that is not as low as a fast moving stream would exert. It may sound like a fancy way of saying 'the air under the car is high or low pressure and then exerts force on the surface' - the distinction is that the air itself is not at a higher or lower pressure, but the effect from the speed is exertion of a higher or lower pressure on the surface. From what I have found, the underbody can be designed to minimize the slowing and turbulence of the air stream under the car, and the diffuser and wing can be designed to help return that air stream to to the wake.
So by constructing an underbody that minimizes disturbing and slowing (relative to the car) the air that is moving under the car is beneficial: the faster stream exerts a lower pressure on the surface. The next big step I believe is realizing that you can do better than minimizing the 'dragging air along' effect that is going under the car. For that, I think it is important to visualize the air under the car as a stream, or at least moving relative to the ground. Suppose you have a splitter around the entire perimeter of the car, a perfectly smooth and level underbody, with the car traveling at 100 mph. The underbody will drag a boundary layer of air along, thinner at the front, and thicker towards the rear of the car, and the stream of air under the car will have an average speed in the same direction as the car, faster near the car and slower near the ground (all relative to the ground.) You could reason that the maximum speed differential that could be attained is less than 100 mph. It is if the air stream under the car moves in the direction of the car, but we can move that stream in a direction opposite the car (relative to BOTH the car and the ground.) This would produce lower pressures than the perfect underbody case above. We can take advantage of the incompressibility of the air, and pay a drag penalty to accelerate the air to speeds relative to the car that are greater than the speed of the car relative to the ground. This faster moving air stream can be kept moving with a smooth underbody, and slowed back down by the diffuser so as not to cause a drag penalty.
Wooo, lots of theory, anyone can read books and make assumptions I said to myself So it was time to experiment. The tool for accelerating the air would be an exaggerated one-sided venturi starting where a splitter would attach, and an underbody panel extending back to the front axle line. The front ground clearance at the splitter is 8.75", and the angle that the venturi makes with the splitter is 20 degrees at the start, curving on a large radius down to 5" off the ground over the course of about 10". The venturi is 57" wide, and the underbody panel extends about 22" back at the 5" height, with appropriate cutouts for the tires. From all classical looks, the car should 'flip over backwards at speed with that air-catcher I built.' Negating the air that escapes out the side, when the car is traveling at 90 mph, the venturi is capable of accelerating the volume of air that passes under the splitter, 57" wide, to a stream traveling at 141 mph. This acceleration is caused by the drag associated with the increased frontal area (8.75" - 5") * 57" that the venturi has added. In my test calculations, this fast moving air stream has 587 square inches of area to affect, and an the 50 mph increase in air speed, along with the slowed air above the venturi, causes an average pressure decrease of .22 psi, for approximately 130 lb of downforce. The fast moving stream (although decelerating as it leaks out the sides) continues to affect the 22" of flat underbody. Assuming the speed drops off to 120 mph near the end of the underbody (this turned out to be an overestimate) I calculated an additional 150 lb of downforce from an average pressure differential of .29 psi and 515 square inches of area. Total projected downforce with no leakage in the venturi: 280 lb.
Test time! I constructed the venturi out of aluminum, for my Camaro, mounted a sensor to my suspension to measure deflection, and logged data at 12, 40, 60, 80, and 120 mph inn 3 configurations: no underbody panel, the venturi underbody, and with the venturi and a 5” splitter. The tests were performed back to back to back and over the same segments and lengths of ‘track.’ I averaged the suspension values over a minimum 7 seconds of travel, collecting data at 100 Hz, with the full suspension travel using about 10 bits of the 12 bit analog to digital range. Downforce chart.png
The scale on the left is in data log units, with an increasing number meaning more lift. Both the venturi and venturi+splitter combo resulted in less lift than without. Neither combination resulted in a downward curvature of the lift to speed graph (that would have been awesome…) The addition of the splitter caused a drop in downforce. This is possibly because with it in place, the air above the splitter was being accelerated into the radiator opening and over the car, while the air under the splitter was not being accelerated yet. I believe that arguing that the venturi was too big and was ‘backing air up’ under the splitter would be an invalid argument based on compressibility. Moving the venturi start out to the leading edge of the splitter would be be the right move to make the splitter effective again, but I haven’t tried that yet. I run with no splitter instead The results were 95 lb reduction of lift at 120 mph. At 2280 lb front weight, this only equates to an increase in lateral G capability of .04 G, but others can attest to how hard it is to get front downforce in a closed body car.
Very long story to get to my suggestion: The GTM has a much better underbody than my test Camaro, and much less front weight. Take advantage of the stage of bodywork you are in, and redesign the front to form the widest venturi, with a starting height of at least 50% higher than your smooth underbody ground clearance, to smoothly accelerate as much air under the car as you can. Take the drag penalty, it will be worth it for front downforce. (Then laugh at people who insist you car will fly up because you will ramp up on all the air you are sending under the car. ) Minimize the side leakages with skirts or vortices, and then move on to the difuser and rear wing to balance and assist bringing the fast air back down to free stream speeds. The underbody downforce will drop off faster once you are in the difuser section, so minimize the length without incuring too much angle. Too high of an angle creates unnecessary drag from flow separation. Don't rake the car too much, as it also slows down the air, increasing the pressure being exerted on the underbody proportionally.
(I'll edit and add a picture of the venturi tomorrow if I don't get killed for such a long post...)
Last edited by KeithBoden; 09-30-2014 at 10:57 PM.
Keith-Good write up. I have been working with your stated theories for years now in redesigning the underbody of the GTMR. It will be interesting to see the real world results.
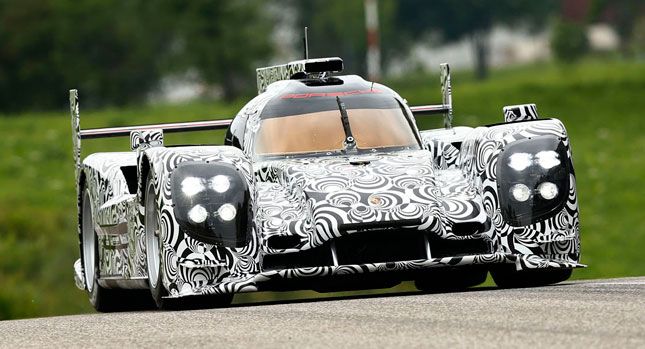
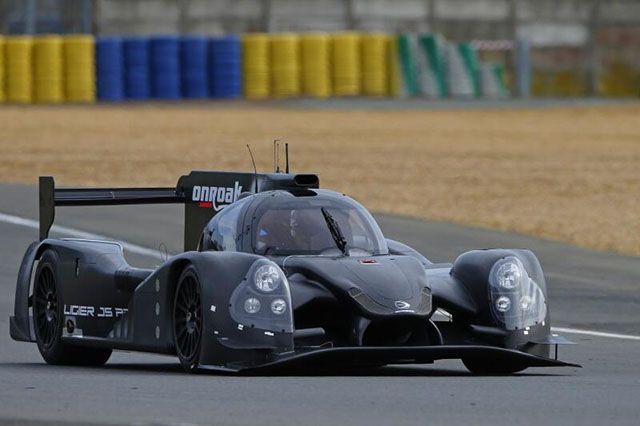
Great post. I had to think about it for a while but the concept makes sense. I have noticed the current crop of LeMans prototypes have the same "air catcher " splitter arrangement.
Makes total sense that if you can make the air go faster under the car then over the car you get downforce. Just like an airplane wing. The air goes faster over the top creating low pressure and lift. Reverse the concept with fast flowing air under the car and we have the holy grail of front downforce.
Seems that the wind tunnel agrees. All the new LeMans prototypes have splitters that force air under the car.
The gen 2 GTM already has a slot down the center of the splitter. All we need to do is optimize it.
Great idea.
John
XTF #2
build start date June 19 2023
GTM # 344
Build Start December 2010
First track day April 2013
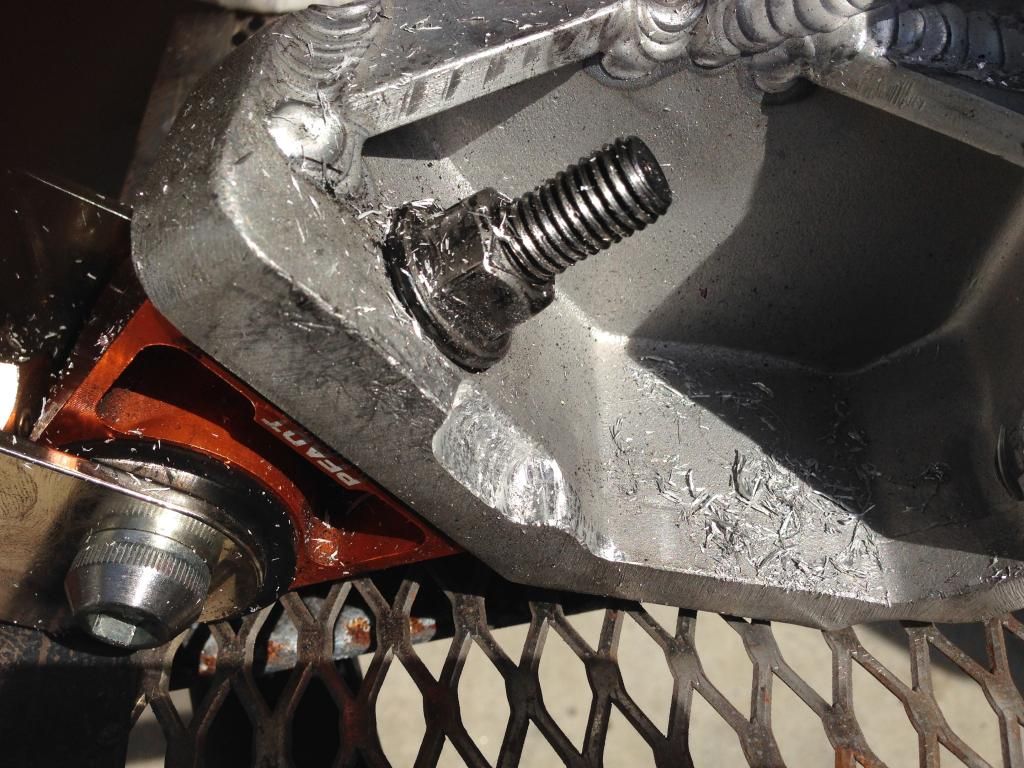
Every weekend before a track weekend I have a punch list of items to work on to get the car ready.
The most important item this week was to adjust the oil pressure.
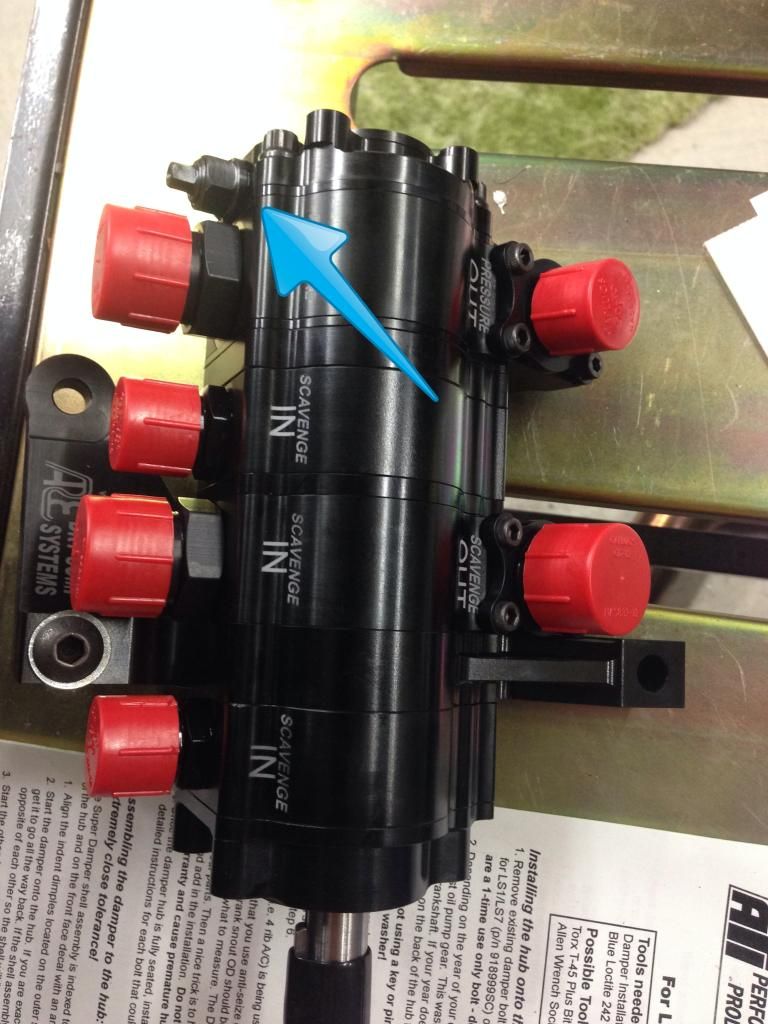
The pressure is adjusted using this nut and bolt.
On the GTM you will need to disconnect the pump from a the block because the adjustment on the ARE 4 stage pump is tucked into the motor mount.
All the lines remain connected so it's not a big deal. After stepping the pressure down two times I ran into a problem. Since I am screwing the adjuster out its getting longer.
The adjuster was hitting the motor mount. Oh man. An hour job just turned into a project.
Luckily believe it or not it's possible to get the motor mount out without even removing the headers. You just unbolt it from the block and frame and twist and turn it with the Pfadt lower section downward.
It took me a few minutes to get the right orientations but finally it came out. Almost like those metal ring puzzles when you get everything right they come apart easily.
After a few min with the carbide bit and die grinder I had cleared out a pocket for the adjustment screw.
Re installed everything and it all fit. Whew dodged a bullet.
I just need to adjust the toothed belt by moving the pump pulley 5/16ths of an inch back. That's when things went south.
XTF #2
build start date June 19 2023
GTM # 344
Build Start December 2010
First track day April 2013
After running the dry sump for two days at the track I saw that the front edge of the toothed belt was just barely touching the harmonic balancer. I could see some dust from the belt rubbing so clearly I needed to adjust the pulley back slightly so the belt would run without touching anything.
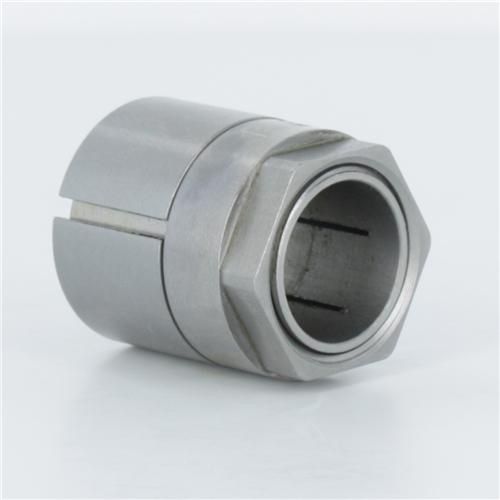
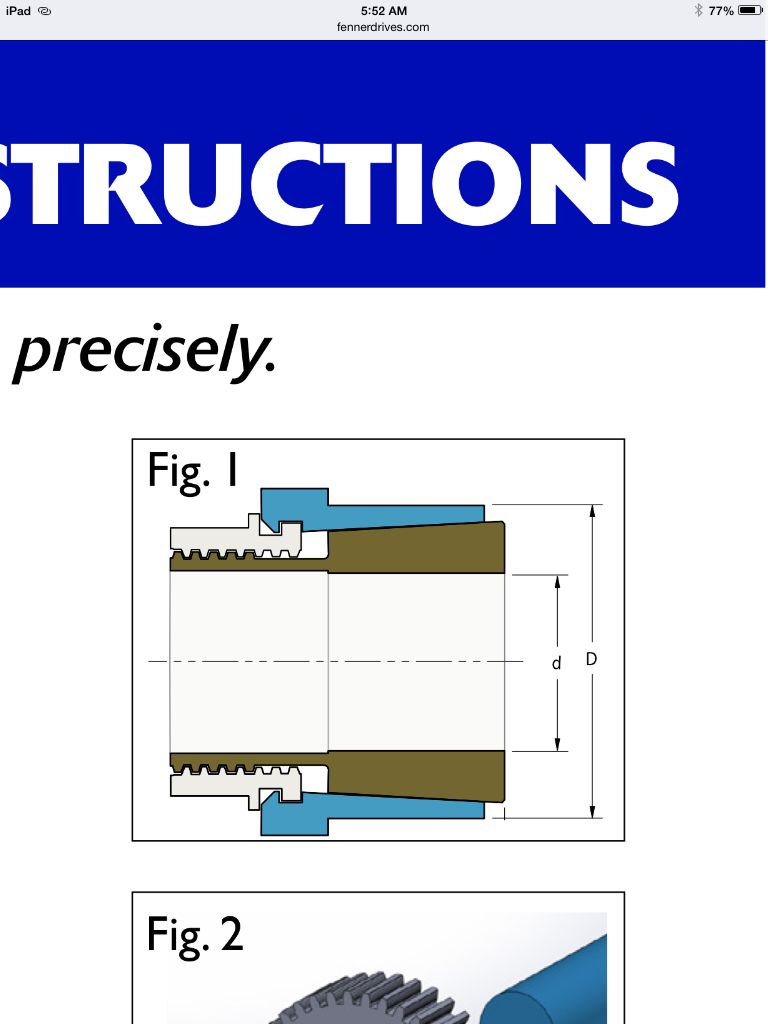
This job should take 30 seconds. ARE use a keyless drive bushing made by Fenner Drives.
It's very cool. It's basically an inner and outer set of wedges. When you torque down the nut the wedges expand and lock the drive pulley on to the pump.
Unfortunately I had never used one of these keyless locking bushings before. It seemed to me that I would need to make it very tight in order to keep it from slipping. I had not done the research and found the proper torque for the drive.
Later I asked Gary at ARE. He suggests 14 ft lbs Fenner drives says 585 inch lbs. shockingly very little torque on the nut results in a very tight grip on the shaft and pulley.
All over the Fenner instructions it warns that over torquing the keyless bushing could result in damage to the bushing. Use a torque wrench!
Well needless to say I made the nut too tight. Probably 75 ft lbs. Now the bushing was locked on. There is not any room to use a puller with the pump installed. The pump needs to come out. I actually needed to drain all the oil from the system. Remove the 6 connections to the oil pump which was a messy job. Then I needed to rig up a way to press off the bushing without damaging the pump or drive pulley. Luckily I was able to grab the bushing with a bearing splitter and press the bearing off the same way you press off a pinion bearing. Boy when that thing locks on its a very tight press fit.
A few hours later I had the whole thing back together. I placed a call to Gary at ARE and he had a new bushing at my house the next day. 5 min after I had the new part the bushing was installed and belt re aligned .
I fired up the motor. Oil pressure was great. 60 psi cold at idle just like it was with the internal pump.
Since it was Tuesday and I was leaving Thursday I was happy that finally everything was working as it should.
XTF #2
build start date June 19 2023
GTM # 344
Build Start December 2010
First track day April 2013
I use the same style wedge fitting, but it uses four small allen screws to keep everything together. Your setup looks like it is more compact, but the advantages of the ones I use are that I can safety wire the locking bolts, and there are four alternate holes that are used by the locking screws to "unlock" the wedge arrangement. Built in press assembly, if you will. They get VERY tight in that there is a loud POP when the wedge separates. The down side is that I have to modify the ARE/JRP belt drive pulleys to accommodate the wedge lock.
I can safety wire the locking bolts, and there are four alternate holes that are used by the locking screws to "unlock" the wedge arrangement. Built in press assembly, if you will. .
That's a good idea. I am going to use those set screws as well. It's always better to have a belt and suspenders.
After sorting out the dry sump I was finally able to run the GTM around the track without any worries.
One of my setup goals for this weekend was to sort out the front rear grip balance.
Saturday I started running the Hoosier slick setup. I have 5 heat cycles on the tires that I did not scrub and let sit for a few days to cure. I did not get the most life out of them that's for sure.
Last time out I was loosing rear traction sooner making right hand turns then making left hand turns. I figured I had just over heated the left rear tire but I was not able to get good tire temps to confirm that in fact I was over heating the tire.
To even out wear on the tires I had swapped the tires left to right. To my surprise the traction issue followed the tire. Now I had rear grip issues making left hand turns! I guess I must have killed the left rear when running the tires on a mostly right hand turn track In only 5 heat cycles. That was not expected!
I am running soft compound up front and hard compound in the rear. This setup works well as it allows me to get heat into the fronts while getting some more life out of the rears. That was the plan anyway.
One thing I learned was that I needed to take rear camber out of the car when running the 355 rear slicks. Otherwise the inside edges over heat.
Even with the grip problems the slicks were still 2 seconds faster then the r888. I left them on until the rear was so loose I was fighting for control most of the time. I enjoy driving a loose car until I push things too far.
I eventually spun out. Of course it was in a 90 mph little quick left right chicane where I was not expecting the rear to break loose. Since I am nearly full throttle both rear tires spun up immediately. The rear snapped out 35 degrees to the right. I caught it but the car snapped back left so hard I could not stop it. Now I was along for the ride. At least I got the clutch in and was able to lock the tires so I kept going in the general direction I was traveling before I started spinning. I came out of the spin pointing generally down the track and drove off the track down the pit in exit.
Unfortunately the belly of the car went sideways across one of the curbs and grass and it just hooked the fiberglass that goes under the door sill. I never bothered to rivet the body to the frame under the door because it stays put without fasteners. That is of course unless you hook a curb going sideways at 90 mph.
A little fiberglass repair is needed but no big deal.
I was lucky not to damage my rims as I went through the grass. I did pickup some souvenirs however .
I put the r888s back on and set the rear the rear anti roll bar to max from the softest setting I was running. With that change alone I cut my lap times by 1 second. I plan to add a stiffer rear anti roll bar over the winter. This mod really changes rear end feel especially when you are pulling +1g in corners.
john
XTF #2
build start date June 19 2023
GTM # 344
Build Start December 2010
First track day April 2013
All I'm going to say is that you are not alone in your tire observations. We have switched over to Yokohama slicks and couldn't be happier right now. Here is a video of Davy Jones running the PDG GTM at Sonoma on a previous tire that didn't work for us long term. Two seconds faster when the tires were new, but...
Those tires only had one 3 hour endurance race on them and you can see the difficulties he is having keeping the car under control. Working it hard. Since going to the Yokohamas it has been nothing but good things. Took us a few sessions to get the suspension setting correct, but our grip and tire wear is PHENOMINAL. Give Troy Simmons a call at Trackside Performance, 949-589-5394. Troy runs the North American Yokohama distribution facility, so you are dealing as direct with Yokohama as possible when you deal with him. I really think you will be happy you did. Tell him you are racing a GTM just like the Prototype Development Group GTM and he will send you exactly what we are running. We have been working with him and he also has our setup notes so either he or I can give you those. PM me if you would like the numbers.
Crash, thanks for the contact re the Yokohama tires. I will try them, the Bridgestone slicks and the Hoosier a6/r6 combo to see which work best and last the longest.
In addition to tires there are a few other upgrades I recommend.
Last trip to the track my buddy experienced rear bearing failure. This is a common thing on c5 corvettes that see lots of track duty. His c5 corvette has about 35k street miles and about 30 track days in the past 2 years.
When I upgraded everything from the c5, the bearings were one of the things I focused on.
One of the best things about the GTM and the C5 is its possible to get parts quickly even at the track on a Saturday.
After 4 hours of track time on Friday the bearing failed. I convinced my buddy we could fix it. We had the new bearing from Napa in an hour and swapped it in another hour.
If you plan to track your GTM bearing upgrades are a good idea.
XTF #2
build start date June 19 2023
GTM # 344
Build Start December 2010
First track day April 2013
Now that I can take the car out of commission for a few months I can dig into the projects that take more then two weekends.
I am at the point where I am happy with the mechanical grip in slow speed corners. I have tuned out the front push which makes the car much safer to drive on the street. Going too hot into a corner with a car that pushes is much easier to control but of corse not as fast on the track.
The next frontier is aero grip and drag reduction.
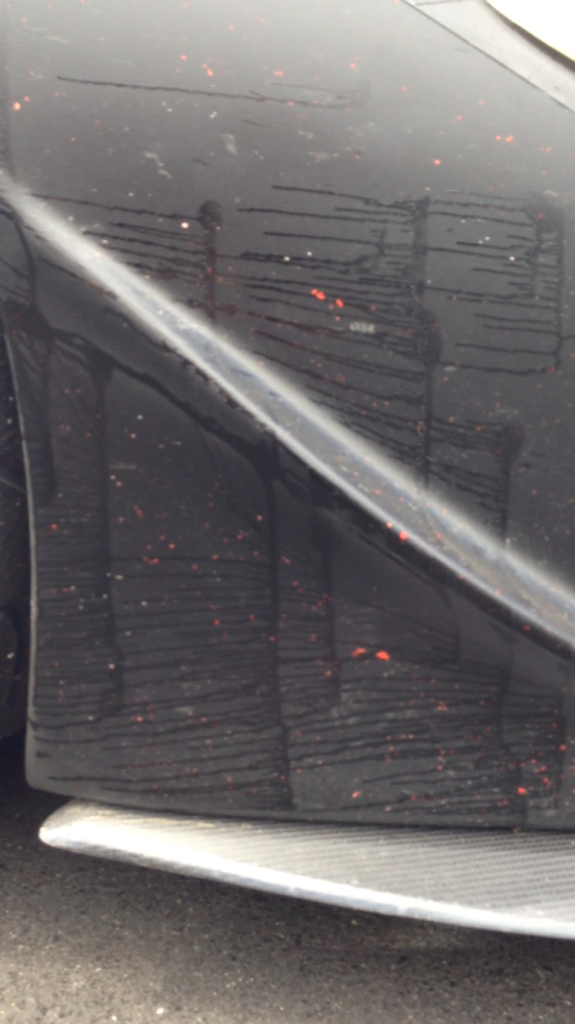
While I was on the track I did some aero testing. In F1 they use a product called flow vis. It's like paint and it travels along the body of the car with the airflow.
I use this fancy thing called motor oil. I think it works almost as well on a matte black car.
The first thing I am going to do is completely shroud the front of the tires. This is a drag reduction step for top speed runs as well as an effort to smooth airflow around the car. While I am working on this area I will apply canards to the nose of the car. As a baseline I got a view of the airflow in this area
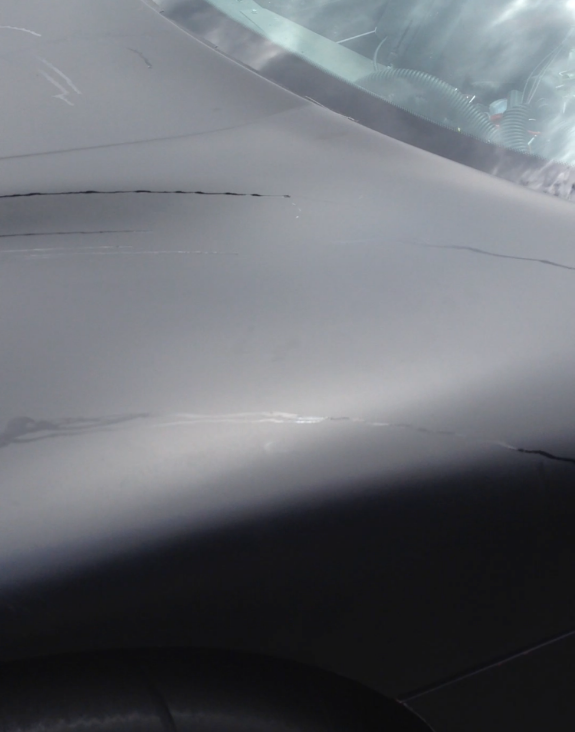
The next item will be wheel arch vents. I did not expect the air to move across the hood so far in front of the windshield.
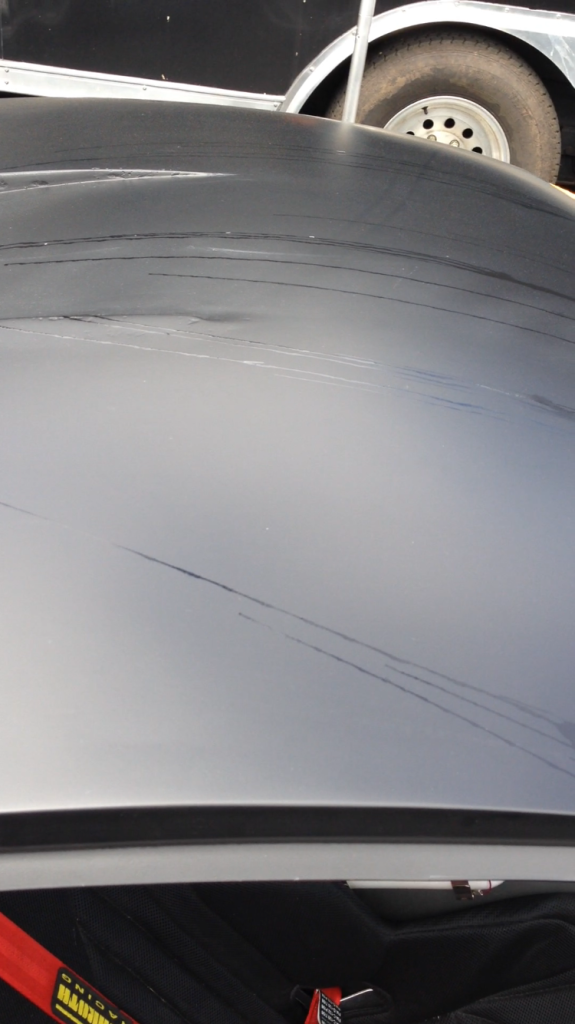
Also on the list is the roof scoop. again I was surprised that air was going across the roof instead of directly back.
I am going to checkout the race cars at SEMA if I can get any ideas before I start construction.
John
Last edited by kabacj; 11-03-2014 at 01:10 PM.
XTF #2
build start date June 19 2023
GTM # 344
Build Start December 2010
First track day April 2013
Not sure, but I met a guy over here that has a line on the rod ends, for the A-arms. He calls them a Johnny joint. Also he may make a replacement for the c5 a-arms, possibly in kit form.
Knowing you, you probably allready know about him. artmorrison.com
I saw he had a GT Sport patch on his bag and started a conversation with him. He lives over by me and never knew. He makes lots of cool stuff.
Does anyone know what the light colored material is on the bottom of the splitter?
John
John,
Phenolic cotton cloth laminated sheet.
Be very careful machining or cutting this product from a HSE view point. Basically treat it like fiberglass from a dust perspective but when I was machining it we had to be careful of the fumes released from the resin.
They may have changed the resin by now.
Great stuff for making gears etc so I am not surprised that it is being used as a wear strip.
Since my splitter took a heavy toll this season from both impact and abrasion. One goal will be to make it wear better, but also balance the ability for it to break away without destroying the front body work.
John
XTF #2
build start date June 19 2023
GTM # 344
Build Start December 2010
First track day April 2013
Not sure, but I met a guy over here that has a line on the rod ends, for the A-arms. He calls them a Johnny joint. Also he may make a replacement for the c5 a-arms, possibly in kit form.
Knowing you, you probably allready know about him. artmorrison.com
I saw he had a GT Sport patch on his bag and started a conversation with him. He lives over by me and never knew. He makes lots of cool stuff.
Hey Gene.
Unless I missed it Art Morrison does not have a direct application that would work for us using the c5 running gear. I am still looking for a solution at a reasonable price but it's starting to look like I'll just need to make my own. I am not looking forward to machining the three parts needed 16 times.
John
XTF #2
build start date June 19 2023
GTM # 344
Build Start December 2010
First track day April 2013


 Thanks:
  Likes:


Originally Posted by Presto51


 Reply With Quote


 So it was time to experiment. The tool for accelerating the air would be an exaggerated one-sided venturi starting where a splitter would attach, and an underbody panel extending back to the front axle line. The front ground clearance at the splitter is 8.75", and the angle that the venturi makes with the splitter is 20 degrees at the start, curving on a large radius down to 5" off the ground over the course of about 10". The venturi is 57" wide, and the underbody panel extends about 22" back at the 5" height, with appropriate cutouts for the tires. From all classical looks, the car should 'flip over backwards at speed with that air-catcher I built.'