-
08-21-2014, 06:02 AM
#121
Senior Member


Originally Posted by
rezell3d

Hello Edward, I just purchased my complete kit yesterday with a delivery date of 10/11/14. I hope you don't mind, but I want to duplicate your build. You are a true artist. I love everything that you did in your build. As a matter of fact, your post is one reason that push me over the edge and placing my order. I hope you don't mind, but I am your new pesty stalker. J/K. Thanks, Rod
Hey Rod. Thanks for the very kind words. But mostly congratulations on your kit purchase! You're in a for quite a journey. The possibilities are endless, and that's one of the things that makes it fun. Glad my build thread was helpful for you. The forums are a great resource to learn from other people's experience. Don't hesitate to ask, and post pictures. We love pictures. 
Build 1: Mk3 Roadster #5125. Sold 11/08/2014.
Build 2: Mk4 Roadster #7750. Sold 04/10/2017.
Build Thread
Build 3: Mk4 Roadster 20th Anniversary #8674. Sold 09/07/2020.
Build Thread and
Video.
Build 4: Gen 3 Type 65 Coupe #59. Gen 3 Coyote. Legal 03/04/2020.
Build Thread and
Video
Build 5: 35 Hot Rod Truck #138. LS3 and 4L65E auto. Rcvd 01/05/2021. Legal 04/20/2023.
Build Thread. Sold 11/9/2023.
-
Post Thanks / Like - 1 Thanks, 0 Likes
-
08-21-2014, 04:15 PM
#122
Yeah Ed, I can't wait to start taking pictures. You know the really cool thing about it this time is that I will be taking pictures of MY Cobra.
-
08-21-2014, 07:36 PM
#123
Senior Member

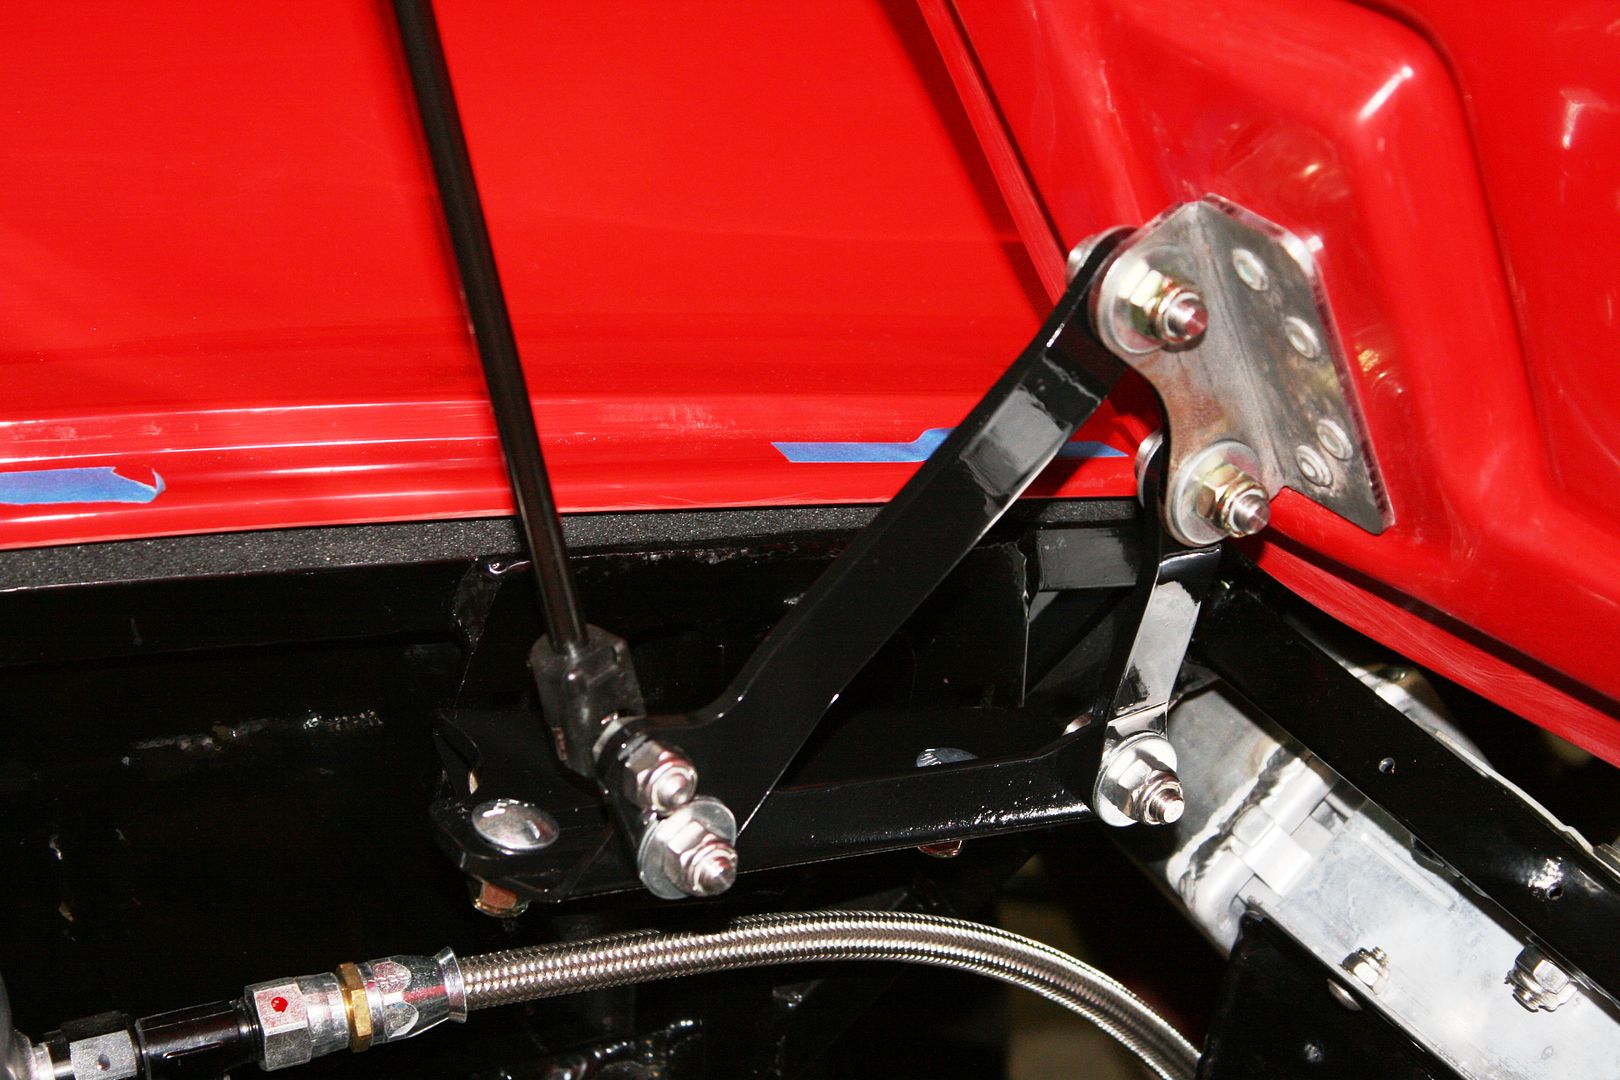
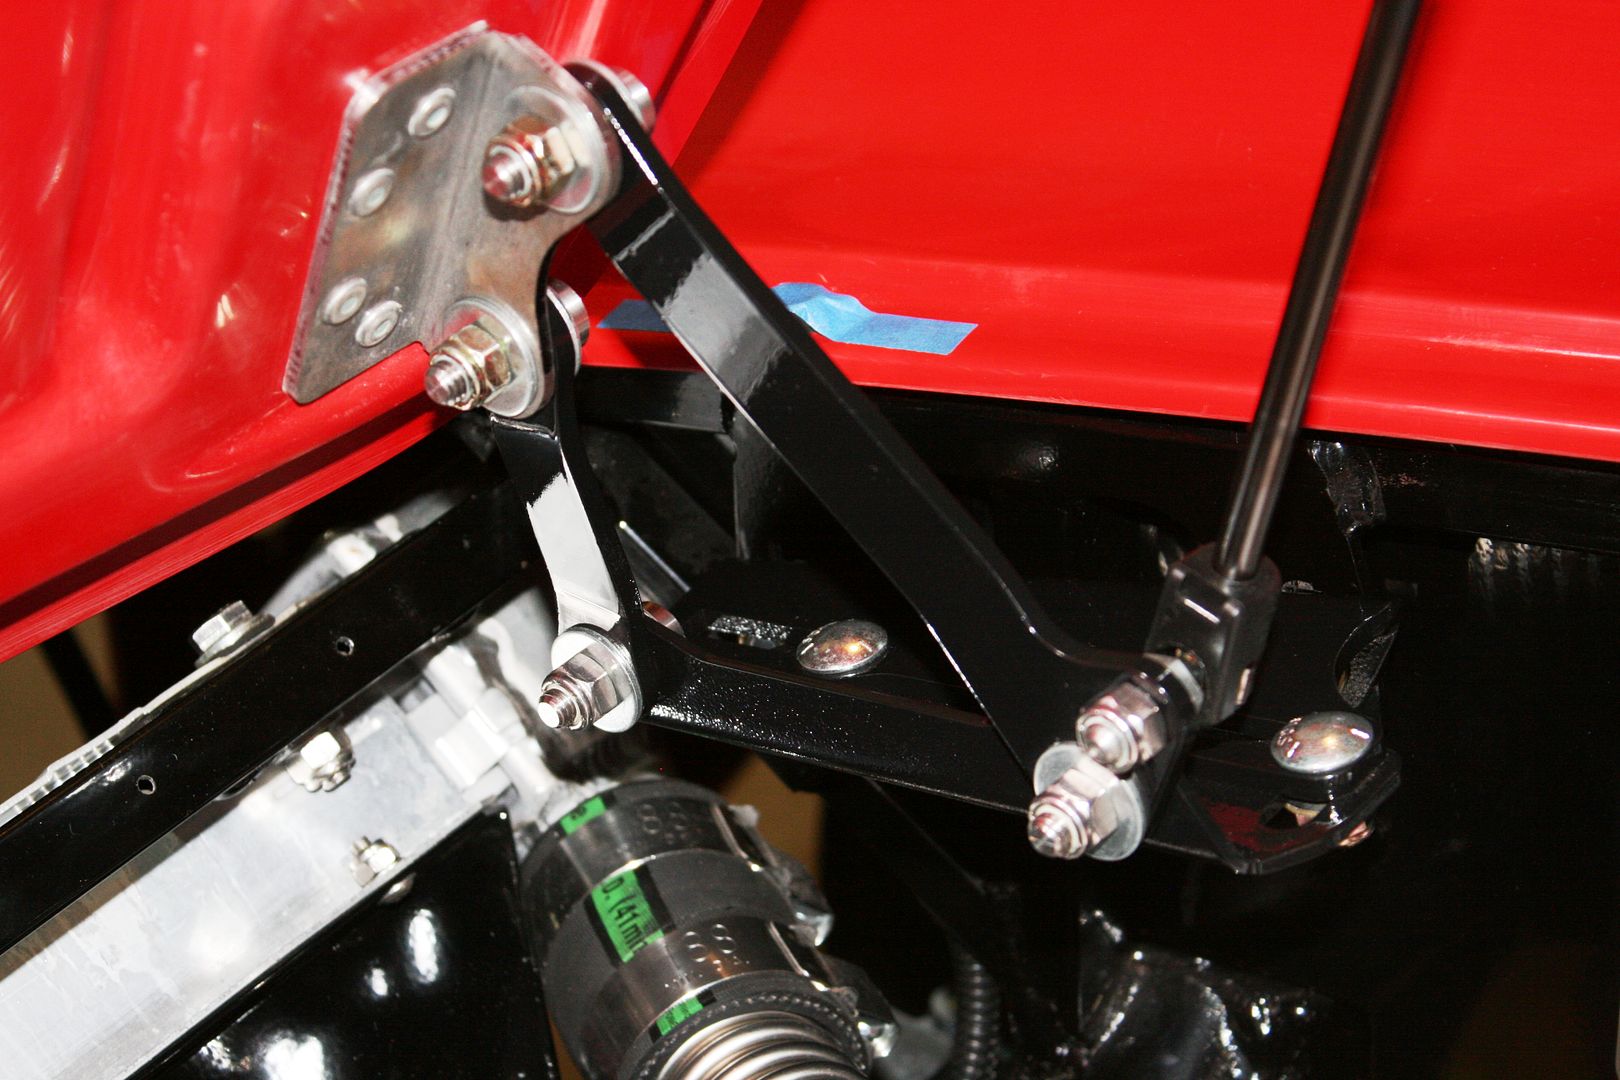
Hi Paul.... how much trouble was it mounting the bracket for the strut with the in-board breeze roll bar leg pretty much in the way??
-
08-21-2014, 09:10 PM
#124
Senior Member
Originally Posted by
fordboy
Hi Paul.... how much trouble was it mounting the bracket for the strut with the in-board breeze roll bar leg pretty much in the way??
I assume you mean the brackets for the trunk lid gas struts that attach up near the rear cockpit wall by the shoulder strap holes? If so, I mounted them before putting the body on while everything was open and accessible. So they were installed and ready for use with the body on now fitting the trunk lid. Looking up in there now, agreed it would be a bit of a pain with the roll bar in place. But the Breeze roll bar isn't any more of an obstacle than a stock FFR one would be.
Build 1: Mk3 Roadster #5125. Sold 11/08/2014.
Build 2: Mk4 Roadster #7750. Sold 04/10/2017.
Build Thread
Build 3: Mk4 Roadster 20th Anniversary #8674. Sold 09/07/2020.
Build Thread and
Video.
Build 4: Gen 3 Type 65 Coupe #59. Gen 3 Coyote. Legal 03/04/2020.
Build Thread and
Video
Build 5: 35 Hot Rod Truck #138. LS3 and 4L65E auto. Rcvd 01/05/2021. Legal 04/20/2023.
Build Thread. Sold 11/9/2023.
-
08-29-2014, 02:44 PM
#125
Senior Member
Labor Day Weekend Updates
Continue to make my way through all the details getting ready for paint.
Final gaps and mounting of hood and trunk lid, including Breeze gasket material: Spent quite a bit of time getting the gaps around the hood and trunk lid to my liking. Then put a break on the edges. Im satisfied with how it turned out. Initial alignment is certainly improved over the Mk3. I installed trunk weatherstrip trim from Breeze. This is similar to the stuff FFR supplies, but made to better fit over the ¼ inch body thickness. I used D shaped stick-on seal on my Mk3. This looks more finished IMO, and keeps me from dinging up the painted edge of the opening like Ive done several times on the Mk3. I left the little cap/cover off the trunk latch bolt, and then fit the ends of the weatherstrip around the bare head and SS tube. Turned out well and almost looks continuous.
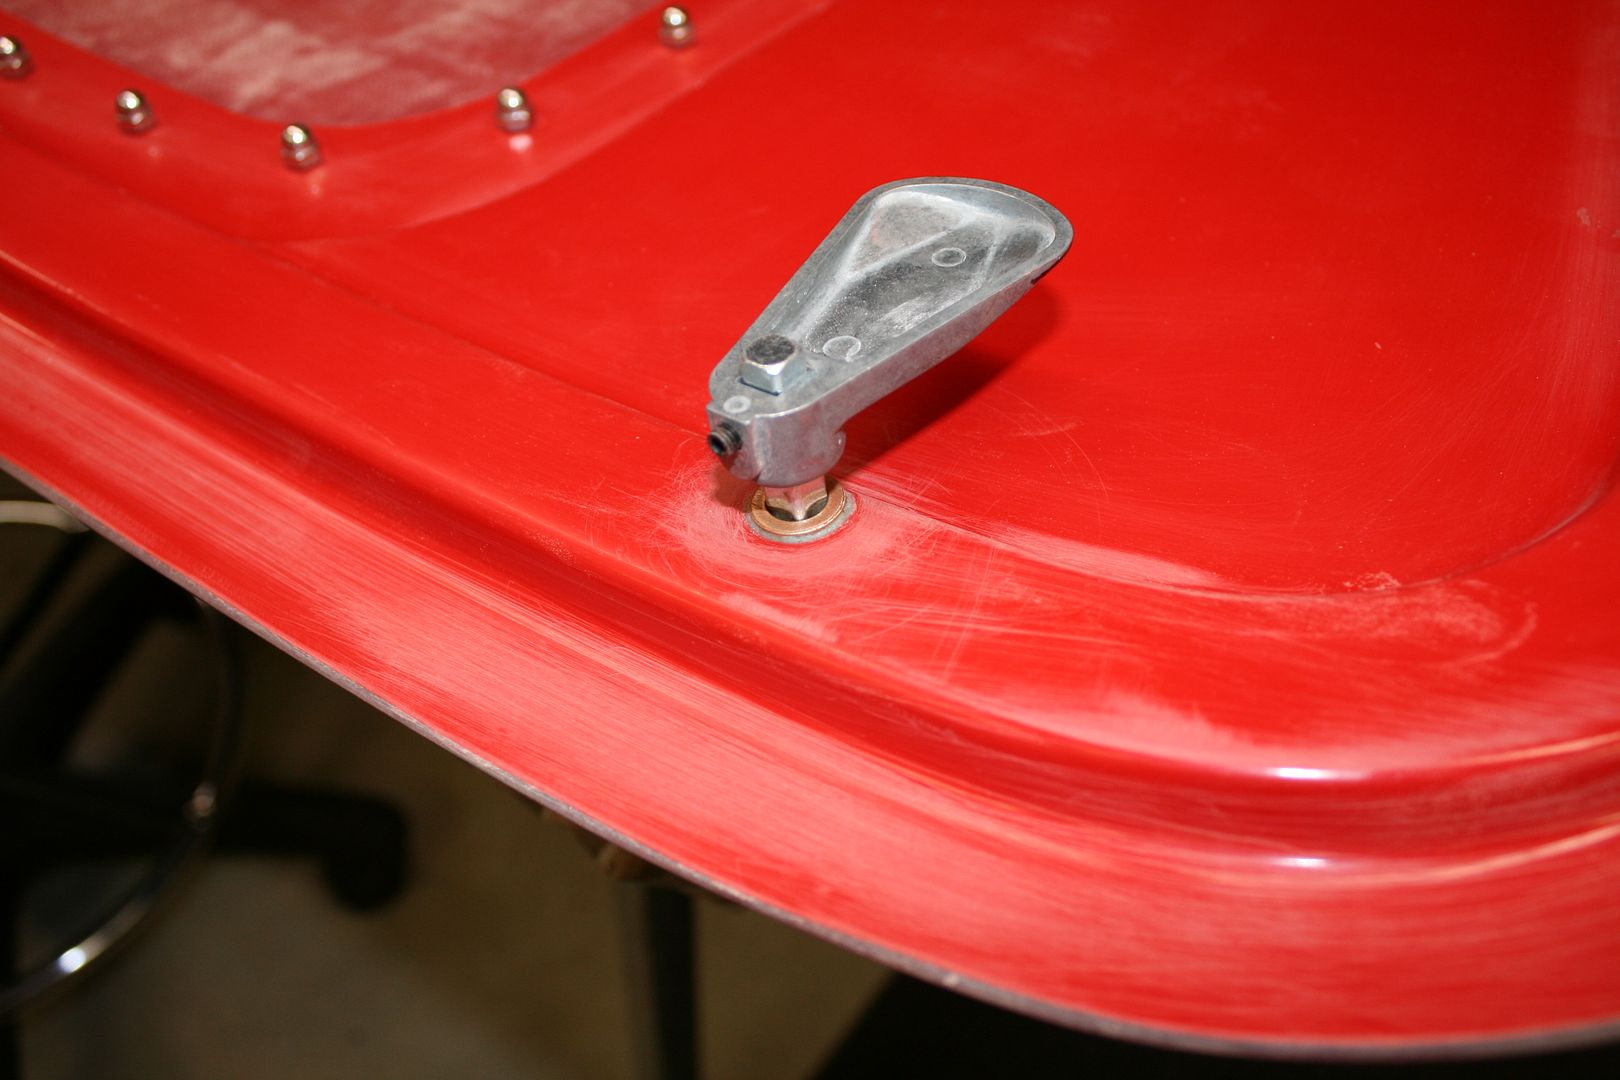
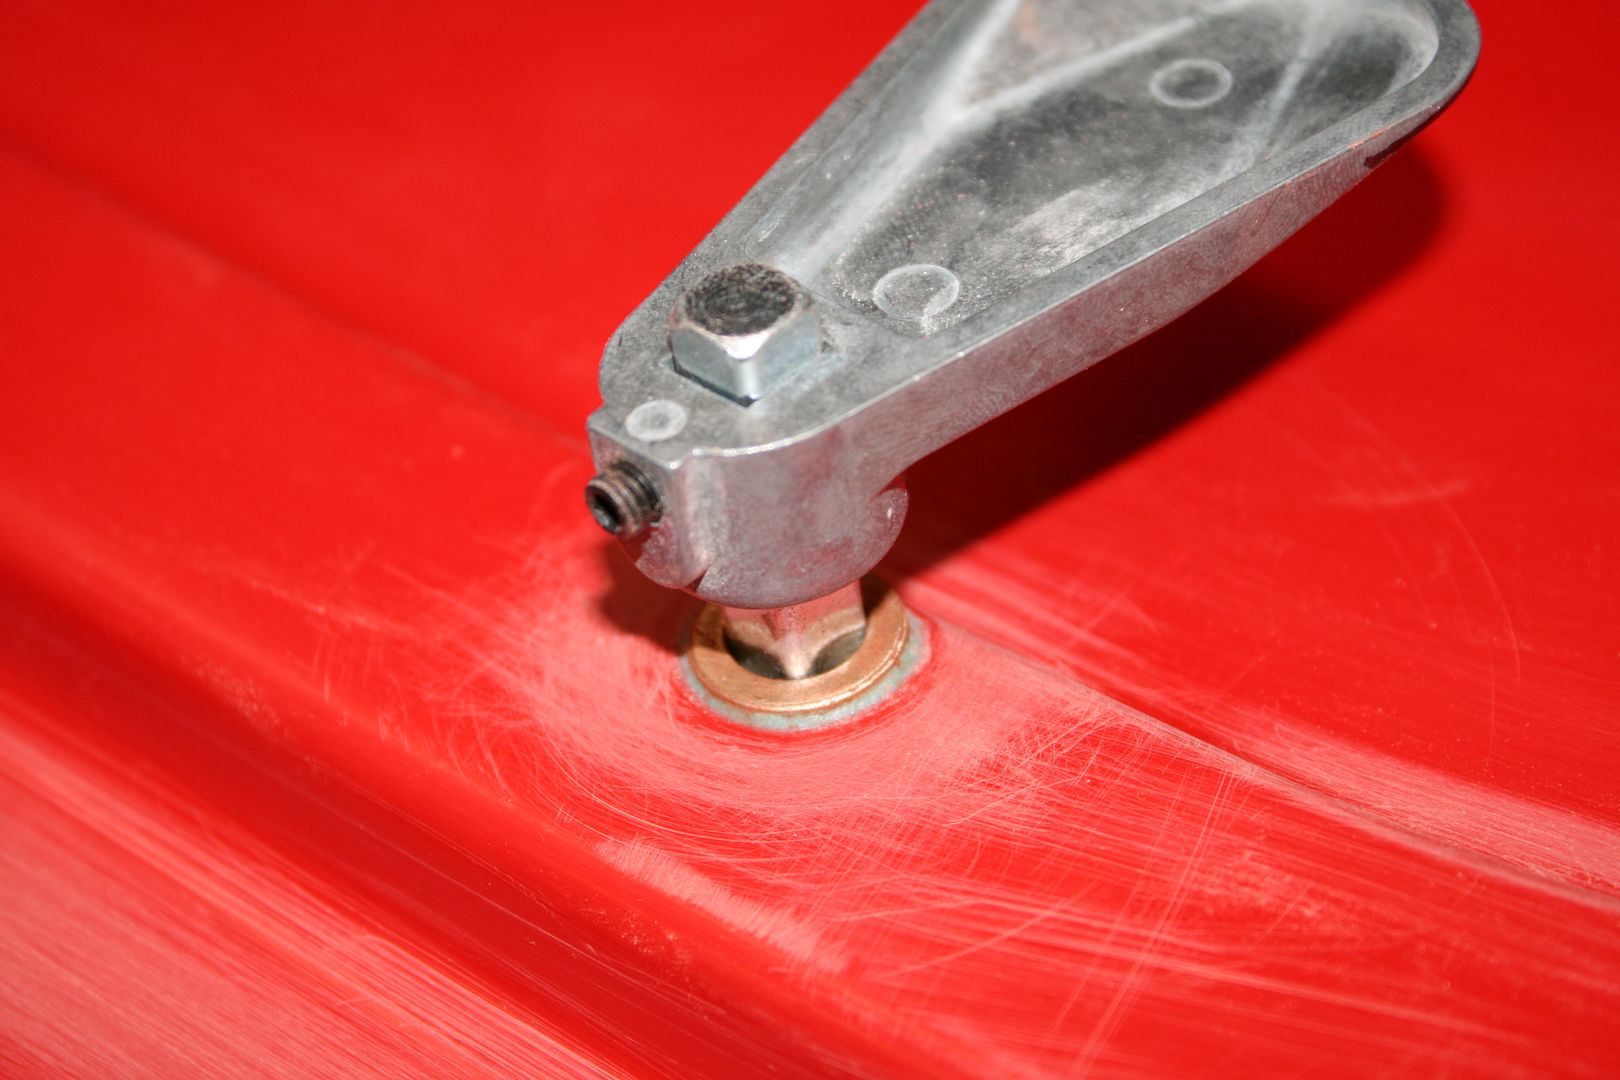
Trunk handle: Installed the trunk handle and latching mechanism. Had to move the handle down slightly and the bolt/tube catch in the body up slightly to get the trunk handle to latch properly. But turned out well. I was happy the predrilled hole for the handle was almost exactly in the center of the trunk lid. Wasnt the case with my Mk3.
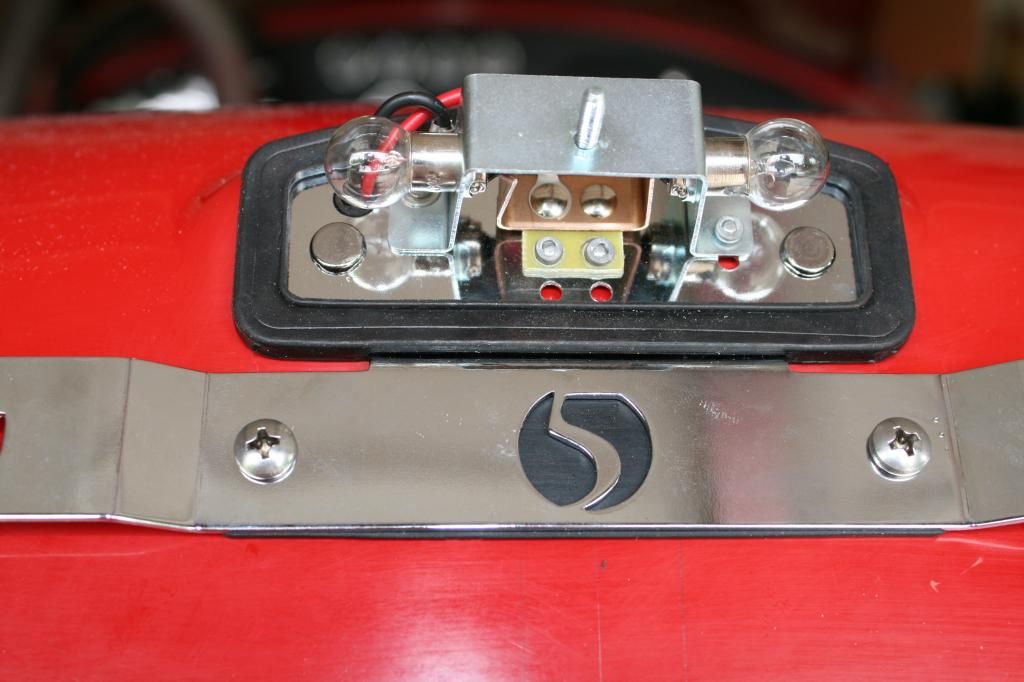
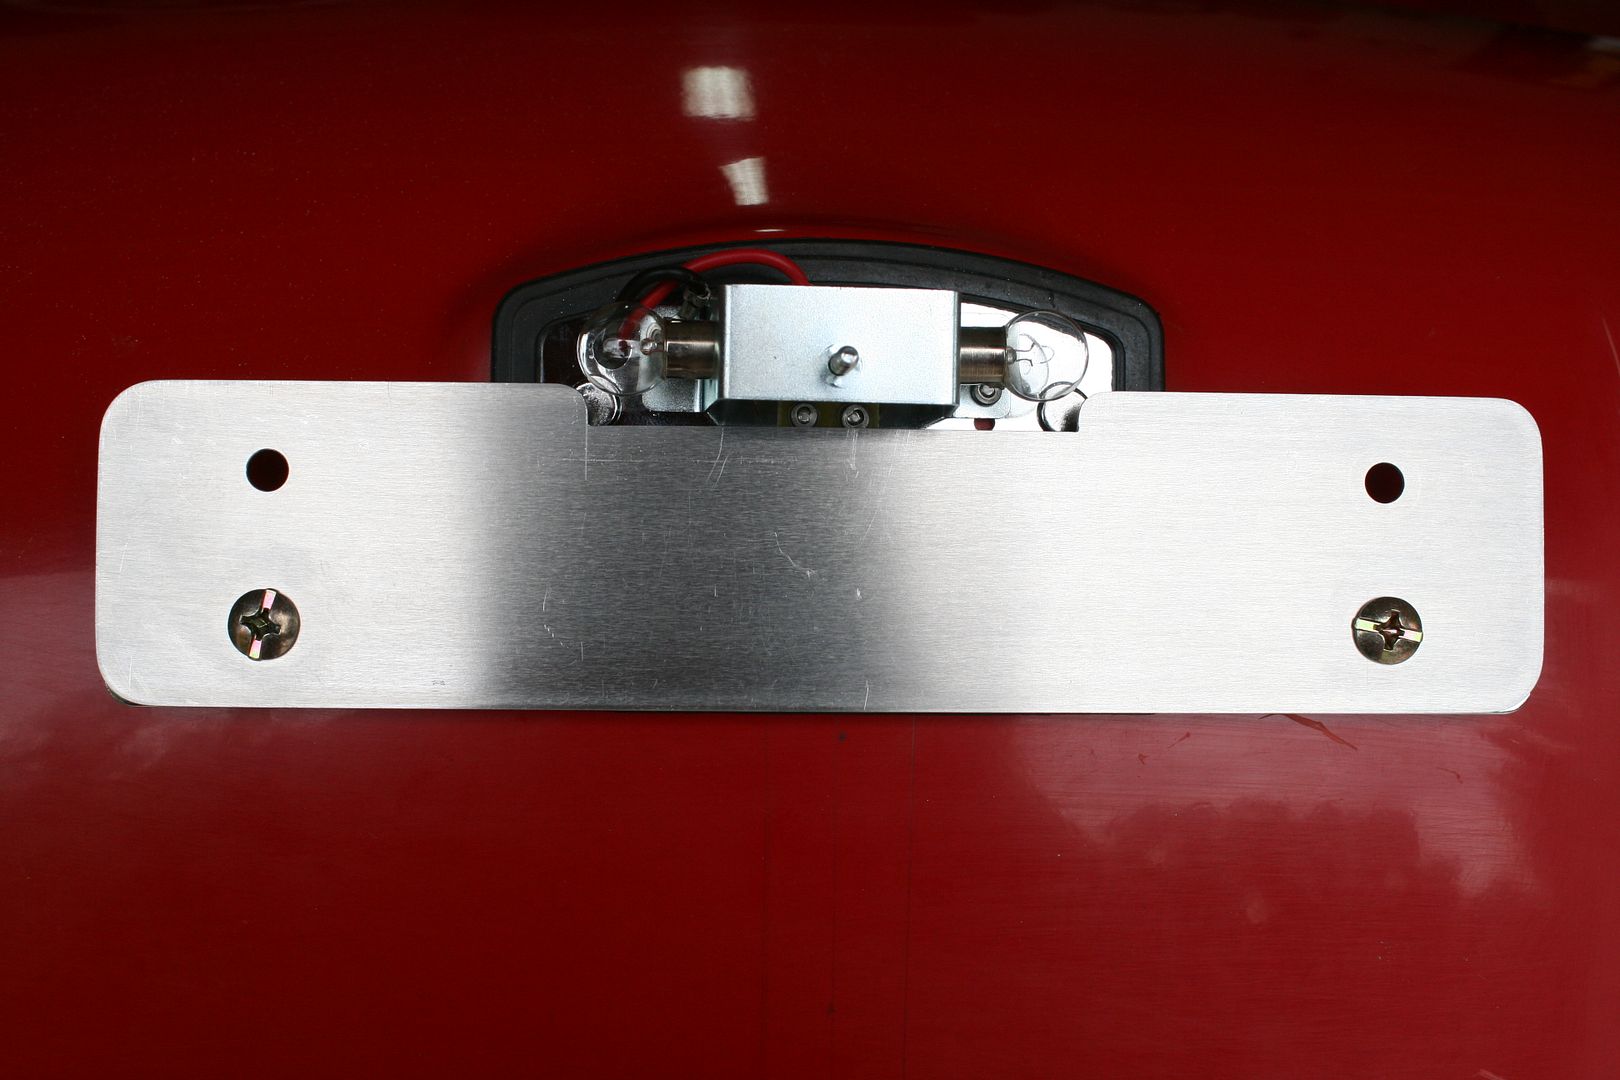
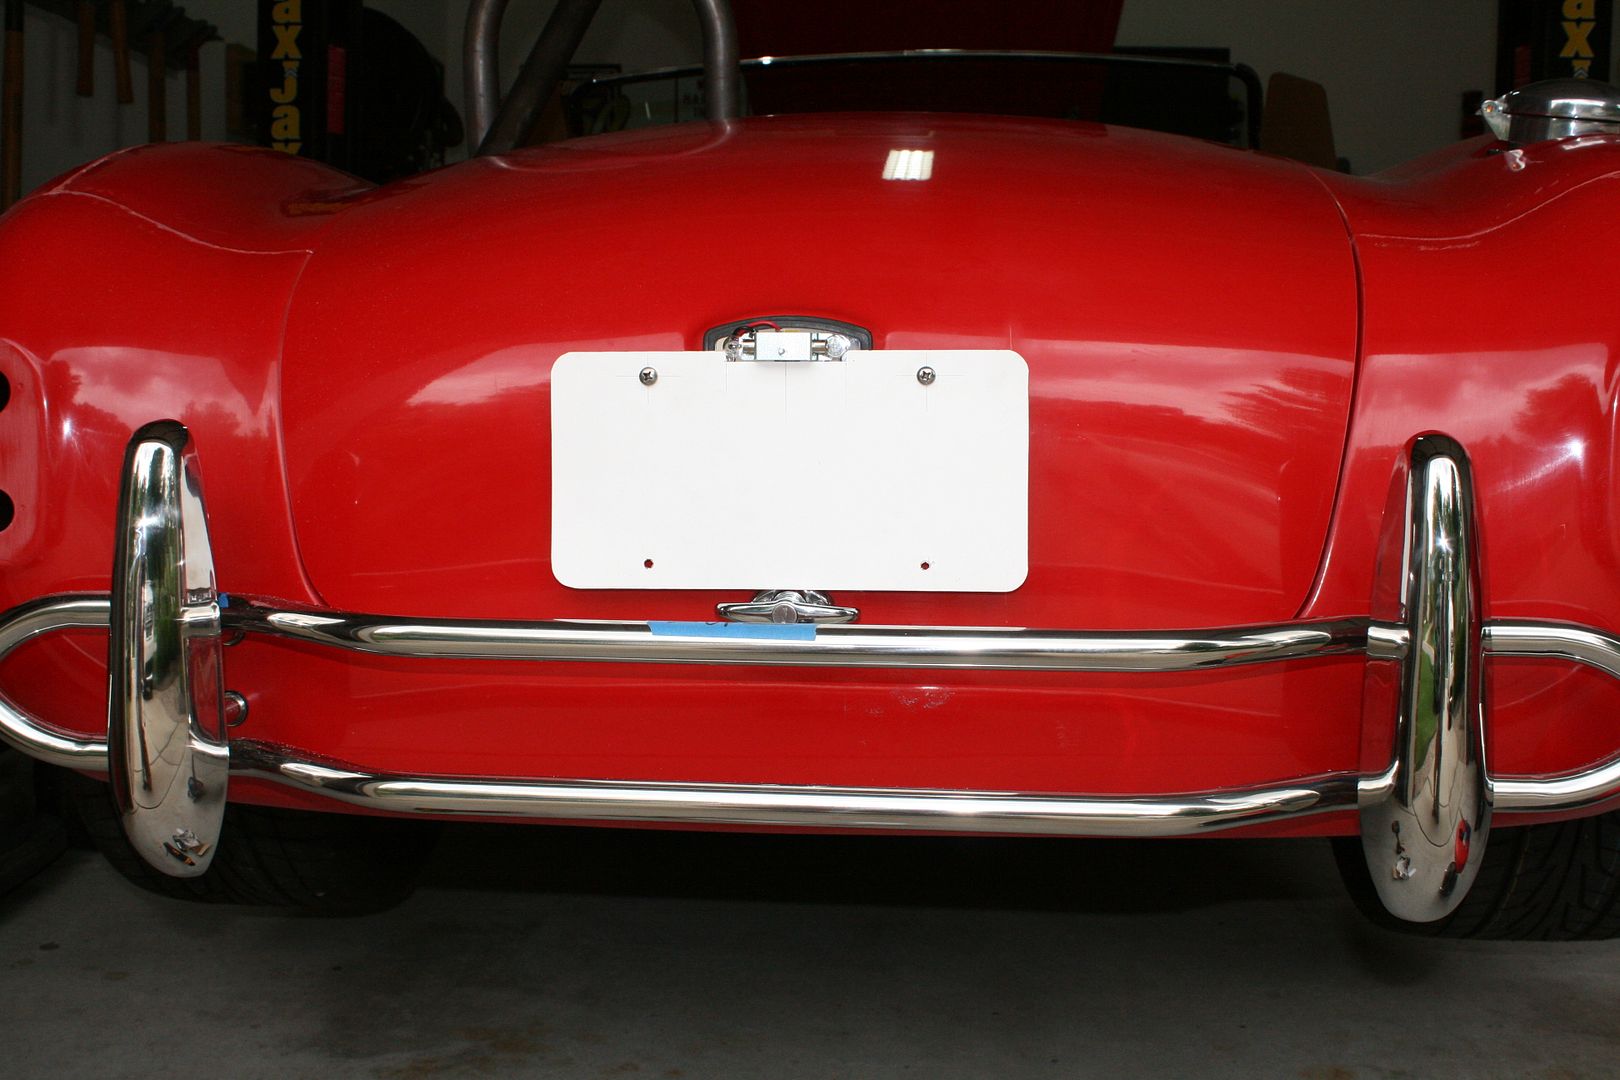
License plate bracket and light: Investigated all the ways guys have solved the license plate fit issue with the Mk4. Really like the Billet Specialties frame around the license plate on my Mk3. But clearly that was never going to happen on the Mk4. I had a lighted Billet Specialties frame donated to me by another forum and club member. Saw a post where this was used. It could work, but best I could tell only by not using the FFR provided light, cover, bracket, etc. Its such a traditional look that I didnt want to go that way. When all was said and done, executed the famous Kleiner solution and modified the light fixture and slotted the clear plastic so the plate fits up inside the light. Jeff describes this as a 20 minute solution. Yea right. Not this slow poke. Spent an evening and part of a Saturday on it. Looks like its going to work fine. I may have to still trim the plate just slightly. But only in the area inside the light fixture, so it wont be visible. I dont know how aggressive MI is about not modifying plates. But I should be fine. One downside to this solution is that the whole thing has to be disassembled to change a bulb, e.g. first the plate, then the bracket, then the cover. I thought about finding an LED light setup for the inside since they should last longer and maybe never have to be taken apart. But gave up without really trying too hard. The incandescent bulbs will be fine. I really dont drive at night all that often. The only minor issue I saw was that the pad/bump on the trunk lid for the light fixture is slightly off center. I cheated as high and slightly off-center as I could. May need to cheat the stripes slightly so its not obvious. The Mk3 had the same issue. Probably a little worse actually. And its pretty visible if you look. But I dont and no ones ever said anything.
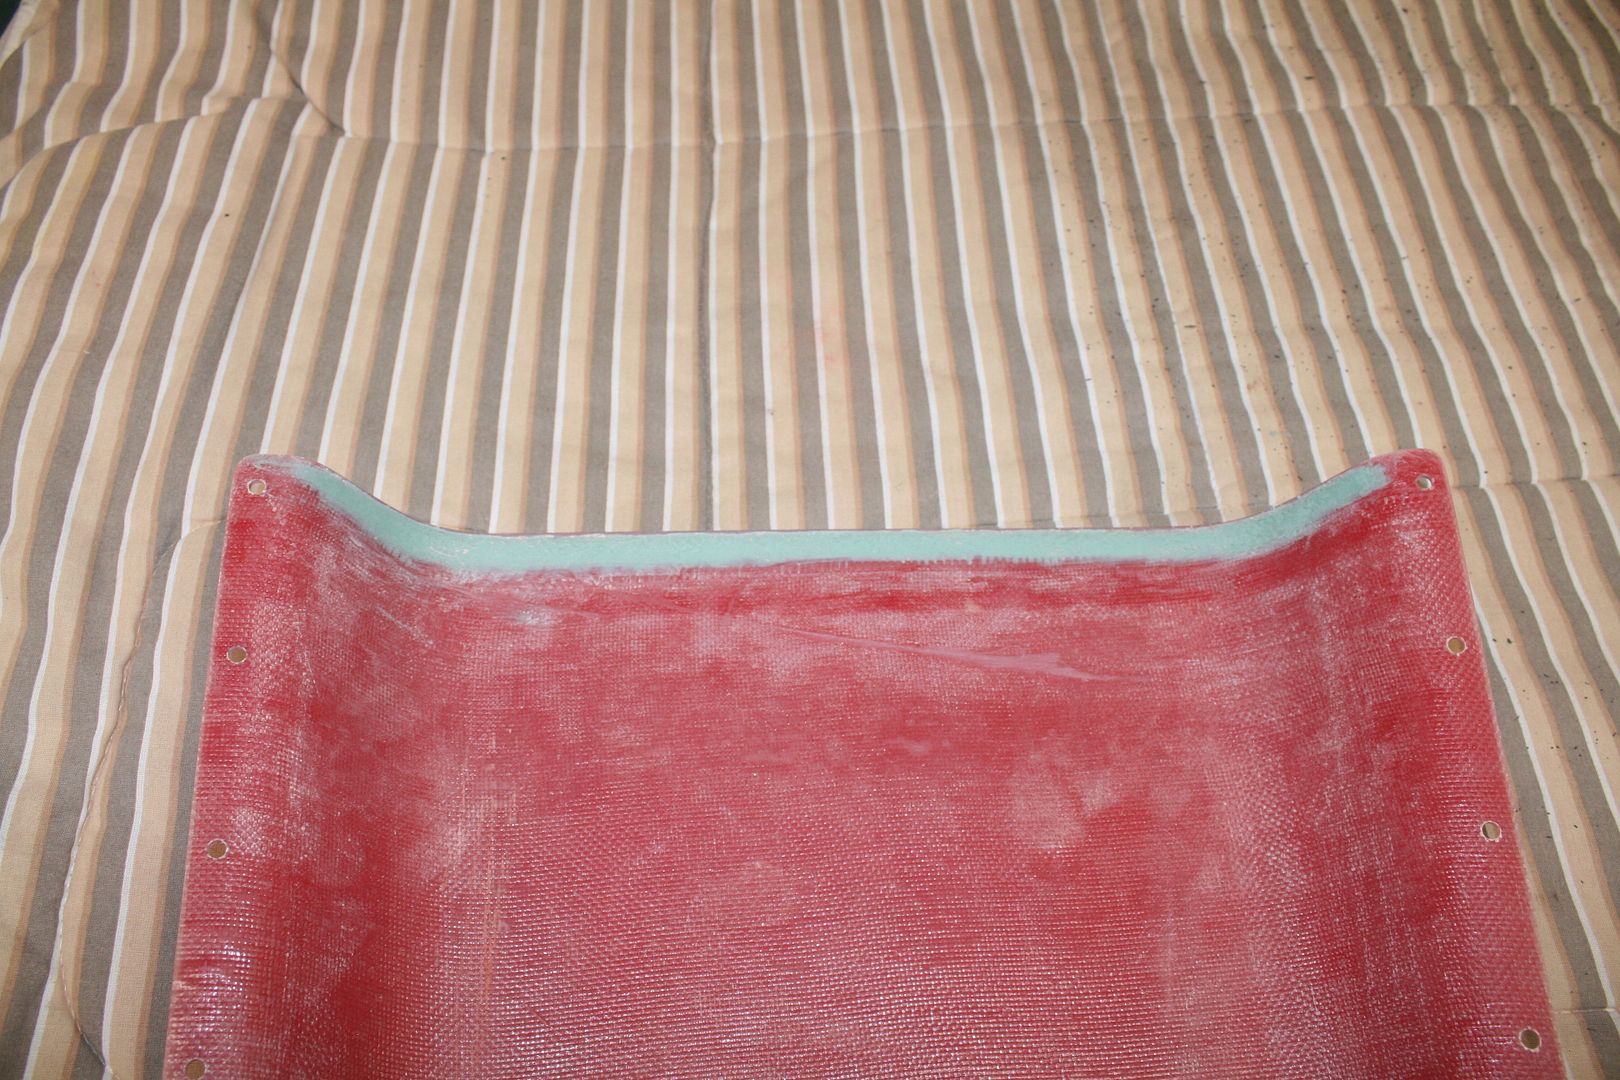
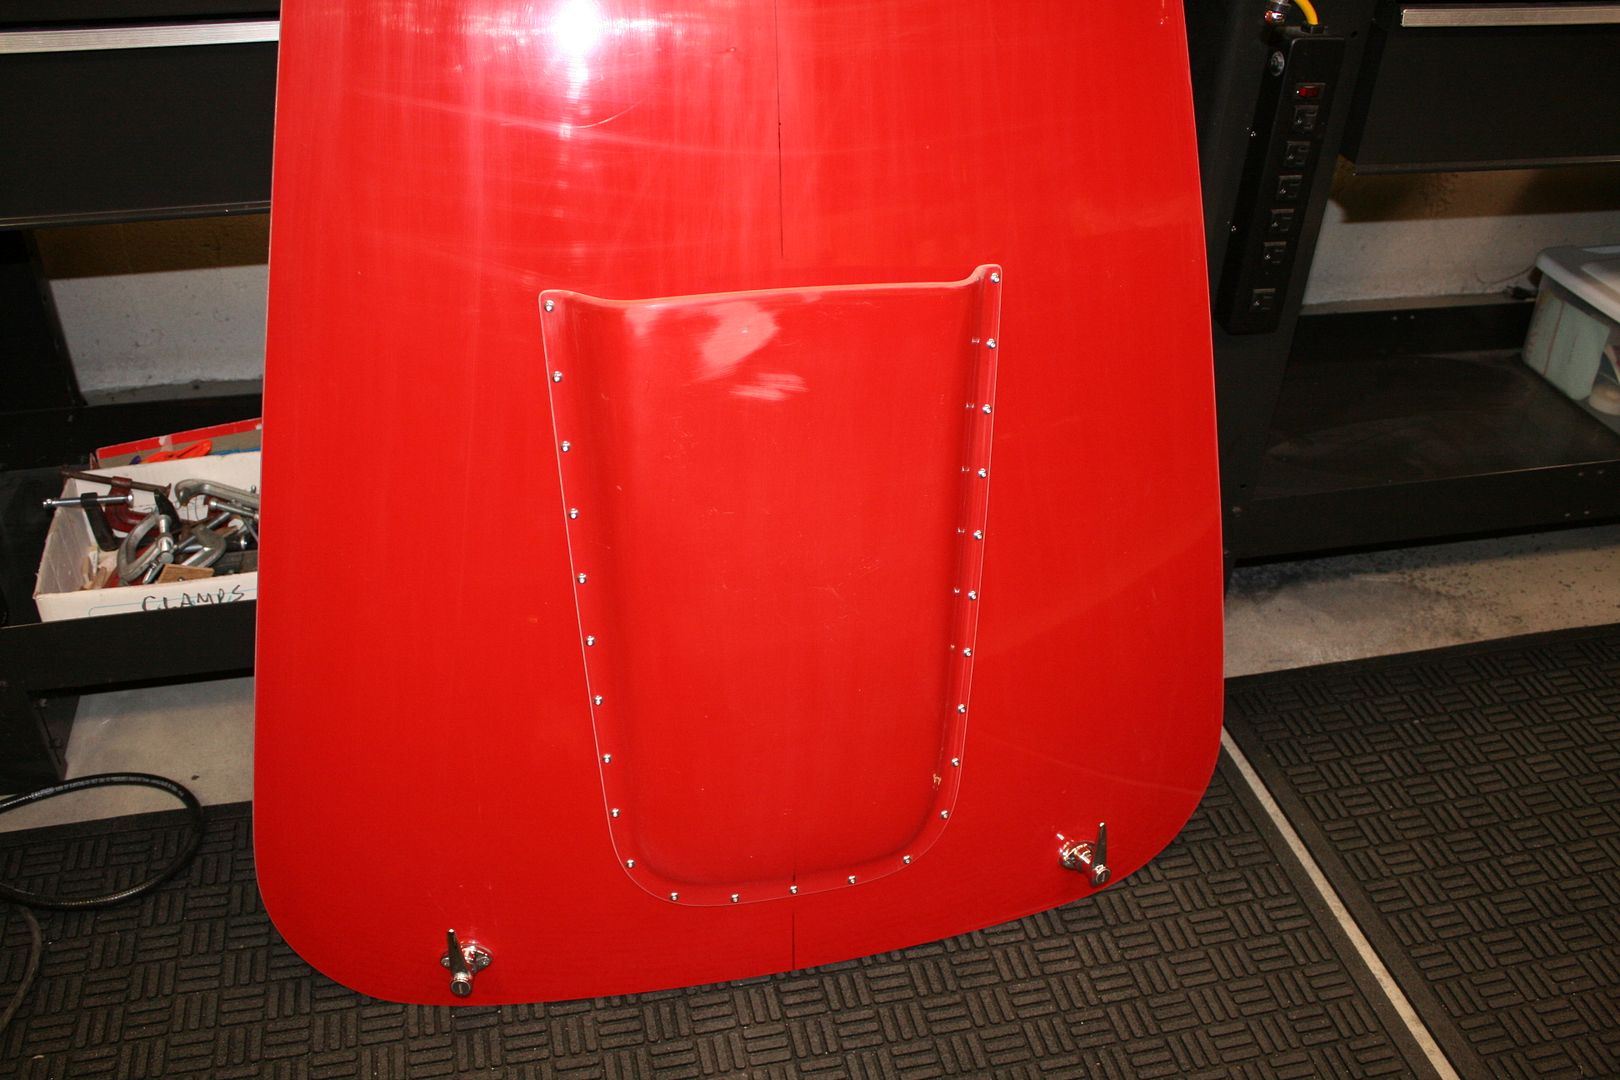
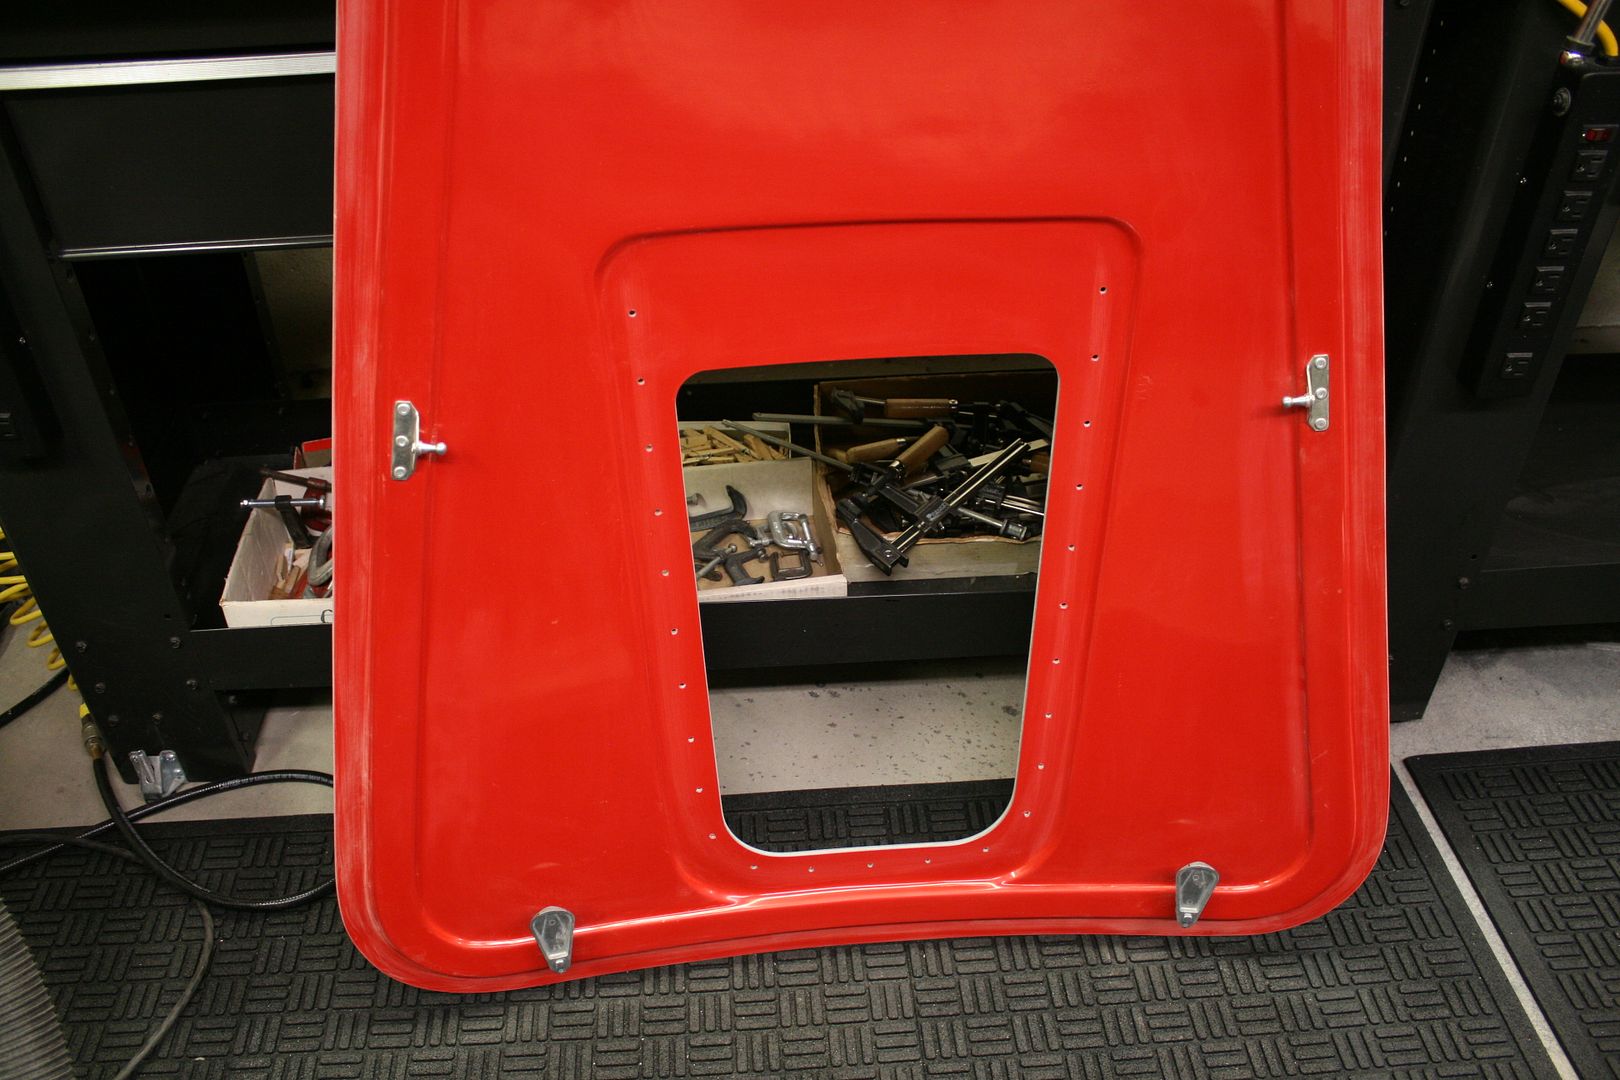
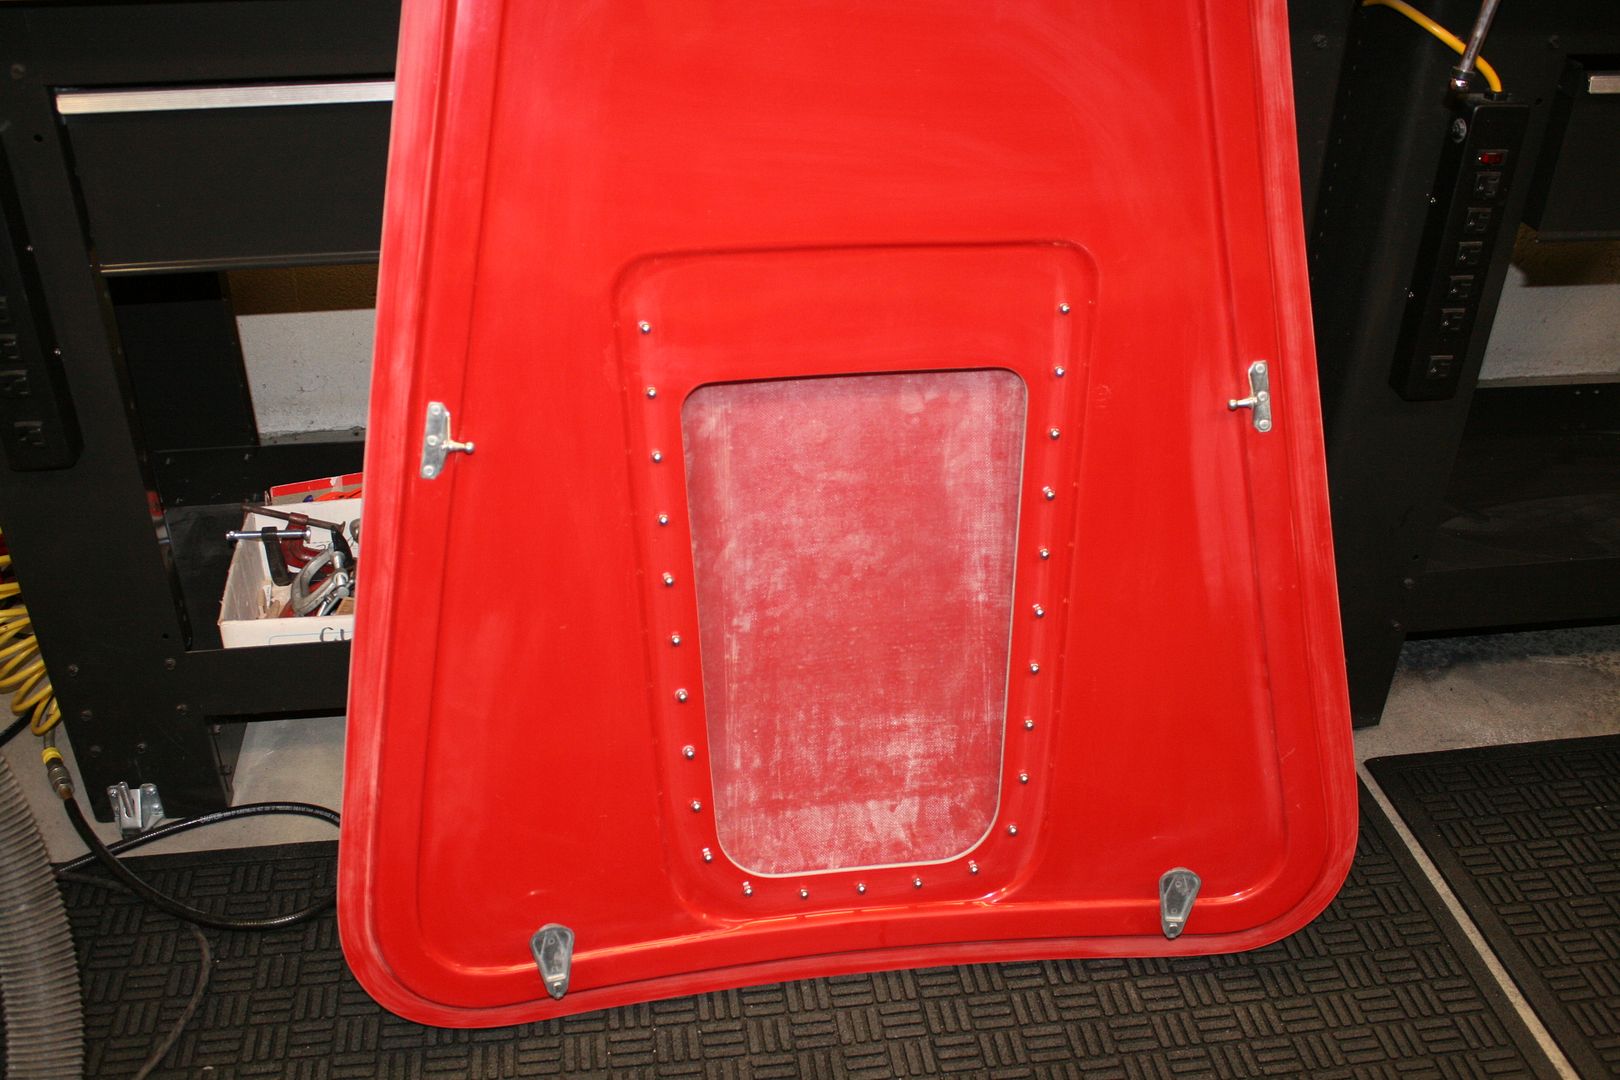
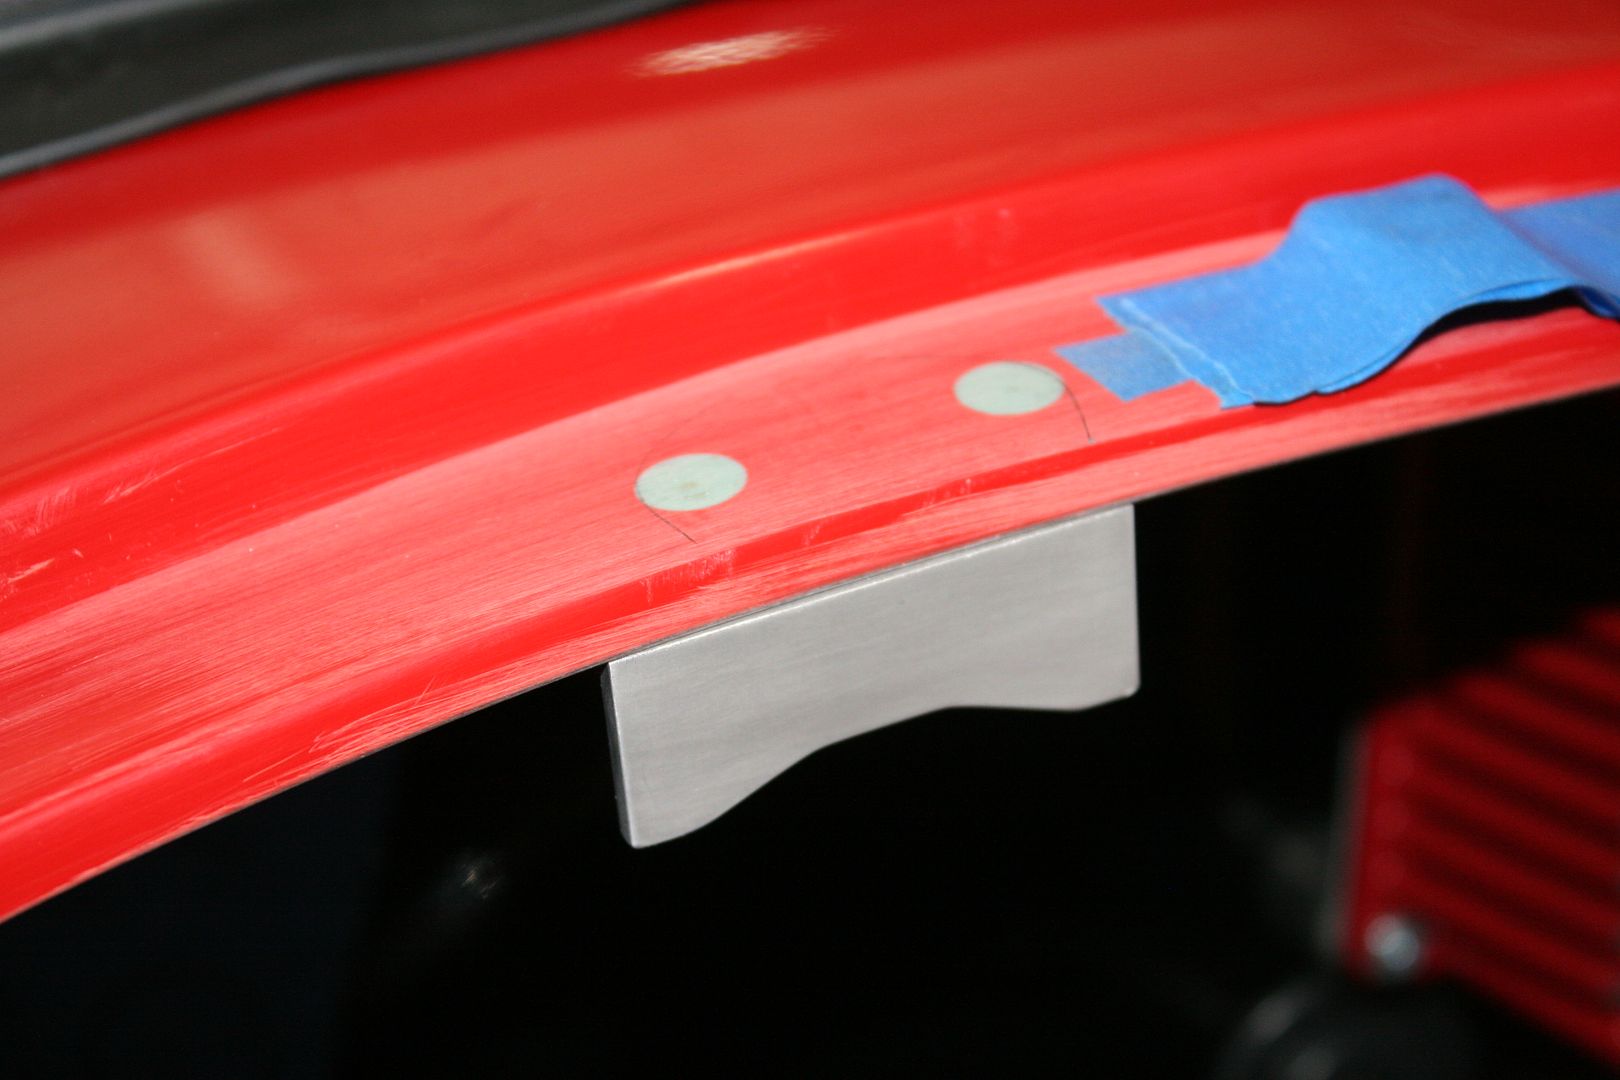
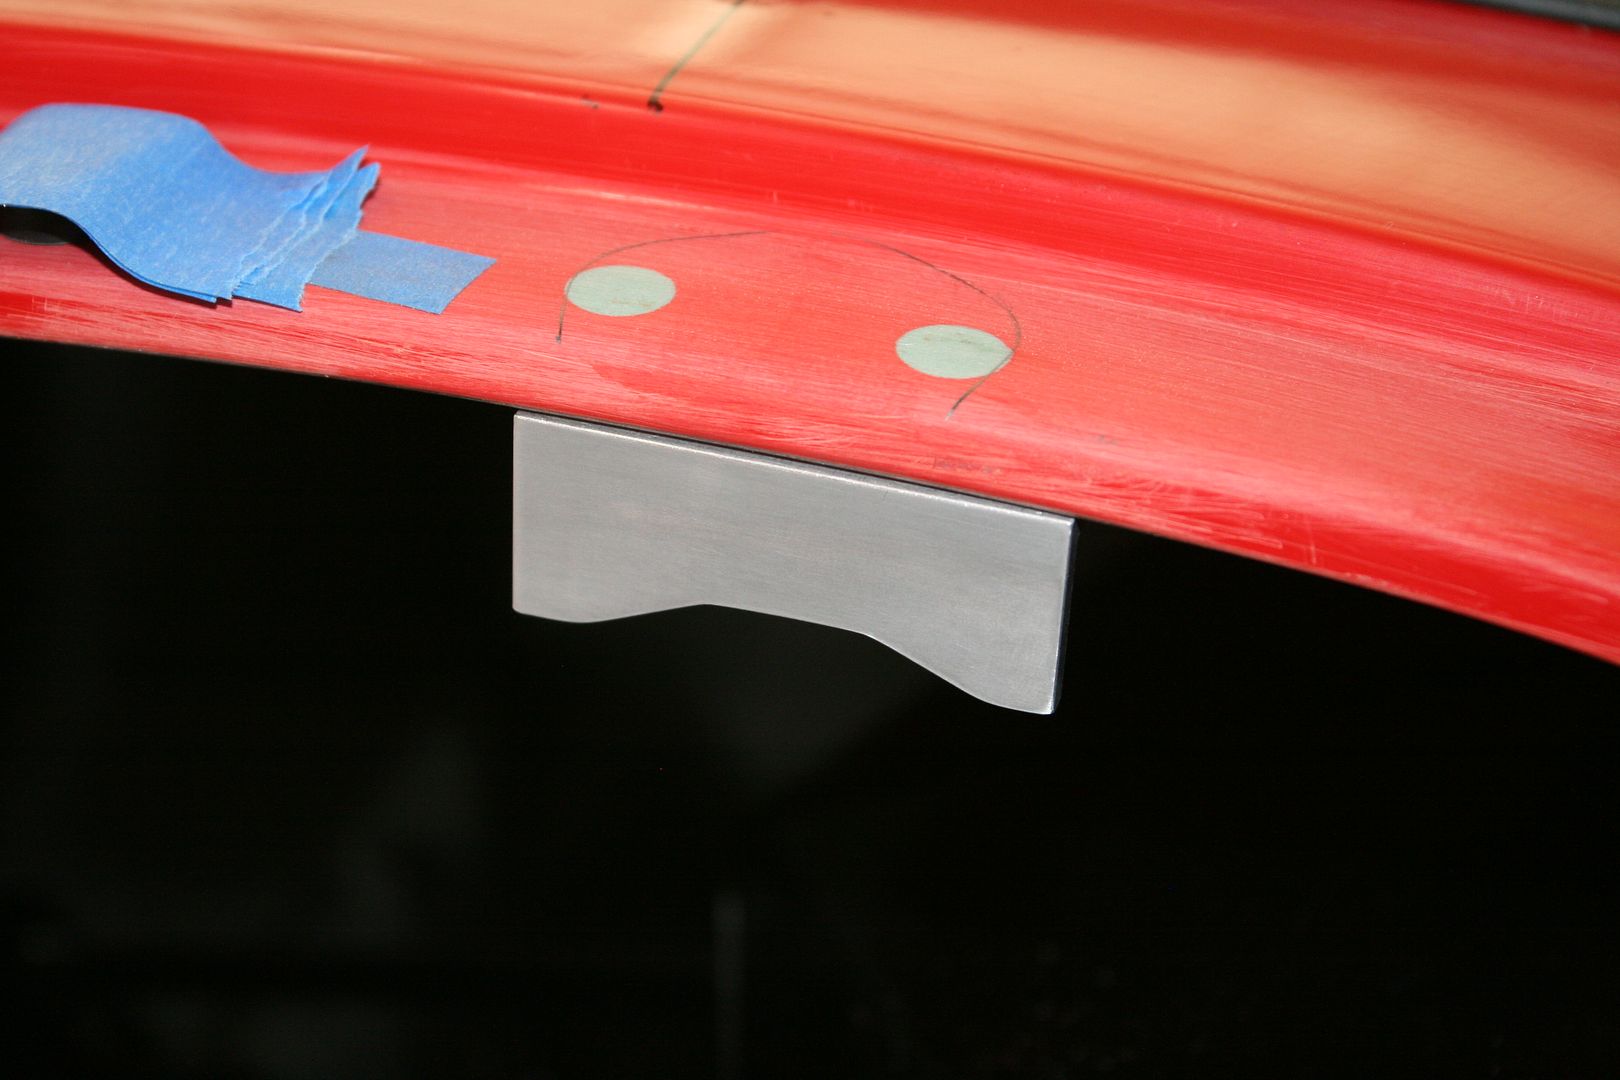
Trunk access cover: Made up a cover for the access hole in the trunk lid. Just a simple piece of .040 aluminum cut and then formed over an exposed sewer pipe in my basement. (I have all the high tech tools.) I bonded some 10-32 nut plates on the inside of the lid with HSRF. Was going to use nutserts, but decided against them in the fiberglass. With the cover and screws in place the nut plates arent going anywhere. Will have the cover painted along with everything else.

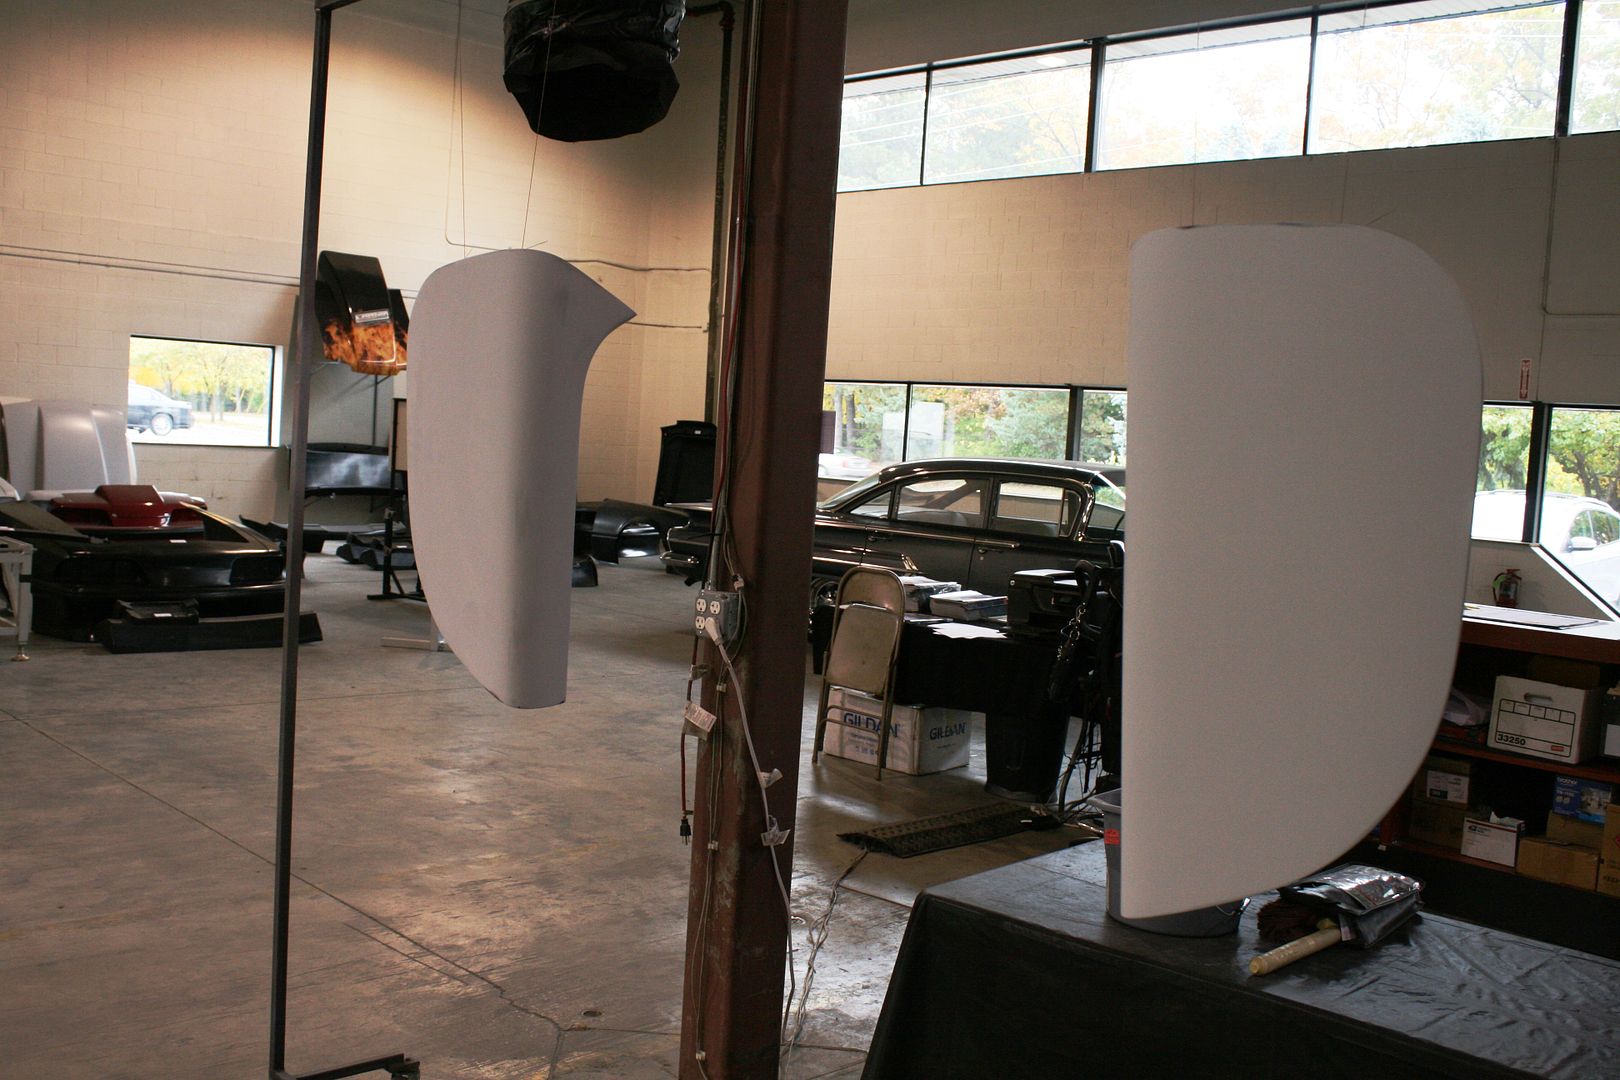
Hood handles: Installed the hood handles the same as I did on my Mk3. Carefully located the handles and cut access holes through. Then I bonded 10-32 nut plates under the top fiberglass layer across the slots where the mounting screws are located. This seems to work pretty well, and is clean on the underside. I spaced the handles back from the edge so that if I accidentally dont turn the paddles away from the hood opening while closing it doesnt hit the exposed part of the body. This hasnt happened yet, but I can just see myself doing that. Still would hit the lip and need to be touched up or patched, but better than the exposed body itself. This does make the square tube slightly off-center underneath. But Im OK with that. Another small touch I added to this build was to make the through hole underneath more finished. Some guys use a grommet and thats a good solution. I decided to take it a step further and used a bronze bushing instead. Adjusted 3/8 inch ID bushings to just fit over the square shaft. Then enlarged the hole so they slid down the shaft and into the hood. Once all fitted, buttered up the bushings with some HSRF and pushed into place. They bonded in perfect alignment with the square tubes. Makes a nice clean finished hole and will look good painted over, plus gives some real support to the shaft end of the hood handles. Im surprised how much more substantial they fell when you turn and pull on them. No longer just the strength of the handle itself, but cantilevered at the other end. (OK I know this is a really trivial kind of thing, but stuff I enjoy doing even though likely not required.)
Build 1: Mk3 Roadster #5125. Sold 11/08/2014.
Build 2: Mk4 Roadster #7750. Sold 04/10/2017.
Build Thread
Build 3: Mk4 Roadster 20th Anniversary #8674. Sold 09/07/2020.
Build Thread and
Video.
Build 4: Gen 3 Type 65 Coupe #59. Gen 3 Coyote. Legal 03/04/2020.
Build Thread and
Video
Build 5: 35 Hot Rod Truck #138. LS3 and 4L65E auto. Rcvd 01/05/2021. Legal 04/20/2023.
Build Thread. Sold 11/9/2023.
-
08-29-2014, 02:45 PM
#126
Senior Member
Labor Day Weekend Updates Continued
Hood scoop: Interesting to see the differences of opinion about the bolt-on hood scoop. When I was building my Mk3, I saw where some guys cut off the scoop and installed a bolt-on scoop. Mainly for authenticity I guess. Also it was a common mod to add a filler to the hood at the front edge of the scoop opening. Now with the Mk4, I see guys complaining about the bolt-on hood scoop and going to some length to bond and blend them in. Guess can’t make everyone happy all the time. I’m OK with the bolt-on scoop, and like the detail and added authenticity. My Mk4 is a couple years old, and still had the fiberglass scoop. First order of business was to trim it down and lay out/drill the mounting holes. Like many, I found it to be not exactly symmetrical. But split the differences around and it’s not noticeable. I trimmed back the front opening edge, then created a filet of HSRF behind it, and put a nice clean edge and roll on the opening. Turned out OK. Moving to the hood, I was very surprised to see the FFR instructions were to cut the hole in the hood first, then mount the scoop. My woodworking days of “measure twice and cut once” would never allow that sequence. (Plus I was given a hint by another builder not to do it that way.) I spent quite a bit of time laying out the center of the hood while on the body. Then positioned the scoop exactly on the center line. I also paid a lot of attention to where the stripes would be, and kept the front corners of the scoop inside those lines. Then carefully made all the holes starting with center back, each side front, then back and forth splitting the difference each time. When done, it laid down perfectly right on center. Then flipped the hood over and determined where the hole should be based on the bolt locations. Was pretty close to what FFR recommended in the instructions. But the radius on the back was more than they pictured. Tested cutting out the hole with a sabre saw as instructed. But even though all new and sharp, couldn’t find a blade that wasn’t chipping the gel coat a bit as I cut. So ended up cutting it out with a Dremel and cut-off wheel and a shop vac behind to keep the dust down. Cleaned up the opening with a drum sander in my hand drill and sanding blocks. Then pushed some HSRF into the gap between the inner and outer shells. Very happy with how it turned out.
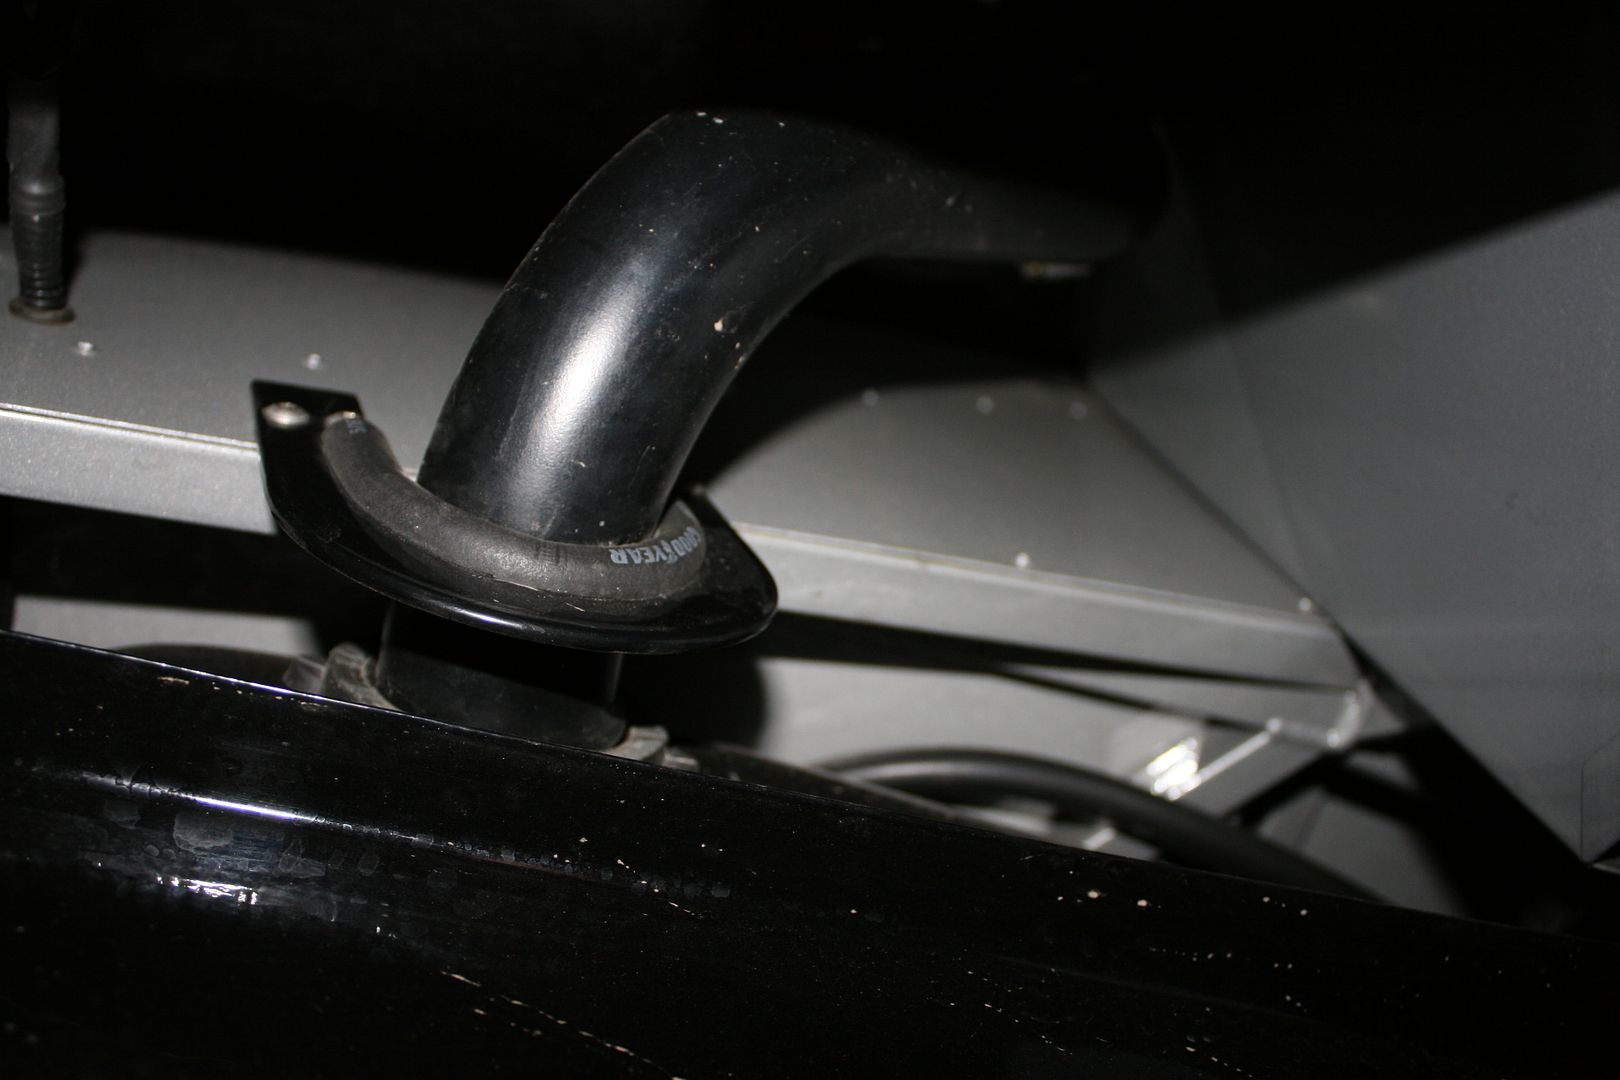
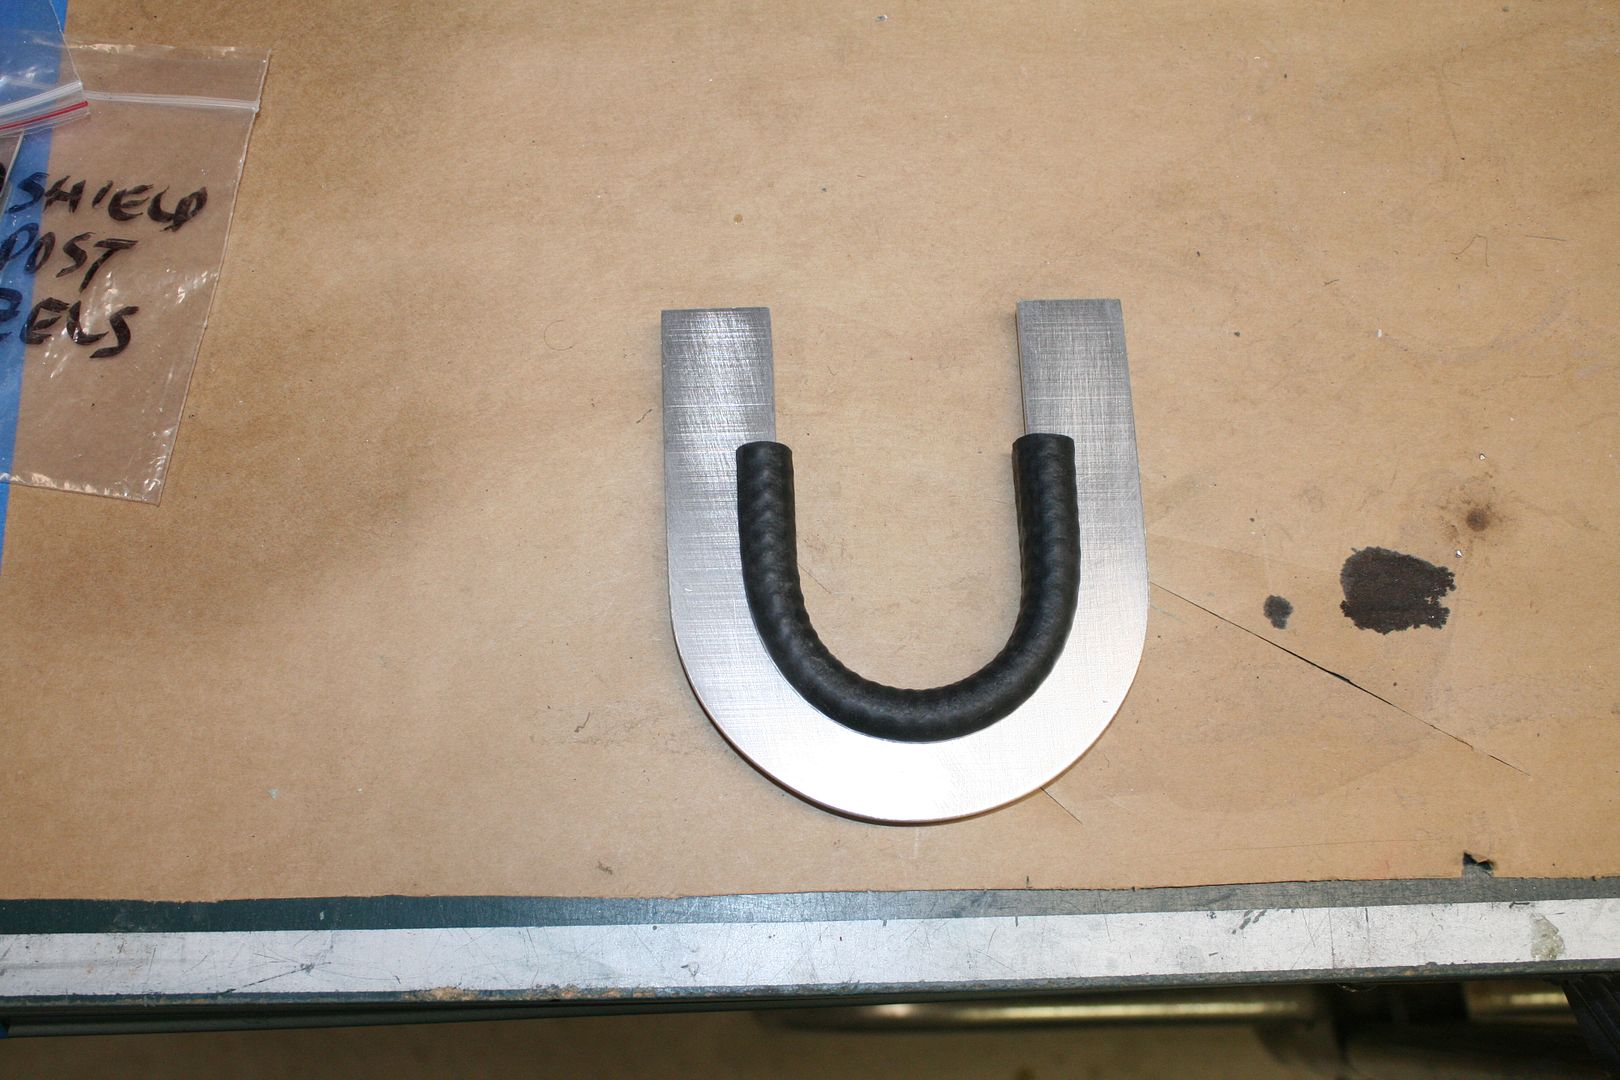
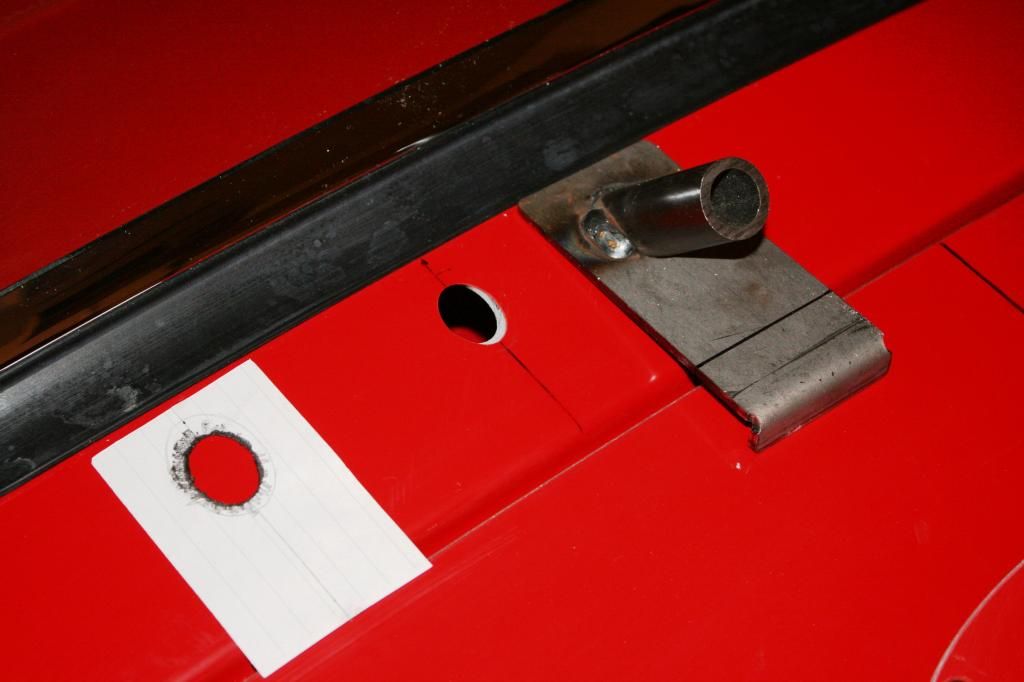
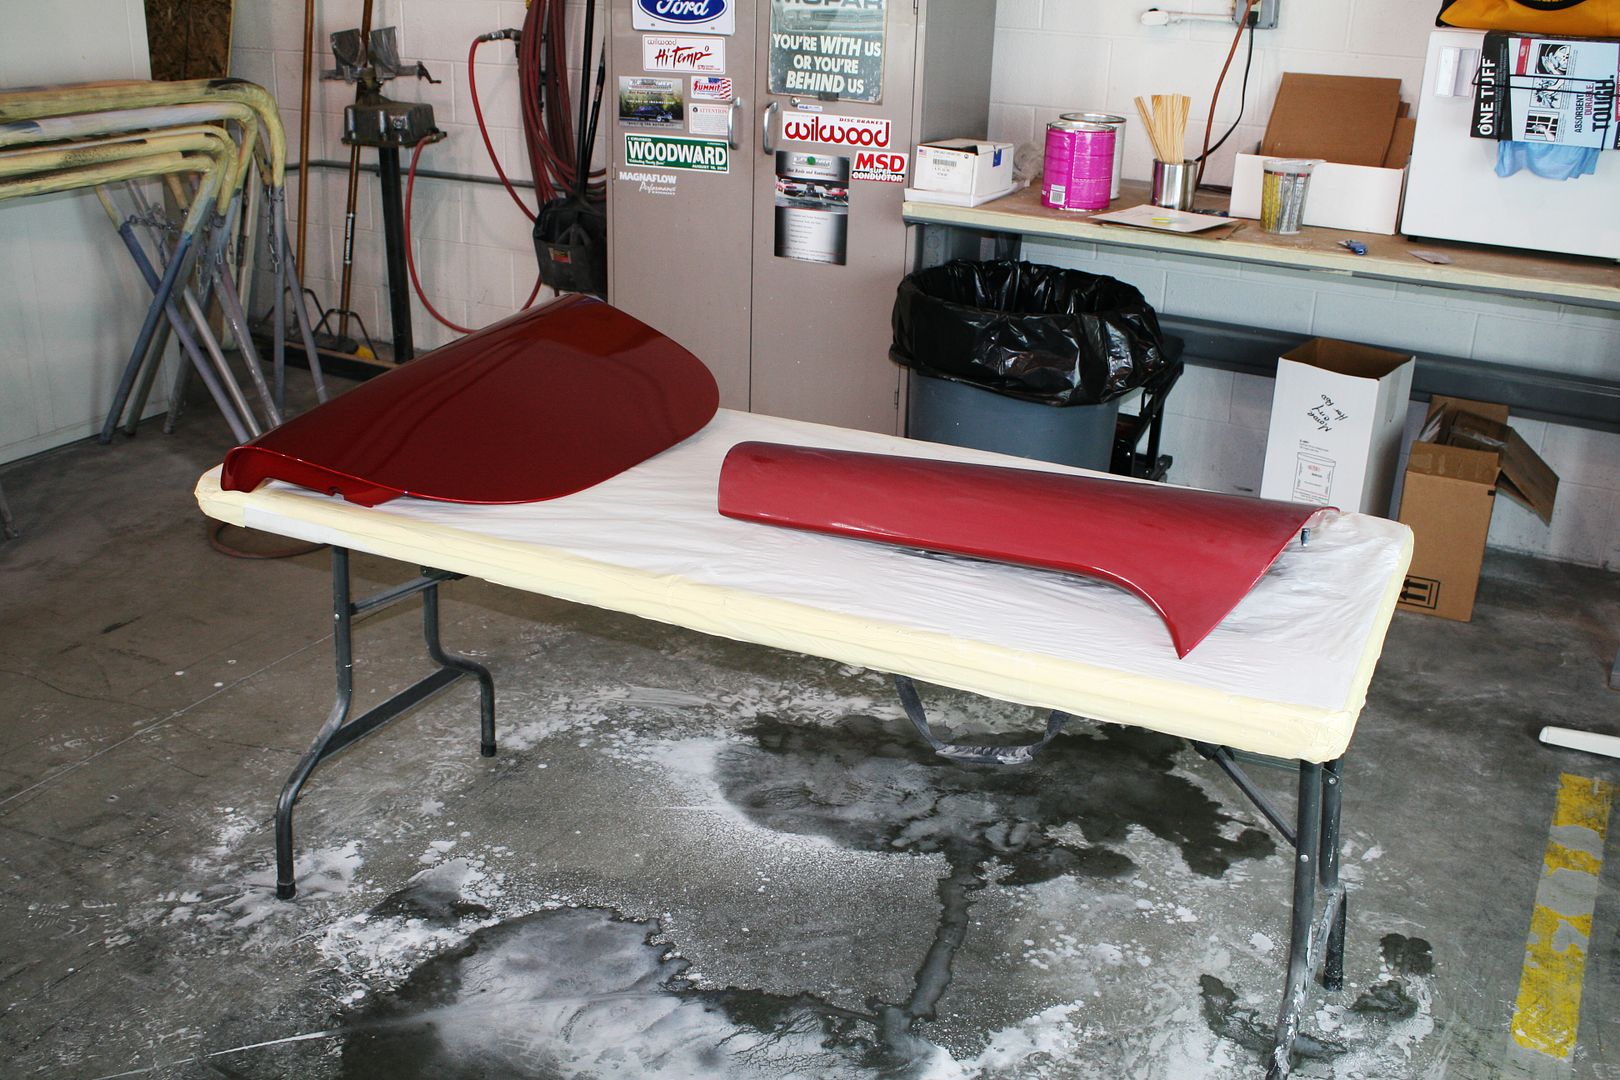
Gasoline filler tube bracket: I’ve never been a big fan of the little ring that’s used on the fuel filler tube to somehow keep the tube in the tank rubber donut. I know they were used on Mustangs forever. But they’re not cheap and I just don’t see that they do much. I know many guys leave them off, and I can see why. On my Mk3, I made up a horseshoe shaped bracket out of 1/8 aluminum, lined it with a piece of split gas line, and attached to the frame to support the filler tube where it goes into the tank. Seemed to work OK and is certainly solid. The picture is the piece I made and installed in the Mk3 several years ago. Planning the same approach on the Mk4. Have the piece made up. As soon as it’s powder coated, will install.
That’s it for updates. Big news though. Visited the painter today. Trailered the build to the shop and they looked it over. Went really well. We’re working out final details, but looks like I’ll be dropping it off in a couple weeks. He’s going to spray out some test panels for me and have ready to finalize the color then. Need to get going and finish my before paint punch list. He’s promising 5-6 weeks. So I could really have something in the next few months.
Last edited by edwardb; 11-07-2014 at 09:15 AM.
Build 1: Mk3 Roadster #5125. Sold 11/08/2014.
Build 2: Mk4 Roadster #7750. Sold 04/10/2017.
Build Thread
Build 3: Mk4 Roadster 20th Anniversary #8674. Sold 09/07/2020.
Build Thread and
Video.
Build 4: Gen 3 Type 65 Coupe #59. Gen 3 Coyote. Legal 03/04/2020.
Build Thread and
Video
Build 5: 35 Hot Rod Truck #138. LS3 and 4L65E auto. Rcvd 01/05/2021. Legal 04/20/2023.
Build Thread. Sold 11/9/2023.
-
08-29-2014, 05:16 PM
#127
That must be so exciting for you. Paint!
-
09-02-2014, 10:43 AM
#128
I'm on the fence for installing the hood scoop. Seems there is a lot of pressure under the hood and unless the scoop feeds the engine intake, it looks like it just increases the under hood pressure. A lot of racers put it on backwards to exhaust the air. Is there any benefit to installing the scoop but not cutting the hole?
-
09-02-2014, 11:15 AM
#129
Senior Member
Originally Posted by
2bking
I'm on the fence for installing the hood scoop. Seems there is a lot of pressure under the hood and unless the scoop feeds the engine intake, it looks like it just increases the under hood pressure. A lot of racers put it on backwards to exhaust the air. Is there any benefit to installing the scoop but not cutting the hole?
I have no idea, to be honest, of the value or practical use of the hood scoop. Also no idea about installing it backwards, not cutting the hole, etc. My build is a pretty traditional tribute, and since the original 427 had a hood scoop, so will mine. As seen in the pictures, I'm pretty committed to the hole in the hood as well. Also for me wasn't a question.
For how I plan to use the car (99% street cruising) the actual performance of the scoop is probably not a big difference either way.
Last edited by edwardb; 09-02-2014 at 02:53 PM.
Build 1: Mk3 Roadster #5125. Sold 11/08/2014.
Build 2: Mk4 Roadster #7750. Sold 04/10/2017.
Build Thread
Build 3: Mk4 Roadster 20th Anniversary #8674. Sold 09/07/2020.
Build Thread and
Video.
Build 4: Gen 3 Type 65 Coupe #59. Gen 3 Coyote. Legal 03/04/2020.
Build Thread and
Video
Build 5: 35 Hot Rod Truck #138. LS3 and 4L65E auto. Rcvd 01/05/2021. Legal 04/20/2023.
Build Thread. Sold 11/9/2023.
-
09-02-2014, 02:20 PM
#130
On a roll

This is truly an impressive build thread. A new guy like me can learn (and is learning) a lot here. Just thought I'd throw in my two cents on the hood scoop. 2bking asked about installing the hood scoop backwards. I've seen this before, but not on a Cobra. The concept is that air pressure is higher at the base of the windshield, you should get more air into the scoop as a result. The effectiveness of that approach is open to discussion - I believe there are a lot of aerodynamic variables. Also, you'd have to move the scoop closer to the windshield and reshape it...
-
09-02-2014, 07:26 PM
#131
Sorry for the confusion. I'm not going to install it backwards as that is a racing mod and my car will probably never see the track. I was referencing the backward scoop to emphasize the air pressure under the hood and the forward scoop adds more. Maybe the merits are somewhere in another thread.
-
09-03-2014, 03:25 PM
#132
Originally Posted by
Al_C
This is truly an impressive build thread. A new guy like me can learn (and is learning) a lot here. Just thought I'd throw in my two cents on the hood scoop. 2bking asked about installing the hood scoop backwards. I've seen this before, but not on a Cobra. The concept is that air pressure is higher at the base of the windshield, you should get more air into the scoop as a result. The effectiveness of that approach is open to discussion - I believe there are a lot of aerodynamic variables. Also, you'd have to move the scoop closer to the windshield and reshape it...
Al_C, this is probably one on the best build threads you're gonna find. I can't wait to see how it turns out.
-
09-05-2014, 08:21 PM
#133
Senior Member
Originally Posted by
rezell3d
Al_C, this is probably one on the best build threads you're gonna find. I can't wait to see how it turns out.
Thanks for the very kind compliment. I can't wait to see how it turns out either! 
Build 1: Mk3 Roadster #5125. Sold 11/08/2014.
Build 2: Mk4 Roadster #7750. Sold 04/10/2017.
Build Thread
Build 3: Mk4 Roadster 20th Anniversary #8674. Sold 09/07/2020.
Build Thread and
Video.
Build 4: Gen 3 Type 65 Coupe #59. Gen 3 Coyote. Legal 03/04/2020.
Build Thread and
Video
Build 5: 35 Hot Rod Truck #138. LS3 and 4L65E auto. Rcvd 01/05/2021. Legal 04/20/2023.
Build Thread. Sold 11/9/2023.
-
09-05-2014, 08:22 PM
#134
Senior Member
Couple more updates
Progress continues. Hood latching brackets: Here I also did a similar solution as my Mk3 build. I cut slightly longer brackets than supplied and put sort of an inverted “V” in them that matches the hood paddles where they cross. Used some HSRF between the bracket and the underside of the hood opening to make a flat pad for mounting. Then mounted them to the hood opening with 10-32 screws countersunk and filled. The mounting screw heads will disappear when painted. These brackets give a nice solid latch or “click” when you turn the hood handles and keeps them straight. I'll remove the brackets during paint and do a little polish on them. Like my bling.
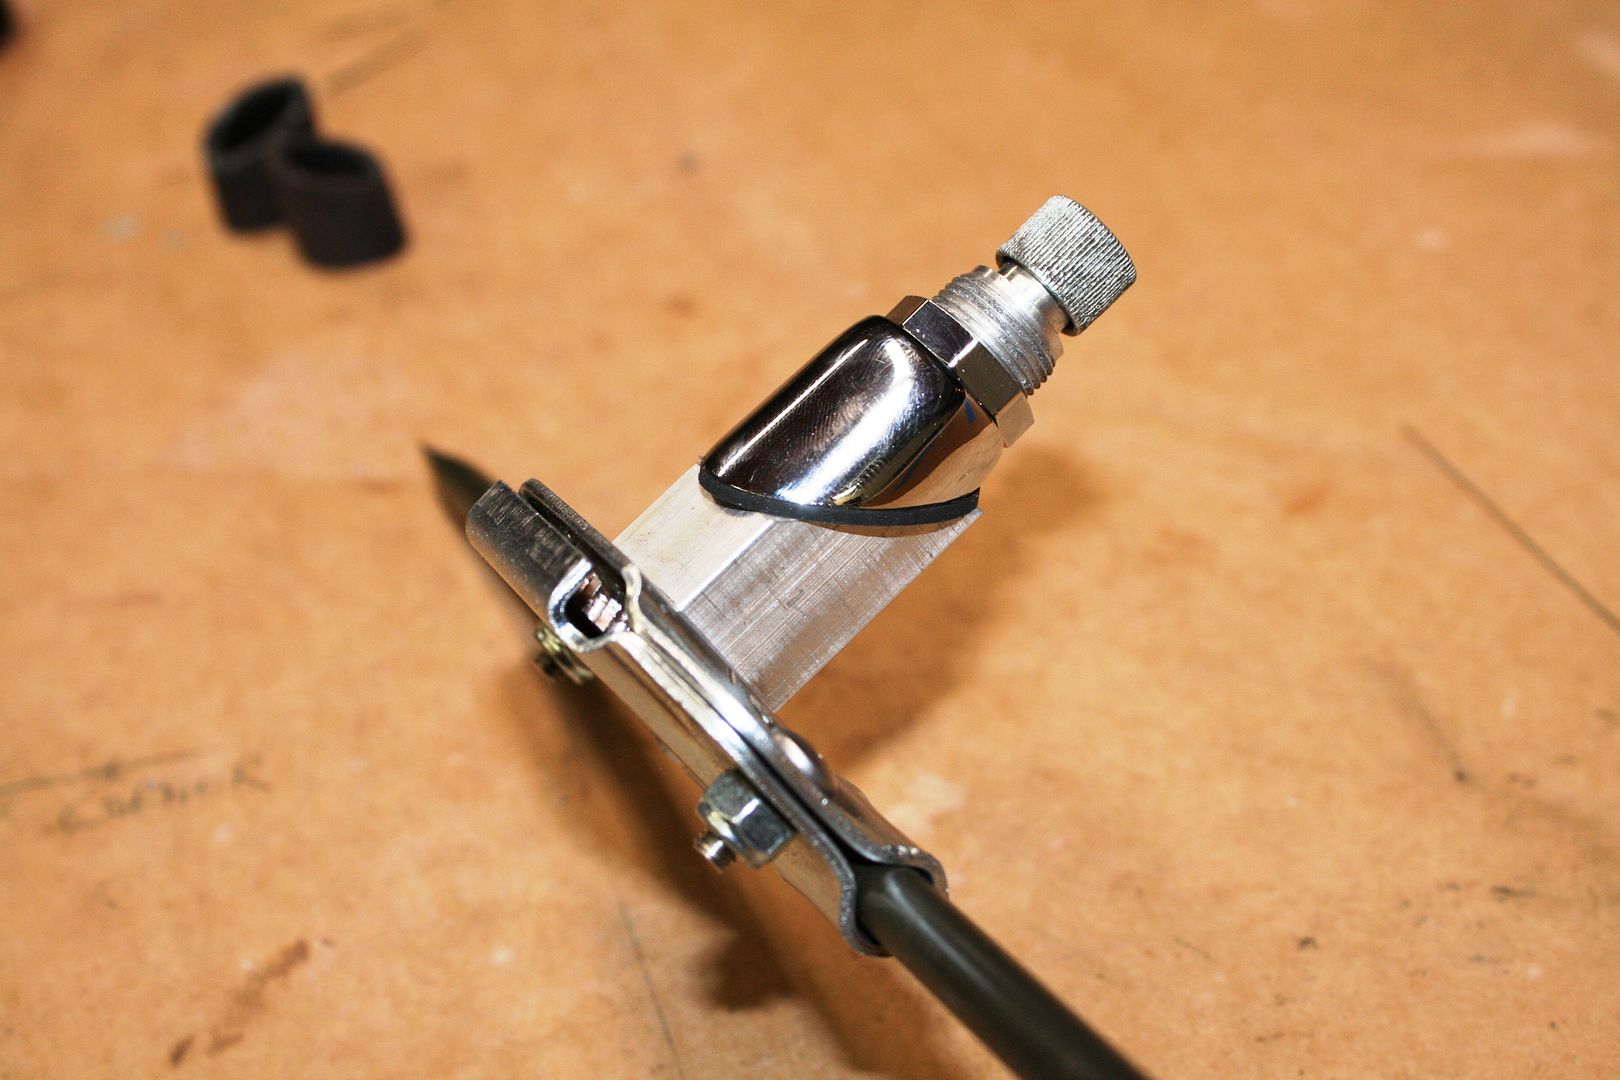
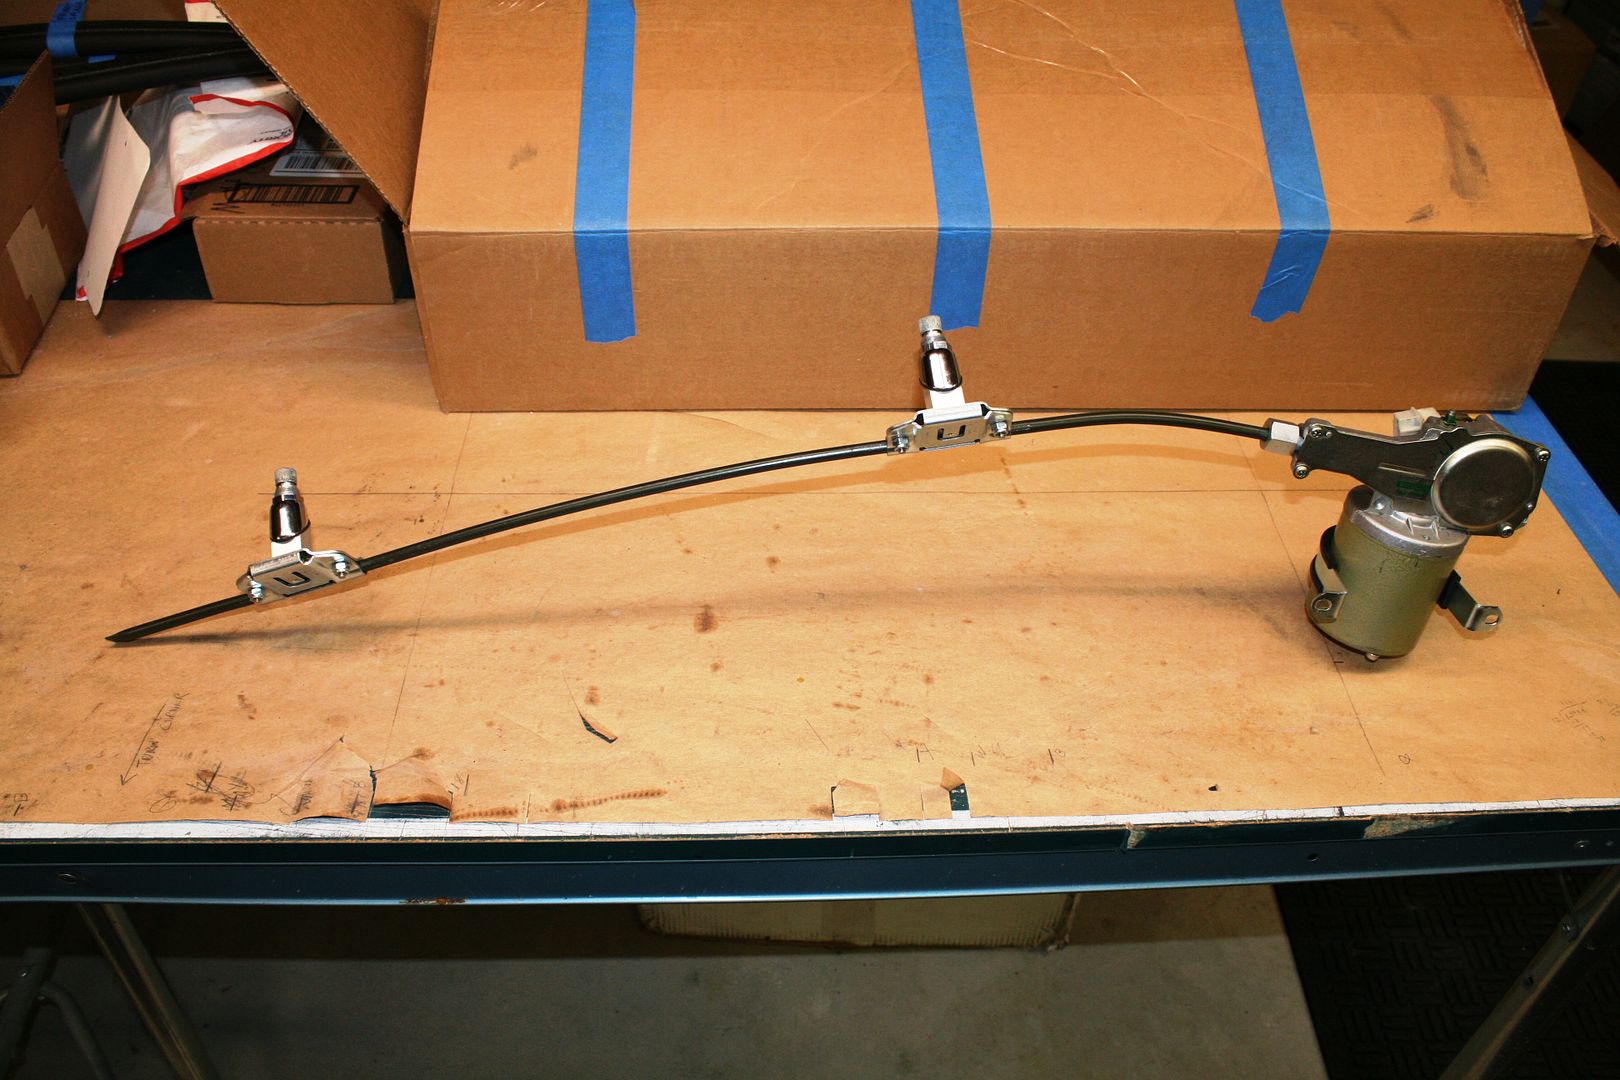
Next was the wipers. They are required here in Michigan and on the safety inspection checklist. Installed them on my Mk3 and the officer specifically checked them. Never a question they would be installed on the Mk4 as well. These things take a beating on this forum, and for good reason I guess. The weak link overwhelmingly IMO is the FFR supplied wheel boxes. They are cheap knock-offs and very marginal quality. During my Mk3 build, I never could get them to line up properly and mesh with the cable actuator reliably. I read every thread and tried every mod (and every size hammer). Gave up and bought the ********** wheel boxes. Huge improvement. Instantly lined up and worked very well. Really hate to replace provided parts. But this does make the system work surprisingly well.
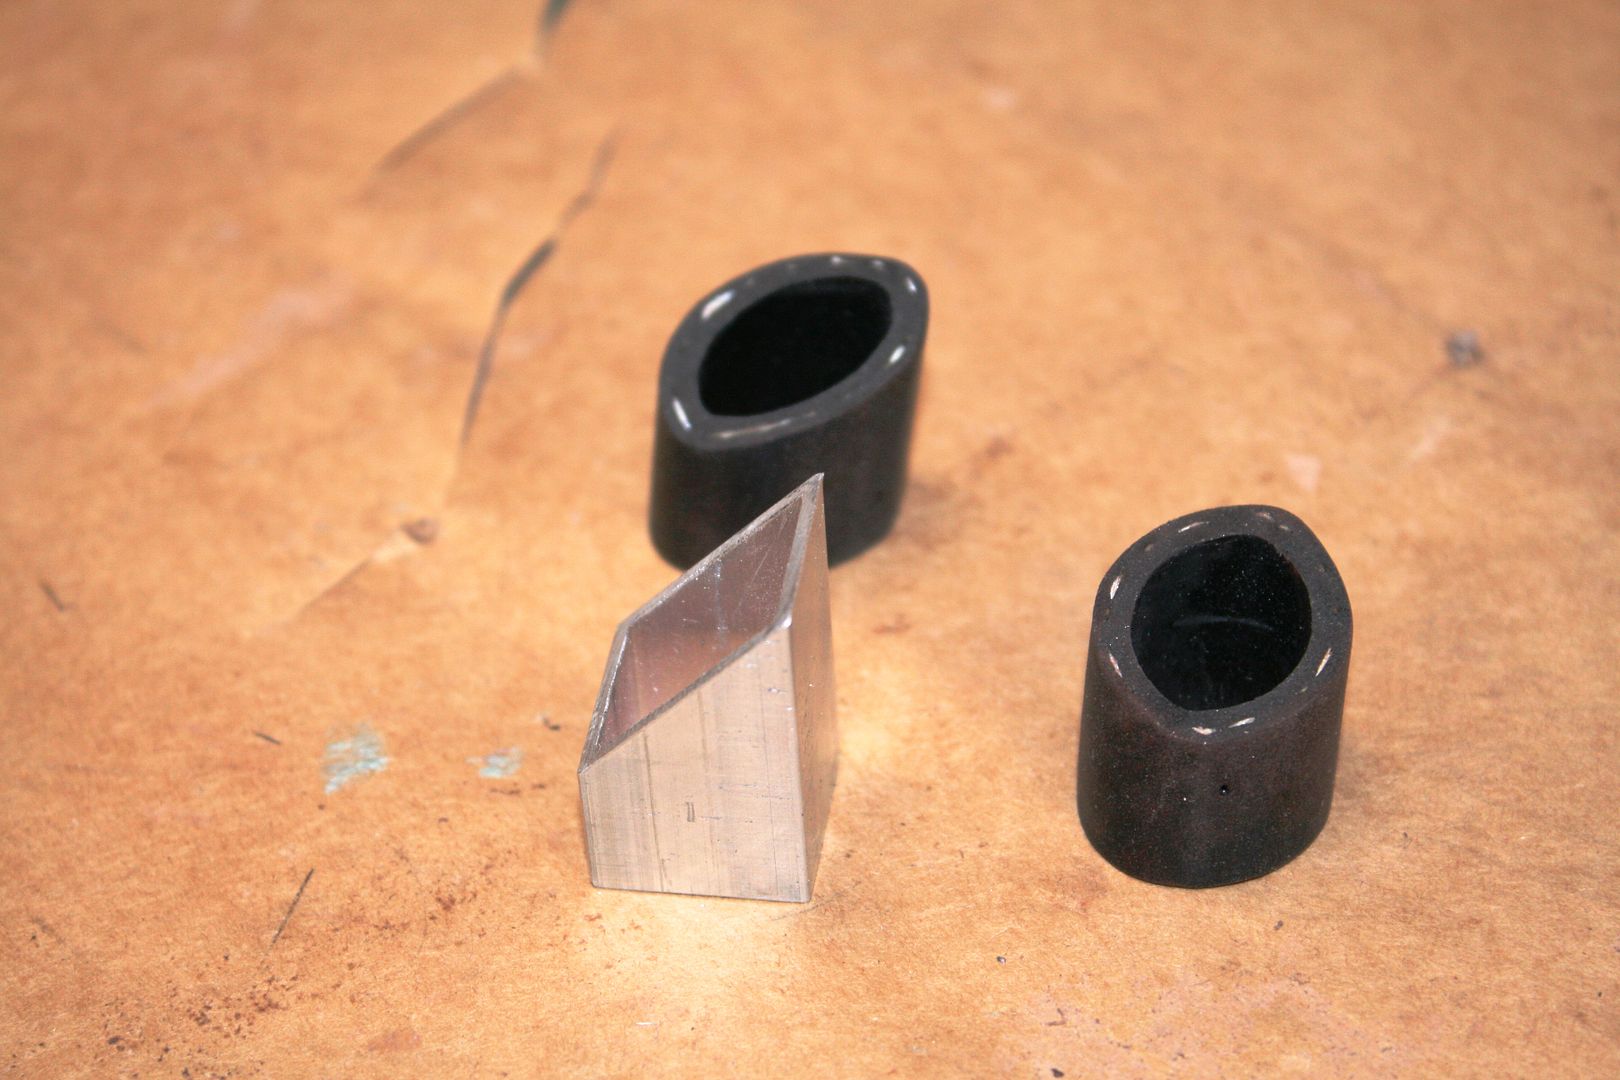
So for my Mk4 build, just started with the ********** wheel boxes. I used 5/16 rigid brake line from O'Reilly's. Cut to the proper lengths and made flares on each end between the wheel boxes and motor. The inner ID fits the cable nicely. Greased up the cable and it slides through the tubing and meshes with the gears perfectly. Then used two short pieces of 3/4 inch square aluminum tubing (5/8 inch ID) for spacers which just fits over the shaft of the wheel boxes. A 45 degree angle on one end fits against the underside of the body and holds the wheel box at just the right angle.
For the holes in the body, I’ve never been able to get my head around spinning a big old 5/8 inch drill in that drill fixture and getting a neat clean hole in the body. Just me I guess because I know many do it successfully. But the fiberglass just isn’t that thick or hard to work with. I used the fixture to make a small paper pattern that I then traced onto the body at the appropriate locations. Then made initial holes freehand by drilling a couple small holes. Then enlarged with some files, and finished with a small 5/8 inch sanding drum that was the perfect size. Kept the fixture there the whole time to eyeball the angle. Took maybe 5 minutes per hole and they turned out just right with no drama.
Next, throw away those pieces of rubber tubing spacers. They're not the right length. Not the right angle. Not the right strength. Honestly, probably one of the poorest pieces provided with the kit. Make something that holds the wiper box properly. I've used 3/4 inch aluminum square tube material on both my builds. Easy to work with and fits perfectly. Many use pieces of PVC tubing. Just need something that’s substantial enough you can tighten against it and hold the proper height and angle. Everything adds up to make these wipers work properly.
This is one of the ********** wheel boxes showing the spacer in place. Through trial and error, adjust the length of each spacer so that the bezel piece and nut expose the same length of the driveshaft. For both of my builds, the two were slightly different lengths as the body thickness had some variation. In this picture, the length of threads showing is exactly the thickness of the body. When installed, the nut just covers the threads.
Completed assembly using 5/16 tubing. All checked out. Runs nice and quiet. Wiper driveshafts run smoothly with no slipping, etc. Should work fine if I don't manage to stay away from rain. Ready to go into the body after paint.
That’s it. I have an appointment to drop off the car for paint in two weeks. Only a handful of things to get done before then, so should be ready.
Last edited by edwardb; 09-05-2014 at 08:47 PM.
Build 1: Mk3 Roadster #5125. Sold 11/08/2014.
Build 2: Mk4 Roadster #7750. Sold 04/10/2017.
Build Thread
Build 3: Mk4 Roadster 20th Anniversary #8674. Sold 09/07/2020.
Build Thread and
Video.
Build 4: Gen 3 Type 65 Coupe #59. Gen 3 Coyote. Legal 03/04/2020.
Build Thread and
Video
Build 5: 35 Hot Rod Truck #138. LS3 and 4L65E auto. Rcvd 01/05/2021. Legal 04/20/2023.
Build Thread. Sold 11/9/2023.
-
09-14-2014, 03:23 PM
#135
Senior Member
Update
Running out of things needed to be done before going to paint this coming Friday. Thats a good thing. No pictures, but finished up the spacers and bolts for the front and rear quick jack mounts. As previously pictured, going with FFR overriders front and rear, and a rear bumper hoop. No front hoop. Using ********** polished 3/4 inch tubing, with ********** grommets in the front. Parts all bagged and tagged and ready for final assembly after paint.
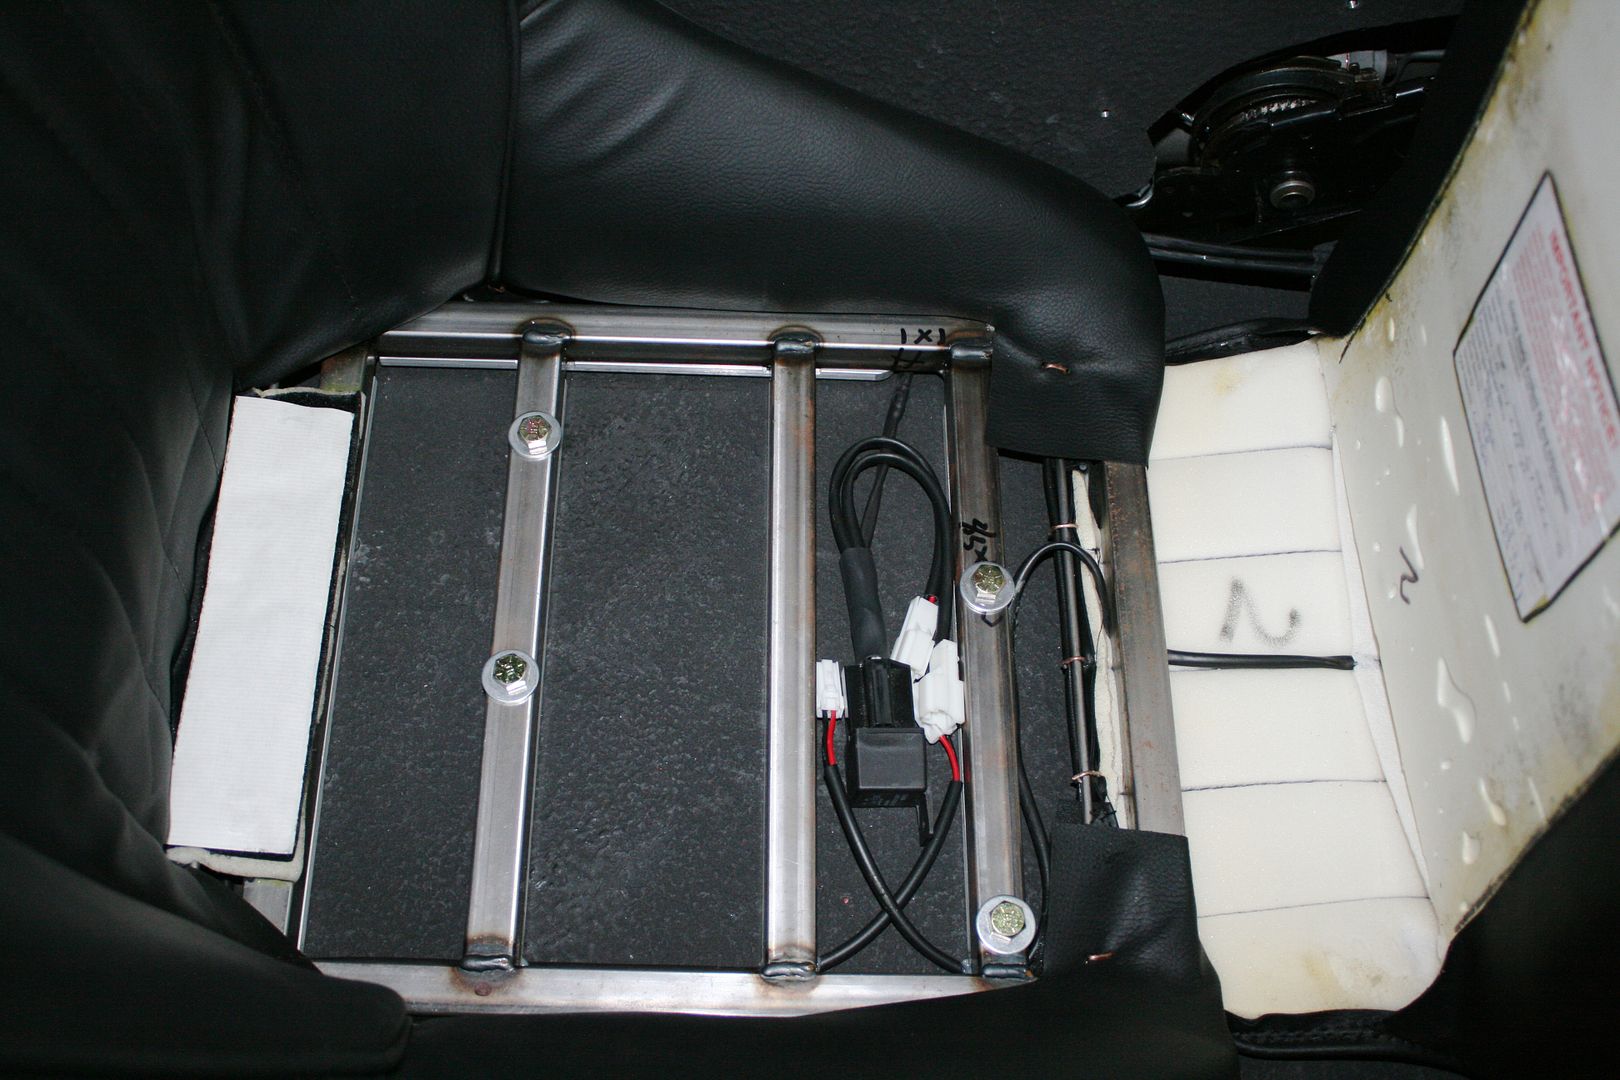
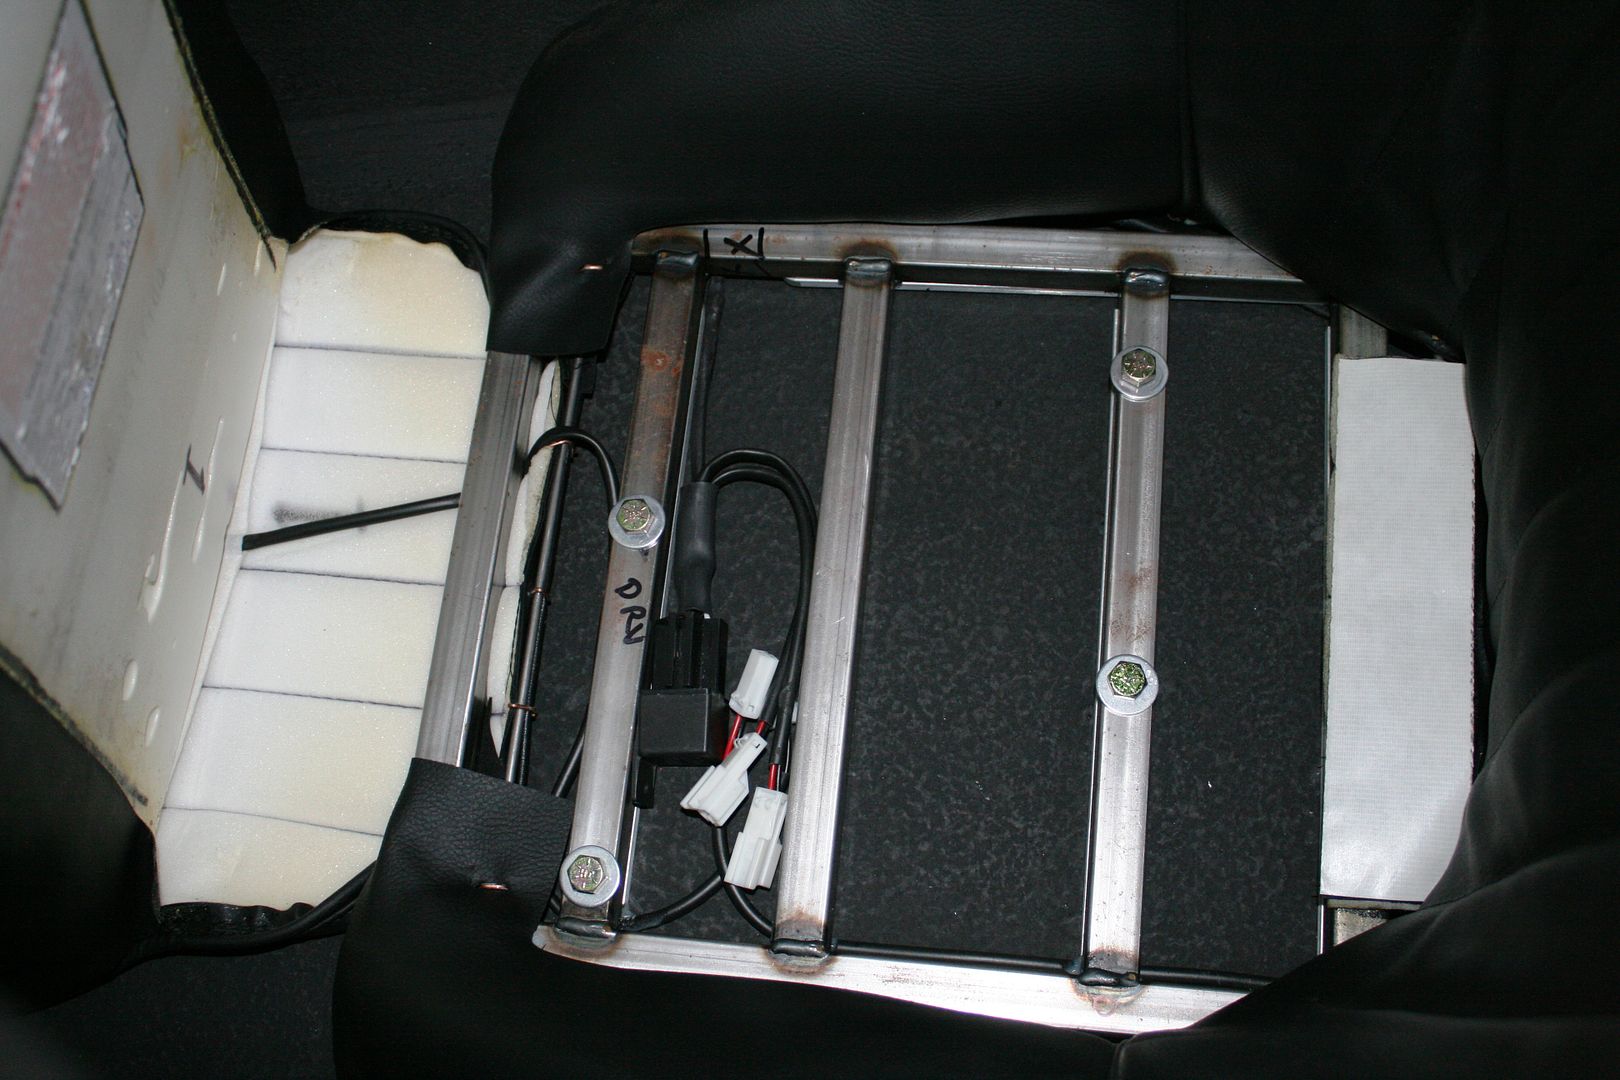
Next up was to complete seat mounting. Worked with both to get in the best seating position, and proceeded to get bolted in place. Im using the standard FFR low back seats. The Mk4 has a nice seat pan so its easier than previous Mks. But in reality, only the front bolts really line up well into it. The rear bolts work best into the two inch square tube, although the 4 inch main chassis tube doesnt let you get either front or back too close to the inner side of the frames. Oh and the supplied seat bolts dont work for any. Too long for the front bolts and too short for the rear. So after a quick trip to my friends at Ace Hardware and some 2 inch and 4 inch grade 8 bolts, bolted the seats as pictured. Two short bolts through the seat frame and the seat pan in the front. For the back, the outside bolt is through the 2 inch chassis tube and bolted. The inner bolt I hit right into the center of the 4 inch tube and tapped 5/16 x 18. I have mixed feelings about the seat being held with a tapped hole. But its the pretty thick 4 inch tube so several good threads. Plus its only one of the four. I even briefly considered only doing three (2 in front and 1 in back) but went ahead and added the tapped hole. The final result is solid and very likely much stronger than the seat frame itself. Note in the pictures you can see the wiring for the heated seats. Like I did on my Mk3, I lined the bottom of the seat frame with 1/4 x 3/4 inch aluminum strips. Gives the seat just a little bit of height, plus I left gaps to pass the wiring through. Dont want the seat frame sitting on the wires.
Another kind of minor point was painting the hood hinges. Most of my parts are powder coated. But I had a minor problem with the hinge pieces on my Mk3 getting a little too much build-up from the PC and made the hinges a little tougher to set up. So I decided to paint these. Always interested in trying something new, Ive seen the advertisements by Eastwood for their 2K Aero-Spray paint. Kind of interesting product. Its a 2-part material that you puncture a vessel inside the spray can when youre ready to use. I used the chassis gloss black for the hinges. Also experimented a bit with the leftovers on an aluminum panel. Its only good for 48 hours once you puncture the catalyst. Generally I was pleased with it. Sprays OK, dries to the touch pretty quickly, and dries very hard in a day or so. Clearly quite a bit harder than normal air-dry solvent type materials. The final finish has a bit of orange peel, but for pieces like this just fine. I would probably use it again, but not on a lot of things. Its not cheap. Note the hood bracket portion isnt painted black. I permanently bonded them to the hood and they will be painted body color.
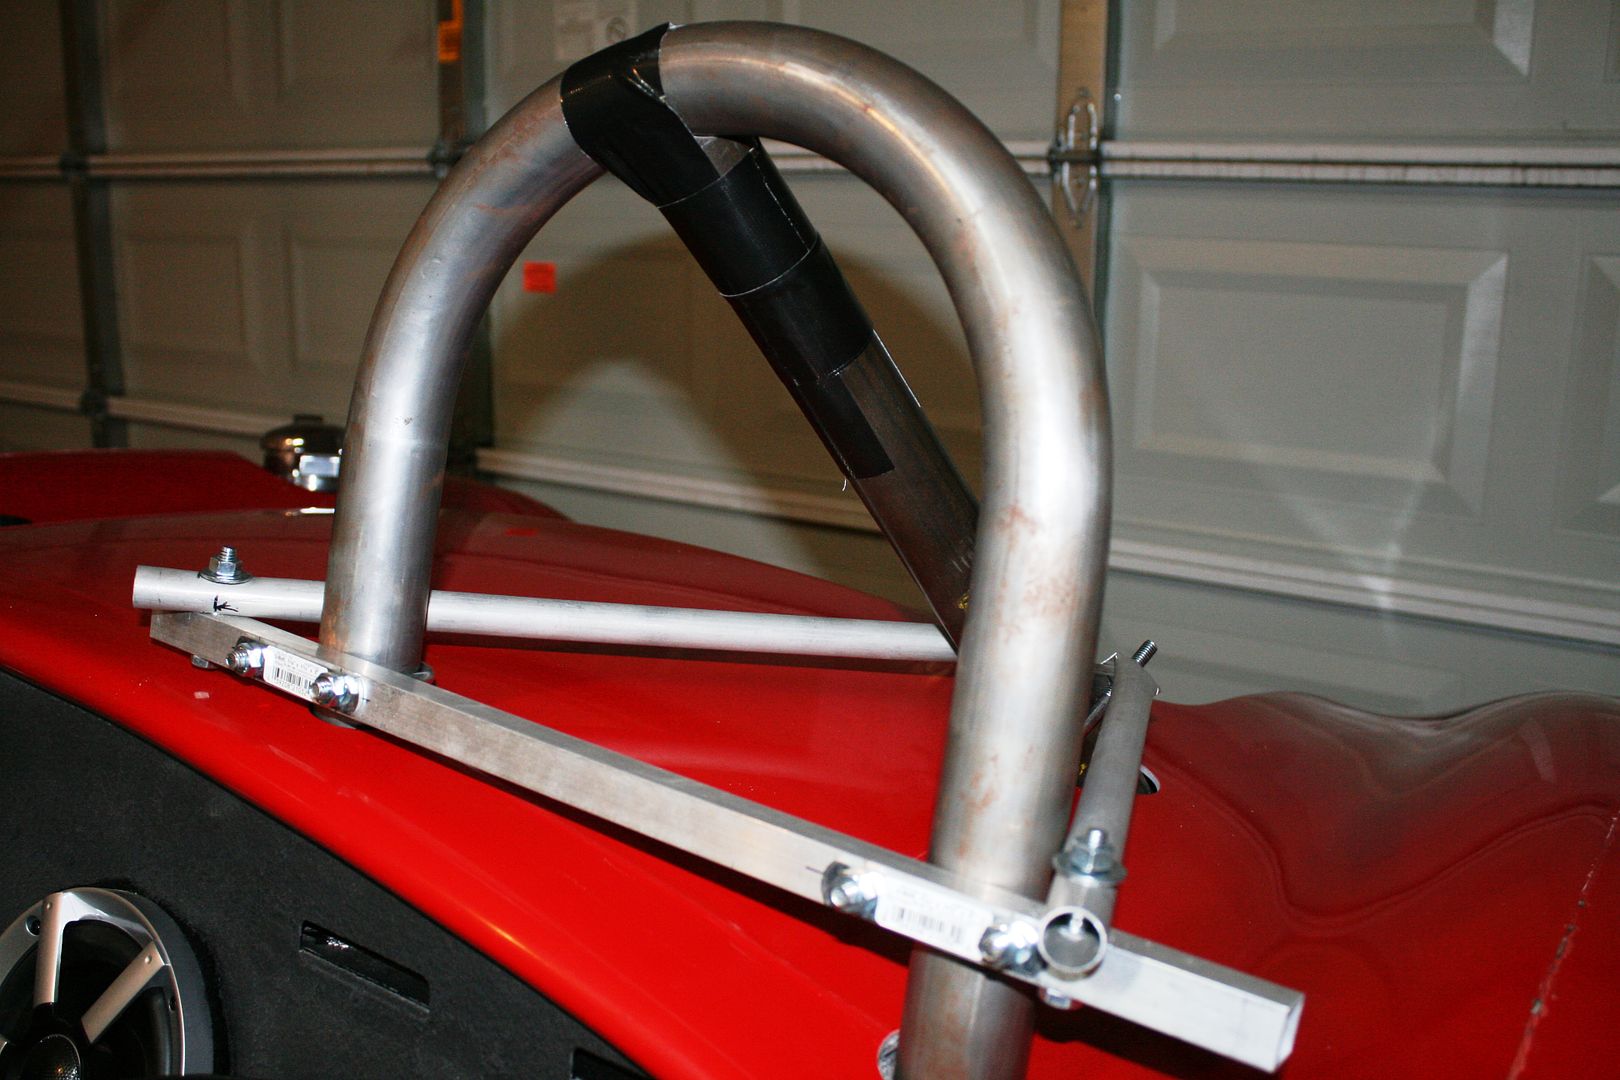
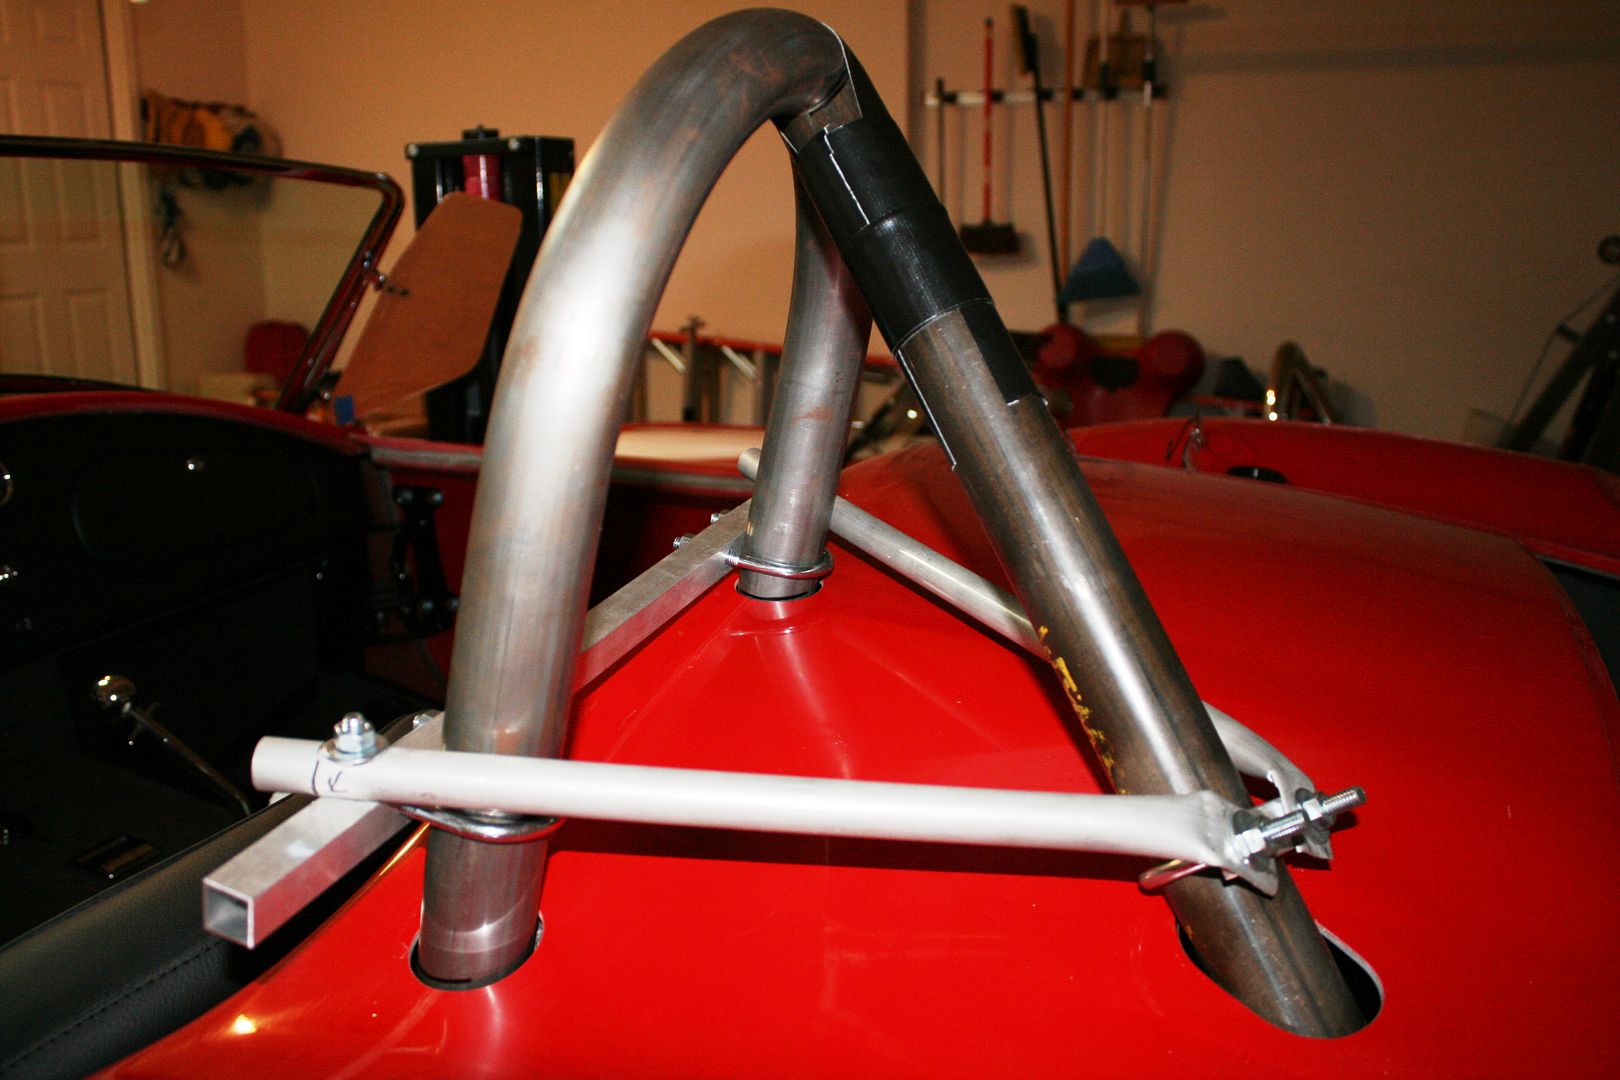
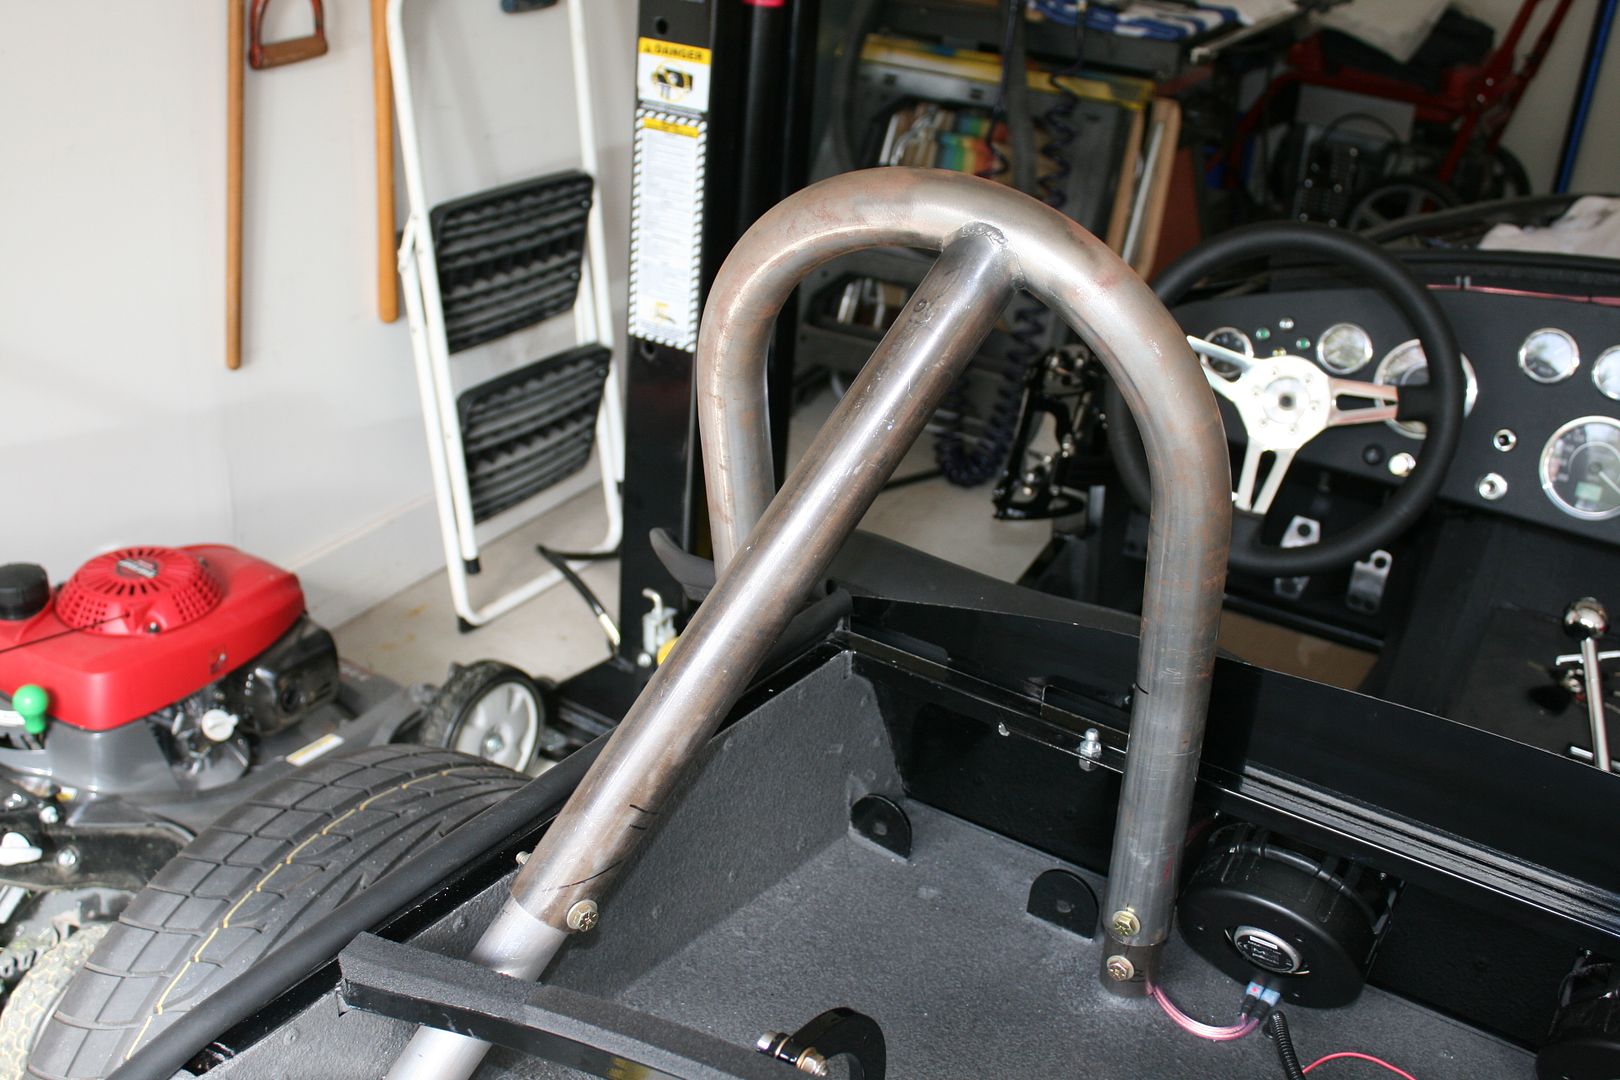
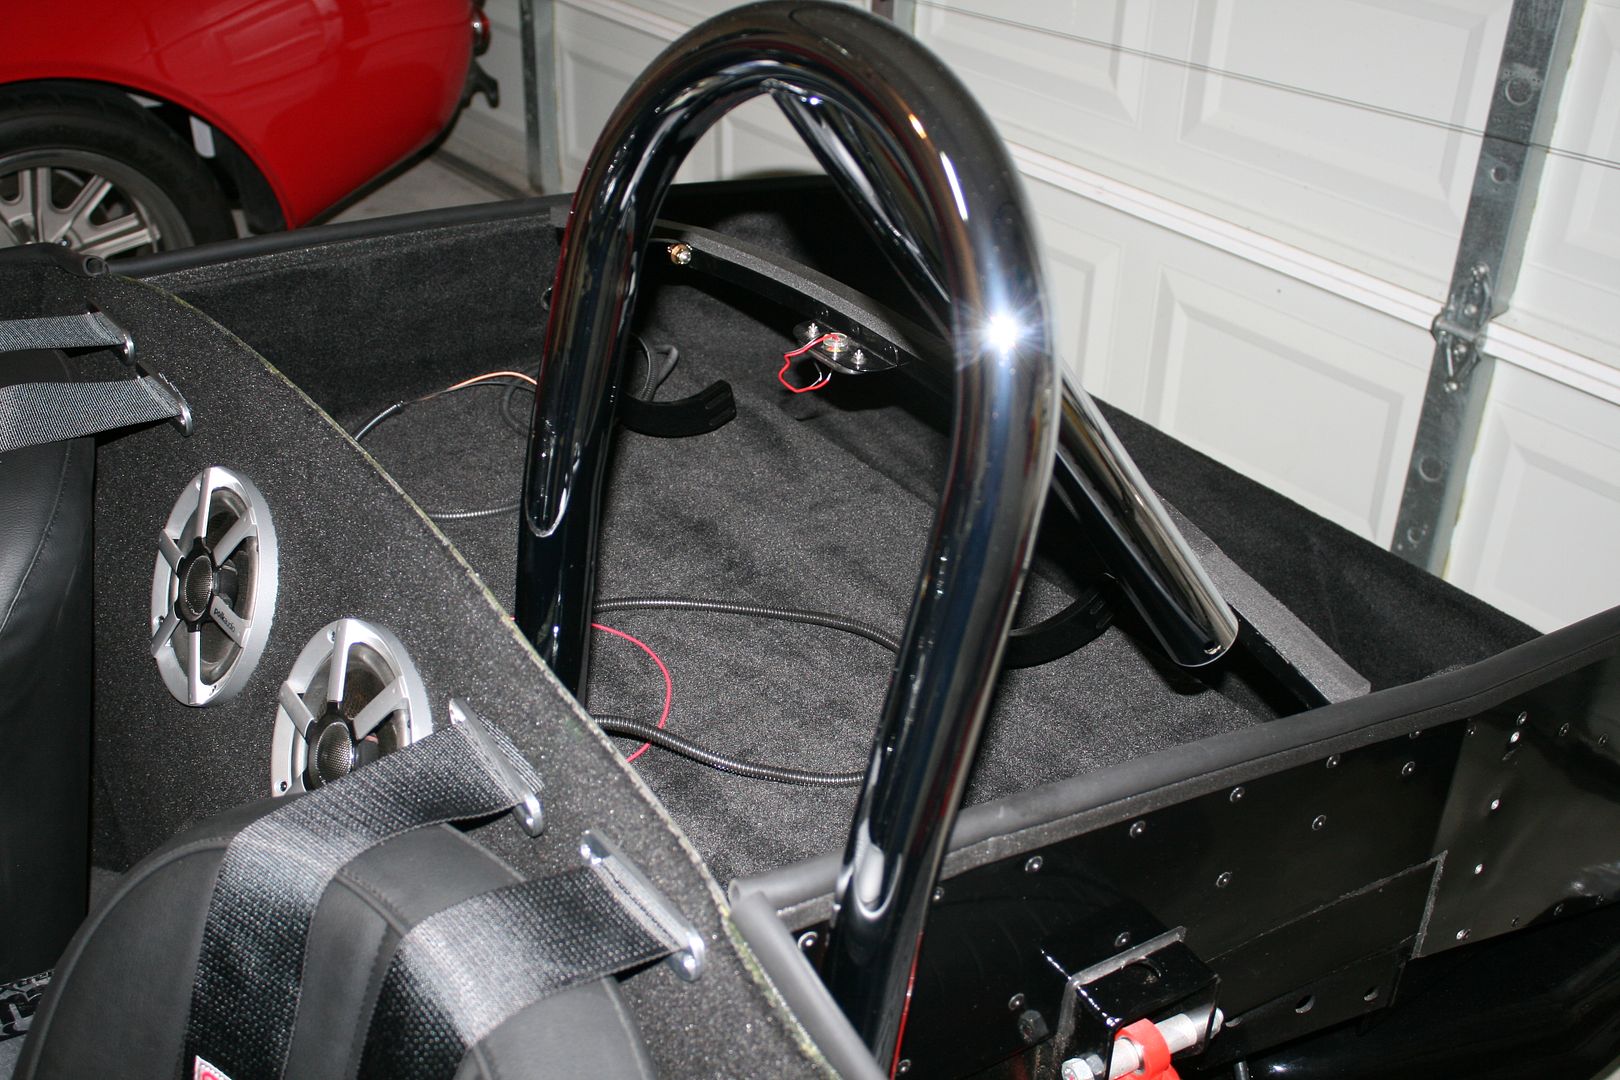
Next up, Im using the Breeze roll bar. Really like it and the look is great. It does require you get the third leg welded in the proper position. I dont weld, and was planning to take the car to a welder with bar in position. But for several reasons, one of which not wanting a welder in the same zip code as my MSD box (a known problem), decided to fixture it up and will take it to the welder off the car. Using mostly scrap pieces from around the shop, jury-rigged this fixture and it holds the third leg pretty well. I ended up adding some tape at the top to make sure it stays in exactly the right place. Theres room to put a couple of tacks on it before removing the tape and finishing it. The roll bar fit and installed exactly per the instructions. I didnt have to do anything special.
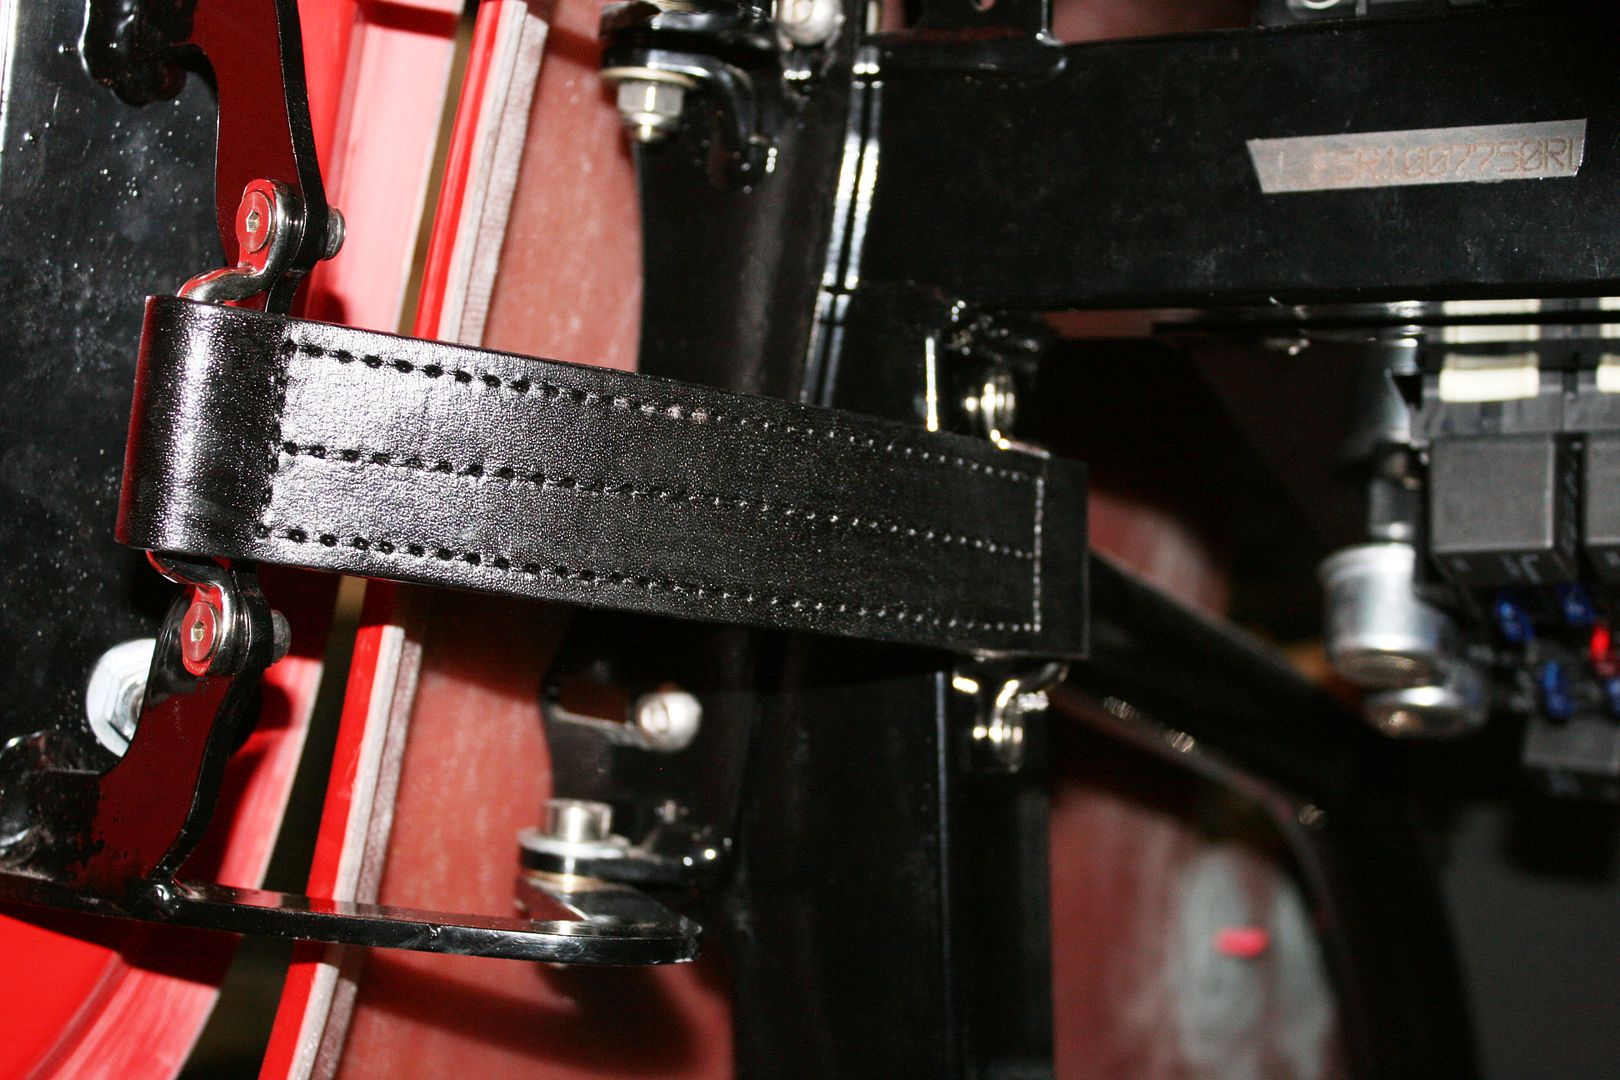
Finally, went ahead and installed the leather check straps on the doors. Goes to my theme of at least mocking up as much as possible before the car is painted. I dyed them black with Fiebings Leather Dye. Used the same material on the leather pads on the Simpson belts BTW. Really happy with how they turned out. Then instead of mounting with pop rivets as instructed, used 10-32 bolts in the door hinges, and 10-32 screws tapped into the frame behind the hinges.
Busy non-building week ahead (work sure gets in the way) but on track to deliver to the painter on Friday. He promised some color samples. At some point I may even share. But doubt anyone will be surprised.
Build 1: Mk3 Roadster #5125. Sold 11/08/2014.
Build 2: Mk4 Roadster #7750. Sold 04/10/2017.
Build Thread
Build 3: Mk4 Roadster 20th Anniversary #8674. Sold 09/07/2020.
Build Thread and
Video.
Build 4: Gen 3 Type 65 Coupe #59. Gen 3 Coyote. Legal 03/04/2020.
Build Thread and
Video
Build 5: 35 Hot Rod Truck #138. LS3 and 4L65E auto. Rcvd 01/05/2021. Legal 04/20/2023.
Build Thread. Sold 11/9/2023.
-
09-15-2014, 04:38 AM
#136
Not a waxer

Great job on the roll bar fixture Paul! I just fitted a set and had to make 4 trips to my buddy's shop tacking, checking, tacking, checking, trying to get them right using reference marks and a protractor. You should be right on the first try!
Jeff
-
09-15-2014, 12:36 PM
#137
Senior Member
Hey coach...how much of the rear support leg drops below the body?
-
09-15-2014, 01:20 PM
#138
cobra Handler

edwardb,
Very clever use of the fixture. It looks substantial enough to hold solidly in the position you choose. When the compound angles are involved any give in any direction can cause a major failure. The longer the lever, the bigger the potential error factor. Good job!
Thanks, WEK.
FFR MkIII 302 (ATK), EFI 75mm TB with custom box plenum chamber, 24# injectors, 4 tube BBK ceramic, cold air sys, alum flywheel, crane roller rockers, T5, Wilwood pedals, custom five link with Watt's link, 4 rotors, coil overs, power steering with Heidt valve, alum FFR rad, driver's crash bar mod, mini dead pedal mod, quick release steering wheel hub #6046
-
09-15-2014, 02:08 PM
#139
Senior Member
Originally Posted by
fordboy
...how much of the rear support leg drops below the body?
The outer visible part of the rear roll bar leg goes just below the body surface. It's then extended to the rear roll bar mount by a smaller diameter 9 inch extension that slides out and down to the mount. There is just enough of the outer roll bar available underneath to put in a through bolt. Then another bolt at the chassis mount through the extension. Hope this makes sense. It's an ingenious way to use the existing mounts and body holes with a 1-piece 3-leg roll bar. These are available from Breeze (forum vendor) in plain steel (like this one) or in stainless. I'm going to have mine chrome plated after it's welded. No hurry now that I have it fixtured and off the car.
As I commented in my update, mine installed with zero issues. The body holes -- specifically the rear one -- are only slightly larger than normal and easily covered with the usual roll bar bezels. I've seen a couple of reports where people said they needed to trim either the rear leg or the extension to get it installed and able to get in/out. That wasn't my experience. I wonder if they had the height of the main roll bar loop set correctly. By raising or lowering the front loop you can tweak where the rear leg goes through and connects to the rear mount. I put the extension on the rear mount, slid the rear leg over, dropped on the front loop, and then pulled the rear leg up to where it contacts and is eventually welded to the main roll bar. It already has an angled fish-mouth cut, and it matched up nicely. At this point, added the fixture, and was able to confirm it would lift off and clear the body holes as one assembly. Again, hopes this makes sense. Easier to do than to explain.
Last edited by edwardb; 09-16-2014 at 05:47 AM.
Build 1: Mk3 Roadster #5125. Sold 11/08/2014.
Build 2: Mk4 Roadster #7750. Sold 04/10/2017.
Build Thread
Build 3: Mk4 Roadster 20th Anniversary #8674. Sold 09/07/2020.
Build Thread and
Video.
Build 4: Gen 3 Type 65 Coupe #59. Gen 3 Coyote. Legal 03/04/2020.
Build Thread and
Video
Build 5: 35 Hot Rod Truck #138. LS3 and 4L65E auto. Rcvd 01/05/2021. Legal 04/20/2023.
Build Thread. Sold 11/9/2023.
-
09-19-2014, 04:59 PM
#140
Senior Member
At the painter!
Delivered the car to the painter today. I had the body pretty in shape with everything hung, gapped, body trimmed, cutouts done, etc. Other than the famous driver door issue, basically ready to start painting. They will start on it next week, and are promising 5-6 weeks. We settled on the color(s) based on a prepared sample. Really happy with the choice. Let the waiting begin! They said they would send some progress pics. Plus I can stop and check it out any time. May post some pics if I get some.
Build 1: Mk3 Roadster #5125. Sold 11/08/2014.
Build 2: Mk4 Roadster #7750. Sold 04/10/2017.
Build Thread
Build 3: Mk4 Roadster 20th Anniversary #8674. Sold 09/07/2020.
Build Thread and
Video.
Build 4: Gen 3 Type 65 Coupe #59. Gen 3 Coyote. Legal 03/04/2020.
Build Thread and
Video
Build 5: 35 Hot Rod Truck #138. LS3 and 4L65E auto. Rcvd 01/05/2021. Legal 04/20/2023.
Build Thread. Sold 11/9/2023.
-
10-01-2014, 06:09 PM
#141
Hurry up painter Hurry up.
-
10-01-2014, 10:31 PM
#142
Senior Member
Originally Posted by
rezell3d
Hurry up painter Hurry up.
Have to agree with you there! 
Hope to get a progress report and maybe a pic or two this week. Maybe I'll drive over and check it out. But it's about 50 miles away on the other side of town, and I do still work for a living...
Last edited by edwardb; 10-02-2014 at 05:25 AM.
Build 1: Mk3 Roadster #5125. Sold 11/08/2014.
Build 2: Mk4 Roadster #7750. Sold 04/10/2017.
Build Thread
Build 3: Mk4 Roadster 20th Anniversary #8674. Sold 09/07/2020.
Build Thread and
Video.
Build 4: Gen 3 Type 65 Coupe #59. Gen 3 Coyote. Legal 03/04/2020.
Build Thread and
Video
Build 5: 35 Hot Rod Truck #138. LS3 and 4L65E auto. Rcvd 01/05/2021. Legal 04/20/2023.
Build Thread. Sold 11/9/2023.
-
10-05-2014, 04:59 PM
#143
Senior Member
This weekend's update
The car has been at the painter two weeks now. I have the chassis in the garage and the body is at the painter on the buck. Talked to them on Friday. Body undercoat is done, and it was in the booth getting some kind of primer. The person answering the phone didn’t know any details. They promised pictures. I may be in that area this week, so will stop in and take some of my own if I get a chance. I’ll post if there’s something to see.
In the meantime, working through my list of details to be completed before paint is done and body is back on. I posted pictures before of the Breeze roll bar fixtured up for welding. Took it to a local shop and they did a nice job on the weld joint. Only charged me $20, which seemed more than fair for a non-welder like me. Back home and out of the fixture, it did need a little tweaking. The heat obviously moves things around a little. Had to adjust the spread of the main hoop just a bit, and then move the rear leg over slightly. Wasn’t bad and now slides on and off pretty easily. Next step is to get it chrome plated. In hindsight, maybe should have opted for the SS version and gone for the polishing option. But I’m committed now. Checking on a couple local places. Also have time to ship out of town if necessary.
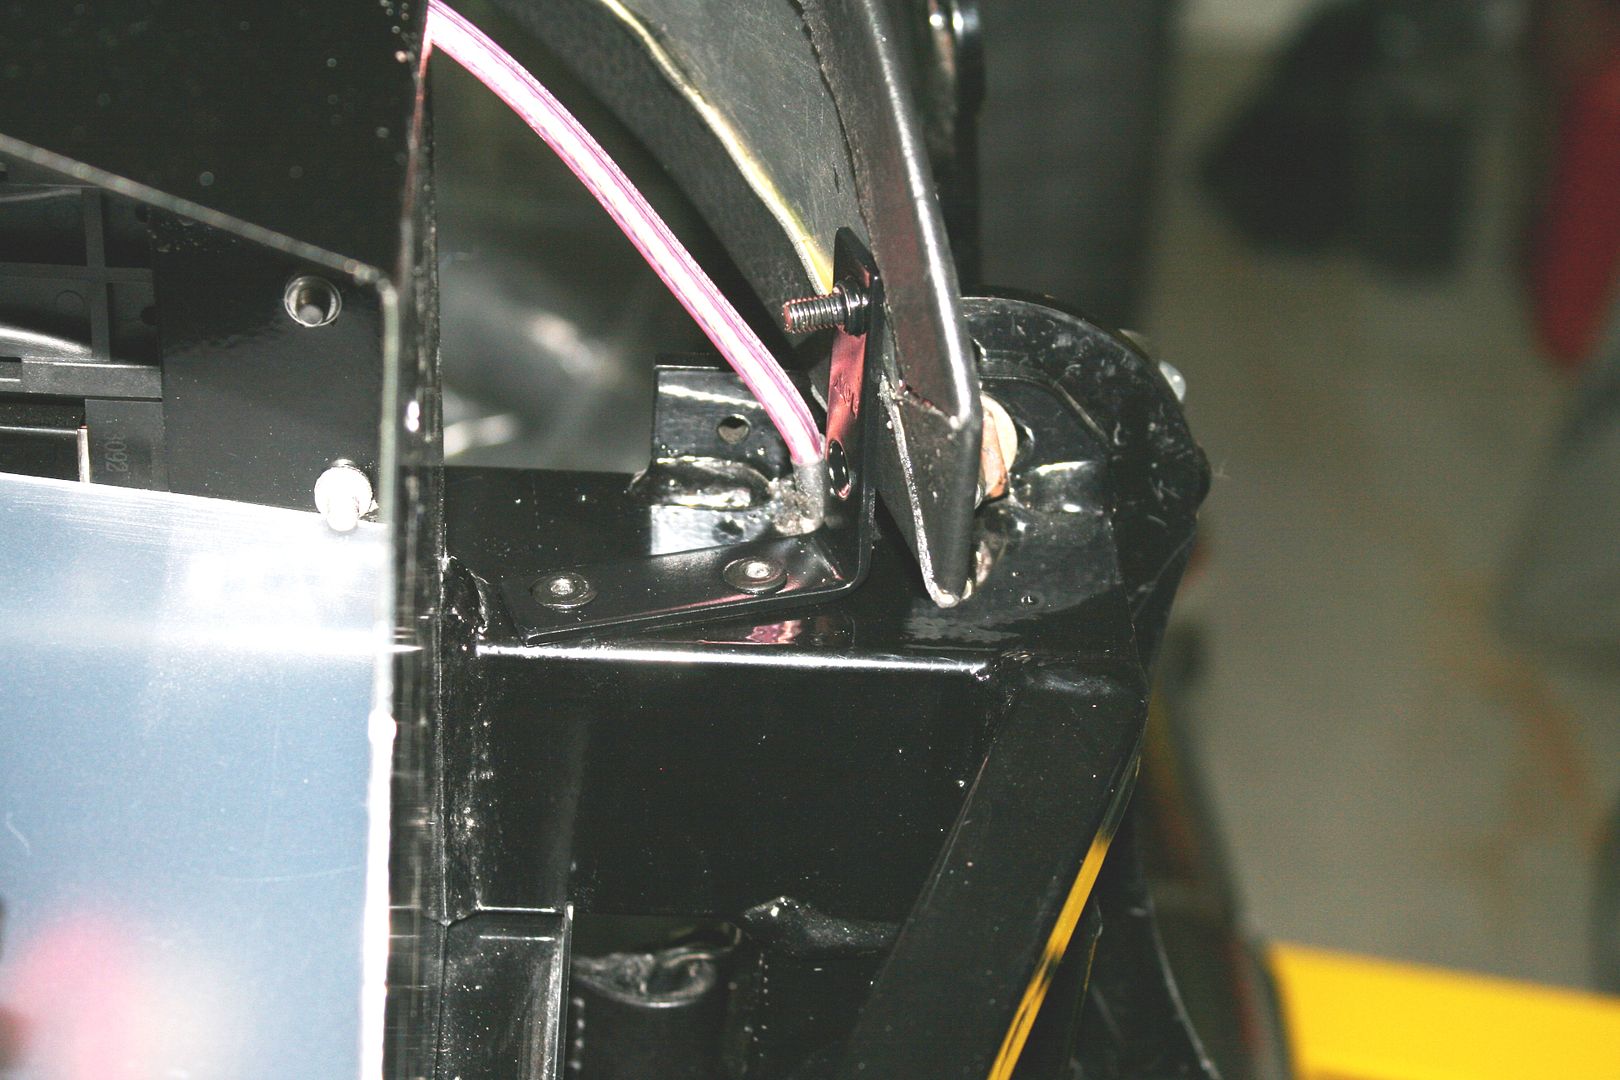
I had marked where the dash ends landed with the body on. So with the body off, put a couple brackets to hold them in place. I know some guys just let them float, and that’s probably OK. But I went ahead and made up some brackets. Used some generic cabinet angle brackets from Ace. Put a 10-32 nutsert in one end, a little black rattle can, and then riveted to the main 2 inch dash tube. Used a machine screw and finish washer on each end, same as I used under the dash, to hold the dash ends in place. The screws are basically hidden from view, but still can be reached if necessary. Not very clear, but this is a picture of the DS. The PS is similar.
My Mk3 has the fuse box in the glove box. This was a mod by the fabricator that started the kit, and it’s handy. Thought of doing the same thing with the Mk4 build, but would have required a number of changes to the harness among other things. So mounted the fuse box in the factory provided location. My OCD had two problems with this location. First I didn’t like that one corner was left basically hanging with no support. So made up a little bracket (I knew those supplied fan braces that nobody uses were good for something) and riveted to the chassis tube. Now all four corners are attached. Used a 10-32 nutsert (I know, again…) same as the other corners. So easy enough to remove if necessary.
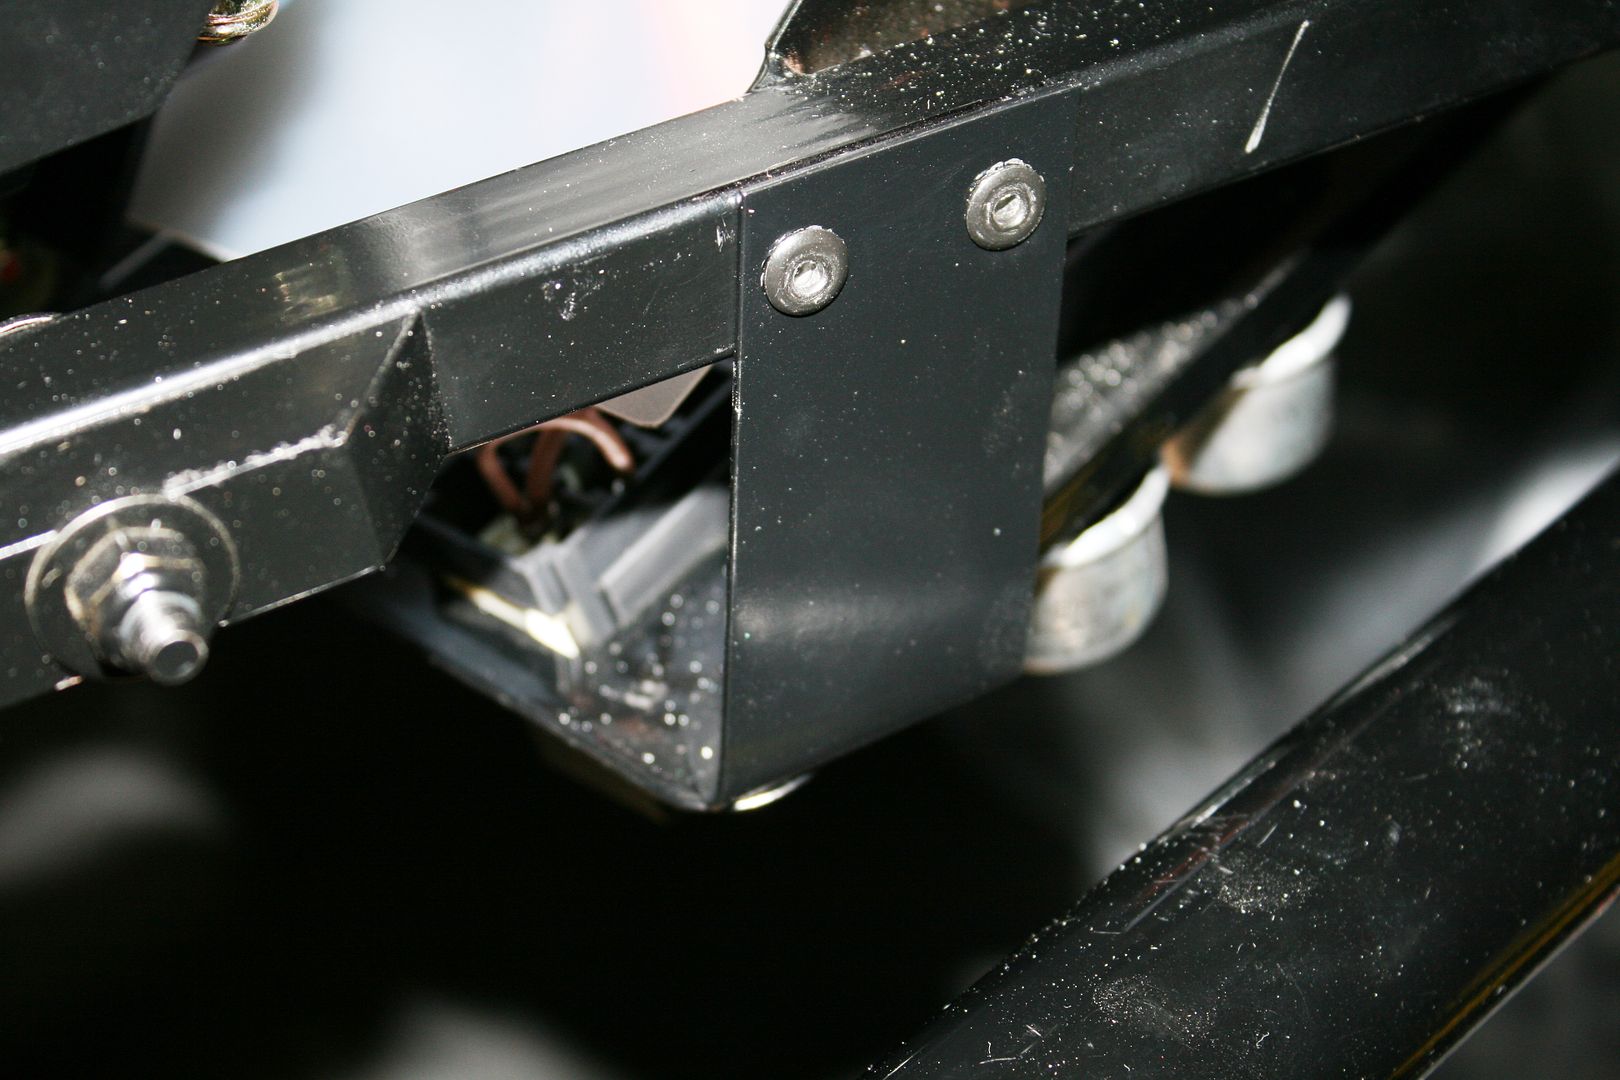
The other thing I couldn’t get my head around was the back side of the fuse box directly under the clutch MC, vulnerable to this plus maybe moisture from the windshield post and just dust/dirt in general. So I made up a cover from a heavy plastic sheet notebook cover from the local Staples. It’s fitted with the sides bent down and snaps around the back of the fuse box reasonably well. It’s far from watertight, so basically is only going to redirect stuff away. But I feel better with it there.
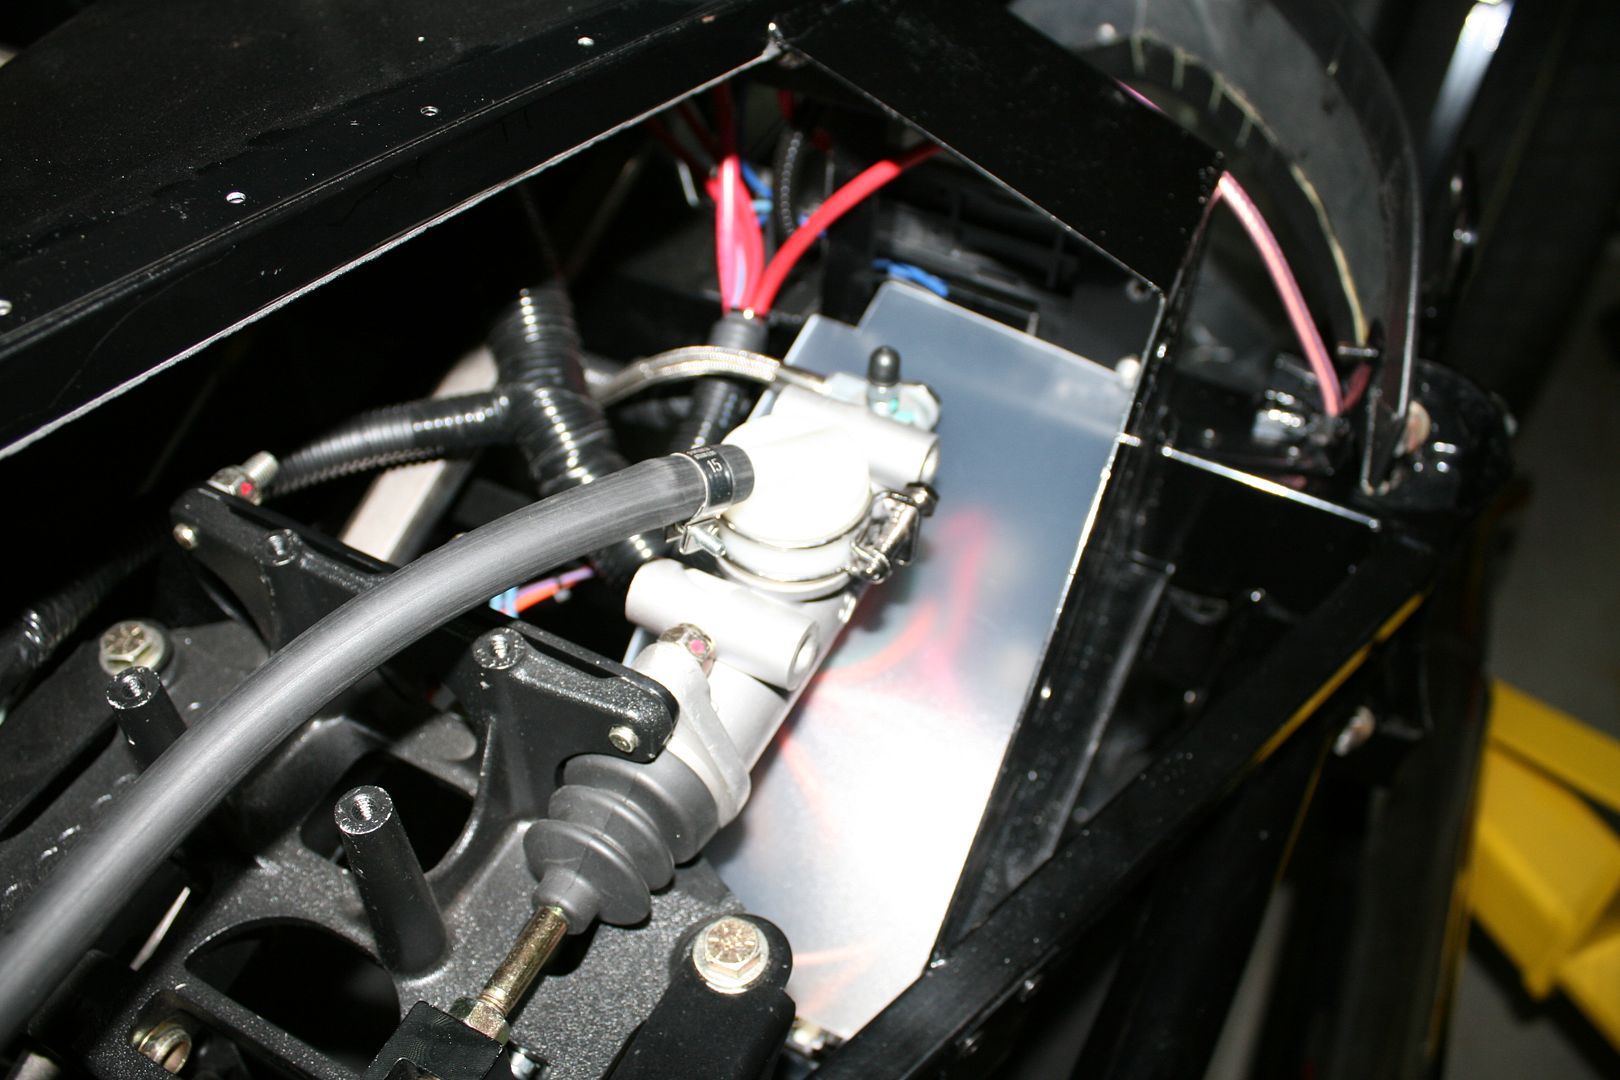
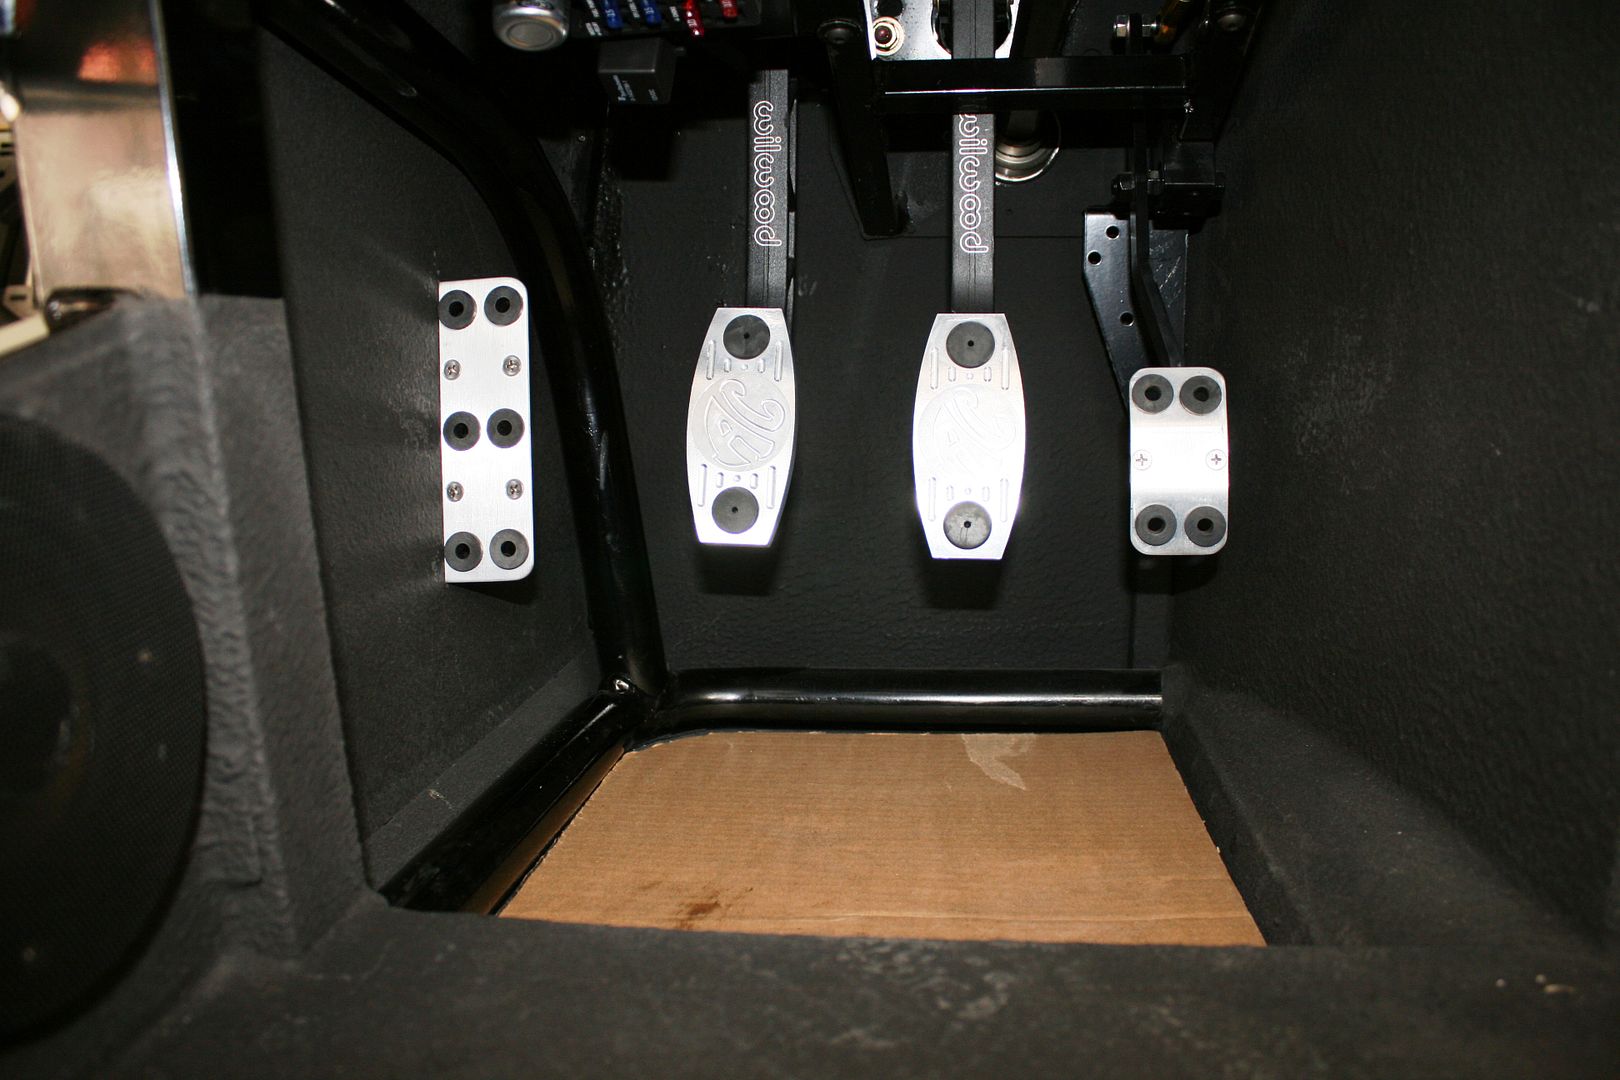
Yesterday I installed the last two cockpit sheet metal pieces. The DS footbox outer side and top. Bit of a milestone to get the last two pieces permanently attached. Next was to install the Russ Thompson dead pedal assembly on the footbox side. I played with the location to get the depth and angle comfortable for where my 10-1/2 wides rest. This is the final pedal setup with the Russ Thompson accelerator and dead pedal, and Wilwood box with Forte AC pedals. I’m really happy with the spacing and how they fall under my feet while sitting in the seat.
I’m now going to start installing carpet. Hope to get it done before paint is ready, but will prioritize so I’m ready any time. I’m using the FFR supplied pieces as patterns for Bentley carpet material.
Last edited by edwardb; 10-05-2014 at 05:03 PM.
Build 1: Mk3 Roadster #5125. Sold 11/08/2014.
Build 2: Mk4 Roadster #7750. Sold 04/10/2017.
Build Thread
Build 3: Mk4 Roadster 20th Anniversary #8674. Sold 09/07/2020.
Build Thread and
Video.
Build 4: Gen 3 Type 65 Coupe #59. Gen 3 Coyote. Legal 03/04/2020.
Build Thread and
Video
Build 5: 35 Hot Rod Truck #138. LS3 and 4L65E auto. Rcvd 01/05/2021. Legal 04/20/2023.
Build Thread. Sold 11/9/2023.
-
10-06-2014, 01:52 PM
#144
Senior Member
Paint is happening!
Today at lunch drove out to the place that’s going to chrome my roll bar, and turns out it was pretty close to where my car is getting painted. So of course had to drop in and see how it’s doing. Parting lines all ground down and body is cleaned up and was in the paint booth with a coat of baked on epoxy sealer. Painter told me today it would get its first high build primer. Evercoat something. He pointed to the cans. Then all the serious sanding starts before the final primer coat. But he was pleased with how it’s going so far. So am I!
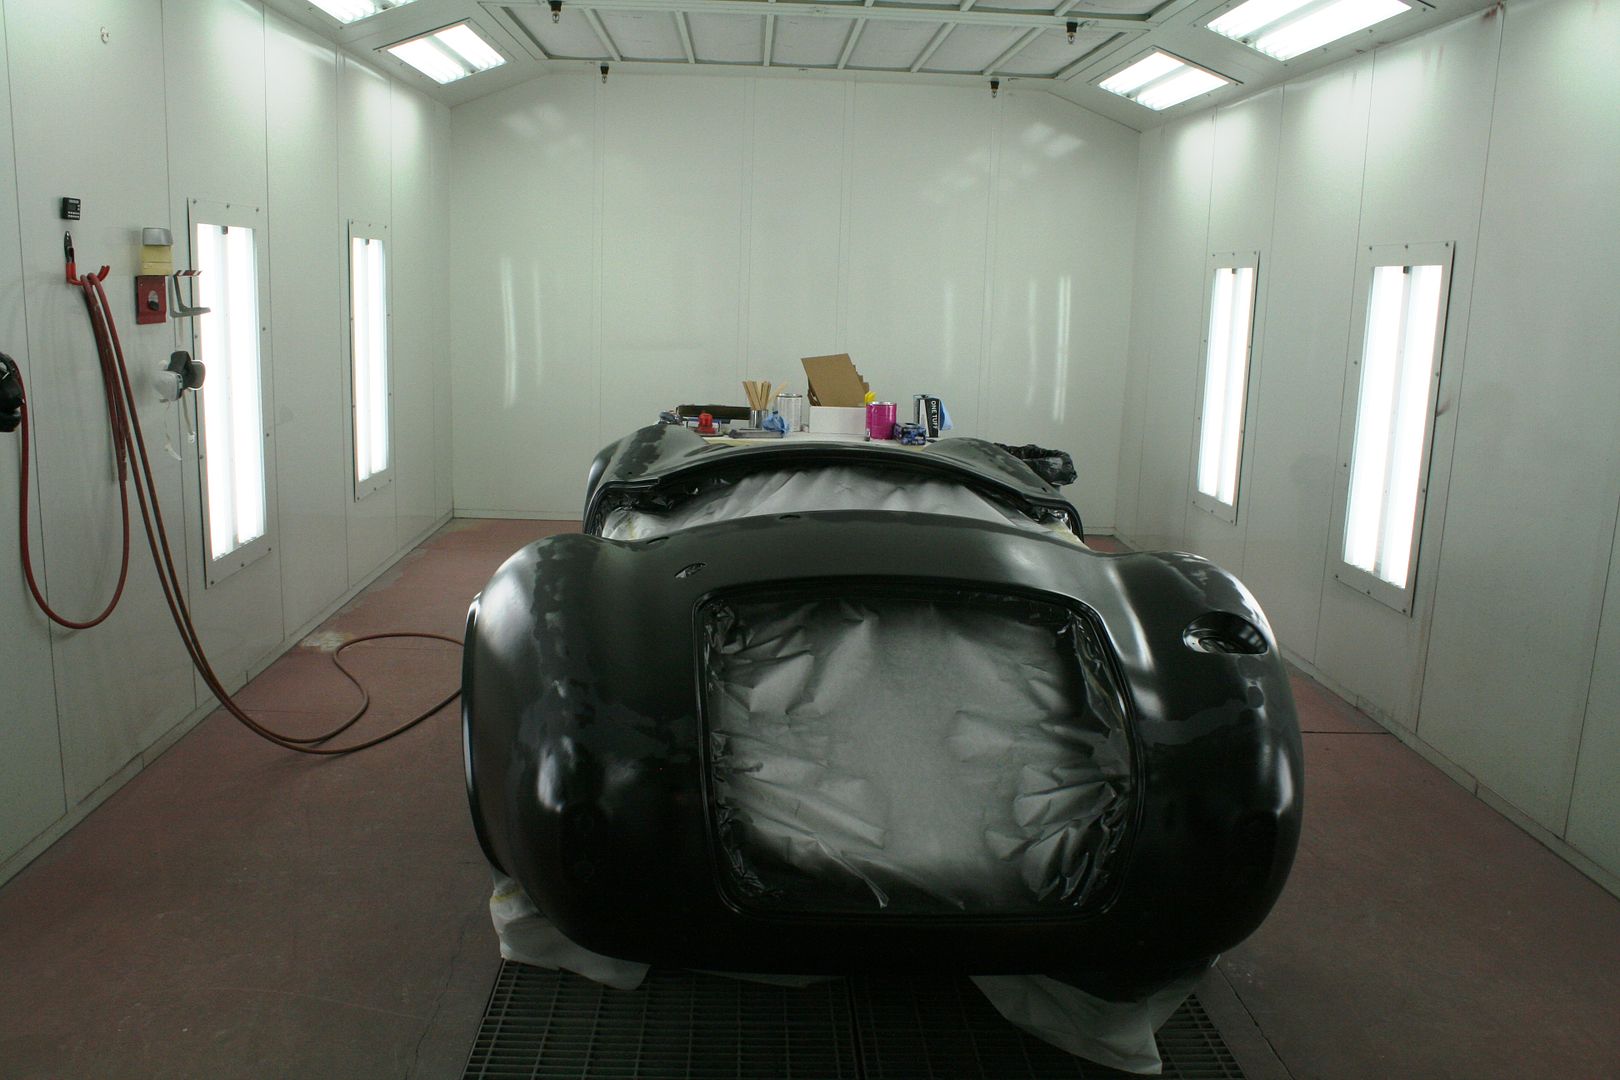
Last edited by edwardb; 10-17-2014 at 03:51 PM.
Build 1: Mk3 Roadster #5125. Sold 11/08/2014.
Build 2: Mk4 Roadster #7750. Sold 04/10/2017.
Build Thread
Build 3: Mk4 Roadster 20th Anniversary #8674. Sold 09/07/2020.
Build Thread and
Video.
Build 4: Gen 3 Type 65 Coupe #59. Gen 3 Coyote. Legal 03/04/2020.
Build Thread and
Video
Build 5: 35 Hot Rod Truck #138. LS3 and 4L65E auto. Rcvd 01/05/2021. Legal 04/20/2023.
Build Thread. Sold 11/9/2023.
-
10-06-2014, 02:18 PM
#145
Not a waxer
Moving along!
Originally Posted by
edwardb
...Painter told me today it would get its first high build primer. Evercoat something. He pointed to the cans...
Slick Sand I imagine, although some guys might still use Featherfill. I usually lay on 2.5 to 3 gallons.
Keep us updated
Jeff
-
10-06-2014, 08:07 PM
#146
Carl

EdwardB,
Thanks for this great thread... I was wondering how I was doing to mockup the Breeze roll bar and you've showed me the way.
Thanks,
Carl
Mk 4 Roadster
October 25, 2012 - Kit Arrives
April 8, 2013 - Build Starts
August 23, 2015 - Rolling Chassis/Engine & Transmission Installed
March 26, 2016 - Go Cart
-
10-09-2014, 08:26 AM
#147
Oh the suspense is killing me Paul.
-
10-09-2014, 10:18 AM
#148
Senior Member

Great progress edward and getting close! I really enjoyed seeing the primer go on because the roadster was all smooth and starting to look finished, also knowing that final paint was just around the corner. Big milestone, Congrats!
Originally Posted by
edwardb
I posted pictures before of the Breeze roll bar fixtured up for welding. Took it to a local shop and they did a nice job on the weld joint. Only charged me $20, which seemed more than fair for a non-welder like me. Back home and out of the fixture, it did need a little tweaking. The heat obviously moves things around a little. Had to adjust the spread of the main hoop just a bit, and then move the rear leg over slightly. Wasn’t bad and now slides on and off pretty easily. Next step is to get it chrome plated. In hindsight, maybe should have opted for the SS version and gone for the polishing option. But I’m committed now. Checking on a couple local places. Also have time to ship out of town if necessary.
I also went with the Breeze Roll-bars and really like them for all of the obvious reasons: 1 3/4" size, slightly shorter, slightly angled, no slip-joint and bolt. Very nice piece. (I also like when guys that know these cars walk up scratching their heads and say "I know it's a Factory Five, but the Roll-bars look better, but what are they?" good conversation piece to start talking about the car.) I've received lots of compliments on them. I opted for the SS versions (thought about getting them polished, but can't find a local place and I'm concerned it will be VERY expensive. Still may happen... later). I think you got a smoking deal on the welding. Local shop charged me $120 (I'm sure it was a little more because it was SS and a finished surface). I think it was a little high, but they did a good job , so no complaints. I installed mine and bolted them up, then took it to the welders to have it tack welded. Drove it home, removed them and took them back to the welder to have them complete the welding. They did a nice job and I was very happy with it (better the the Chrome Roll Bars I originally bought from FFR, kinda sloppy welds, then they chromed right over them). They did have to be man-handled to re-install them, as you said, I think the heat from welding does distort them slightly.
Looking forward to seeing your finished project!
F5R #7446: MK4, 302, T5 midshift, 3.55 Posi IRS, 17" Halibrands
Delivered 4/4/11, First start 9/29/12, Licensed 4/24/13, off to PAINT 2/15/14!! Wahoo!
-
10-17-2014, 01:09 PM
#149
Senior Member
Paint update and color tease
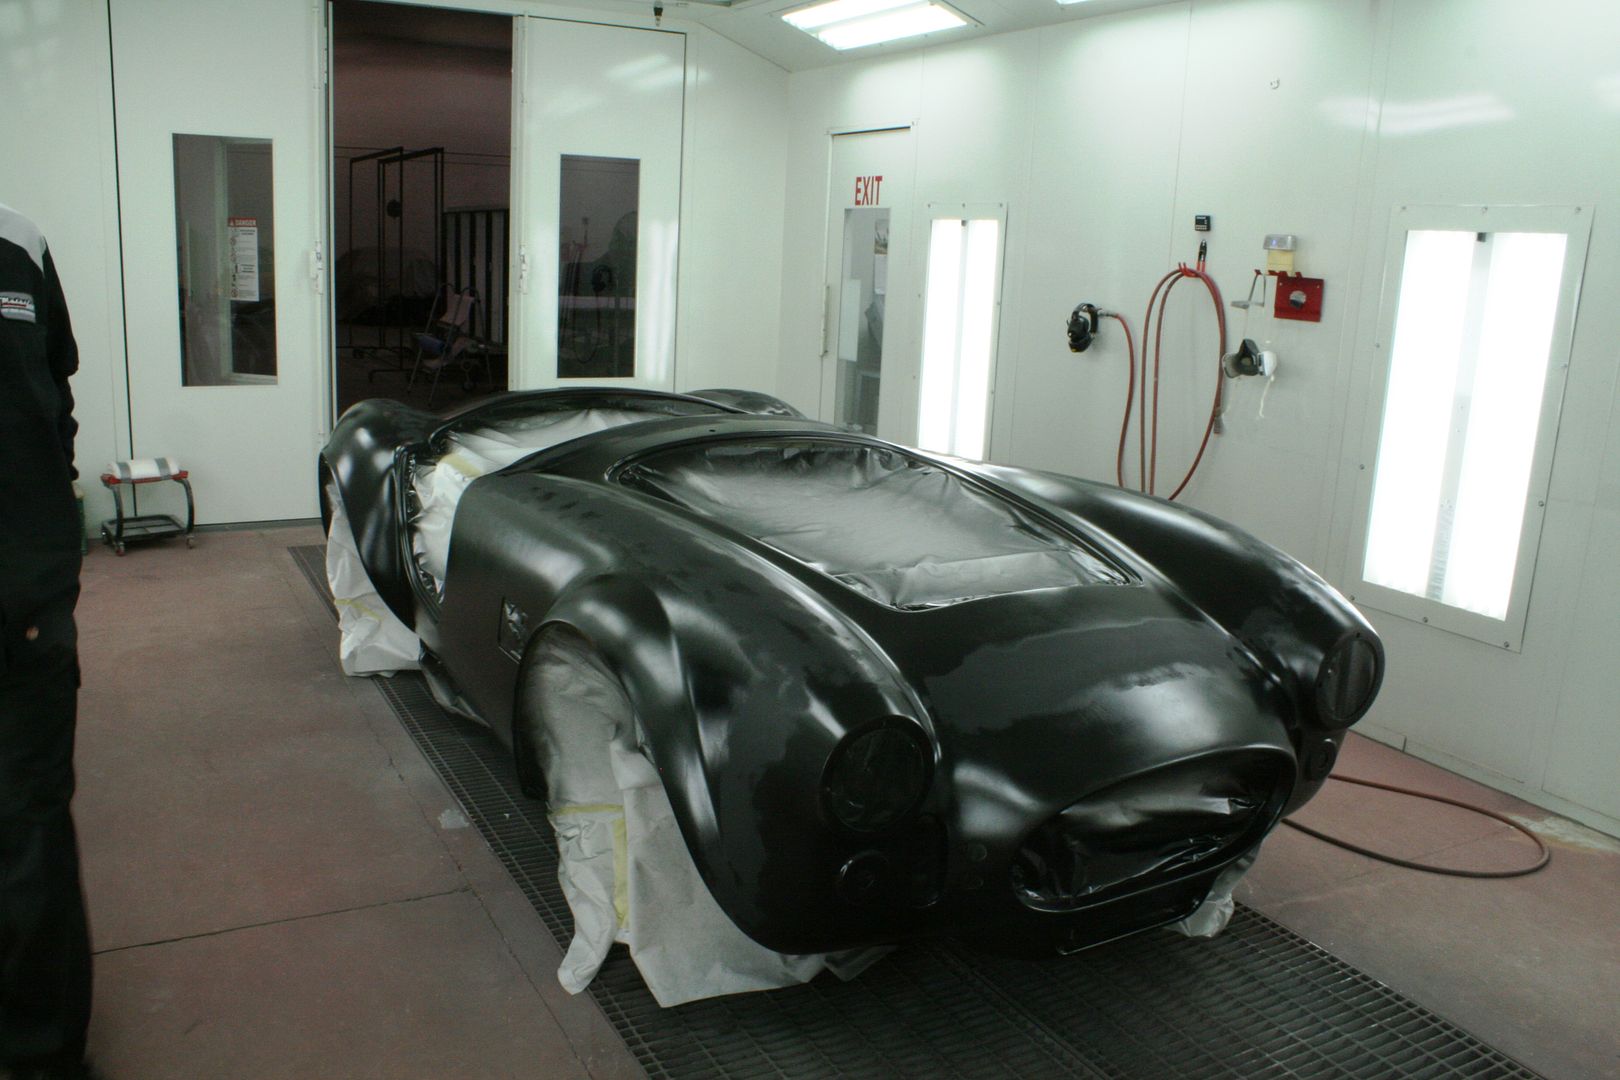
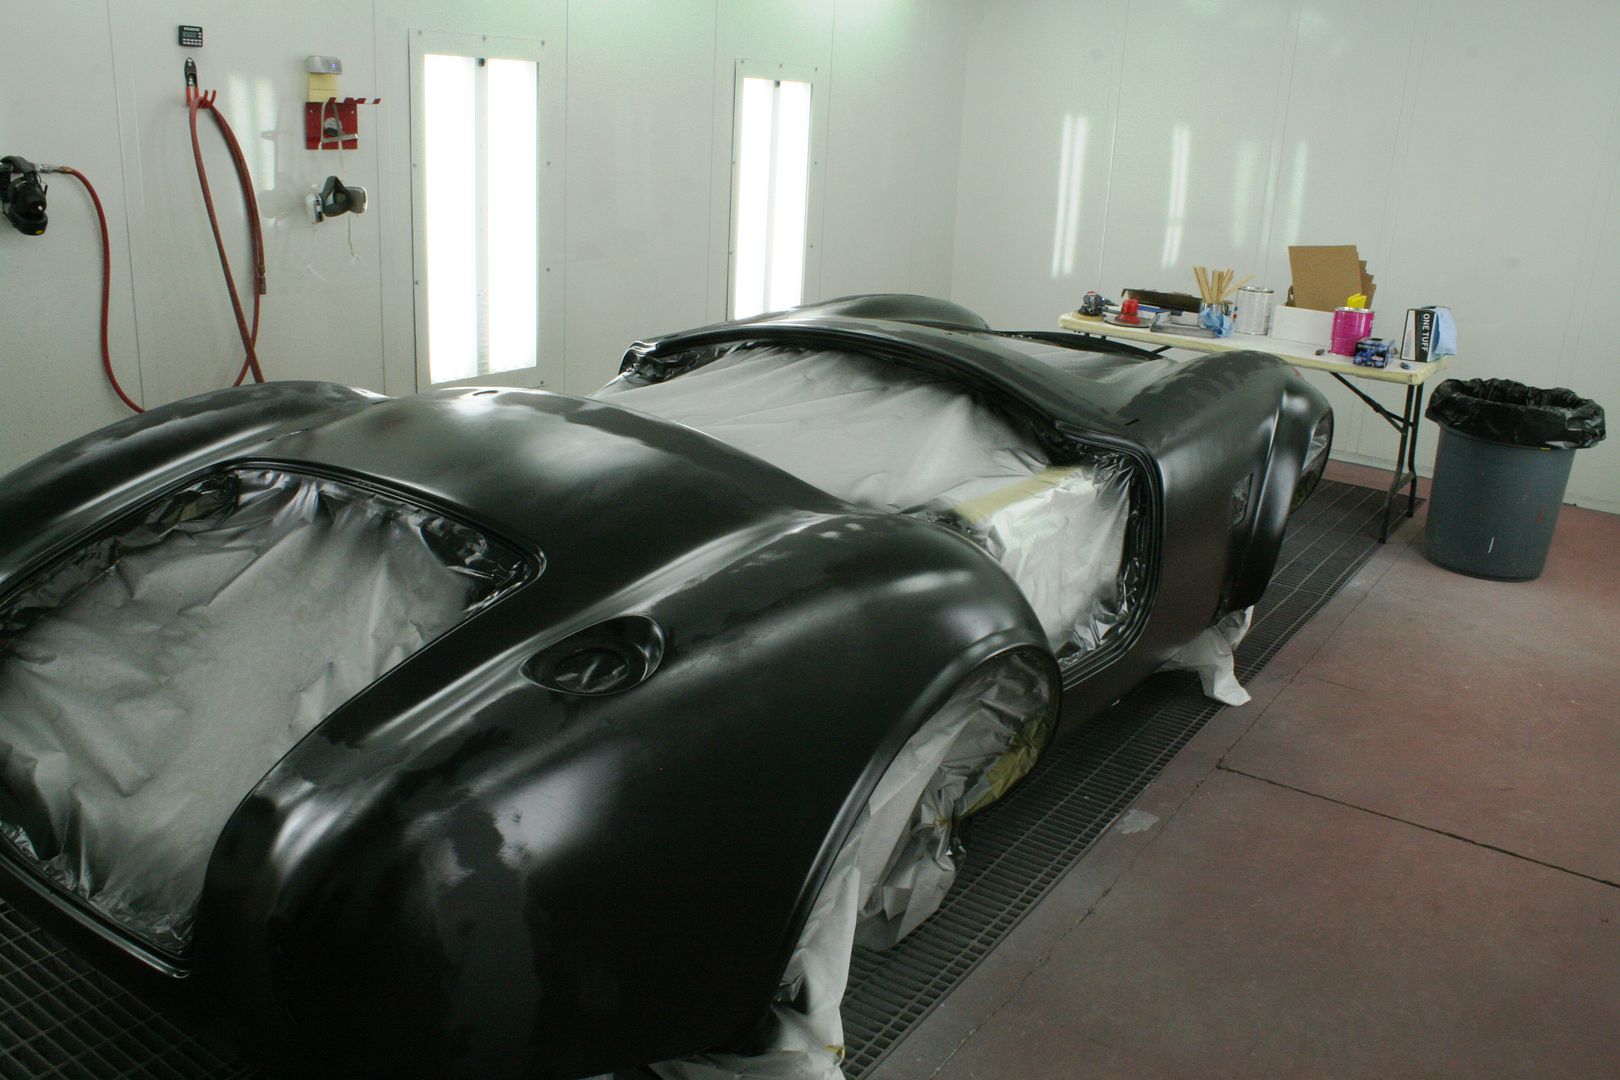
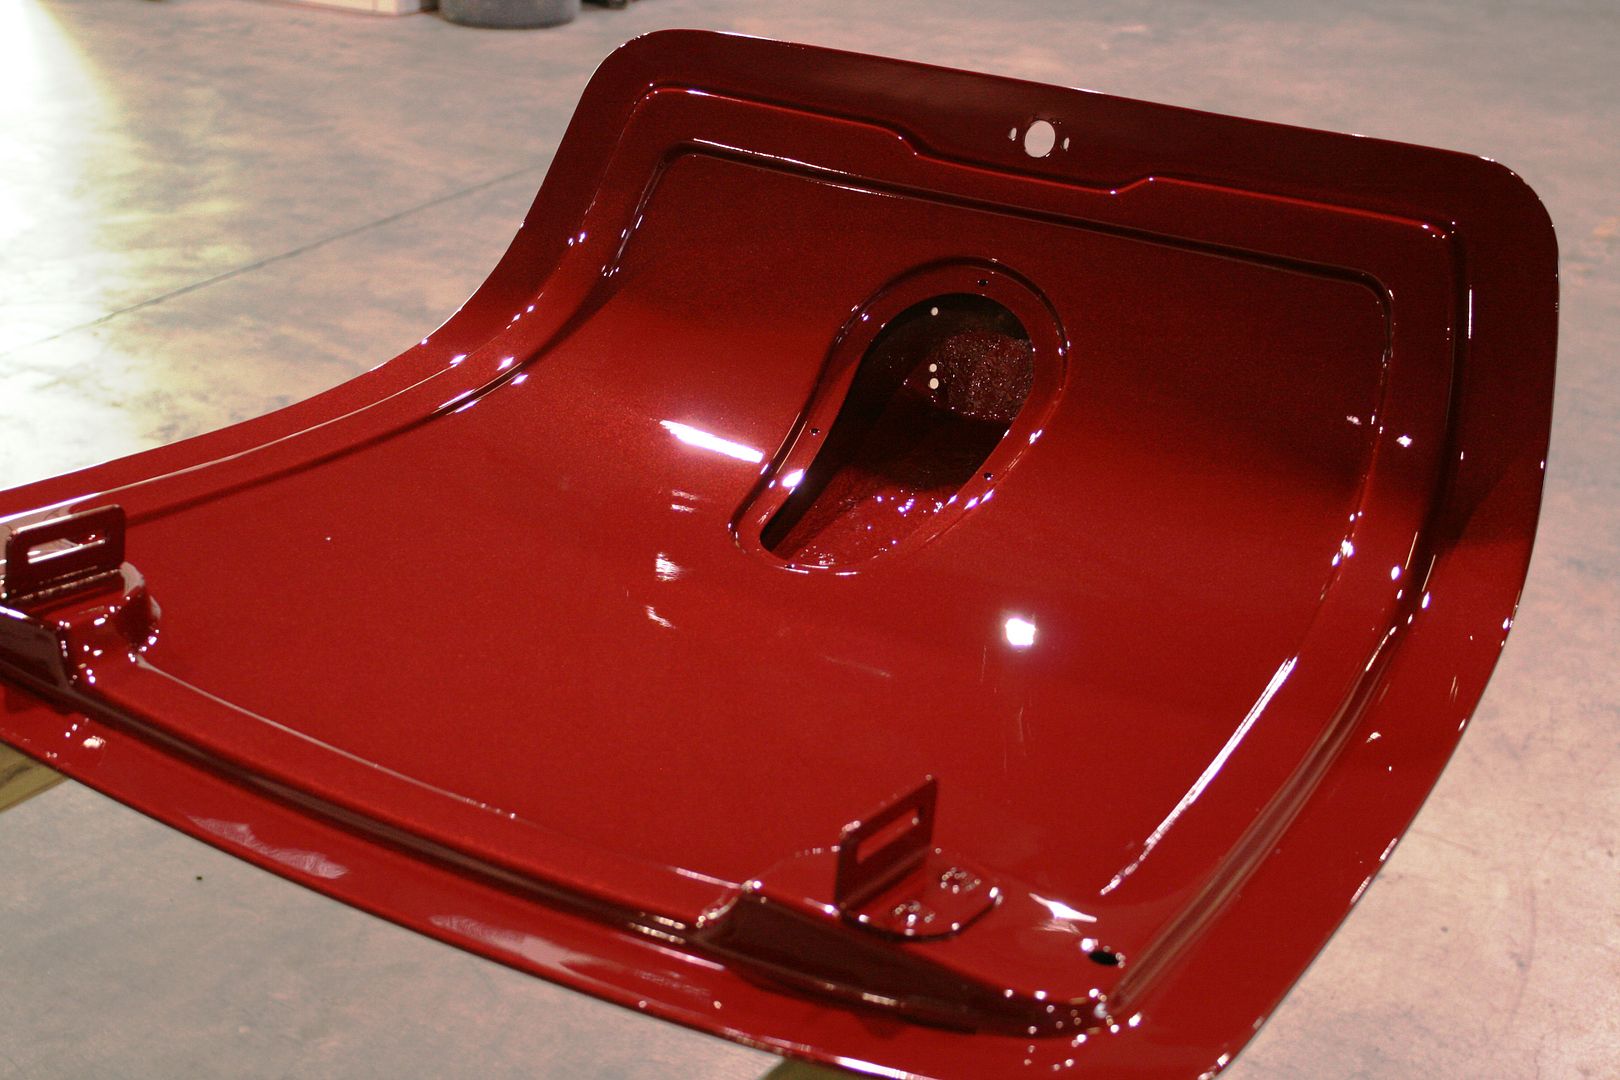
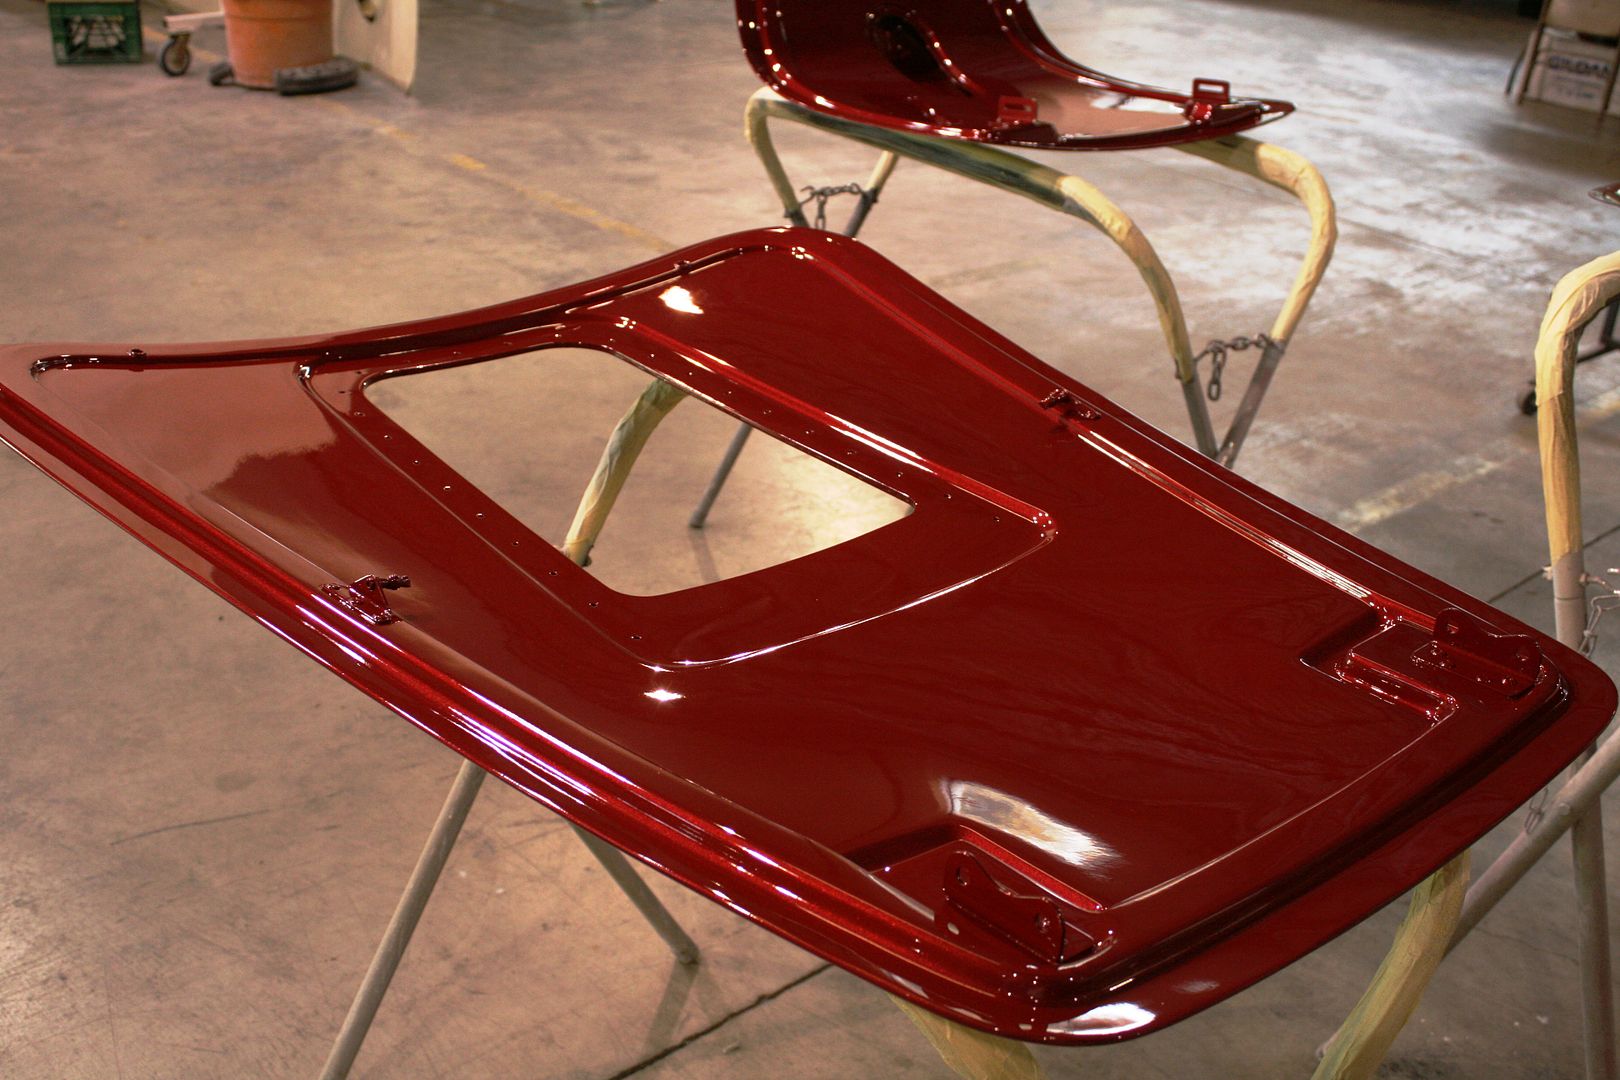
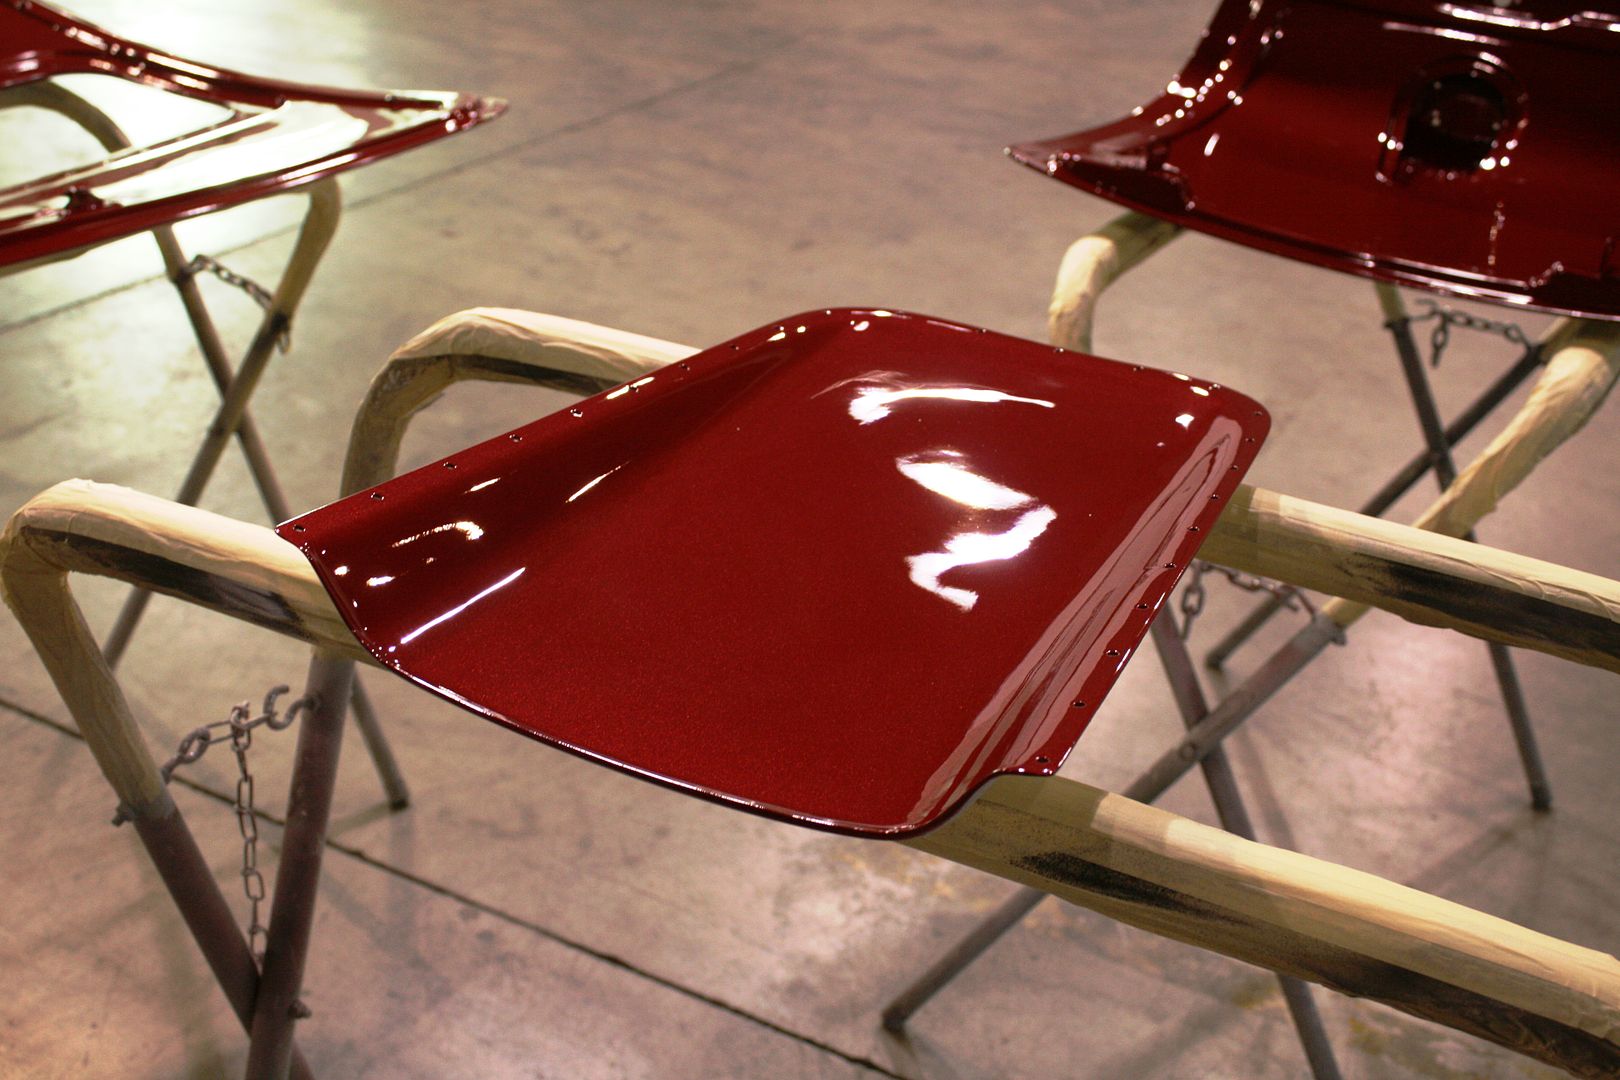
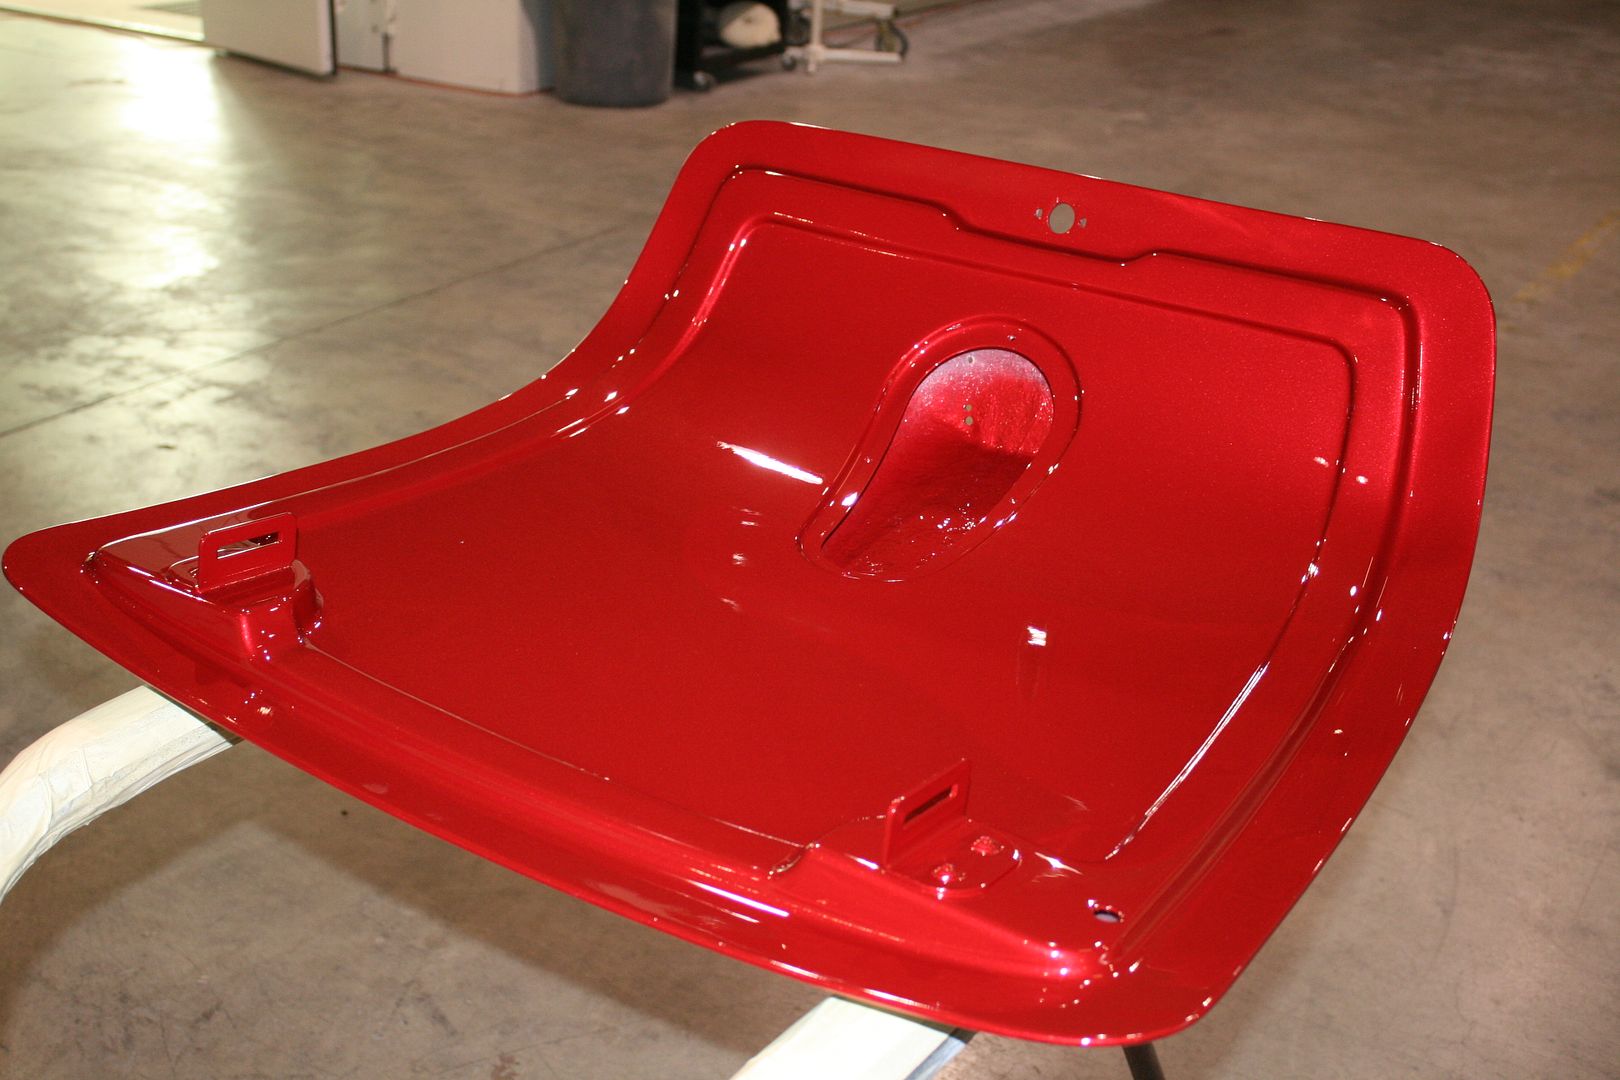
Visited the shop painting the car today over lunch. Well an extended lunch since its across town. Great progress! The car is completely final primed and sanded and ready for color. Even more of a surprise, the painter (Rick) put color on the back side of the hood, trunk lid and scoop. This is the first Ive seen of the color other than the small test sample. The pics dont do it justice. It's actually a bit lighter than the pictures show. With the metallic, should really pop in the sun. Im really happy with it. He said today he would get things finally ready, and Monday the whole car would get color. Then the white stripes. Then clear and color sand. Said it might be done as soon as next Friday. Cant wait!
Wrapping up the carpet and all the other details on the chassis. So I should be ready. This week was also big because the Mk3 is sold. Still here in the garage, and will be for a couple weeks before delivery. But its officially on the way to a new owner. Good news, but with mixed feelings.
Body in the booth today getting final prep and mask for color. Looks fantastic.
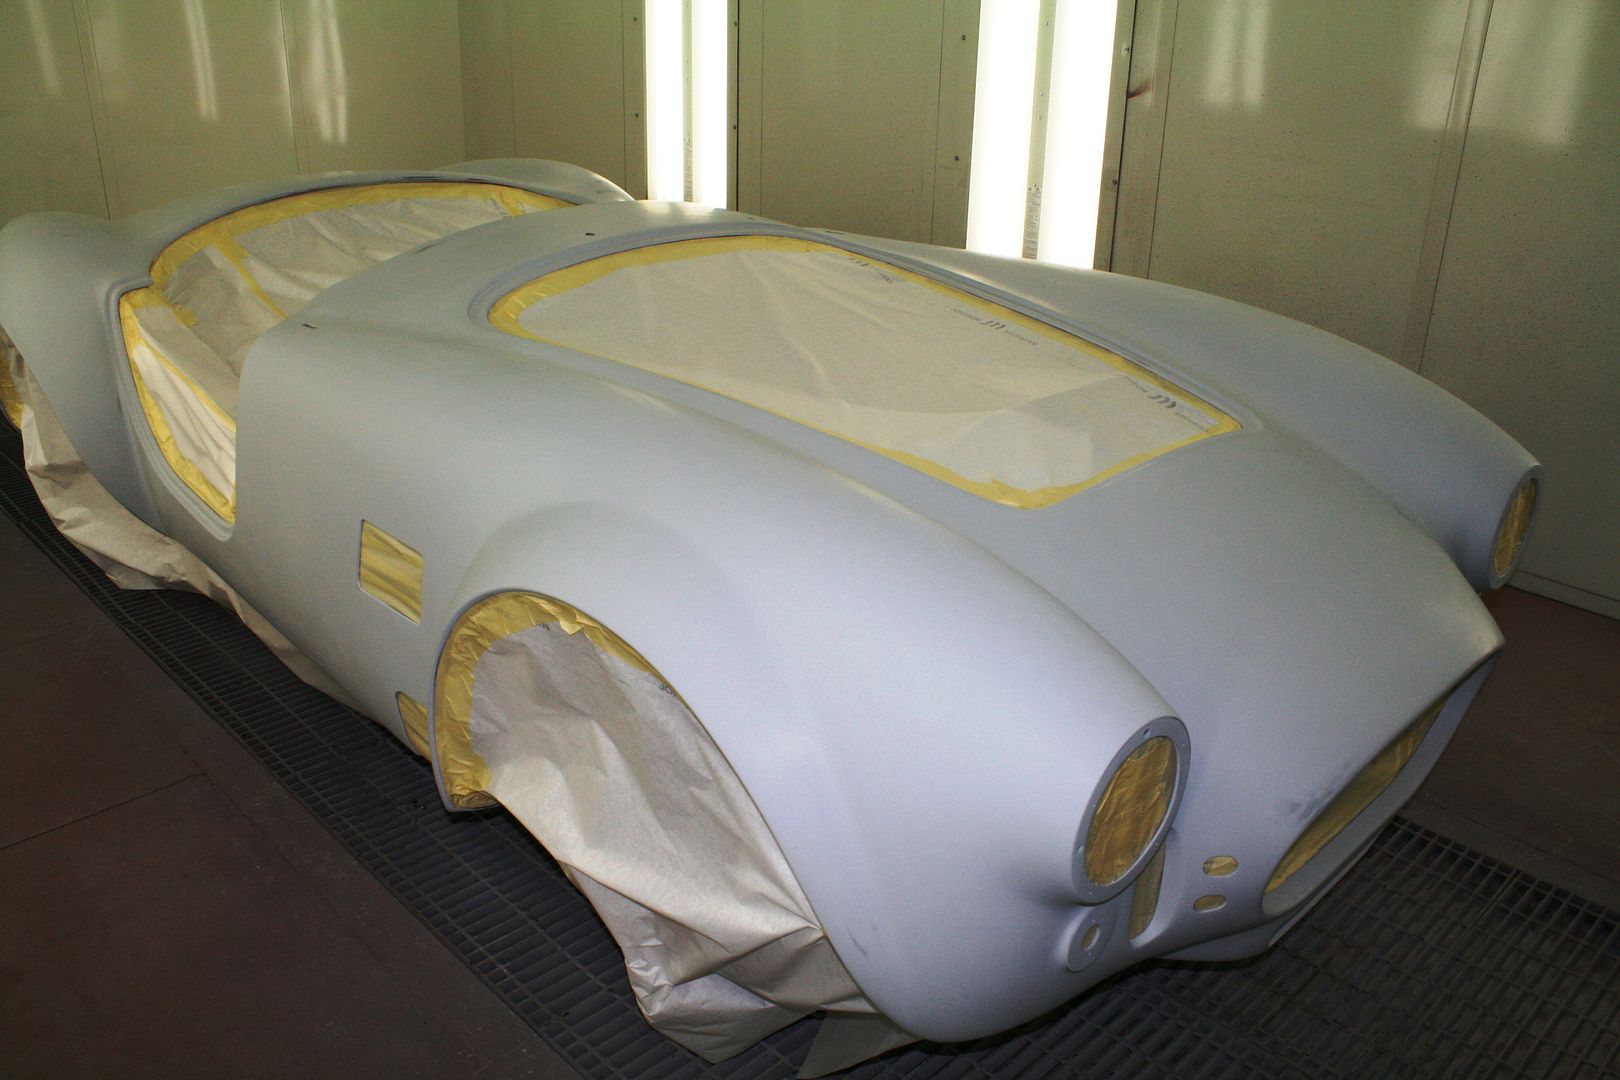
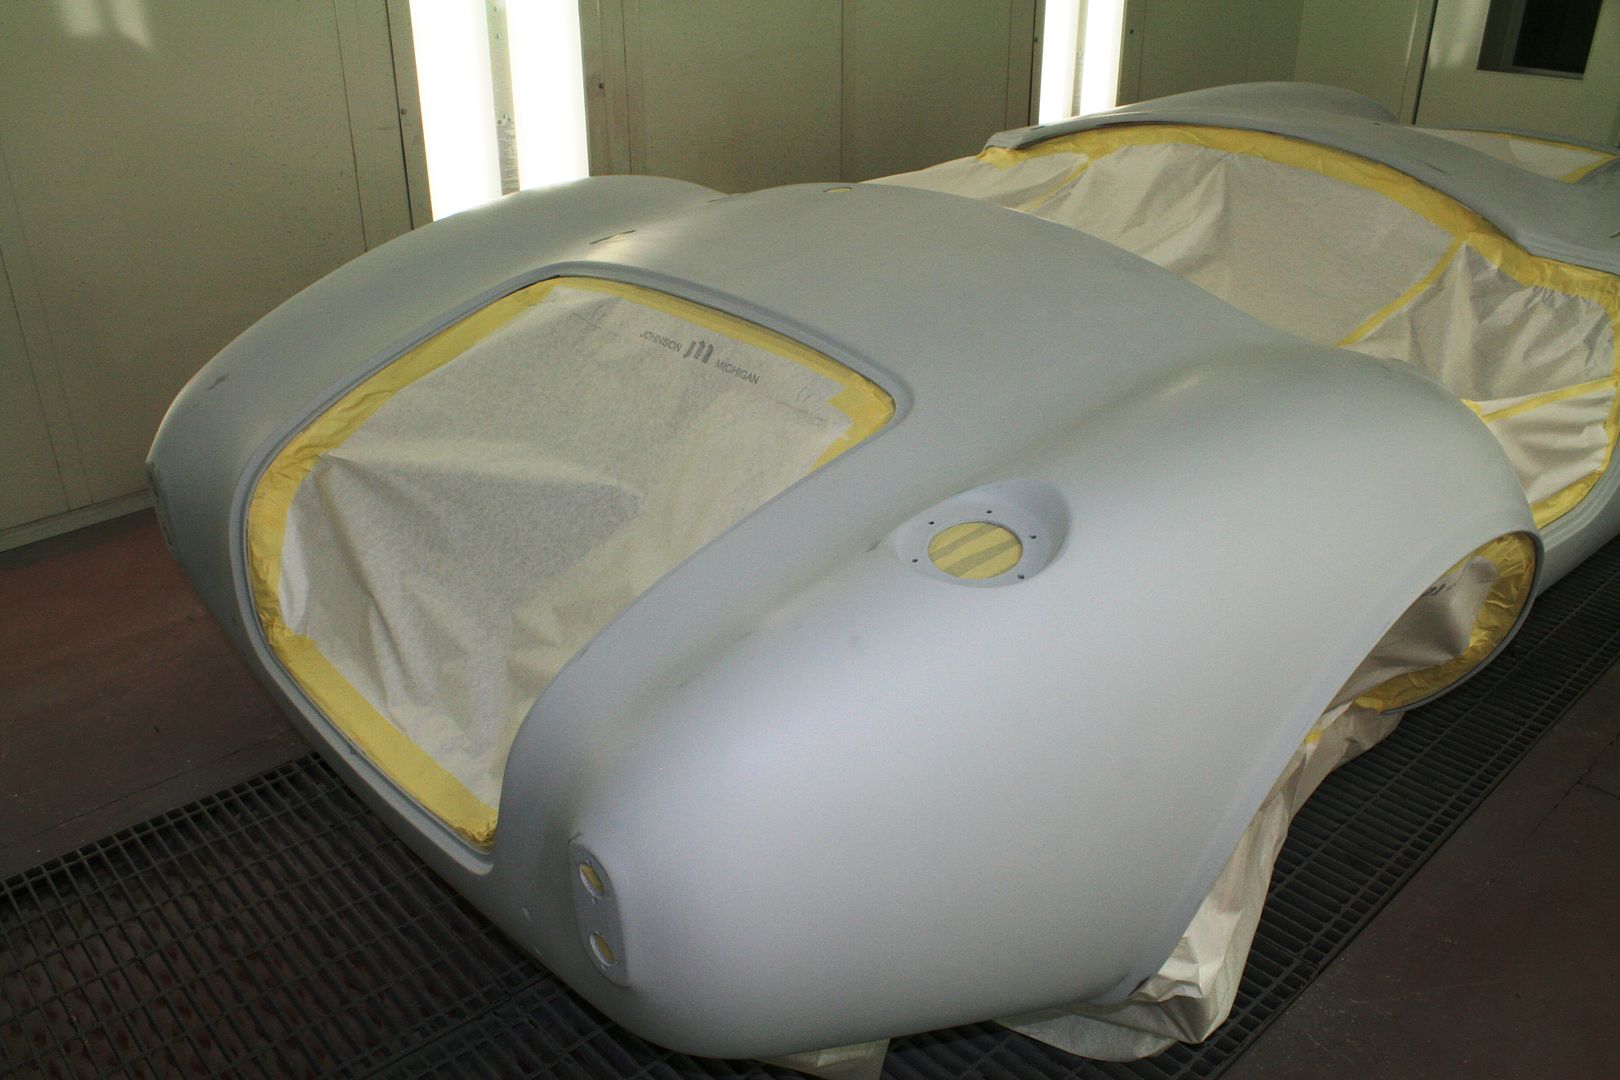
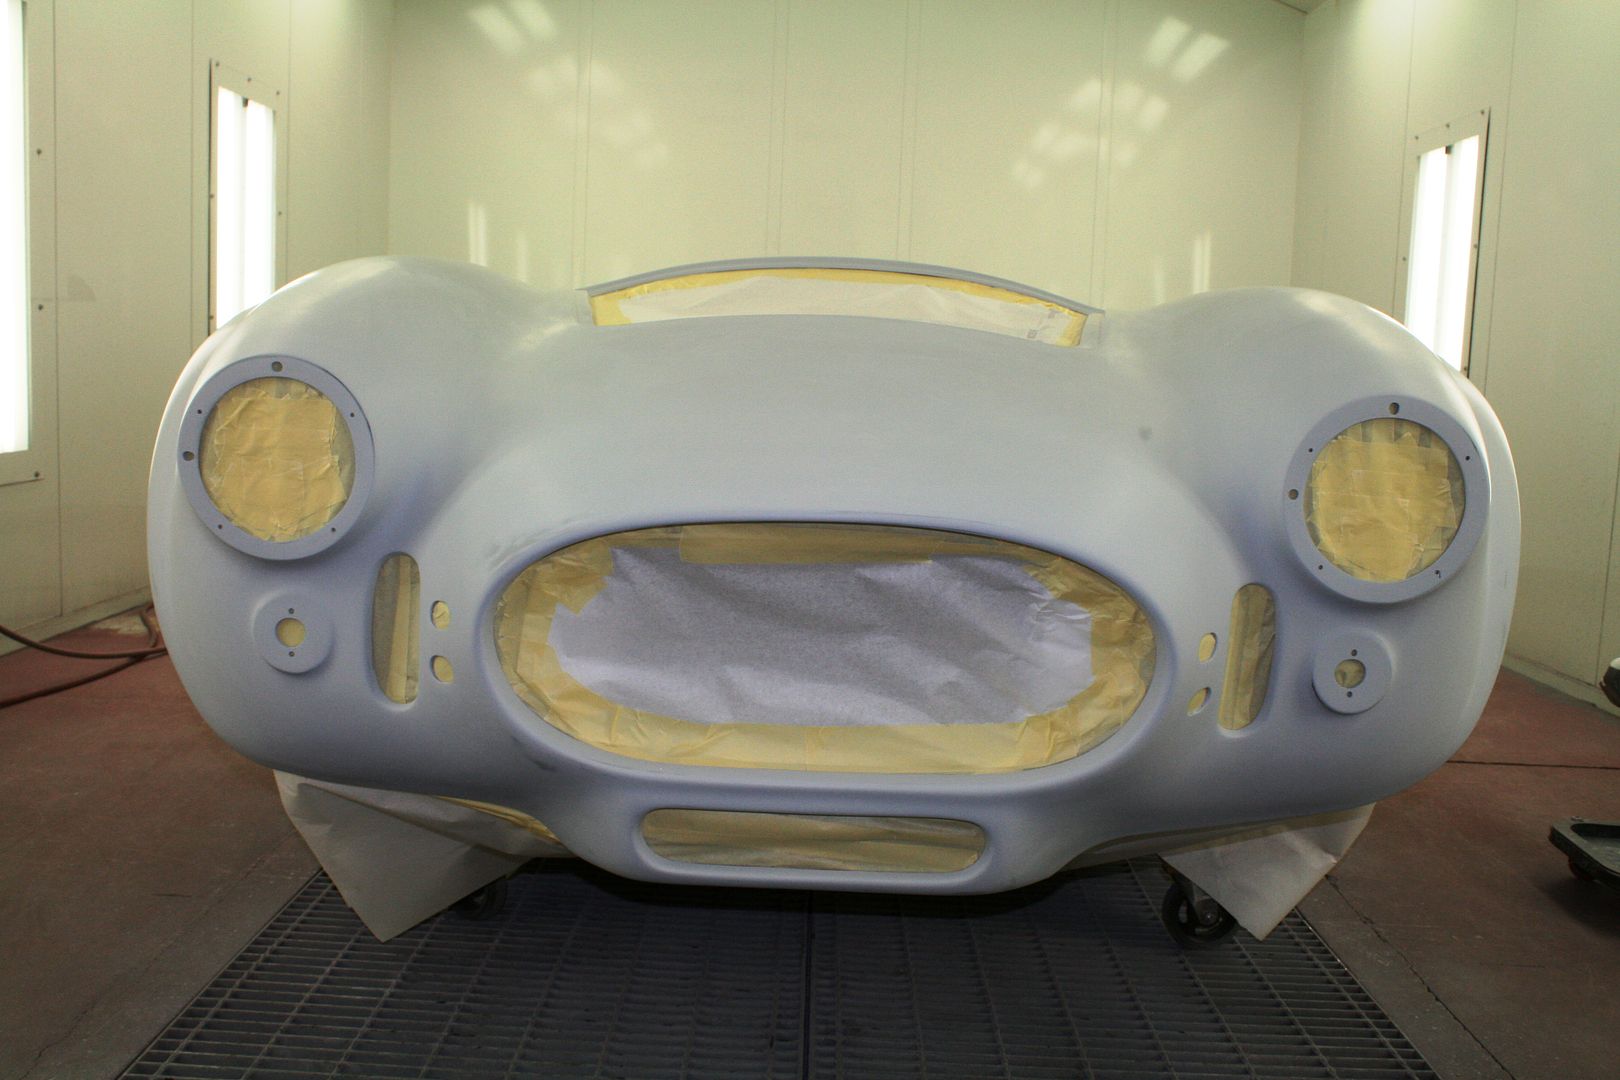
Here it is, the first color tease. I know people are going to ask the color code, and sorry I don't have it at this moment. It's a 2013/2014 Ford Metallic red. I'll get the code at some point.
I'm thinking the color is no longer a secret.
Build 1: Mk3 Roadster #5125. Sold 11/08/2014.
Build 2: Mk4 Roadster #7750. Sold 04/10/2017.
Build Thread
Build 3: Mk4 Roadster 20th Anniversary #8674. Sold 09/07/2020.
Build Thread and
Video.
Build 4: Gen 3 Type 65 Coupe #59. Gen 3 Coyote. Legal 03/04/2020.
Build Thread and
Video
Build 5: 35 Hot Rod Truck #138. LS3 and 4L65E auto. Rcvd 01/05/2021. Legal 04/20/2023.
Build Thread. Sold 11/9/2023.
-
10-17-2014, 04:47 PM
#150
Senior Member
Another paint tease picture
Didn't originally post this pic, but I'll throw it into the mix. This is with a flash. The other's weren't. Upon further review, this is probably closer to how the color will look outside in the sun. Maybe not quite this bright red. But the others are definitely a bit dark.
Build 1: Mk3 Roadster #5125. Sold 11/08/2014.
Build 2: Mk4 Roadster #7750. Sold 04/10/2017.
Build Thread
Build 3: Mk4 Roadster 20th Anniversary #8674. Sold 09/07/2020.
Build Thread and
Video.
Build 4: Gen 3 Type 65 Coupe #59. Gen 3 Coyote. Legal 03/04/2020.
Build Thread and
Video
Build 5: 35 Hot Rod Truck #138. LS3 and 4L65E auto. Rcvd 01/05/2021. Legal 04/20/2023.
Build Thread. Sold 11/9/2023.
-
10-17-2014, 09:31 PM
#151
Chuck Krueger
MK4 Kit - Picked up 4/5/14, Complete Kit, 3-Link, Wilwood upgrade, Coyote, TKO 500, First Start 7/25/15
2000 C5
2003 C5 Z06
2007 C5 Z06
-
10-18-2014, 09:06 AM
#152
I saw this Mustang in a parking lot a couple of weeks ago and told my wife that this was the color my Cobra will be.
Cobra Color.jpg
Now I have to keep looking I guess, LOL. You have good taste Paul.
-
10-18-2014, 07:28 PM
#153
Senior Member
Originally Posted by
rezell3d
I saw this Mustang in a parking lot a couple of weeks ago and told my wife that this was the color my Cobra will be.
Cobra Color.jpg
Now I have to keep looking I guess, LOL. You have good taste Paul.
OK, that's pretty funny. That does look like the same Ford color I picked. It's really OK if you use the same color.
Build 1: Mk3 Roadster #5125. Sold 11/08/2014.
Build 2: Mk4 Roadster #7750. Sold 04/10/2017.
Build Thread
Build 3: Mk4 Roadster 20th Anniversary #8674. Sold 09/07/2020.
Build Thread and
Video.
Build 4: Gen 3 Type 65 Coupe #59. Gen 3 Coyote. Legal 03/04/2020.
Build Thread and
Video
Build 5: 35 Hot Rod Truck #138. LS3 and 4L65E auto. Rcvd 01/05/2021. Legal 04/20/2023.
Build Thread. Sold 11/9/2023.
-
10-24-2014, 01:50 PM
#154
Senior Member
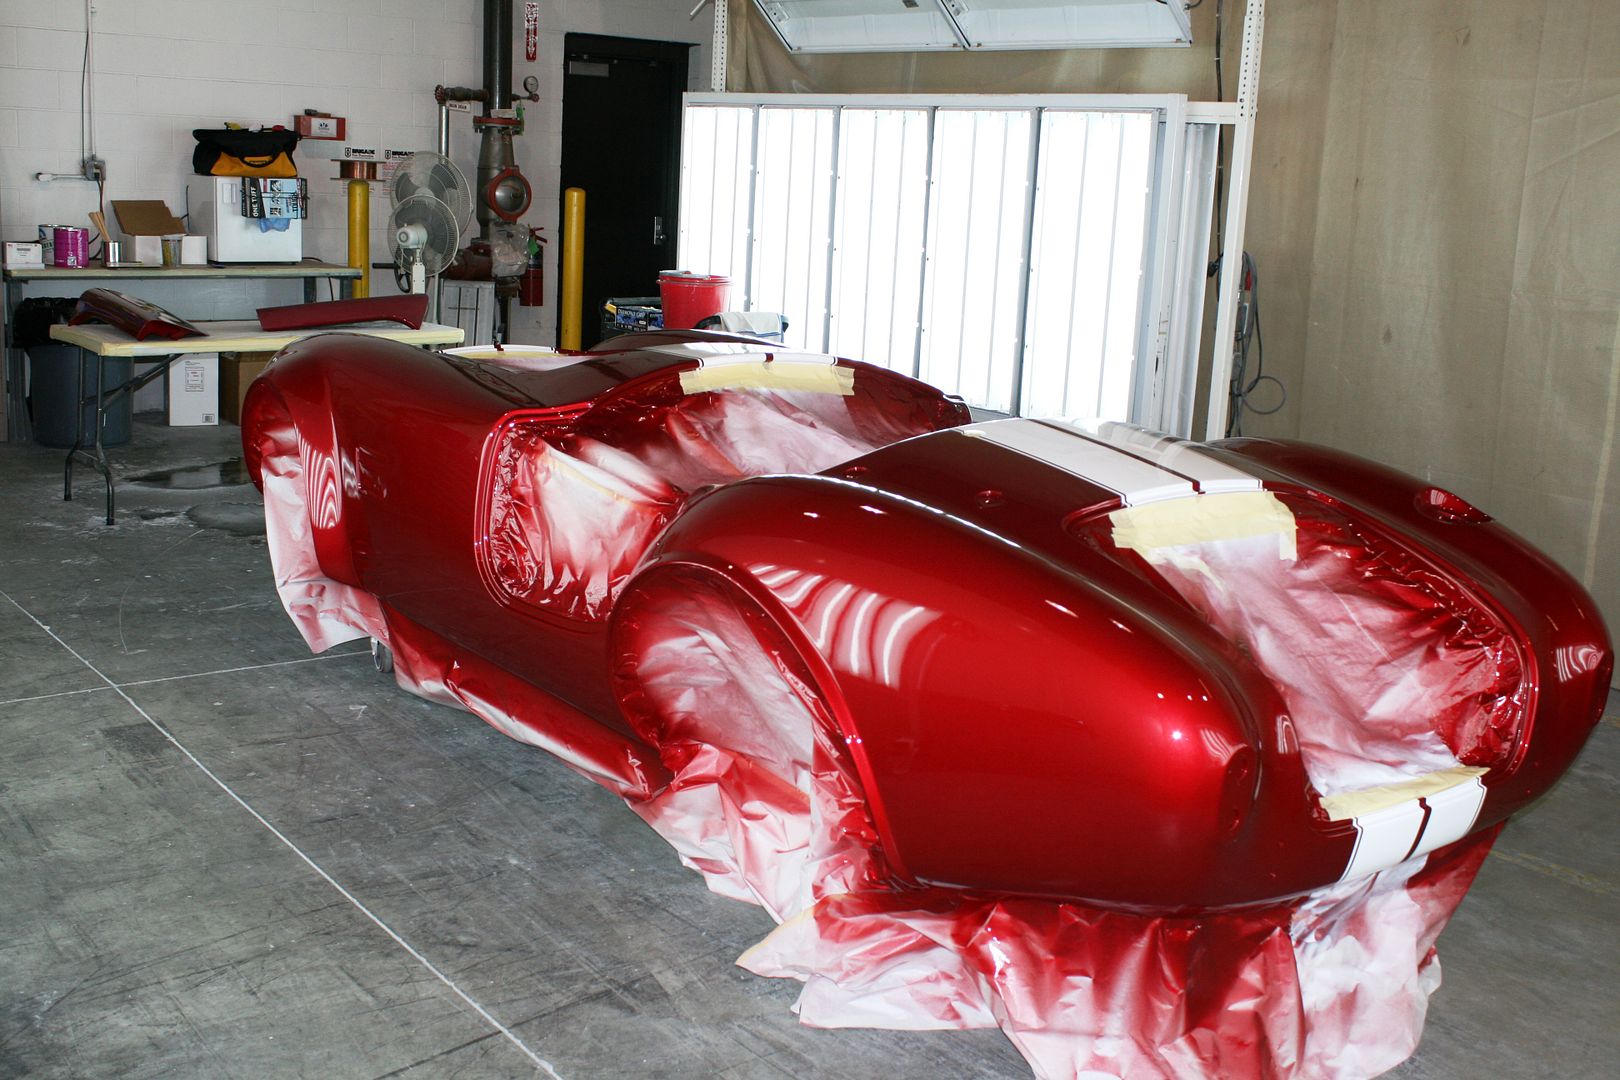
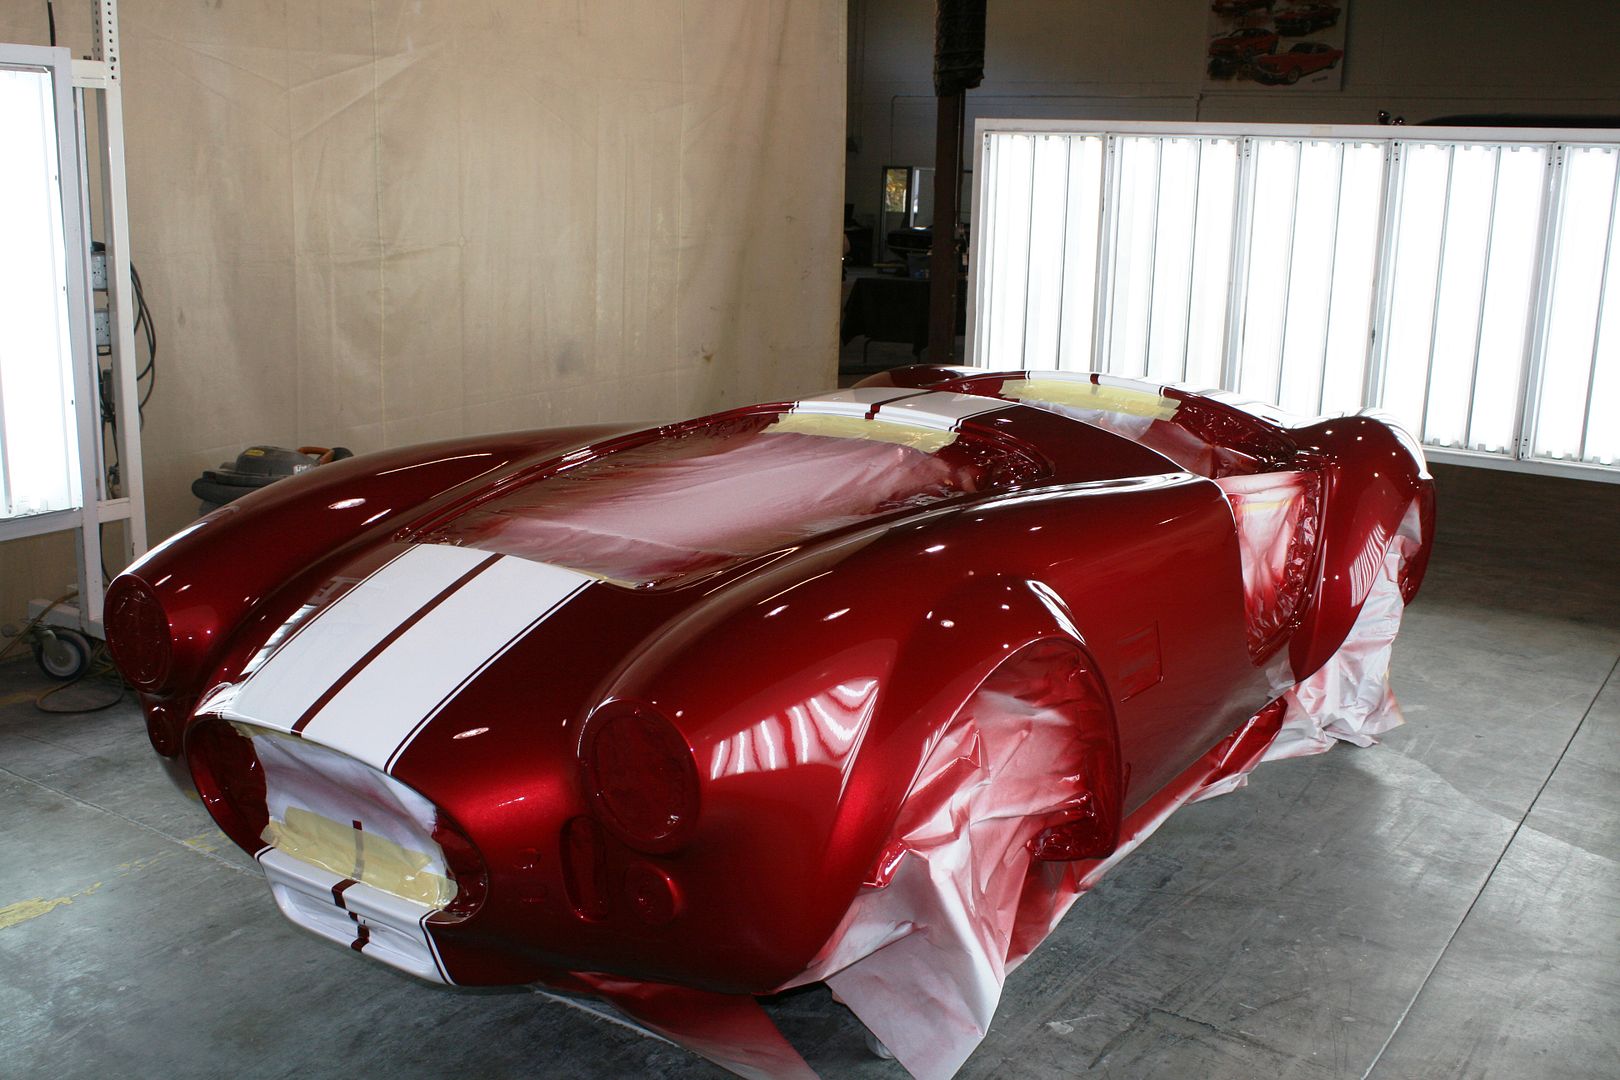
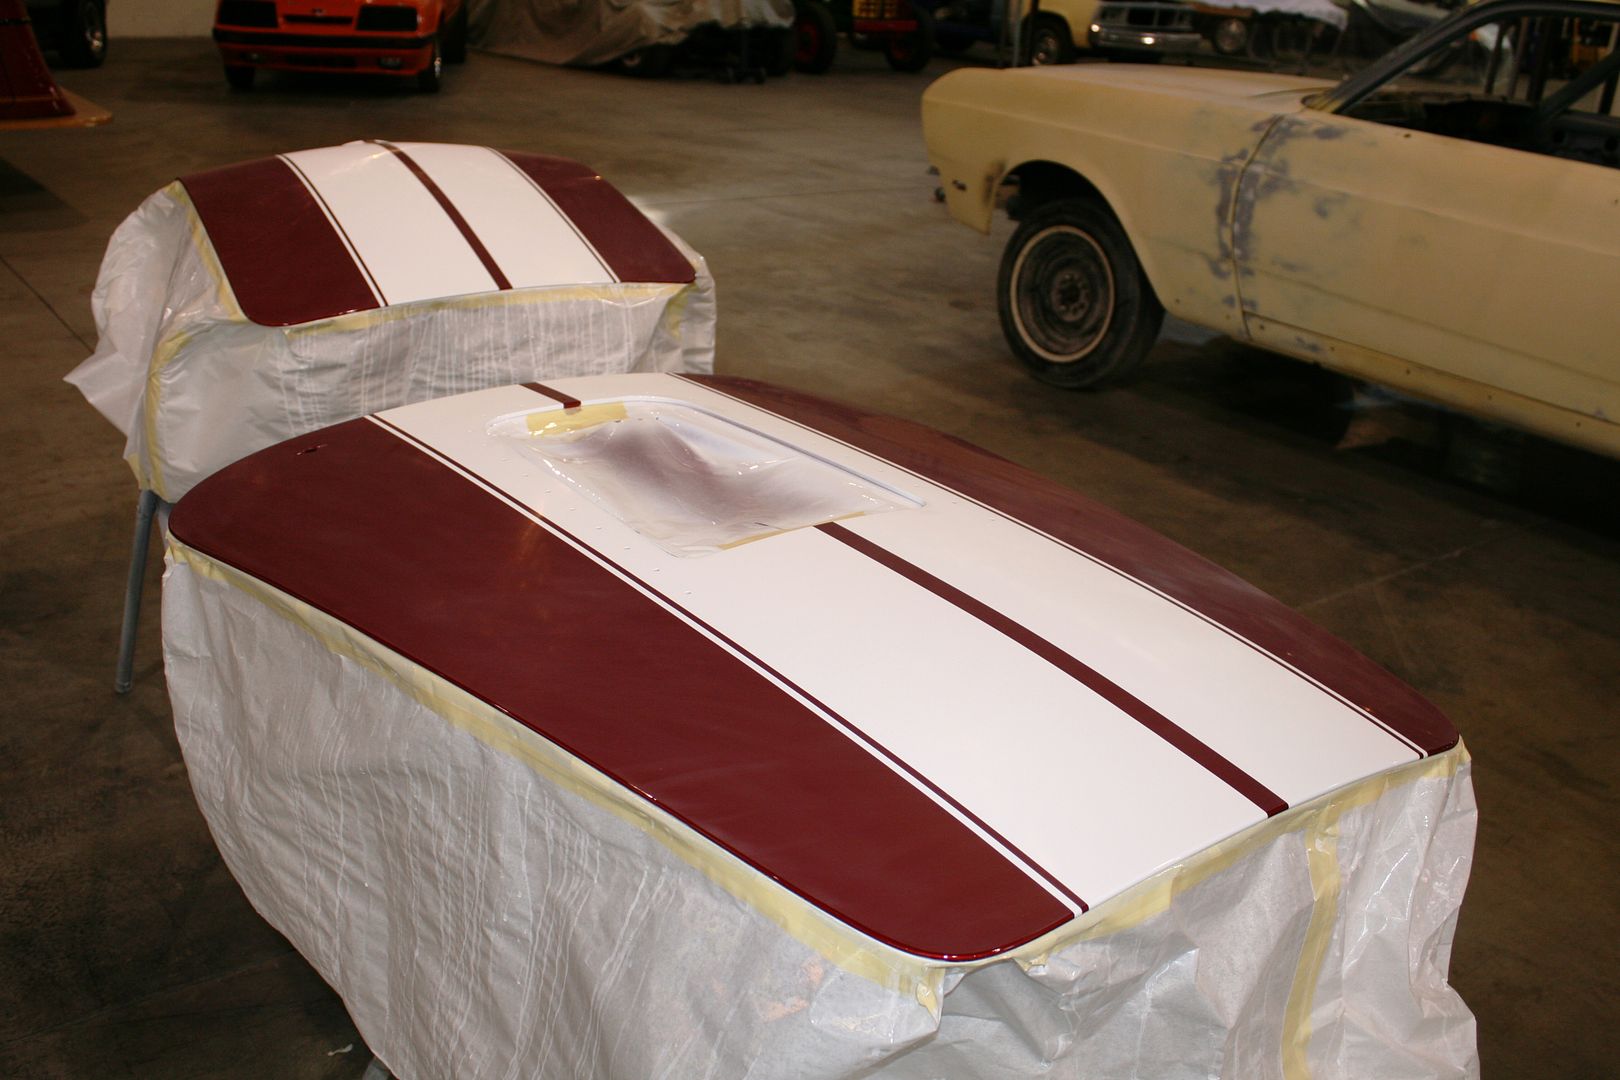
Paint Update. Nearly done!
Made another run to the paint shop today. Getting close now. Base coat, stripes, and clear all done. Cut and buff is underway. Looks outstanding. Hopefully will be done next week.
Body waiting for cut and buff. Looks good now. Will look even better soon.
Hood and trunk lid sanded. Waiting for final buff.
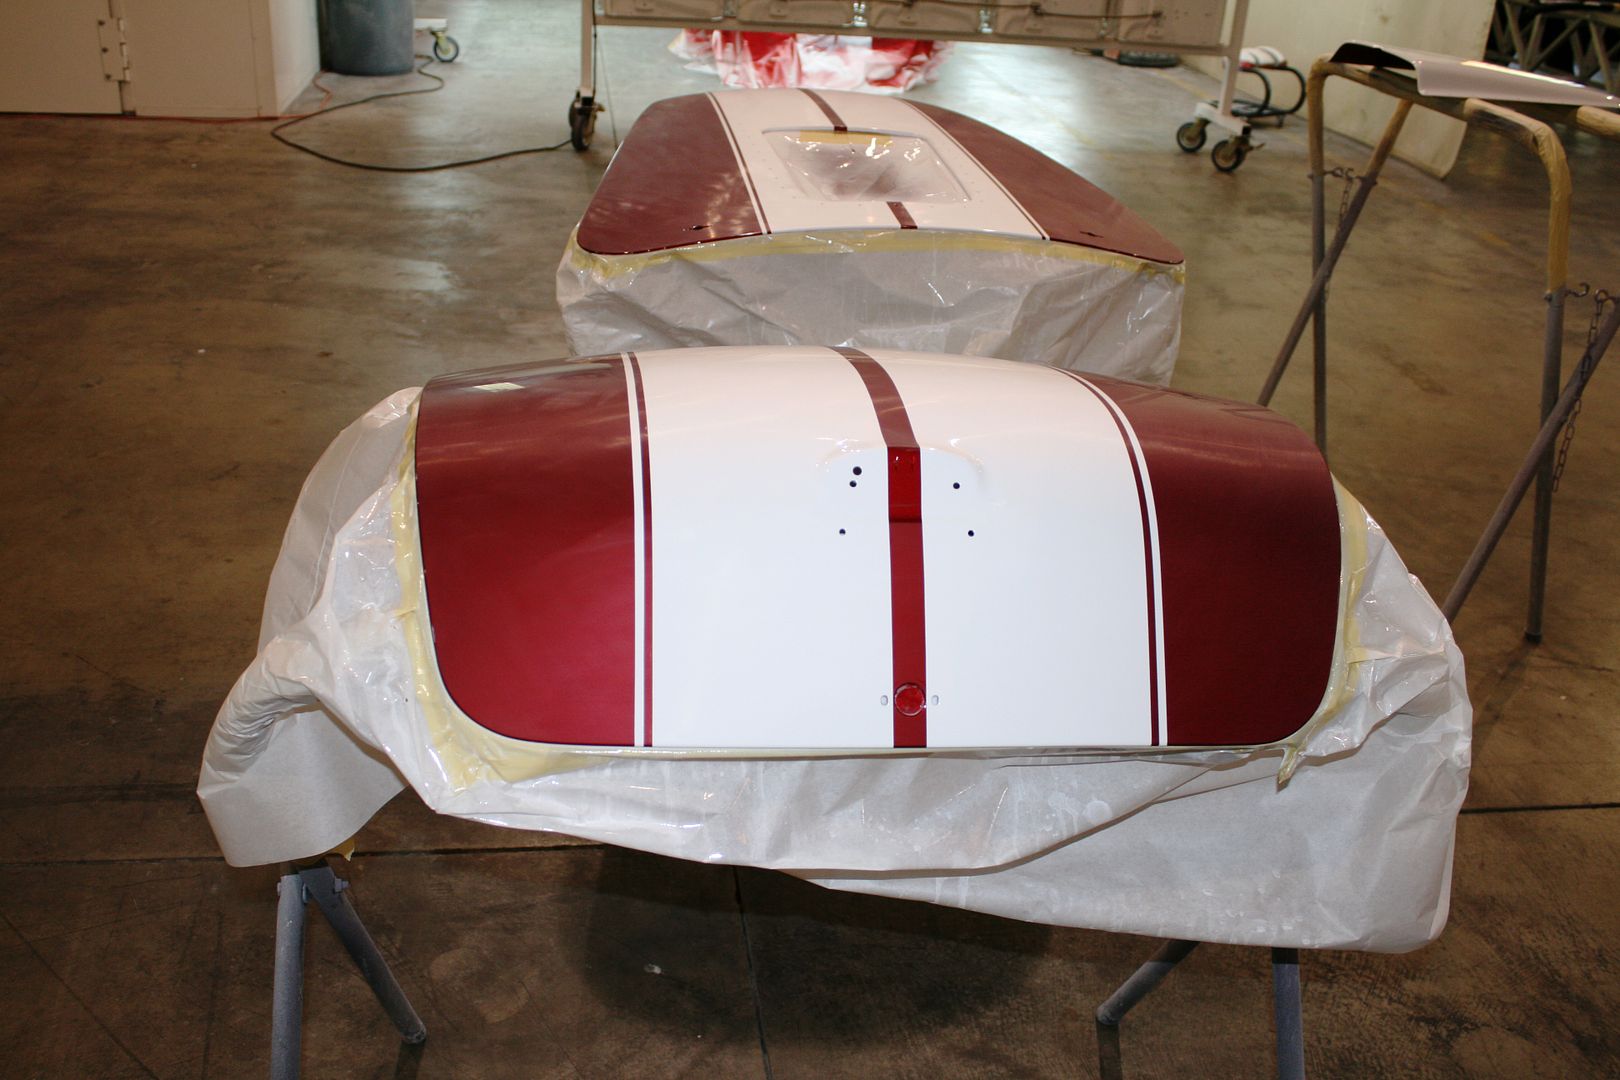
Doors in process of sanding. Can be messy work!
Should be done in the next few days. But I won’t be able to pick up until the first week of November. Will be away from the build for the next days as we’ll be out of town for my youngest son’s wedding. The next pictures should be with the paint completed and body mounted. It's really coming together now.
Last edited by edwardb; 10-24-2014 at 01:55 PM.
Build 1: Mk3 Roadster #5125. Sold 11/08/2014.
Build 2: Mk4 Roadster #7750. Sold 04/10/2017.
Build Thread
Build 3: Mk4 Roadster 20th Anniversary #8674. Sold 09/07/2020.
Build Thread and
Video.
Build 4: Gen 3 Type 65 Coupe #59. Gen 3 Coyote. Legal 03/04/2020.
Build Thread and
Video
Build 5: 35 Hot Rod Truck #138. LS3 and 4L65E auto. Rcvd 01/05/2021. Legal 04/20/2023.
Build Thread. Sold 11/9/2023.
-
10-24-2014, 02:35 PM
#155
-
10-24-2014, 03:53 PM
#156
Wowser!!!!!!! Man that is really looking good. Love the color.
Chuck Krueger
MK4 Kit - Picked up 4/5/14, Complete Kit, 3-Link, Wilwood upgrade, Coyote, TKO 500, First Start 7/25/15
2000 C5
2003 C5 Z06
2007 C5 Z06
-
10-25-2014, 10:48 AM
#157
Senior Member

Beautiful color. Can't wait to see it outside
-
10-25-2014, 01:45 PM
#158
cobra Handler
That's very nice, Edward! Should really pop when you get it all together.
Good luck on the reassembly.
WEK.
FFR MkIII 302 (ATK), EFI 75mm TB with custom box plenum chamber, 24# injectors, 4 tube BBK ceramic, cold air sys, alum flywheel, crane roller rockers, T5, Wilwood pedals, custom five link with Watt's link, 4 rotors, coil overs, power steering with Heidt valve, alum FFR rad, driver's crash bar mod, mini dead pedal mod, quick release steering wheel hub #6046
-
10-25-2014, 09:45 PM
#159
Senior Member
Breeze Roll Bar, Trunk
Just a quick update. Picked up the welded Breeze roll bar from the plater yesterday. I was second guessing my choice to go steel and chrome vs. stainless and then polish. But it turned out great, and now glad I went this direction. Just set it in place for this pic. Now back to the basement until the body is on.
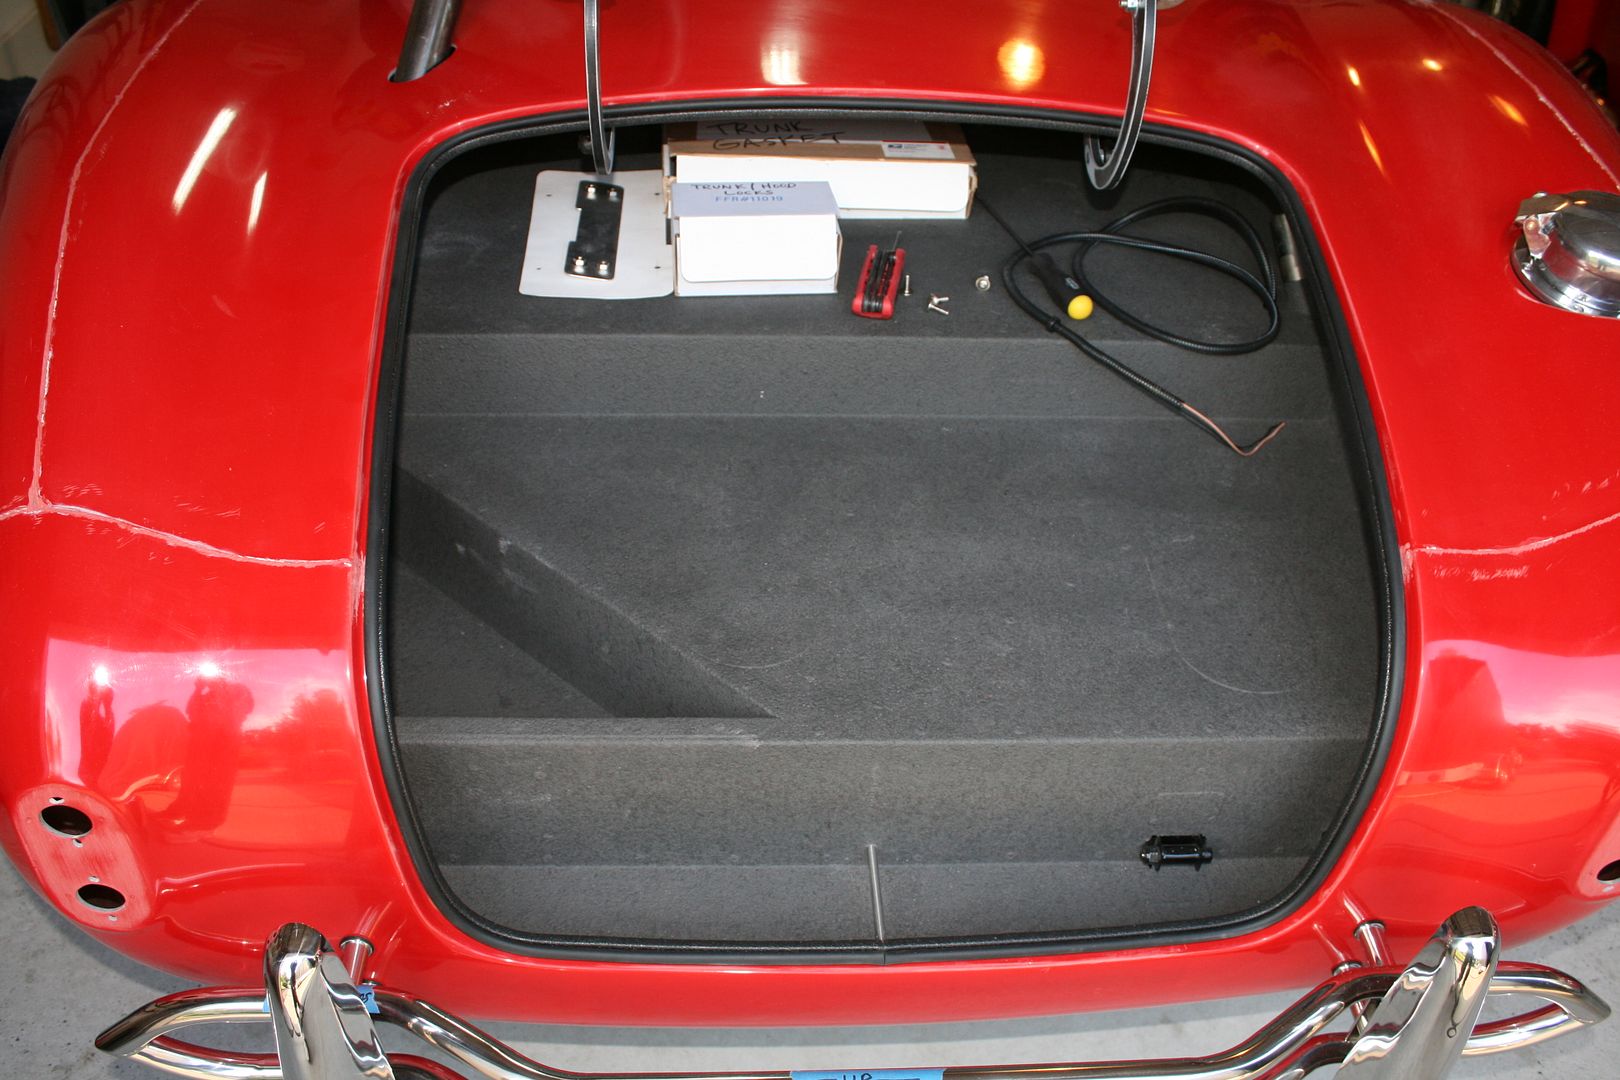
Got bored watching the Michigan/Michigan State game this afternoon, so installed the last few pieces of trunk carpet. Finally done. I'm happy with how it turned out, but kind of a pain fitting around the little storage area I added.
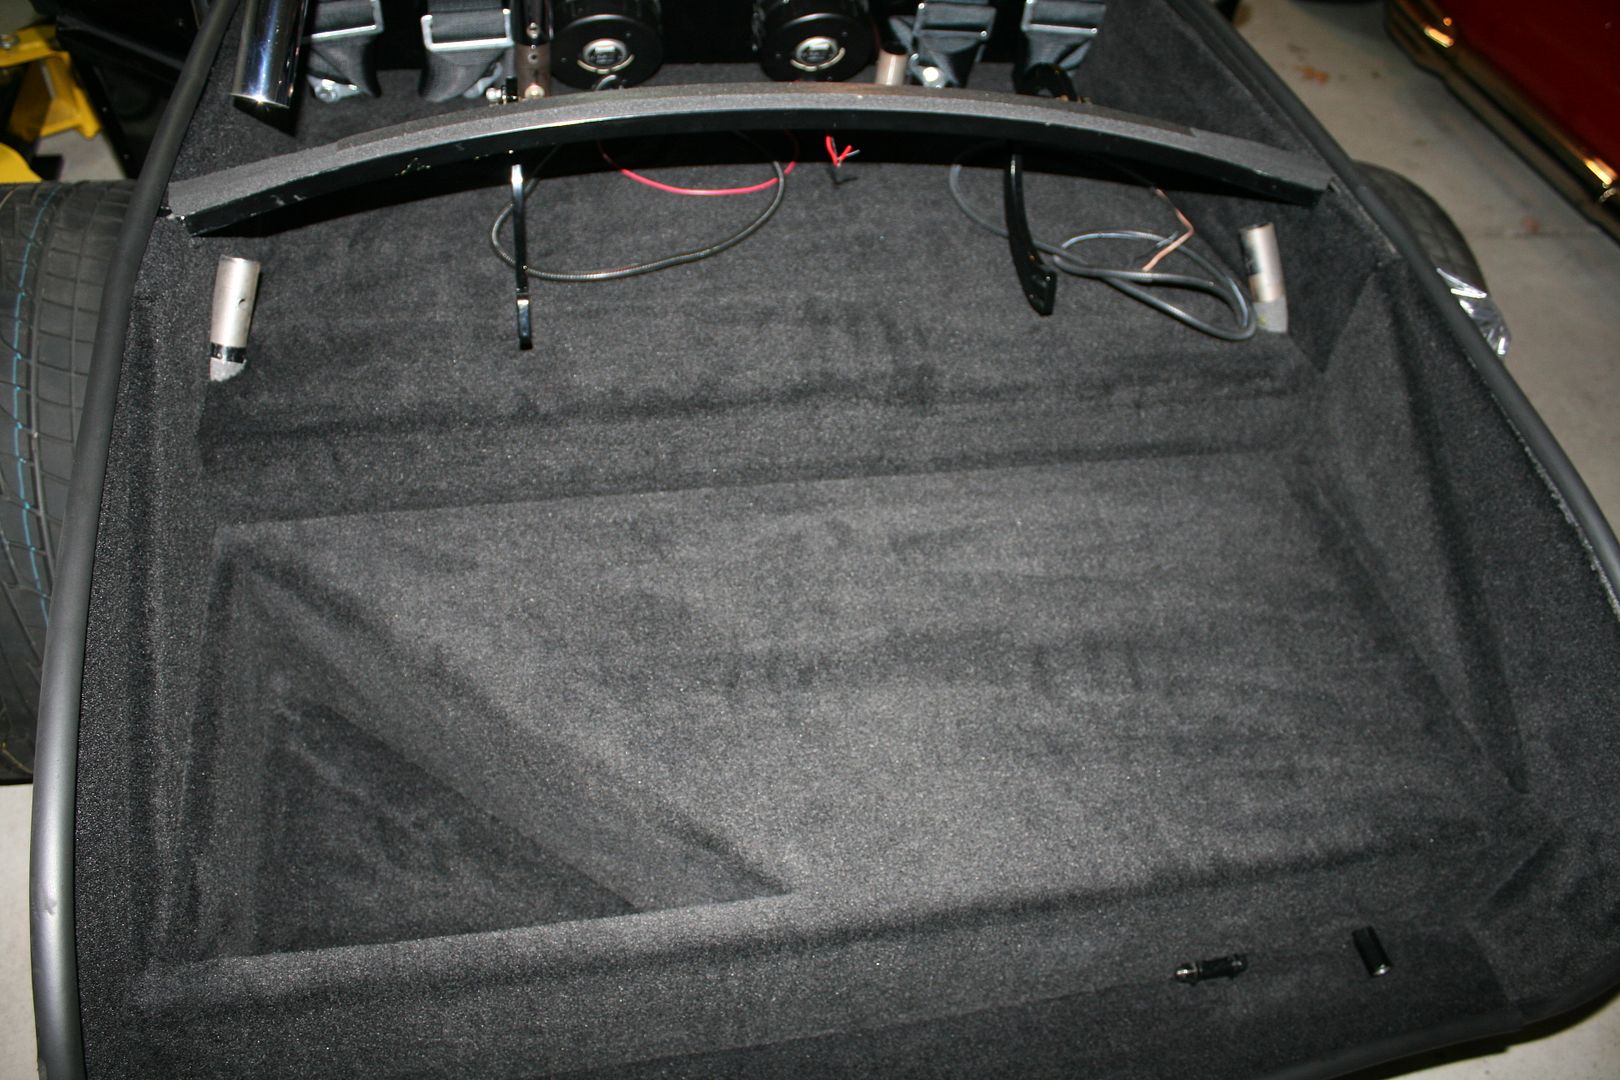
The cockpit carpet is done except for the two large floor pieces, the trans tunnel, and the door sills. Will be easy to finish once the body is on. Down in the footwells is done, and I'm glad because even harder to reach once the body is on. Just a warning for all those doing the PS footbox mod like I did. Nice mod, but guess what? None of the carpet pieces fit. Duh. Several new ones required. Fortunately I had some extra carpet.
I'm now 100% ready to install the painted body. Good thing. The build is officially stopped until Nov 3 for my son's wedding in southern Indiana. If the weather cooperates, he's going to drive his bride from the church to the reception in the Mk3 Roadster. Should make for some great memories and pictures.
Build 1: Mk3 Roadster #5125. Sold 11/08/2014.
Build 2: Mk4 Roadster #7750. Sold 04/10/2017.
Build Thread
Build 3: Mk4 Roadster 20th Anniversary #8674. Sold 09/07/2020.
Build Thread and
Video.
Build 4: Gen 3 Type 65 Coupe #59. Gen 3 Coyote. Legal 03/04/2020.
Build Thread and
Video
Build 5: 35 Hot Rod Truck #138. LS3 and 4L65E auto. Rcvd 01/05/2021. Legal 04/20/2023.
Build Thread. Sold 11/9/2023.
-
10-25-2014, 10:35 PM
#160
Senior Member

Originally Posted by
edwardb
Just a quick update. Picked up the welded Breeze roll bar from the plater yesterday. I was second guessing my choice to go steel and chrome vs. stainless and then polish. But it turned out great, and now glad I went this direction. Just set it in place for this pic. Now back to the basement until the body is on.
Got bored watching the Michigan/Michigan State game this afternoon, so installed the last few pieces of trunk carpet. Finally done. I'm happy with how it turned out, but kind of a pain fitting around the little storage area I added.
The cockpit carpet is done except for the two large floor pieces, the trans tunnel, and the door sills. Will be easy to finish once the body is on. Down in the footwells is done, and I'm glad because even harder to reach once the body is on. Just a warning for all those doing the PS footbox mod like I did. Nice mod, but guess what? None of the carpet pieces fit. Duh. Several new ones required. Fortunately I had some extra carpet.
I'm now 100% ready to install the painted body. Good thing. The build is officially stopped until Nov 3 for my son's wedding in southern Indiana. If the weather cooperates, he's going to drive his bride from the church to the reception in the Mk3 Roadster. Should make for some great memories and pictures.
Trunk Carpet looks great Ed! I'll want to cover the Lizard Skin that will get applied over my powder coated panels also. If you don't mind sharing where you purchased the carpet? Looks like a charcoal color in the pics?


 Thanks:
  Likes:


 Reply With Quote


