-
10-26-2014, 06:25 AM
#161
Senior Member


Originally Posted by
rmiller64

Trunk Carpet looks great Ed! I'll want to cover the Lizard Skin that will get applied over my powder coated panels also. If you don't mind sharing where you purchased the carpet? Looks like a charcoal color in the pics?
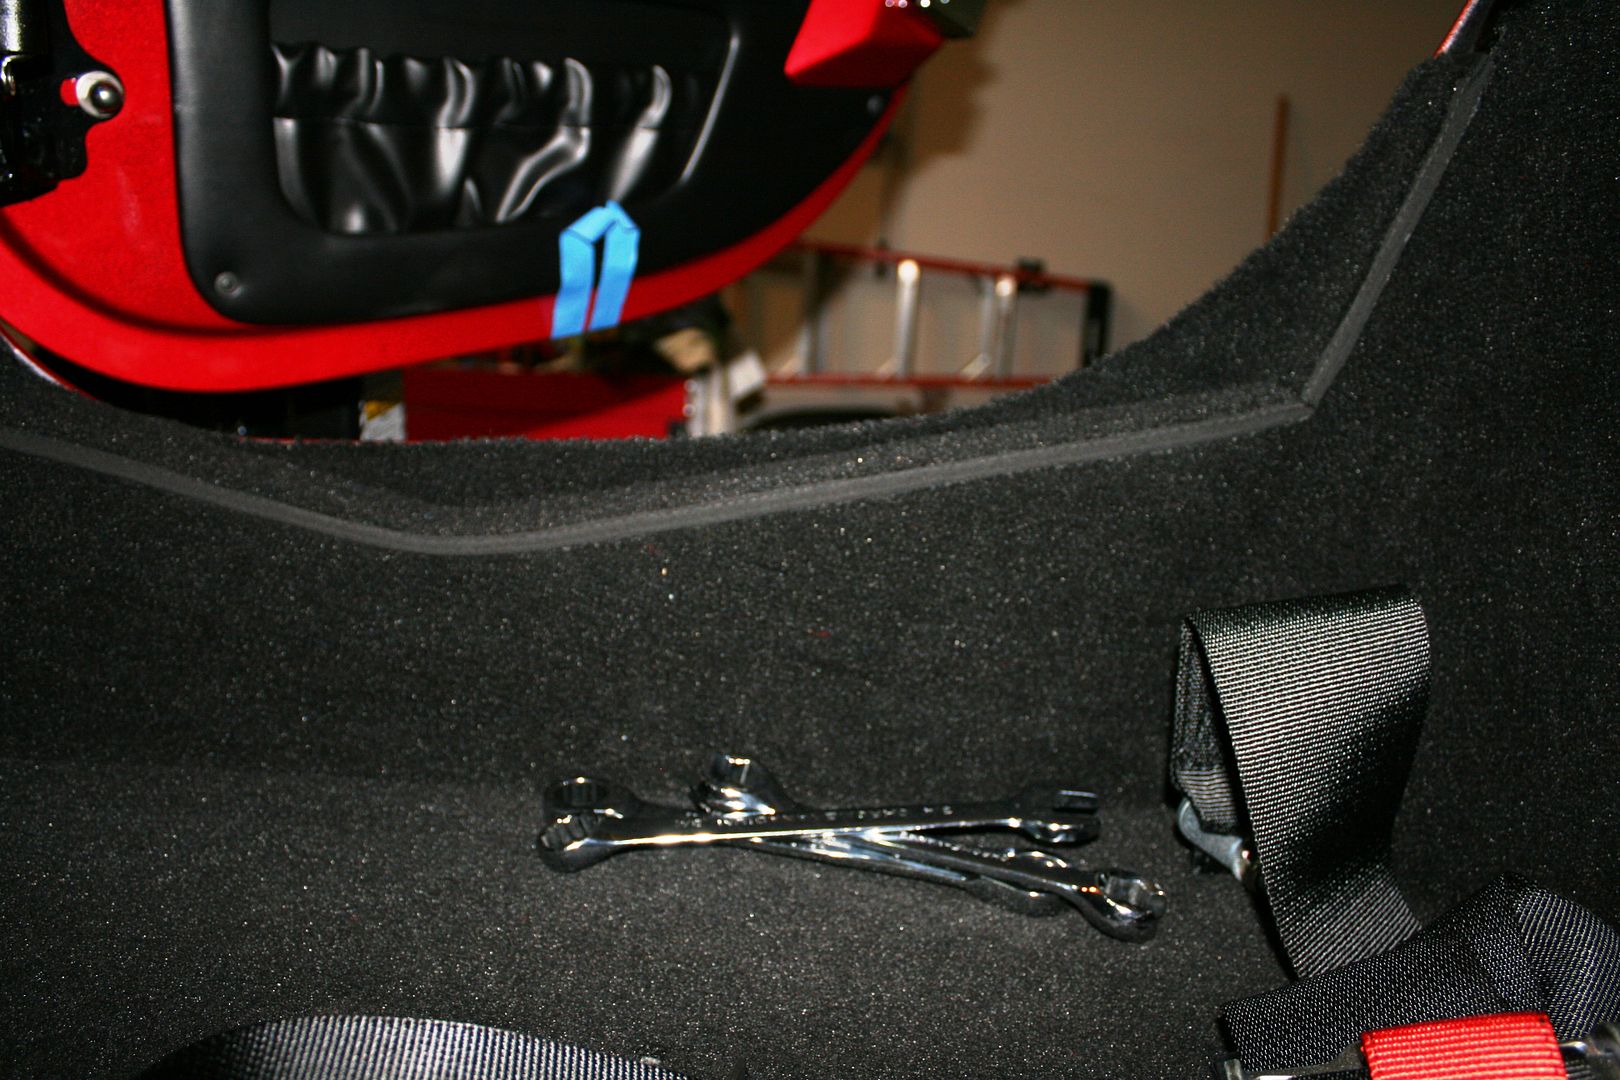
Rick, the trunk carpet is black. Exactly the same color as the supplied FFR carpet. The camera flash makes it look lighter, but it's just about pure black. The actual carpet is CA1201 Bentley Auto Carpet - Black from The Miami Corporation. Several recommended this carpet as an upgrade from the FFR supplied carpet, so was planning to use it everywhere. But after receiving, found that while it's nice carpet, I liked the FFR supplied carpet better for the cockpit and used it only in the trunk. I recommend it. Makes a very nice finished product. Better than the indoor/outdoor stuff from the big box stores. But it is only the trunk after all. Some may find it overkill.
You didn't ask, but I applied both the trunk and cockpit carpet mainly with Weldwood outdoor carpet adhesive. Just trowel it on with a notched putty knife and push into place. You have time to position as necessary. Several of the small pieces where instant grab was manageable are attached with Weldwood Gel Contact Cement. Both products worked well over the Lizard Skin.
Last edited by edwardb; 10-26-2014 at 06:28 AM.
Build 1: Mk3 Roadster #5125. Sold 11/08/2014.
Build 2: Mk4 Roadster #7750. Sold 04/10/2017.
Build Thread
Build 3: Mk4 Roadster 20th Anniversary #8674. Sold 09/07/2020.
Build Thread and
Video.
Build 4: Gen 3 Type 65 Coupe #59. Gen 3 Coyote. Legal 03/04/2020.
Build Thread and
Video
Build 5: 35 Hot Rod Truck #138. LS3 and 4L65E auto. Rcvd 01/05/2021. Legal 04/20/2023.
Build Thread. Sold 11/9/2023.
-
Post Thanks / Like - 1 Thanks, 1 Likes
-
10-28-2014, 01:47 AM
#162
Senior Member

-
10-28-2014, 11:21 AM
#163
Senior Member

Originally Posted by
edwardb
Rick, the trunk carpet is black. Exactly the same color as the supplied FFR carpet. The camera flash makes it look lighter, but it's just about pure black. The actual carpet is CA1201 Bentley Auto Carpet - Black from The Miami Corporation. Several recommended this carpet as an upgrade from the FFR supplied carpet, so was planning to use it everywhere. But after receiving, found that while it's nice carpet, I liked the FFR supplied carpet better for the cockpit and used it only in the trunk. I recommend it. Makes a very nice finished product. Better than the indoor/outdoor stuff from the big box stores. But it is only the trunk after all. Some may find it overkill.
You didn't ask, but I applied both the trunk and cockpit carpet mainly with Weldwood outdoor carpet adhesive. Just trowel it on with a notched putty knife and push into place. You have time to position as necessary. Several of the small pieces where instant grab was manageable are attached with Weldwood Gel Contact Cement. Both products worked well over the Lizard Skin.
Thank you for sharing Ed and appreciate info. on securing the carpet. Looking up now and adding to the need to purchase list.
-
10-29-2014, 02:05 PM
#164
Senior Member
Got the call!
Painter just called. Car is done! They said everyone at the shop thinks it looks fantastic. (Of course) I can't get there until next week though. Will take the chassis over next Wednesday and we'll get the body installed. I'll take lots of pics and post them. Anticipation... 
Build 1: Mk3 Roadster #5125. Sold 11/08/2014.
Build 2: Mk4 Roadster #7750. Sold 04/10/2017.
Build Thread
Build 3: Mk4 Roadster 20th Anniversary #8674. Sold 09/07/2020.
Build Thread and
Video.
Build 4: Gen 3 Type 65 Coupe #59. Gen 3 Coyote. Legal 03/04/2020.
Build Thread and
Video
Build 5: 35 Hot Rod Truck #138. LS3 and 4L65E auto. Rcvd 01/05/2021. Legal 04/20/2023.
Build Thread. Sold 11/9/2023.
-
10-30-2014, 06:39 PM
#165
Member

Originally Posted by
edwardb
Painter just called. Car is done! They said everyone at the shop thinks it looks fantastic. (Of course) I can't get there until next week though. Will take the chassis over next Wednesday and we'll get the body installed. I'll take lots of pics and post them. Anticipation...
Just went thru all your posts after joining the forum. The craftsmanship is out of this world. Your attention to detail boggles the mind. Thanks for documenting it so well and providing tips for others. Looking forward to your completion soon.
-
10-31-2014, 02:20 PM
#166
Originally Posted by
smokinss
Just went thru all your posts after joining the forum. The craftsmanship is out of this world. Your attention to detail boggles the mind. Thanks for documenting it so well and providing tips for others. Looking forward to your completion soon.
Smokinss, my sentiments exactly. My build will be a lot like his. He is a true craftsman.
-
10-31-2014, 03:21 PM
#167
Senior Member
Originally Posted by
smokinss
Just went thru all your posts after joining the forum. The craftsmanship is out of this world. Your attention to detail boggles the mind. Thanks for documenting it so well and providing tips for others. Looking forward to your completion soon.
Originally Posted by
rezell3d
Smokinss, my sentiments exactly. My build will be a lot like his. He is a true craftsman.
Hey guys, thanks for the very generous comments.

Said it before, and I'll say it again, fun to build and fun to share. So the deal is you have to post your builds and pictures and we all learn together. That's what I've been doing. Thanks again.
Build 1: Mk3 Roadster #5125. Sold 11/08/2014.
Build 2: Mk4 Roadster #7750. Sold 04/10/2017.
Build Thread
Build 3: Mk4 Roadster 20th Anniversary #8674. Sold 09/07/2020.
Build Thread and
Video.
Build 4: Gen 3 Type 65 Coupe #59. Gen 3 Coyote. Legal 03/04/2020.
Build Thread and
Video
Build 5: 35 Hot Rod Truck #138. LS3 and 4L65E auto. Rcvd 01/05/2021. Legal 04/20/2023.
Build Thread. Sold 11/9/2023.
-
11-05-2014, 06:43 PM
#168
Senior Member
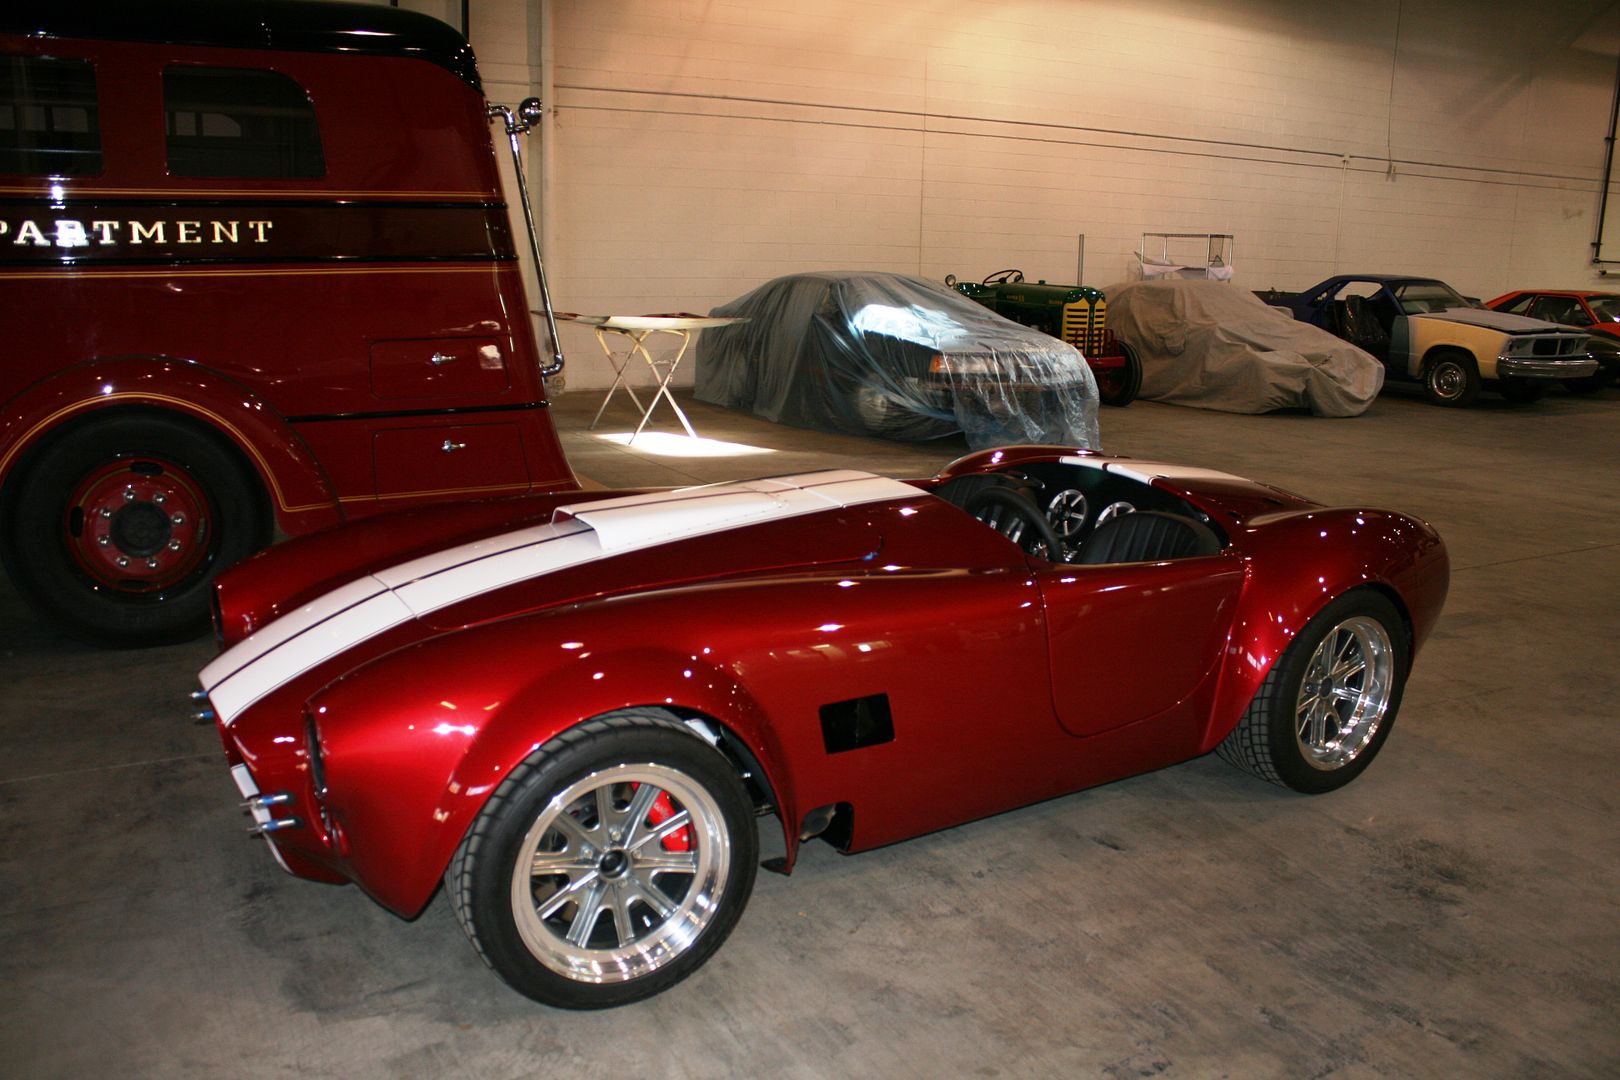
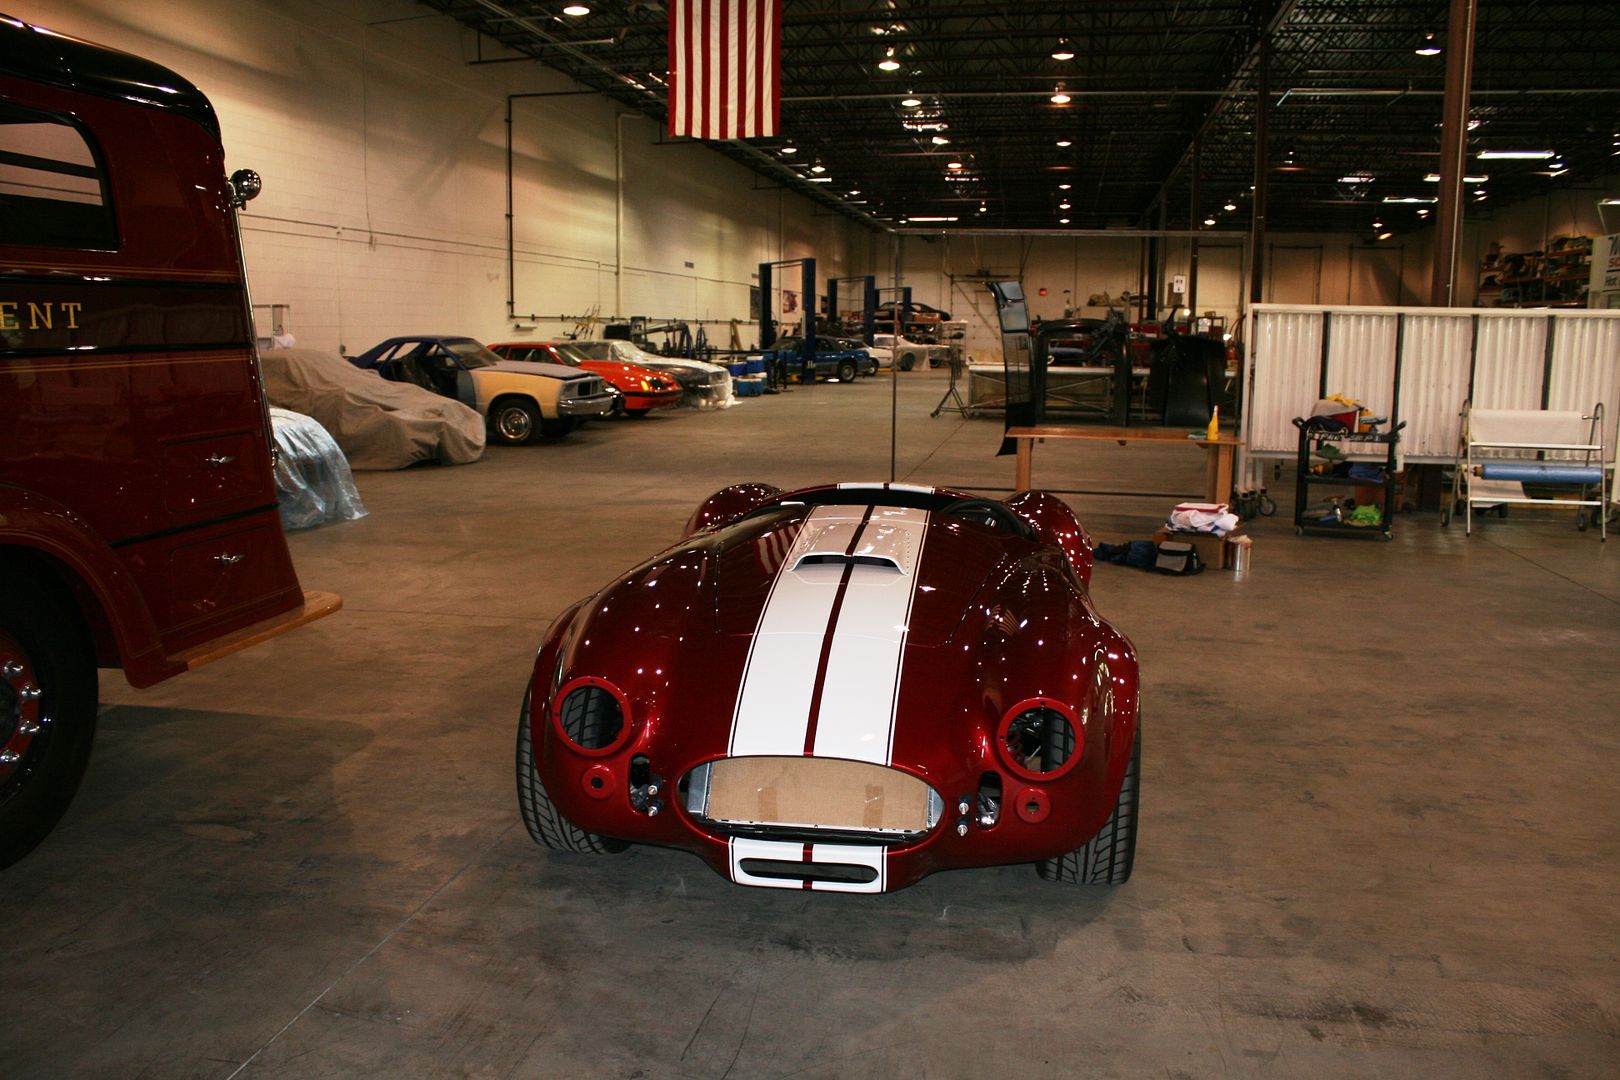
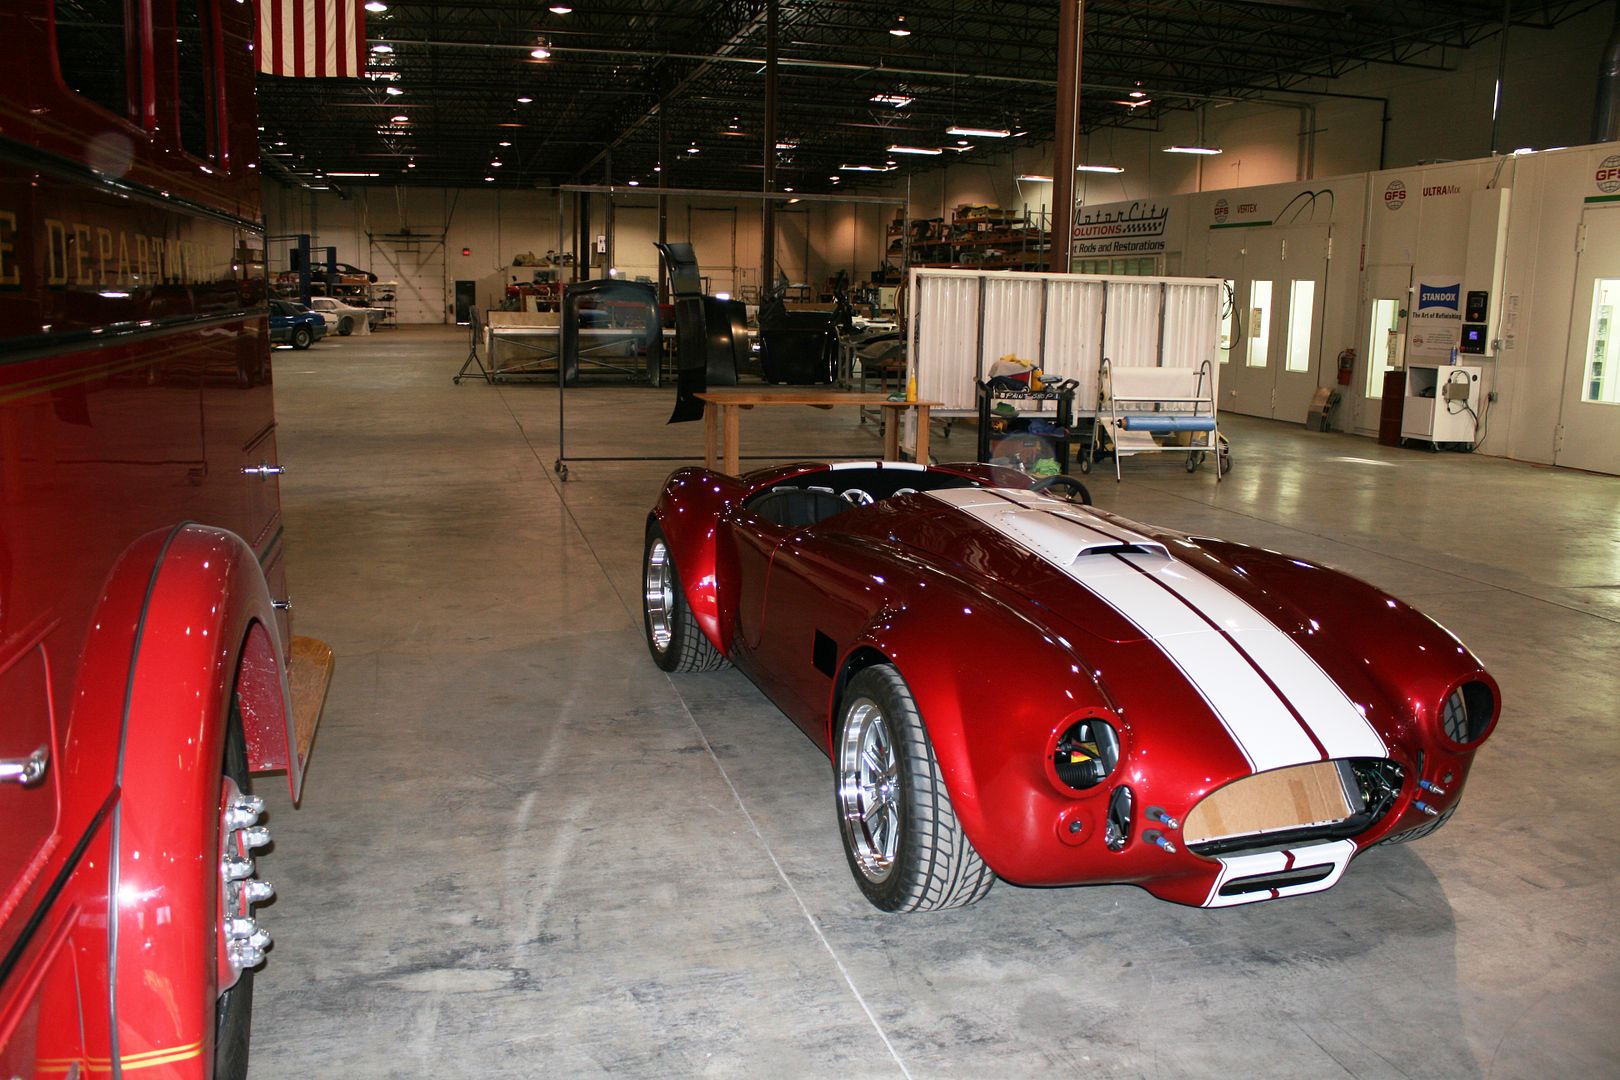
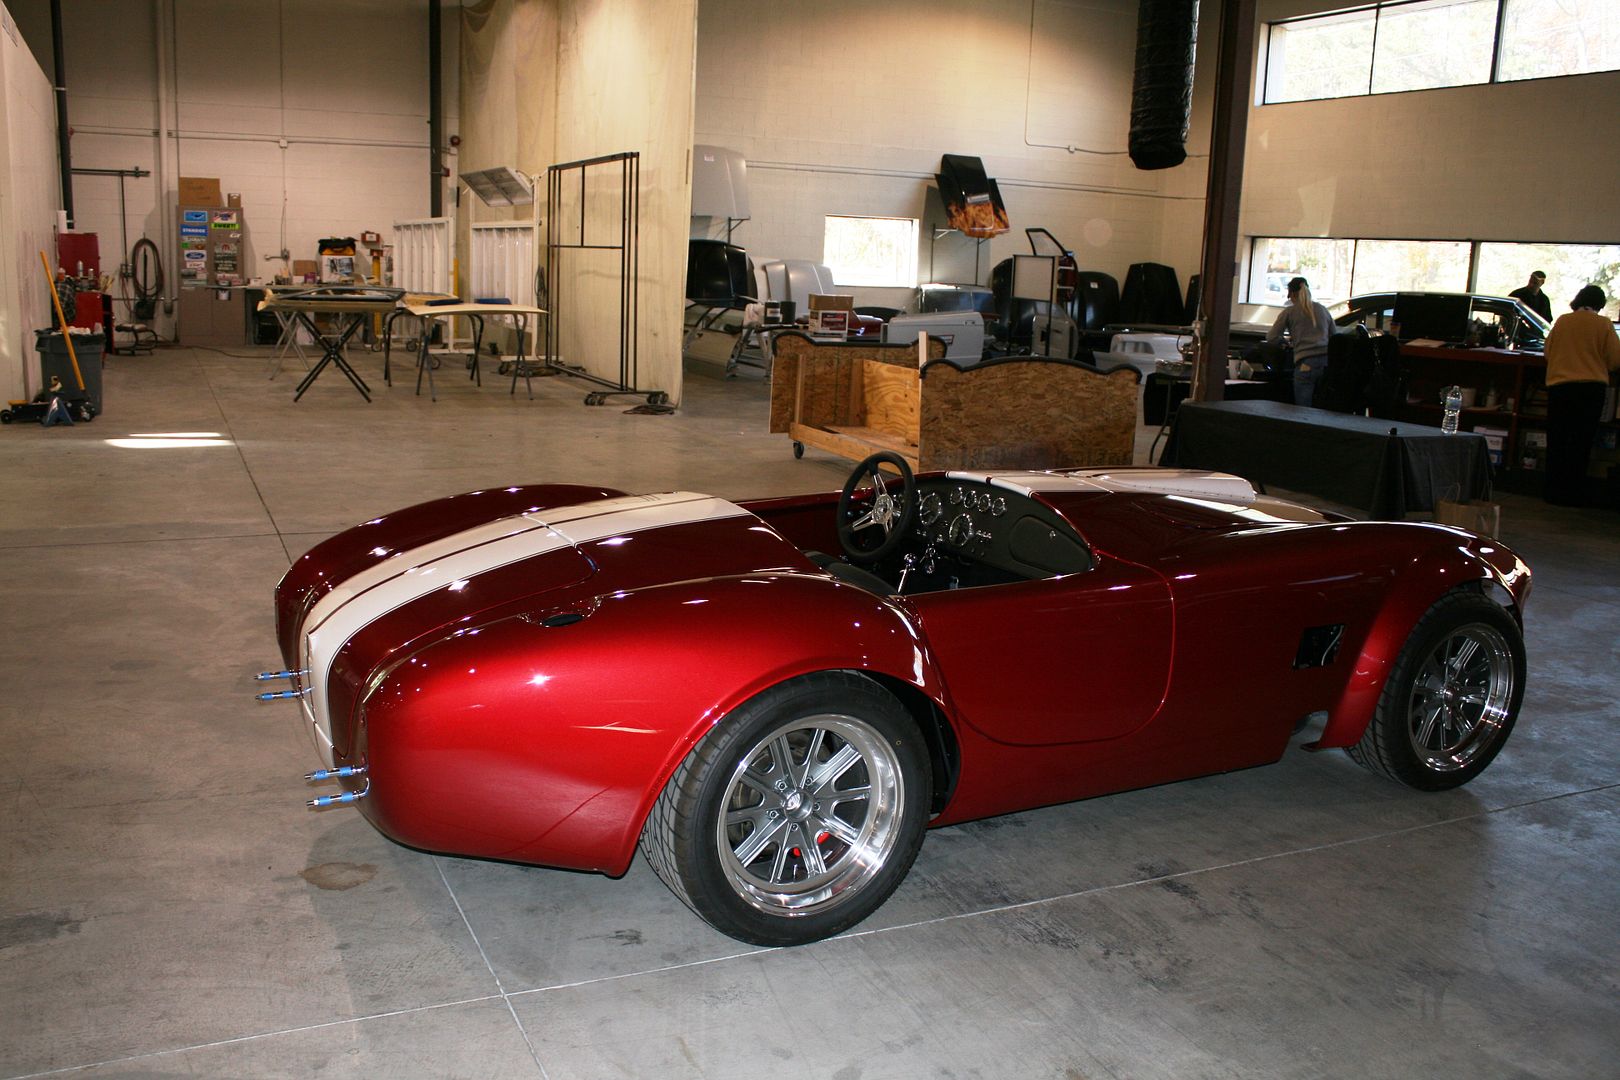
Paint Done, Body Mounted
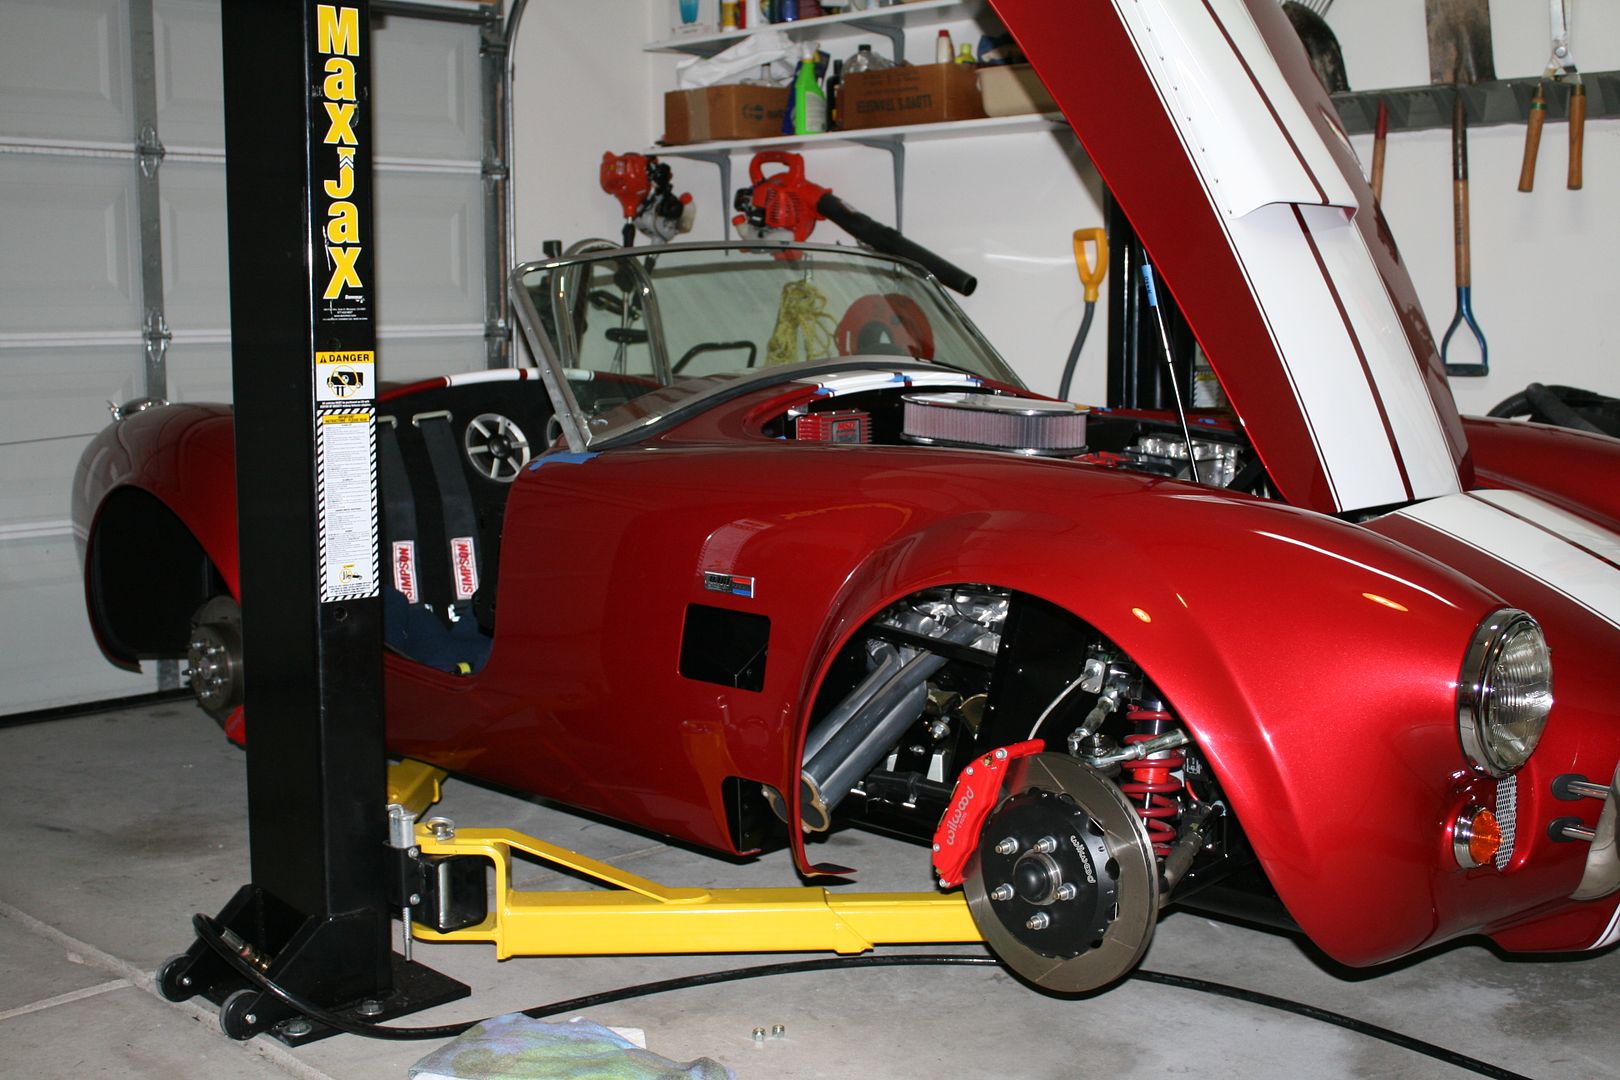
Well today was another huge milestone. Took the chassis to the shop and it was all hands on deck to drop the body on. Amazing how much easier it is with 4-5 people. Then my son and I spent a couple hours getting the mounting bolts in and panels installed. Still some alignment work to do with the hinges, but close. This is how it looks. Offered without too much comment. First pics inside right after the body install was done. Last pics outside before loading back into the trailer. Needless to say, it really pops in the sunlight. The shop did a great job, and seemed genuinely pleased that I was happy with it. The color is Ford RZ Red Candy 2.
Last edited by edwardb; 11-07-2014 at 09:05 AM.
Build 1: Mk3 Roadster #5125. Sold 11/08/2014.
Build 2: Mk4 Roadster #7750. Sold 04/10/2017.
Build Thread
Build 3: Mk4 Roadster 20th Anniversary #8674. Sold 09/07/2020.
Build Thread and
Video.
Build 4: Gen 3 Type 65 Coupe #59. Gen 3 Coyote. Legal 03/04/2020.
Build Thread and
Video
Build 5: 35 Hot Rod Truck #138. LS3 and 4L65E auto. Rcvd 01/05/2021. Legal 04/20/2023.
Build Thread. Sold 11/9/2023.
-
11-05-2014, 06:44 PM
#169
Senior Member
Paint Done, Body Mounted (continued)
Build 1: Mk3 Roadster #5125. Sold 11/08/2014.
Build 2: Mk4 Roadster #7750. Sold 04/10/2017.
Build Thread
Build 3: Mk4 Roadster 20th Anniversary #8674. Sold 09/07/2020.
Build Thread and
Video.
Build 4: Gen 3 Type 65 Coupe #59. Gen 3 Coyote. Legal 03/04/2020.
Build Thread and
Video
Build 5: 35 Hot Rod Truck #138. LS3 and 4L65E auto. Rcvd 01/05/2021. Legal 04/20/2023.
Build Thread. Sold 11/9/2023.
-
11-05-2014, 08:24 PM
#170
Member

Just read your thread from start to finish (what luck to pick the day when your car is pretty in paint!). As everyone else have all stated, great build choices, awesome attention to detail, stunning results, and a superbly written and photographed thread. Great job!
Mk IV 7329, '04 Mach 1 donor, 3 link, FFR lowers, heater, Kirkey seats, seat heaters, CobraEarl vents, dual rollbars, 9/10.5 x 17 Halibrand replicas; Kumho Ecsta XS 255/315s, Lexus Indigo Ink Pearl/Artic White stripes, picked up 9/25/10, engine in 7/16/11, first start 3/9/12, go kart 3/18/12, first drive in primer 4/1/12, tags/title 4/16/12, paint 6/8/12, complete 7/24/12
-
11-05-2014, 08:49 PM
#171
Senior Member

Absolutely STUNNING!
The color turned out great!
Bet ya can't wait to get it back together now and take it out for a spin!
F5R #7446: MK4, 302, T5 midshift, 3.55 Posi IRS, 17" Halibrands
Delivered 4/4/11, First start 9/29/12, Licensed 4/24/13, off to PAINT 2/15/14!! Wahoo!
-
11-06-2014, 11:16 AM
#172
Edward-
She looks terrific! Great color choice, and looks like awesome body work. I look forward to seeing her all buttoned up.
Regards,
Steve
-
11-06-2014, 04:01 PM
#173
Edward,
I've been waiting since yesterday to get the account activated just so that I could post a comment. I've been reading your build thread and it's is better than reading a Stephen King novel! I actually was going to beg for pictures cause it had been a while since your last post! but you beat me to it! Lol
But on a more serious note, you have done a great piece of work! Congrats!! I hope my time will come soon enough to where I can start on a project like this myself!
Ram
-
11-06-2014, 04:35 PM
#174
Senior Member
Thanks for all the great comments guys. It does look good sitting in my garage. Family stuff going on through this weekend, but I'll be back on it soon. Most of what needs to be done has already been mocked up. So should move pretty fast. But kind of a moot point now. Our weather is definitely moving into a much colder stage. Looks like it won't be on the road until spring. Not a surprise I guess. I'll have plenty of time to finish it up.
Originally Posted by
blkout25
Edward, I've been waiting since yesterday to get the account activated just so that I could post a comment. I've been reading your build thread and it's is better than reading a Stephen King novel! I actually was going to beg for pictures cause it had been a while since your last post! but you beat me to it! Lol But on a more serious note, you have done a great piece of work! Congrats!! I hope my time will come soon enough to where I can start on a project like this myself! Ram
Nice first post! Thanks, and I've been accused of my writing being a lot of things, but never like Stephen King... I'm assuming that's a compliment. ")
Last edited by edwardb; 11-06-2014 at 04:38 PM.
Build 1: Mk3 Roadster #5125. Sold 11/08/2014.
Build 2: Mk4 Roadster #7750. Sold 04/10/2017.
Build Thread
Build 3: Mk4 Roadster 20th Anniversary #8674. Sold 09/07/2020.
Build Thread and
Video.
Build 4: Gen 3 Type 65 Coupe #59. Gen 3 Coyote. Legal 03/04/2020.
Build Thread and
Video
Build 5: 35 Hot Rod Truck #138. LS3 and 4L65E auto. Rcvd 01/05/2021. Legal 04/20/2023.
Build Thread. Sold 11/9/2023.
-
11-06-2014, 04:51 PM
#175
Of course it's compliment!! Just couldn't find another analogy I guess! What I meant was that once I started reading these forums I've been addicted, and yours his the most!!! Also cause it triggers my daydreaming of one day doing the same as you guys! Thanks again for fueling my addiction! Lol
-
11-06-2014, 04:55 PM
#176
I forgot to ask if you knew of an app to view/post in here? I hate going the long route to log in! Not that it's not worth it! Lol
-
11-06-2014, 10:04 PM
#177
Edward,
Congrats. It has been incredibly helpful to have your build thread. As I progress I find myself constantly going back to your thread for help. Just sorry you did not do an IRS. Henry
MK IV complete kit delivered August 21st, 2014. Ford Racing 427w with X heads. IRS. Upgraded Wilwoods, 6 piston front and 4 rear. Tremec t600 and Ram Dual clutch. Holley Terminator EFI.
-
11-06-2014, 10:19 PM
#178
Senior Member
Originally Posted by
blkout25
Of course it's compliment!! Just couldn't find another analogy I guess! What I meant was that once I started reading these forums I've been addicted, and yours his the most!!! Also cause it triggers my daydreaming of one day doing the same as you guys! Thanks again for fueling my addiction! Lol
I knew it was a compliment. That's why the smiley. Just struck me as a funny comparison.
Originally Posted by
blkout25
I forgot to ask if you knew of an app to view/post in here? I hate going the long route to log in! Not that it's not worth it! Lol
No, not that I'm aware of. I use this forum sometimes with my iPhone or iPad with Chrome or Safari browsers. Just make sure to click the "Remember me?" box when you sign in, and you should be able to go back to the session repeatedly without signing in again.
Build 1: Mk3 Roadster #5125. Sold 11/08/2014.
Build 2: Mk4 Roadster #7750. Sold 04/10/2017.
Build Thread
Build 3: Mk4 Roadster 20th Anniversary #8674. Sold 09/07/2020.
Build Thread and
Video.
Build 4: Gen 3 Type 65 Coupe #59. Gen 3 Coyote. Legal 03/04/2020.
Build Thread and
Video
Build 5: 35 Hot Rod Truck #138. LS3 and 4L65E auto. Rcvd 01/05/2021. Legal 04/20/2023.
Build Thread. Sold 11/9/2023.
-
11-17-2014, 07:02 AM
#179
Senior Member
Final Assembly Progress
Had some quality time this weekend to get parts on the build for (finally) the last time. Couple of minor sidetracks. In an earlier post, I described how I used 5/16-18 nutserts along the lower body sill to hold the Mk4 wraparound body in place with flanged button head screws. I still like the idea, but managed to spin one of the nutserts by cross threading during assembly. It originally happened at the body shop. Must have been in too much of a hurry, plus with the car on the ground it’s pretty low so just didn’t see I was putting it in wrong. It took some pretty tedious “surgery” to get the screw out, then the nutsert (or what was left of it) with the painted body in the area. Turns out the nutsert was near a weld bead and wasn’t sitting flush to the surface, so wasn’t gripping like it should have. Then I messed up and cross threaded it. Once it started spinning it was all over. Flattened the area and got a new one in nice and solid and all is good.
Another sidetrack was I decided while the undercoat the shop applied to the complete underside was first rate stuff (Wurth SKS Stone Guard) it wasn’t real thick in the wheel wells so in my infinite wisdom decided to add a couple coats of truck bedliner. I used the water based stuff from Dupli-Color and added two coats in each wheel well. Mission accomplished, but that was MESSY. No matter how careful I was, I managed to get it all over my clothes, the floor, parts of the car not intended, etc. Fortunately I had lots of drop cloths and was wearing old clothes, plus the water based stuff cleans up relatively easily, so all is OK. But note to self (and anyone reading this thread), apply body undercoat with the body off and upside down. No exceptions. If there are any future builds, that’s what I will be doing. Trust me.
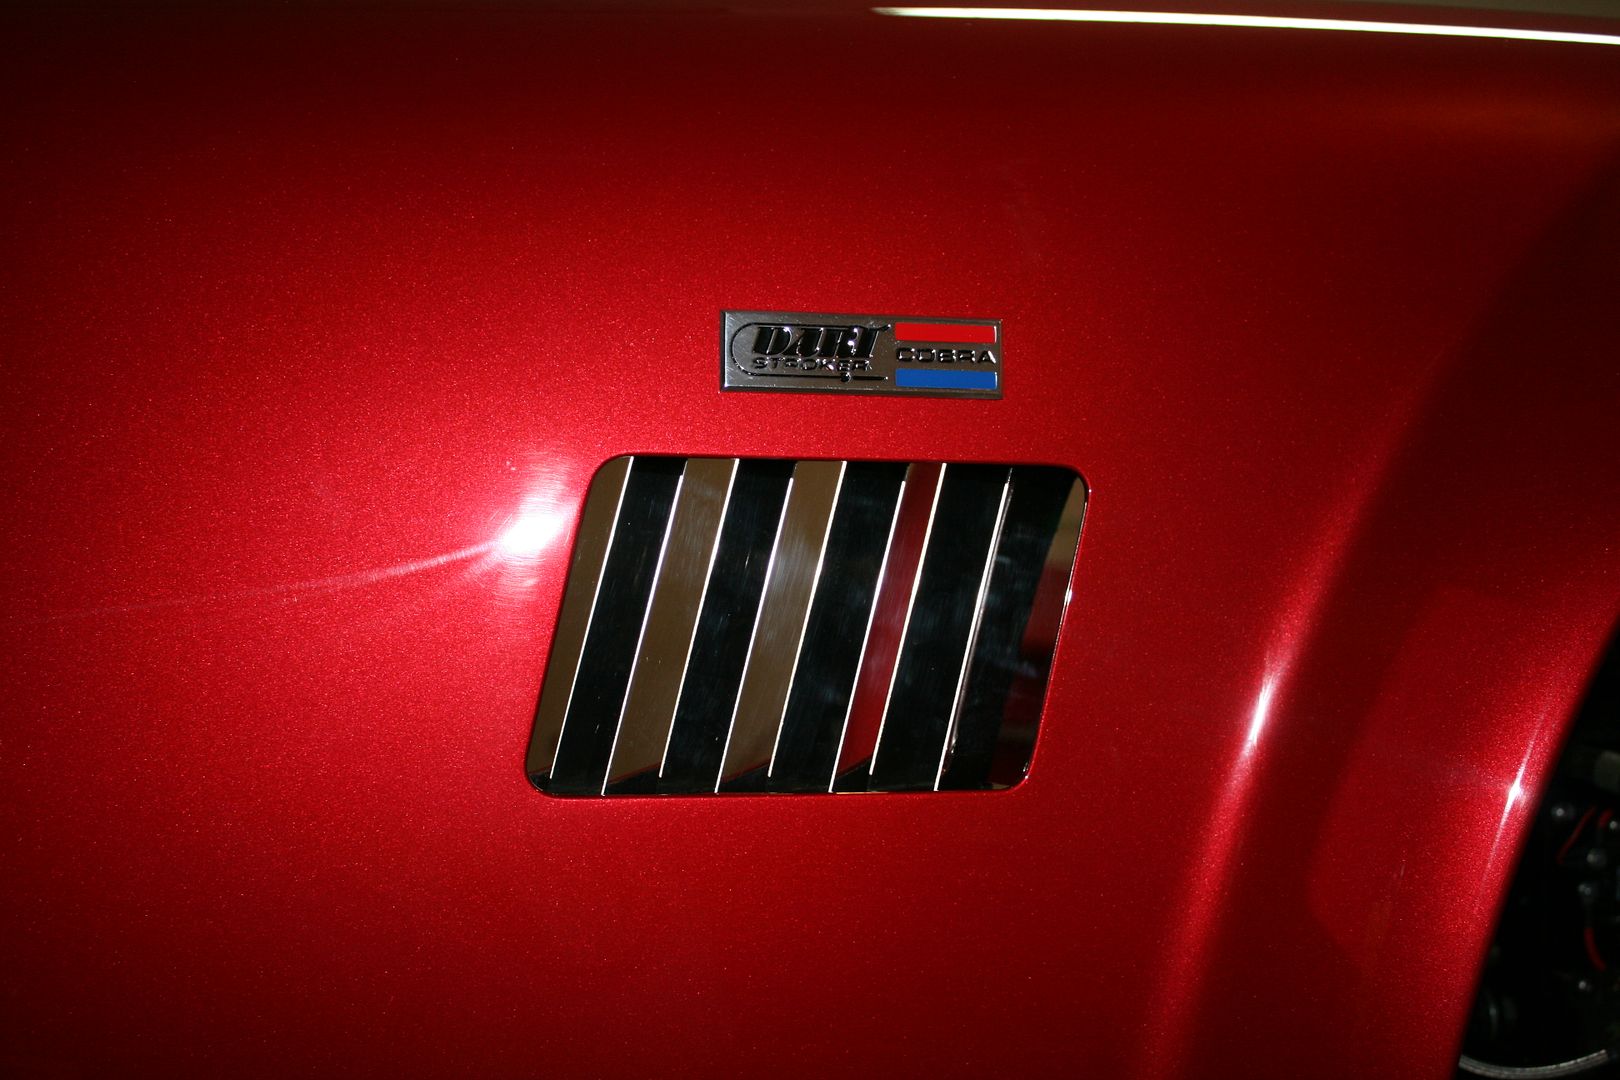
So, back on track and really taking my time around the fresh paint, managed to get the front and rear quick jack mounts in place, all the lights (they all work!), side badges, Dark Water splitter, handles, louvers, gas cap and fill tube, etc. installed. As mentioned earlier in my thread, and discussed in multiple threads, I used the ********** grommets and ********** 3/4 inch polished aluminum tubing for the front quick jack mounts, replacing the FFR captured bolt setup. Before paint, I established the location of the body front, and opened up the holes to exactly fit the grommets. The final product is rock solid, looks good, and doesn't put any stress on the body. One hint. The grommets are made for about 1/4 inch thick material, and the body is less than that. So the grommets will not stay flush against the body if used as is and I'm pretty OCD about stuff like that. So before putting the tubes in place, I pushed the grommets flush against the outside of the body and then added a healthy bead of silicone (I used Permatex Ultra Black) around the inside of the body location to hold them in place. I made sure to get the silicone well down into the grommet slot to hold them. Worked well, and the grommets give a clean finished look. Used the same silicone material to bond the grilles over the brake cooling ducts.
I’m not assembling the fill panels around the radiator inlet yet. Still thinking about how I’m going to do this. The Dark Water splitter likely has no practical value, but I like the look so have it mocked up. Does make it “interesting” for the FFR provided fill pieces. Likely I will make new ones, but I have all winter to sort that out. I don’t have the rear overriders in place yet. Waiting to get the trunk lid alignment done, just in case I need to adjust the rear valance a little. Next will be side pipes, splash guards, the windshield, and then final align the doors, hood and trunk lid. Still need to decide what to do for a charcoal filter for the tank vent. Then finish the interior carpet and it will be basically done. We’ve had our first measureable snow plus they’re putting down salt on the roads now, so I’m officially grounded until spring. Plenty of time to get it done, to say the least. Have I mentioned how much I like having a lift? What a pleasure it is doing this work either standing or sitting, and not bending over or crawling under the car.
Last edited by edwardb; 11-17-2014 at 09:13 AM.
Build 1: Mk3 Roadster #5125. Sold 11/08/2014.
Build 2: Mk4 Roadster #7750. Sold 04/10/2017.
Build Thread
Build 3: Mk4 Roadster 20th Anniversary #8674. Sold 09/07/2020.
Build Thread and
Video.
Build 4: Gen 3 Type 65 Coupe #59. Gen 3 Coyote. Legal 03/04/2020.
Build Thread and
Video
Build 5: 35 Hot Rod Truck #138. LS3 and 4L65E auto. Rcvd 01/05/2021. Legal 04/20/2023.
Build Thread. Sold 11/9/2023.
-
11-17-2014, 10:48 AM
#180
I really like the grommets on the front quick jacks. Small details make for such a polished result. Nice work.
-
11-21-2014, 01:33 PM
#181
It's turning out perfect, I envy many guys in this site but you the most!! Congrats!!! Can't wait for you to post a video driving this beauty!!
-
11-24-2014, 08:52 AM
#182
Originally Posted by
blkout25
It's turning out perfect, I envy many guys in this site but you the most!! Congrats!!! Can't wait for you to post a video driving this beauty!!
I second that.
-
11-24-2014, 09:29 AM
#183
Senior Member
Thanks for the nice comments guys. I'm still plugging away at it, wrapping up details and getting everything finalized. I will have some vacation time this week and hope to have it nearly done. I will post some finished pictures over the next week or two and probably close out the build thread. Now I just have to wait until spring to actually drive it. 
Build 1: Mk3 Roadster #5125. Sold 11/08/2014.
Build 2: Mk4 Roadster #7750. Sold 04/10/2017.
Build Thread
Build 3: Mk4 Roadster 20th Anniversary #8674. Sold 09/07/2020.
Build Thread and
Video.
Build 4: Gen 3 Type 65 Coupe #59. Gen 3 Coyote. Legal 03/04/2020.
Build Thread and
Video
Build 5: 35 Hot Rod Truck #138. LS3 and 4L65E auto. Rcvd 01/05/2021. Legal 04/20/2023.
Build Thread. Sold 11/9/2023.
-
11-29-2014, 10:40 PM
#184
Senior Member
Final Assembly Update
Had some time off this week, and in between turkey, football, family time, etc. was able to keep plugging away at all the final assembly details. The time flies by, and feel like I’m not making too much progress. But I just looked back at my build log, and last Thanksgiving I was finishing up wiring the dash and the main wiring harness. A lot has happened since then! Sometime in the next weeks, when it looks a little more done, I will take some final pictures and call this thread good, even though I’ll fiddle around with details probably all winter. As many have said, these things are never really done. Anyway, here are a few specifics of what I’ve been working on.
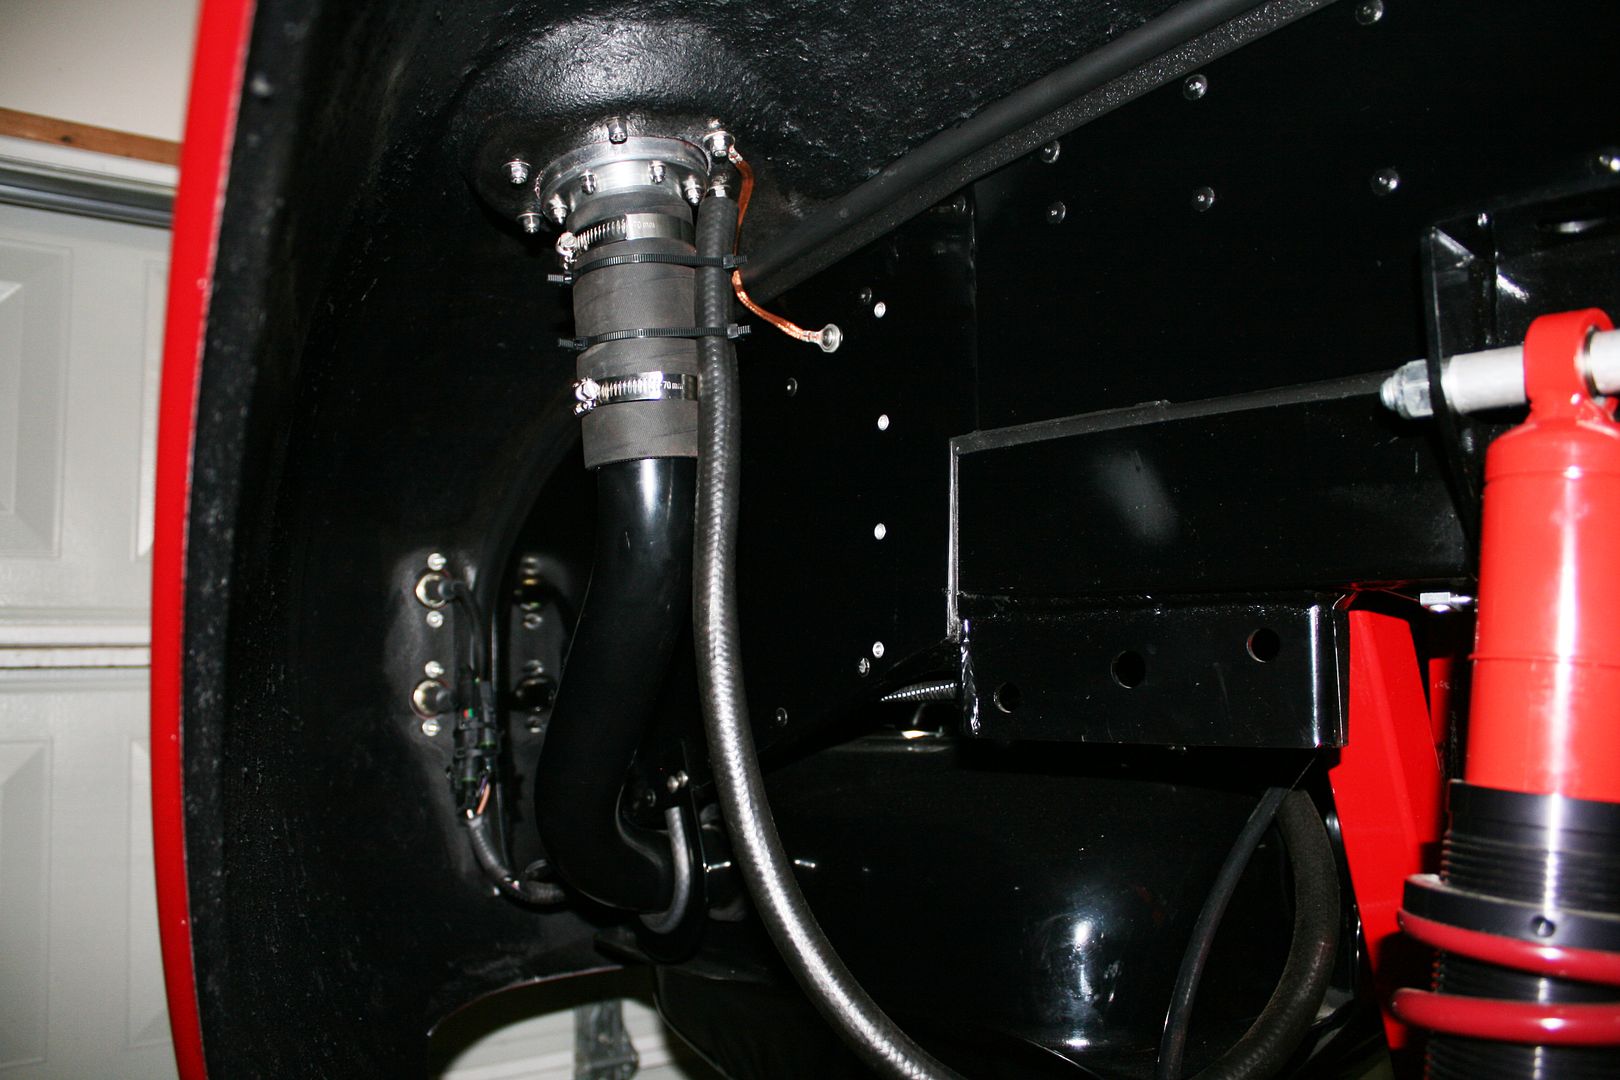
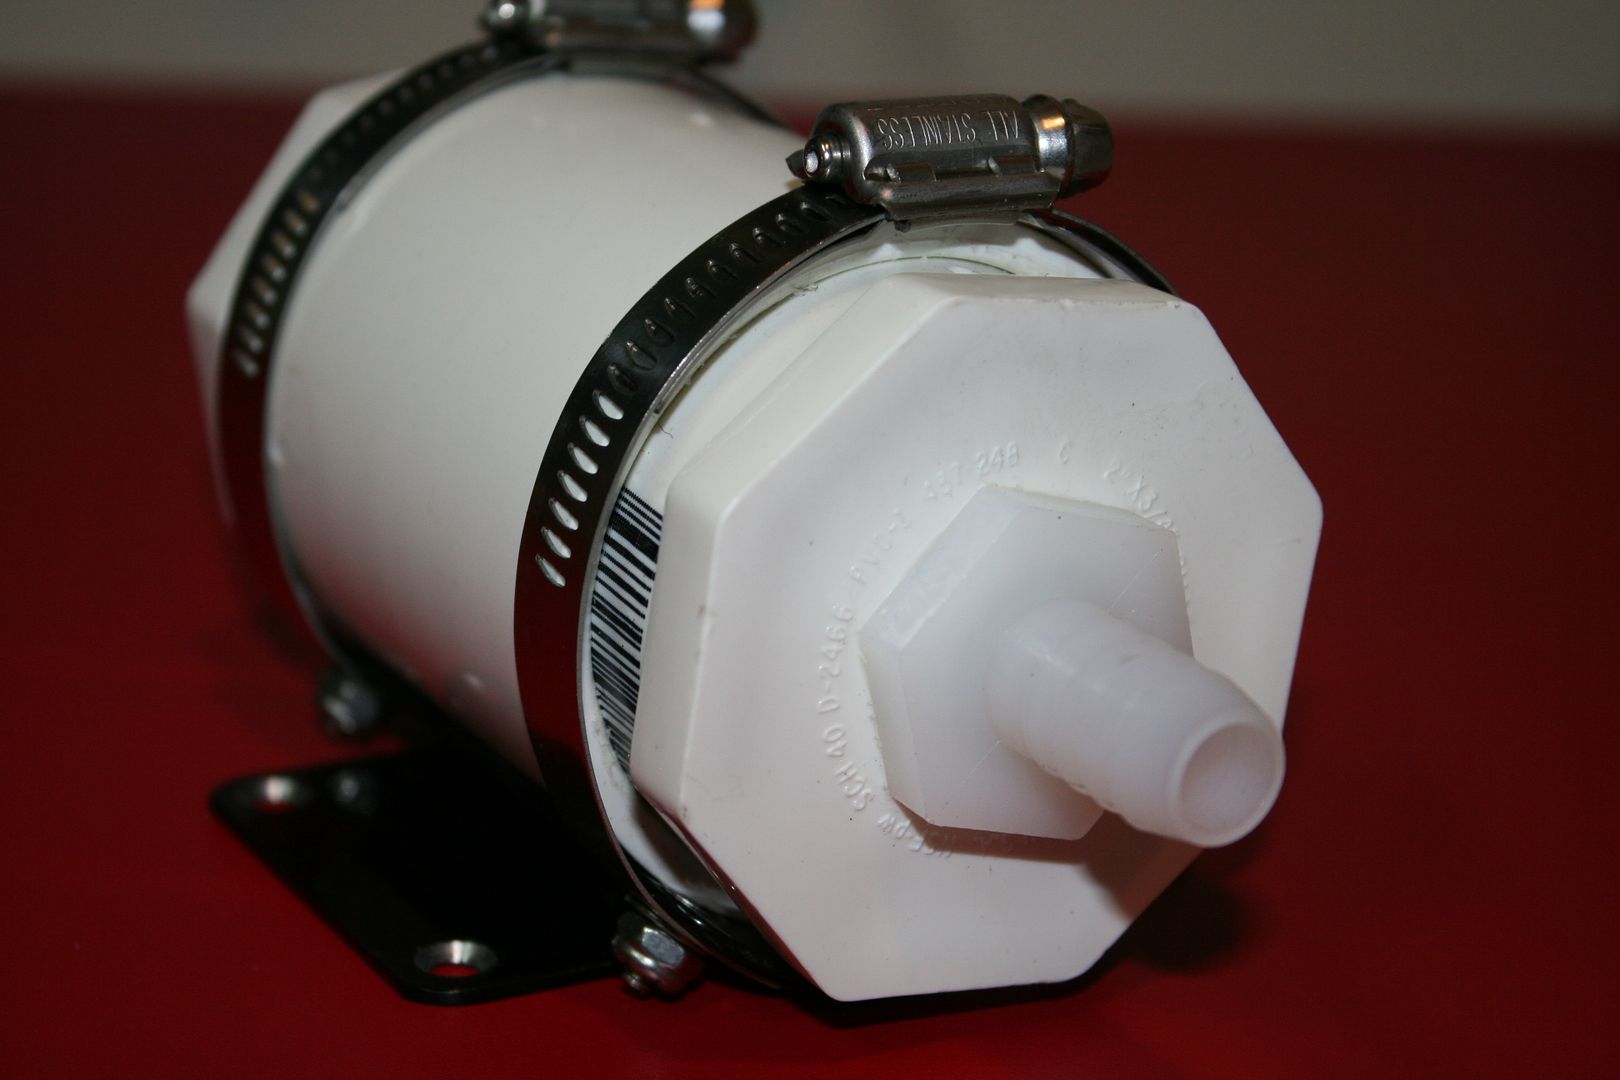
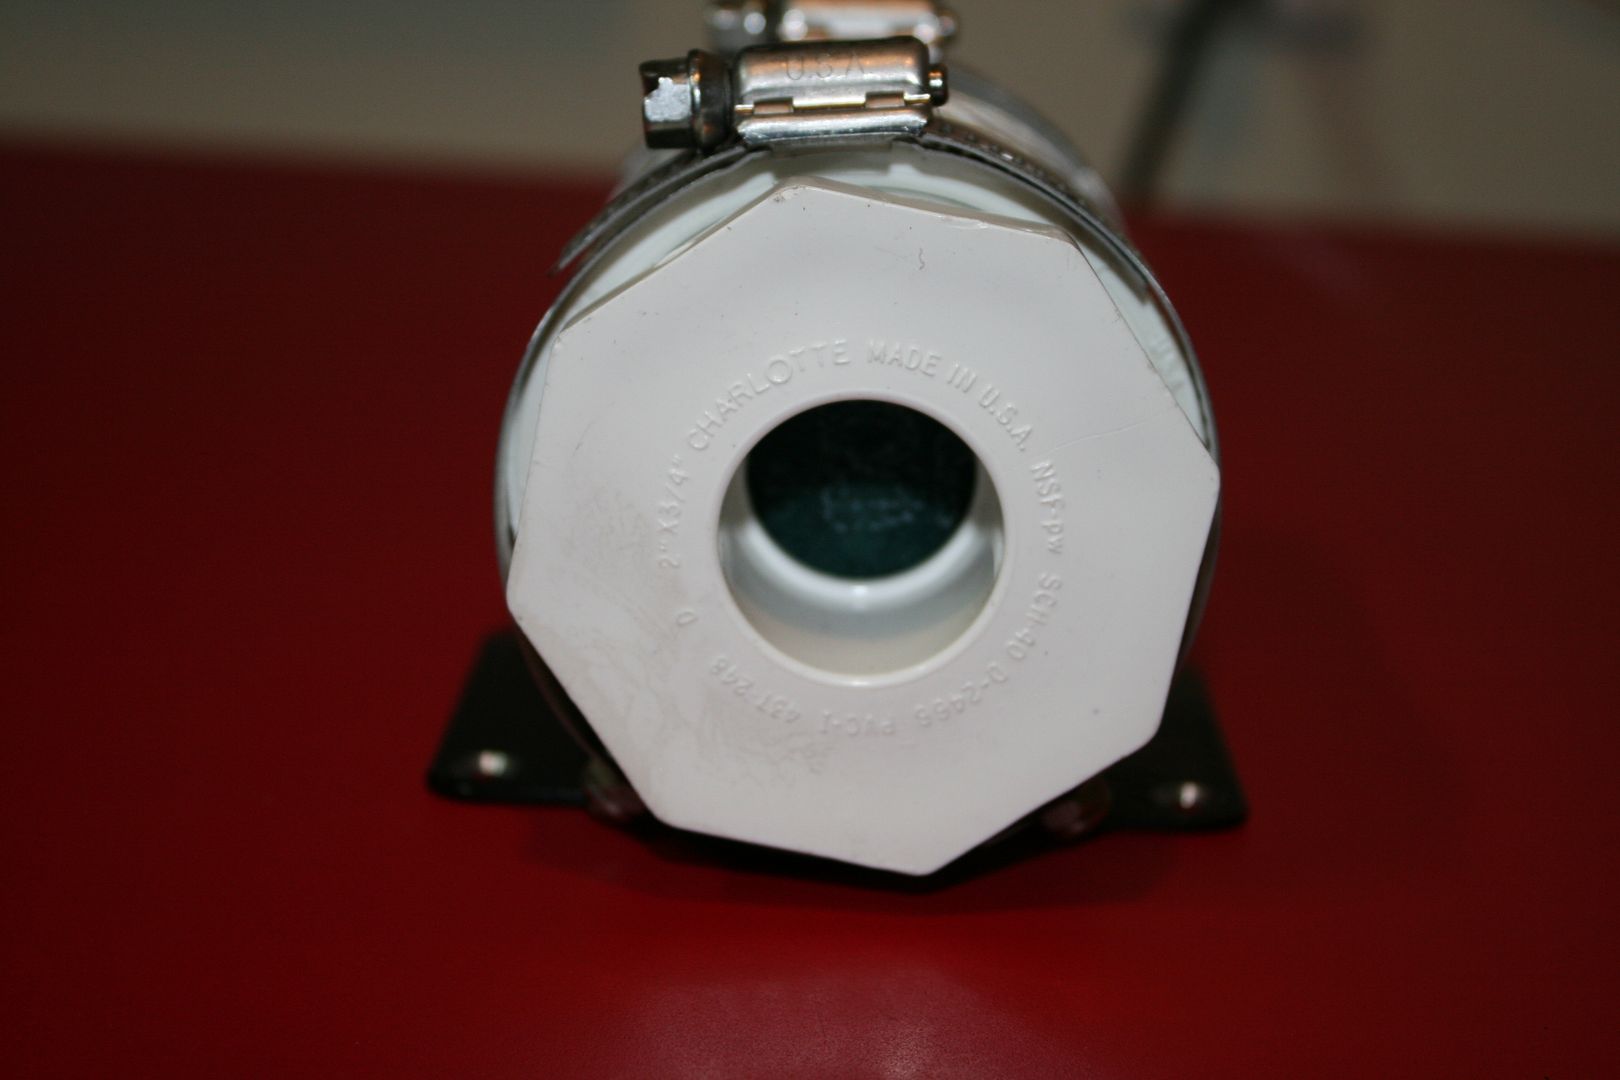
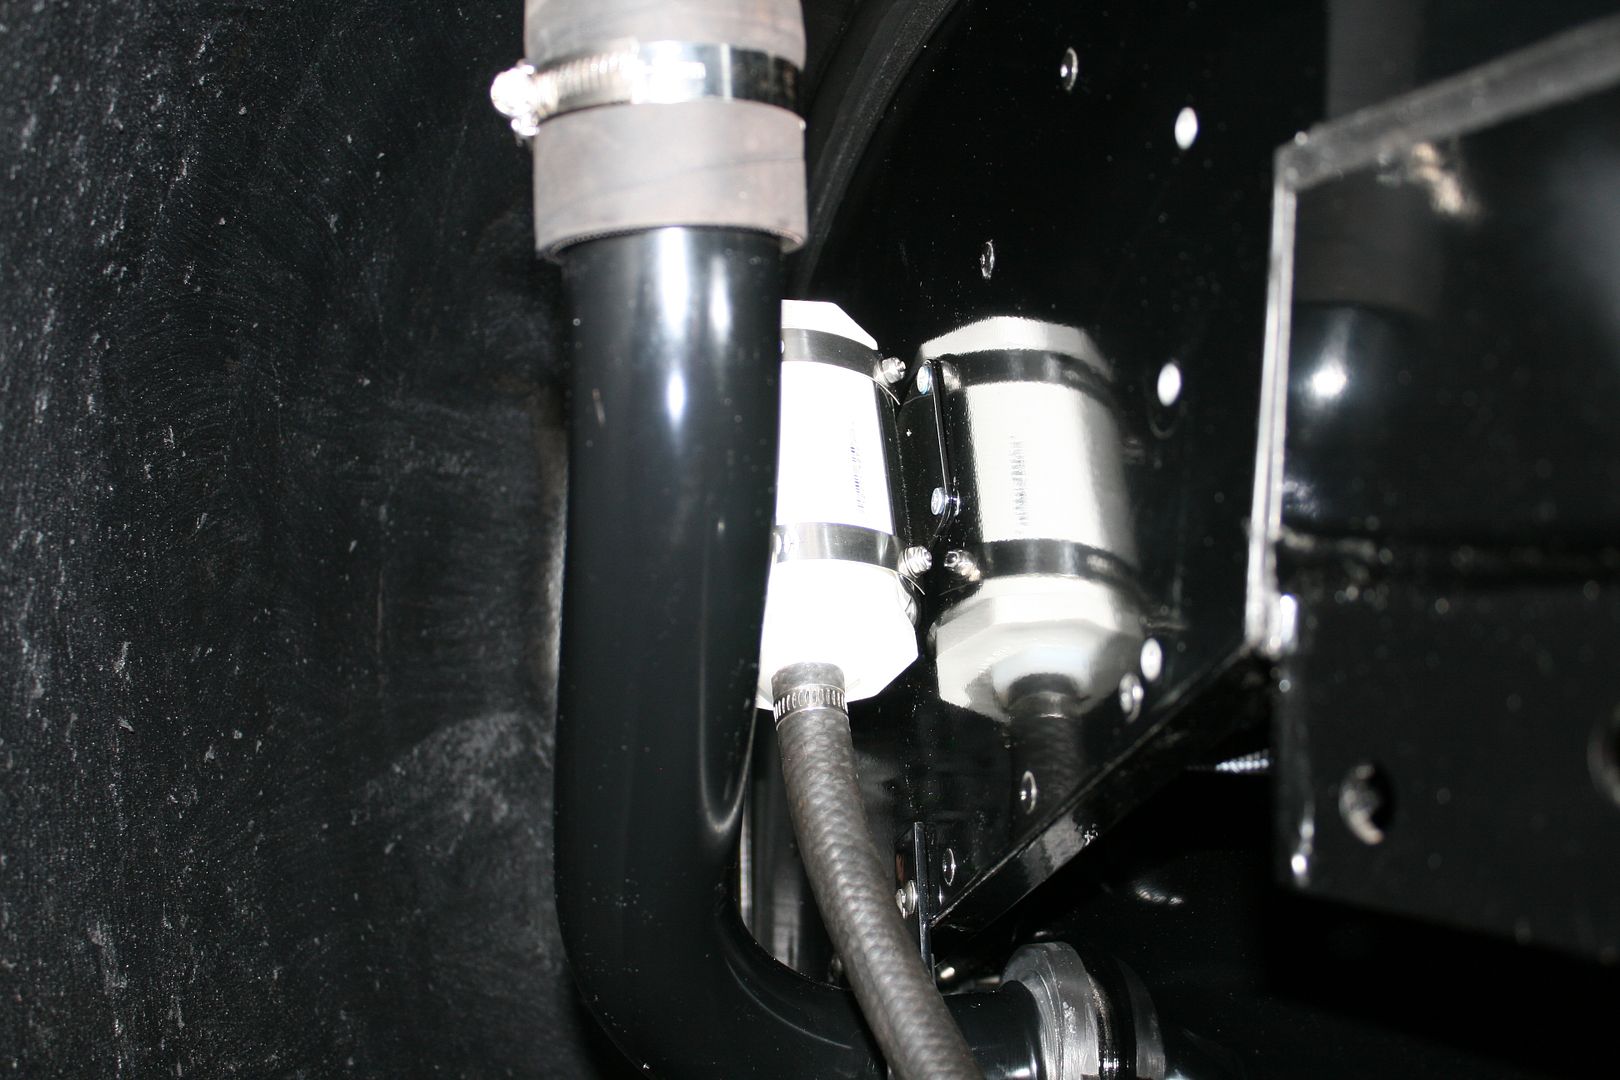
Wanted to install a charcoal filter for the fuel tank vent to eliminate any gas odors in the garage. Lots of discussion on this, e.g. is it necessary, how well does the charcoal really work, various commercial and homemade varieties, and so on. I ended up kind of borrowing a number of ideas, probably mainly from Jeff Kleiner’s version. After wandering the aisles at Home Depot and Lowes, ended up with a PVC coupler, two ends, a 1/2 inch barb fitting, and some Scotchbrite. Found activated charcoal in the pet dept at Wal-Mart. It's used for aquarium filters. Have enough to recharge this thing several times. I bought an AllStar reservoir bracket to hold it in place along with some hose clamps. The barb fitting and one end are glued in place with PVC cement, the other end is held quite securely by the hose clamp. There are circles made from Scotchbrite in each end to hold in the charcoal. The open end of one of the caps provides plenty of venting. Filled it with the activated charcoal, put the lid on, and mounted to the base with the hose clamps. Installed on the outer trunk side near the tank filler. I can get at it pretty easily to remove it and recharge as necessary. Not so visible now since I put the splash guard in.
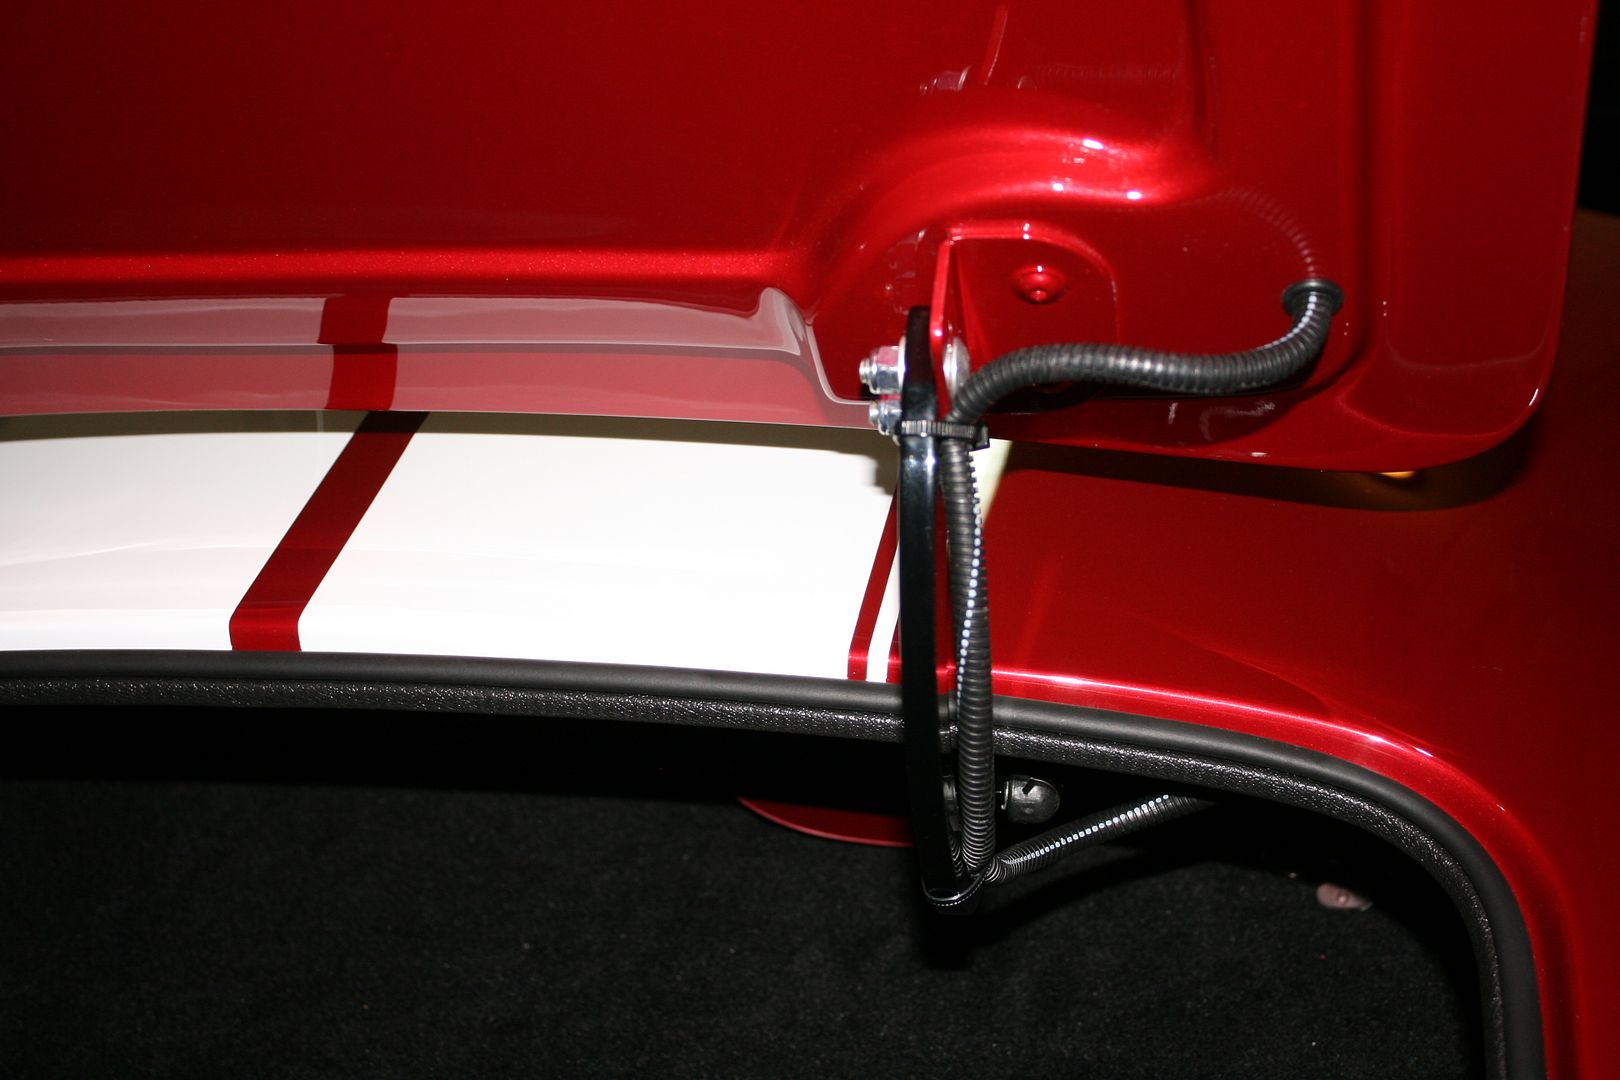
I had previously hung the trunk lid and got it lined up pretty well. Went ahead and ran the wire for the license plate light up by the pass side hinge. There’s a Weatherpack connector under there you can’t see so I can disconnect if I need to remove the trunk lid. Note that I bonded the trunk hinge plates to the trunk lid before paint, filled the slots, and had them painted over. A bit of a gamble because takes the side-to-side adjustment out of play. But I like the clean look, and all lined up just fine. Same as when the body was installed and mocked up previously. The main adjustment between the lid and hinge itself isn't affected.
Same thing on the hood hinges. Bonded the hinge plates to the hood before paint. Also the mounting points for the hood shocks. Then also had them painted in.
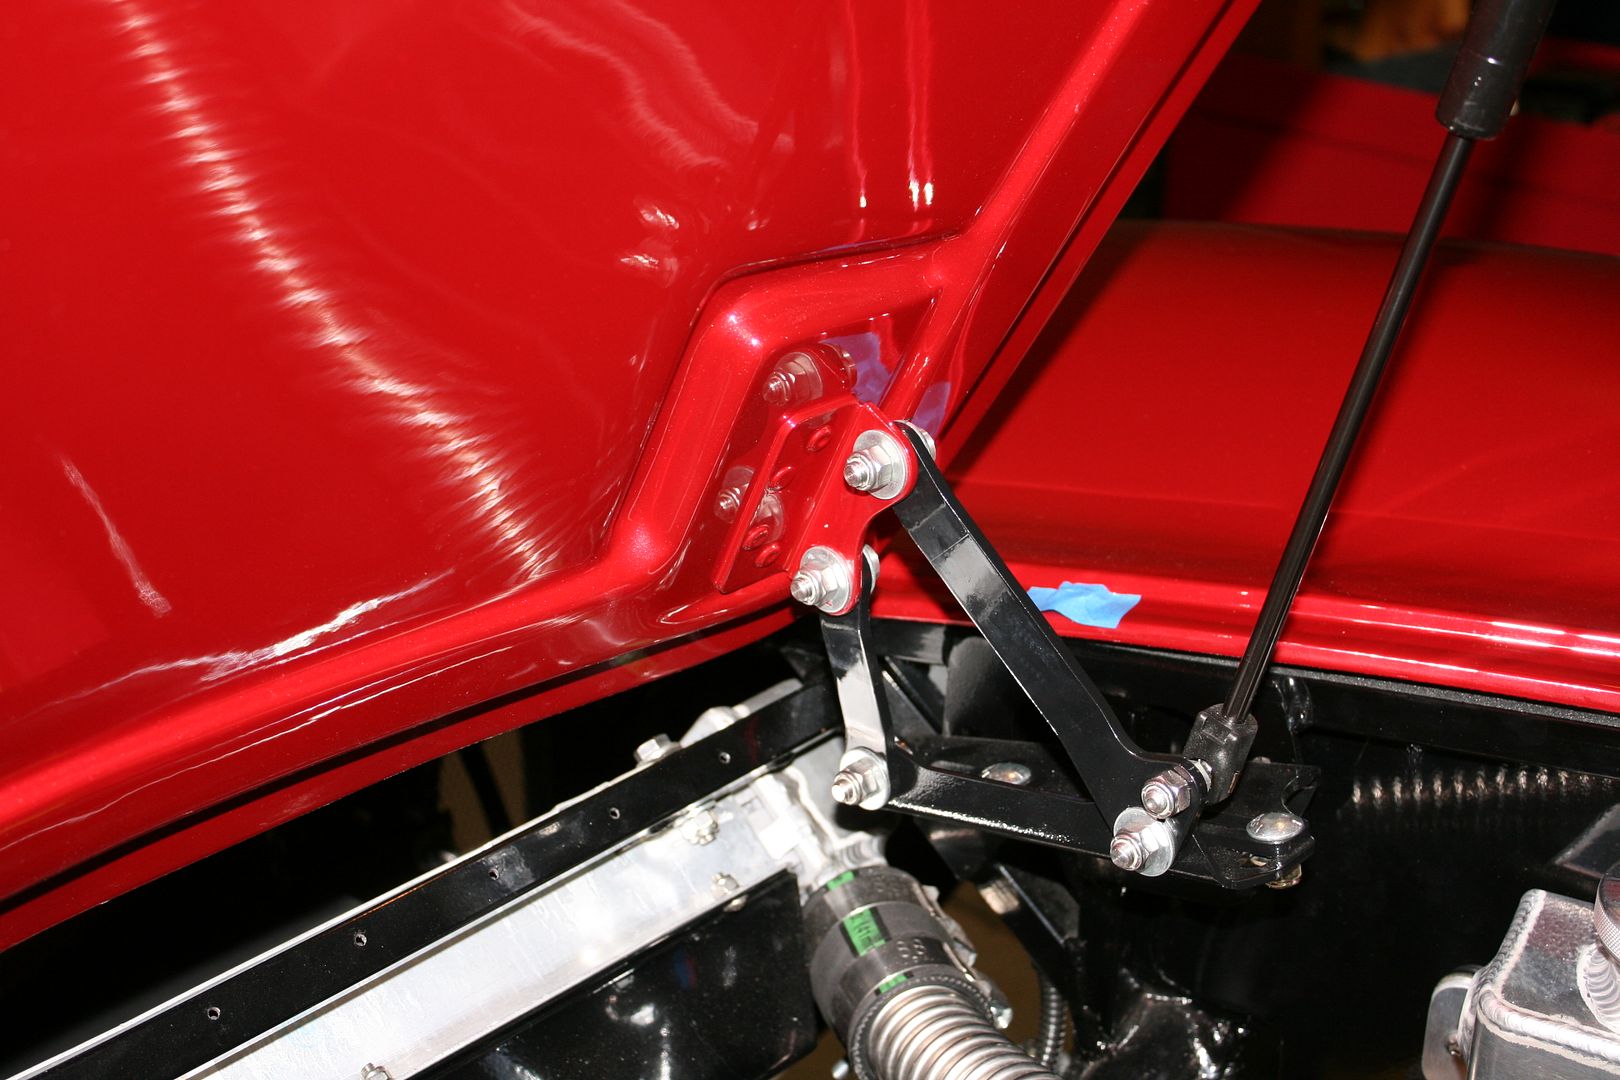
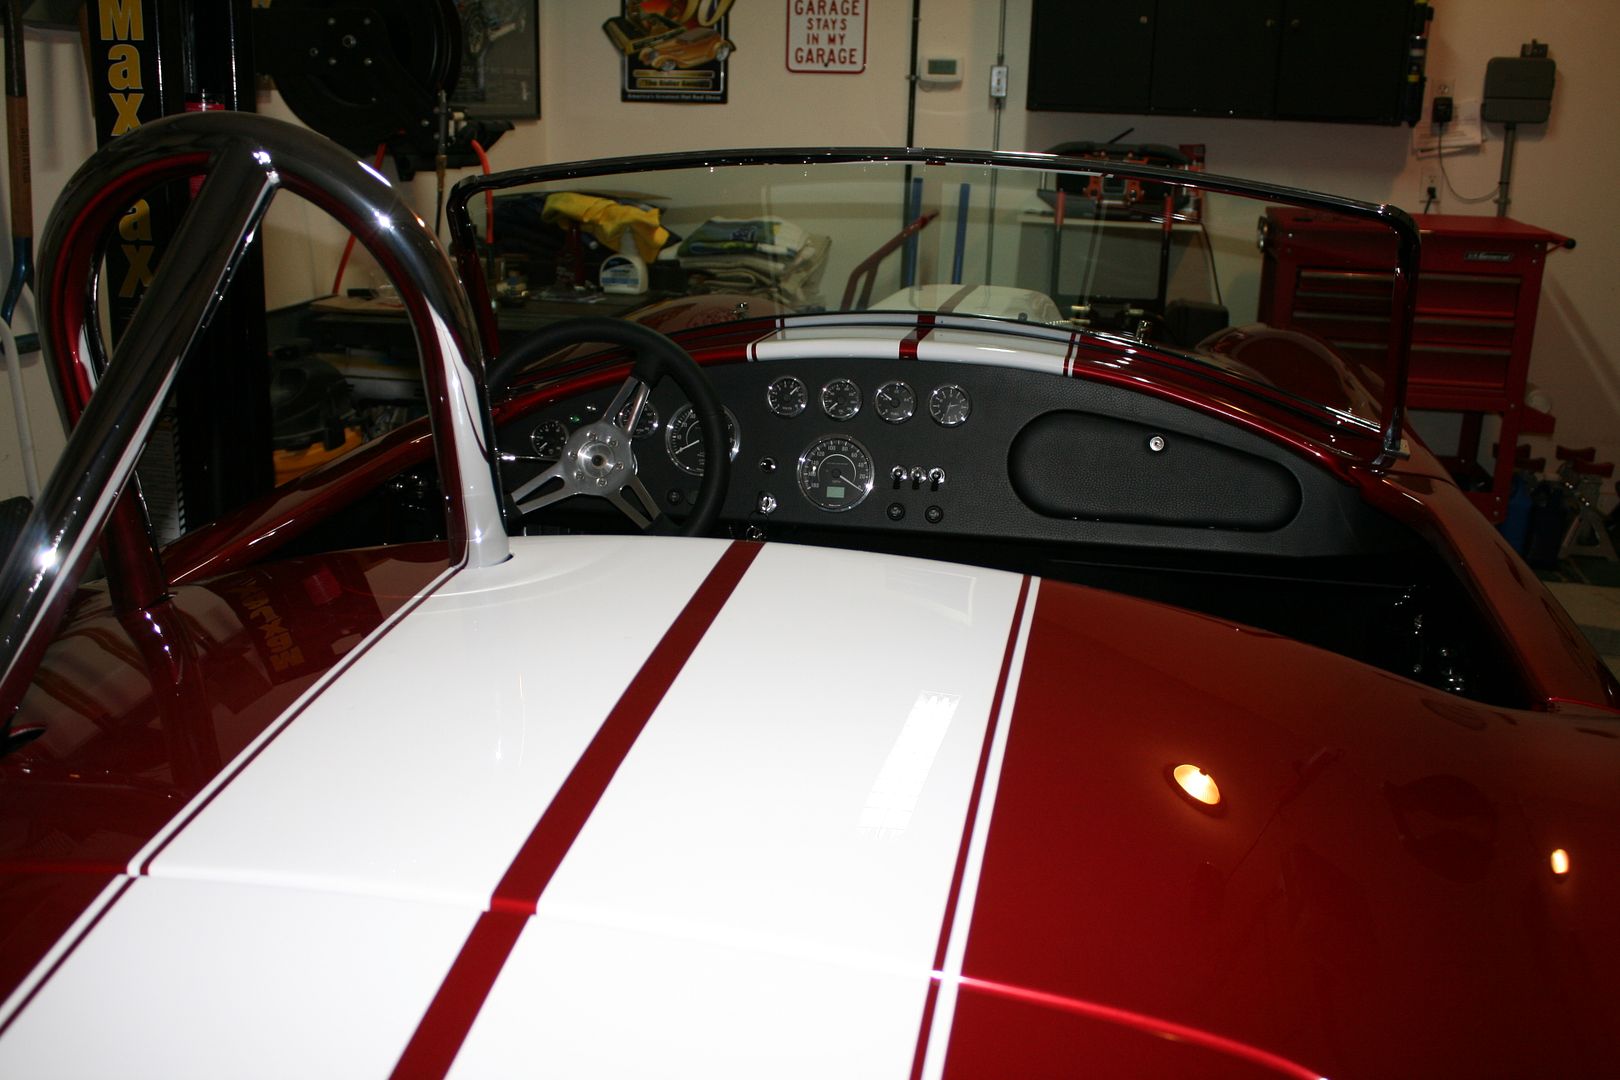
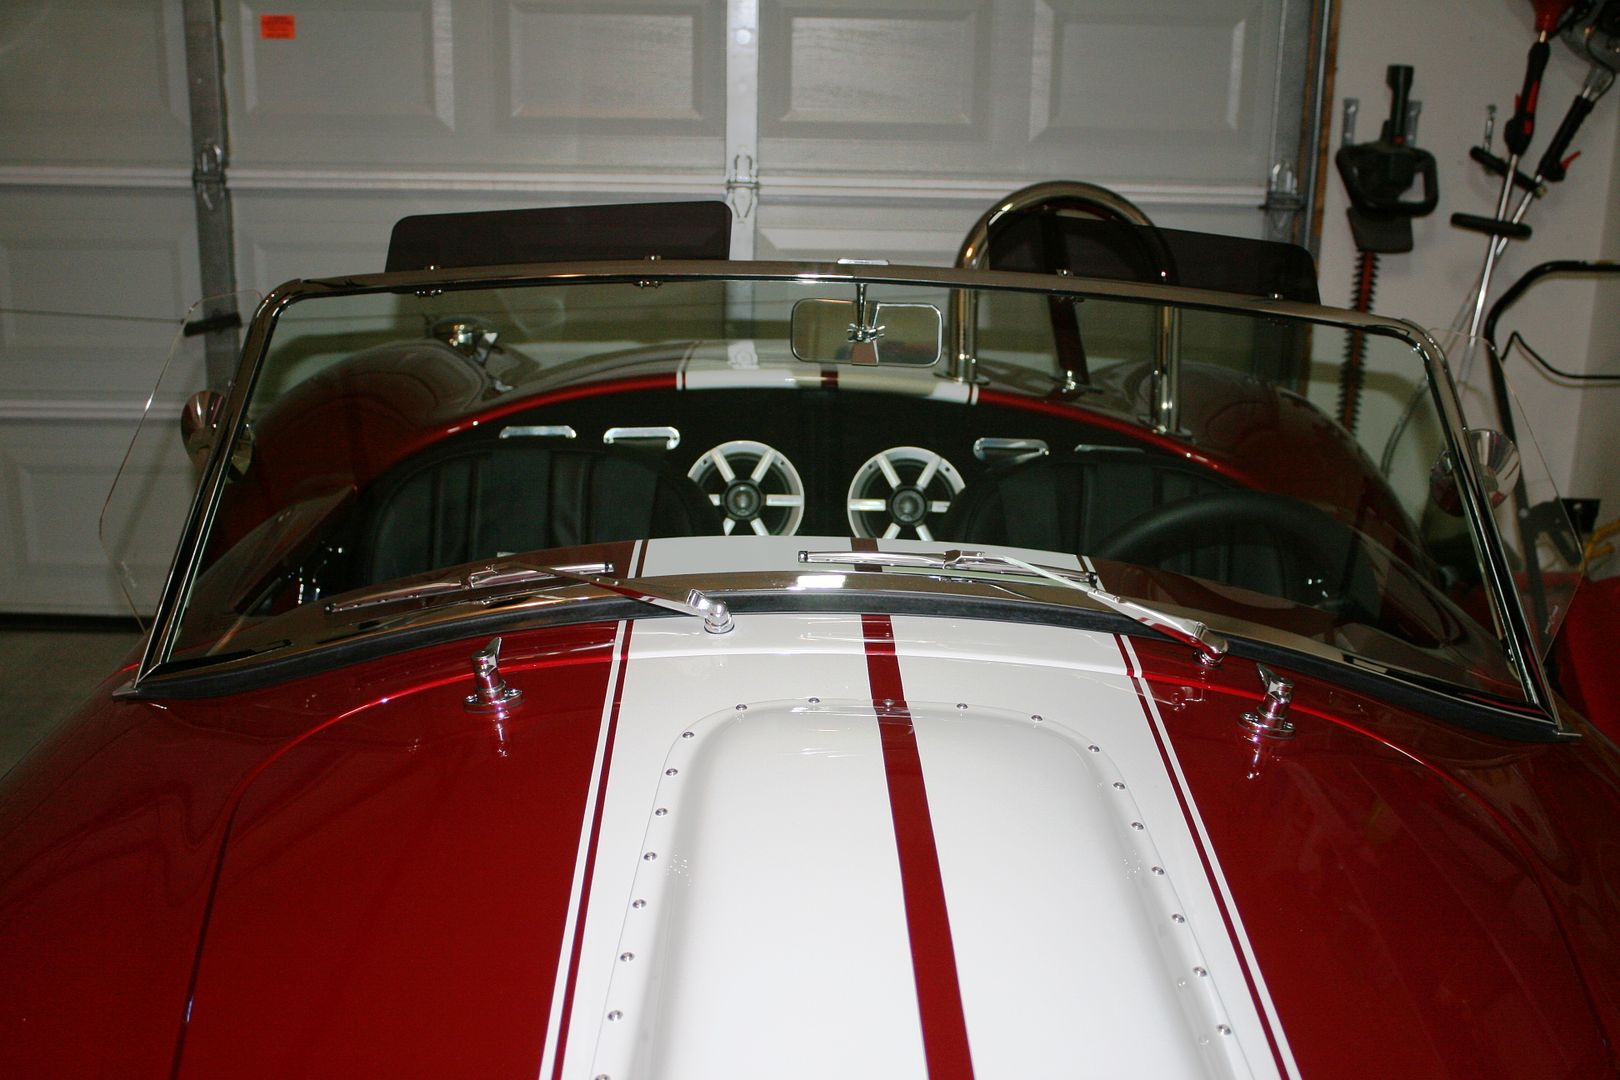
Got the windshield installed. Love reaching down into the bowels of the car getting those windshield bolts in! But it’s done and lined up just like I had it before. Sits down on the cowl just right and the angle is correct in case I ever think about adding a top. Looks ready to jump in and drive away.
One very small detail that I did on my Mk3 that people commented about. It’s a small thing, but did the same thing here. I used Mike Everson’s windshield trim plates, cut down similar to the way FFR supplies them now. I like the FFR plates OK, but my Mk4 is a couple years old, and I received two LH sides (or are they RH?) so they’re not usable. I had Mike’s parts on hand. What I did though was replace the gasket material with 1/8 thick neoprene. This is the exact thickness of the windshield gasket, so they sit nice and flat.
Last edited by edwardb; 12-01-2014 at 06:46 AM.
Build 1: Mk3 Roadster #5125. Sold 11/08/2014.
Build 2: Mk4 Roadster #7750. Sold 04/10/2017.
Build Thread
Build 3: Mk4 Roadster 20th Anniversary #8674. Sold 09/07/2020.
Build Thread and
Video.
Build 4: Gen 3 Type 65 Coupe #59. Gen 3 Coyote. Legal 03/04/2020.
Build Thread and
Video
Build 5: 35 Hot Rod Truck #138. LS3 and 4L65E auto. Rcvd 01/05/2021. Legal 04/20/2023.
Build Thread. Sold 11/9/2023.
-
11-29-2014, 10:42 PM
#185
Senior Member
Final Assembly Update continued
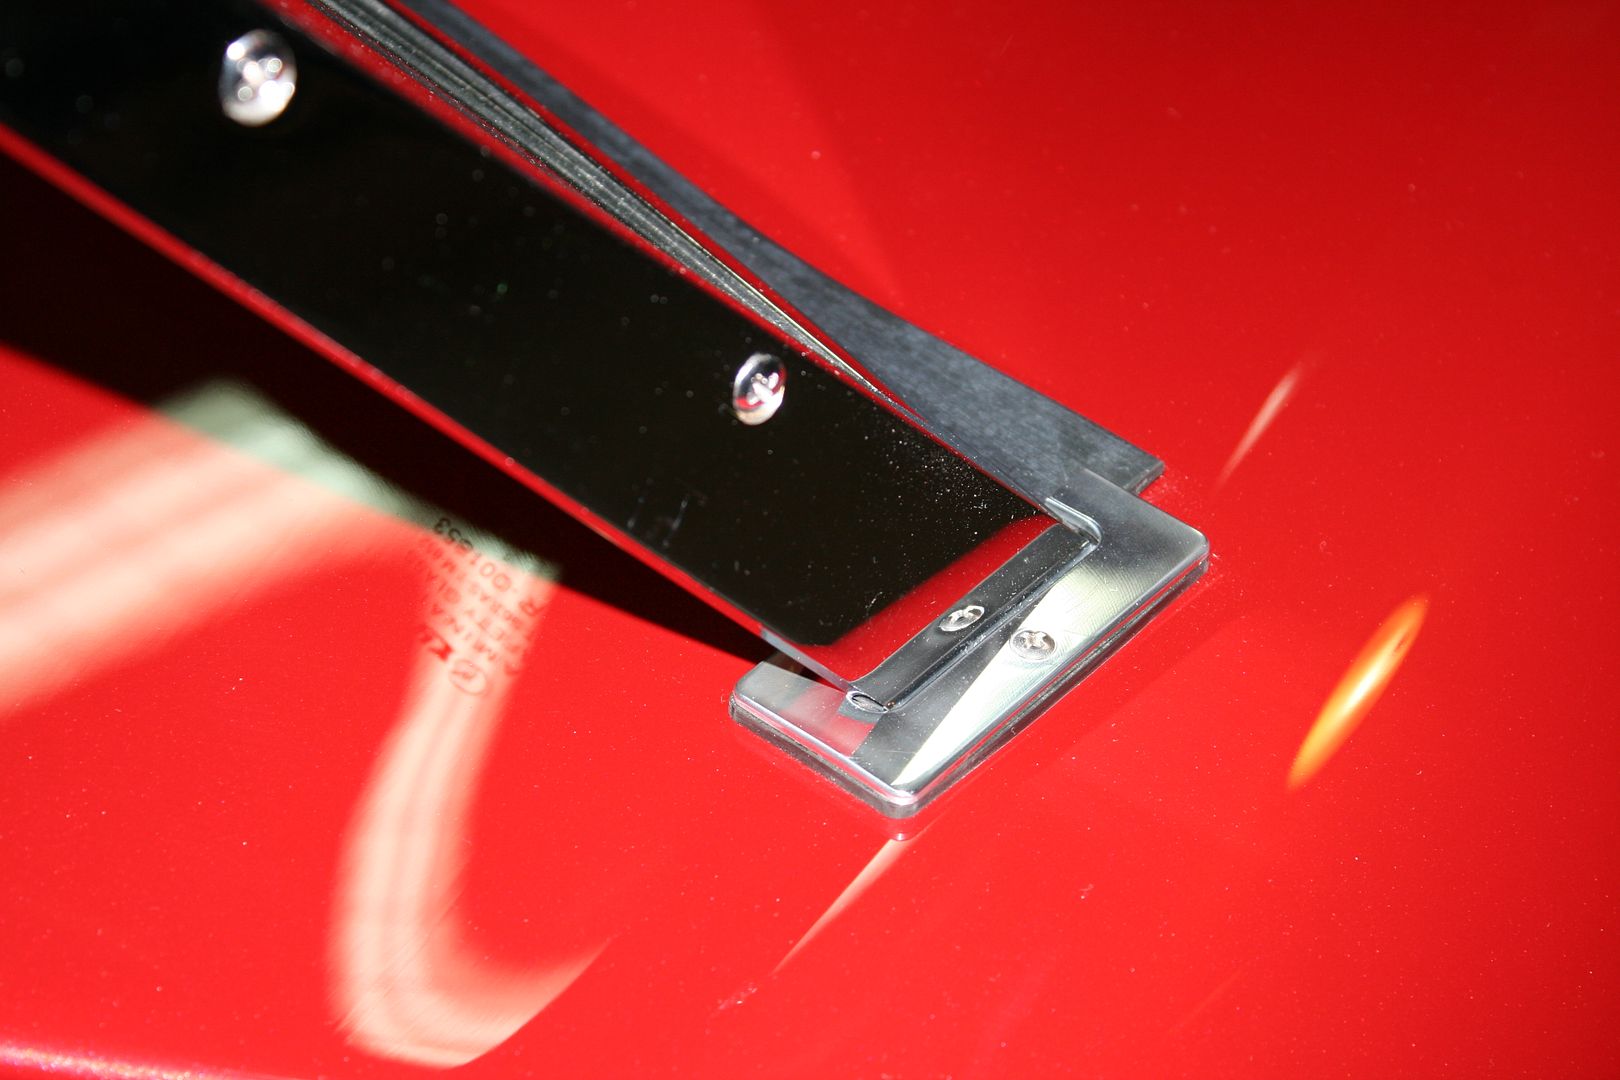
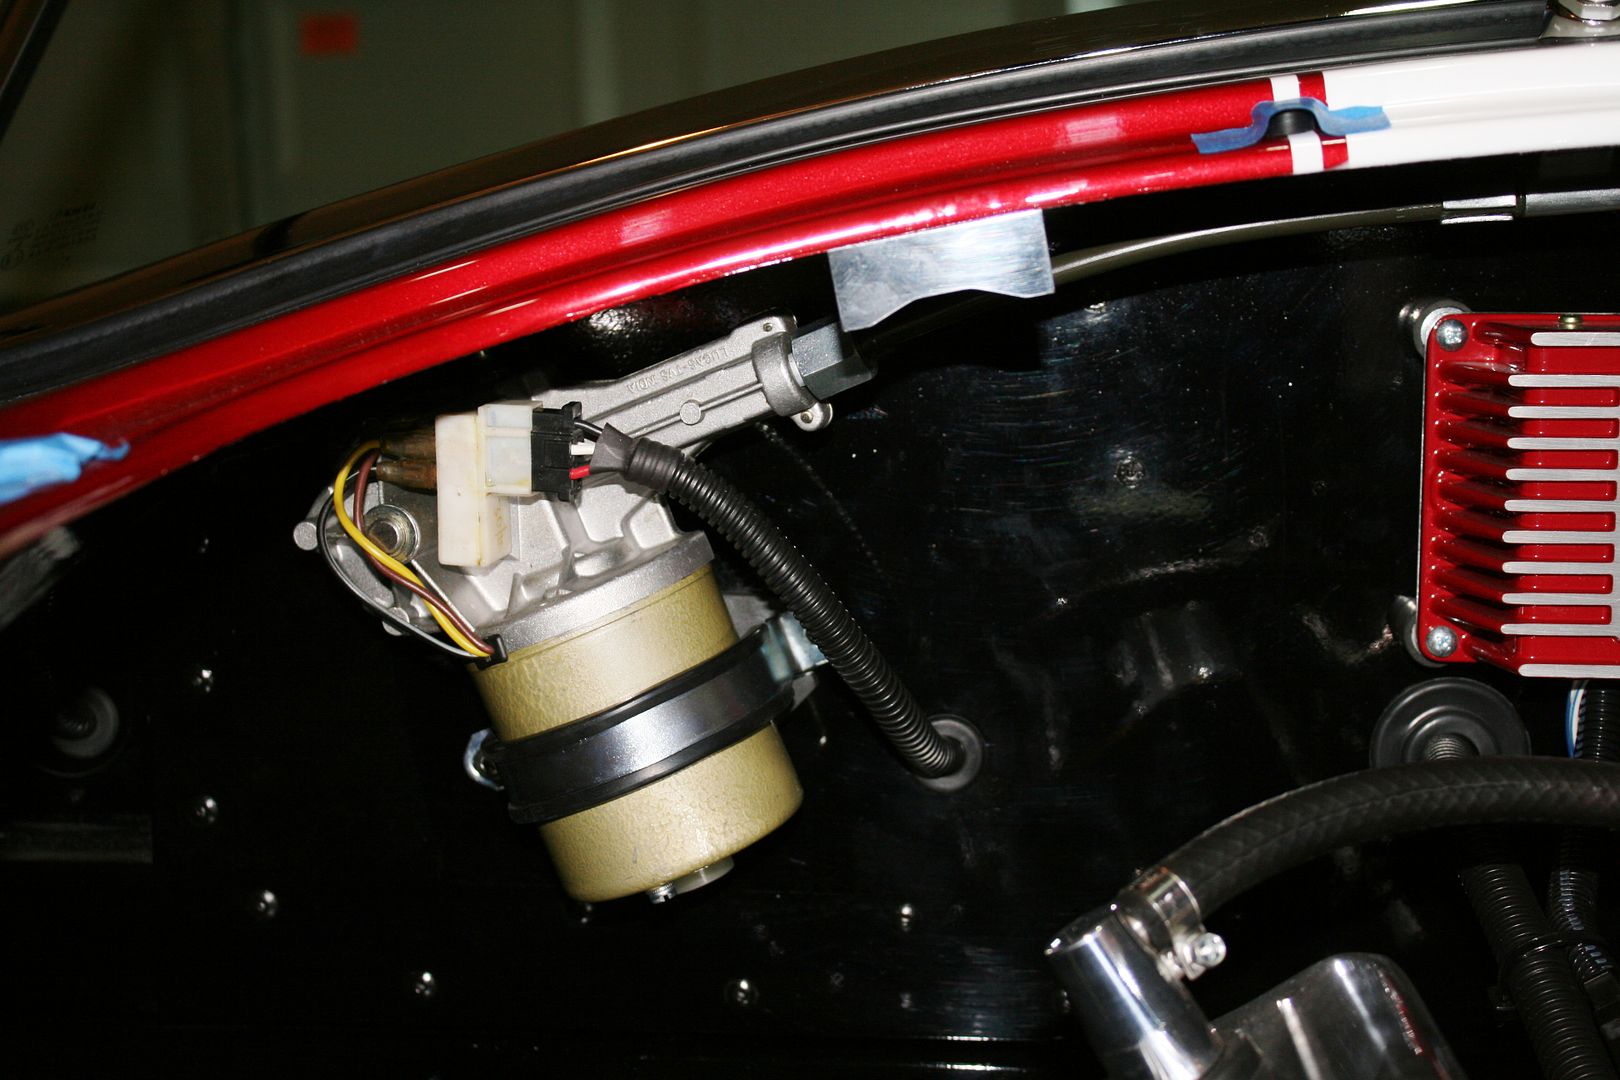
Got the windshield wiper motor assembly mounted. Lucas plug and switch from ********** and good to go. It works and actually parks. I'm amazed how much this is discussed in various threads, and the lengths guys go to get them working properly. With the right parts it's pretty easy. The supplied FFR switch works fine as well, it just didn't match the Lucas switches I have elsewhere on the dash. Also in this picture you can see one of the hood latches. These are parts I made with a profile that fits the top side of the hood latch. Kind of "click" in place when you close them. They're held on with bolts I installed before paint, so the heads are hidden.
Seat belt trim plates, also from Mike Everson, installed:
Doors hung, catches and latches all adjusted. Installed Herb’s door panels. Note I used some automotive trim screws in addition to the supplied Velcro. Three along the bottom, two along the top. Also installed the under door aluminum. In hindsight, not sure I used quite enough rivets (!). Probably could have used the 3 inch spacer instead of 2 inch. Still need to install the carpet there.

Today I got the Gas’N pipes installed. No gaskets, just Permatex Ultra Copper RTV and grade 8 bolts with stover lock nuts.
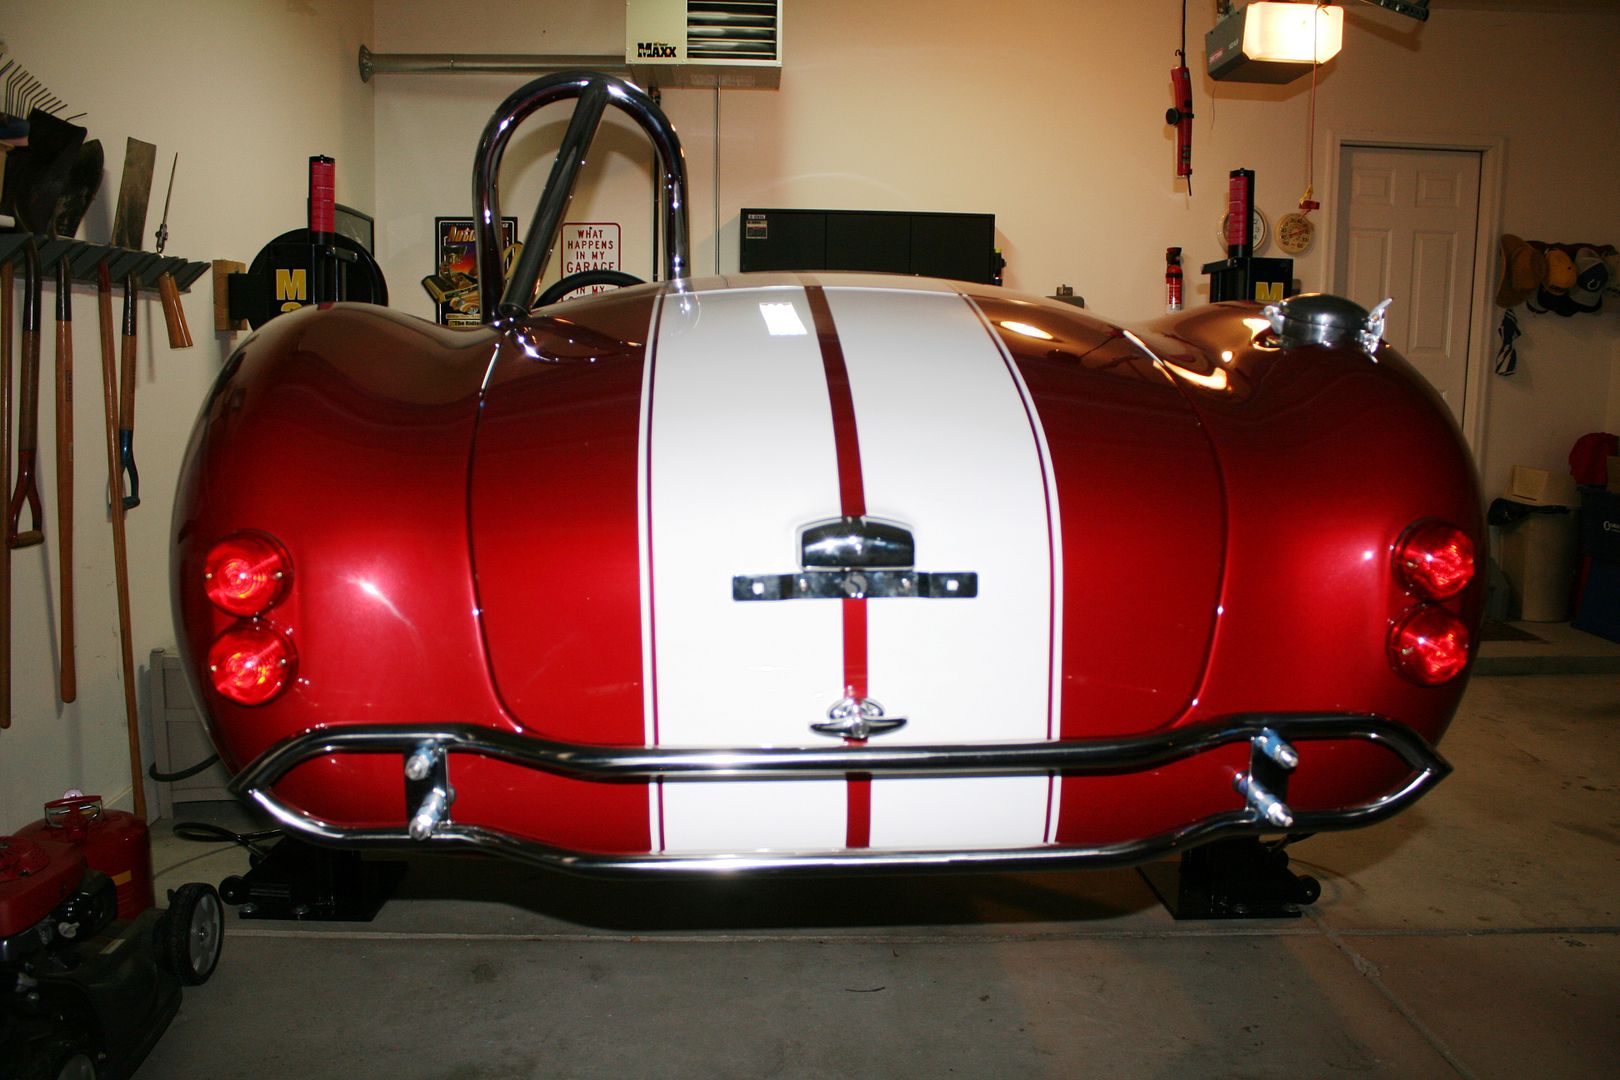
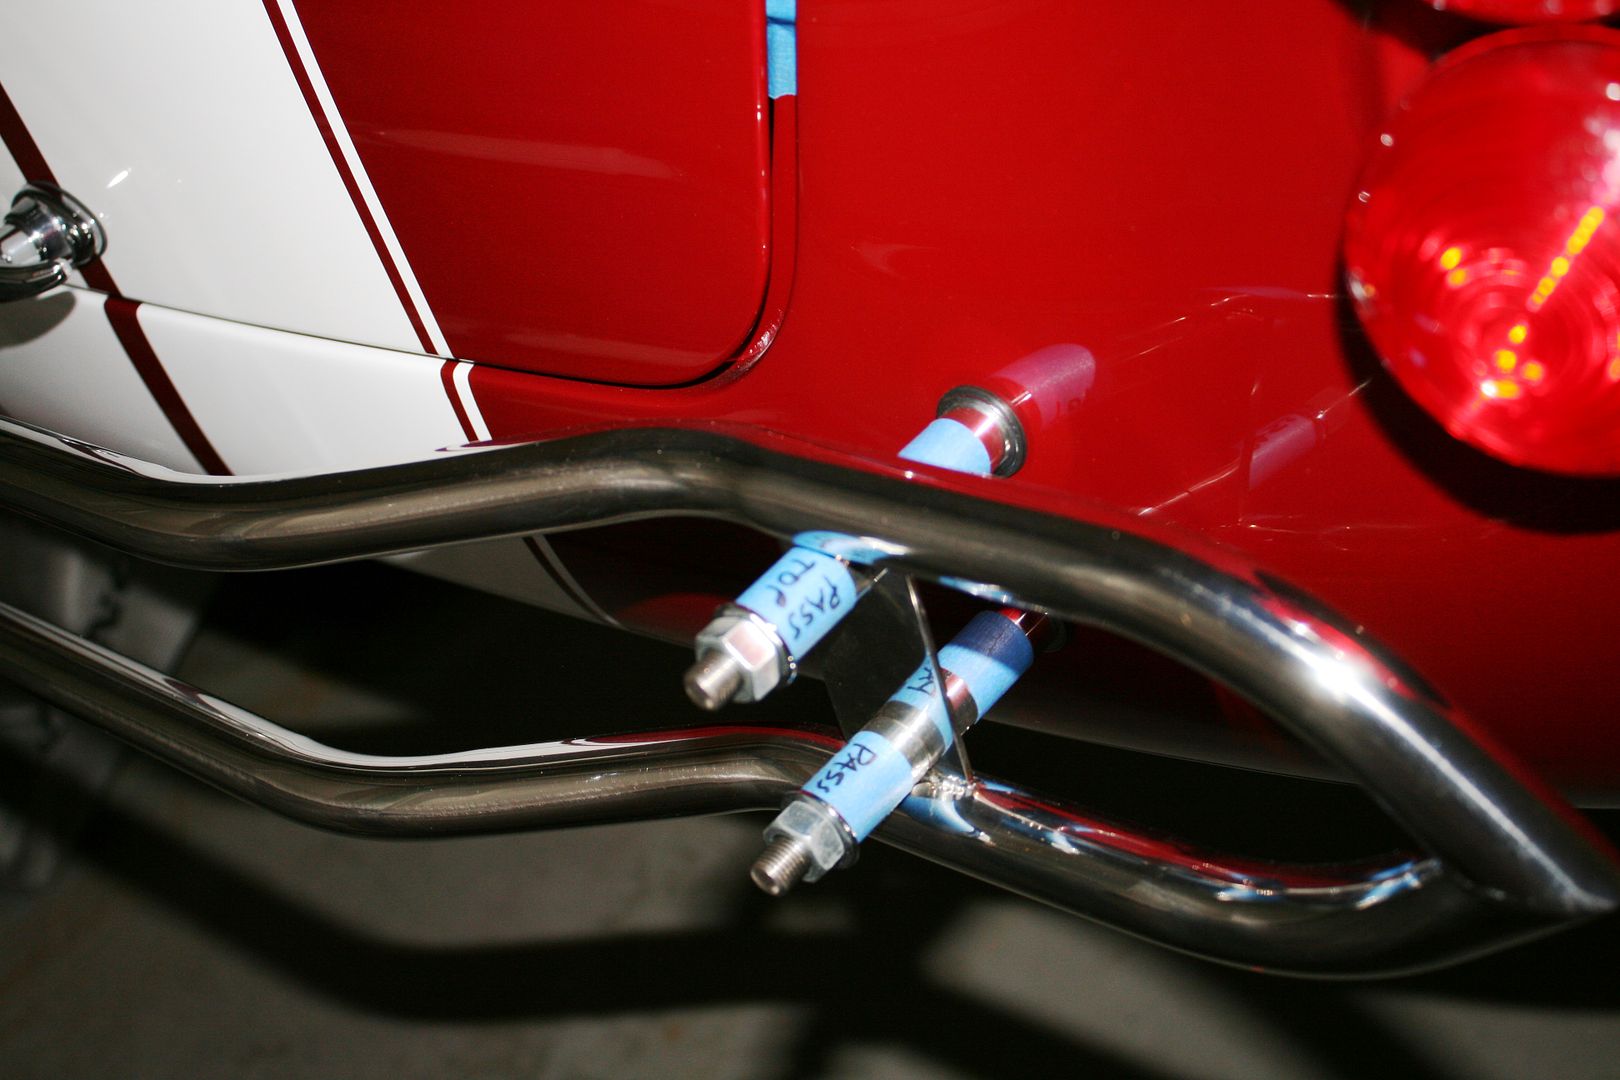
Installed the overriders on the back, so the rear bumper assembly is now complete.
Installed badges from ********** on the front and rear. These were from their 50% off sale. Nice. Cut off the pins and put on with 3M emblem tape.
This is a picture from earlier in the week before much of what is pictured here was completed. But kind of what the build looks like right now.
Still lots of details but it’s getting there.
Last edited by edwardb; 12-01-2014 at 06:54 AM.
Build 1: Mk3 Roadster #5125. Sold 11/08/2014.
Build 2: Mk4 Roadster #7750. Sold 04/10/2017.
Build Thread
Build 3: Mk4 Roadster 20th Anniversary #8674. Sold 09/07/2020.
Build Thread and
Video.
Build 4: Gen 3 Type 65 Coupe #59. Gen 3 Coyote. Legal 03/04/2020.
Build Thread and
Video
Build 5: 35 Hot Rod Truck #138. LS3 and 4L65E auto. Rcvd 01/05/2021. Legal 04/20/2023.
Build Thread. Sold 11/9/2023.
-
11-30-2014, 11:25 AM
#186
Edward,
You truly are the "Gold Standard" for these builds. I find that when I get to a point where I don't know what to do or don't know what to buy for a specific use, I go back to your thread. I am going to print the whole thread to save myself time from looking it up everyday. Congrats on the build. Will you be going to London so we can all see it? Henry.
P.S.
Sad that you cannot drive it. Here in Pass Christian, Mississippi, it is a nice 75, with no clouds. Never seen salt on the roads. Henry
MK IV complete kit delivered August 21st, 2014. Ford Racing 427w with X heads. IRS. Upgraded Wilwoods, 6 piston front and 4 rear. Tremec t600 and Ram Dual clutch. Holley Terminator EFI.
-
11-30-2014, 12:16 PM
#187
Senior Member
Originally Posted by
pcww
Edward,
You truly are the "Gold Standard" for these builds. I find that when I get to a point where I don't know what to do or don't know what to buy for a specific use, I go back to your thread. I am going to print the whole thread to save myself time from looking it up everyday. Congrats on the build. Will you be going to London so we can all see it? Henry.
P.S. Sad that you cannot drive it. Here in Pass Christian, Mississippi, it is a nice 75, with no clouds. Never seen salt on the roads. Henry
Really glad to hear you find the thread useful. And thanks for rubbing it in about the weather.  It's unseasonably warm here today (53 degrees) but just teasing us. Supposed to be cold again tomorrow.
Yes, I will be at London. I've gone for the past four years, last three with the Mk3. The Mk4 will be there! Normally stay at the Hampton along with several other couples from our local club. Looking forward to it. Always a great time.
Build 1: Mk3 Roadster #5125. Sold 11/08/2014.
Build 2: Mk4 Roadster #7750. Sold 04/10/2017.
Build Thread
Build 3: Mk4 Roadster 20th Anniversary #8674. Sold 09/07/2020.
Build Thread and
Video.
Build 4: Gen 3 Type 65 Coupe #59. Gen 3 Coyote. Legal 03/04/2020.
Build Thread and
Video
Build 5: 35 Hot Rod Truck #138. LS3 and 4L65E auto. Rcvd 01/05/2021. Legal 04/20/2023.
Build Thread. Sold 11/9/2023.
-
12-04-2014, 10:11 PM
#188
Member

Edward, Absolutely stunning... Your attention to Detail is amazing. The thought put in to the various mods, material choice, and problem solving... the mark of a true craftsman. I've read through this thread a few times and will use is as my benchmark. I am a ways off from ordering. I am still working through donor or complete, engine/trans, etc... and trying to convince my wife to agree. When I do order and start my build, I will keep a printed copy of this thread handy and probably refer to it more than the instruction manual. Thanks for a good read. I cannot wait to see the finished piece of art you have created.
Rob W. Elkhorn, WI
-
12-06-2014, 12:06 PM
#189
Paul, I know this is probably a redundant question, but I can't find the answer that easily. On your brake lines you went wirth the 45 degree fittings. My question is what does the kit come in? I want to run ss line too, but I don't know if I should run 45 or 37. I'm a little confused.
-
12-06-2014, 01:14 PM
#190
Senior Member
Originally Posted by
rezell3d
Paul, I know this is probably a redundant question, but I can't find the answer that easily. On your brake lines you went with the 45 degree fittings. My question is what does the kit come in? I want to run ss line too, but I don't know if I should run 45 or 37. I'm a little confused.
Correct. All the SS brake (and some of the SS fuel line fittings) in my build are 45 degree double flare fittings. The brake tubing and fittings supplied with the kit from FFR are also 45 degree double flare. Kind of the norm for most brake lines on this side of the pond.
37 degree flares are typically only single flare, and are associated with AN type fittings. I have a few AN fittings in the build (fuel line at tank, fuel line at pump, power steering/brake hoses) but both sides of the fittings are purchased. None are from flares I made.
Build 1: Mk3 Roadster #5125. Sold 11/08/2014.
Build 2: Mk4 Roadster #7750. Sold 04/10/2017.
Build Thread
Build 3: Mk4 Roadster 20th Anniversary #8674. Sold 09/07/2020.
Build Thread and
Video.
Build 4: Gen 3 Type 65 Coupe #59. Gen 3 Coyote. Legal 03/04/2020.
Build Thread and
Video
Build 5: 35 Hot Rod Truck #138. LS3 and 4L65E auto. Rcvd 01/05/2021. Legal 04/20/2023.
Build Thread. Sold 11/9/2023.
-
12-12-2014, 07:21 PM
#191
edwardb, I second RobW's comments, what you've written here is a quality shop manual for future builders like myself to reference. It's been said a hundred times, but just wanted to say thanks for your efforts on this thread as it's filled with invaluable information. Not to mention, of course, your car just looks freakin' awesome! I'm in the research/planning stage and am targeting kit purchase mid 2015 and look forward to incorporating your tips and lessons learned into my build. Thanks!
-
12-13-2014, 07:39 AM
#192
Senior Member
Thanks RobW and thumper24! Very kind words and great first posts! (even if I say so) Welcome to the forum. Glad you find the build thread useful. Good luck planning your builds. It really is a great experience. I will have some more final assembly pictures probably later this weekend.
Build 1: Mk3 Roadster #5125. Sold 11/08/2014.
Build 2: Mk4 Roadster #7750. Sold 04/10/2017.
Build Thread
Build 3: Mk4 Roadster 20th Anniversary #8674. Sold 09/07/2020.
Build Thread and
Video.
Build 4: Gen 3 Type 65 Coupe #59. Gen 3 Coyote. Legal 03/04/2020.
Build Thread and
Video
Build 5: 35 Hot Rod Truck #138. LS3 and 4L65E auto. Rcvd 01/05/2021. Legal 04/20/2023.
Build Thread. Sold 11/9/2023.
-
12-14-2014, 08:11 PM
#193
Senior Member
More Final Assembly
Completed the final details for several items since the last update. On the home stretch now. Just about done.
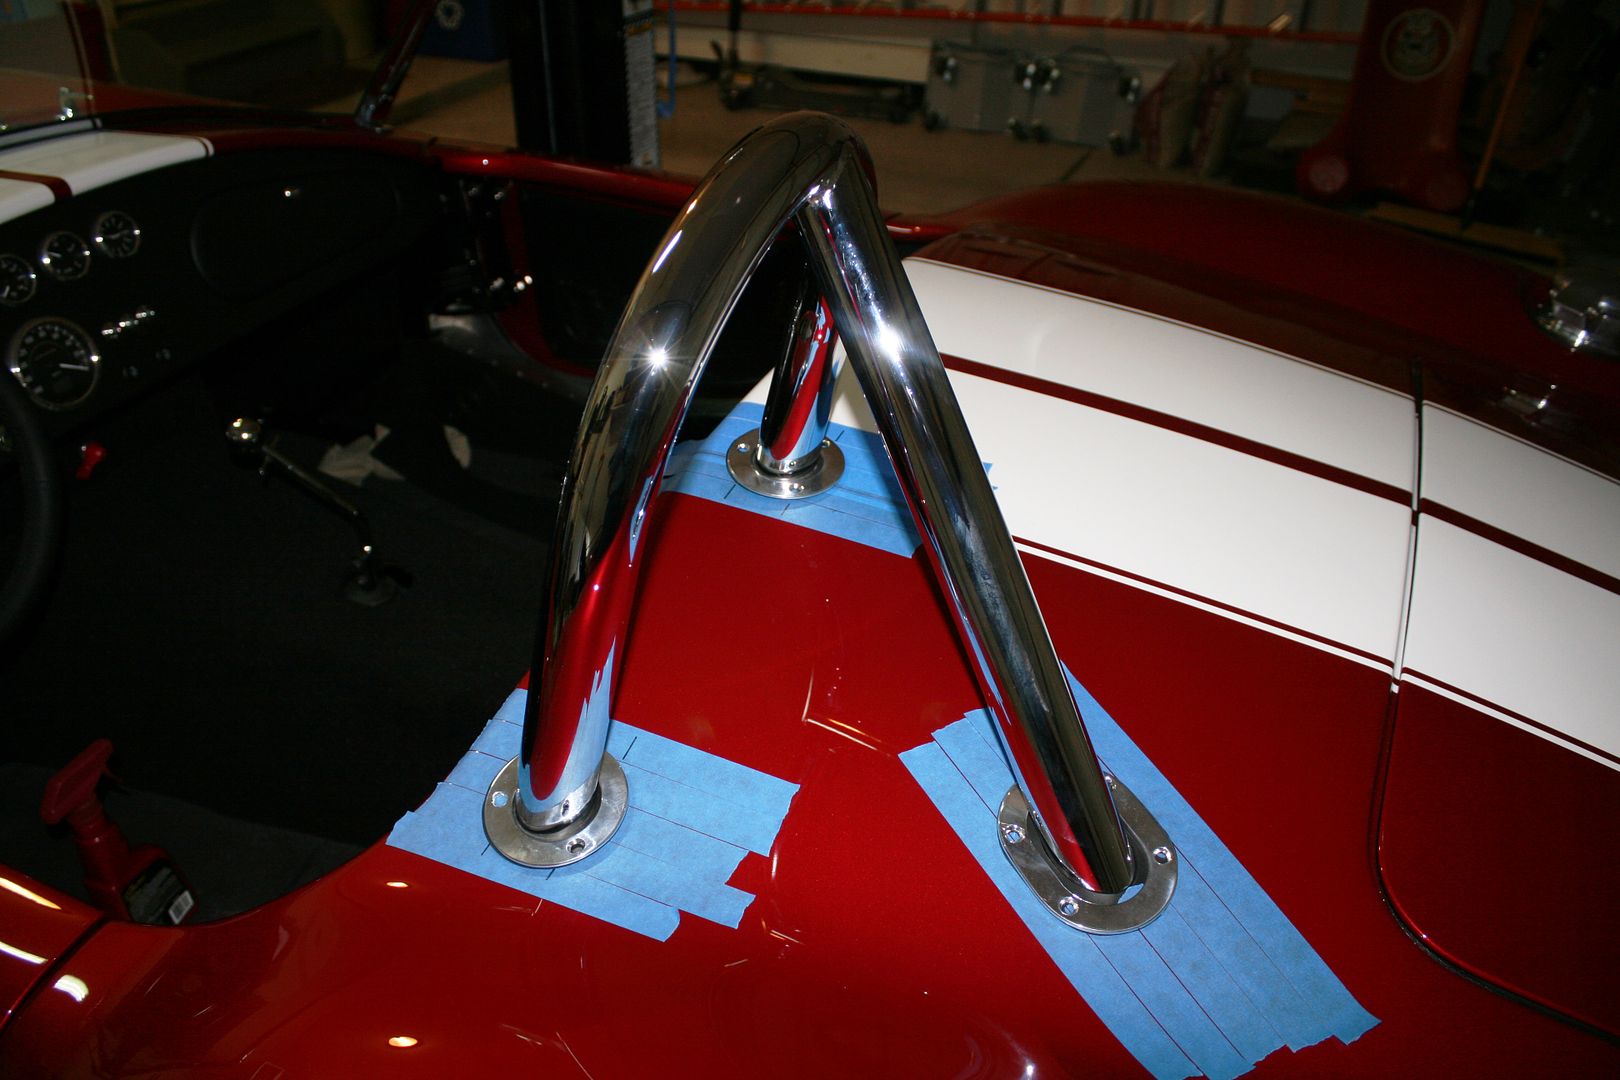
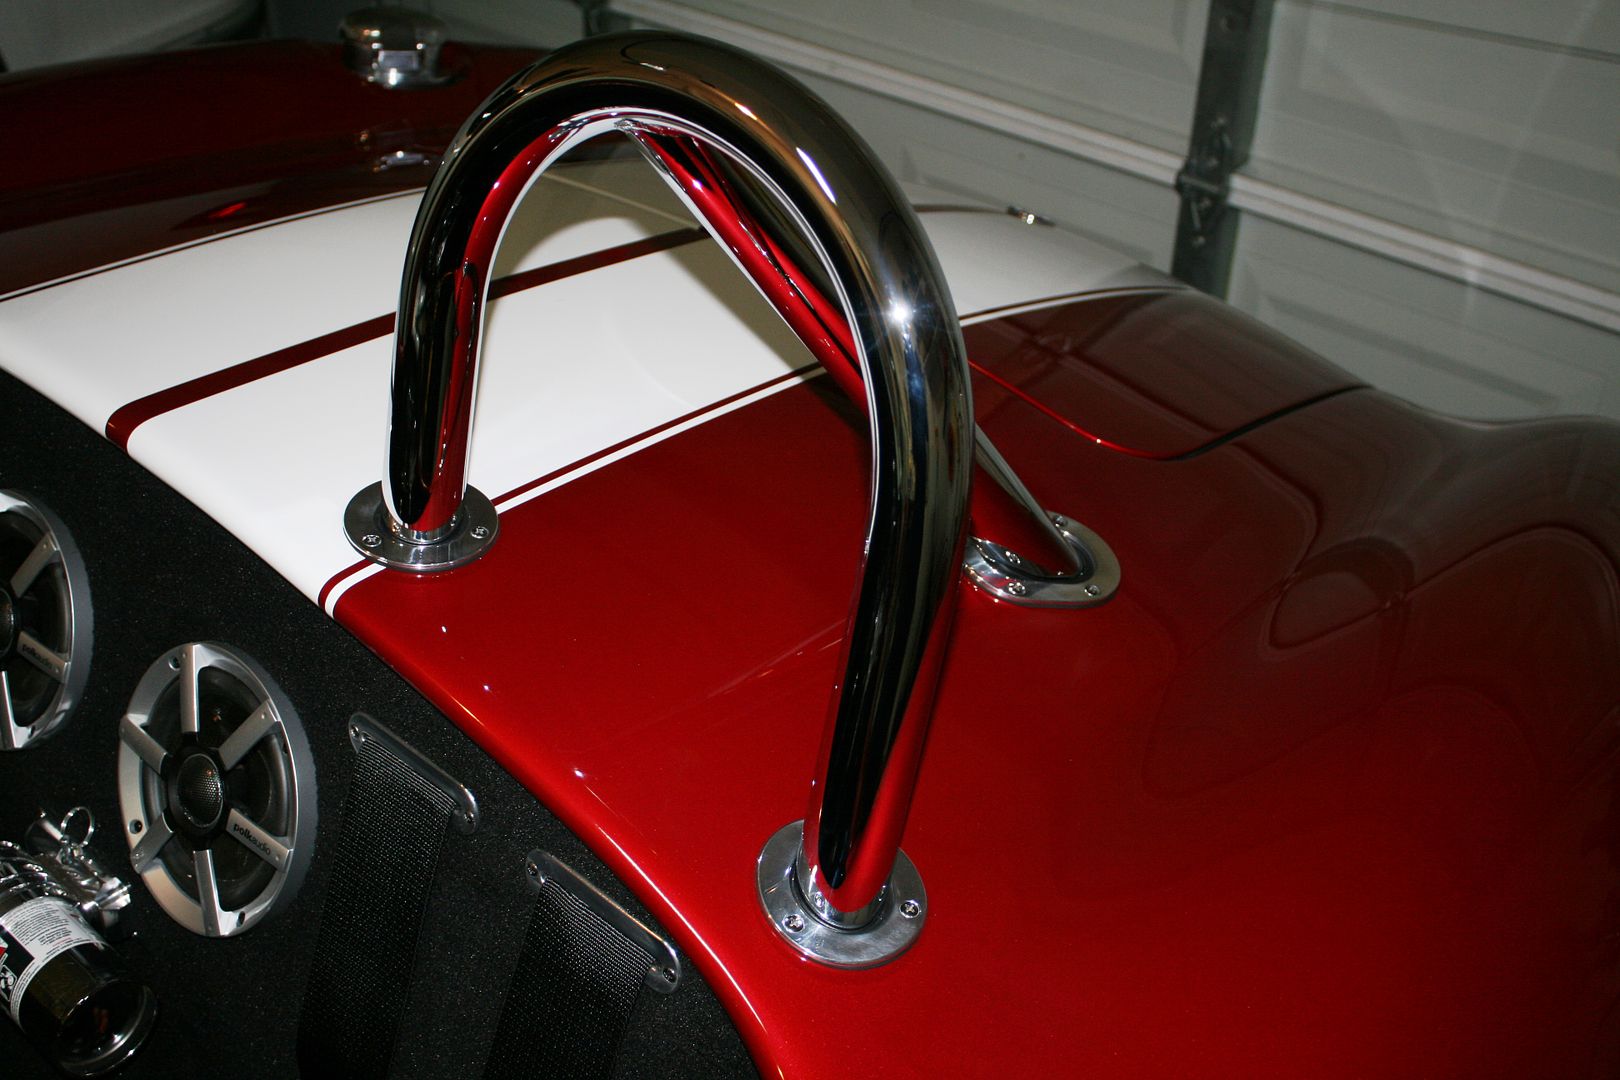
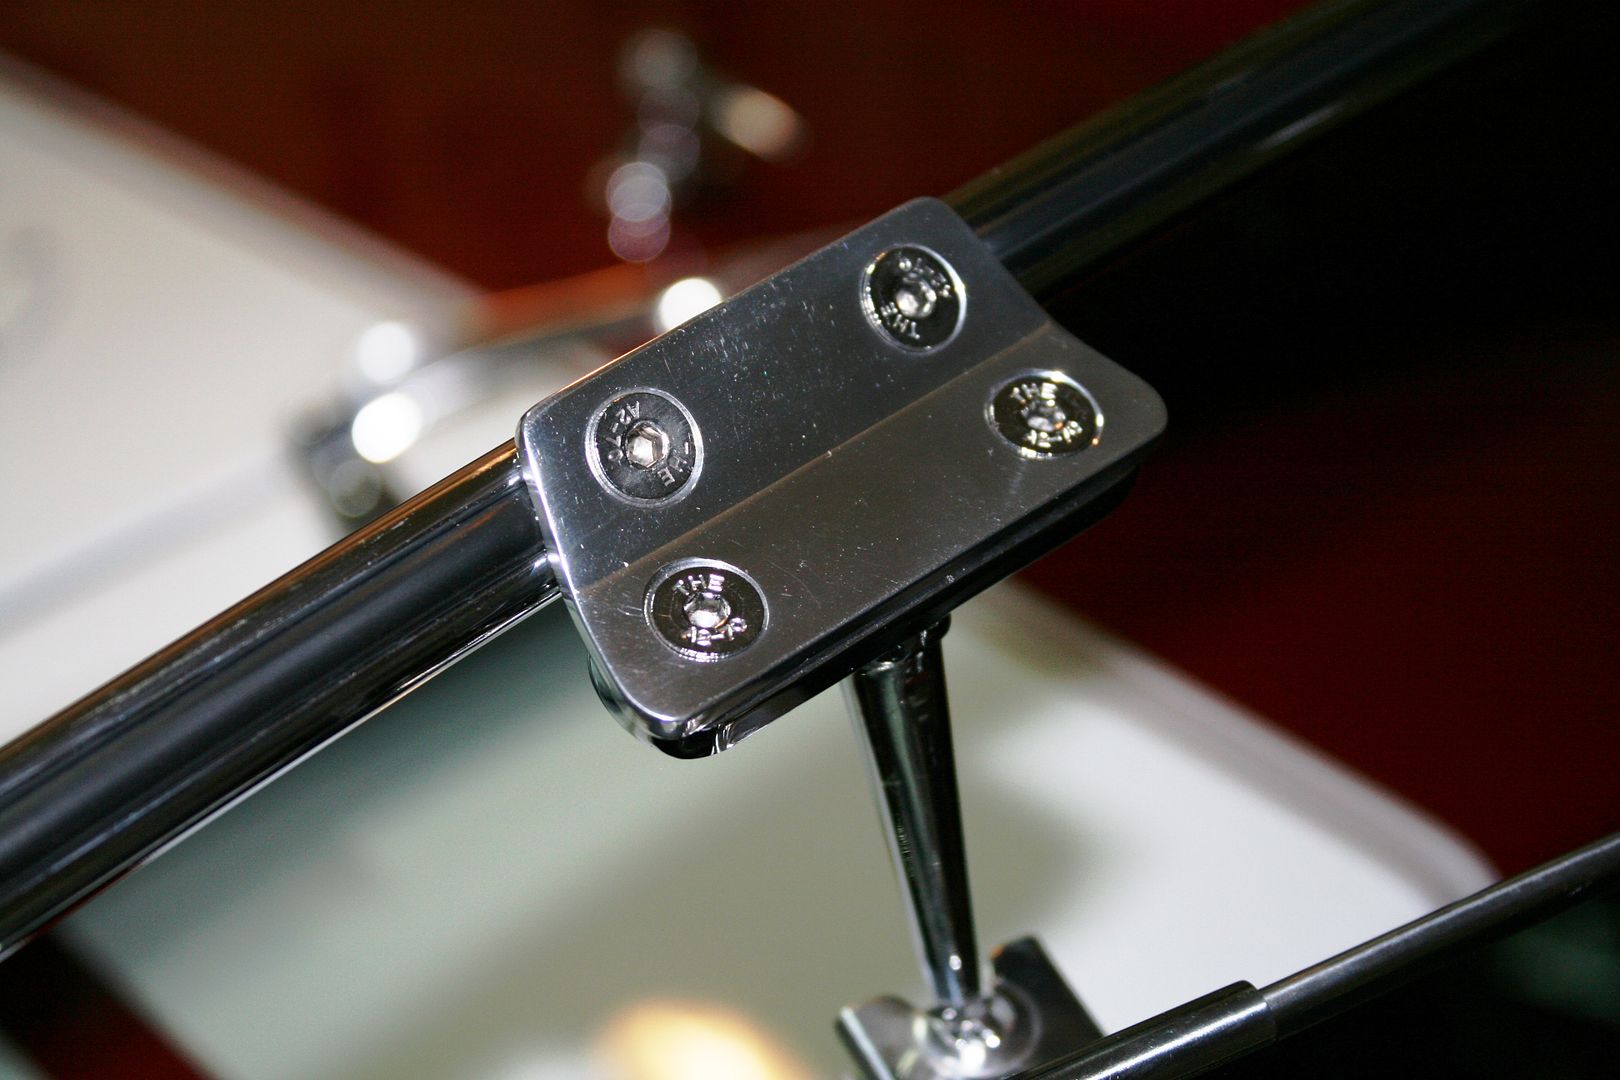
Bolted in the Breeze roll bar, and located and mounted the Russ Thompson trim rings. Note he doesnt list these on his website since theyre made for the 1-3/4 inch diameter Breeze roll bar. But sent an email asking about them, and he said hes made several on request. His usual very high quality. I put a bunch of tape on the body while getting the final locations and drilling holes. Not interested in scratching the body in this step, like may have happened during the Mk3 build
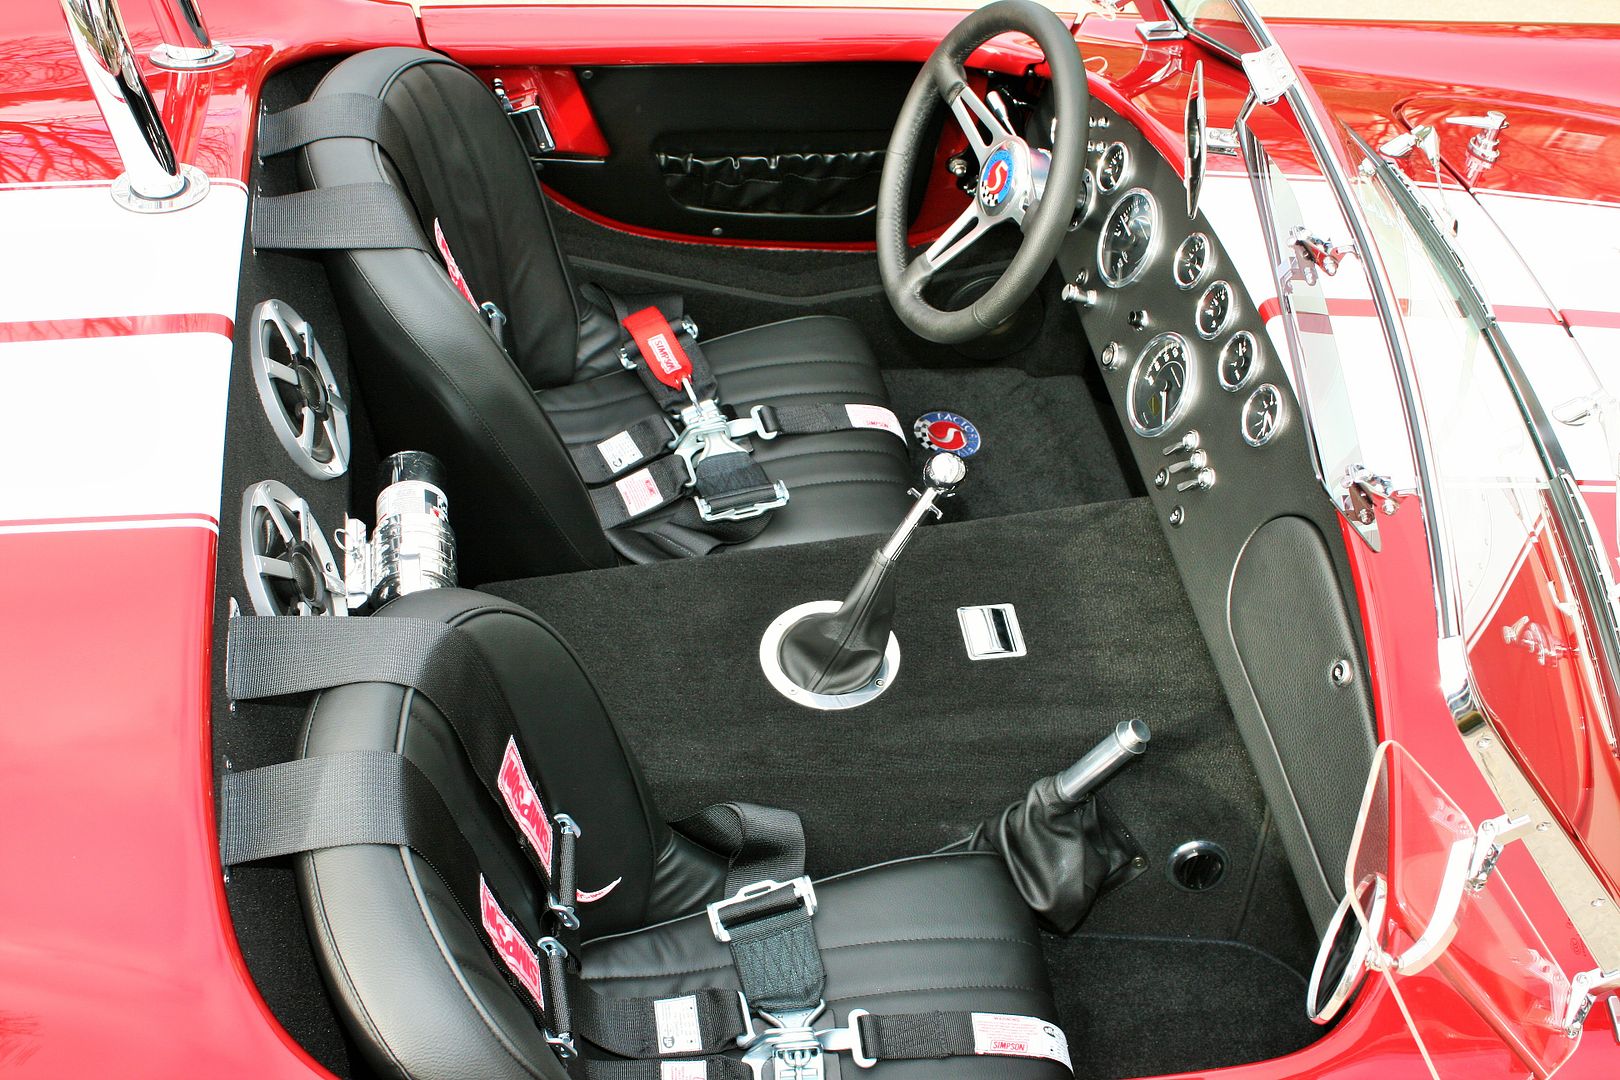
Finally finished all the interior carpet. Pretty normal installation using Weldwood Outdoor Carpet Adhesive and Weldwood Gel Contact Cement. Same as I used on the trunk shown earlier. The passenger footbox mod meant I had to make new or modify several pieces in that area. But all done now. I really wanted to do something with the raw edge coming over the door sills down to the floor. Plus up the side of the door opening by the latch. After looking at several options, took the pieces to an auto upholstery shop and had binding sewn along the edges. They recommended a nylon material just wrapped and sewn. Similar to whats on floor mats. It was a great idea, and Im really happy with how it turned out. Also decided to have them bind the front and back edge of the transmission tunnel cover. These small touches really clean it up IMO.
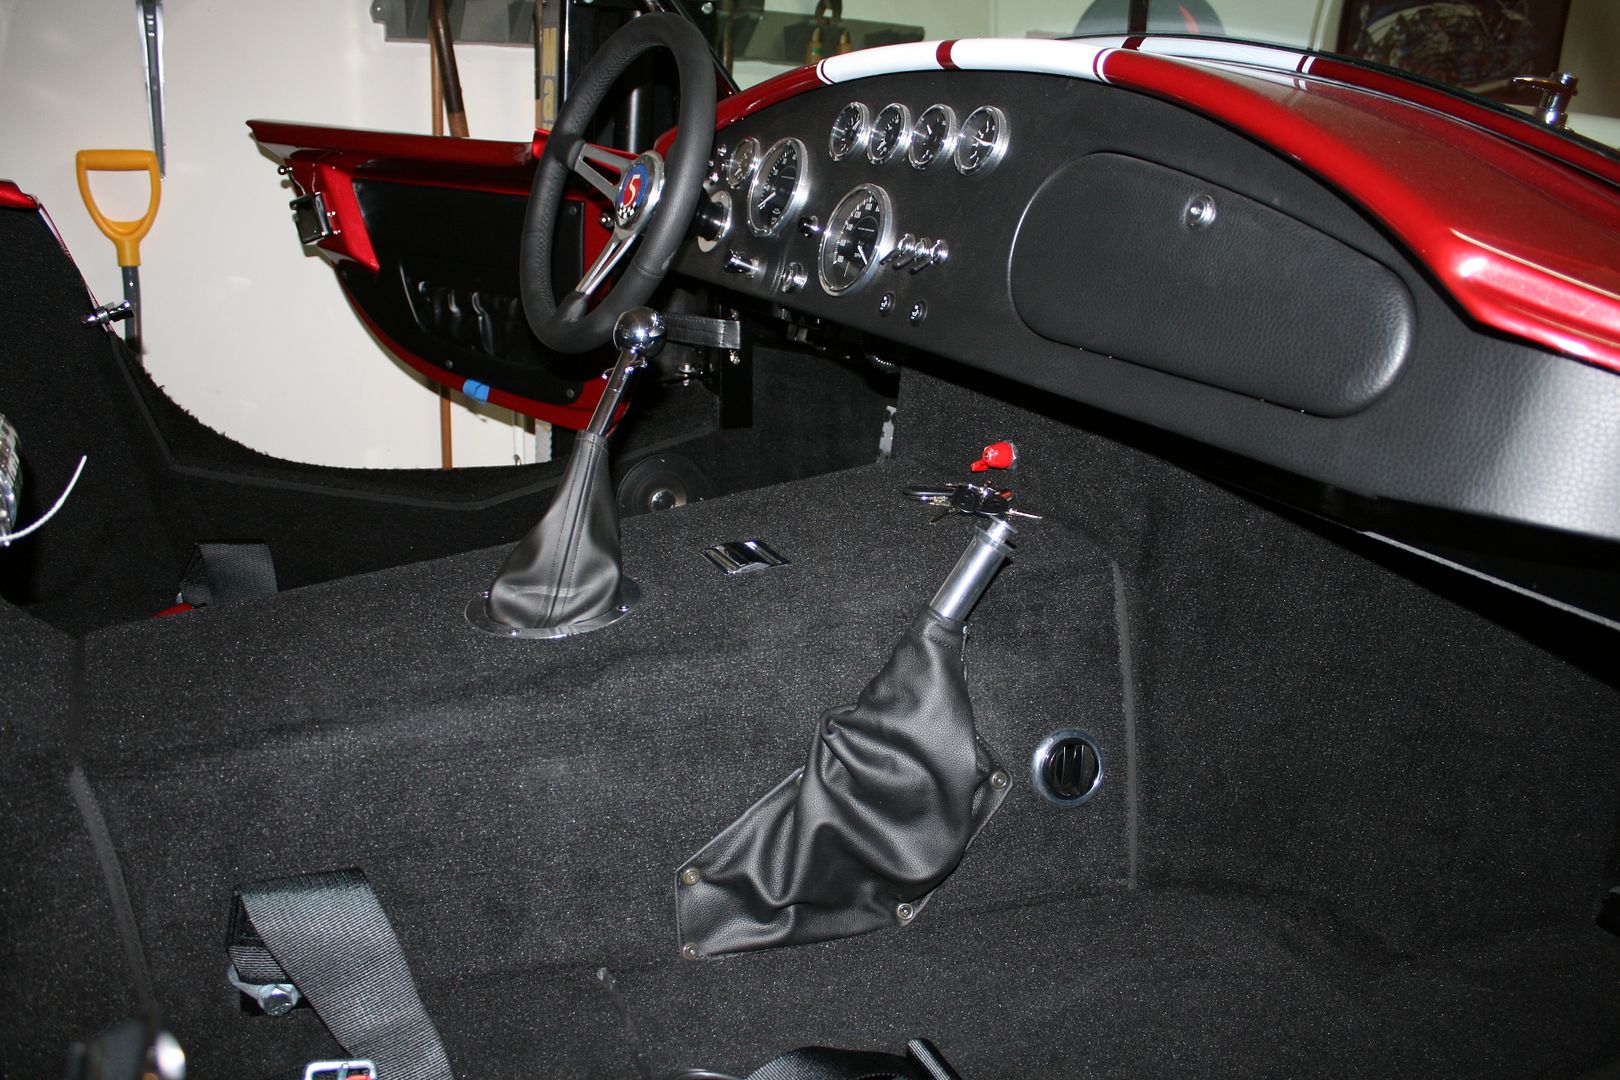
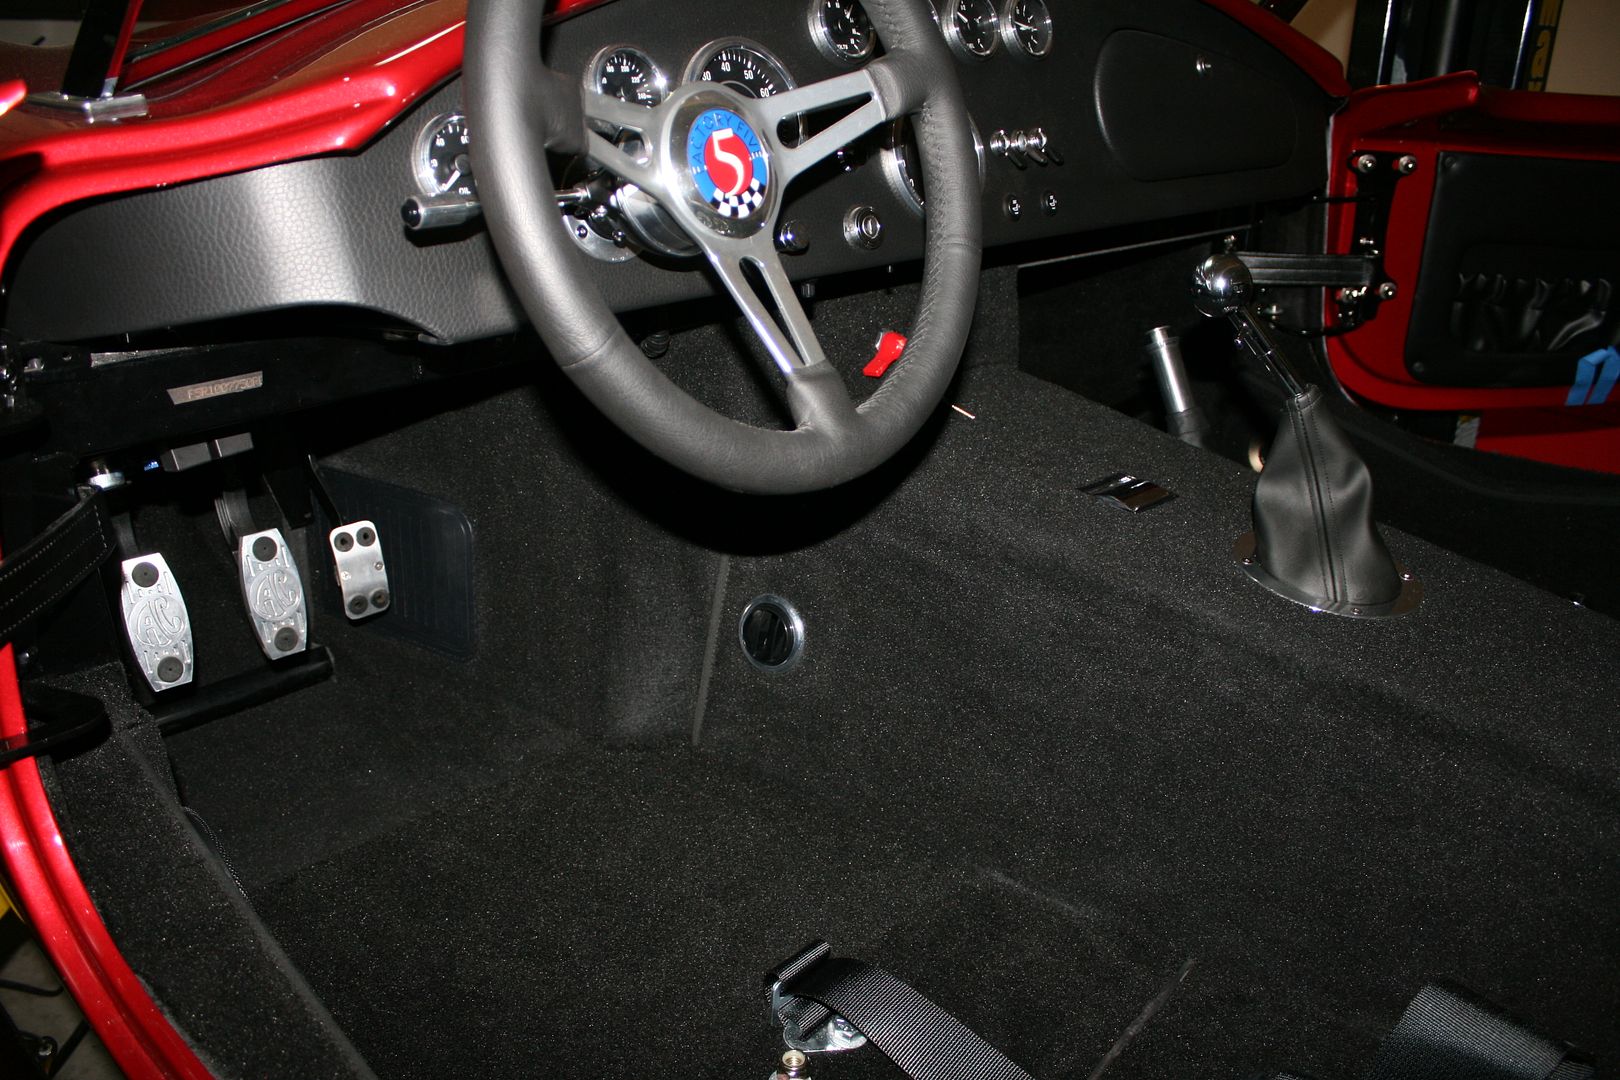
Then installed the belts, seats, floor mats, etc. Now really looking finished. If you look closely you can see where the pass side Mk4 floor mat doesn't quite fit again because of the footbox mod. It blends in pretty OK since they're both black, plus down in the footwell. I'm not going to worry about it. At least for now.
Build 1: Mk3 Roadster #5125. Sold 11/08/2014.
Build 2: Mk4 Roadster #7750. Sold 04/10/2017.
Build Thread
Build 3: Mk4 Roadster 20th Anniversary #8674. Sold 09/07/2020.
Build Thread and
Video.
Build 4: Gen 3 Type 65 Coupe #59. Gen 3 Coyote. Legal 03/04/2020.
Build Thread and
Video
Build 5: 35 Hot Rod Truck #138. LS3 and 4L65E auto. Rcvd 01/05/2021. Legal 04/20/2023.
Build Thread. Sold 11/9/2023.
-
12-14-2014, 08:12 PM
#194
Senior Member
More Final Assembly continued
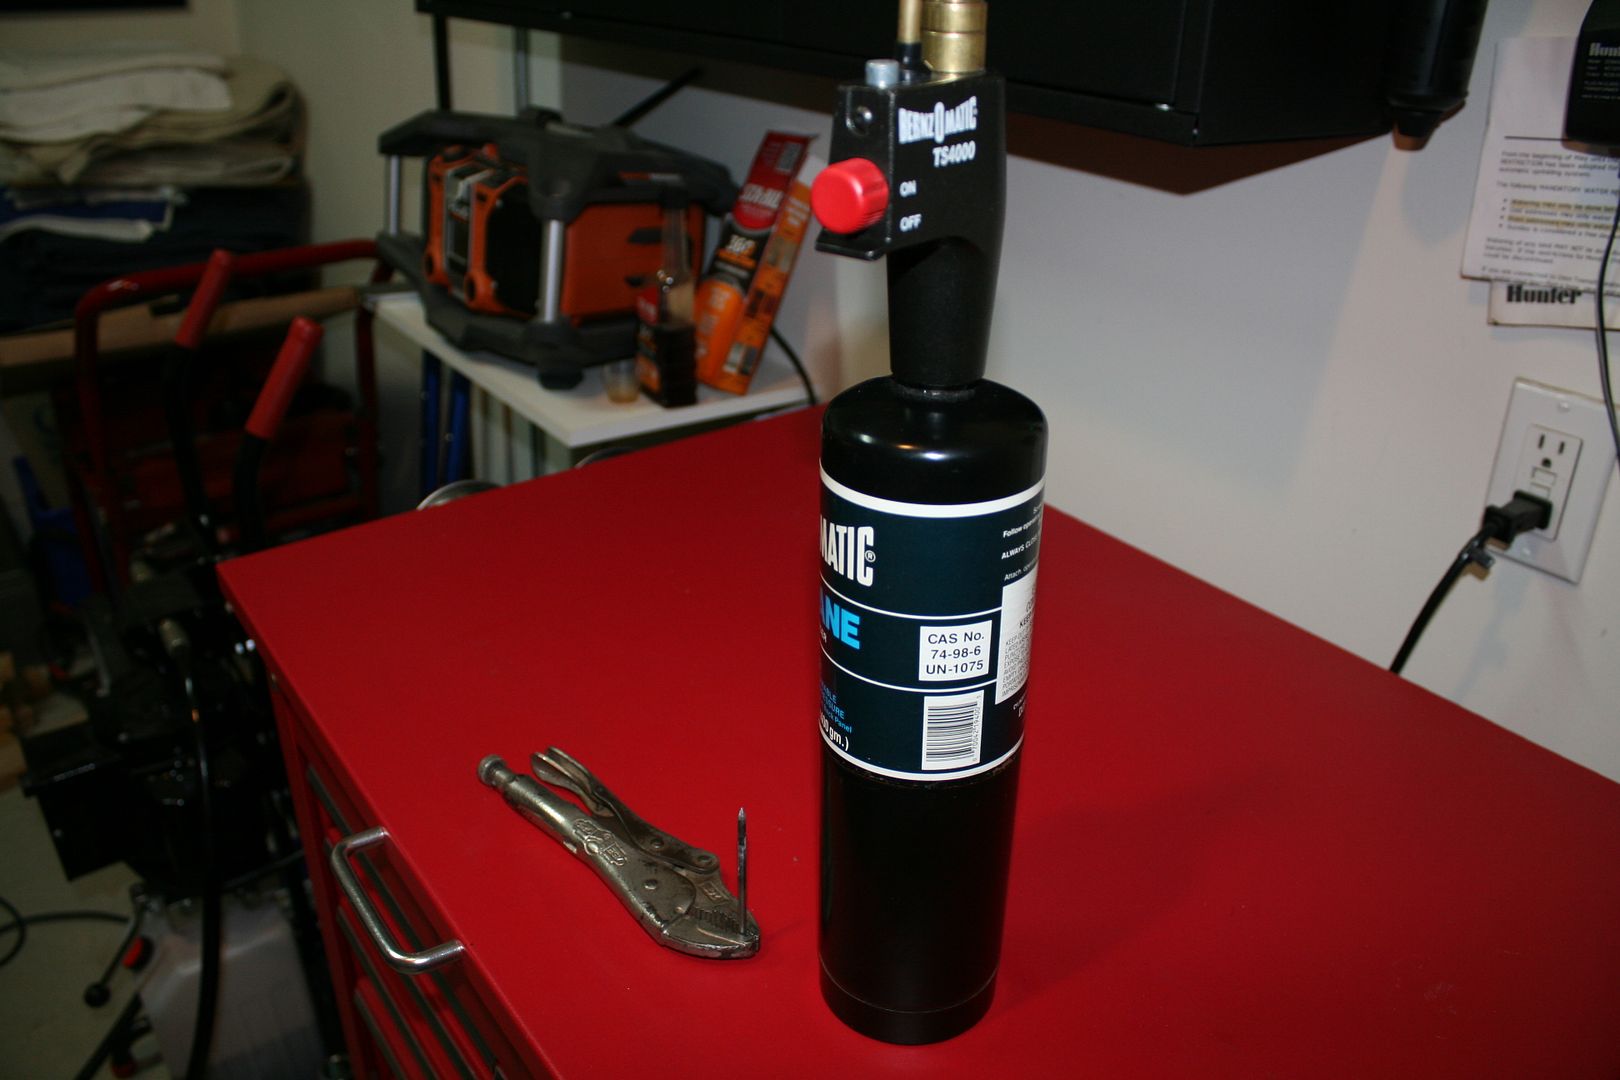
One hint for you guys doing carpet. It can be challenging finding holes under the carpet, and then opening them up sufficiently to get the bolts through, not fowl threads, etc. Includes holes for the seats, shift ring, e-brake boot, etc. What I did was the following: Before installing the carpet piece, made a real quick paper pattern with kraft paper. This to find the holes once the carpet is in place by putting the pattern over the carpet and confirming the hole location with an awl. Then I used a nail, held in a pair of vice grips and heated with a propane torch, to melt the holes open. Outside and away from the car, I lit the torch and heated the nail end until it started to turn red. Then set the torch down and turned around into the cockpit and inserted the nail into the marked location, moving it around to open the holes the full amount. Pretty much need to reheat for each hole. I’ve seen guys use a solder iron for this, and that would work too. But I wasn’t really interested in contaminated the tip on my solder station. This works great. Melts the carpet like butter. Just be careful. That heated nail can do some damage. Here’s a pic of this very high tech setup:
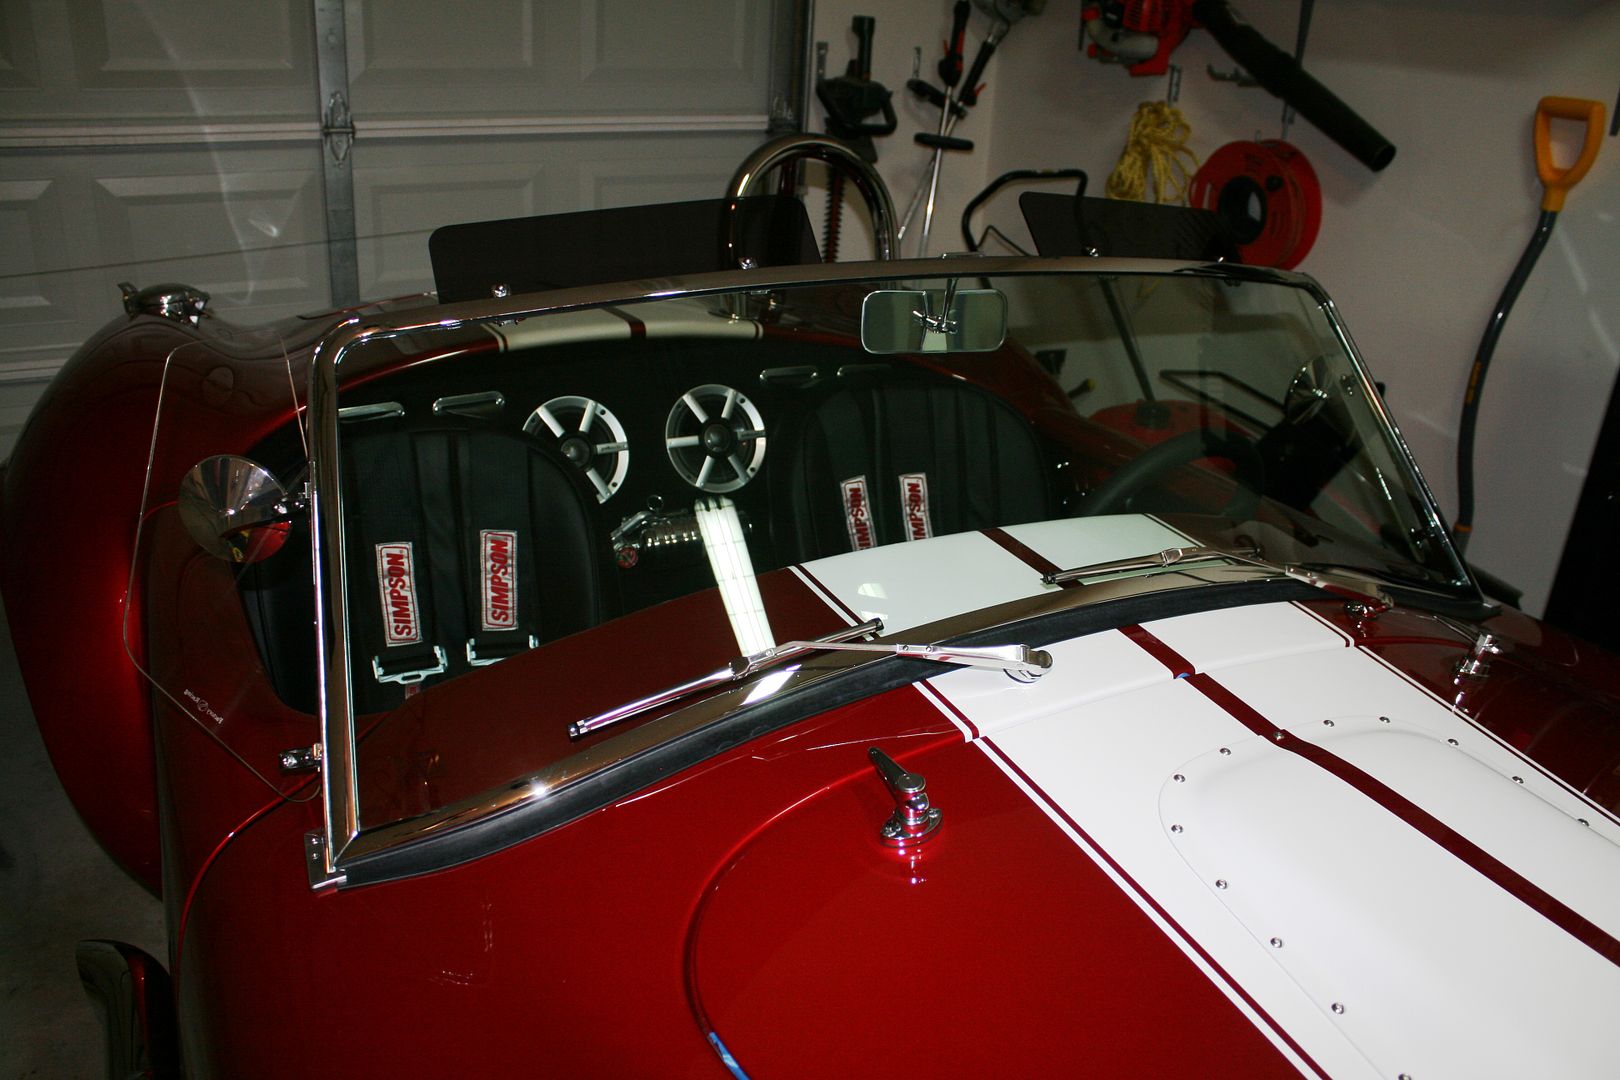
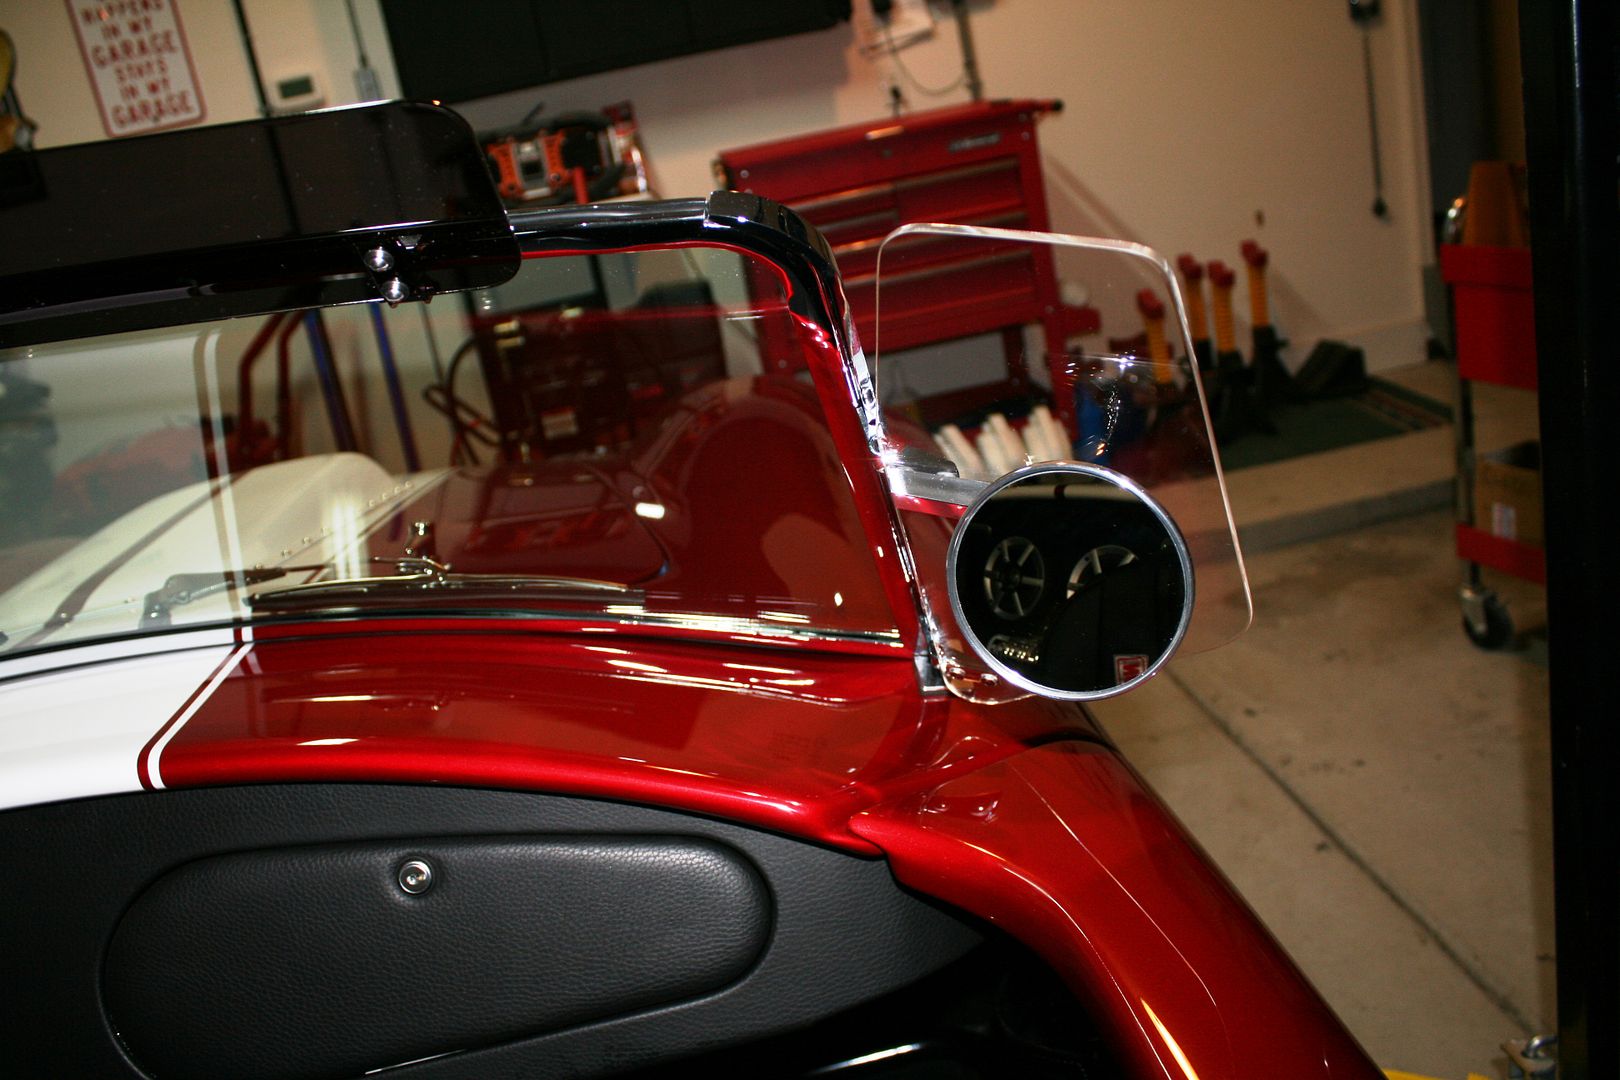
With the interior done, mounted the wind wings, visors, center and side rear view mirrors. I was really careful to check the depth of the screws on the visors and adjust them as necessary. Not interested in any broken glass. I used the Breeze rear view mirrors like on my Mk3. Love those. Also used the Dark Water mount for the center rear view mirror at the top of the windshield. If you look closely in this picture, you can see the 1/4 inch OD vacuum line material from NAPA I pushed into the channel across the top of the windshield. It gives it a nice finished look. Saw this in an old forum post some time ago, and did the same thing on my Mk3. Obviously wouldn’t be a good idea if planning to use a top, since that’s what the channel is for.
 [/URL]
Last night I finished the wipers. Heated and bent the wiper arms so they park parallel to the bottom of the windshield frame. This is another one of the little things you can do to really make your build look more finished. Out of the box, the wiper arm angles point up a bit. You can heat the arms with a propane torch, and they bend pretty easily when in a vice. The pass side just slightly more than the driver side. Just don’t touch them until they cool. Ask me how I know. The slight discoloration from the heat polishes out with 1000-1500-2000 paper or a buffing wheel.
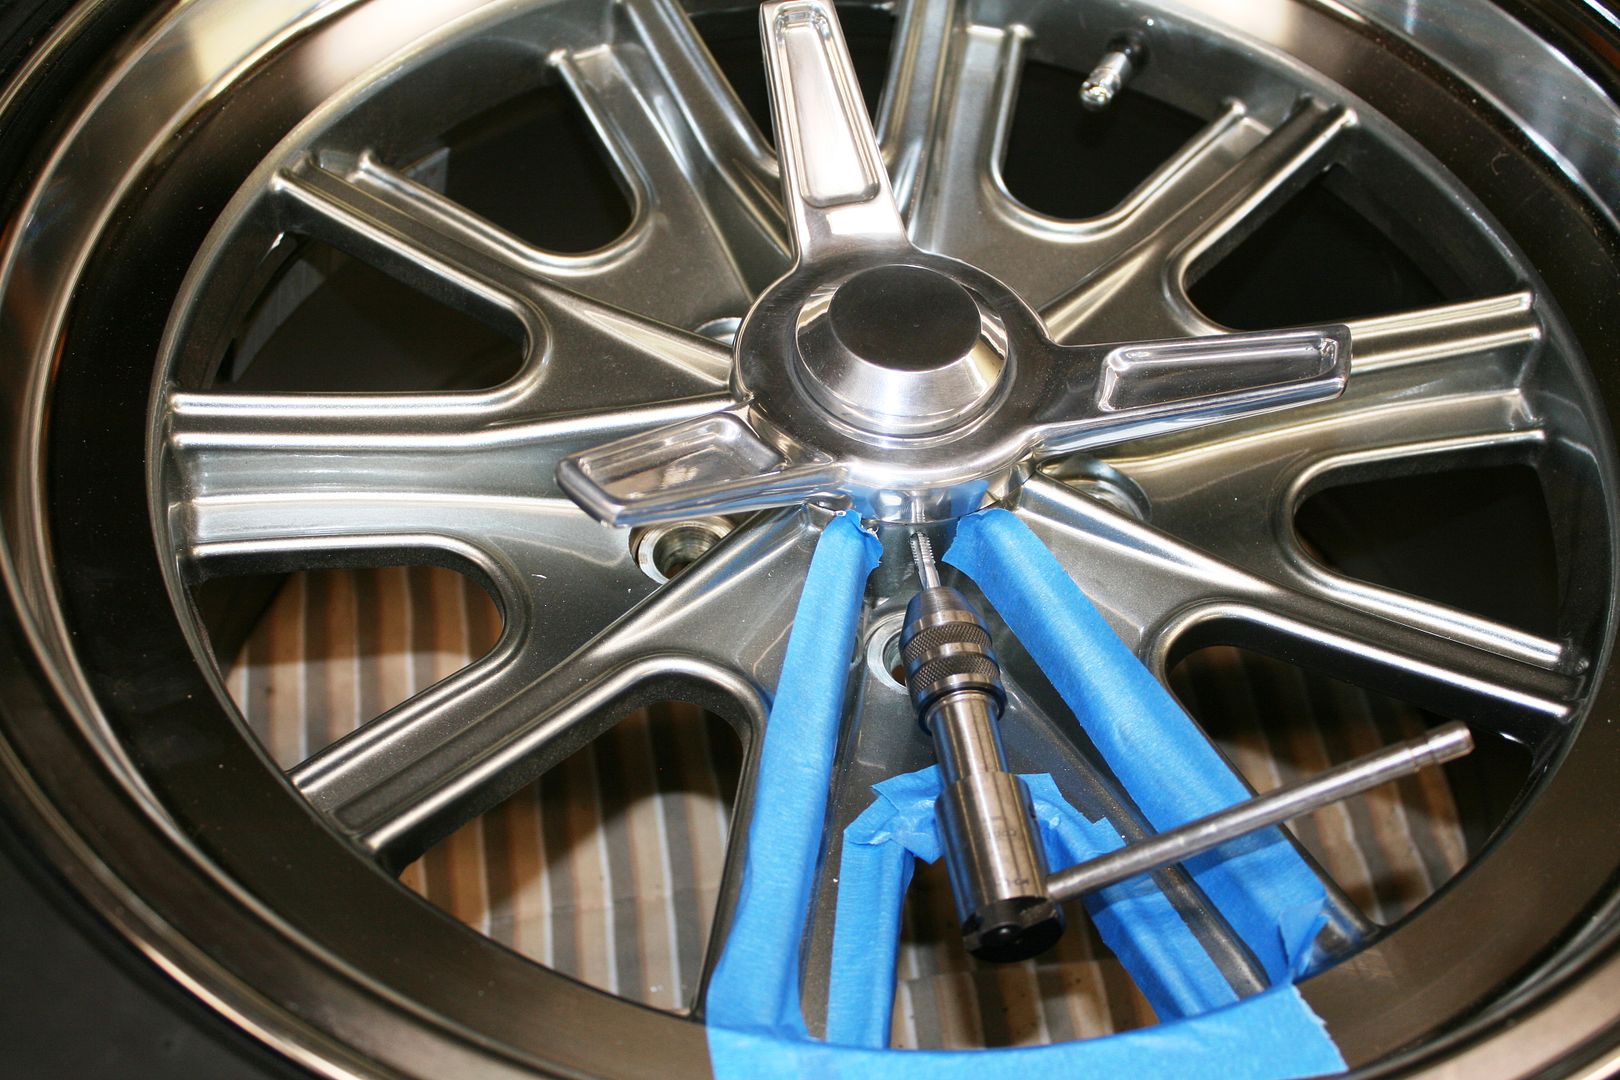
Today I’m putting set screws in the wheels to keep the spinner adapter from turning with the spinner during installation and removal. I've had them off and on just enough to know I needed to do something. There are other ways, like gluing them in. But I chose this way. Using 3/4 inch long 10-24 set screws. Just the right length to go through the wheel and also the adapter. There’s just enough room, if you’re careful, to drill the hole with a right angle drill and to fit the tap handle.
Once this last step is done, and the wheels mounted, the build will be ready for some final pictures. Hopefully I can get a decent day and take the pics outside. Pictures in the garage are cluttered. I’m giving myself an external flash for my Canon EOS DSLR for Christmas (nice of me) so looking forward to some hopefully high quality pics.
Last edited by edwardb; 12-14-2014 at 11:31 PM.
Build 1: Mk3 Roadster #5125. Sold 11/08/2014.
Build 2: Mk4 Roadster #7750. Sold 04/10/2017.
Build Thread
Build 3: Mk4 Roadster 20th Anniversary #8674. Sold 09/07/2020.
Build Thread and
Video.
Build 4: Gen 3 Type 65 Coupe #59. Gen 3 Coyote. Legal 03/04/2020.
Build Thread and
Video
Build 5: 35 Hot Rod Truck #138. LS3 and 4L65E auto. Rcvd 01/05/2021. Legal 04/20/2023.
Build Thread. Sold 11/9/2023.
-
12-14-2014, 10:39 PM
#195
Senior Member

Won't air leak out. Seriously, your build is stunning. Great job
Thanks,
Al Adkins
Certified "Kool Aid" drinker
-
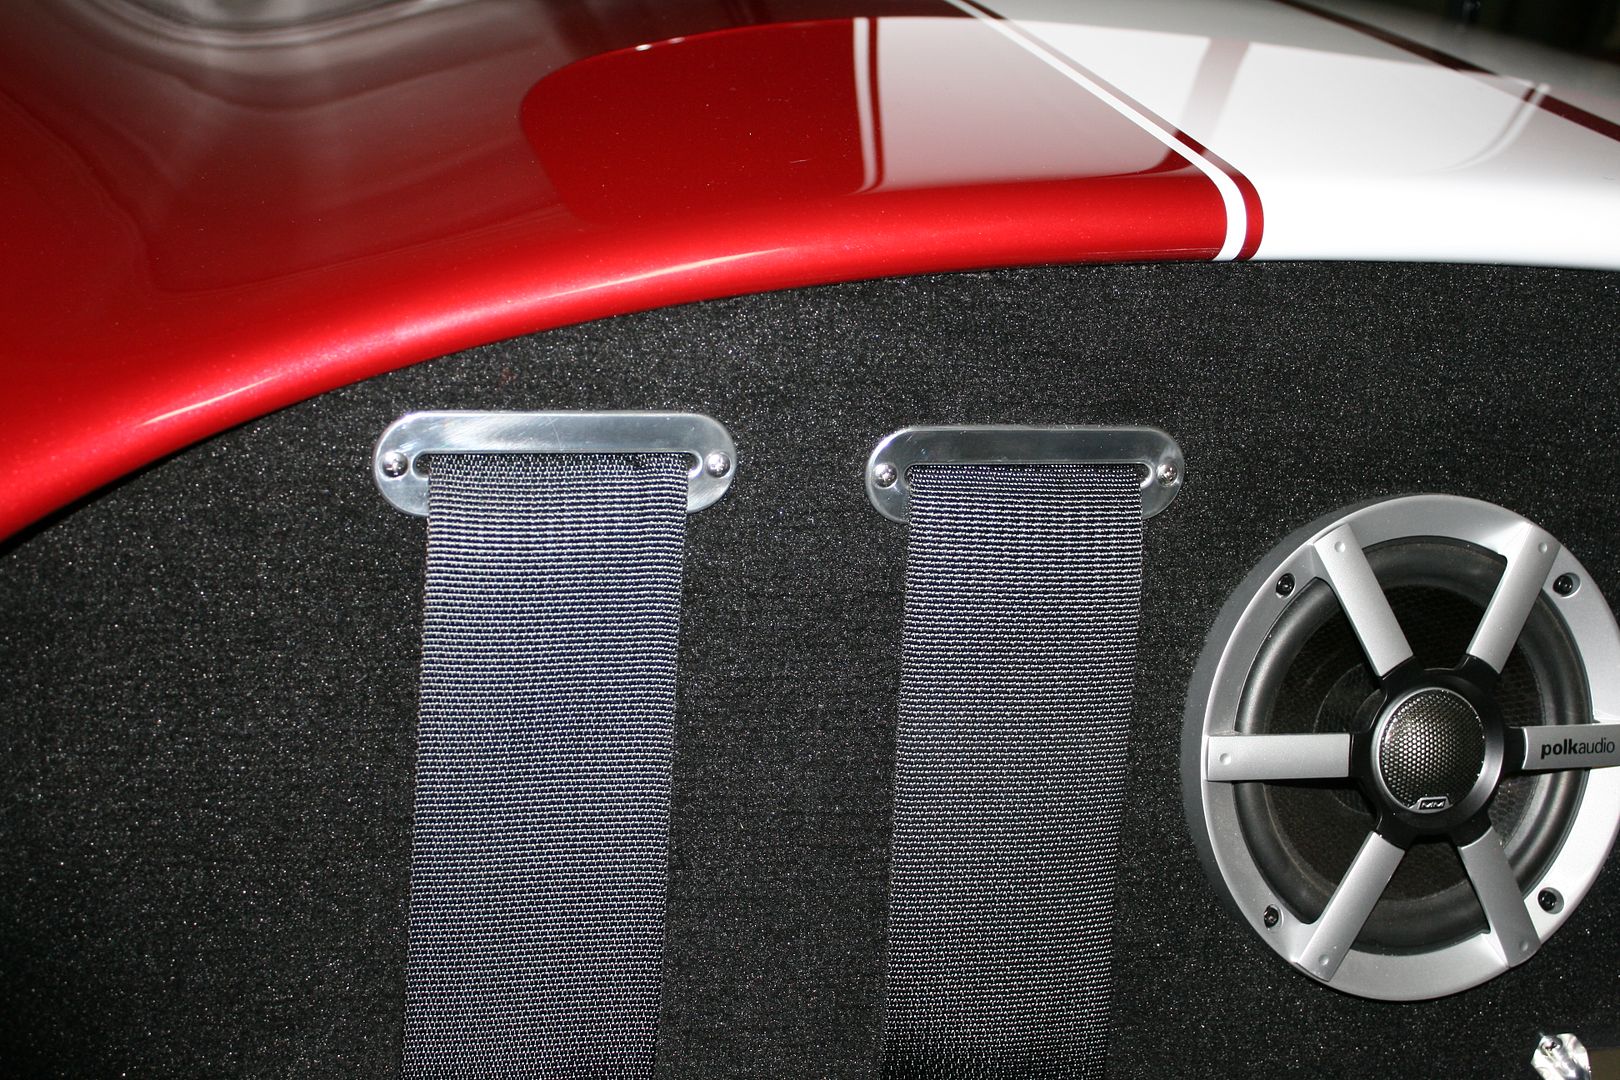
12-17-2014, 11:15 AM
#196
The speakers appear to have worked out great now that the seats are in. How loud do you have to crank up the volume to get past the engine/exhaust?  Was it still worth the effort or have you had the opportunity to cruise with it yet?
-
12-17-2014, 12:05 PM
#197
Senior Member
Originally Posted by
thumper24
The speakers appear to have worked out great now that the seats are in. How loud do you have to crank up the volume to get past the engine/exhaust?
Was it still worth the effort or have you had the opportunity to cruise with it yet?
I can't be too definitive about the sound system yet while driving, because it won't be on the road for some months yet. Something about winter in Michigan... Having said that, couple of conclusions so far. Certainly sounds better now with the body on, trunk lid in place, etc. It's going to be plenty loud to be heard while driving. Just not sure how frequently I'll use it while driving. The sound from the rear speakers is pretty predominant. The speakers down in the door sills provide some fill, and I'm glad I put them there. But they were a lot of work for not a lot of gain. Bottom line: I'm happy I put the system in and would do it again.
Build 1: Mk3 Roadster #5125. Sold 11/08/2014.
Build 2: Mk4 Roadster #7750. Sold 04/10/2017.
Build Thread
Build 3: Mk4 Roadster 20th Anniversary #8674. Sold 09/07/2020.
Build Thread and
Video.
Build 4: Gen 3 Type 65 Coupe #59. Gen 3 Coyote. Legal 03/04/2020.
Build Thread and
Video
Build 5: 35 Hot Rod Truck #138. LS3 and 4L65E auto. Rcvd 01/05/2021. Legal 04/20/2023.
Build Thread. Sold 11/9/2023.
-
12-19-2014, 02:19 PM
#198
Senior Member
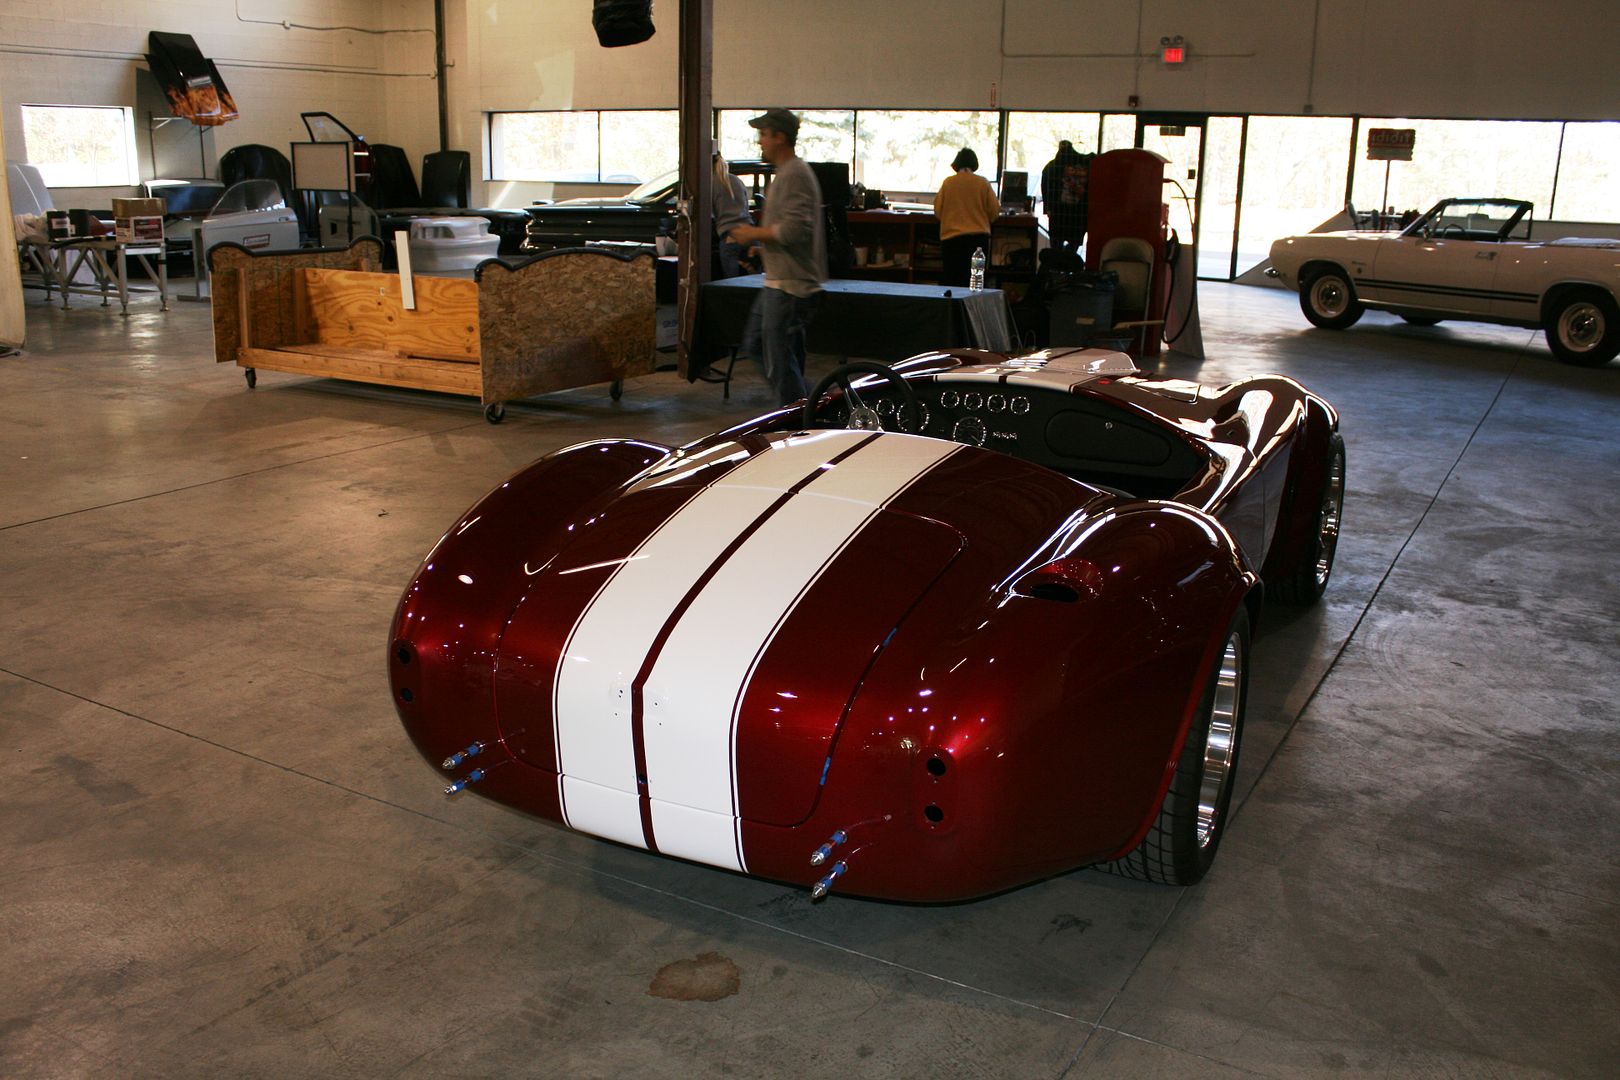
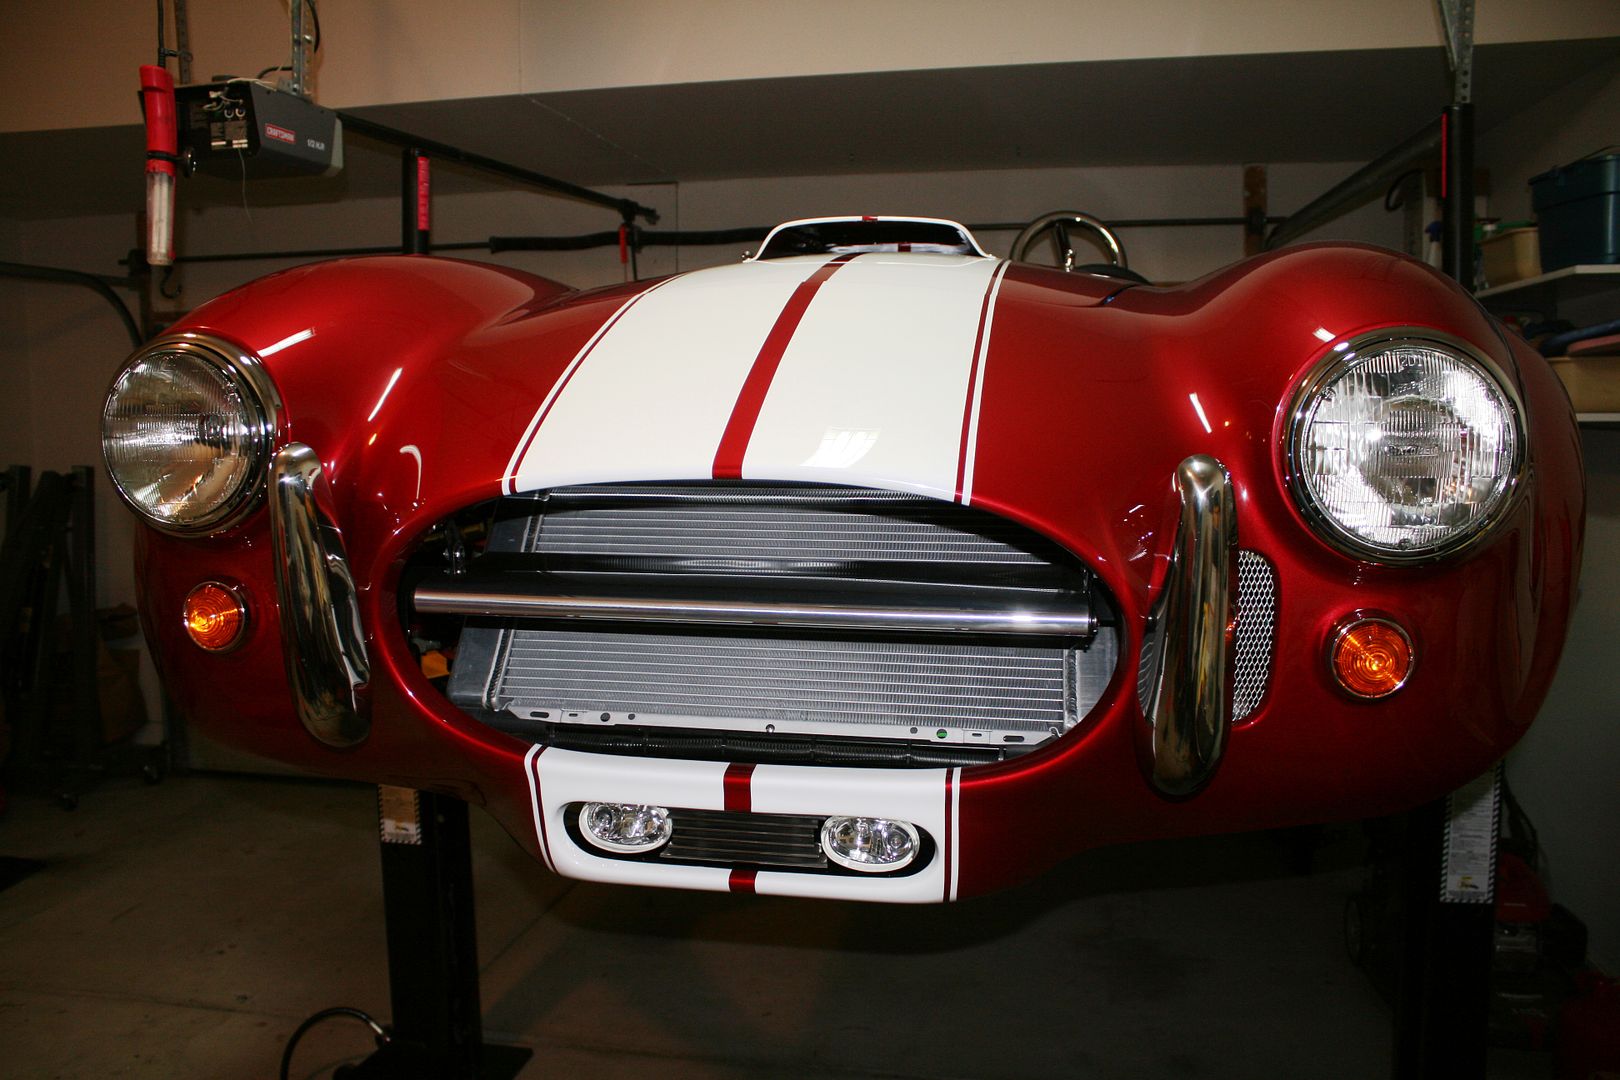
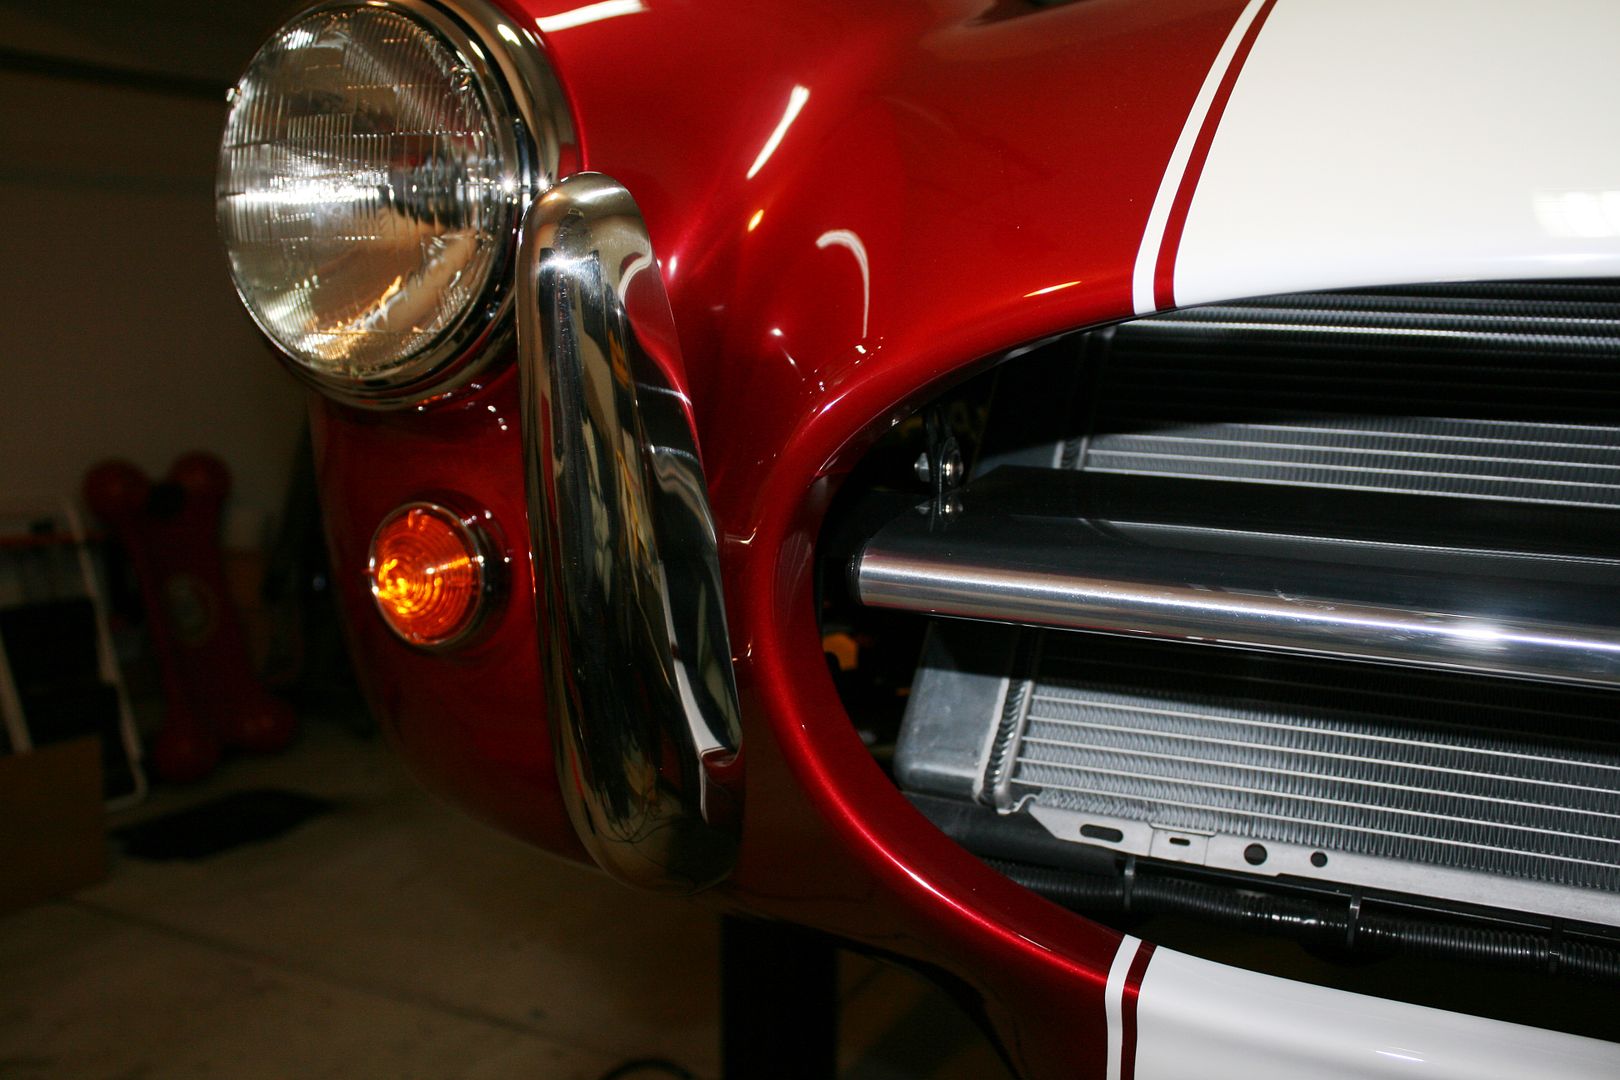
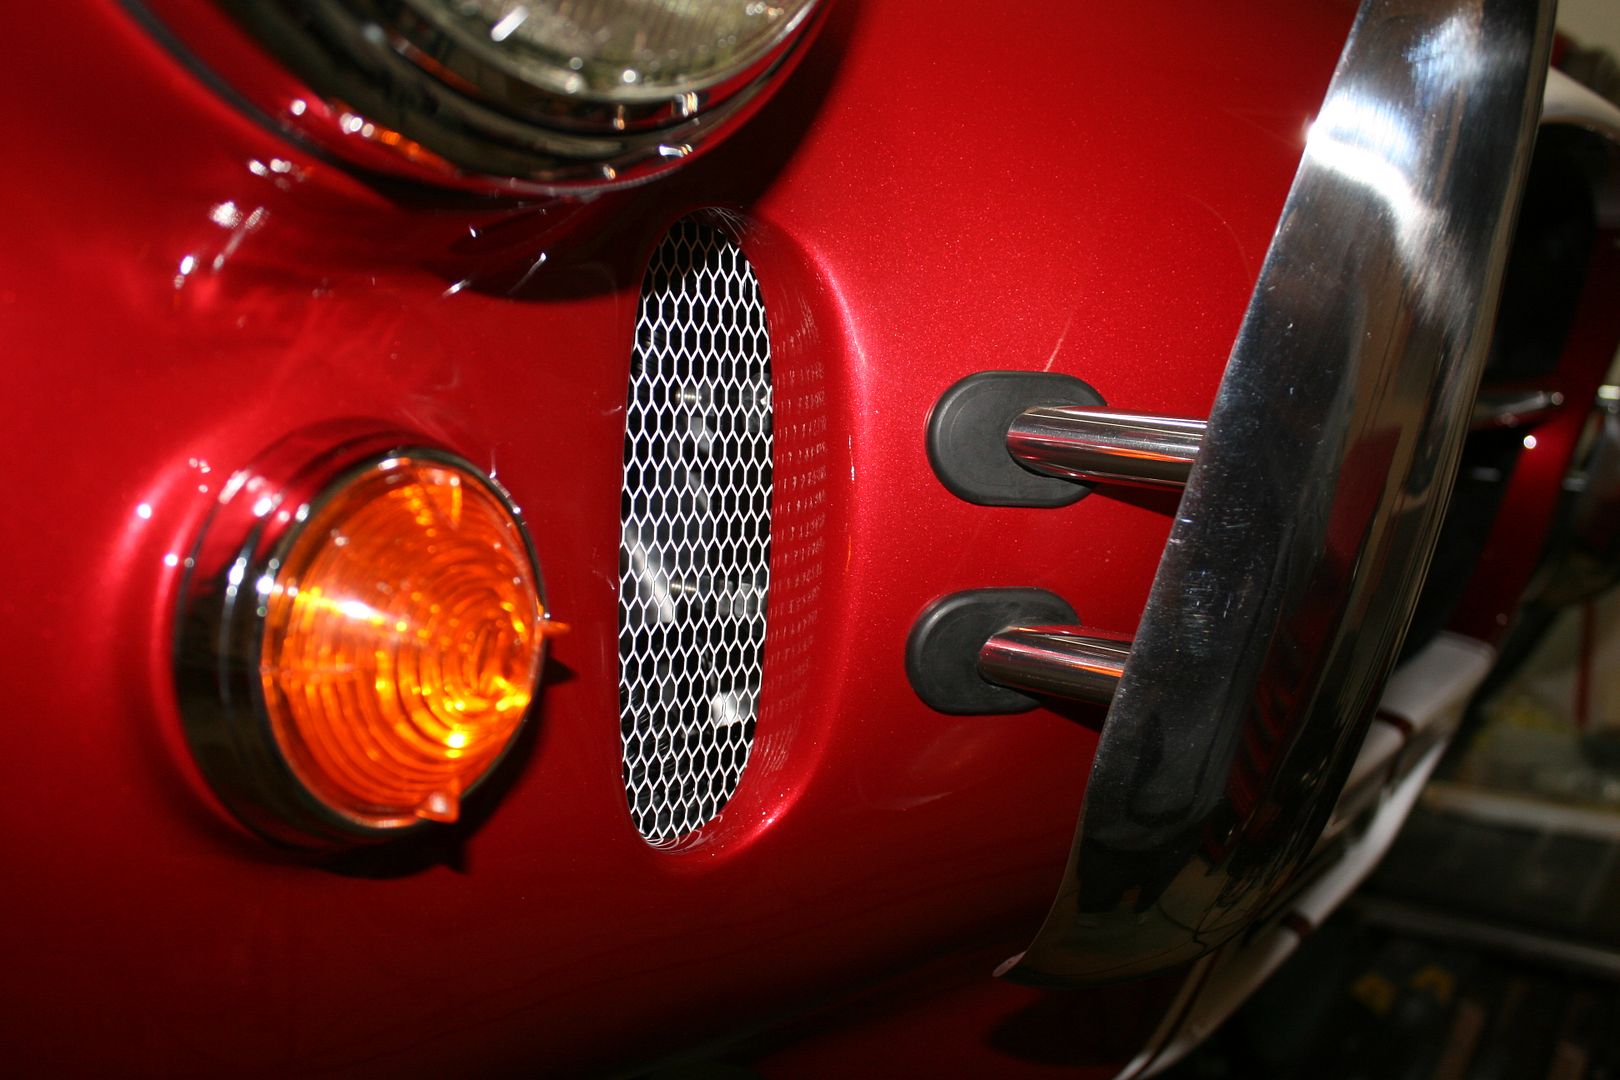
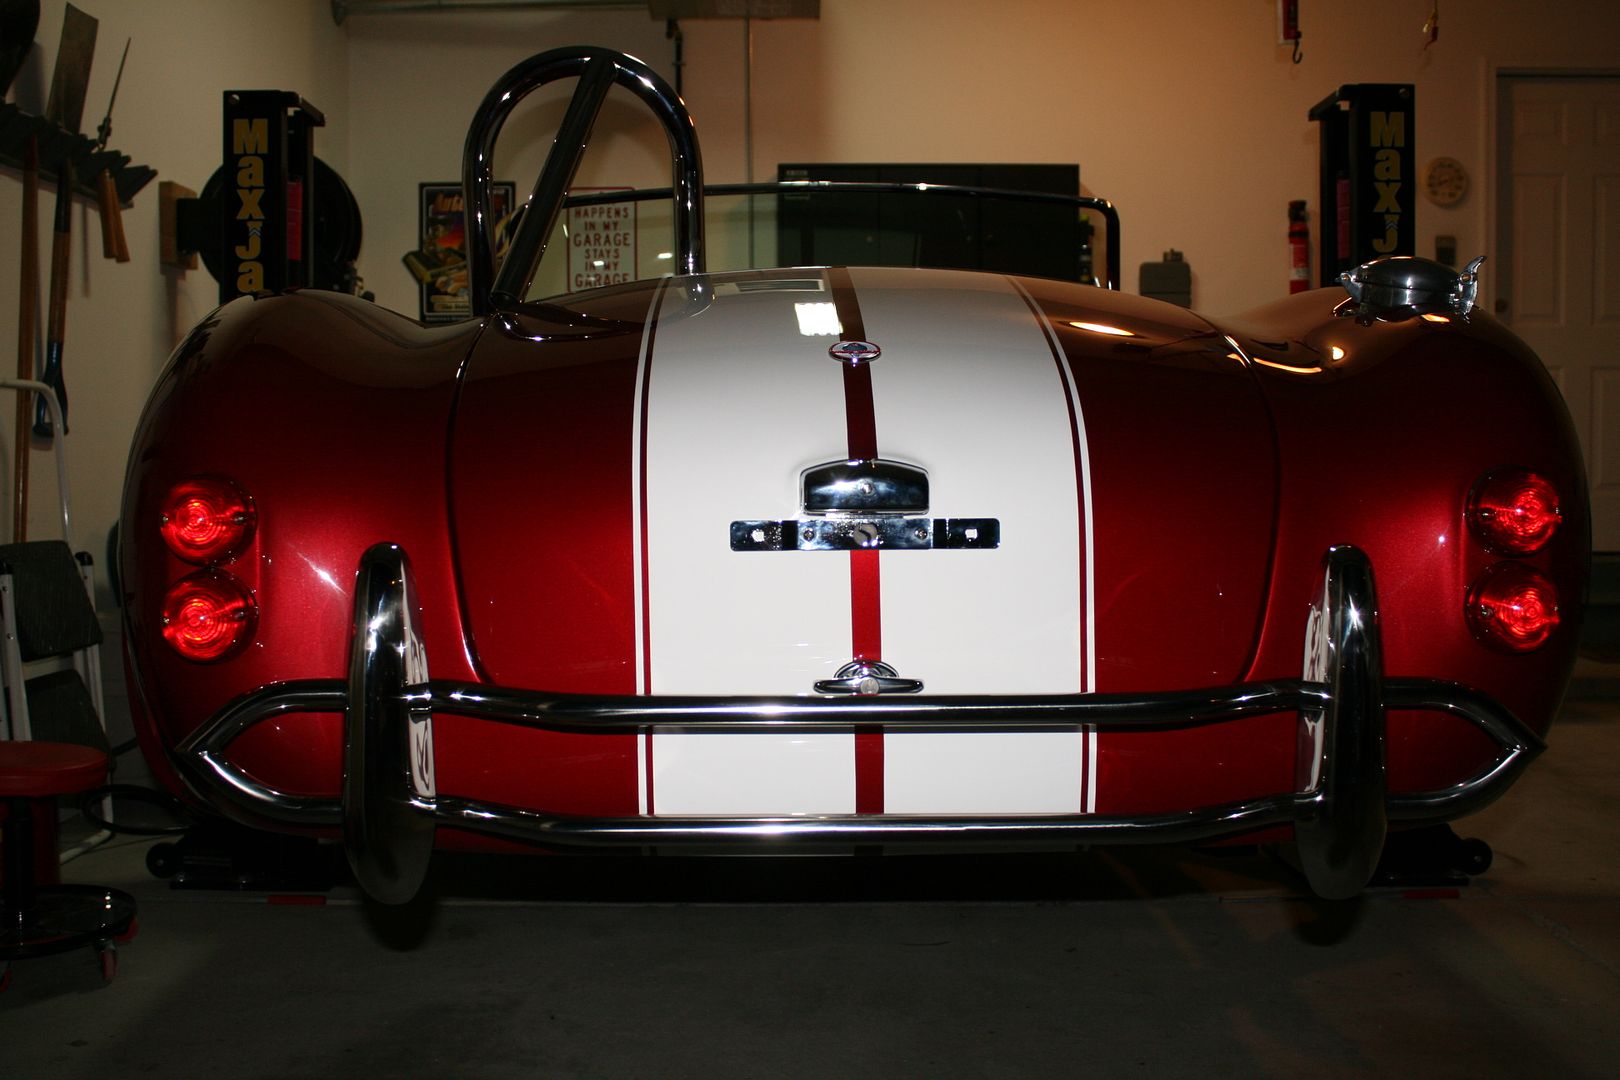
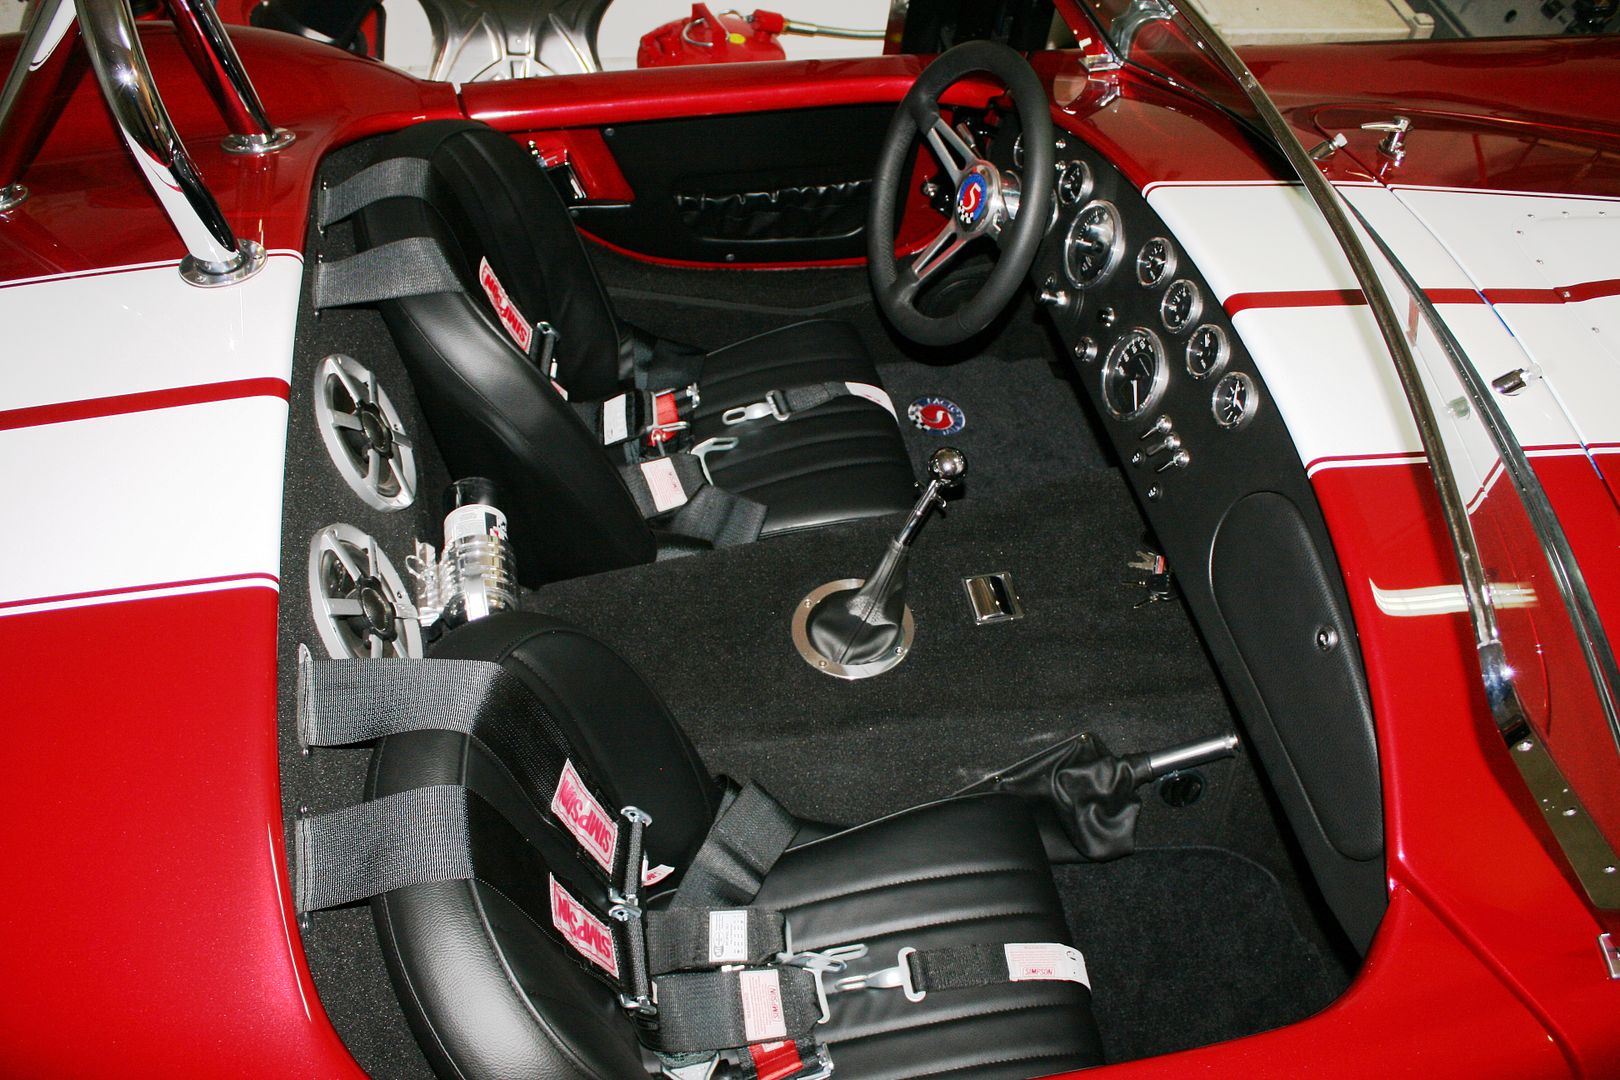
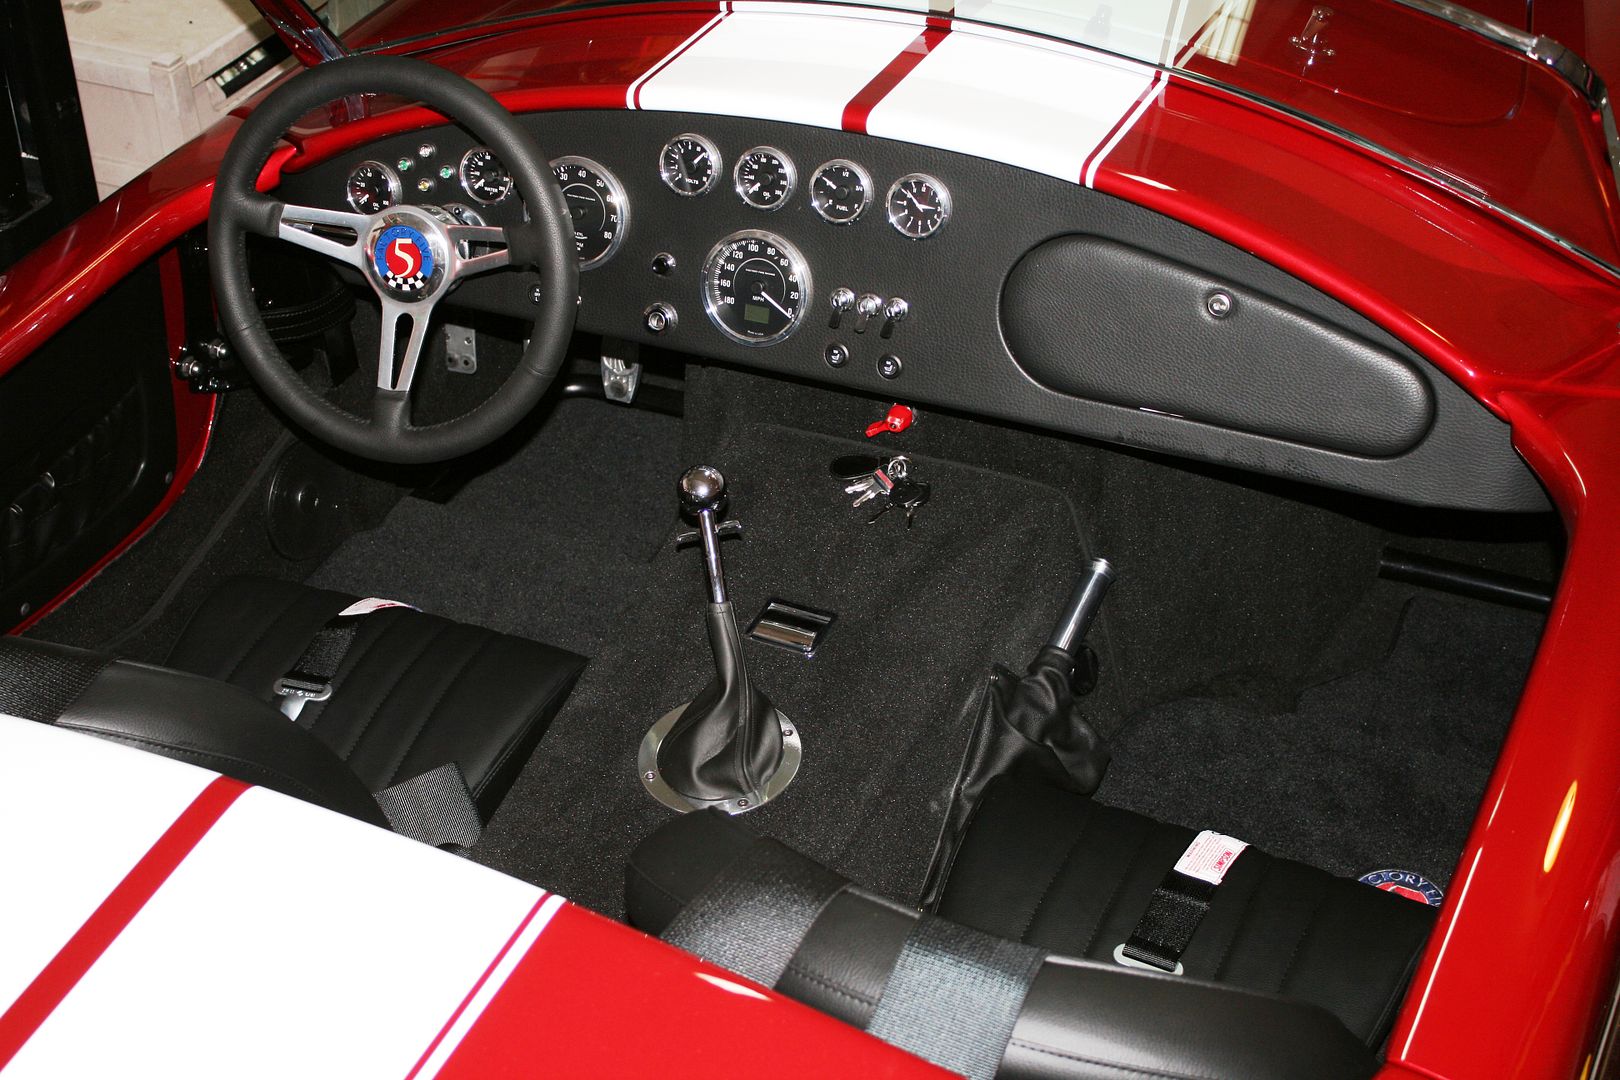
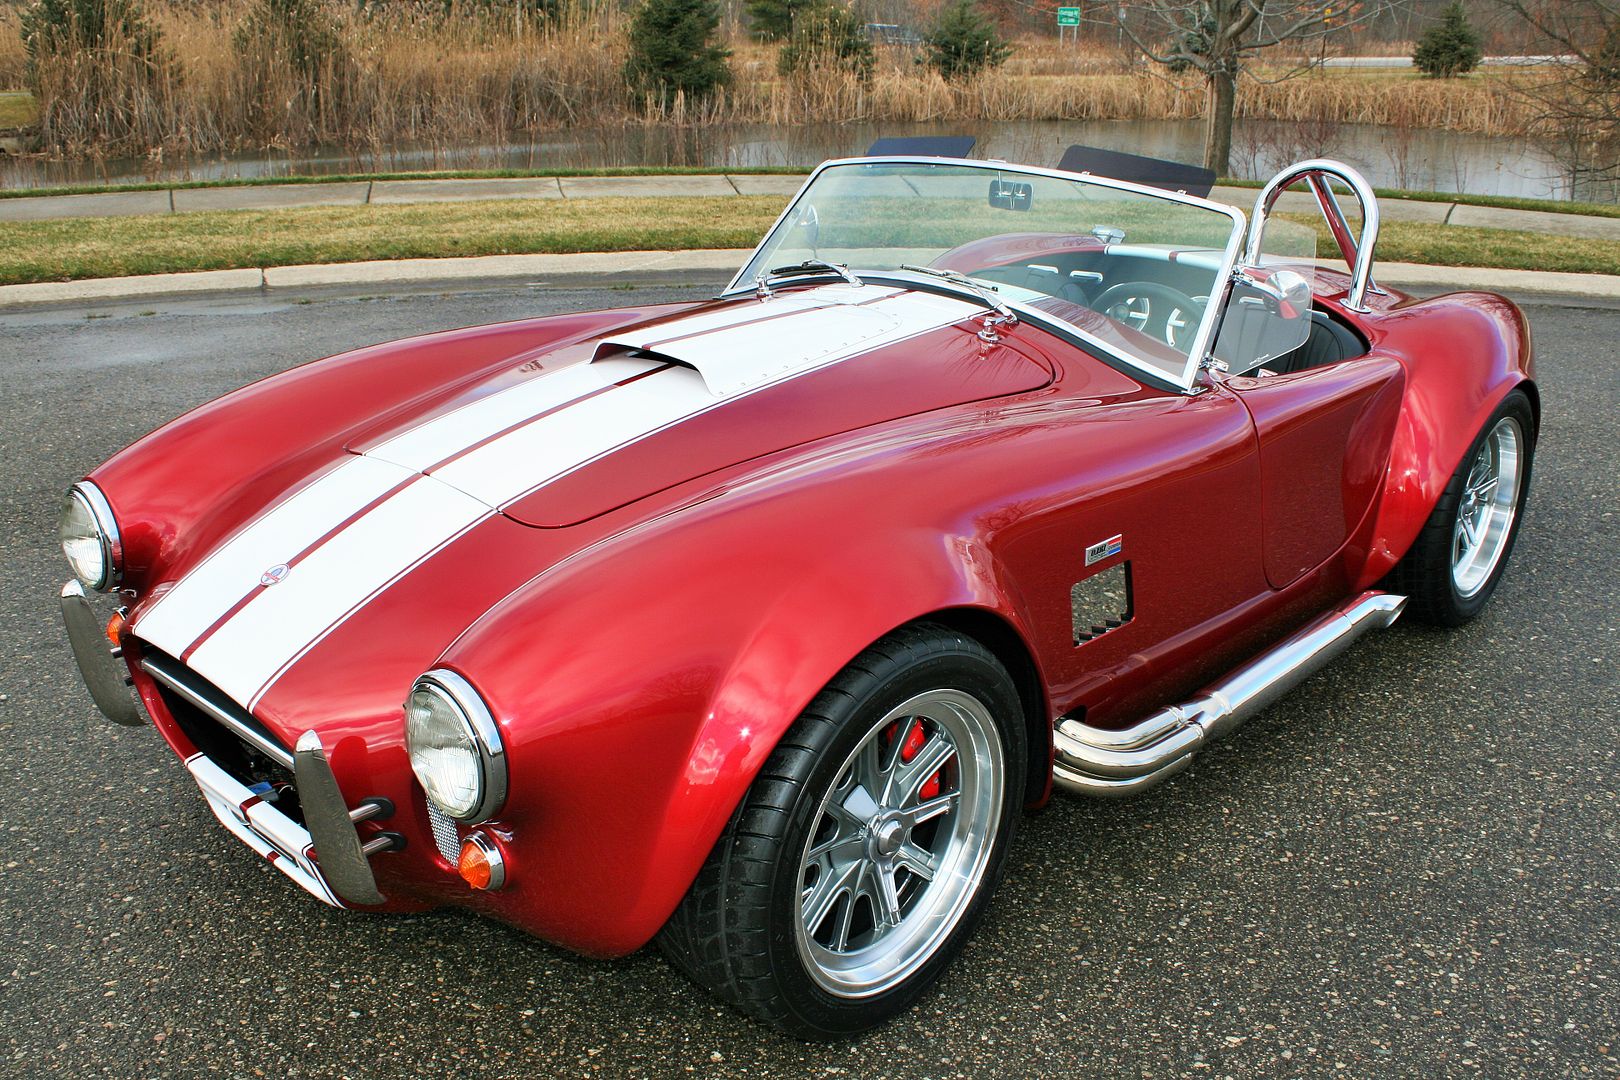
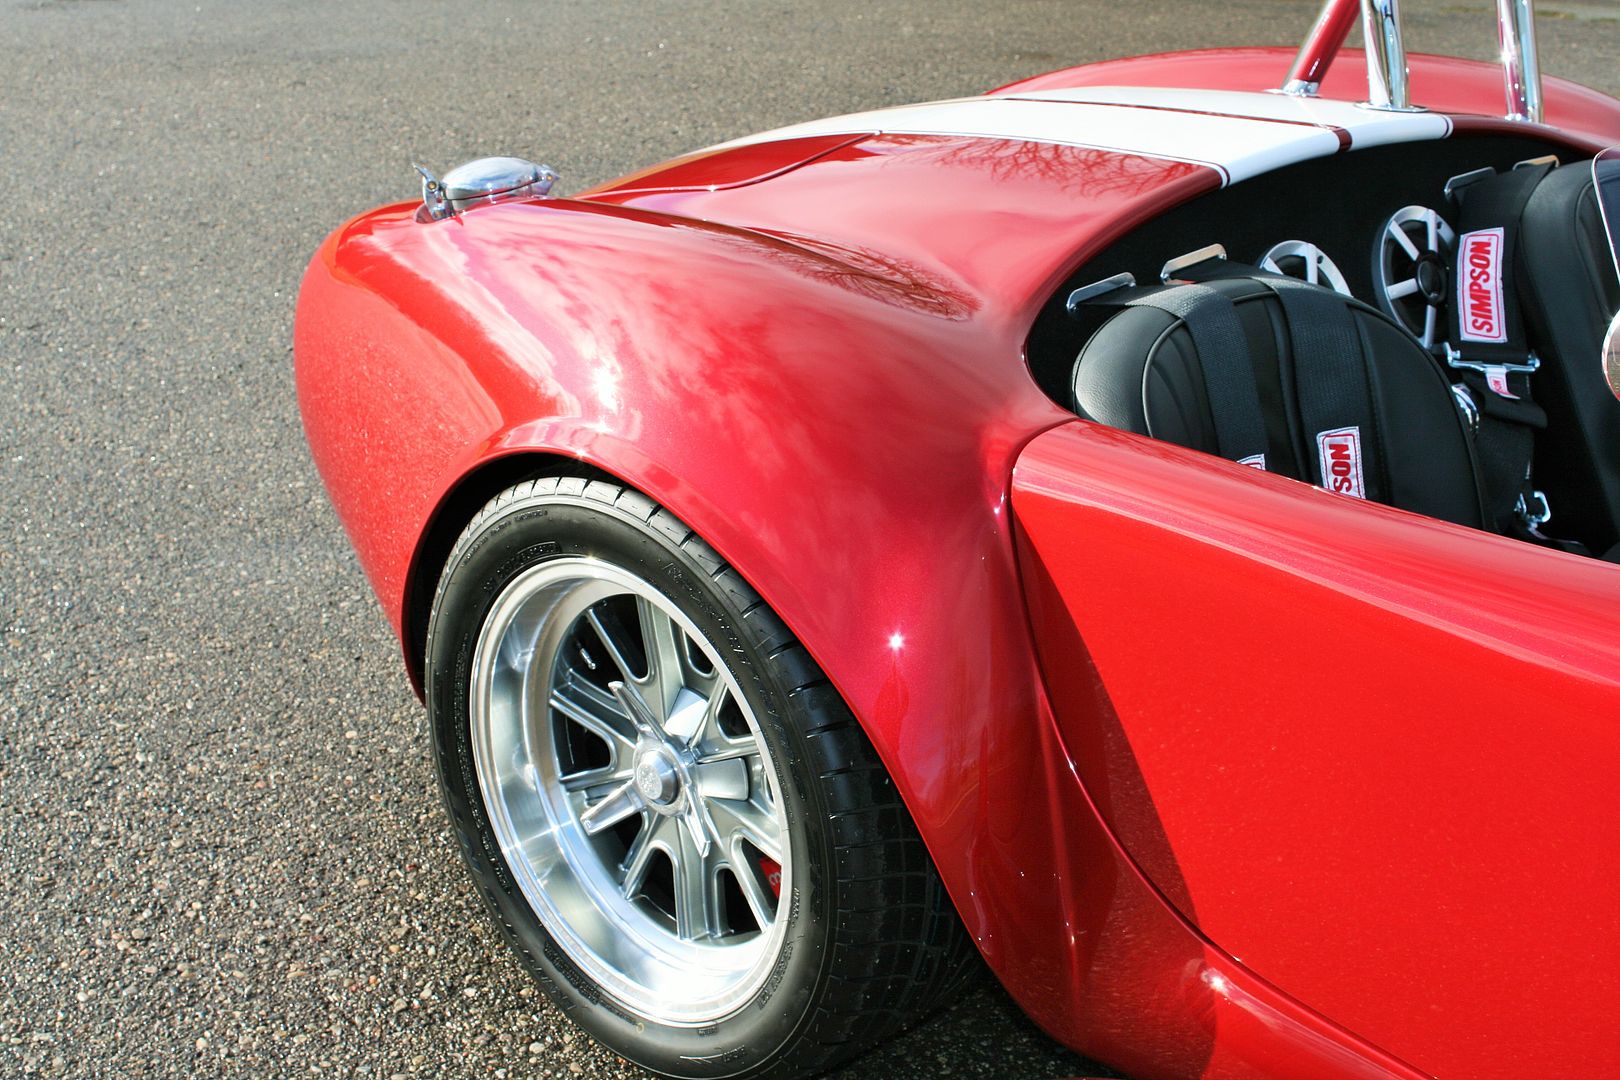
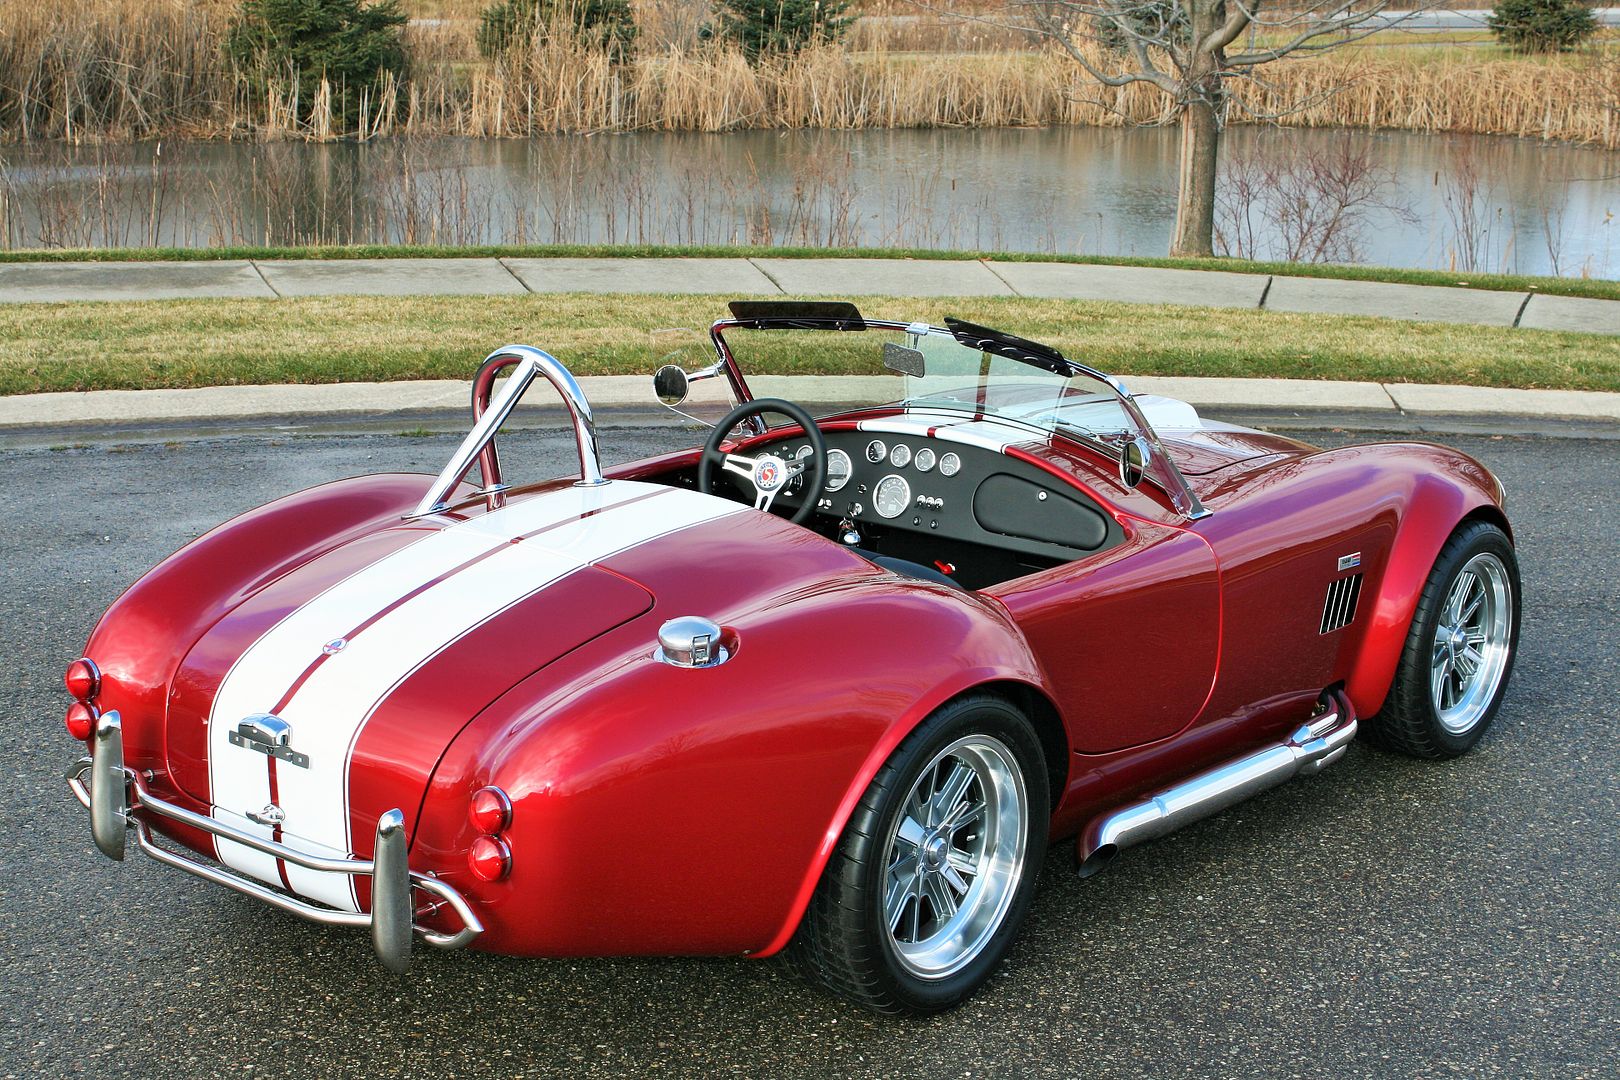
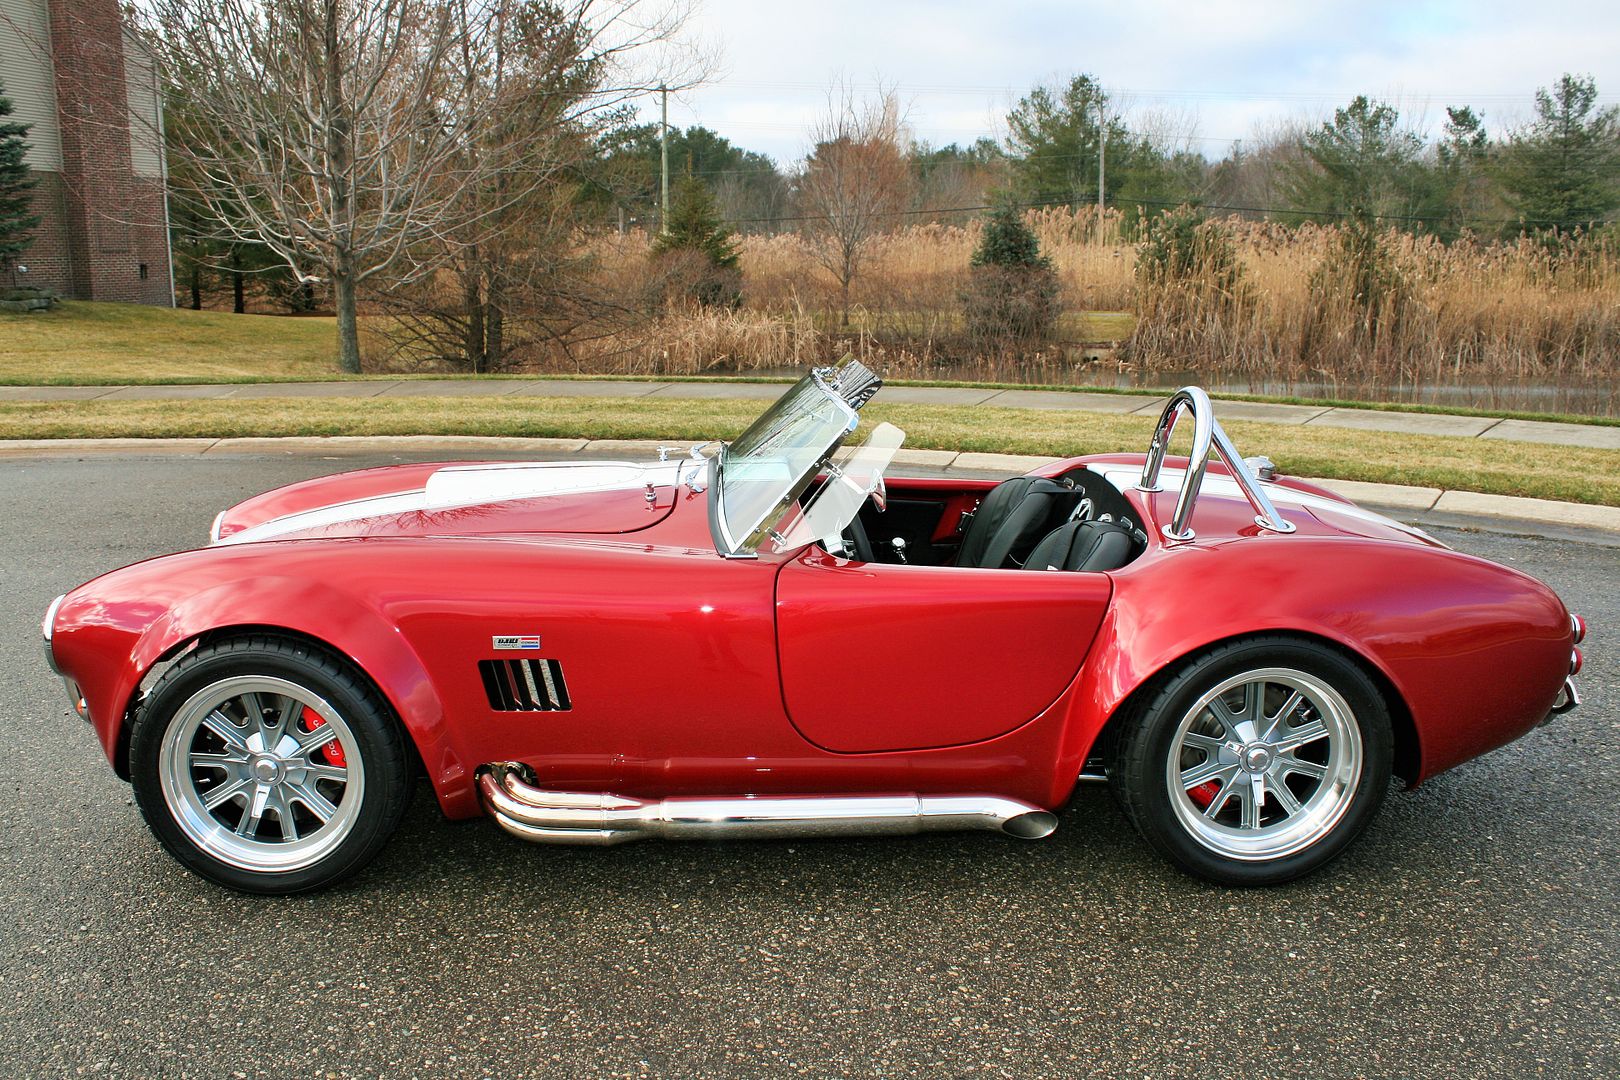
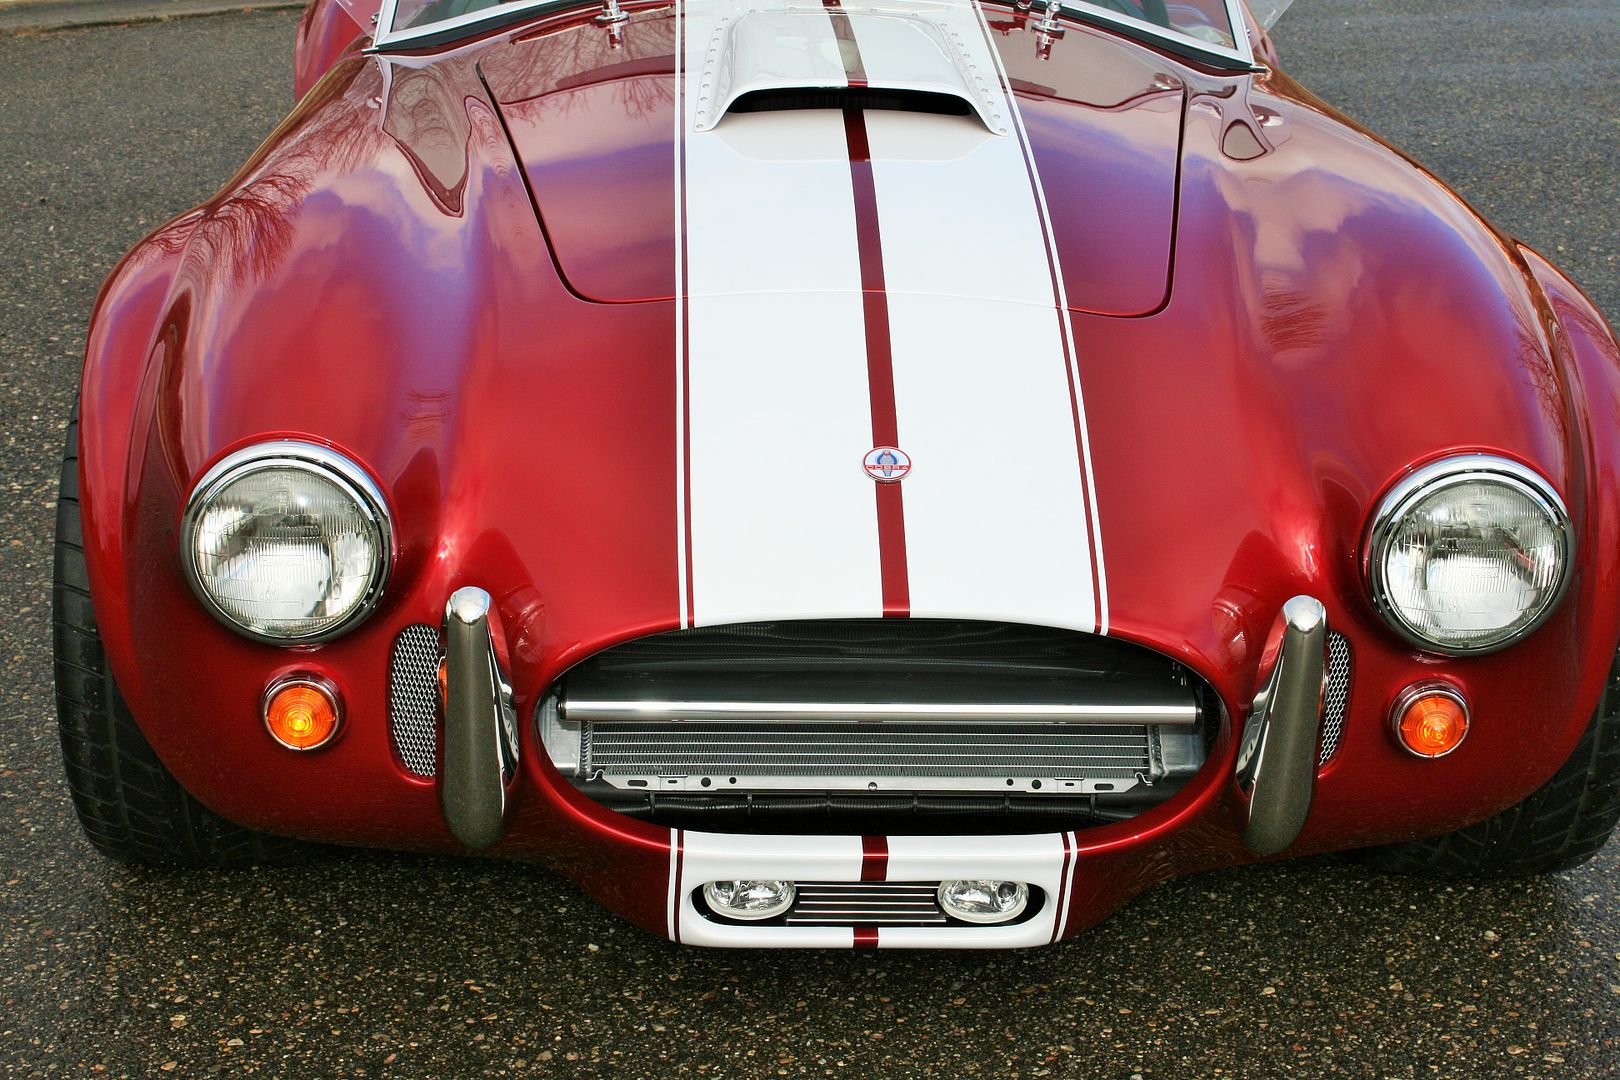
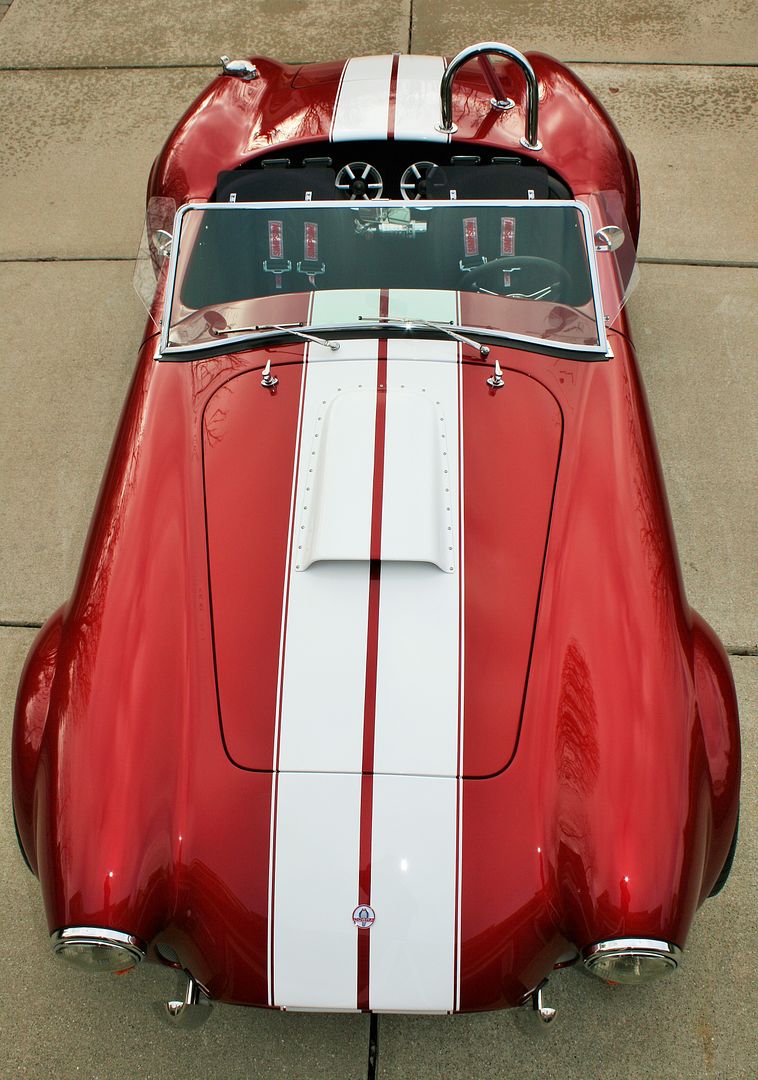
Complete! Final Build Pictures
Well, this is it. Today I rolled the Roadster out into a somewhat sunny 25 degree Michigan morning and had Factory Five Mk4 #7750 pose for some final build pictures. Yea, there are still some details I’ll be finishing up over winter. But I’m calling it done for this build thread. I’ll post a graduation thread in the spring when it’s titled and licensed and I can give a driving report.
It’s been just over two years since I received the kit and started this build thread. 196 posts and 23,192 views later, and here we are. It’s been an adventure, and fun to share. Thanks to everyone for their encouragement along the way! I’ve learned a lot in the process. The next build (if there is one!) will have some of the same ideas, but I’m sure I’ll think of some new ones. That’s part of the fun for me.
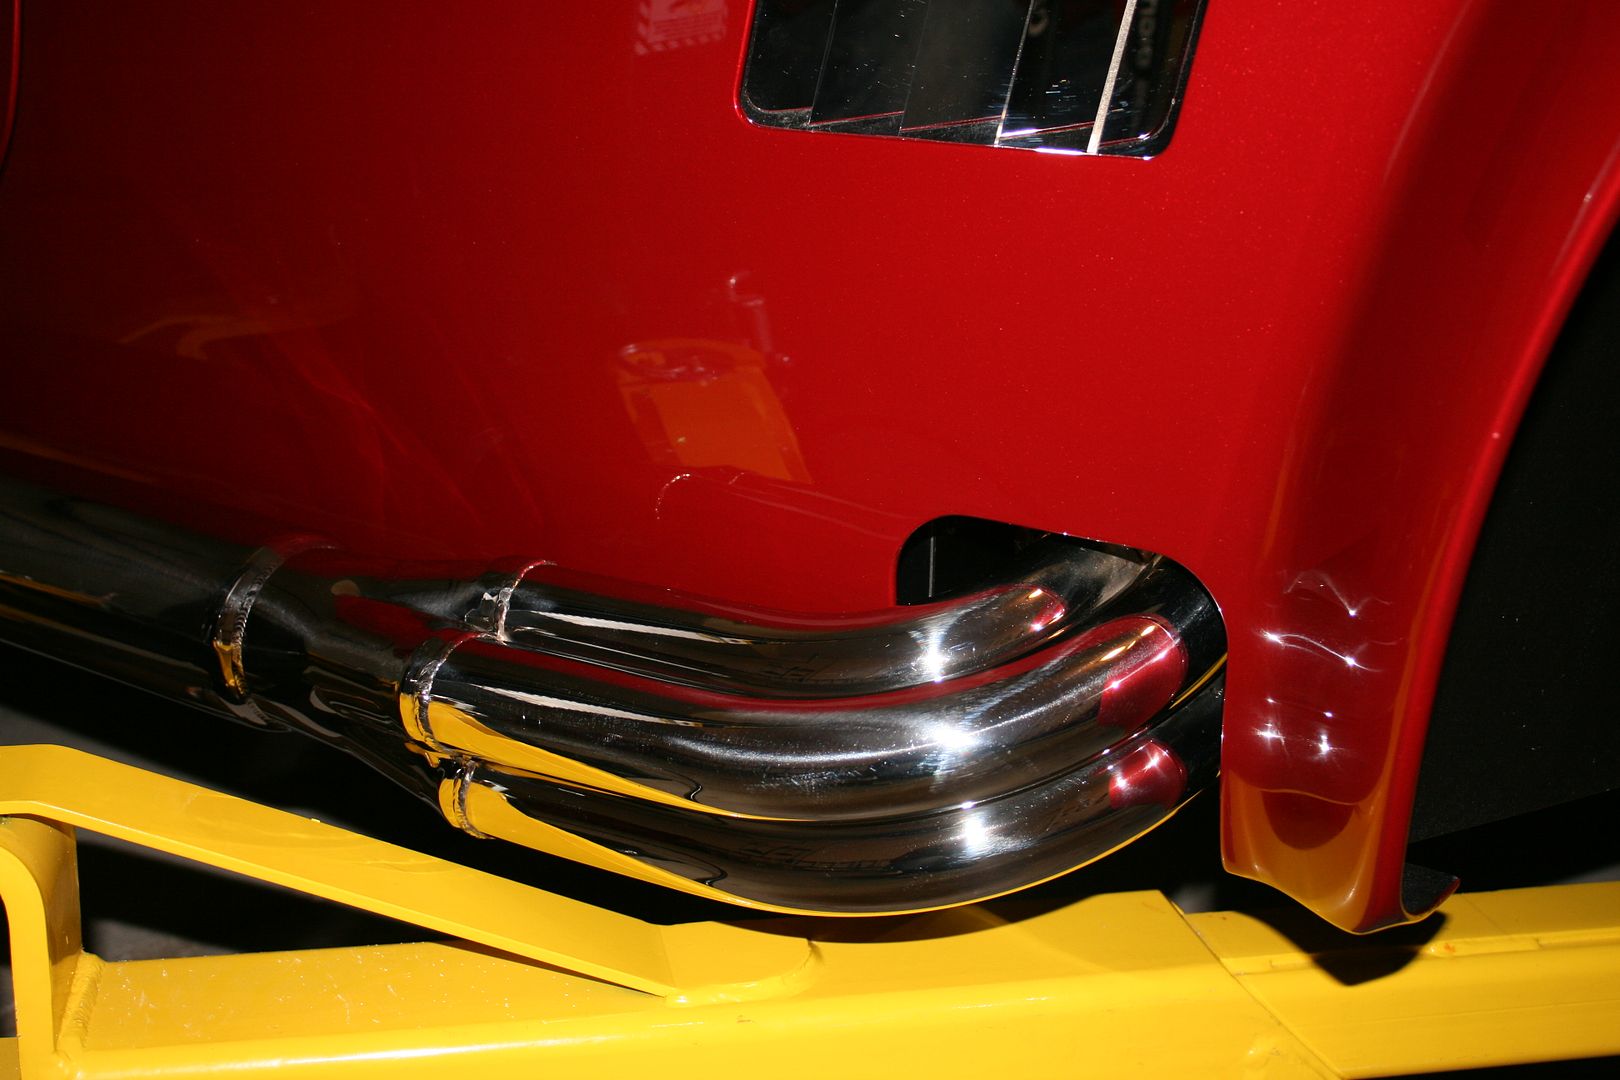
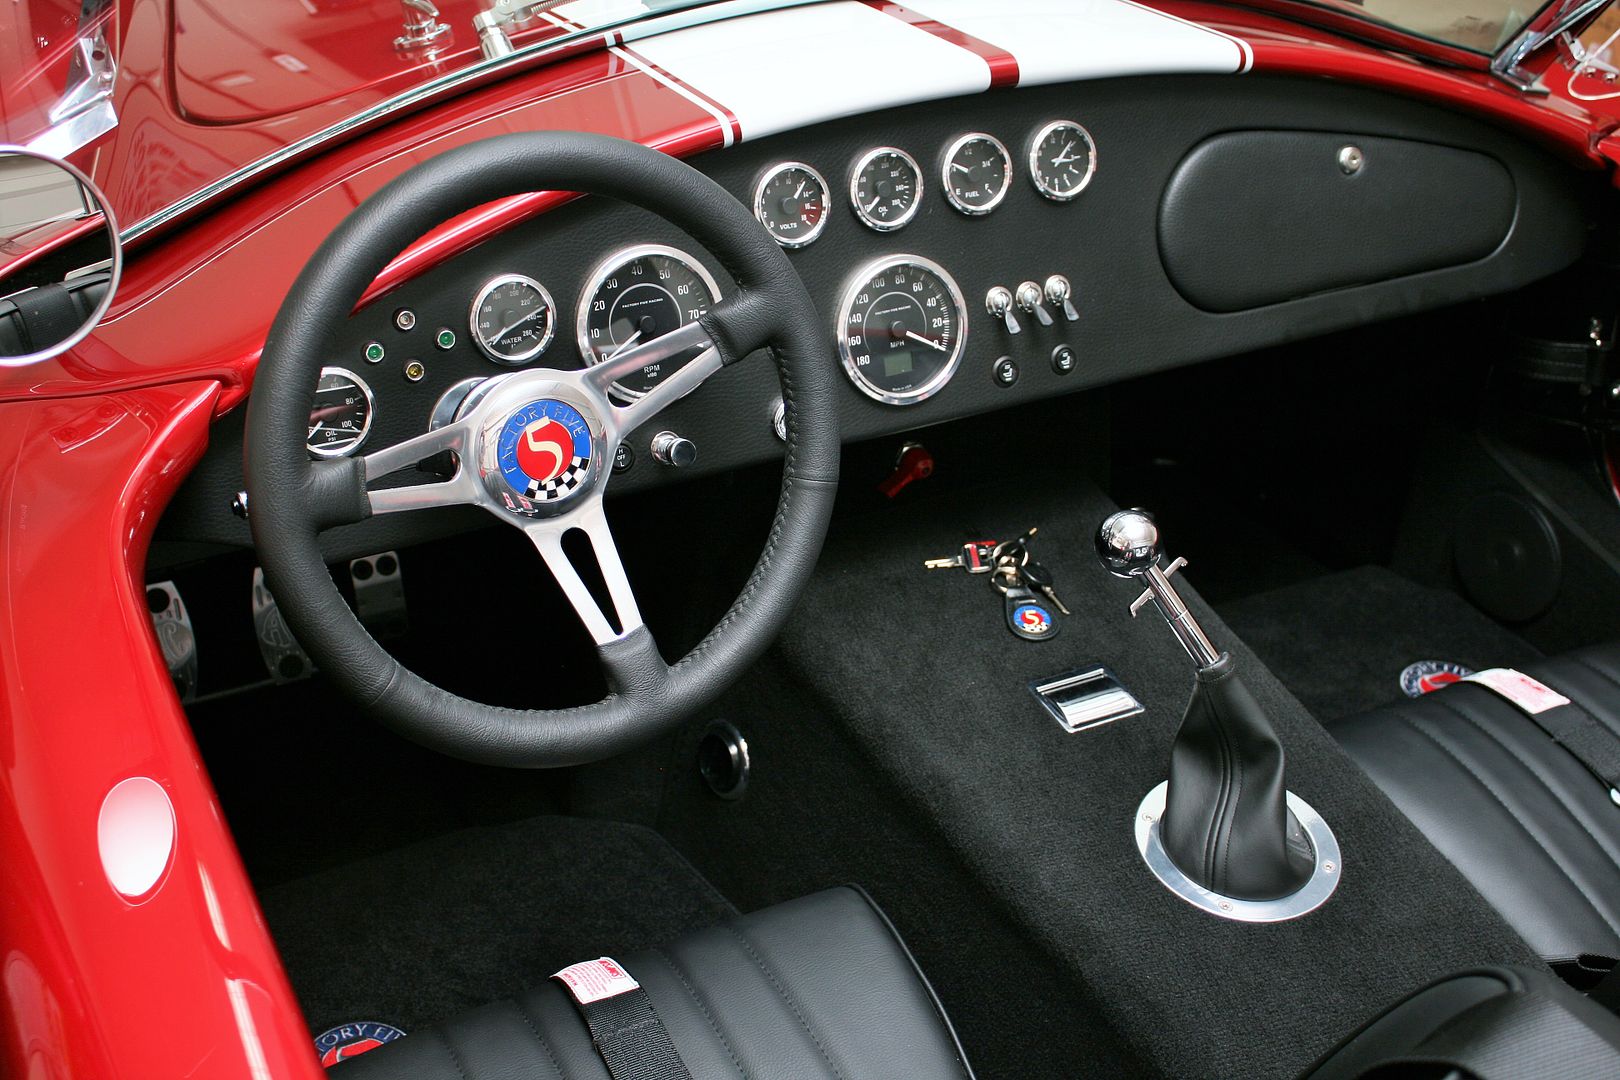
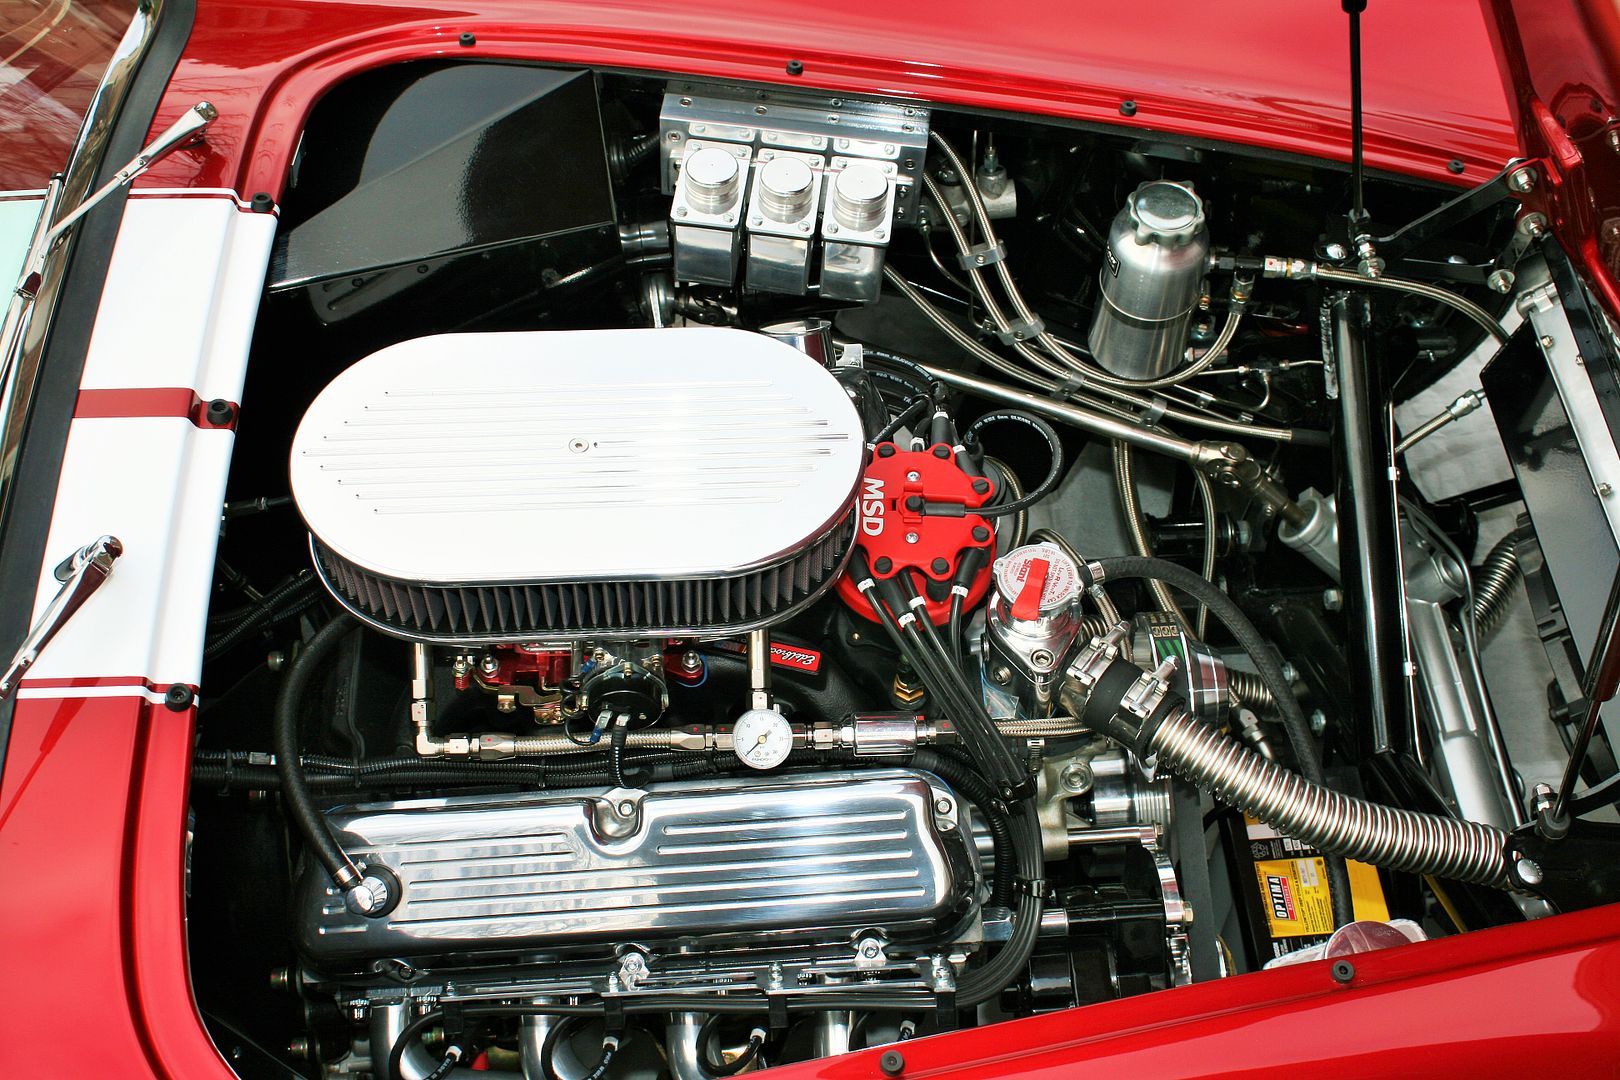
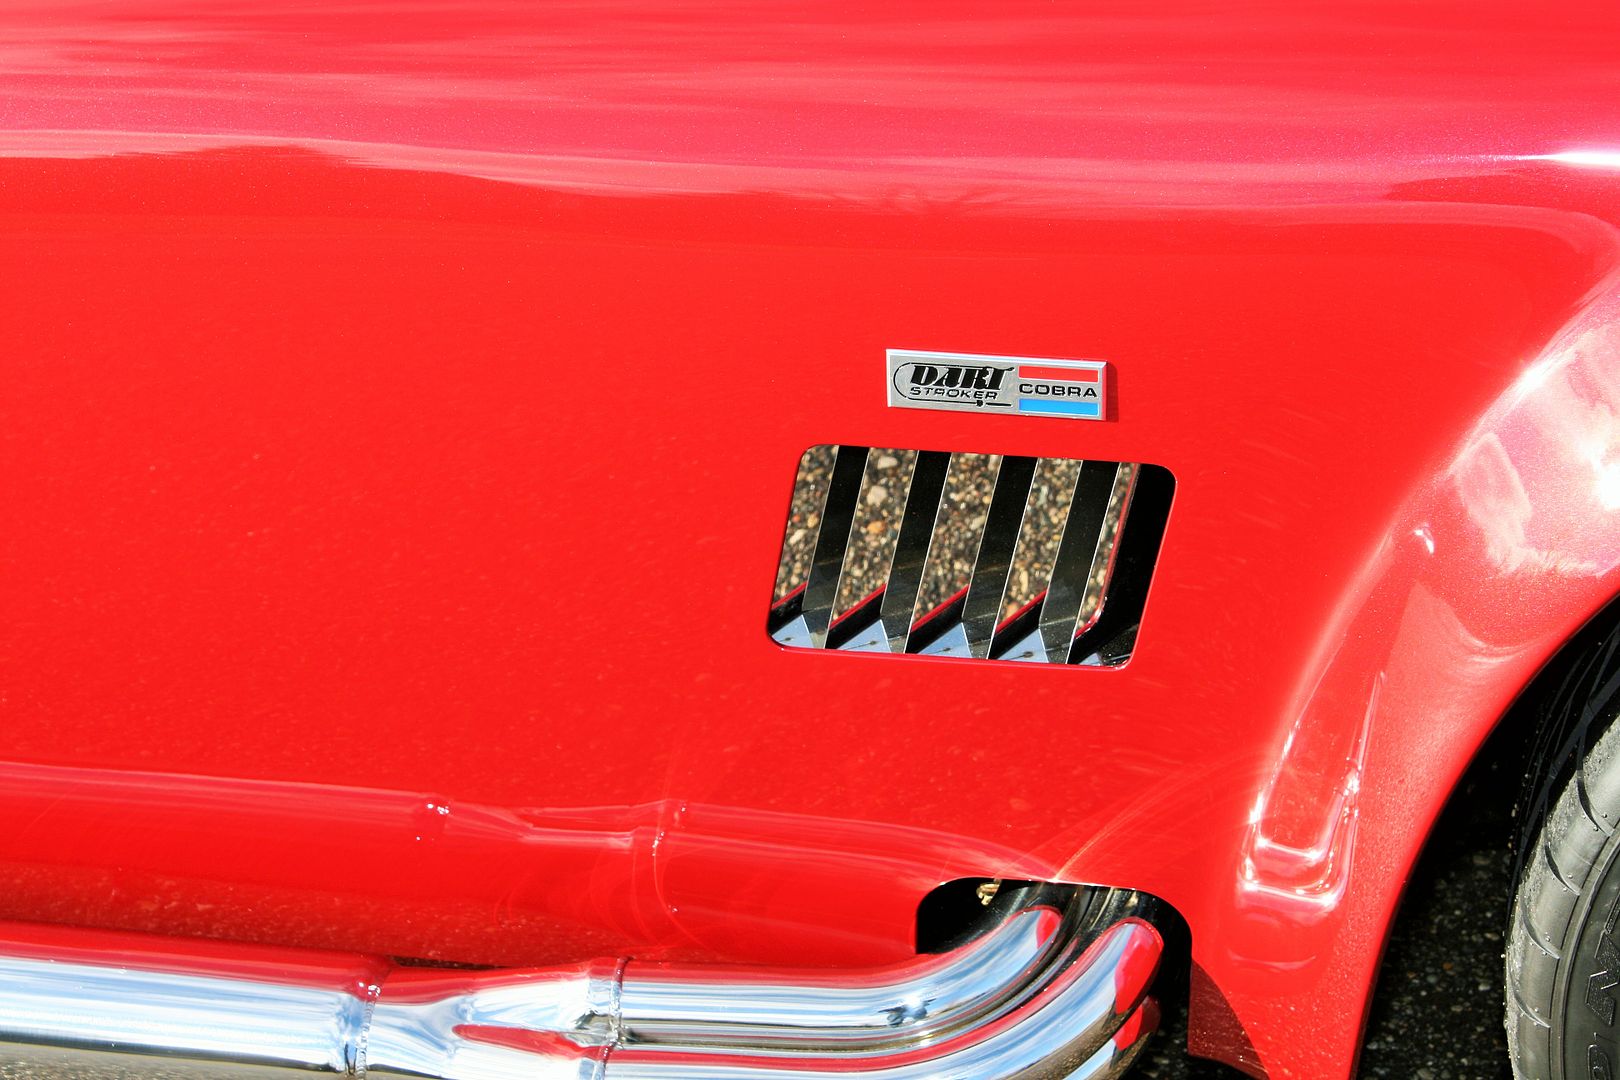
For those that haven’t been following the thread, these are some of the vitals: Mk4 #7750 basic kit, non-donor build. DART 347 stroker with SCAT forged internals, AFR 185 heads, COMP Cam custom billet cam, COMP Cam Ultra Pro Magnum roller rockers, MSD distributor and digital ignition box, Edelbrock Air Gap intake, Quick Fuel SS-750 double pumper carb, Quicktime bell housing, McLeod clutch, TKO600, Gordon Levy 5-link rear suspension, FFR spindles, Unisteer rack, KONI shocks, Wilwood pedal box with hydraulic clutch, FFR/Wilwood brakes, PS, hydroboost PB, Nitto 555 tires, 255 x 17 front, 315 x 17 rear, Ron Francis harness, Speedhut gauges, FFR/BBK headers, GAS-N SS side pipes, Breeze roll bar, Lizard Skin insulation and sound coating, Alex dash covering and glovebox, heated seats.
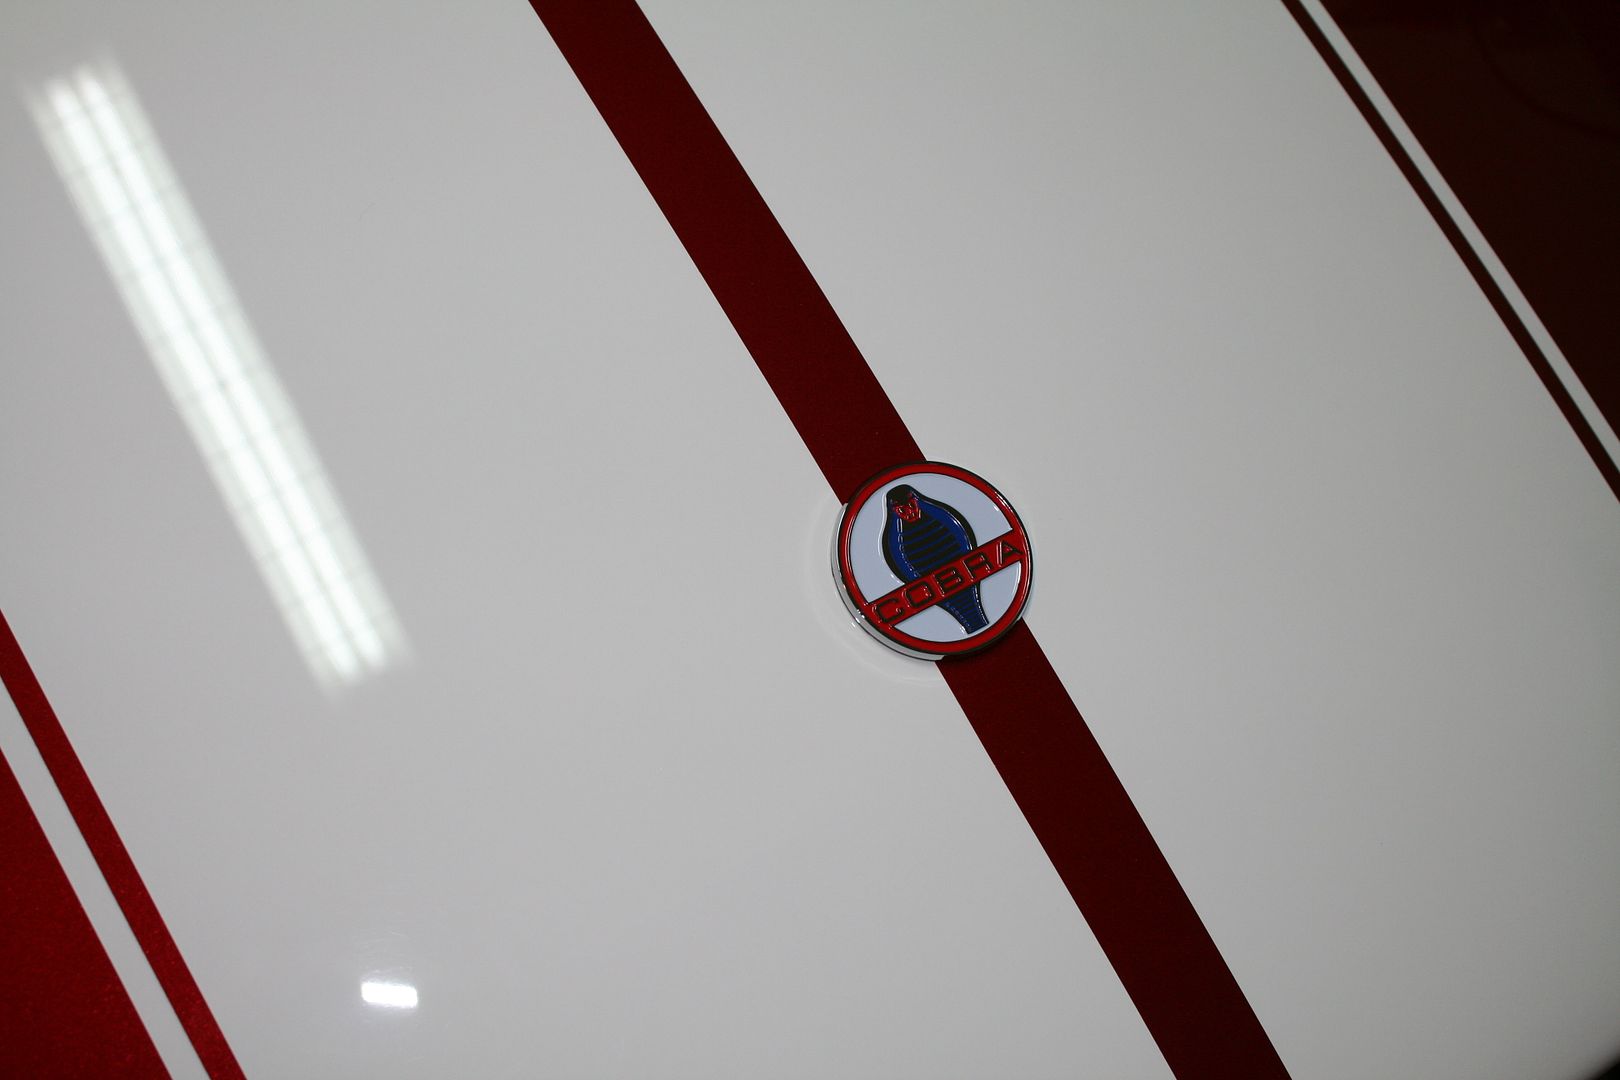
The color is Ford RZ Red Candy 2. It really looks different depending on the ambient light, sun, etc. It has a nice metallic flake in it that doesn’t show that much in these pics. But I love the color. Gloss black powder coat on all the aluminum panels. Frame black powder coat by FFR.
I’ll be using a few of these pics to prepare an application to show the car at the Detroit Autorama in March 2015. I’ve already found out from Factory Five that they won’t be there, so no chance to be in their factory display. But I’m planning to enter on my own. Not something I would want to do every year, but I did once with the Mk3 and enjoyed it. So planning to do it again with the Mk4.
So without further comments, here is a gallery of the completed build. Enjoy!
Last edited by edwardb; 12-19-2014 at 02:38 PM.
Build 1: Mk3 Roadster #5125. Sold 11/08/2014.
Build 2: Mk4 Roadster #7750. Sold 04/10/2017.
Build Thread
Build 3: Mk4 Roadster 20th Anniversary #8674. Sold 09/07/2020.
Build Thread and
Video.
Build 4: Gen 3 Type 65 Coupe #59. Gen 3 Coyote. Legal 03/04/2020.
Build Thread and
Video
Build 5: 35 Hot Rod Truck #138. LS3 and 4L65E auto. Rcvd 01/05/2021. Legal 04/20/2023.
Build Thread. Sold 11/9/2023.
-
12-19-2014, 02:20 PM
#199
Senior Member
Complete! Final Build Pictures continued
If youre interested, this is a slideshow from the directory where I put all these final gallery pics. Lots of repeats and a couple different views. Completed Slideshow by edwardb123 | Photobucket
Thanks everyone!
Build 1: Mk3 Roadster #5125. Sold 11/08/2014.
Build 2: Mk4 Roadster #7750. Sold 04/10/2017.
Build Thread
Build 3: Mk4 Roadster 20th Anniversary #8674. Sold 09/07/2020.
Build Thread and
Video.
Build 4: Gen 3 Type 65 Coupe #59. Gen 3 Coyote. Legal 03/04/2020.
Build Thread and
Video
Build 5: 35 Hot Rod Truck #138. LS3 and 4L65E auto. Rcvd 01/05/2021. Legal 04/20/2023.
Build Thread. Sold 11/9/2023.
-
12-20-2014, 07:48 PM
#200
Bravo!! Job well done. Your car is really good eye candy.


 Thanks:
  Likes:


 Reply With Quote


