Boig Motorsports

Visit our community sponsor

Thanks Thanks:  0
Likes Likes:  0
Page 4 of 11 FirstFirst ... 23456 ... LastLast
Results 121 to 160 of 408

Thread: GUNS' 818SR Build Thread

  1. #121
    Senior Member Xusia's Avatar
    Join Date
    Oct 2011
    Location
    Eugene, OR, USA
    Posts
    2,343
    Post Thanks / Like
    Quote Originally Posted by blueoval_bowtie_guy View Post
    There really isn't anything about the spacing that is important. You want them close enough so you don't have big gaps between the rivets where the silicone sealant will cause a slight warp in the panel.

    I did thousands of rivets on helicopters in the Marine Corps. There, the rivets were structural and spacing was important. Here with these it isn't. It is more for appearance than anything. Having them all in a nice straight line and with even spacing really makes it look a lot more professional.
    Awesome, thanks!

    Quote Originally Posted by Mechie3 View Post
    Rather than tear up my undies causing them to potentially get in a bunch...
    Good one!

  2. #122
    Junior Member
    Join Date
    Dec 2012
    Location
    Oregon
    Posts
    20
    Post Thanks / Like
    Quote Originally Posted by cmcintyre View Post
    Speaking of drill bits, does anyone have a good source for the #11 and #30 bits recommended in the build books for the other FFR cars? My local roadster guys said it made the whole riveting process easier as they are few thou bigger than 1/8 (.191 vs .187) and 3/16. I see this one - http://www.matcotools.com/catalog/pr...UGE-DRILL-BIT/ , but no experience with them.
    My regular day job is in a different kit industry (Aircraft). It is difficult to put an 1/8 rivet in an 1/8" hole... +1 regarding using #30 for 1/8" rivets (standard practice on aircraft). For 5/32 rivets we use a #20 and 3/16" we use a #12.

    One of the major suppliers that is very popular is AVERY TOOLS

    Super people. Even though they carry a lot of tools that an FFR kit builder would likely never need, I am sure they would be happy to help you with the basics.

    Note... not affiliated with them in any way, but I have done business with them many times and always satisfied.

  3. #123
    Junior Member
    Join Date
    Jul 2013
    Location
    Maine
    Posts
    2
    Post Thanks / Like
    stylespilotshop_2269_6220913741.jpg

    Built 3 Airplanes and will build an 818R - after I sell my Porsche 911 race car and wait up to one year for a kit...

  4. #124
    Junior Member
    Join Date
    Jul 2013
    Location
    Maine
    Posts
    2
    Post Thanks / Like
    Oh sorry.. picture is a Rivet Spacer for drilling ALL the holes nice and straight... Most AirCraft supply places have them

  5. #125
    Senior Member
    Join Date
    Feb 2011
    Posts
    607
    Post Thanks / Like
    Quote Originally Posted by BullDogMosport View Post
    stylespilotshop_2269_6220913741.jpg

    Built 3 Airplanes and will build an 818R - after I sell my Porsche 911 race car and wait up to one year for a kit...
    Just bought one on amazon, thanks!

  6. #126
    Senior Member AZPete's Avatar
    Join Date
    Feb 2011
    Location
    Scottsdale, AZ
    Posts
    2,374
    Post Thanks / Like
    Mechie3, we assumed you owned more than one pair of undies so you'd better buy some elastic.
    818S/C : Chassis #25 with 06 WRX 2.5 turbo, ABS, cruise, PS, A/C, Apple CarPlay, rear camera, power windows & locks, leather & other complexities. Sold 10/19 with 5,800 miles.
    Mk3 Roadster #6228 4.6L, T45, IRS, PS, PB, ABS, Cruise, Koni's, 17" Halibrands, red w/ silver - 9K miles then sold @ Barrett-Jackson Jan 2011 (got back cash spent).

  7. #127
    Mechie3's Avatar
    Join Date
    May 2012
    Location
    Indianapolis
    Posts
    5,174
    Post Thanks / Like
    Quote Originally Posted by AZPete View Post
    Mechie3, we assumed you owned more than one pair of undies so you'd better buy some elastic.
    Apparently I've been doing it wrong.


    Zero Decibel Motorsports
    Check out my new website!
    www.zerodecibelmotorsports.com
    www.facebook.com/zero.decibel.motorsports

  8. #128
    Senior Member
    Join Date
    Feb 2011
    Posts
    607
    Post Thanks / Like
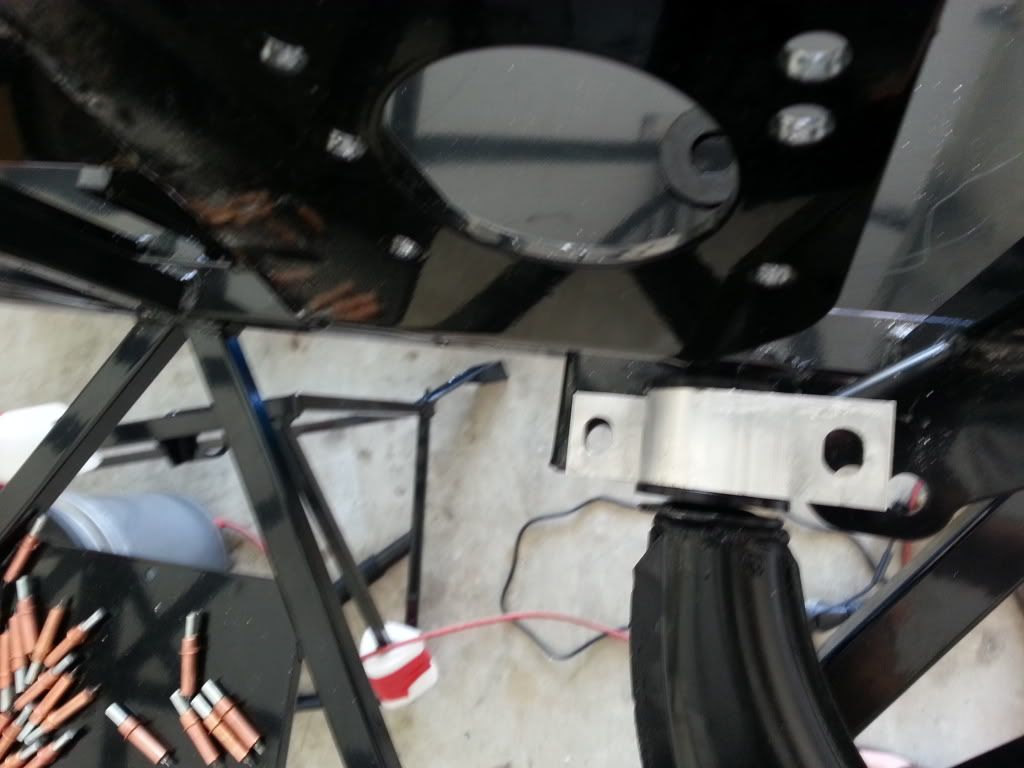
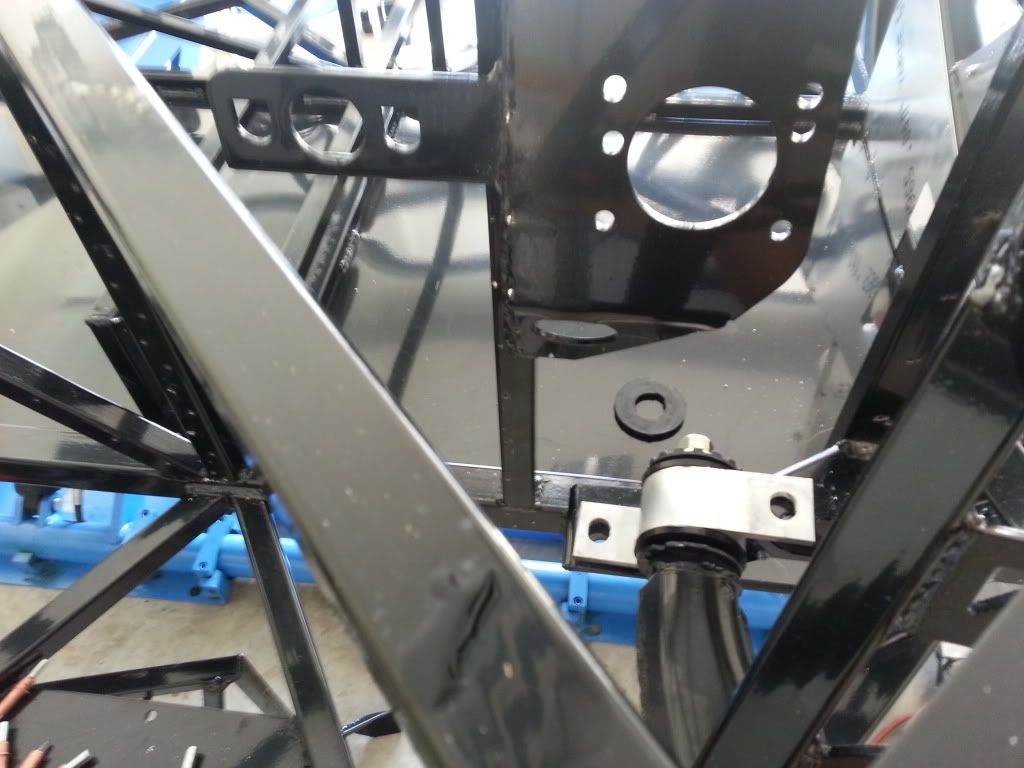
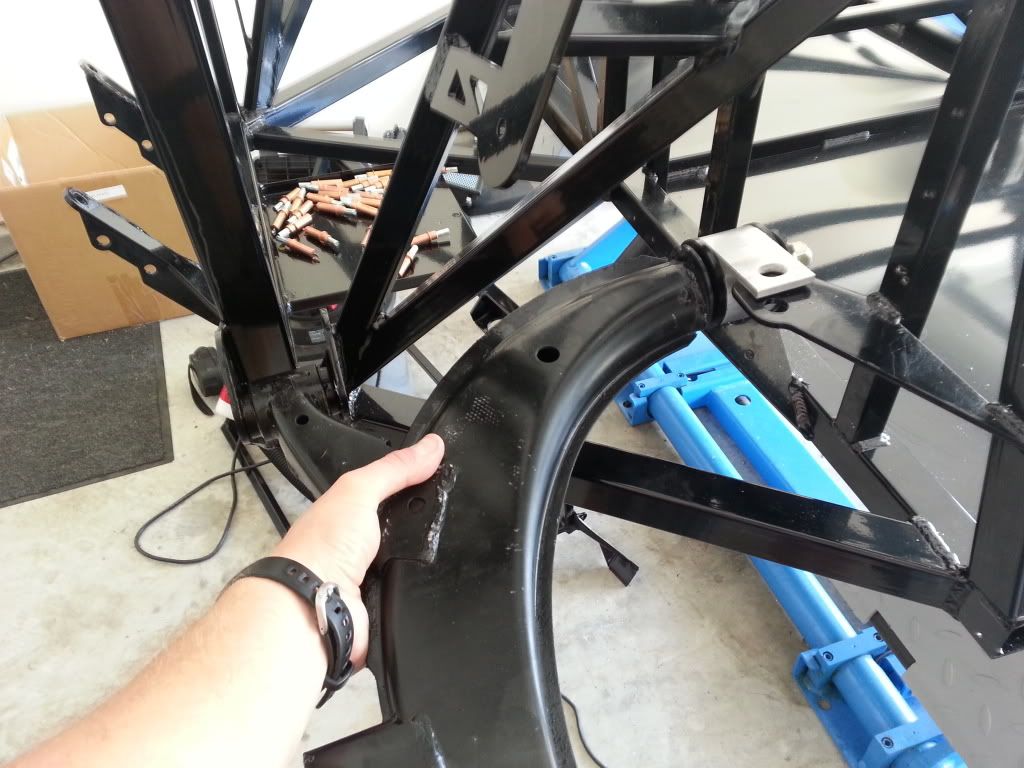
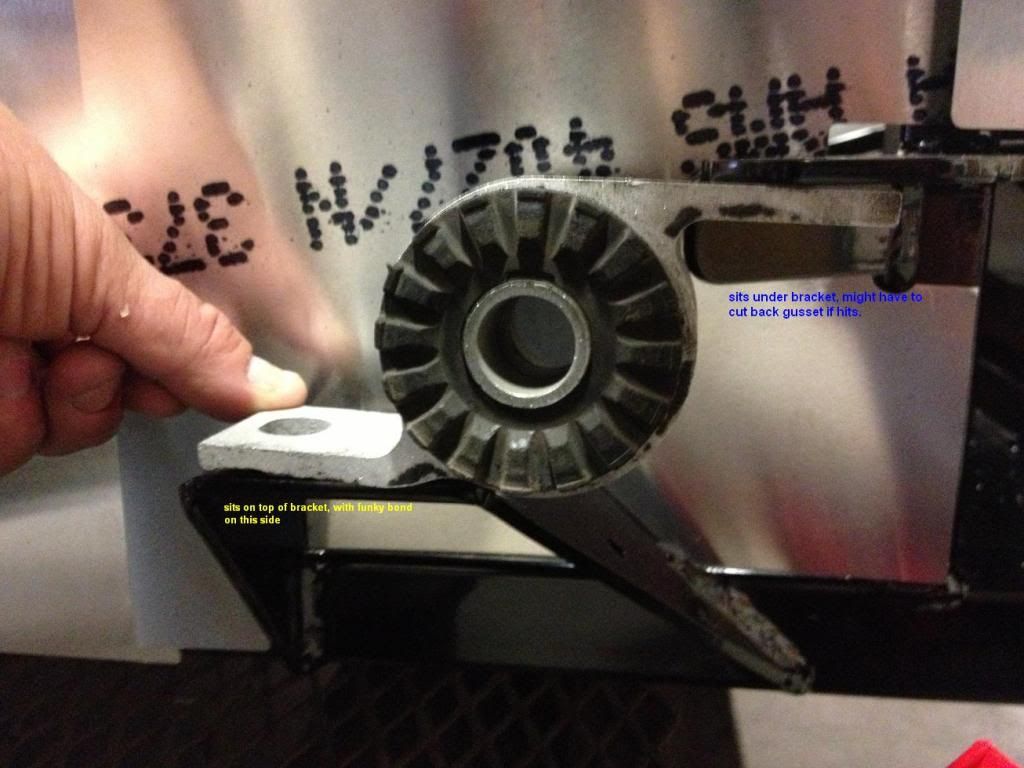
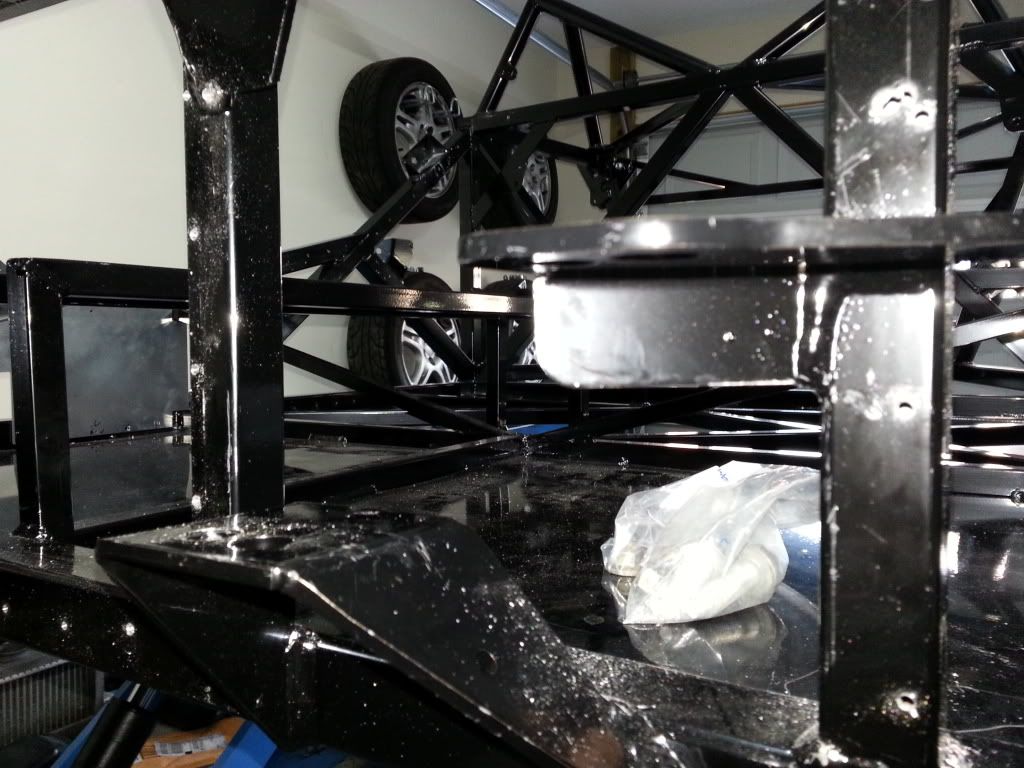
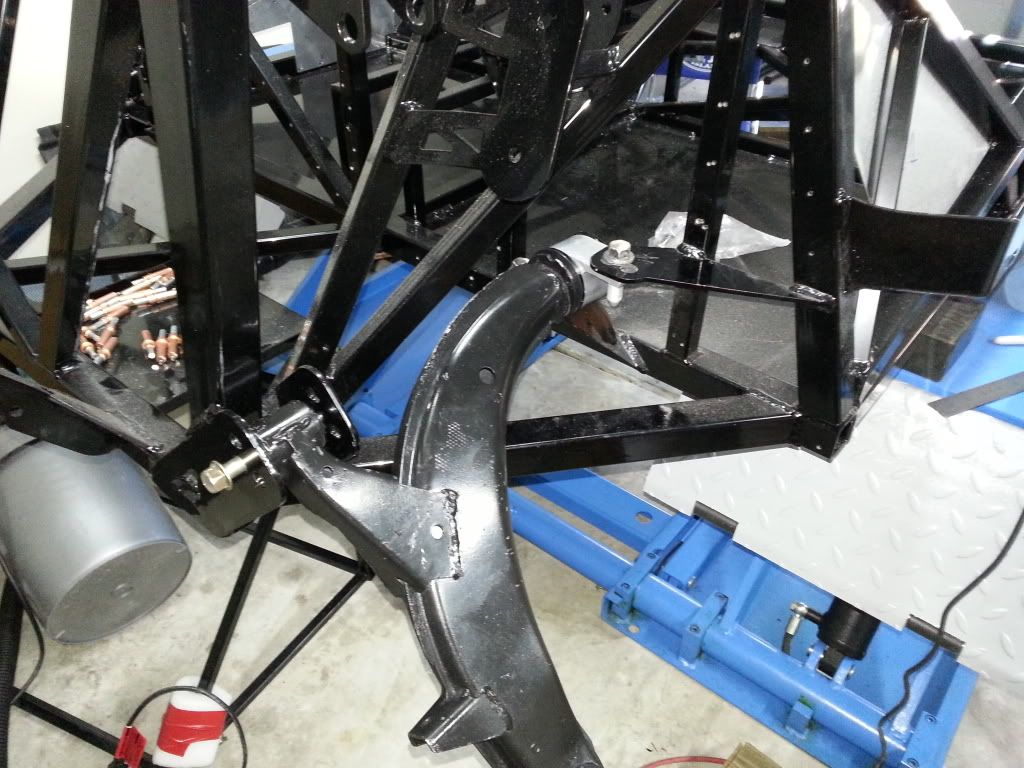
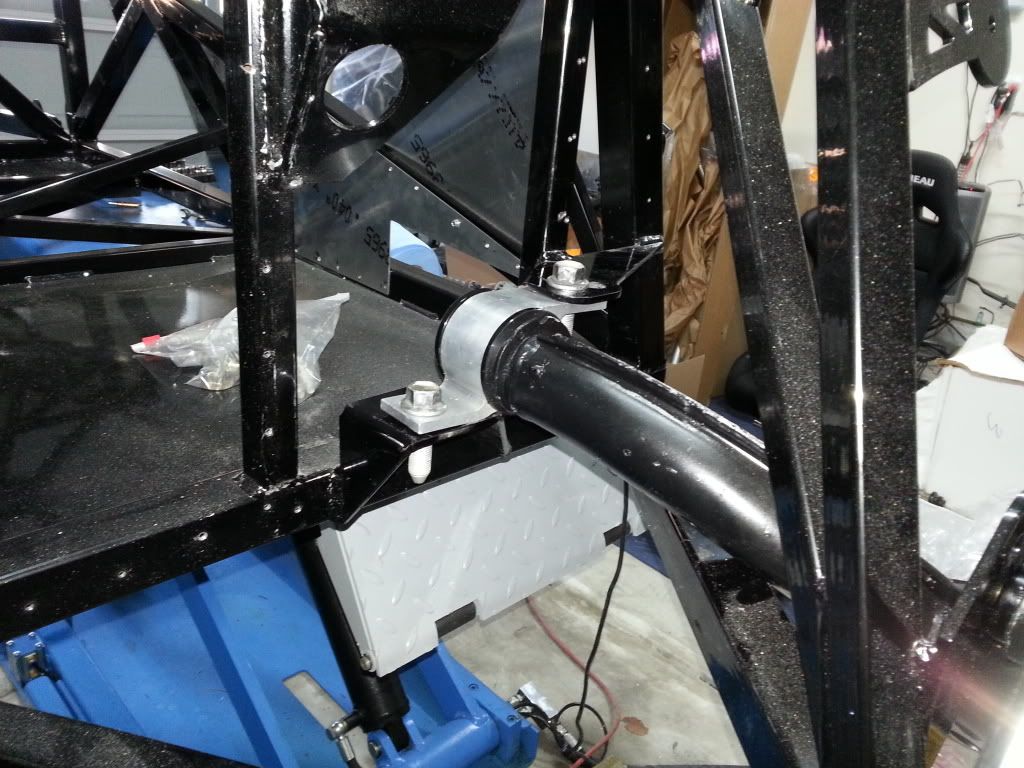
    Decided to do a test fit of the suspension while waiting for the firewall panels to come back from powder coating. Is anyone else having trouble lining up their lower A arms? I know RM1SepEx is having a similar issue. Look at the following pictures to see the rear bushing not lining up with the frame. I can't even get the bushing to mount below the chassis bracket as depicted in the manual.


  9. #129
    Senior Member C.Plavan's Avatar
    Join Date
    Mar 2011
    Location
    Clovis, Ca
    Posts
    2,225
    Post Thanks / Like
    Did you flip the sides? I remember you have to swap rear bushing sides.
    Thanks- Chad
    818R-SOLD!!!- Go Karted 7/20/14/ Officially raced NASA ST2- 2/28/15
    2016 Elan NP01 Prototype Racecar Chassis #20
    1969 Porsche 911ST Vintage Race Car
    1972 Porsche 911T (#'s matching undergoing nut & bolt resto in my garage)

  10. #130
    Mechie3's Avatar
    Join Date
    May 2012
    Location
    Indianapolis
    Posts
    5,174
    Post Thanks / Like
    I have aluminum arms. I'll try and drill them tonight and test fit them. Just have to remember where I put them....

    Couple questions though: You did swap the end pieces right? Do you have aftermarket bushings? Lots of them are offset. IIRC, even on the factory WRX setup, removing and installing these sometimes requires you to pull really hard on the arm to line stuff up.
    Zero Decibel Motorsports
    Check out my new website!
    www.zerodecibelmotorsports.com
    www.facebook.com/zero.decibel.motorsports

  11. #131
    Junior Member
    Join Date
    Jun 2012
    Location
    Huntsville, AL
    Posts
    11
    Post Thanks / Like
    Quote Originally Posted by JAubin View Post
    I order weekly from Mcmaster Carr for work, they offer decent discounts when you're buying in bulk. http://www.mcmaster.com/

    I'll add a vote for McMasterCarr here. I've used them for years for supplies for school, work, and personal projects and they have always given me great customer service.

    My orders always shipped out of Atlanta, usually have my stuff in less than 2 days (in Alabama), usually next day.

  12. #132
    Senior Member RM1SepEx's Avatar
    Join Date
    Jul 2011
    Location
    Freeport, ME
    Posts
    3,801
    Post Thanks / Like
    they won't fit
    I made 1/4 inch spacers under the low side and put the high side on the top. The manual says one thing yet shows another... PM me your emails and I'll send it to you by email.... everyone so far has done this, some w/o the spacers but I think that stresses the bushings too much... I got there Sunday AM and have been having internet issues... If you are using the shorter arms from a wagon etc... your problem is bigger.

    Mine fit under on the right but the holes wouldn't line up... on the left, wouldn't go under AND tyhe 90 return under the upper bracket forces the arm forward so that you can't line up the forward lower pivot in the brackets.
    Last edited by RM1SepEx; 08-05-2013 at 02:27 PM.

  13. #133
    Mechie3's Avatar
    Join Date
    May 2012
    Location
    Indianapolis
    Posts
    5,174
    Post Thanks / Like
    Sort of related: what hardware did you use to mount the top a arms RM1? The manual didn't specify.
    Zero Decibel Motorsports
    Check out my new website!
    www.zerodecibelmotorsports.com
    www.facebook.com/zero.decibel.motorsports

  14. #134
    818 builder metalmaker12's Avatar
    Join Date
    Mar 2012
    Location
    Exeter R.I
    Posts
    2,834
    Post Thanks / Like
    Blog Entries
    1
    [QUOTE=RM1SepEx;111439]they won't fit
    I made 1/4 inch spacers under the low side and put the high side on the top. The manual says one thing yet shows another... PM me your emails and I'll send it to you by email.... everyone so far has done this, some w/o the spacers but I think that stresses the bushings too much... I got there Sunday AM and have been having internet issues... If you are using the shorter arms from a wagon etc... your problem is bigger.
    Mine fit under on the right but the holes wouldn't line up... on the left, wouldn't go under AND tyhe 90 return under the upper bracket forces the arm forward so that you can't line up the forward lower pivot in the

    I used a 1/4 inch pin pry bar and got it to line up just fine. I mean they are a little difficult, but no real issue. The manual, what's that lol, I barely looked at it yet. If you need advice pm me. Also you have to cut the remaining threads off on the left lower control arm on the aluminum arms to not hit the aluminum panels, btw that's not in the manual. And the left upper control arm needs to be cut down also

  15. #135
    Senior Member RM1SepEx's Avatar
    Join Date
    Jul 2011
    Location
    Freeport, ME
    Posts
    3,801
    Post Thanks / Like
    I posted the same thing on my thread with photos, took the time to chop the photos so they would fit... :-)

    Metalmaker, I tried to PM you sunday to discuss and your mailbox was full!

    We came up with the same soln!
    Last edited by RM1SepEx; 08-05-2013 at 03:18 PM.

  16. #136
    Senior Member RM1SepEx's Avatar
    Join Date
    Jul 2011
    Location
    Freeport, ME
    Posts
    3,801
    Post Thanks / Like
    Quote Originally Posted by C.Plavan View Post
    Did you flip the sides? I remember you have to swap rear bushing sides.
    that isn't flipped, you end up with the flat bushing side down and the one with the slight inflection on top... see my build thread for photos

  17. #137
    Senior Member
    Join Date
    Feb 2011
    Posts
    607
    Post Thanks / Like
    Man I've tried these things every which way and they just won't line up. The have trouble lining up off the control arms as well, you have to sort of angle them to get them to work. I do have aftermarket bushings, but they are all the same size. I'm thinking I might have to offset my forward control arm bushings to move the entire assembly forward a bit.

  18. #138
    East Coast Speed Machines Erik W. Treves's Avatar
    Join Date
    Feb 2011
    Location
    Huntsville, Al
    Posts
    2,109
    Post Thanks / Like
    which aftermarket bushing do you have? They have offset centers which makes it harder. I had to flip them and add washers as spacers to take the anti-lift out of them which gave me a 1* pitch up on the control arm..worked out fine in the end. Also if they have been in a car before the bushings all have some memory in them so you have to fight that as well.
    FFR 1879, Blown DSS 306,REDLINE management, VeryCoolParts Tuned 460RWHP

    FFR 818S, The Flash, Chassis #5, 2.0L, LSD, Electromotive TEC-S, VCP Tuned, 278RWHP 265 RWTQ

    FFR 6651, Green Lantern, 408W Crate, Hellion 66mm Turbo, JGS Waste gate / Blowoff valve, Tec-GT management, VCP Tuned, 575 RWHP, 690 RWTQ

    FFR 8335, Black Mamba, 289 FIA CSX 2001 tribute car, 347, 48 IDA webers, VCP Tuned, 311 RWHP 386 RWTQ, 3-link, Trigo's

    FFR 0004, Gen 3 , Hawk Coupe, Coyote twin turbo, 683 RWHP 559 RWTQ, IRS, VCP Tuned. "not too shabby"

    US ARMY Maintenance Test Pilot (CW4 Retired)

  19. #139
    fasterer and furiouser longislandwrx's Avatar
    Join Date
    Aug 2012
    Location
    Long Island
    Posts
    2,540
    Post Thanks / Like
    Blog Entries
    6
    Can you press the front bushing in another 1/4 inch? looks like that would line it right up. I will look at mine when I get home. (not installed yet)
    A well stocked beverage fridge is the key to any successful project.

  20. #140
    Senior Member
    Join Date
    Feb 2011
    Posts
    607
    Post Thanks / Like
    They are brand new Turn In Concepts Bushings. They are not an anti lift kit, just new bushings. I tried this before with the stock bushings installed with the same results.

  21. #141
    Senior Member
    Join Date
    Feb 2011
    Posts
    607
    Post Thanks / Like
    Quote Originally Posted by longislandwrx View Post
    Can you press the front bushing in another 1/4 inch? looks like that would line it right up. I will look at mine when I get home. (not installed yet)
    Maybe. Right now they are even. I'm not sure how that would effect the geometry if I offset that bushing. I'm guessing not much, but what do I know?

  22. #142
    818 builder metalmaker12's Avatar
    Join Date
    Mar 2012
    Location
    Exeter R.I
    Posts
    2,834
    Post Thanks / Like
    Blog Entries
    1
    I will post mine, I got them in ok with aluminum arms.

  23. #143
    Senior Member RM1SepEx's Avatar
    Join Date
    Jul 2011
    Location
    Freeport, ME
    Posts
    3,801
    Post Thanks / Like
    take the bushing off the arm, place it on the lower bracket and see if you can slide it under the top bracket, i'm willing to bet you a cold one it will not fit.

    see page 71 of the build manual for the cad drawing for proper orientation of the bushing it is 2 5/8 tall.

    On page 79 it states

    The rear of the control arm bolts to the top of the bottom bracket and the bottom of the top bracket. The
    inner set of holes is for the WRX sedan arms and the outer is for the 2.5RS and Wagon.

    did you check out my thread and photos?

    http://thefactoryfiveforum.com/showt...d-Thread/page2 post 60, how do your's compare?

    As far as I can tell EVERYONE has bolted them on top! Clamp your bushing on the top of the bracket... I just filled the space with a 1/4 inch Aluminum spacer

    If you use the short arms, you can't put them on the top w/o cutting the bracket and ruining your powder coat... AND you can't upgrade to the much prettier aluminum arms OR ever convert the car to track setup...

  24. #144
    Senior Member Bob_n_Cincy's Avatar
    Join Date
    Sep 2012
    Location
    Cincinnati OH
    Posts
    3,904
    Post Thanks / Like
    I don't know if this helps. It is a picture from SEMA 2012
    Bob
    586.jpg

  25. #145
    Senior Member RM1SepEx's Avatar
    Join Date
    Jul 2011
    Location
    Freeport, ME
    Posts
    3,801
    Post Thanks / Like
    Quote Originally Posted by Mechie3 View Post
    Sort of related: what hardware did you use to mount the top a arms RM1? The manual didn't specify.
    Page 79

    1/2 - 20 1.75 flange head and locknuts, I'd give you the PN but that stuff is in the garage and I don't want to go back out... I need to stop playing for the night!

    Bob most of ours don't fit under like that but yes that is what the manual says tho the bushing is flopped over in the cad drawing so the jiggle in the bushing is on the top

    Dan

  26. #146
    Senior Member
    Join Date
    Feb 2011
    Posts
    607
    Post Thanks / Like
    Quote Originally Posted by Bob_n_Cincy View Post
    I don't know if this helps. It is a picture from SEMA 2012
    Bob
    586.jpg
    Mine do not fit like that. The holes will not line up.
    Last edited by GUNS; 08-05-2013 at 08:22 PM.

  27. #147
    Senior Member
    Join Date
    Feb 2011
    Posts
    607
    Post Thanks / Like
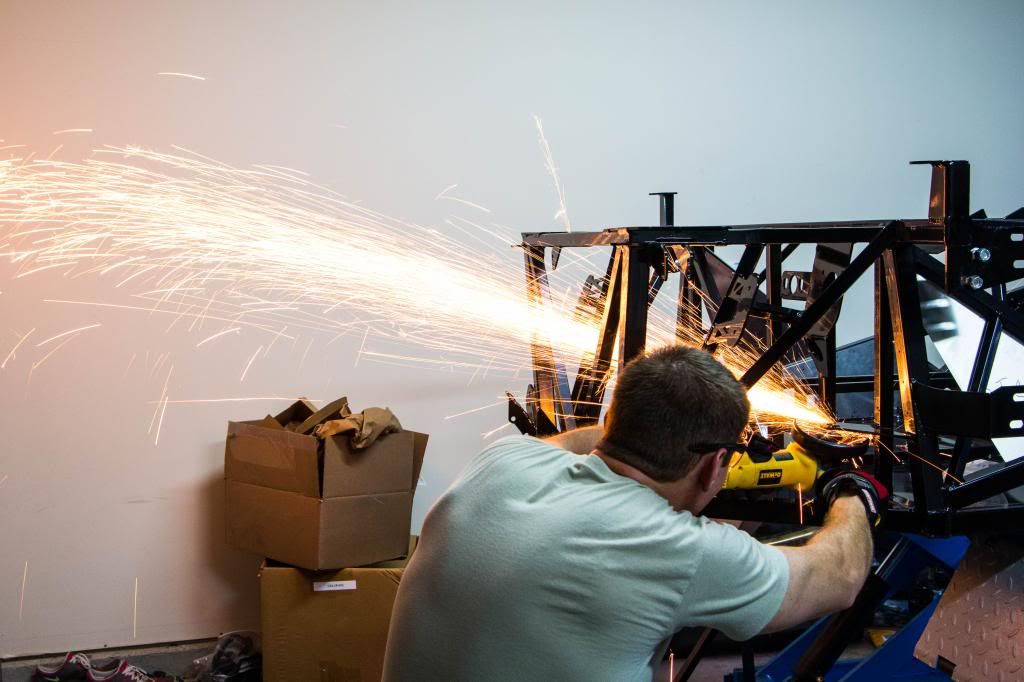
    Got this from FFR today in regards to the LCA bushing issues. I'm about to go into the garage and continue cutting as I have a lot of that "gusset" to trim.


  28. #148
    Senior Member
    Join Date
    Feb 2011
    Posts
    607
    Post Thanks / Like
    Ok, got the driver side done!


    Began by cutting and grinding the tab or "gusset" that hangs down and gets in the way:


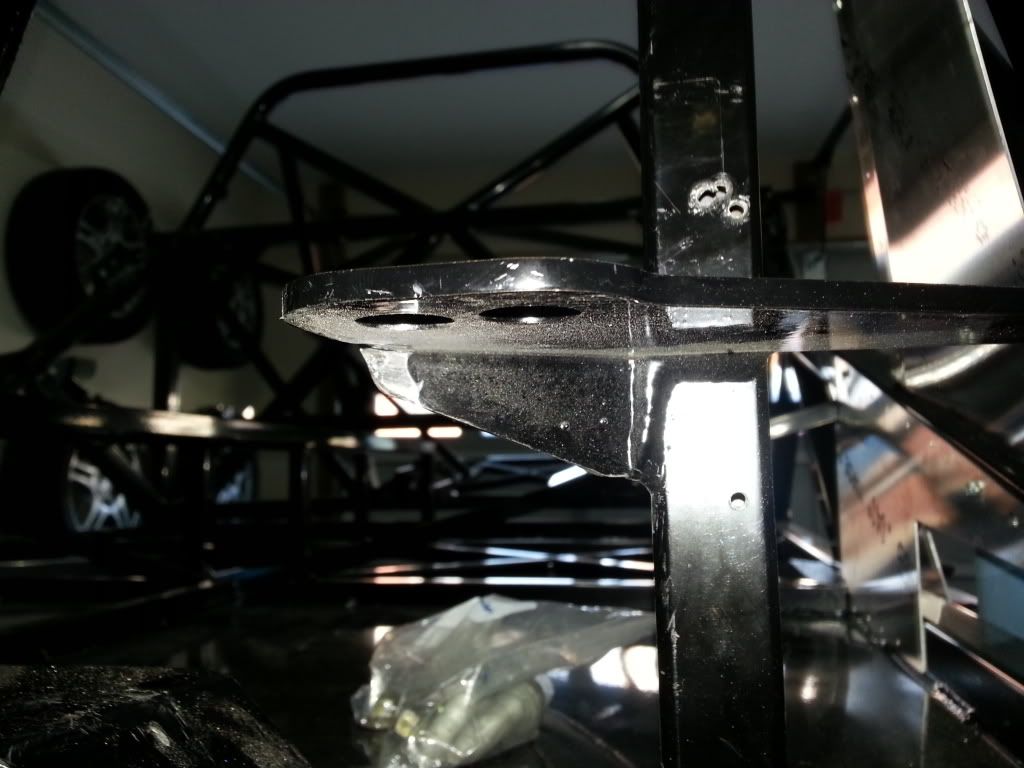
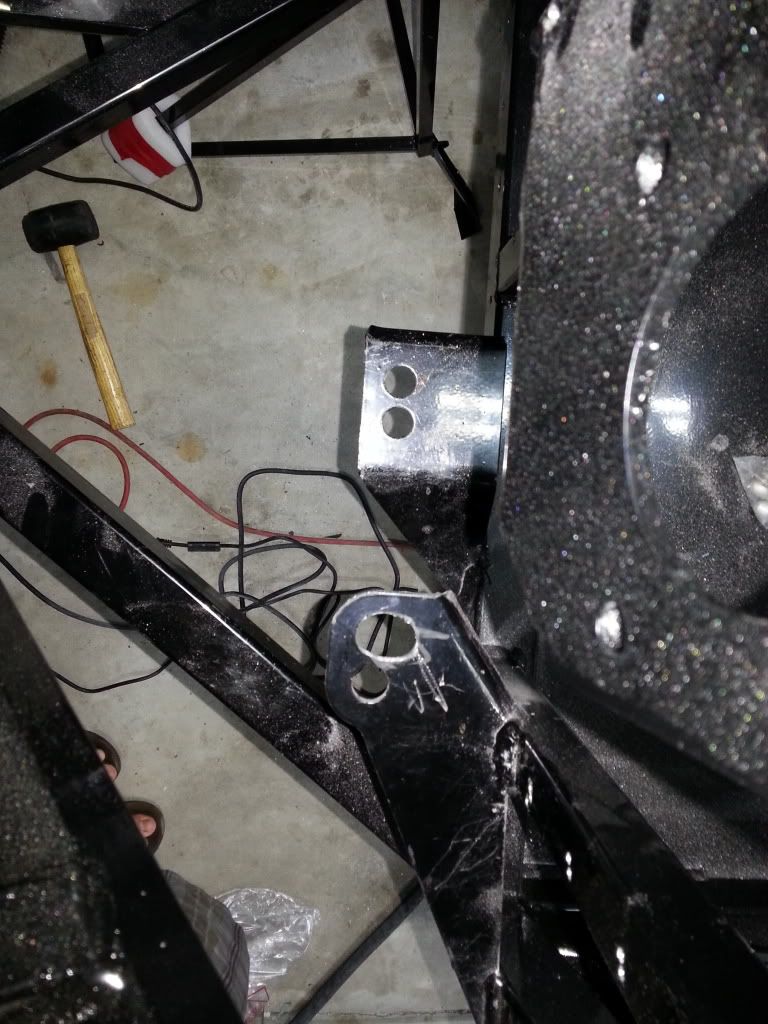
    I then had to widen the bolt holes to allow the bushing to align correctly:


    I plan on touching up the bare metal with gloss paint. Don't mind the areas where the Dremel got away from me.


    Now I just have to rinse and repeat the other side.

  29. #149
    Senior Member Nuul's Avatar
    Join Date
    Sep 2011
    Location
    Indianapolis, IN
    Posts
    247
    Post Thanks / Like
    Very nice, that looks much better mounted that way.

  30. #150
    Mechie3's Avatar
    Join Date
    May 2012
    Location
    Indianapolis
    Posts
    5,174
    Post Thanks / Like
    Before AND after pics? Awesome!

    I plan to do this tonight. I don't have front springs yet anyways so I've been working on other areas in the meantime.
    Zero Decibel Motorsports
    Check out my new website!
    www.zerodecibelmotorsports.com
    www.facebook.com/zero.decibel.motorsports

  31. #151
    Senior Member RM1SepEx's Avatar
    Join Date
    Jul 2011
    Location
    Freeport, ME
    Posts
    3,801
    Post Thanks / Like
    Bob, please try my broom handle trick and see how well aligned you can get your arms, I'm interested to see how well it works with the steel arms.

    http://thefactoryfiveforum.com/showt...d-Thread/page4 post 124
    Dan

    818S #17 Picked up 8/1/13 First start 11/1/13 Go Kart 3/28/14

  32. #152
    818 builder metalmaker12's Avatar
    Join Date
    Mar 2012
    Location
    Exeter R.I
    Posts
    2,834
    Post Thanks / Like
    Blog Entries
    1
    Broomstick lol your too funny, it prob works though. Noticed you did not even try to ask me,, I will got get a flame thrower ready lol.

  33. #153
    Senior Member RM1SepEx's Avatar
    Join Date
    Jul 2011
    Location
    Freeport, ME
    Posts
    3,801
    Post Thanks / Like
    I thought you had AL arms... I am interested in your measurements re this test

    Did you try the fuel tank yet? I'm about to take mine out of the box...
    Dan

    818S #17 Picked up 8/1/13 First start 11/1/13 Go Kart 3/28/14

  34. #154
    Senior Member
    Join Date
    Feb 2011
    Posts
    607
    Post Thanks / Like
    Update to the damage done during shipping. FFR will be replacing my rear bumper. Stewart will be doing a swap out the next time they are near by. Both companies were great to deal with during this and it took very little effort on my part.

  35. #155
    Senior Member ehansen007's Avatar
    Join Date
    Mar 2011
    Location
    Aliso Viejo, CA
    Posts
    1,625
    Post Thanks / Like
    That is great to hear! Good for you man. I can only imagine getting your kit after two years of waiting only to find out it's damage! . It happens though and it's great to hear they are backing it up. Doesn't surprise me either.

  36. #156
    Senior Member
    Join Date
    Feb 2011
    Posts
    607
    Post Thanks / Like
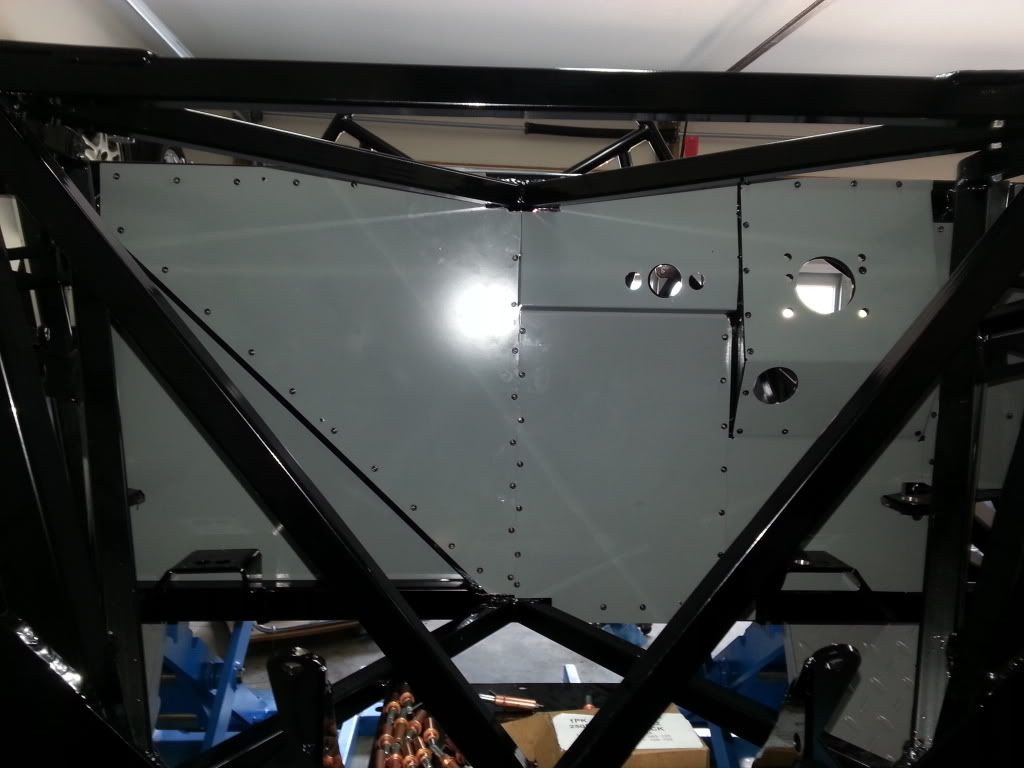
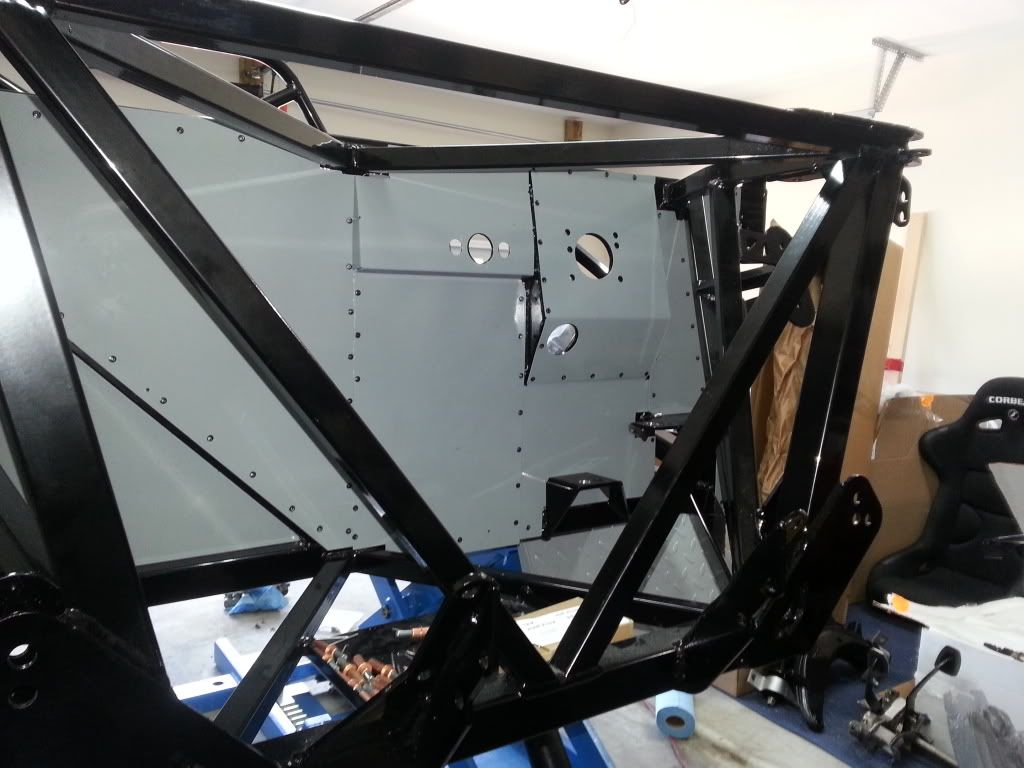
    Front firewall sealed & riveted:


  37. #157
    Mechie3's Avatar
    Join Date
    May 2012
    Location
    Indianapolis
    Posts
    5,174
    Post Thanks / Like
    Does your panel for the clutch cylinder sit flush? Mine is 1/2" off even with the sides all bottomed out.
    Zero Decibel Motorsports
    Check out my new website!
    www.zerodecibelmotorsports.com
    www.facebook.com/zero.decibel.motorsports

  38. #158
    Senior Member RM1SepEx's Avatar
    Join Date
    Jul 2011
    Location
    Freeport, ME
    Posts
    3,801
    Post Thanks / Like
    what do you mean "sit flush"? mine looks just like gun's only in black
    Dan

    818S #17 Picked up 8/1/13 First start 11/1/13 Go Kart 3/28/14

  39. #159
    818 builder metalmaker12's Avatar
    Join Date
    Mar 2012
    Location
    Exeter R.I
    Posts
    2,834
    Post Thanks / Like
    Blog Entries
    1
    Mechie mine was off as well, actually put my spacers, one on inside, one on outside

    Btw guns, really like it bro!! Nice

  40. #160
    Senior Member
    Join Date
    Feb 2011
    Posts
    607
    Post Thanks / Like
    Quote Originally Posted by Mechie3 View Post
    Does your panel for the clutch cylinder sit flush? Mine is 1/2" off even with the sides all bottomed out.
    No, but this is mostly caused by user error. I messed up the panel that the clutch MC bolts through and the one to the left of it as you are looking at it. I drilled these before I had the manual and thought that the clutch panel had to overlap the flange on the panel next to it. It's actually suppose just line up next to it. I noticed this after I drilled and figured it wasn't a big enough deal to justify drilling more holes. I test fit the clutch MC and it still fits fine and you won't notice it when it's all bolted together.

    I actually thought mine was not able to be centered, but I was able to finagle the panels enough to get it to line up, but this was after I had drilled.

    RM, by flush he means having the panels centered over the chassis holes.

Page 4 of 11 FirstFirst ... 23456 ... LastLast

Posting Permissions

  • You may not post new threads
  • You may not post replies
  • You may not post attachments
  • You may not edit your posts
  •  

Martin's Dent and Collision Shop

Visit our community sponsor