Visit our community sponsor
It was keeping me warm too Sunday!
and Monday
and some week before that
and some time before that
and the steaks I made
and the fish I grilled
and the shrimp and...
I've had that tank since mid summer last year? I don't remember. I'm not worried about it. It was more of a "oh...uh...well, this might get cold". HA!
Zero Decibel Motorsports
Check out my new website!
www.zerodecibelmotorsports.com
www.facebook.com/zero.decibel.motorsports
So, I may have lied. I didn't do another paper test fit. Decided to jump right in with an aluminum piece. We have so much of this anodized aluminum sitting around that I could make parts all day and still have stuff left over. I programmed it wrong on the slide portion, so the end ended up being an open tuning fork. It's supposed to be a 1/2 depth cut so another piece can key into it and slide back/forth so I can perfect the location of that second piece. Once that's done, it'll still key in, but the bolts will have through holes, not slots, not mate with. The three bolts holes lined up perfectly (one not shown, forgot it at work).
Zero Decibel Motorsports
Check out my new website!
www.zerodecibelmotorsports.com
www.facebook.com/zero.decibel.motorsports
Looks good for a prototype. What other custom pieces are you considering making?
Billet heads.
Not really. Things I have planned/ideas for:
Titanium shift knob
Titanium alternator pulley (like an idiot, I dropped my alternator and bent the steel pulley)
Aluminum radiator mounts (stock ones damaged in wreck)
CNC my logo/"team" name on the trans block off plate
Mount for the Y block and FPR on the front of the manifold
Mount to put the coolant header tank on the 818 frame (similar to the mount I did for my WRX putting the header tank on the strut tower)
Mount for a Subaru S202 wing blade
Other stuff as I get ideas.
Zero Decibel Motorsports
Check out my new website!
www.zerodecibelmotorsports.com
www.facebook.com/zero.decibel.motorsports
Looks good! Always feels nice when everything lines up... makes me think if someone had a CAD model, or at least the major mounting points it would be really nice for designing some of the accessory brackets. Who has a stripped down longblock and a 3d scanner? Heh.
I have a few CAD models on www.3dcontentcentral.com. They're all free for download. Not all will be useful, but they include:
-8AN and -6AN fuel fittings
Aeromotive FPR
Subaru Ball Joint
Plastic coolant header tank
Fuel Y block
I could make a model of the 3 mounting points and put that on there too.
Zero Decibel Motorsports
Check out my new website!
www.zerodecibelmotorsports.com
www.facebook.com/zero.decibel.motorsports
nice... I see your fittings bit not the Subaru parts.
http://www.3dcontentcentral.com/Cont...aspx?id=224424
Last edited by longislandwrx; 03-07-2013 at 10:07 AM.
A well stocked beverage fridge is the key to any successful project.
On the left, above the CAD models, it says in bold "Contributions". Go to the right, and in small letters it says "view all contributions". Then, go to page 2 of the models I've made.
Alternatively, if you search "subaru" all three models that show up in the entire database are mine.
http://www.3dcontentcentral.com/cont...tentType=Model
I'll typically upload OEM stuff I've modeled, but not things I design myself. It's nice when you can find off the shelf parts modeled by someone else, but I'm not going to give away the particulars of my specific designs (with some exceptions, like the cam seal install tool).
Zero Decibel Motorsports
Check out my new website!
www.zerodecibelmotorsports.com
www.facebook.com/zero.decibel.motorsports
Time for some bad cell phone shots.
Made another part of the mount yesterday. Didn't get to do much though because of volleyball. This piece goes between the mounting ears of the alternator then will bolt to that plate I cnc'd. A third piece will hold up the other side eventually.
Zero Decibel Motorsports
Check out my new website!
www.zerodecibelmotorsports.com
www.facebook.com/zero.decibel.motorsports
Didn't get much done Friday or Saturday. Friday I spend machining parts for an F500. Saturday I spent most of my time at the Indycar Factory for Indy Cars and Coffee. I did make some spacers, buy some bolts, and make a plate to bolt the two halves of the mount together. From here I can take measurements for the final part I need and made adjustments to the first two parts for the final design. It's self supporting enough to take a picture now without holding onto it.
Zero Decibel Motorsports
Check out my new website!
www.zerodecibelmotorsports.com
www.facebook.com/zero.decibel.motorsports
When you selling them lol, cool idea
I could sell some when I have the final design. I borrowed the main idea from Carl Davey (think that's his name). He had a similar design a few years back but don't think he's made any in recent years.
Zero Decibel Motorsports
Check out my new website!
www.zerodecibelmotorsports.com
www.facebook.com/zero.decibel.motorsports
Made the adjuster today and ordered some rod ends and a left hand tap. One side will have a right hand thread, the other side a left, so it works like a turnbuckle to tension the belt. Ends are tapered for looks, knurling to hand tighten it quickly, then flats for a 19mm wrench in the middle for final tightening.
Zero Decibel Motorsports
Check out my new website!
www.zerodecibelmotorsports.com
www.facebook.com/zero.decibel.motorsports
very cool, round the edges of that tuning fork though.. or install a bucket underneath... free blood donation.
A well stocked beverage fridge is the key to any successful project.
The tuning fork is a mistake. lol. I haven't changed it because I'm going to mock up the entire thing, then make changes to the CAD model, then remachine a new setup.
Zero Decibel Motorsports
Check out my new website!
www.zerodecibelmotorsports.com
www.facebook.com/zero.decibel.motorsports
I'm definitely in line if you decide to make more and sell them.
Aluminum bit might have ended up a little long (I did make it .125" over the length I designed it just in case, I can always go smaller) but it works. Just want the alternator as low as possible for fuel rail routing but currently have no where to put the lock nuts. Overall, it works beautifully. Center distance from crank pulley to alternator pulley is adjustable from 8" to 9", give or take. Raising it is as easy as spinning the center. Need to cut down some bolts to fit perfectly. They don't make shoulder bolts with an M10x1.25 thread so I bought some extra long bolts so that they had an unthreaded section to ride in the rod end. For the end that attaches to the alternator I either need to make a sleeve, or turn down a bolt and put an M8 thread (I think) on the end.
Zero Decibel Motorsports
Check out my new website!
www.zerodecibelmotorsports.com
www.facebook.com/zero.decibel.motorsports
I see in your future.... a new alternator pulley.
A well stocked beverage fridge is the key to any successful project.
Yup. Going to make one out of titanium or aluminum. Like an idiot, I thought it would sit on the motor for 10 seconds while I grabbed a wrench and it fell off a few weeks ago, landed pulley side down. The best part? It didn't cut through the epoxy on the floor.
Zero Decibel Motorsports
Check out my new website!
www.zerodecibelmotorsports.com
www.facebook.com/zero.decibel.motorsports
Haven't updated this in 3 months since I've been busy with other projects. Designed a mount to put my y block and FPR both on the center of the intake manifold. The alternator was moved to the driver side to make room. Now both the feed and return lines will be equal left to right. You can see it, but there are two bolts that go into the bottom of the back side of the FPR as well as the ring mount. These previously stripped out, thus the reason for reinforcing the mounting with the ring.
Zero Decibel Motorsports
Check out my new website!
www.zerodecibelmotorsports.com
www.facebook.com/zero.decibel.motorsports
Nice! i'll be following your build closely. nice to know there will be at least a few 818's in the Indy area to maybe check out someday. Keep up the good work.
PS, props on rocking the IMS flag in the garage.
IMAG0118.jpg
Nice work
FPS=...? Fuel Pressure Regulator??
I have 4 indy flags currently: 2009-2011 cententiall era, 2012, and 2013 race flags plus the IMS flag. One flag to cover each time I've been to the race since I moved here in 2009. I didn't know you were in Indy. There's another fellow (wildolive IIRC) on the North side with a early early July delivery.
errr.... The only FPS I see on this page is yours. 
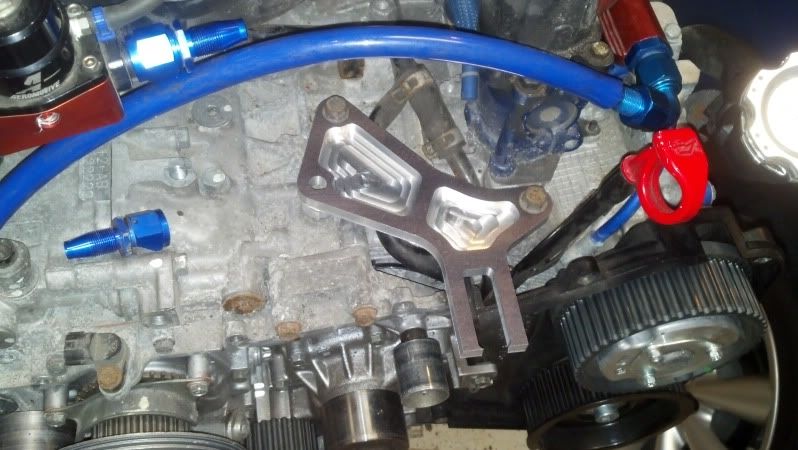
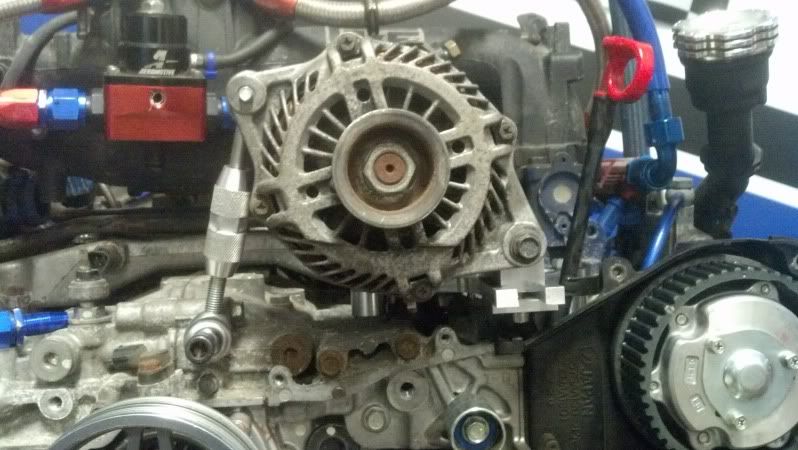
It wouldn't be beyond me to mispell something dumb like that though. It is indeed a fuel pressure regulator (blac/red) and a Y block (blue). The top will feed the back side of the fuel rails, the return is through theh front of the rails.
Zero Decibel Motorsports
Check out my new website!
www.zerodecibelmotorsports.com
www.facebook.com/zero.decibel.motorsports
Found a replacement pulley on NASIOC for the steel one I dented. It's a little bit lighter (whoopty doo!, lol) and the circumference is 25% longer, so it spins 25% slower. Hopefully it's not an issue. It was only $27 shipped used, so I couldn't argue with that. Faster than making my own and cheaper than buying a used steel one.
Zero Decibel Motorsports
Check out my new website!
www.zerodecibelmotorsports.com
www.facebook.com/zero.decibel.motorsports
Zero Decibel Motorsports
Check out my new website!
www.zerodecibelmotorsports.com
www.facebook.com/zero.decibel.motorsports
Nice... do you plan to make more?
how-much.jpg
I did made one extra, though the threads might be messed up. I make these at work and making parts for profit on their machines is a bit of a no no. Though, sometimes I make parts for myself that I don't end up needing.
Zero Decibel Motorsports
Check out my new website!
www.zerodecibelmotorsports.com
www.facebook.com/zero.decibel.motorsports
In a perfect world Mechie3 would live next door to me!
818S/C : Chassis #25 with 06 WRX 2.5 turbo, ABS, cruise, PS, A/C, Apple CarPlay, rear camera, power windows & locks, leather & other complexities. Sold 10/19 with 5,800 miles.
Mk3 Roadster #6228 4.6L, T45, IRS, PS, PB, ABS, Cruise, Koni's, 17" Halibrands, red w/ silver - 9K miles then sold @ Barrett-Jackson Jan 2011 (got back cash spent).
Zero Decibel Motorsports
Check out my new website!
www.zerodecibelmotorsports.com
www.facebook.com/zero.decibel.motorsports
Zero Decibel Motorsports
Check out my new website!
www.zerodecibelmotorsports.com
www.facebook.com/zero.decibel.motorsports
It's mostly done. Still need to put my 818 logo on the top and chamfer the bottom of the cap so it doesn't look so square. Not sure I'm 100% satisfied. It works, but it's a little tight. Might need to change the ID some more, but I might change from a radial seal to an axial seal. An axial seal would have no resistance until it sealed. The radial seal has drag from the momen it engages until you stop tightening.
Zero Decibel Motorsports
Check out my new website!
www.zerodecibelmotorsports.com
www.facebook.com/zero.decibel.motorsports
Nice work man, so when you shipping mine??
I redesigned it last night, so I'll prototype that one this week. I'm having a local shop quote it for me to see if it's worth trying to make or just give away the drawings to others. I can't really make parts for profit at work.
Started on the engine wiring harness. Removed all the wires for the PS pump, air pump and valves, and the evap solenoid. Extended three wires so that all of the engine to main harness connectors are together on one side. In the stock config, two large connectors are on the driver side, and two medium ones on the passenger side. They're all on the driver side now. I ran out of tape, and have to leave for a get together, but I started to bundle an rewrap it. Most connectors and wires will be hidden.
Got the rear timing belt covers and timing belt on, but on the front middle cover. The dealership gave me the wrong bolts for the front side covers, so I'll have to source some other ones.
Zero Decibel Motorsports
Check out my new website!
www.zerodecibelmotorsports.com
www.facebook.com/zero.decibel.motorsports