Very Cool Parts

Visit our community sponsor

Thanks Thanks:  0
Likes Likes:  0
Page 3 of 6 FirstFirst 12345 ... LastLast
Results 81 to 120 of 201

Thread: What did you do to, about or for your coupe today?

  1. #81
    Senior Member HCP 65 COUPE's Avatar
    Join Date
    Mar 2012
    Location
    NORTH CENTRAL CT
    Posts
    145
    Post Thanks / Like
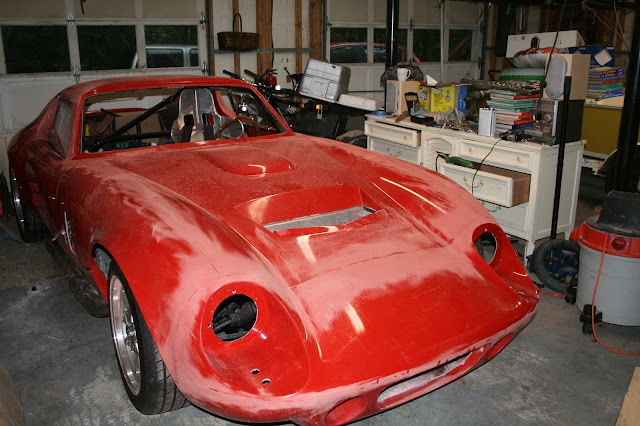
    Thx Guys means alot coming from you folks. QSL thats a good one The air box's are just so it's easy for a cold air setup and they look differant than most anything else. I'll post some more pics when she's in the car, I'm going to try to drop it in saturday or sunday have a little engine bay prep work left before I do tho.
    Last edited by HCP 65 COUPE; 08-03-2013 at 10:29 AM.

  2. #82
    Senior Member QSL's Avatar
    Join Date
    Nov 2011
    Location
    CORONA, CA
    Posts
    700
    Post Thanks / Like
    Oh, I can see the benefit. It looks good too. Wish I had something like that when I had to do smog. Would have made my life a lot easier. Cant wait to see her mounted!
    MK4 delivery 12/17/11
    Build thread: HERE
    Epic First start video HERE

    Type 65 Coupe Ordered 01/17/13
    Build thread: HERE

  3. #83
    Senior Member HCP 65 COUPE's Avatar
    Join Date
    Mar 2012
    Location
    NORTH CENTRAL CT
    Posts
    145
    Post Thanks / Like
    Spent all weekend preping the engine bay and playing with my bell housing and clutch setup
    I had to machine custom offset dowels to get the bell housing to indicate better than .005 and the .007 Lakewood dowels didn't get it done plus the .014 dowels where to much, I had to machine them @ .010 to get it within .001 it took all day Saturday monking with it but at least it's right.

    So Sunday I started setting up the clutch linkage mounted the bell and clutch fork and I go to the hardware Bag for the pivot ball nada not there never was, wish quick time said it didn't come with it (both summit and quicktimes descripton said it did) cause trying to find one that would work took all day grrrr. Ended up buying a stock one at mustangs unlimited and I tried to shorten it but could not get it short enough grrr. This morning I started over and machined one from a 1.25 long grade 8 flange bolt worked like a charm.

    I spent the rest of the day bolting down the tranny and Headers, then droping her in the bay. It was a little tricky with the headers on but she did go after I looseed the motor mounts up and got them to wiggle around a bit. The FMS Z head 3/4 primary shorty's fit really nice with about 1/4 to spare on driver side footbox. All in all she went together rough but it fits optimally and that is what I like tough install but worth the extra pita. It would not have been so bad if quick time sent the pivot ball with the bell housing and they made dowels with closer offsets, .007 between sizes is just to much to get it right. .0035x2 is .007 T.I.R. just to much for my comfort zone.

    I'll add pics later can't get this stupid phone to add them right now.

    The pics came out a little dark the lights in my garage could use an upgrade.

    ENGINE INSTALLED 004.JPG

    ENGINE INSTALLED 005.JPG

    ENGINE INSTALLED 006.JPG

    ENGINE INSTALLED 007.JPG
    Last edited by HCP 65 COUPE; 08-06-2013 at 10:53 AM.

  4. #84
    Senior Member HCP 65 COUPE's Avatar
    Join Date
    Mar 2012
    Location
    NORTH CENTRAL CT
    Posts
    145
    Post Thanks / Like

    Coupe Under Car Exhaust

    This week I fabricated my under car exhaust out of 304 stainless mandrel bends and some magna flow 2 1/2in round glass packs. Here's some pic's.

    UNDER CAR EXHAUST 001.JPG

    UNDER CAR EXHAUST 002.JPG

    UNDER CAR EXHAUST 003.JPG

    UNDER CAR EXHAUST 004.JPG

    UNDER CAR EXHAUST 006.JPG The 4 link Mouse Ears are going to get cut off when every thing goes to ceramic coating.

    UNDER CAR EXHAUST 007.JPG For those that want to know the mufflers are the shortest round glass pack Magna flow makes but I could have used 26-28in overall length ones, Im starting to think I should have.

    UNDER CAR EXHAUST 008.JPG

    x over post weld 001.JPG This is the X-over after my welder fully tig welded it, man that guy has some major talent.
    Last edited by HCP 65 COUPE; 08-10-2013 at 12:46 PM.

  5. #85
    Senior Member QSL's Avatar
    Join Date
    Nov 2011
    Location
    CORONA, CA
    Posts
    700
    Post Thanks / Like
    interested to see the outlet... are you worried about the mufflers being over the tank? Looks pretty cool.
    MK4 delivery 12/17/11
    Build thread: HERE
    Epic First start video HERE

    Type 65 Coupe Ordered 01/17/13
    Build thread: HERE

  6. #86
    Senior Member HCP 65 COUPE's Avatar
    Join Date
    Mar 2012
    Location
    NORTH CENTRAL CT
    Posts
    145
    Post Thanks / Like
    QSL,

    Im planing on making some sort of heat shield under the mufflers and covering it with heat reflecting material and the fuel tank is a stealth sumped tank from Glens Performace so it has an external pump and pickup in the front of the tank, it has no line's coming out of the top, the return is still in the hump but is still a good distance away from the muffler. As far as the outlet goes I was thinking I would make a removable aluminum oval plate for the rear of the car and maybe have some louvers cut in the space between the tip's kinda like the GT-40. Or maybe just 2 round disk's, not sure yet. Btw your dash looks killer makes me want to do something similar but i dont have the metal skills, have been thinking about retrofiting a dash from a 66 mustang, parts are cheap and easy to get and its a 60's style vintage look like the one you guys built, probably would be something Mr ####by whould have done if they ever made a street version.
    Last edited by HCP 65 COUPE; 08-12-2013 at 01:17 PM.

  7. #87
    Senior Member QSL's Avatar
    Join Date
    Nov 2011
    Location
    CORONA, CA
    Posts
    700
    Post Thanks / Like
    I like the GT40 idea. Also the dash idea. I had actually thought of doing something similar. I think it could look really killer. Worth a shot.
    MK4 delivery 12/17/11
    Build thread: HERE
    Epic First start video HERE

    Type 65 Coupe Ordered 01/17/13
    Build thread: HERE

  8. #88
    Senior Member
    Join Date
    Feb 2011
    Location
    Cumming, GA
    Posts
    232
    Post Thanks / Like
    Finished the body cutouts, installed the headlight buckets and turn signals, installed the side windows and cut a wedge out of the bottom of the bonnet and glassed it back in place.


  9. #89
    Senior Member
    Join Date
    Feb 2011
    Location
    Cumming, GA
    Posts
    232
    Post Thanks / Like
    Sanded down the body mold seams. Highs and lows between the panels become really apparent at this stage. I discovered I have a new favorite tool


  10. #90
    FFR Rookie Craftsman
    Join Date
    Jul 2011
    Location
    Bugtussell, AR
    Posts
    37
    Post Thanks / Like
    Howdy,

    I decided that the old body buck, which I threw together with a few scrap 2x4s just so the cab wasn't sitting on the ground, wasn't cutting it anymore and was about to fall apart, so I built a new one.

    Cab section sitting on old buck:


    I used 8 2x4s and a couple of boards from the old buck. I need to add a set of wheels on the tail end so I can move it around easier. Maybe a couple of "X" braces too.

    Cab section sitting on new buck:


    Now it's time to start sanding, again.

    Paul
    FFR 4859GT 414W (stroked 351W, 4.0" stroke, 4.060" bore). Tremec TKO 5spd. IRS w/3.55 and Torsen diff. 13" dual-piston front disc brakes (Mustang Cxxxra parts), 12" rear disc brakes (Corvette parts). 2003 Mustang Coxxa wheels, 275/40 front, 315/35 rear.

    Possibly the only person in the world that is currently building a Spyder GT.

  11. #91
    Senior Member snakebit31's Avatar
    Join Date
    Feb 2011
    Location
    Virginia Beach, VA
    Posts
    168
    Post Thanks / Like
    Blog Entries
    1
    I spent the weekend insulating the rear hatch area and taping the seams with aluminum tape, no holes or leaks. Also started sanding the body after the latest coat of Slick Sand.


    Rob

  12. #92
    Senior Member
    Join Date
    Feb 2011
    Location
    Cumming, GA
    Posts
    232
    Post Thanks / Like
    Test fit the hatch glass and measured out the location for the rear spoiler. Even the wife is getting excited at this point.


  13. #93
    Senior Member turbonut48's Avatar
    Join Date
    Feb 2011
    Location
    Milwaukee, Wi.
    Posts
    142
    Post Thanks / Like
    Its always nice to have an excited wife.

    The Nut

  14. #94
    Senior Member xlr8or's Avatar
    Join Date
    Feb 2011
    Location
    San Diego CA
    Posts
    316
    Post Thanks / Like
    Just freaking WOW!

    Just stunning execution.
    It's never too early to start beefing up your obituary.

  15. #95
    Senior Member GThompson's Avatar
    Join Date
    Feb 2011
    Location
    Spencerport, NY
    Posts
    115
    Post Thanks / Like
    First start last night, pretty exciting! I took a video but am having trouble posting to photobucket. It ran better than I had expected it to (this is the 1st engine I've completely assembled, was REALLY nervous about starting it). Then, technically, 1st go-kart as I drove it back into the barn.
    George T

    Type 65 Coupe #338, Picked Up 4-Aug-07, Roller on 8-Mar-09, 1st start 8-Sep-13, 1st Autocross 7-Oct-18, finished sanding & sprayed paint myself 6-Nov-21, IRS/LCA/Koni/traditional gages/Kirkey/pin-drive rear width/15" Torq-Thrust Ds/44IDFs/Brodix ST5.0R heads/Eagle internal-balance crankshaft/oil pan by Armando/home-made turkey pan/S-10 mid-shift T5

  16. #96
    Senior Member John Dol's Avatar
    Join Date
    Feb 2011
    Location
    Gorham, ME
    Posts
    1,522
    Post Thanks / Like
    All great progress guys!!
    George you have to be stoked with all those accomplishments. Hope to be in your shoes by the end of next week. If you have a you tube account it might be easier to post the video.

    John
    Finished the "My Coupe, my way" project.

    http://s956.photobucket.com/albums/ae46/jdcoupe1969/
    Coupe #386,17" Team III 245 FR 315 RR, 3-link, T5, 4 wheel disk, power brakes/steering. Sniper EFI
    First start Sept. 18 2013 First go kart Sept 19 2013

  17. #97
    Junior Member EEP's Avatar
    Join Date
    Jun 2013
    Location
    Windsor Ontario
    Posts
    26
    Post Thanks / Like
    I ordered and Paid for my Coupe today

  18. #98
    Senior Member
    Join Date
    Feb 2011
    Location
    Myrtle Beach, SC
    Posts
    2,108
    Post Thanks / Like
    EEP-

    Congratulations! How exciting to have that done. Now comes the hard part; waiting......

    Best of luck with your build, and please keep us updated!!

    Regards,

    Steve

  19. #99
    Senior Member GThompson's Avatar
    Join Date
    Feb 2011
    Location
    Spencerport, NY
    Posts
    115
    Post Thanks / Like
    I started a youtube account. Here's the link to my 1st start video: http://youtu.be/kZwlBD2Qquc. That popping noise goes away after ~10 sec. My synchrometer should be in my mailbox so I'll synch the Webers this weekend and go-kart it after. I can't wait!

    Quick update: OMG, this thing is a MONSTER!!! I just finished the first synch and it ROARS!!!! The right rear cylinder isn't getting enough fuel at idle so I'll pull that carb off tomorrow and fix it but, WOW, it's going to be FAST!!! I really can't believe I put this thing together!! My first engine and she's a runner! I'll put up another video tomorrow.
    Last edited by GThompson; 09-13-2013 at 09:32 PM.
    George T

    Type 65 Coupe #338, Picked Up 4-Aug-07, Roller on 8-Mar-09, 1st start 8-Sep-13, 1st Autocross 7-Oct-18, finished sanding & sprayed paint myself 6-Nov-21, IRS/LCA/Koni/traditional gages/Kirkey/pin-drive rear width/15" Torq-Thrust Ds/44IDFs/Brodix ST5.0R heads/Eagle internal-balance crankshaft/oil pan by Armando/home-made turkey pan/S-10 mid-shift T5

  20. #100
    Senior Member John Dol's Avatar
    Join Date
    Feb 2011
    Location
    Gorham, ME
    Posts
    1,522
    Post Thanks / Like
    Great stuff George hoping to be right behind you next week.
    Gathered some last minute parts over the last week in order to be ready for Mark to come on Monday. Could have saved a lot on shipping if my brain could recognize I needed several parts from the same place. Oh well the parts are, here and ready to go when we need them. I bought the throttle bracket, air cleaner, fog lights and the RT turn signal. My enthusiasm is rising and by Monday should be brimming over!

    John
    Finished the "My Coupe, my way" project.

    http://s956.photobucket.com/albums/ae46/jdcoupe1969/
    Coupe #386,17" Team III 245 FR 315 RR, 3-link, T5, 4 wheel disk, power brakes/steering. Sniper EFI
    First start Sept. 18 2013 First go kart Sept 19 2013

  21. #101
    Senior Member Rodster's Avatar
    Join Date
    Nov 2011
    Location
    Orange County, CA
    Posts
    280
    Post Thanks / Like

    Cockpit aluminum. Question.

    Did some more sheet metal work. Here's a question - On the outer rear wall, is the panel supposed to smash tight against the small square tubing? I have a considerable amount of space between the back of the aluminum piece and that tube. Looks like this, I can stick my fingers inside so it must be about an inch or so of air.

    Here's a picture:

    kh6wz - type 65 coupe 008.JPG

    More details are on my WordPress site: http://wayneyoshida-kh6wz.com/2013/0...uminum-chores/

    Any suggestions? Nothing is riveted yet, just cleco-ed - so if I have to start over, I have to start over. Arg. Or maybe make new panels like everyone else had to do?

    Pictures would be helpful.

    Thanks,
    wayne
    Ordered Type 65 Complete Kit Aug 29, 2012 - The 50-50 $ale!
    Standard Width IRS; Halibrands - 17x9, 17x10.5
    Kit Arrived: Oct 9, 2012; Build Started: Oct 28, 2012
    WordPress: http://wayne-yoshida-kh6wz.com/
    LinkedIn: www.linkedin.com/in/waynetyoshida
    YouTube: http://www.youtube.com/user/kh6wz?feature=results_main

  22. #102
    Senior Member
    Join Date
    Feb 2011
    Location
    Gorham, ME
    Posts
    253
    Post Thanks / Like
    Not to worry, mine is the same. You've got enough support at the bottom where it rivts to the rear floorboard lip, at the sides where it rivets to the rear bhd and the side sill and at the top where it rivets to the cross bar. You're all set. Some guys will cover this later with a splash panel that hides the open sill chamber.
    Bill

    Coupe #421, Picked Up 11/15/08, started 1/1/09 - Rebuilt mildly massaged 302, T5, 3 Link, and Loads of Extras

  23. #103
    Senior Member Fluge's Avatar
    Join Date
    Mar 2011
    Location
    Ontario
    Posts
    260
    Post Thanks / Like
    Hi Wayne

    This was a tough area to get a perfect fit. I also have a slight gap between the back aluminum and the vertical frame. I can't tell where you picture was taken from. There have also been posts describing different ways to place the aluminum in terms of what pieces go first...ie. small lip on the inside or outside of cockpit. In the end I think it is personal preference and depends on the finish you are looking for and whether you will be covering with carpet or not.

  24. #104
    Senior Member
    Join Date
    Feb 2011
    Location
    Cumming, GA
    Posts
    232
    Post Thanks / Like
    Quote Originally Posted by Rodster View Post
    Did some more sheet metal work. Here's a question - On the outer rear wall, is the panel supposed to smash tight against the small square tubing? I have a considerable amount of space between the back of the aluminum piece and that tube. Looks like this, I can stick my fingers inside so it must be about an inch or so of air.

    Here's a picture:

    kh6wz - type 65 coupe 008.JPG

    More details are on my WordPress site: http://wayneyoshida-kh6wz.com/2013/0...uminum-chores/

    Any suggestions? Nothing is riveted yet, just cleco-ed - so if I have to start over, I have to start over. Arg. Or maybe make new panels like everyone else had to do?

    Pictures would be helpful.

    Thanks,
    wayne
    Does this show what you need? I had to persuade mine with a rubber mallet


  25. #105
    Senior Member Fluge's Avatar
    Join Date
    Mar 2011
    Location
    Ontario
    Posts
    260
    Post Thanks / Like
    Hi Wayne

    I think I know where you are taking about now and yes I also have a gap there but just along the back half of the 1" tube. i was able to get rivets into the tube in the front half. The edges of those panels are all riveted in place so I'm not worried. I know others have made new panels for that spot but I got mine to fit nicely.

    Marc
    It's just A Matter Of Time

    Marc

    FFR Coupe 434, 347ci, Power Brakes, SAI Mod, 3 link rear

  26. #106
    Senior Member Fluge's Avatar
    Join Date
    Mar 2011
    Location
    Ontario
    Posts
    260
    Post Thanks / Like
    Getting a front alignment done today
    It's just A Matter Of Time

    Marc

    FFR Coupe 434, 347ci, Power Brakes, SAI Mod, 3 link rear

  27. #107
    Senior Member Rodster's Avatar
    Join Date
    Nov 2011
    Location
    Orange County, CA
    Posts
    280
    Post Thanks / Like

    Those interior panels - thanks!

    Thanks everyone for the comments on the cockpit aluminum. I think it will be OK as-is. I may add some spacers and screws, but as others have said there's a lot of rivets in there. And yes - I will be adding insulation over everything (Cool-It) and carpet.
    Ordered Type 65 Complete Kit Aug 29, 2012 - The 50-50 $ale!
    Standard Width IRS; Halibrands - 17x9, 17x10.5
    Kit Arrived: Oct 9, 2012; Build Started: Oct 28, 2012
    WordPress: http://wayne-yoshida-kh6wz.com/
    LinkedIn: www.linkedin.com/in/waynetyoshida
    YouTube: http://www.youtube.com/user/kh6wz?feature=results_main

  28. #108
    Senior Member Rodster's Avatar
    Join Date
    Nov 2011
    Location
    Orange County, CA
    Posts
    280
    Post Thanks / Like
    George - Just saw your video - Great job - what's the finish on your exhaust? Ceramic?

    -wayne


    Quote Originally Posted by GThompson View Post
    I started a youtube account. Here's the link to my 1st start video: http://youtu.be/kZwlBD2Qquc. That popping noise goes away after ~10 sec. My synchrometer should be in my mailbox so I'll synch the Webers this weekend and go-kart it after. I can't wait!

    Quick update: OMG, this thing is a MONSTER!!! I just finished the first synch and it ROARS!!!! The right rear cylinder isn't getting enough fuel at idle so I'll pull that carb off tomorrow and fix it but, WOW, it's going to be FAST!!! I really can't believe I put this thing together!! My first engine and she's a runner! I'll put up another video tomorrow.
    Ordered Type 65 Complete Kit Aug 29, 2012 - The 50-50 $ale!
    Standard Width IRS; Halibrands - 17x9, 17x10.5
    Kit Arrived: Oct 9, 2012; Build Started: Oct 28, 2012
    WordPress: http://wayne-yoshida-kh6wz.com/
    LinkedIn: www.linkedin.com/in/waynetyoshida
    YouTube: http://www.youtube.com/user/kh6wz?feature=results_main

  29. #109
    Senior Member John Dol's Avatar
    Join Date
    Feb 2011
    Location
    Gorham, ME
    Posts
    1,522
    Post Thanks / Like
    Mounted the gas struts for the hood.

    John
    Finished the "My Coupe, my way" project.

    http://s956.photobucket.com/albums/ae46/jdcoupe1969/
    Coupe #386,17" Team III 245 FR 315 RR, 3-link, T5, 4 wheel disk, power brakes/steering. Sniper EFI
    First start Sept. 18 2013 First go kart Sept 19 2013

  30. #110
    Senior Member
    Join Date
    Feb 2011
    Location
    Cumming, GA
    Posts
    232
    Post Thanks / Like
    Wet sanded the whole body

  31. #111
    Senior Member John Dol's Avatar
    Join Date
    Feb 2011
    Location
    Gorham, ME
    Posts
    1,522
    Post Thanks / Like
    Laid the rear glass with hard ware in the opening. Next will be connecting the hard ware to the chassis.

    John
    Finished the "My Coupe, my way" project.

    http://s956.photobucket.com/albums/ae46/jdcoupe1969/
    Coupe #386,17" Team III 245 FR 315 RR, 3-link, T5, 4 wheel disk, power brakes/steering. Sniper EFI
    First start Sept. 18 2013 First go kart Sept 19 2013

  32. #112
    Senior Member John Dol's Avatar
    Join Date
    Feb 2011
    Location
    Gorham, ME
    Posts
    1,522
    Post Thanks / Like
    Installed the glass rear hatch


    Also put on the hood shocks the other day. Used a piece of aluminum that I formed to fit the wafer board for support.


    John
    Finished the "My Coupe, my way" project.

    http://s956.photobucket.com/albums/ae46/jdcoupe1969/
    Coupe #386,17" Team III 245 FR 315 RR, 3-link, T5, 4 wheel disk, power brakes/steering. Sniper EFI
    First start Sept. 18 2013 First go kart Sept 19 2013

  33. #113
    Senior Member Rodster's Avatar
    Join Date
    Nov 2011
    Location
    Orange County, CA
    Posts
    280
    Post Thanks / Like
    HCP 65 Coupe -
    That is an amazing looking engine - it deserves an entire article all by itself! Keep on posting!
    -wayne
    Ordered Type 65 Complete Kit Aug 29, 2012 - The 50-50 $ale!
    Standard Width IRS; Halibrands - 17x9, 17x10.5
    Kit Arrived: Oct 9, 2012; Build Started: Oct 28, 2012
    WordPress: http://wayne-yoshida-kh6wz.com/
    LinkedIn: www.linkedin.com/in/waynetyoshida
    YouTube: http://www.youtube.com/user/kh6wz?feature=results_main

  34. #114
    Senior Member Rodster's Avatar
    Join Date
    Nov 2011
    Location
    Orange County, CA
    Posts
    280
    Post Thanks / Like

    FFMetal battery box for the Coupe

    Started work on getting the FFMetal Battery Box into the Coupe. Thanks to this and that forum, I figured it out. Here's some pictures....

    kh6wz-024-coupe-battery-box-13.jpg

    kh6wz-004-coupe-battery-box-3.jpg

    More details are posted on my WordPress site. . .
    Ordered Type 65 Complete Kit Aug 29, 2012 - The 50-50 $ale!
    Standard Width IRS; Halibrands - 17x9, 17x10.5
    Kit Arrived: Oct 9, 2012; Build Started: Oct 28, 2012
    WordPress: http://wayne-yoshida-kh6wz.com/
    LinkedIn: www.linkedin.com/in/waynetyoshida
    YouTube: http://www.youtube.com/user/kh6wz?feature=results_main

  35. #115
    Senior Member GThompson's Avatar
    Join Date
    Feb 2011
    Location
    Spencerport, NY
    Posts
    115
    Post Thanks / Like
    Quote Originally Posted by Rodster View Post
    George - Just saw your video - Great job - what's the finish on your exhaust? Ceramic?

    -wayne
    Thanks! No, I was impatient and didn't want to wait for coating the pipes so I painted them with Rustoleum high-temp paint (the kind with a barbeque grill on the can). I used one full can per side, will probably hit them with a little more just before I put them back on after the body's painted.
    George T

    Type 65 Coupe #338, Picked Up 4-Aug-07, Roller on 8-Mar-09, 1st start 8-Sep-13, 1st Autocross 7-Oct-18, finished sanding & sprayed paint myself 6-Nov-21, IRS/LCA/Koni/traditional gages/Kirkey/pin-drive rear width/15" Torq-Thrust Ds/44IDFs/Brodix ST5.0R heads/Eagle internal-balance crankshaft/oil pan by Armando/home-made turkey pan/S-10 mid-shift T5

  36. #116
    Junior Member psych's Avatar
    Join Date
    Jan 2013
    Posts
    20
    Post Thanks / Like

    Minor Diversion

    Had to take a few days off to paint the Mustang before the snow flies. Now, back to the coupe.
    Attached Images Attached Images

  37. #117
    Senior Member John Dol's Avatar
    Join Date
    Feb 2011
    Location
    Gorham, ME
    Posts
    1,522
    Post Thanks / Like
    Mustang looks Hot!!

    John
    Finished the "My Coupe, my way" project.

    http://s956.photobucket.com/albums/ae46/jdcoupe1969/
    Coupe #386,17" Team III 245 FR 315 RR, 3-link, T5, 4 wheel disk, power brakes/steering. Sniper EFI
    First start Sept. 18 2013 First go kart Sept 19 2013

  38. #118
    Senior Member Rodster's Avatar
    Join Date
    Nov 2011
    Location
    Orange County, CA
    Posts
    280
    Post Thanks / Like
    Quote Originally Posted by GThompson View Post
    Thanks! No, I was impatient and didn't want to wait for coating the pipes so I painted them with Rustoleum high-temp paint (the kind with a barbeque grill on the can). I used one full can per side, will probably hit them with a little more just before I put them back on after the body's painted.
    George -
    OK, looks great - I know that stuff - I used silver - on my firewall.
    Ordered Type 65 Complete Kit Aug 29, 2012 - The 50-50 $ale!
    Standard Width IRS; Halibrands - 17x9, 17x10.5
    Kit Arrived: Oct 9, 2012; Build Started: Oct 28, 2012
    WordPress: http://wayne-yoshida-kh6wz.com/
    LinkedIn: www.linkedin.com/in/waynetyoshida
    YouTube: http://www.youtube.com/user/kh6wz?feature=results_main

  39. #119
    Senior Member Rodster's Avatar
    Join Date
    Nov 2011
    Location
    Orange County, CA
    Posts
    280
    Post Thanks / Like

    Battery Box - painted and installed

    Ordered Type 65 Complete Kit Aug 29, 2012 - The 50-50 $ale!
    Standard Width IRS; Halibrands - 17x9, 17x10.5
    Kit Arrived: Oct 9, 2012; Build Started: Oct 28, 2012
    WordPress: http://wayne-yoshida-kh6wz.com/
    LinkedIn: www.linkedin.com/in/waynetyoshida
    YouTube: http://www.youtube.com/user/kh6wz?feature=results_main

  40. #120
    Senior Member
    Join Date
    Feb 2011
    Location
    Cumming, GA
    Posts
    232
    Post Thanks / Like
    Scuffed the entire car and began applying Rage Gold


Page 3 of 6 FirstFirst 12345 ... LastLast

Posting Permissions

  • You may not post new threads
  • You may not post replies
  • You may not post attachments
  • You may not edit your posts
  •  

Martin's Dent and Collision Shop

Visit our community sponsor