Very Cool Parts

Visit our community sponsor

Thanks Thanks:  5
Likes Likes:  2
Page 16 of 22 FirstFirst ... 61415161718 ... LastLast
Results 601 to 640 of 872

Thread: Carl's Mk 4 Roadster Build

  1. #601
    Boydster's Avatar
    Join Date
    Aug 2014
    Location
    Maryville, TN
    Posts
    1,104
    Post Thanks / Like
    Excellent. I think this will work better... more reliably... and more accurately. Sorry you got hurt.

  2. #602
    Senior Member
    Join Date
    Feb 2011
    Location
    Myrtle Beach, SC
    Posts
    2,108
    Post Thanks / Like
    Carl-
    I hope you are able to sue the heck out of that syncope fellow!! Hsly AHA

    Seriously hope you are well soon, and better than ever. So sorry to hear about your fall.

    I look forward to following your progress again very soon!

    Regards,

    Steve

  3. #603
    Senior Member DaleG's Avatar
    Join Date
    Mar 2013
    Location
    Prescott, AZ; formerly from the Bay Area
    Posts
    829
    Post Thanks / Like
    Don't rush the recovery.

    Cheers, Dale
    SOLD 03/2013: MK II #5004: 5.0 EFI: 8.8, 3.55, E303, TW heads, GT40 intake, 24#, 70mm MAF

    Ordered MK IV Coyote Complete Kit.

  4. #604
    Carl carlewms's Avatar
    Join Date
    May 2012
    Location
    Nokesville, VA
    Posts
    1,125
    Post Thanks / Like
    Folks,

    It has been a while ... too long since I have been here or for that matter in the garage working on the car ...

    With the various health issues behind me ...

    Insomnia struck again this morning ... or excitement on getting back in the "wrenching" mode. I got up around 3 am and headed out to the garage ...

    As previously discussed I needed to rearrange fittings to allow the heater inlet to come off the intake manifold before the t-stat.

    The heater inlet was originally downstream of the t-stat in a location on the t-stat housing:


    After considerable discussion I really needed to move it to the intake manifold so I found a fitting from Breeze Automotive that provided for the inlet to the heater and the ECT temperature sensor.

    Here is the new setup (with the spark plug wire disconnected at the dizzy for clarity).


    I still need to cleanup the yellow wire from the alternator to the voltmeter, drain and fill with 50% coolant/antifreeze mixture and then pressure test.

    It feels great to get back into the car ...

    Carl
    Mk 4 Roadster
    October 25, 2012 - Kit Arrives
    April 8, 2013 - Build Starts
    August 23, 2015 - Rolling Chassis/Engine & Transmission Installed
    March 26, 2016 - Go Cart

  5. #605
    Senior Member wareaglescott's Avatar
    Join Date
    Apr 2016
    Location
    Auburn, AL
    Posts
    2,146
    Post Thanks / Like
    Glad to hear those health issues are behind you and you are back at it!
    MK4 #8900 - complete kit - Coyote, TKO600, IRS - Delivered 6/28/16 First Start 10/6/16 Go cart - 10/16/16 Build completed - 4/26/17 - 302 days to build my 302 CI Coyote Cobra - Registered and street legal 5/17/17
    Build Thread http://thefactoryfiveforum.com/showt...e-build-thread
    PHIL 4:13 INSTAGRAM - @scottsrides

  6. #606
    Senior Member dallas_'s Avatar
    Join Date
    Feb 2011
    Location
    Dallas, TX
    Posts
    449
    Post Thanks / Like
    Blog Entries
    2
    Glad to see you back at it. Still on for TCC?
    FFR 7123 tilt front, Levy 5link/wilwoods/LCA's, webers.
    SL-C, LS3 525, Mendeola SDR5,

  7. #607
    Carl carlewms's Avatar
    Join Date
    May 2012
    Location
    Nokesville, VA
    Posts
    1,125
    Post Thanks / Like
    WarEagleScott and Dallas ... thanks ... it is good to be back with wrench in hand.

    Dallas ... yes but it will be in gelcoat ...

    Carl
    Mk 4 Roadster
    October 25, 2012 - Kit Arrives
    April 8, 2013 - Build Starts
    August 23, 2015 - Rolling Chassis/Engine & Transmission Installed
    March 26, 2016 - Go Cart

  8. #608
    Carl carlewms's Avatar
    Join Date
    May 2012
    Location
    Nokesville, VA
    Posts
    1,125
    Post Thanks / Like
    In preparations for the next fit up of the body ...

    I trimmed the aluminum and installed the seals that go on the aluminum and frame.

    As others have found ... During the first trial fit up the body was up very tight against the lower floor of the trunk not leaving any room for the bulb seal. Here is a photo prior to trimming ...


    For the first trial fit about 3/16" was trimmed off the panel including a small rear section of the DS vertical "wing".


    Note: For Apple users the camera has a neat application that comes with the operating system that allows you to insert a close up view (louver view) in a photo; it is great for showing details on a photo.

    The bulb seal goes on the trunk sides, the rear of the trunk lower floor and the firewall. Here is a photo showing the bulb seal installed.


    I wanted to keep these bulb seals as pliable as possible so after finding out that "plumber's grease" serves that purpose well, I picked up some of the slimy stuff (90% Silicone) and applied it to the bulb seal. Here is a comparison on a part of the seal.


    In addition to the bulb seal there is weatherstripping attached to the trunk hoop and the 3/4" square tubes going down each side of the engine compartment (in some cases the white protective tape has not been removed yet.

    Trunk Hoop:


    3/4" Square Tube:


    The weatherstripping was not installed where the cover of the DS foot box attaches ... it will wait until the top is finally installed.

    My goal now is to get everything ready to reinstall the body to see if it fits properly and then get the doors, hood and trunk lid fit up done.

    Am I on the right track?

    Carl
    Last edited by carlewms; 02-28-2017 at 07:57 AM.
    Mk 4 Roadster
    October 25, 2012 - Kit Arrives
    April 8, 2013 - Build Starts
    August 23, 2015 - Rolling Chassis/Engine & Transmission Installed
    March 26, 2016 - Go Cart

  9. #609
    Not a waxer Jeff Kleiner's Avatar
    Join Date
    Feb 2011
    Location
    Bloomington, Indiana
    Posts
    8,057
    Post Thanks / Like
    Quote Originally Posted by carlewms View Post

    Am I on the right track?

    Carl
    Yep!

    Jeff

  10. #610
    Carl carlewms's Avatar
    Join Date
    May 2012
    Location
    Nokesville, VA
    Posts
    1,125
    Post Thanks / Like

    Heater Installation Update

    I headed out to the Olde Goat Garage this morning and it was just too darn cold ... so I am going to catch up the build three instead ..

    The body is back on ... (photos and more detail to follow). It is amazing how much better it fits when you have all the seals and weather stripping in place. The first shot at mounting and fitting the infamous doors is done ... and will require a lot of tedious work to get right before applying Rage Gold to cover up the remaining sins.

    Heater Ventilation System Mockup ...

    As a reminder ... I have set up the standard FFR supplied heater as a source of heat during the winter and for defrost and cool air during the summer ...


    To date everything except the defroster section, the blast gate on the defroster leg and the two rear facing vents was installed ... now the rest of the installation was mocked up.

    The DS rear facing vent shares duty with the defroster when the gate valve on the defroster is open (and the louver on the DS vent is closed)


    The upper DS outlet is connected to the PVC "T". Air for the defroster is sent up to the very nice NorthRacers defroster vent plenum via a 2 in blast gate valve. When not needed the air is directed to the DS rear facing louvered vent.

    Once the exact position on the plenum is identified the vent tubes will be cut to fit and the "T" painted semi gloss black to match the remainder of the system.

    Before fitting the body back on Craig and I were concerned that the plenum would not fit where it goes over the heater box ... there fore driving some unusual positions for the defroster vents. Fortunately after body fitting it looks like the plenum can be centered above the dash interior and have clearance over the heater box.

    More to follow ...
    Mk 4 Roadster
    October 25, 2012 - Kit Arrives
    April 8, 2013 - Build Starts
    August 23, 2015 - Rolling Chassis/Engine & Transmission Installed
    March 26, 2016 - Go Cart

  11. #611
    Junior Member
    Join Date
    Jul 2016
    Posts
    20
    Post Thanks / Like
    keep up the good work!!!

  12. #612
    Carl carlewms's Avatar
    Join Date
    May 2012
    Location
    Nokesville, VA
    Posts
    1,125
    Post Thanks / Like

    The Body is Back on the Beast ... Again

    With the assistance of Craig and Artie, the body is back on the beast ...

    With the bulb seals and weatherstripping in place the body sits a whole lot better

    1. Clearance For the Defroster Plenum. It looks like I will be able to mount the plenum without modification. The plenum is 1 1/8" deep and the space is 1 1/2" above the heater box.


    2. There is plenty of room for the top of the dash. I might have trimmed it a little much but fitting the dash will now be relatively easy and there will be no binding on the leather.


    3. Door Mockup ... first installation with the seals in place and, yes it does make a huge difference. Jeff Kleiner's Mk 4 Body Work Thread on the Factory Five Racing forums (http://www.ffcars.com/forums/17-fact...rk-thread.html) has been a total blessing and extremely helpful. His first step was to get the door tops fitted ... so that is what I did.

    Passenger Side Door ... normally this is supposed to be the easy one to fit up but so far that has not been the case.

    Front


    The lower part of the door is about 1/4" below the level of the body in front of it .. ugh!

    Rear


    Still a fair amount of fiddling to get this one better fitted ...

    Driver's Side Door ... normally the real PIA and so far pretty much has been what others have found ...

    Front


    Rear


    Sealing. Except for one small area on the PS in the trunk the bulb seal is touching the body as I believe it should.

    Trimming. I have an area about 7" wide on the rear cockpit roll over that need to be trimmed slightly to make enough room for the carpet.

    Having fun now for sure ...

    Carl
    Mk 4 Roadster
    October 25, 2012 - Kit Arrives
    April 8, 2013 - Build Starts
    August 23, 2015 - Rolling Chassis/Engine & Transmission Installed
    March 26, 2016 - Go Cart

  13. #613
    Carl carlewms's Avatar
    Join Date
    May 2012
    Location
    Nokesville, VA
    Posts
    1,125
    Post Thanks / Like
    Has anyone installed the Breeze door latches and if so could you post some photos please ...
    Mk 4 Roadster
    October 25, 2012 - Kit Arrives
    April 8, 2013 - Build Starts
    August 23, 2015 - Rolling Chassis/Engine & Transmission Installed
    March 26, 2016 - Go Cart

  14. #614
    Carl carlewms's Avatar
    Join Date
    May 2012
    Location
    Nokesville, VA
    Posts
    1,125
    Post Thanks / Like
    After spending some more time on the doors ... I decided to tackle the trunk lid fitment. I thought I would wait until all the doors, trunk and hood are mocked up before breaking out the 80 grit sandpaper and Rage Gold again.

    Getting the lid mounted ...


    The MK 4 FFR uses the old style trunk hinges that are hidden inside the trunk giving a nice clean look to the area behind the cockpit. There is plenty of adjustment in the hinges to allow the trunk lid to be moved side to side and front to back. Easier done with an assistant, I did manage to get it attached.


    It is a bit of trial and error as you make multiple tries to get the lid in the best position before doing the final tightening of the hinge.

    Here are the initial results ...


    I purchased a seal for the trunk from Breeze Automotive awhile back ... he no longer carries it but refers you to McMaster-Carr:

    "We list it here however because you can order a 10' length from McMaster-Carr P/N 1120A411 at www.mcmaster.com at a good price. Edge Trim, Black Vinyl Pepple Grain, for 1/4" Thickness with 3/8" dia. tubular foam rubber seal on one side. This is similar to the edge trim FFR has supplied for roadster trunk openings but made to fit up to a 1/4" thick edge."


    The lid fit got significantly better after the seal installation ...


    Next Up .. the Trunk Latch
    Mk 4 Roadster
    October 25, 2012 - Kit Arrives
    April 8, 2013 - Build Starts
    August 23, 2015 - Rolling Chassis/Engine & Transmission Installed
    March 26, 2016 - Go Cart

  15. #615
    Carl carlewms's Avatar
    Join Date
    May 2012
    Location
    Nokesville, VA
    Posts
    1,125
    Post Thanks / Like

    Bodywork Continues - Trunk Latch

    After fiddling a little more with the hinge end of the trunk lid I proceeded to install the latching mechanism using the one supplied with the kit.


    Installation is fairly straightforward but I noted a some of challenges not mentioned in the manual:

    1. The center hole for the square rod has to be drilled out to accommodate the boss under the handle. I used a 9/16" bit to get enough room for a tight fit;

    2. The long bolt that goes through the valence and into the frame has a lock nut that goes on the frame end; with the tank in place getting this nut installed is not going to be easy. I decided to leave the nut off for now since there is enough rod length to hold everything in place while doing the gapping on the lid;

    3. The manual does not mention installing the rubber gasket under the latch. I found it after the installation so it will go on when during the final installation;


    After adjusting the grip of the "hook" on the latch, the lid has a pretty good fit on the body. There are some high spots as the trunk turns down the back of the car and the lower valence is a little proud of the bottom edge of the trunk lid. I believe some of this I can take out by adjusting the position of the valence.


    The bolt/sleeve is not perpendicular to the valence ... I will try to get the body more aligned or at least the rear more aligned to see if it can be made more perpendicular ...

    The position of the valence can be adjusted with the quick jack bolts and somewhat with the bolt/sleeve that are part of the latching system.

    Mk 4 Roadster
    October 25, 2012 - Kit Arrives
    April 8, 2013 - Build Starts
    August 23, 2015 - Rolling Chassis/Engine & Transmission Installed
    March 26, 2016 - Go Cart

  16. #616
    Senior Member AC Bill's Avatar
    Join Date
    Feb 2011
    Location
    Vancouver Island BC Canada
    Posts
    1,878
    Post Thanks / Like
    Coming along good Carl.
    Curious as to why you needed to order a trunk seal. Does FFR no longer include them, or was yours damaged or something?

    It is possible to reach the trunk striker bolt's, nut, with the fuel tank in place, although it's a finger tip job, getting the nut first threaded on. I had to play around with my striker sleeve (tube that covers the bolt), trying to adjust the lower body at that point, ever so slightly, and had it in and out several times.

    Are you concerned that once you shift the body over slightly, to make your striker bolt centered better, all the trunk lid fitting will need to be re-done?

  17. #617
    Carl carlewms's Avatar
    Join Date
    May 2012
    Location
    Nokesville, VA
    Posts
    1,125
    Post Thanks / Like
    Bill,

    The answer to the first question ... well let's just say it was a senior moment. I now have a spare :roll eyes:

    I am going to give it the old college try on the nut ... my fat old fingers will probably try my patience; and,

    Yes ... a little. I have not actually started the process of trimming or sanding for the gaps yet. I have done some measurements to see if the body is centered on the chassis and it appears to be so (it also looks like it is visually in the center as well).

    One thought I had was to slightly elongate the hole in the fiberglass to center the striker ... it would not take much.

    What do you think?

    Thanks,

    Carl
    Mk 4 Roadster
    October 25, 2012 - Kit Arrives
    April 8, 2013 - Build Starts
    August 23, 2015 - Rolling Chassis/Engine & Transmission Installed
    March 26, 2016 - Go Cart

  18. #618
    Carl carlewms's Avatar
    Join Date
    May 2012
    Location
    Nokesville, VA
    Posts
    1,125
    Post Thanks / Like

    Bodywork - Door Latches

    The door latches are installed temporarily ... pretty much as outlined in the manual. I debated and researched the forums to see when it should be done versus the final body work on the doors. After fiddling with the position of both doors ... I decided to proceed.

    After using most of the shimming washers to correctly position the striker so the base was even with the vertical face where the latch is attached to the door (I will replace the washers with a section of tube/pipe polished to match the washers. I put blue painter's tape on the door area to make marking the 4 attachment points for the 4 sheet metal screws that hold the latching mechanism easier to locate.


    The door latching mechanism (previously modified) is latched on to the striker (this establishes the position of the latching mechanism on the door).


    The spacers provided by FFR where used; I will paint them before final fitting.


    When I initially installed the DS latch the striker was to far into the PS of the mounting tab and the latch was engaging but not enough to hold under pressure. The notch on the striker kept the door from flying open but the pin was not seating in the hole on the striker properly. A slight tweak and it worked perfectly.


    The supplied cover will go on during final installation.
    Mk 4 Roadster
    October 25, 2012 - Kit Arrives
    April 8, 2013 - Build Starts
    August 23, 2015 - Rolling Chassis/Engine & Transmission Installed
    March 26, 2016 - Go Cart

  19. #619
    Carl carlewms's Avatar
    Join Date
    May 2012
    Location
    Nokesville, VA
    Posts
    1,125
    Post Thanks / Like

    Bodywork - License Plate Light

    I installed the modified license plate light in the trunk lid. The light fixture was modified to include long lasting LED lights as well as the Kleiner Mod to allow installation of the license plate without the latch handle being covered.


    The template from the manual was modified to reflect the changes to the mount. The hole in the upper left corner is not used.


    The template was positioned to give as much room for the plate and still provide a solid surface for the rubber to seal the fixture against the body.


    A 1/2 inch bit was used to make the ends of the slot and the initial holes. The slot was then cleaned up using a file readied to accept the fixture. The fixture fit a little tight in the two holes drilled to attach it which is what I wanted.


    Here is a photo with the fixture installed.


    Carl
    Mk 4 Roadster
    October 25, 2012 - Kit Arrives
    April 8, 2013 - Build Starts
    August 23, 2015 - Rolling Chassis/Engine & Transmission Installed
    March 26, 2016 - Go Cart

  20. #620
    Senior Member
    Join Date
    May 2014
    Location
    Burlington, WI
    Posts
    689
    Post Thanks / Like
    Blog Entries
    1
    Carl,

    I cannot seem to find the license plate template in neither the hard copy nor electronic version of the manual. Could you point me in the right direction?
    Mk4 Roadster 20th Anniversary #8658. 04 of 20. 3.31 IRS.
    Forte 427 Dart, TKO 600, Quick Fuel 780 carb. Delivered 9/2/2015, First start/Go Cart 2/18/2017.
    Road Legal August 31, 2017

  21. #621
    Member
    Join Date
    Feb 2011
    Location
    Rhode Island
    Posts
    62
    Post Thanks / Like
    Carl,

    This observation goes back to your post #608. Now that you are in the body work phase be careful with that Silicone Grease. Silicone and paint jobs just don't go together. It wouldn't take much for some of it from your bulb seals to get on to the body and ruin your paint job.

    A friend of mine owns a body shop and one day he was in the spray booth painting a car while his son was in the next bay detailing his own vehicle apparently spraying armorall on something and the mist got sucked into the air intake filters of the spray booth, they ended up stripping the vehicle and painting it again, since that episode he has not allowed any silicone products in the shop.

    BigUgly
    FFR 6760 Mk 3.1 Fortes Dart 427 TKO 600 3.55 3 Link Solid Axle

  22. #622
    Junior Member
    Join Date
    Feb 2017
    Posts
    27
    Post Thanks / Like
    Really nice build, best of luck with it

  23. #623
    Carl carlewms's Avatar
    Join Date
    May 2012
    Location
    Nokesville, VA
    Posts
    1,125
    Post Thanks / Like
    [Carl,

    I cannot seem to find the license plate template in neither the hard copy nor electronic version of the manual. Could you point me in the right direction?[/QUOTE]

    I found it in the templates section in the back of the manual ... specifically it is on the back of the page with the template for the reverse lights. Here is the one from my manual.

    FFR LIcense Plate Light Template - Mar 14 2017 - 7-21 PM.pdf[QUOTE=ThickCobra;271497]
    Mk 4 Roadster
    October 25, 2012 - Kit Arrives
    April 8, 2013 - Build Starts
    August 23, 2015 - Rolling Chassis/Engine & Transmission Installed
    March 26, 2016 - Go Cart

  24. #624
    Carl carlewms's Avatar
    Join Date
    May 2012
    Location
    Nokesville, VA
    Posts
    1,125
    Post Thanks / Like
    Quote Originally Posted by BigUgly View Post
    Carl,

    This observation goes back to your post #608. Now that you are in the body work phase be careful with that Silicone Grease. Silicone and paint jobs just don't go together. It wouldn't take much for some of it from your bulb seals to get on to the body and ruin your paint job.

    A friend of mine owns a body shop and one day he was in the spray booth painting a car while his son was in the next bay detailing his own vehicle apparently spraying armorall on something and the mist got sucked into the air intake filters of the spray booth, they ended up stripping the vehicle and painting it again, since that episode he has not allowed any silicone products in the shop.

    BigUgly
    BigUgly,

    Thanks for the additional update ... before the body got near the seals I did completely wipe them down with towels to remove any excess silicone.

    I will store the silicone out of the garage as well just as a precaution.

    Carl
    Mk 4 Roadster
    October 25, 2012 - Kit Arrives
    April 8, 2013 - Build Starts
    August 23, 2015 - Rolling Chassis/Engine & Transmission Installed
    March 26, 2016 - Go Cart

  25. #625
    Carl carlewms's Avatar
    Join Date
    May 2012
    Location
    Nokesville, VA
    Posts
    1,125
    Post Thanks / Like

    Body Work Continues ... Doors Revisited

    After making all the adjustments I could after adding the latches, I put the front up on jack stands to get room to move and fix the lower part of the rocker panel to get a better fit on the doors. As Kleiner over on the FFR forums says ... your really "moving the hole to fit the doors".

    With the help of Craig Stuard ...you need one person to hold the body in position and one to fix the body to the frame with sheet metal screws. We ended up with one screw basically at the front outside corner of the foot box and one at the 2" square tube just at the back edge of the door.

    Here are the results before any gapping or Rage Gold ...

    Driver Side Door:


    Passenger Side Door:


    The difference between the cowl and the door seems to be caused by the shape of the door ... I tried to reduce it but it affected the position of the lower door and the inside of the door went below the cowl.

    Any thoughts before I tackle the gaps and filler ...
    Mk 4 Roadster
    October 25, 2012 - Kit Arrives
    April 8, 2013 - Build Starts
    August 23, 2015 - Rolling Chassis/Engine & Transmission Installed
    March 26, 2016 - Go Cart

  26. #626
    Not a waxer Jeff Kleiner's Avatar
    Join Date
    Feb 2011
    Location
    Bloomington, Indiana
    Posts
    8,057
    Post Thanks / Like
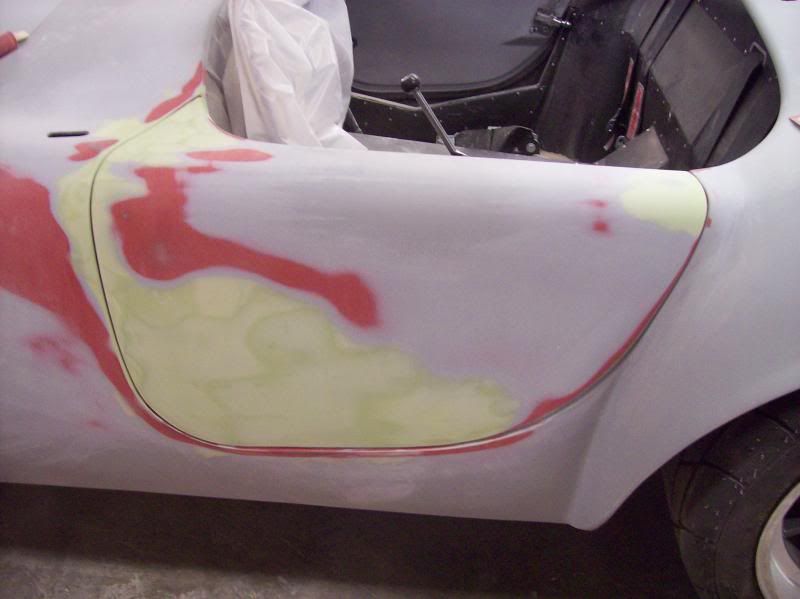
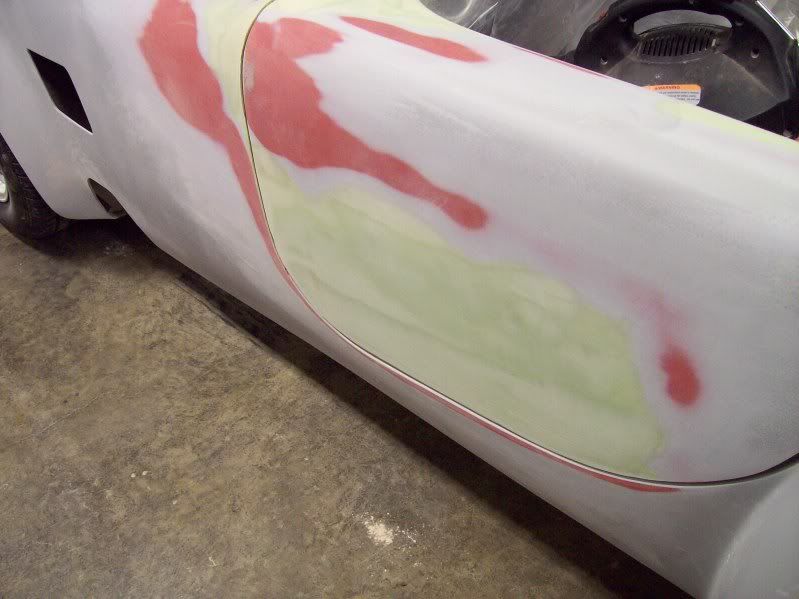
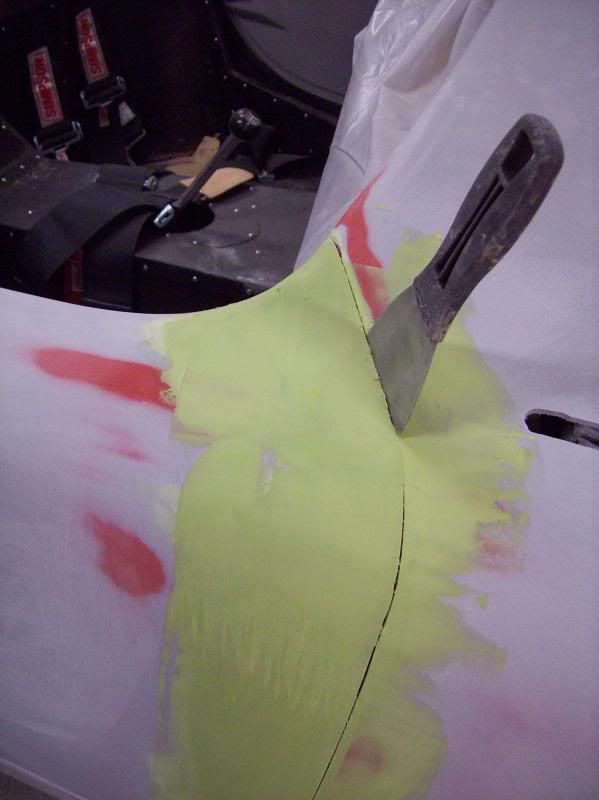
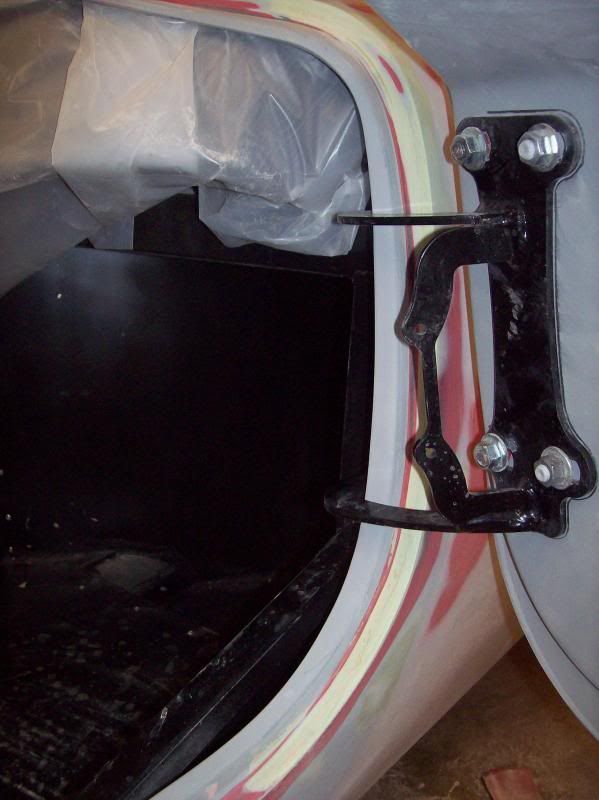
    What you're seeing is pretty typical Carl. To show you how typical take a look at these photos---these are two different cars but they took filler is in pretty much the same spots which is also where yours needs it.


    As you've discovered the door tops are generally lower than the cowl and also the main body takes a pretty severe dive or roll into the door opening. To straighten these areas out I bridge all the way across between the door and body with filler then cut through right before it cures:


    After a couple of applications once the body and door lines are flowing nicely I butter it back into the door jamb and square the edge off while doing the gaps/margins ("making the hole fit the door")


    Sure wish we had a visit with our daughter in Manassas coming up soon but we probably won't be back out there again until summer---I'd love to come spend a day with ya'.

    Carry on!

    Jeff

  27. #627
    Jazzman's Avatar
    Join Date
    Jan 2014
    Location
    Scottsdale, AZ
    Posts
    1,164
    Post Thanks / Like
    Jeff Kleiner, you are an artist! That is both quite ingenious as well as being clearly described! Thanks!!
    Jazzman

    MKIV #8745 "Flip Top" Roadster, Custom Tilt front, Coyote Engine, Tremec TKO600, Custom Interior. Best of Show winner, Huntington Beach Cruise In 2018.

    1967 Ford Mustang Coupe build thread updated 1/22/2021

    Roadster Frame Dolly Plan

  28. #628
    Carl carlewms's Avatar
    Join Date
    May 2012
    Location
    Nokesville, VA
    Posts
    1,125
    Post Thanks / Like
    Quote Originally Posted by Jazzman View Post
    Jeff Kleiner, you are an artist! That is both quite ingenious as well as being clearly described! Thanks!!
    Jeff,

    Ditto on Jazzman's post ... Thanks so much for the feedback both in photos and words. As this is my very first attempt at body work these posts are invaluable to the project.

    I will be headed to the store for some more Rage Gold today ... I will be needing it for sure.

    Carl

    PS Welcome anytime your back in Manassas ... The Olde Goat Garage is always open!
    Mk 4 Roadster
    October 25, 2012 - Kit Arrives
    April 8, 2013 - Build Starts
    August 23, 2015 - Rolling Chassis/Engine & Transmission Installed
    March 26, 2016 - Go Cart

  29. #629
    Not a waxer Jeff Kleiner's Avatar
    Join Date
    Feb 2011
    Location
    Bloomington, Indiana
    Posts
    8,057
    Post Thanks / Like
    Quote Originally Posted by carlewms View Post
    Welcome anytime your back in Manassas ... The Olde Goat Garage is always open!
    I've talked with Craig a couple of times about trying to do that but you know how packed with activities those family visits get! Next time for sure

    Jeff

  30. #630
    Carl carlewms's Avatar
    Join Date
    May 2012
    Location
    Nokesville, VA
    Posts
    1,125
    Post Thanks / Like

    Body Work Continues - Hood Fitment

    The next job I tackled is the hood ...

    To set the stage I am using the Breeze Hood Hinges which are more like the ones used in the originals and are definitely less complicated than the newer modern versions provided by FFR. Another reason: When you get the basic kit you don't get the new hinge mechanisms; Breeze were less expensive.

    To do the test fitting I taped on rubber bumpers provided in the kit (1 large in the center at the cockpit end and one small at each corner). Taking 80 grit sandpiper to round off the edges and before installing the hood to the hinges ...

    The PS Front Corner


    The DS Front Corner ...


    These photos sort of show that the arch of the rear of the hood is slightly less than the arch of the cockpit

    The PS Rear Corner ...


    The DS Rear Corner ...


    With the PS side down the gap increases on the DS ...


    I see two solutions to this problem ... 1) Set the hood out in the sun and prop up the center while weighing down the sides to change the arch a little bit or 2) Establish the positions of the hood latches such that they pull the hood down into the proper position. It would seem the latter is the easier way to go.

    What do you all think I should do ...

    Carl
    Mk 4 Roadster
    October 25, 2012 - Kit Arrives
    April 8, 2013 - Build Starts
    August 23, 2015 - Rolling Chassis/Engine & Transmission Installed
    March 26, 2016 - Go Cart

  31. #631
    Not a waxer Jeff Kleiner's Avatar
    Join Date
    Feb 2011
    Location
    Bloomington, Indiana
    Posts
    8,057
    Post Thanks / Like
    Quote Originally Posted by carlewms View Post
    ...Establish the positions of the hood latches such that they pull the hood down into the proper position. It would seem the latter is the easier way to go.

    What do you all think I should do ...

    Carl
    That's how you do it. One of the larger bumpers in the center (you may have to shave it a bit to get the hood flush with the cowl) then use the latch paddles to pull the corners down. I've not used the Breeze hinge but know it has a good bit of adjustability like the FFR version so you will use it to bring the front of the hood into place. When the front corners are flush it is not uncommon to need to use a bumper at the center to get the front edge of the hood flush with the nose. By the way, don't drill the holes for these bumpers until you have established the centerline for the stripes so that they don't wind off to one side or the other (one of those OCD anal retentive things that would drive me crazy ). Once your 4 corners and front & rear edges are set you can work on the sides. Usually on Mk4s the body will be low in relation to the hood. Bring the body up to the hood by shimming between the underside of the hood opening flange and square chassis tubes. I have some 1/4" thick runner sheet that works great for this when cut into 1"x2" pieces. Most times adding these a couple of places down each side (sometimes stacked 2 deep) will bring the surfaces to flush or close enough that only a minimal amount of filler is necessary. Before pulling the body I mark where they went and then when doing the final installation after paint silicone them in place.

    Hope that helps!

    Jeff

  32. #632
    Carl carlewms's Avatar
    Join Date
    May 2012
    Location
    Nokesville, VA
    Posts
    1,125
    Post Thanks / Like
    Jeff,

    Thanks ... it helps a bunch!

    Do you end up gapping the hood like the doors?

    Again thanks for all your help.

    Carl
    Mk 4 Roadster
    October 25, 2012 - Kit Arrives
    April 8, 2013 - Build Starts
    August 23, 2015 - Rolling Chassis/Engine & Transmission Installed
    March 26, 2016 - Go Cart

  33. #633
    Senior Member 42Bfast's Avatar
    Join Date
    Feb 2017
    Location
    Pensacola
    Posts
    154
    Post Thanks / Like
    Quote Originally Posted by carlewms View Post
    BigUgly,

    Thanks for the additional update ... before the body got near the seals I did completely wipe them down with towels to remove any excess silicone.

    I will store the silicone out of the garage as well just as a precaution.

    Carl
    I'm just coming off of a 30 year career in aviation manufacturing,...... WD-40 and similar lubricants are not allowed in any of the factories for the same effect on painting. Recommend you be very careful with all caulks and lubricants around a surface that is to receive paint. It is very easy to contaminate the surface enough for paint to not adhere. A little on your finger or a rag, and then against an otherwise clean surface can make for an ugly spot when painted, for example. Not the end of the world, but a significant pain nonetheless.

  34. #634
    Not a waxer Jeff Kleiner's Avatar
    Join Date
    Feb 2011
    Location
    Bloomington, Indiana
    Posts
    8,057
    Post Thanks / Like
    Quote Originally Posted by carlewms View Post
    Do you end up gapping the hood like the doors?
    Generally I set the gaps and adjust to get the hood and body matching as closely as possible as described earlier then use filler as necessary to get the hood and body flush. Sometimes "butter" it down into the openings to even up the radius all the way around but it usually doesn't take much:


    Cheers,
    Jeff
    Attached Images Attached Images

  35. #635
    Carl carlewms's Avatar
    Join Date
    May 2012
    Location
    Nokesville, VA
    Posts
    1,125
    Post Thanks / Like

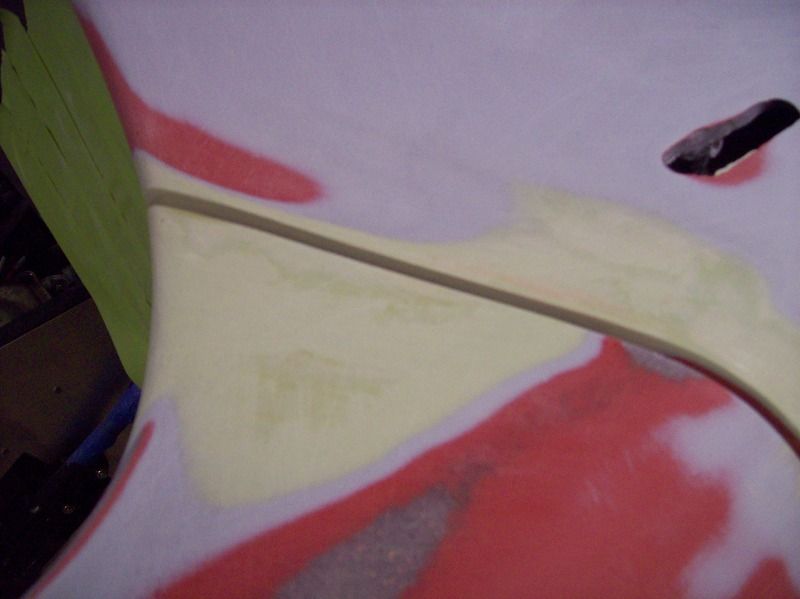
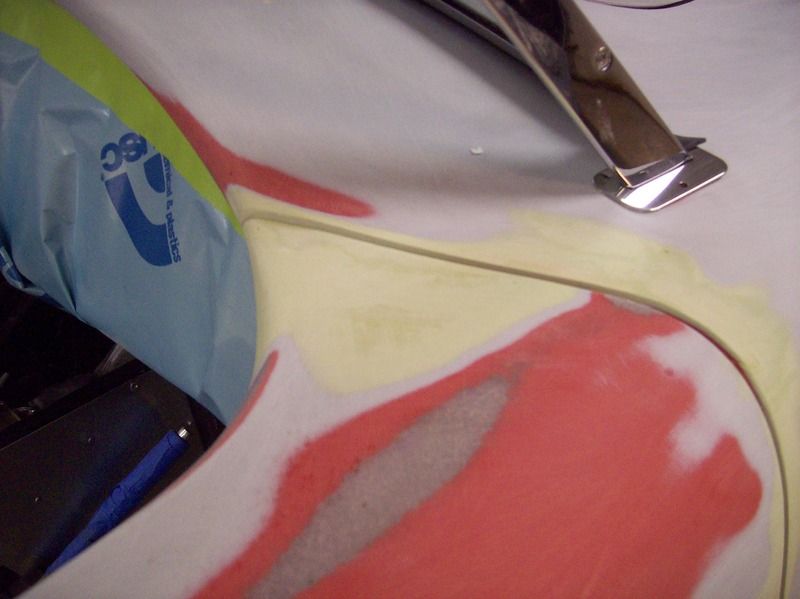
    Body Work Continues - PS Door Filling Starts ... and Stops

    I broke out the Rage Gold and started filling in some of the PS door and adjacent body. The garage was a bit cool ...no cold; so working time was not an issue.

    Here is the door top before I started filling ...


    I mixed up a batch and started at the front top of the door and worked my way down the vertically section to just through the the lower part of the door where it curves back to the rear. I had my trustee large putty knife in the ready to make the first cut to create the gap ... and then I got a little distracted with the rear of the door (another one of those senior moments).

    By the time I got "undistracted" the putty knife would barely penetrate the rapidly setting filler ... any more delay and I would have glued the door to the body! The only immediate solution was to open the door; this is the result. A jagged edge of epic proportions! Fortunately more filler, a rasp and some 80 grit will help "fix" the problem.


    After a little bit of sanding the gap started to look a little more uniform ... but not much. There are still some low areas on both the door and the body to fill in and then a lot more sanding to do.

    Although I couldn't find a minimum temperature for using the filler I decided I better wait until it was warmer before the next use...and I ran out of hardener.

    Because of the temperatures I will shift gears on getting the hood ready for installation and leave the filling for a slightly warmer day.
    Mk 4 Roadster
    October 25, 2012 - Kit Arrives
    April 8, 2013 - Build Starts
    August 23, 2015 - Rolling Chassis/Engine & Transmission Installed
    March 26, 2016 - Go Cart

  36. #636
    Carl carlewms's Avatar
    Join Date
    May 2012
    Location
    Nokesville, VA
    Posts
    1,125
    Post Thanks / Like

    Body Work Continues - Hood Fitment Part 2

    With just a little time in the Olde Goat Garage I turned to working on getting the hood ready to install on the body.

    After very good feedback from those online the best way of dealing with the difference in arch at the rear of the hood was installing the hood latches and the hood connected to the hinges.

    First getting the front of the hood on the Breeze supplied hinges. Craig had previously helped me locate the position to attach the hinge flange to the hood. This was not an easy job with body and radiator in place...Craig did the hard part; I just pushed the hood down.


    To improve the accuracy of the installation I decided to make a template to use to mark the 3 drilling points on the hood (this also gave near chance to make sure there was no interference between the new and old holes already in the hood).


    Later I recreated the template in a drawing program and validated it against the actual flange and the original hand drawn template. Two copies were made and taped on to the area using the edges of the flange marked on the body as a guide. The distances between the template and reference points checked to make sure they were the same. The true test will be when mounting the good to the hinges.


    Next the latches on the rear of the trunk lid. This took longer because it meant cutting into the top of the hood ... measure three times drill once.

    Blue painter's tape was put on the rear rib of the hood (a little protection for the fiberglass and makes it easier for my tired old eyes to see the marks).


    Pilot holes were drilled from this side of the hood taking care to make sure the drill bit is completely perpendicular to the surface. The hood was flipped over to drill the final holes. The instructions call to drill through both layers with a 5/8" bit; took a slightly different route sort of by necessity.


    Using a step drill bit with tape applied to mark the depth (or the max diameter not to be exceeded) allowed cutting a smaller diameter hole on the inner cover of the hood; shown here with the latch installed.


    I drew a line perpendicular to the hood edge through the center of the hole to help in marking the holes for the two mounting screws. As per the manual the latch base was used to mark the hole locations.


    Part 2 will have the installation of the body side parts ... and a little more trauma or drama.
    Mk 4 Roadster
    October 25, 2012 - Kit Arrives
    April 8, 2013 - Build Starts
    August 23, 2015 - Rolling Chassis/Engine & Transmission Installed
    March 26, 2016 - Go Cart

  37. #637
    Senior Member AC Bill's Avatar
    Join Date
    Feb 2011
    Location
    Vancouver Island BC Canada
    Posts
    1,878
    Post Thanks / Like
    Depending on how much detail you may like Carl, I have seen a few builders make polished bezels for the underside of the hood where the shaft protrudes. They are a nice finishing touch. These could be added anytime in the future of course.

  38. #638
    Senior Member edwardb's Avatar
    Join Date
    Feb 2011
    Location
    Lake Orion, Michigan
    Posts
    10,566
    Post Thanks / Like
    Quote Originally Posted by AC Bill View Post
    Depending on how much detail you may like Carl, I have seen a few builders make polished bezels for the underside of the hood where the shaft protrudes. They are a nice finishing touch. These could be added anytime in the future of course.
    Quote Originally Posted by carlewms View Post
    Using a step drill bit with tape applied to mark the depth (or the max diameter not to be exceeded) allowed cutting a smaller diameter hole on the inner cover of the hood; shown here with the latch installed.


    I found putting a bushing in the hood rib looks more finished plus provides nice stability to the latch mechanism. I used standard bronze bushings from McMaster that fit over the shaft with a little adjustment. Installed before paint so they get finished along with everything else. Works really well. One other comment FWIW. I agree the shaft looks best centered on the rib. But be careful. In this location the tip of the paddle will hit the body opening if you have it rotated around that direction when closing. Ask me how I know. I push them back a little so if that happens it hits the stepped down hood lip area instead. Still catches on the aluminum pieces under the hood lip just fine.

    Last edited by edwardb; 03-27-2017 at 06:16 AM.
    Build 1: Mk3 Roadster #5125. Sold 11/08/2014. Build 2: Mk4 Roadster #7750. Sold 04/10/2017. Build Thread
    Build 3: Mk4 Roadster 20th Anniversary #8674. Sold 09/07/2020. Build Thread and Video. Build 4: Gen 3 Type 65 Coupe #59. Gen 3 Coyote. Legal 03/04/2020. Build Thread and Video
    Build 5: 35 Hot Rod Truck #138. LS3 and 4L65E auto. Rcvd 01/05/2021. Legal 04/20/2023. Build Thread. Sold 11/9/2023.

  39. #639
    Carl carlewms's Avatar
    Join Date
    May 2012
    Location
    Nokesville, VA
    Posts
    1,125
    Post Thanks / Like
    Paul,

    Thanks for the input ... and another thing to order from M-C. I like the look.

    I wish I had thought of the issue with the paddle hitting the paint if in the closed position.

    Since i have already drilled the holes do you think I could reshape the paddles so they won't hit the exposed part of the hood?

    Carl
    Mk 4 Roadster
    October 25, 2012 - Kit Arrives
    April 8, 2013 - Build Starts
    August 23, 2015 - Rolling Chassis/Engine & Transmission Installed
    March 26, 2016 - Go Cart

  40. #640
    Senior Member edwardb's Avatar
    Join Date
    Feb 2011
    Location
    Lake Orion, Michigan
    Posts
    10,566
    Post Thanks / Like
    Quote Originally Posted by carlewms View Post
    Paul,

    Thanks for the input ... and another thing to order from M-C. I like the look.

    I wish I had thought of the issue with the paddle hitting the paint if in the closed position.

    Since i have already drilled the holes do you think I could reshape the paddles so they won't hit the exposed part of the hood?

    Carl
    I probably wouldn't do anything to the paddles. I'll bet most other builds have the same issue. Up to you though. Just be aware and don't learn the hard way like I did. Move them back a little on the next build!
    Build 1: Mk3 Roadster #5125. Sold 11/08/2014. Build 2: Mk4 Roadster #7750. Sold 04/10/2017. Build Thread
    Build 3: Mk4 Roadster 20th Anniversary #8674. Sold 09/07/2020. Build Thread and Video. Build 4: Gen 3 Type 65 Coupe #59. Gen 3 Coyote. Legal 03/04/2020. Build Thread and Video
    Build 5: 35 Hot Rod Truck #138. LS3 and 4L65E auto. Rcvd 01/05/2021. Legal 04/20/2023. Build Thread. Sold 11/9/2023.

Page 16 of 22 FirstFirst ... 61415161718 ... LastLast

Posting Permissions

  • You may not post new threads
  • You may not post replies
  • You may not post attachments
  • You may not edit your posts
  •  

Martin's Dent and Collision Shop

Visit our community sponsor