Boig Motorsports

Visit our community sponsor

Thanks Thanks:  1
Likes Likes:  4
Page 9 of 23 FirstFirst ... 789101119 ... LastLast
Results 321 to 360 of 908

Thread: GTM roll cage modifications and race car build log

  1. #321
    LCD Gauges's Avatar
    Join Date
    Apr 2011
    Location
    Toronto, Ontario
    Posts
    1,545
    Post Thanks / Like
    Blog Entries
    3
    Just drive up on some 2" x 8" slabs of wood, then you can fit the jack underneath. I did that for all the low-riders that I used to service, and for the GTM in the garage.

    I'll even use a stand-off between the pad to clear the fiberglass under the "rocker" area.
    jack_pad.jpg
    Custom LCD Gauges , Data Loggers, Control Touch Screens
    www.LCDdash.com \\ 647-522-9953 \\ Voice & Text
    Proud new owner of GTM Gen 1., #105 - 08/27/11
    LQ9 Powered, G96.00 6 speed transaxle

  2. #322
    Senior Member mikespms's Avatar
    Join Date
    Apr 2011
    Location
    North Miami,FL
    Posts
    145
    Post Thanks / Like
    Here in Miami beach you need a lift system to get around, most of the residential areas have speed bumps and streets flood at high tide in some areas.Not to mention that I could not get a jack under the car or put it on the lift with out driving on wood ramps.I was surprised to hear the Beiber was drag racing in Pine Tree dr. not to far from me.I don't think there is a stretch long enough with out a speed bump or a traffic light and the short stretches are like washboard with the roots of the pine trees.

  3. #323
    LCD Gauges's Avatar
    Join Date
    Apr 2011
    Location
    Toronto, Ontario
    Posts
    1,545
    Post Thanks / Like
    Blog Entries
    3
    I totally did not read the post entirely. Ignore my response.
    Custom LCD Gauges , Data Loggers, Control Touch Screens
    www.LCDdash.com \\ 647-522-9953 \\ Voice & Text
    Proud new owner of GTM Gen 1., #105 - 08/27/11
    LQ9 Powered, G96.00 6 speed transaxle

  4. #324
    Senior Member mikespms's Avatar
    Join Date
    Apr 2011
    Location
    North Miami,FL
    Posts
    145
    Post Thanks / Like
    Hey John,

    Looking at your picture I see that your ground clearance in the back is about the same as mine. I set my ride height at 4 1/2" and it has settled at about 4 3/8" since I have a 3" lift I am keeping it low but I am concerned about the clearance between the top of the front tire and the hood and wheel well. I was wondering if you have had any rubbing problems with your suspension travel at the track. How much room do you have between the top of the tire and fender? What spring rate do you have up front? Have you had any issues at high speed or when your suspension bottoms out?
    Your input on this would be a big help,I don't want to have to make changes after the body is on and painted.
    Thanks Mike

  5. #325
    Member kabacj's Avatar
    Join Date
    Mar 2011
    Location
    Long Island
    Posts
    1,103
    Post Thanks / Like
    Quote Originally Posted by mikespms View Post
    Hey John,

    Looking at your picture I see that your ground clearance in the back is about the same as mine. I set my ride height at 4 1/2" and it has settled at about 4 3/8" since I have a 3" lift I am keeping it low but I am concerned about the clearance between the top of the front tire and the hood and wheel well. I was wondering if you have had any rubbing problems with your suspension travel at the track. How much room do you have between the top of the tire and fender? What spring rate do you have up front? Have you had any issues at high speed or when your suspension bottoms out?
    Your input on this would be a big help,I don't want to have to make changes after the body is on and painted.
    Thanks Mike
    Hi Mike. Good questions.


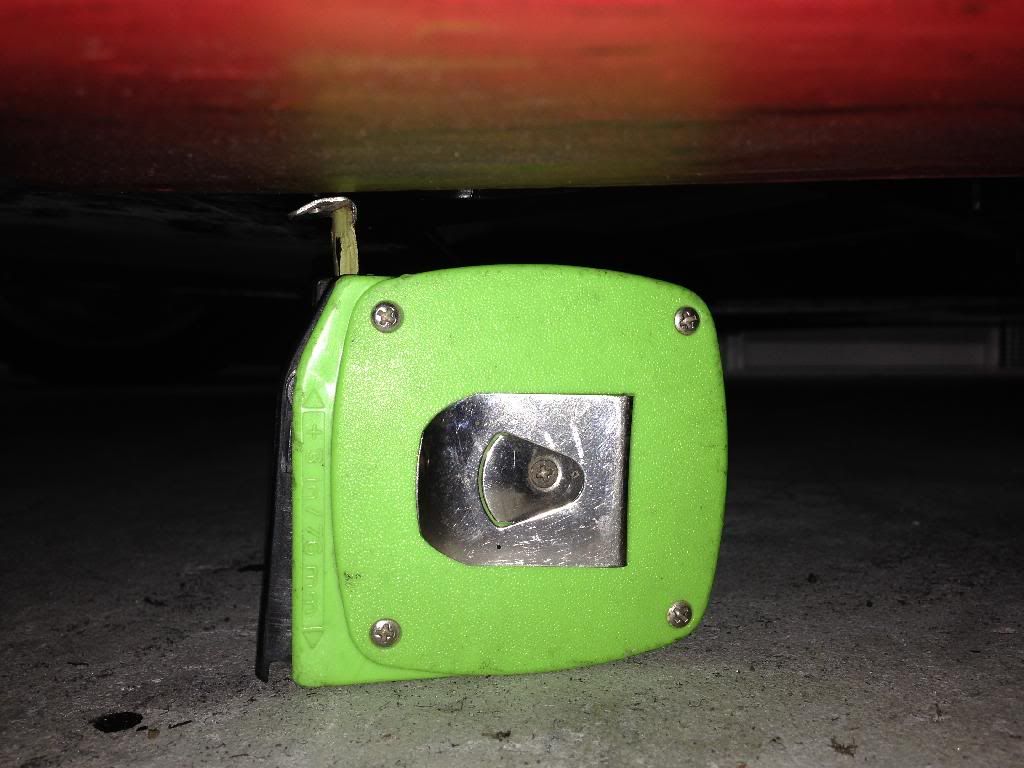
    The front ride height on my car measured under the corner of the chassis right under the door hinge is 3.5 inches. The tape measure itself is 3 inches and add a half.


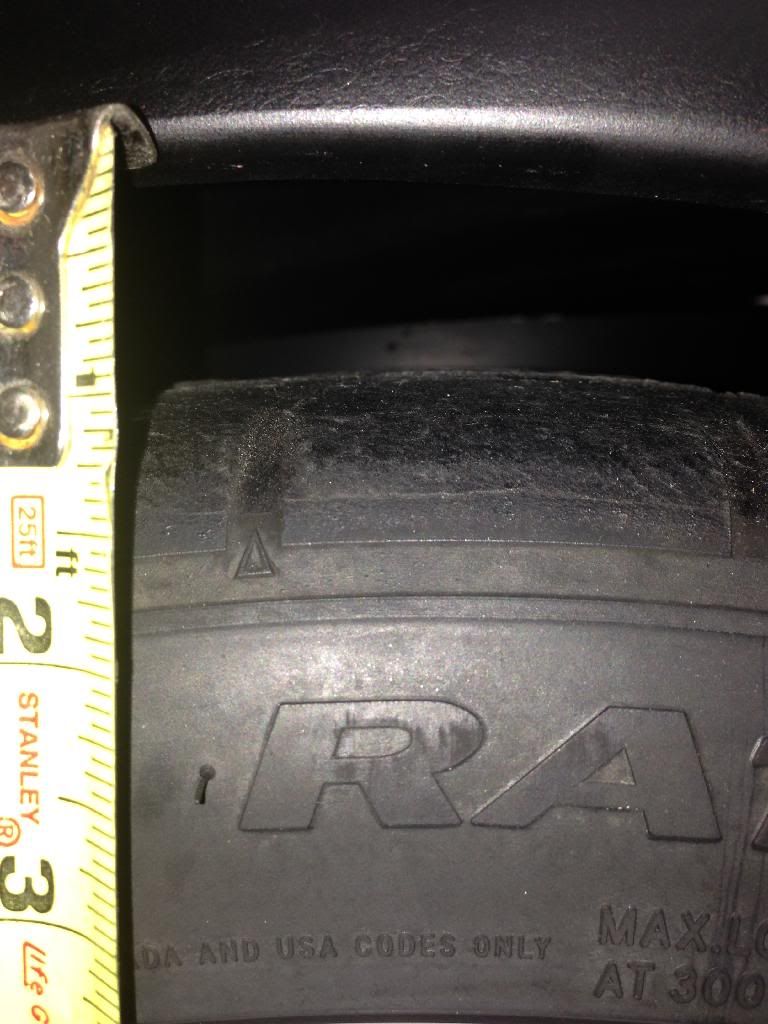
    The tire sits a little less then 1 inch under the wheel arch at static ride height.


    The other key bit of information is the shock travel. My shocks have about 1.5 inch of compression travel.

    I am running a 450 lb spring with 3/8 inch of pre load.

    Even under full braking down from 155 to 75 where I travel through a section of the track that undulates and often bottoms peoples suspension and forces brake lock up. I do not have any tire rubbing issues. I can see that I am using the full travel of my suspension but not bottoming it.

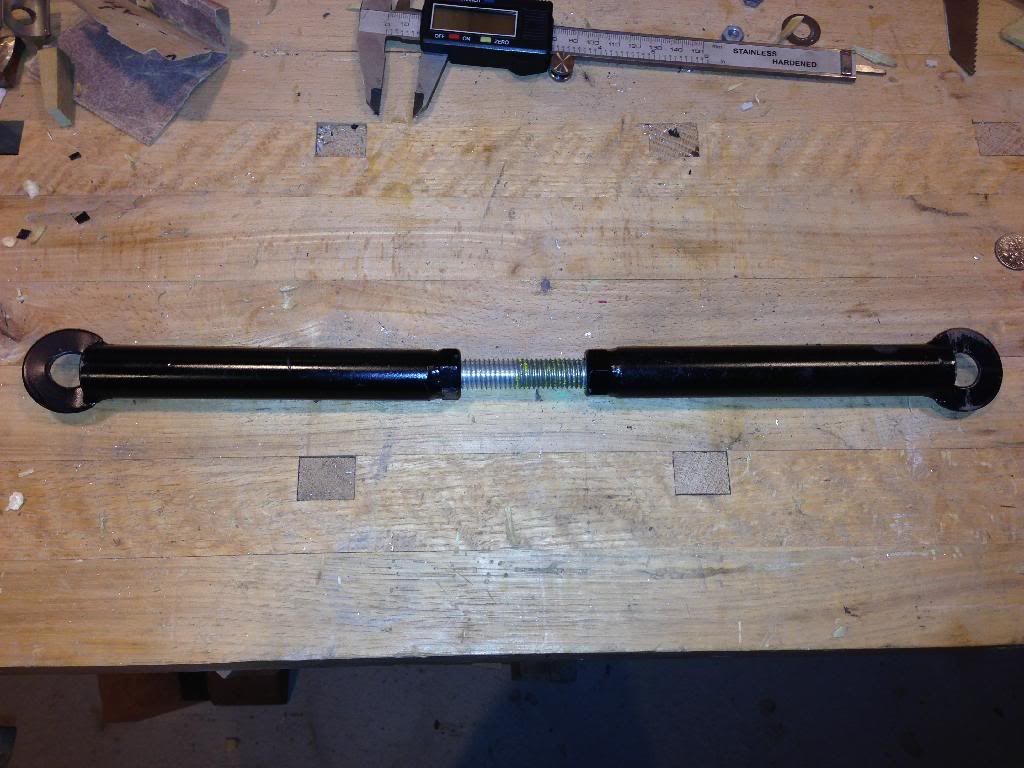
    One way you can be double sure about wheel rubbing is to measure the length of your shock at full compression without a spring. I made a tool from some threaded rod, nuts, two washers and some tube.


    If you make two of those and adjust them to the length to the fully compressed shock you can see what the car looks like under full compression. I also used them to set the shock length at ride height. Hell I had the car rolling around on them for a few months while my shocks were being made. As long as you use 1/2 inch threaded rod its strong enough to hold up the car.

    Hope that helps.

    John
    Last edited by kabacj; 01-26-2014 at 06:08 PM.
    XTF #2
    build start date June 19 2023

    GTM # 344
    Build Start December 2010
    First track day April 2013

  6. #326
    Member kabacj's Avatar
    Join Date
    Mar 2011
    Location
    Long Island
    Posts
    1,103
    Post Thanks / Like
    Sunday was a beautiful day with spring like temps in the mid fifties. A perfect day to take out the 5 speed H pattern Mendiola.

    Since I have done this at least 4 times already I am getting pretty good at it. I learned a trick that I wanted to pass on.

    The key to both mounting and dismounting the transaxle is getting it properly aligned so that the input shaft slides onto the motor without binding.

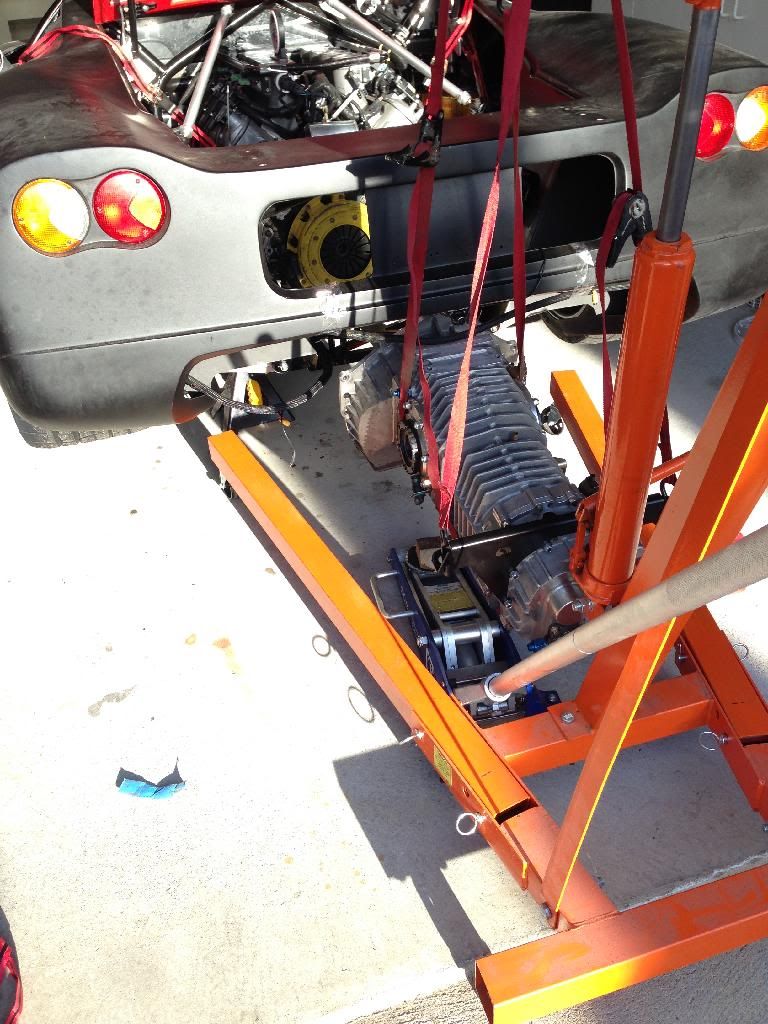
    The transaxle is not heavy but you are not putting the thing in without the engine crane.

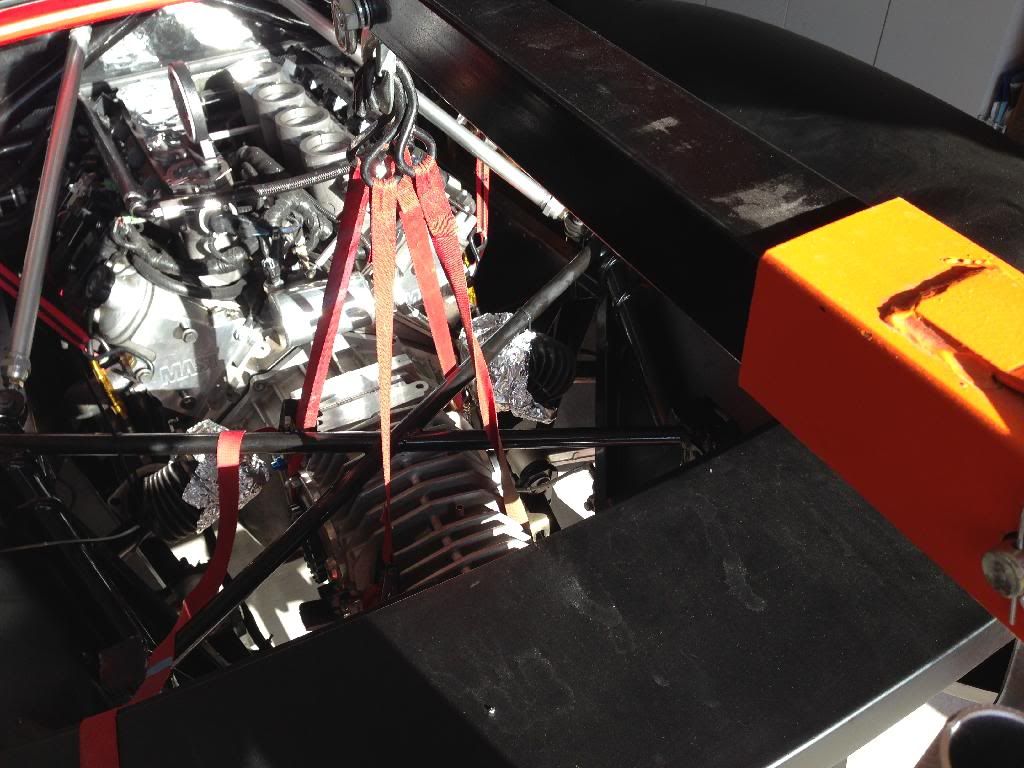
    The best and fastest way to install the transaxle is using ratchet straps to suspend the transaxle under the engine crane.


    Using three straps you can always have two straps slung under the body of the transaxle while you tip and swing the transaxle out past the X brace and body without issue.


    The most important thing is the straps have some give. This allows you to bounce and tip the transaxle and wiggle it in or out . Not something you can do with an engine crane, chains, and load leveler.

    I had the car disassembled and transaxle out in an afternoon without any help. This was the fastest yet and by far the easiest single person transaxle removal.

    John
    XTF #2
    build start date June 19 2023

    GTM # 344
    Build Start December 2010
    First track day April 2013

  7. #327
    Senior Member mikespms's Avatar
    Join Date
    Apr 2011
    Location
    North Miami,FL
    Posts
    145
    Post Thanks / Like
    Hey John,

    What are you doing ? Practicing for your pit stops!

  8. #328
    Senior Member
    Join Date
    Apr 2011
    Posts
    641
    Post Thanks / Like
    Great tip, looks like a good way to do that.

  9. #329
    Member kabacj's Avatar
    Join Date
    Mar 2011
    Location
    Long Island
    Posts
    1,103
    Post Thanks / Like
    Quote Originally Posted by mikespms View Post
    Hey John,

    What are you doing ? Practicing for your pit stops!
    HA HA , yeah . Not exactly a quick change transaxle, but its a pretty quick change.

    Real race teams can do it in under 5 min. I have a little more speed to learn before I can do it in a pit stop


    Quote Originally Posted by fastthings View Post
    Great tip, looks like a good way to do that.
    So much easier. Turns a job where I would fight to find the right angle to one where it just slides in an out. Also makes it much easier to tip the transaxle as when you are using the load leveler removing one side without supporting the whole transaxle is a no no. This way you use three ratchet straps and the transaxle is always supported. Also the straps dont damage the powder coat on the X brace or paint on the body.

    john
    XTF #2
    build start date June 19 2023

    GTM # 344
    Build Start December 2010
    First track day April 2013

  10. #330
    Member kabacj's Avatar
    Join Date
    Mar 2011
    Location
    Long Island
    Posts
    1,103
    Post Thanks / Like

    clutch upgrade

    As it slowly but surely gets warmer here in the northeast its time to get the car ready for the track season.

    On the install list is a sequential transaxle Mendiola custom made for me. The sequential will have similar gearing to the SDR, as I was very happy with the gear placement relative to the power band of the motor, but obviously the sequential will be quicker and easier to shift on the track.

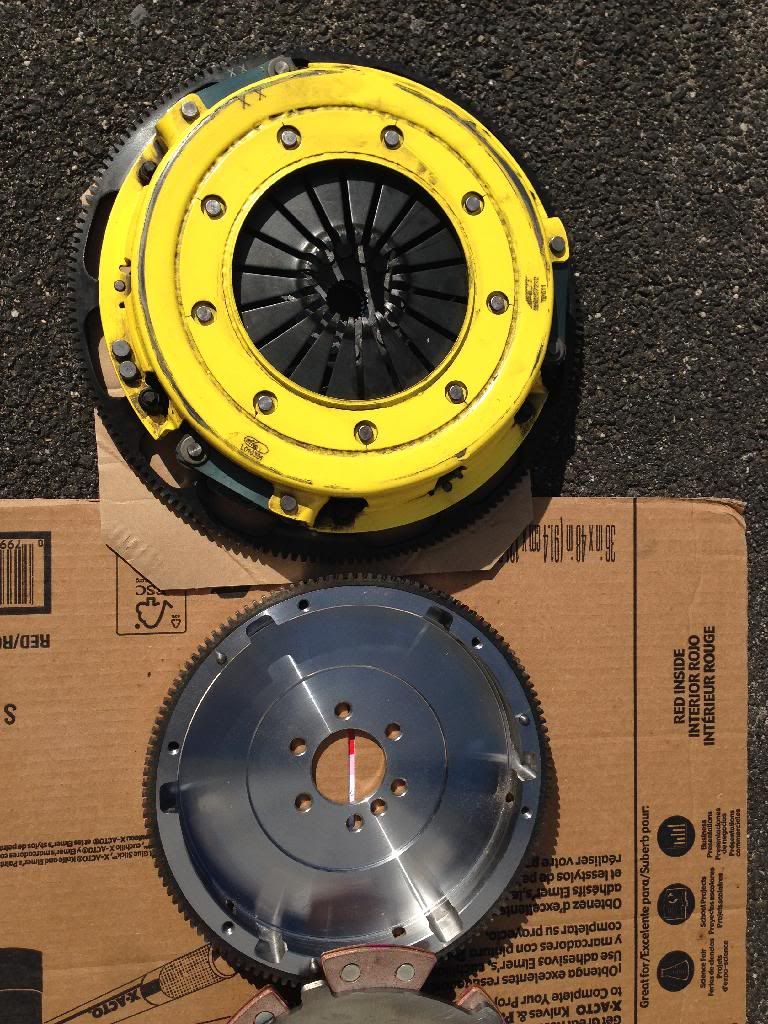
    After taking out the SDR, the next step was to change the flywheel and clutch. The SDR uses a standard GM flywheel and clutch. I opted for the twin disk ACT clutch. I was very happy with the performance with both. Good torque holding power and reasonably smooth engagement but lighter then stock LS3. Definitely street worthy but heavy duty enough for the track.

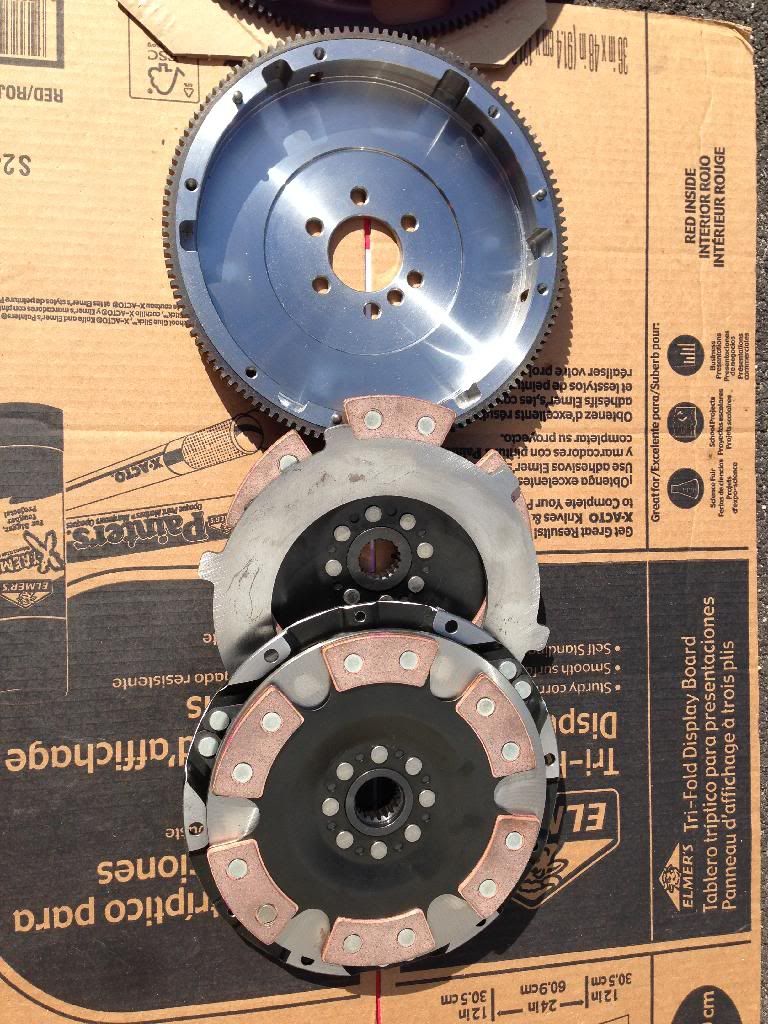
    The new setup needs a Porsche flywheel to fit inside the bell housing of the sequential transaxle. I opted for the twin disk Kennedy. This setup should be up to the task of track duty but not as friendly for the street. Folks do use it, on the street. I just will not expect to slip it like a standard street clutch. The nice thing is I can just dump the clutch at idle and the car happily motors along. The drive by wire calibration MAST Motorsports put together make the car stall proof.

    Since the transaxle and clutch swap is so easy ,its reasonable to have both a street and track setup. I can switch it over in a few hours. The car keeps getting more track focused as time goes on and the stock GTM has FAR FAR more capacity then you could ever use on the street ..... I will start the street registration process in a few weeks. At any rate it will be fun to have a street legal race car.

    Here are a few pictures of the two setups.

    you can see the new flywheel is smaller


    The new Kennedy setup is very much like a motorcycle clutch with floating friction and steel disks.


    One other thing. the Kennedy clutch and flywheel is only 34.5 lbs that is almost 10 lbs lighter then the ACT twin disk. The light setup will have less inertia. It will make for a better track setup. Ill let you all know how it works on the street.

    John
    XTF #2
    build start date June 19 2023

    GTM # 344
    Build Start December 2010
    First track day April 2013

  11. #331
    Banned
    Join Date
    Aug 2011
    Posts
    669
    Post Thanks / Like
    interested to see how it does on the street and the track with the new trans and clutch/flywheel. how's the hatch project going? looking forward to more vids this year. thanks for the motivation!

  12. #332
    Member kabacj's Avatar
    Join Date
    Mar 2011
    Location
    Long Island
    Posts
    1,103
    Post Thanks / Like
    Quote Originally Posted by carbon fiber View Post
    interested to see how it does on the street and the track with the new trans and clutch/flywheel. how's the hatch project going? looking forward to more vids this year. thanks for the motivation!
    Hey Jason. Yeah I also am interested to see how everything works out. This territory is not well charted.

    Regarding the hatch. I have made good progress with the foam models. I'm still working out the final design in my head. As you know every part has some interaction with every other part. My solution needs to look cool but also be track worthy. It's hard enough to make things that look cool, but the requirement to work under extreme conditions is a whole other ball game. I'll be sure to call you for some pointers when I get to the CF construction phase.

    I made a downdraft table so I could make dust without coating the whole garage in dust. The table connects to my woodworking dust collector. 99% of the dust is captured with this solution.

    Now I am at he point where I need to start fitting parts to the car. I don't have a car sized down draft table sadly. I don't want to coat the whole garage with fiberglass dust. I'm focusing on getting the driveline done till I can work outside. I still need to fabricate a transaxle hanger and sort out the new shifter and cables. Ideally I will be able to quickly swap the H pattern and sequential shifter.

    Once that's done I'm focusing on the bodywork. I am adding wider front tires. The car is setup to push from the factory. That's a much safer street setup. The new tires and rims will require a little front end rework. Since I don't have enough time to finish all this work I better get started

    John
    XTF #2
    build start date June 19 2023

    GTM # 344
    Build Start December 2010
    First track day April 2013

  13. #333
    Banned
    Join Date
    Aug 2011
    Posts
    669
    Post Thanks / Like
    i'll pm you with contact info. if you need any advice on the cf stuff, no prob. maybe you could frame up a temporary "room" inside the garage with 2x4s and plastic to contain the dust. then just take it down when you're finished, like some people do with homemade spray booths. i'm doing tons of mods to the gtm body myself, but i'm trying to keep the mods from creating too much drag or disrupting laminar airflow. I WISH I had the money to do wind tunnel testing, but I think i'm gonna be ok, as the mods i'm doing aren't completely reinventing the wheel. i'm mostly gonna be on the street, but I want to track the car in a similar fashion as you're doing now. at this point i'm mostly focused on 0-180 mph and handling braking vs top speed. are you gonna be able to fit larger front without flares? no big deal if you have make some anyway. keep it up, when I get disgusted I watch some of your vids and i'm ready to go back in the garage!

  14. #334
    Senior Member
    Join Date
    Apr 2011
    Posts
    641
    Post Thanks / Like
    Looks like the ACT was rubbing a little. How much clearence did you have. It gave you no problems though.

  15. #335
    Member kabacj's Avatar
    Join Date
    Mar 2011
    Location
    Long Island
    Posts
    1,103
    Post Thanks / Like
    Quote Originally Posted by fastthings View Post
    Looks like the ACT was rubbing a little. How much clearence did you have. It gave you no problems though.
    Hi Gene,

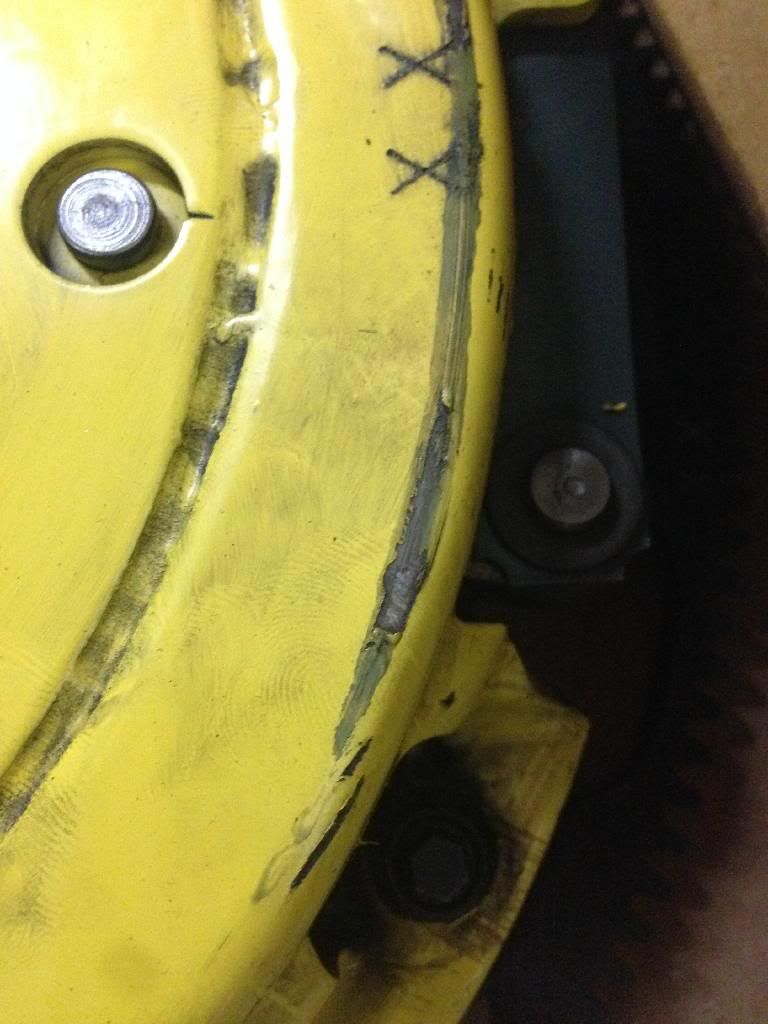
    Well I had enough clearance when when the engine and transaxle were cool and even when it was warm from tooling around the neighborhood. But after a few hot laps and getting the motor up to peak temperature on the track, I guess everything expanded just enough to make contact with the part of the bell housing that holds the clutch fork mechanism.

    After a few weekends i pulled it all apart and I saw that there was a small area on the machined surface that looks like it was a few thou higher. It only ended up taking off the paint on the clutch housing. In some spots it just made a mark on the paint.

    I cleaned it up with a bur in 20 seconds.

    The tight clearance did not cause any issue. It actually looks worse then it is. Here is a close up of the clutch housing.


    John
    XTF #2
    build start date June 19 2023

    GTM # 344
    Build Start December 2010
    First track day April 2013

  16. #336
    Member
    Join Date
    May 2011
    Posts
    77
    Post Thanks / Like
    I think Mike(crash) may have mentioned about tires. Adding wider tires on the GTM is probably not the ticket for you right now. The car is notorious for not getting heat in the front tires in race conditions. With 275/17's it took about three years to figure out how to get the correct heat. Went to 295's and lost 30 degrees. The GTM is pretty light in the front and deals with a mid range push. Even using big canards, it still develops a mid entry push. Notice on some more recent photos of the PDG car with open cut fenders and the stock holes in the nose have been moved as far back as the stock frame and accessories allow. Last outing the driver reported no push and tire temps were perfect along with wear. However, the openings in the nose made the rear a little too loose and now they are looking to widen the rear tires from 315 to 335/345.

    cheers

  17. #337
    Member kabacj's Avatar
    Join Date
    Mar 2011
    Location
    Long Island
    Posts
    1,103
    Post Thanks / Like
    Quote Originally Posted by Cobra 61 View Post
    I think Mike(crash) may have mentioned about tires. Adding wider tires on the GTM is probably not the ticket for you right now. The car is notorious for not getting heat in the front tires in race conditions. With 275/17's it took about three years to figure out how to get the correct heat. Went to 295's and lost 30 degrees. The GTM is pretty light in the front and deals with a mid range push. Even using big canards, it still develops a mid entry push. Notice on some more recent photos of the PDG car with open cut fenders and the stock holes in the nose have been moved as far back as the stock frame and accessories allow. Last outing the driver reported no push and tire temps were perfect along with wear. However, the openings in the nose made the rear a little too loose and now they are looking to widen the rear tires from 315 to 335/345.

    cheers
    Hi Richard.

    Thanks for the info.

    I am running the stock setup with 245/18 fronts and 335/18 rears.

    Yes Mike did mention that you guys needed to tweek your setup to get heat in the fronts.

    With my setup I don't seem to have issues getting heat in the front tires. I was able to dial out some of the mid corner push with stiffer front springs. I think I solved some of the push by limiting the weight transfer. I also adjusted the shock damping to limit weight transfer.

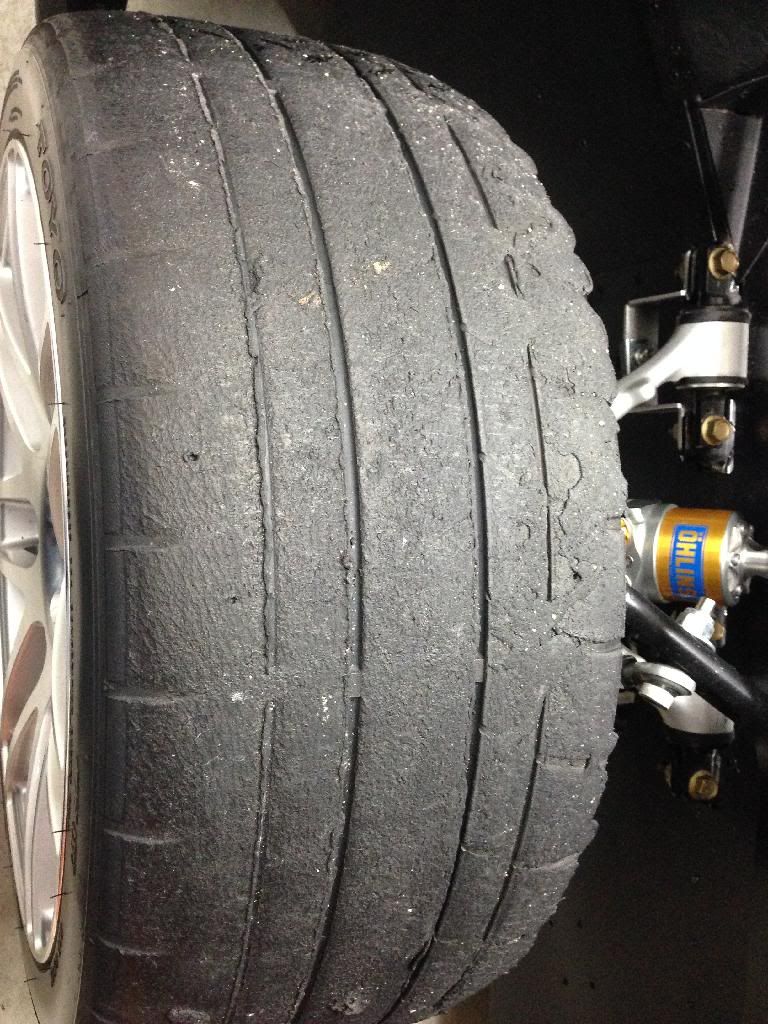
    Even with those changes , I can actually over heat the fronts and ended up raising the front pressures to keep the heat down. This is what the tire looks like after a weekend where the peak air temp was 55 degrees.


    I have played with getting the car to turn in by trail breaking into the corner and using rear brake bias to start the car rotating. That was not faster also not ideal in traffic. I could probably add a rear bar and remove rear grip but that is a last resort.

    I am also running lots of caster. And plan on adding more.

    I figure I'll try 275s and 310s in the front. Maybe the 310s are too big, but I'm pretty sure the 275s will be better.

    I can always push the fronts harder to get more heat into them. Now I need to ease up on them or they get greasy.

    Right now I think I can gain the most time if I could get on the gas from the apex. Now I'm waiting a few clicks for the car to get pointed before rolling into it.

    I'm not surprised our cars act differently. As you know the GTM is very sensitive to chassis changes.

    The final big variable. Actually maybe the biggest variable as I think about why our cars are not behaving the same way is the diff lockup. The SDR had a pretty tight diff according to Ian at Mendiola. Like everything with this car, at the limits we are in uncharted territory. Factory Five sell a street car not a race car.

    Ian was happy to hear that the car with the SDR was neutral even in the rain on the race track. Very good balance on and off throttle.

    Maybe the S5r diff is stiffer then the SDR. It could be stiff enough that it is fighting the rotation of the car.

    We will have a closer setup this year. Happy to share race notes.

    Thanks again
    John
    Last edited by kabacj; 03-11-2014 at 09:29 AM.
    XTF #2
    build start date June 19 2023

    GTM # 344
    Build Start December 2010
    First track day April 2013

  18. #338
    Senior Member
    Join Date
    Apr 2011
    Posts
    641
    Post Thanks / Like
    Good to know, I'm running the ACT. Thanks for posting your results.

  19. #339
    Member
    Join Date
    Jul 2011
    Posts
    35
    Post Thanks / Like
    Looks good Kabacj. My SLC is going to the interior shop this week. Let's meet up at a track day this spring, but before then we should schedule another lunch.

  20. #340
    Member kabacj's Avatar
    Join Date
    Mar 2011
    Location
    Long Island
    Posts
    1,103
    Post Thanks / Like
    Quote Originally Posted by Stage7 View Post
    Looks good Kabacj. My SLC is going to the interior shop this week. Let's meet up at a track day this spring, but before then we should schedule another lunch.
    That's great news Stage7. Absolutely. I'll send you a PM

    John
    XTF #2
    build start date June 19 2023

    GTM # 344
    Build Start December 2010
    First track day April 2013

  21. #341
    Member
    Join Date
    May 2011
    Posts
    77
    Post Thanks / Like
    I forgot you were running the 245's. Stepping to a 275 would be a good effort in the front. Are you running sway bar in the rear?

  22. #342
    Member kabacj's Avatar
    Join Date
    Mar 2011
    Location
    Long Island
    Posts
    1,103
    Post Thanks / Like
    Quote Originally Posted by Cobra 61 View Post
    I forgot you were running the 245's. Stepping to a 275 would be a good effort in the front. Are you running sway bar in the rear?
    Thanks Richard. That's good to hear.

    I am not running a rear sway bar yet. I am evaluating using the stock c5 19mm corvette rear bar vs building my own.

    John
    XTF #2
    build start date June 19 2023

    GTM # 344
    Build Start December 2010
    First track day April 2013

  23. #343
    Senior Member Presto51's Avatar
    Join Date
    Feb 2011
    Location
    Catonsville, Maryland
    Posts
    578
    Post Thanks / Like
    Quote Originally Posted by kabacj View Post
    Thanks Richard. That's good to hear.

    I am not running a rear sway bar yet. I am evaluating using the stock c5 19mm corvette rear bar vs building my own.

    John
    Hi John,

    If you build your own sway bars, is there a certain formula that you would use to figure out size, shape etc.?

    Ron
    "May you be in heaven a full half hour before the Devil knows you're dead"

  24. #344
    Senior Member mikespms's Avatar
    Join Date
    Apr 2011
    Location
    North Miami,FL
    Posts
    145
    Post Thanks / Like
    016.JPG

    Hi John,

    I opted for the corvette bars since is just about a direct bolt on, the mounting is basically the same as in the corvette and it can be changed in minutes. Jim from factory five recommend a a 24mm but since you have change your shocks and springs, starting with a 19mm may be the way to go. I have seen the bars on ebay from $50.00 with the links at that price you could get a few different bars and change them at the track for fine tuning.
    Last edited by mikespms; 03-12-2014 at 08:57 AM.

  25. #345
    Senior Member Kempo's Avatar
    Join Date
    Feb 2011
    Location
    Cabo Rojo,PR. USA
    Posts
    723
    Post Thanks / Like
    Quote Originally Posted by mikespms View Post
    016.JPG

    Hi John,

    I opted for the corvette bars since is just about a direct bolt on, the mounting is basically the same as in the corvette and it can be changed in minutes. Jim from factory five recommend a a 24mm but since you have change your shocks and springs, starting with a 19mm may be the way to go. I have seen the bars on ebay from $50.00 with the links at that price you could get a few different bars and change them at the track for fine tuning.
    I really like that set up Mike. Can you please post some more pictures of it?
    GenII GTM #354
    Delivered (02/09/11)

  26. #346
    Senior Member VD2021's Avatar
    Join Date
    Feb 2011
    Location
    Central, FL
    Posts
    958
    Post Thanks / Like
    Blog Entries
    2
    Quote Originally Posted by Kempo View Post
    I really like that set up Mike. Can you please post some more pictures of it?
    Hugo,
    Here's Mike's original thread while you wait for his reply. http://www.ffcars.com/forums/42-fact...sway-bars.html
    R/s
    Vidal
    CURRENT STATUS: Interior Rework and Bodywork.
    GenII GTM #331. Delivered (23/9/10)
    BUILD LOG AND WEBSITE:
    http://gtmbuild.weebly.com/ .

  27. #347
    Senior Member Kempo's Avatar
    Join Date
    Feb 2011
    Location
    Cabo Rojo,PR. USA
    Posts
    723
    Post Thanks / Like
    Thanks for the link Vidal.
    GenII GTM #354
    Delivered (02/09/11)

  28. #348
    Senior Member mikespms's Avatar
    Join Date
    Apr 2011
    Location
    North Miami,FL
    Posts
    145
    Post Thanks / Like
    IMG_0521.JPGhttp://mikespms.weebly.com/uploads/8...06054_orig.jpg

    Hey Hugo,

    I don't have to many pictures,I think I deleted them accidentally.This is What I could find,I have templates for the brackets I can send you or make you the brackets if you want. Pm me or call me ,my father is here with me and I will be taking him back to P.R. in a few weeks.

  29. #349
    fasterer and furiouser longislandwrx's Avatar
    Join Date
    Aug 2012
    Location
    Long Island
    Posts
    2,540
    Post Thanks / Like
    Blog Entries
    6
    Your car is looking fantastic, I enjoy following your build, it's a good to take a break from the 818 threads.

    How goes the registration process?

    Looking forward to seeing it one day.

    Jeff
    A well stocked beverage fridge is the key to any successful project.

  30. #350
    Senior Member Kempo's Avatar
    Join Date
    Feb 2011
    Location
    Cabo Rojo,PR. USA
    Posts
    723
    Post Thanks / Like
    Quote Originally Posted by mikespms View Post
    IMG_0521.JPGhttp://mikespms.weebly.com/uploads/8...06054_orig.jpg

    Hey Hugo,

    I don't have to many pictures,I think I deleted them accidentally.This is What I could find,I have templates for the brackets I can send you or make you the brackets if you want. Pm me or call me ,my father is here with me and I will be taking him back to P.R. in a few weeks.
    Looks like a very nice and clean set up. I was able to see the ones on the link Vidal posted. Call me you you come down lest try to meet up.
    GenII GTM #354
    Delivered (02/09/11)

  31. #351
    Member kabacj's Avatar
    Join Date
    Mar 2011
    Location
    Long Island
    Posts
    1,103
    Post Thanks / Like
    Quote Originally Posted by mikespms View Post
    016.JPG

    Hi John,

    I opted for the corvette bars since is just about a direct bolt on, the mounting is basically the same as in the corvette and it can be changed in minutes. Jim from factory five recommend a a 24mm but since you have change your shocks and springs, starting with a 19mm may be the way to go. I have seen the bars on ebay from $50.00 with the links at that price you could get a few different bars and change them at the track for fine tuning.
    I agree with Hugo, This is a great setup Mike. Since its almost a direct bolt on and since there are many sizes you can use it takes lots of work to do much better. The aftermarket even has adjustable rear sway bars for the Corvette that we can use on the GTM. Since my shocks are adjustable and I actually want the car to be stiffer in the back I could keep my current springs. I assume Jim suggested you soften your rear springs by 50 or 100 lbs as the stiff rear springs are as much about roll control as they are about supporting the car. I ended up going with more spring preload and more shock damping in the rear to simulate some of the effects of a rear bar. There are a few left right transitions where I know a rear bar would help.

    Quote Originally Posted by Presto51 View Post
    Hi John,

    If you build your own sway bars, is there a certain formula that you would use to figure out size, shape etc.?
    Ron
    Hey Ron,

    If I decide to go with the build my own bar solution i will use resources like this http://www.1speedway.com/sb_rates.htm to figure out the bar I should use to gain the amount of roll resistance I want to have. Then i will figure out how long the lever arms are and make a guess at the bar rate I should use. The key points 1) many bar choices that fit my setup as well as 2) packaging up the solution in the space in the rear of the car. Ideally with each bar should have lever arms with a few adjustments so I can increase or decrease the amount of anti roll in small steps.

    It really boils down to the fact that I can fine tune a bar I make my self and I a little more limited if I go with a corvette bar. But if i can find a corvette bar that works with my setup its the obvious choice. My friend is replacing his stock c5 19mm rear bar so I get that one for free. That makes the corvette bar an easy choice to start.


    Quote Originally Posted by longislandwrx View Post
    Your car is looking fantastic, I enjoy following your build, it's a good to take a break from the 818 threads.

    How goes the registration process?

    Looking forward to seeing it one day.

    Jeff
    Hey Jeff. I also check out what you guys are doing with the 818. I was able to spend time with Wane from Very cool Parts and the quality you can get with the 818 build is awesome.

    Regarding registration, I was waiting to swap the transaxle before I bother making the car road worthy again. The first step will be getting the car weighed on a certified scale. I will do that in the next 2 weeks. From then on the registration process should only take about a month. I think you are near by so ill drive over and check out your 818 build and you can check out the GTM.
    Last edited by kabacj; 03-12-2014 at 07:34 PM.
    XTF #2
    build start date June 19 2023

    GTM # 344
    Build Start December 2010
    First track day April 2013

  32. #352
    Member kabacj's Avatar
    Join Date
    Mar 2011
    Location
    Long Island
    Posts
    1,103
    Post Thanks / Like

    GTM on the Track

    I was looking for some inspiration to get out in the garage and get the GTM ready for the track and I was reviewing videos. I thought I would share this one.


    John
    Last edited by kabacj; 03-13-2014 at 09:42 PM.
    XTF #2
    build start date June 19 2023

    GTM # 344
    Build Start December 2010
    First track day April 2013

  33. #353
    Senior Member mikespms's Avatar
    Join Date
    Apr 2011
    Location
    North Miami,FL
    Posts
    145
    Post Thanks / Like
    Awesome! That engine sounds great,is like music to my ears.

    Great video, Thanks

  34. #354
    Senior Member
    Join Date
    Apr 2011
    Posts
    641
    Post Thanks / Like
    Oh man, I love it. Lots of fun.

  35. #355
    Member kabacj's Avatar
    Join Date
    Mar 2011
    Location
    Long Island
    Posts
    1,103
    Post Thanks / Like
    Quote Originally Posted by mikespms View Post
    Awesome! That engine sounds great,is like music to my ears.

    Great video, Thanks
    I need to work on the sound pickup a bit as its clipping, but yes I really enjoy the sound of the car. I even like to listen to the vid without watching it its like background music.


    Quote Originally Posted by fastthings View Post
    Oh man, I love it. Lots of fun.
    Gene I wish I was as close to the track as you are. You will be out there all the time. The GTM is so silly fast you cant get anywhere near the limit on the road.


    John
    XTF #2
    build start date June 19 2023

    GTM # 344
    Build Start December 2010
    First track day April 2013

  36. #356
    Member
    Join Date
    Nov 2012
    Posts
    34
    Post Thanks / Like
    Awesome video! The Octopus makes me pay when I can't get in to the curb tight on turn 8, although it looks like you do it far less frequently than I do (1st time looked like it was definitely because of traffic.) Even so, looking at 7:30, it looks like you can take about any line you want and the car is still fast as hell through there. For anyone that wants to see a slow comparison, here is 145 on the straight, and 20-40 mph slower .5G less everywhere else:


    Again...awesome car and video kabacj!
    Last edited by KeithBoden; 03-14-2014 at 04:33 PM.

  37. #357
    Member kabacj's Avatar
    Join Date
    Mar 2011
    Location
    Long Island
    Posts
    1,103
    Post Thanks / Like
    Thanks for the Video reply Keith! Great to see other guys out on the track.

    Yep I was taking all sorts of lines during that session. Its not like when you are racing you barge your way through and often you setup the pass a lap earlier. With these events you pass people in every corner even the corners that its really should never pass in so I end up in the wrong place for the next turn but that adds to the fun.

    Ill be at the NASA event at NJMP in May. Maybe ill see you there?

    John
    XTF #2
    build start date June 19 2023

    GTM # 344
    Build Start December 2010
    First track day April 2013

  38. #358
    Member kabacj's Avatar
    Join Date
    Mar 2011
    Location
    Long Island
    Posts
    1,103
    Post Thanks / Like

    New Sequential

    For the new season I decided to try out a sequential trans-axle. Mendiola made me a setup that is geared much like the SDR so I will have a 60mph first gear and a 215mph 5th gear with the ability to easily swap out gears to optimize the gearing for the track I plan to visit.

    Its impossible to buy a setup like you get from mendiola for less then 25k. When you get an Emco transaxle you are also paying for the semi that attends the races to provide you with what ever parts fail or need to be optimized. I sorta doubt Emco will show up to any event I frequent.

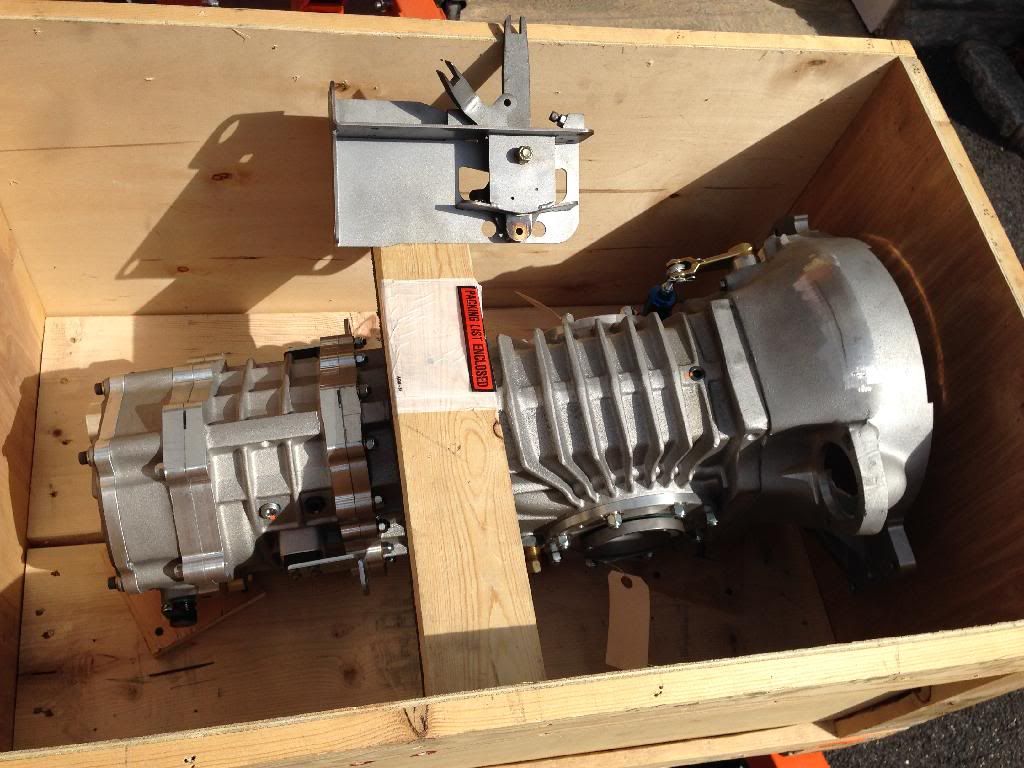
    The box arrived with the transaxle and an the shifter mechanism.


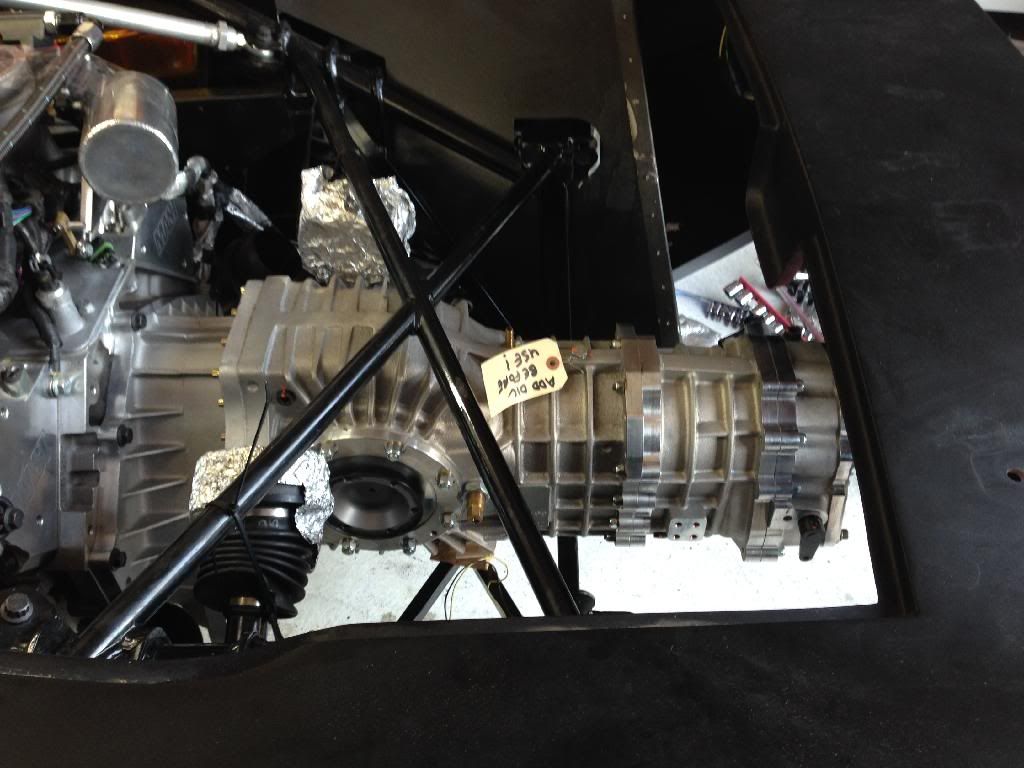
    Using the engine crane and ratchet strap sling method to install the transaxle I had it in the car and bolted in 30 min.


    The only trick was to twist the transaxle 45 degrees to fit it between the x brace and lower frame. The S4 does not have a two piece bell housing like the SDR, but it still fits without any fab work.

    That is when the easy part ended.

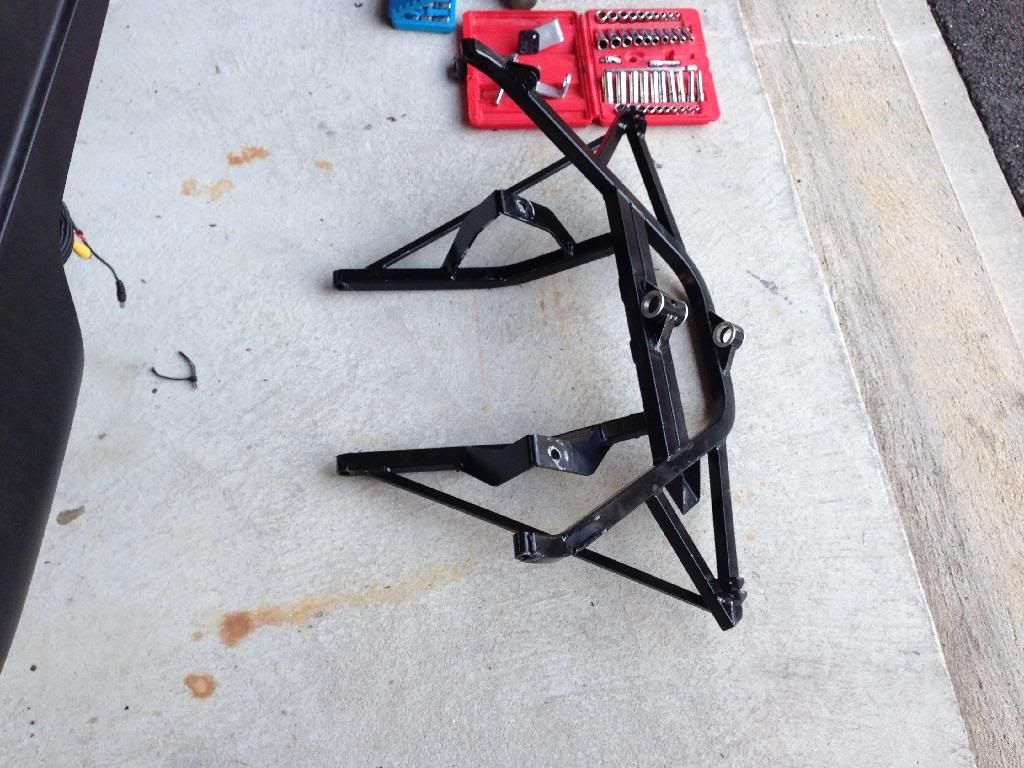
    The carrier that works for the SDR and Porsche boxes does not work with the S4. I will need to make a new one of these. The two down legs are not wide enough to fit the transaxle housing or shift actuators.


    I wanted to remake the carrier out of aluminum anyway. I have modified it to work as a wing mount and exhaust mount. I think I can make it both lighter and stronger . We shall see.

    John
    Last edited by kabacj; 03-16-2014 at 10:39 AM.
    XTF #2
    build start date June 19 2023

    GTM # 344
    Build Start December 2010
    First track day April 2013

  39. #359
    Senior Member mikespms's Avatar
    Join Date
    Apr 2011
    Location
    North Miami,FL
    Posts
    145
    Post Thanks / Like
    Hey John,

    Very cool! It will be like riding a 4 wheel motorcycle. What is your first gear and final gear ratio,In your video it looked like you where going 150mph@6000rpm was that in 5th? Did the trans come with a rear mount or you have to make it,looks like the pad with the 4 holes on the side of the trans would line up with your rear frame mount with minor modification.Or is that for the shifter? Is there anything like this available for that trans or do think this may work(dynojet quick shifter)http://www.dragspecialties.com/search/?ci[0]=204&ct1=3071&format=json&q=&offset=282&rows=6
    That car is going to be a blast to drive.

    Mike
    Last edited by mikespms; 03-17-2014 at 08:22 AM.

  40. #360
    Senior Member
    Join Date
    Feb 2011
    Location
    San Diego
    Posts
    1,961
    Post Thanks / Like
    As I have mentioned before, Team PDG uses the stock GTM shifter. We just changed the pivot points and U joints to make the entire setup much tighter. It took a little tuning, but it works very well. Just an option.
    www.myraceshop.com

    GTM solution kits
    Corvette and Race parts

Page 9 of 23 FirstFirst ... 789101119 ... LastLast

Tags for this Thread

Posting Permissions

  • You may not post new threads
  • You may not post replies
  • You may not post attachments
  • You may not edit your posts
  •  

Stewart Transport

Visit our community sponsor