Boig Motorsports

Visit our community sponsor

Thanks Thanks:  0
Likes Likes:  0
Results 1 to 18 of 18

Thread: Hot Spots in the Cockpit

  1. #1
    cobra Handler skullandbones's Avatar
    Join Date
    Jul 2011
    Location
    Superstition Mtn foothills 5 miles west of Gold Canyon AZ
    Posts
    2,686
    Post Thanks / Like
    Blog Entries
    19

    Hot Spots in the Cockpit

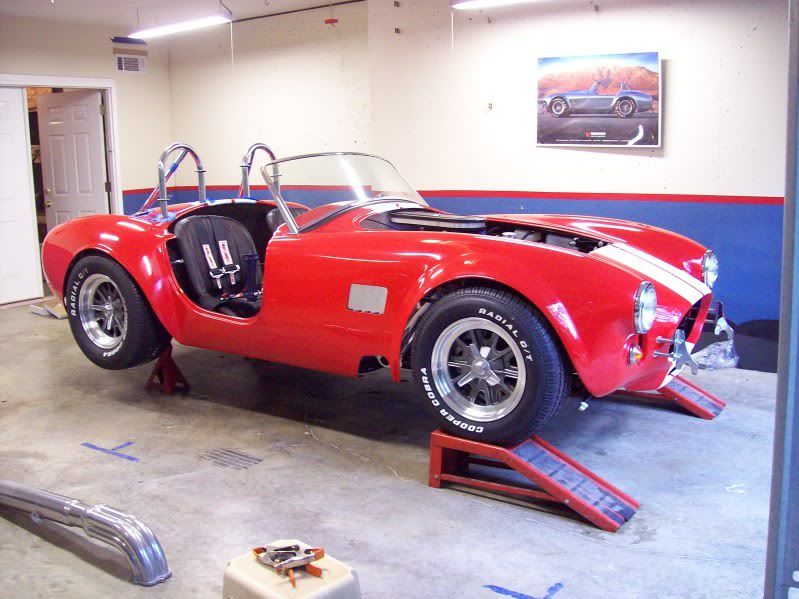
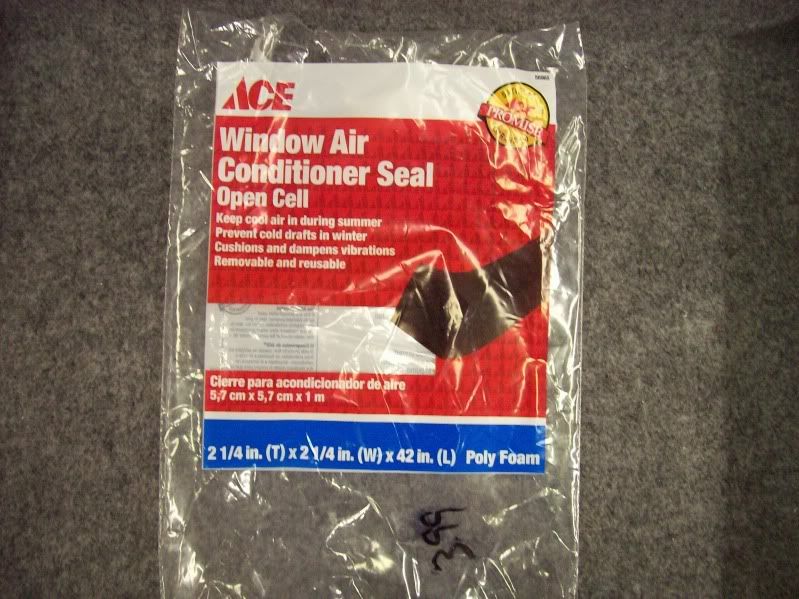
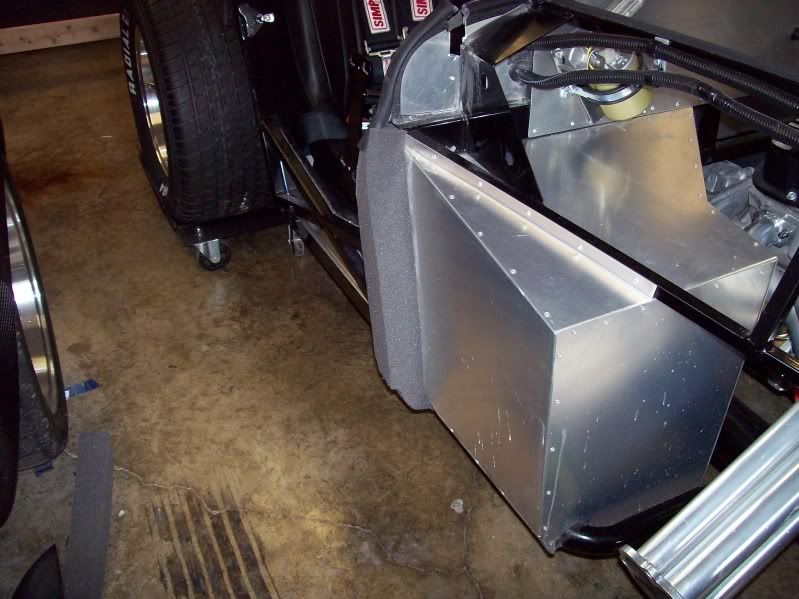
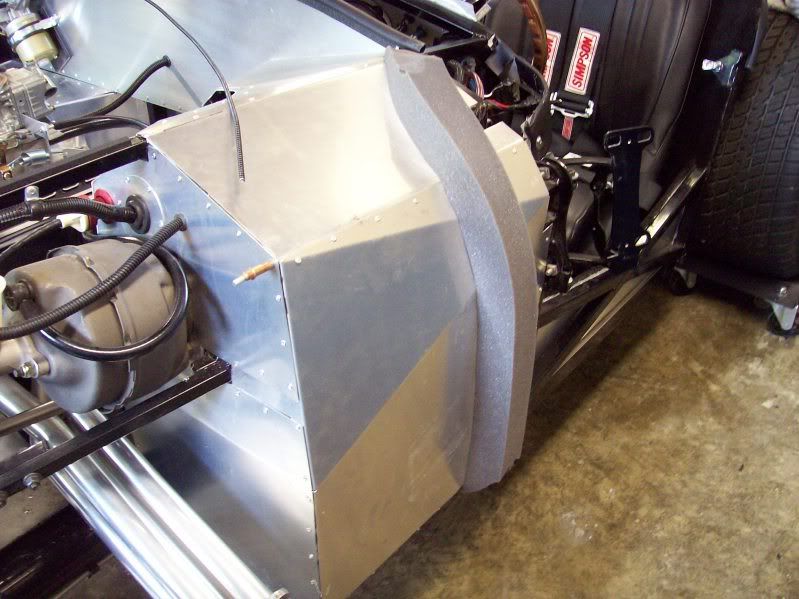
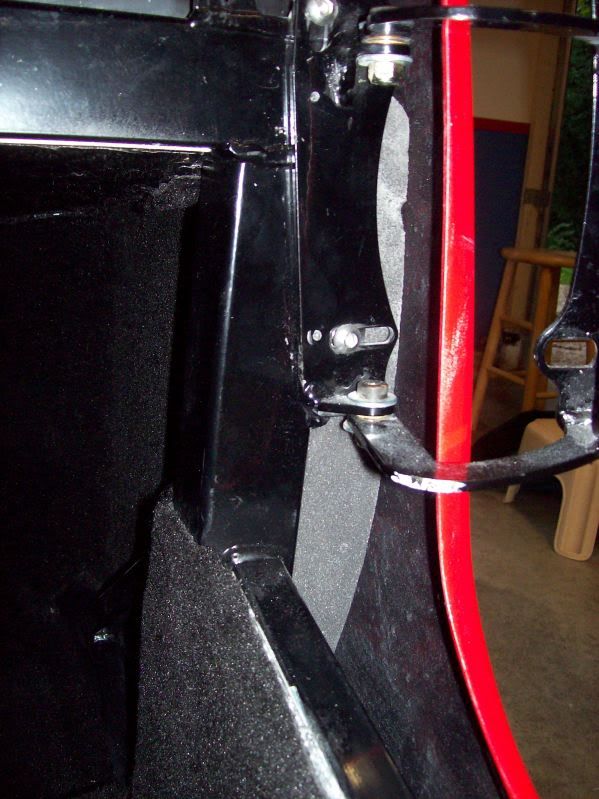
    Maybe it's just me and my way of looking at things but I am surprized there isn't more discussion about the insulation of the spaces between the body and the chassis in the roadster. I didn't find any reference in the manual or threads when I did a general search. I was strolling thru Walmart and saw the pool noodle display and just had to get one to have it on hand. I have heard of using them for bodywork but my main concern now is that space behind the door hinge. I was driving here in PHX area (the valley of the sun - got its name honestly). After the car got up to temp, I noticed it got much hotter in the cockpit and when I leaned my left leg over to the vertical 2x2 post holding the door hinge, it was almost too hot to touch. So if I was in Minnesota, that might be an asset (no heater needed) but it isn't going to get it here! I have over insulated the foot boxes and surrounding areas but that makes no difference when the heat is bypassing the footbox and aiming directly at the driver like a giant hair dryer. I will experiment with the pool noodle idea. I talked with a friend who used "Great Stuff" in that area and then painted it. I just happen to have 3/4 case of enerfoam which is a commercial version of the sprayable foam product. It's very effective but permanent by sticking to everything it touches (adhesive as well as filler).

    Have others gone this route and if so did it work out the way you planned? I know there are many ways to "skin a cat" but I'm tired of experimenting at this point. I find that I enjoy driving the roadster more than working on it! Duh. Thanks, WEK.
    FFR MkIII 302 (ATK), EFI 75mm TB with custom box plenum chamber, 24# injectors, 4 tube BBK ceramic, cold air sys, alum flywheel, crane roller rockers, T5, Wilwood pedals, custom five link with Watt's link, 4 rotors, coil overs, power steering with Heidt valve, alum FFR rad, driver's crash bar mod, mini dead pedal mod, quick release steering wheel hub #6046

  2. #2

    Join Date
    Feb 2011
    Location
    Colorado Springs
    Posts
    1,383
    Post Thanks / Like
    Over the years, there has been a lot of discussion about that. Pool noodles are a common recommendation. I don't like that idea, because they are not fire proof. I used pipe insulation, because it has the same shape, it is a true insulation, and it is available in fire proof and fire resistant materials.

    In front of the rear wheels and under the door I recommend expanding foam insulation to keep water out of the cockpit.
    .boB "Iron Man"
    NASA Rocky Mountain, TTU #42, HPDE Instructor
    BDR 1642: Coyote, 6 Speed Auto, Edelbrock Supercharger
    Member: www.MileHiCobraClub.com
    www.RacingTheExocet.com

  3. #3
    Senior Member turbonut48's Avatar
    Join Date
    Feb 2011
    Location
    Milwaukee, Wi.
    Posts
    142
    Post Thanks / Like
    The best suggestion I heard is to spray the expanding foam into a bag inside the cavity you want to plug. If you need to remove it it comes out a little easier because its not stuck to the actual body of the car. Great Stuff expands a LOT ! Theres also DAP which is a latex base foam. It washes off of hands and surfaces but doesnt expand as much.

    The Nut

  4. #4
    Senior Member MPTech's Avatar
    Join Date
    Feb 2011
    Location
    St. Louis, MO
    Posts
    1,186
    Post Thanks / Like
    Blog Entries
    8
    skullandbones,
    I was JUST complaining about this very issue yesterday.
    I have the body temporarily mounted in gel-coat, just got is registered and licensed a couple weeks ago. I did not install any of the weather-stripping or insulation yet. The mk4 comes with a piece of foam that is to be installed on the back edge of the footboxes, just in front of the door hinges, but I didn't install them yet (I was afraid I'd tear them up and I still need to finish and mount the aluminum panels)
    Yesterday, I drove it about 45 miles to my buddy's house (Rich GRSC) then we took about a 2 hour cruise through the backroads of St. Charles Mo. It was a beautiful 85 degrees, but the under-door aluminum panel and that 2x2 frame was REALLY HOT, and uncomfortable to the touch, almost painful to the touch.
    When I got home last night (and after the car cooled off) I installed some insulation in the air-space.
    Today, I drove it around for about 50 miles, and the difference is absolutely amazing. NO HEAT! The panels were air temperature and no hot air blowing in the cockpit!!!!!

    I went to Home Depot and bought 2 packages of black 2x2" by 40" foam insulation, used for around window air-conditioners.
    I removed the aluminum trim panels that go on top of the under-door x-frame, the horizontal panels, not the vertical panels. I left the vertical aluminum panels in.
    With the doors and hinges still on, I began stuffing the foam from the bottom of the hinge and moving it up with a metal 12" ruler, pushing from the bottom and working with my fingers from the top. It was kinda hard and I did scratch up my knuckles a bit (probably should have worn my shop gloves), but eventually I worked it all the way to the top, just in front of the windshield posts. I also used an ice pick at the top of the hinge to poke the foam and pull it up. Then I stuffed the rest in the bottom and brought it back along the lower frame a bit and cut off about a foot. I took this piece and stuffed it into the top of the footbox from the engine compartment. This prevents 90% of the hot air that enters behind the dash!

    Before you mess with the expandable foam and pool noodles, I HIGHLY recommend this method.
    I am VERY HAPPY with the results!
    Last edited by MPTech; 05-19-2013 at 09:20 PM.
    F5R #7446: MK4, 302, T5 midshift, 3.55 Posi IRS, 17" Halibrands
    Delivered 4/4/11, First start 9/29/12, Licensed 4/24/13, off to PAINT 2/15/14!! Wahoo!

  5. #5
    Senior Member edwardb's Avatar
    Join Date
    Feb 2011
    Location
    Lake Orion, Michigan
    Posts
    10,577
    Post Thanks / Like
    The kit comes with expandable foam sealing tape, and the instructions show using this material on the aluminum panels just in front of the door hinges right before installing the body. It expands and fills the area nicely. It is one-time use, so can't be used for the multiple times the body is on/off during the build. But it's easy and works so well I'm a little unclear why these others solutions, e.g. pool noodles, spray foam, etc.

    For my Mk3 build, I was not the original owner, and the FFR supplied expanding sealing tape wasn't included. I used a similar material from McMaster. Their PN 7650A14, Gap-Filling Expandable Foam Sealing Tape 1" W, 13' L, 1/2" Compressed/2" Expanded Thickness. Highly recommended.
    Build 1: Mk3 Roadster #5125. Sold 11/08/2014. Build 2: Mk4 Roadster #7750. Sold 04/10/2017. Build Thread
    Build 3: Mk4 Roadster 20th Anniversary #8674. Sold 09/07/2020. Build Thread and Video. Build 4: Gen 3 Type 65 Coupe #59. Gen 3 Coyote. Legal 03/04/2020. Build Thread and Video
    Build 5: 35 Hot Rod Truck #138. LS3 and 4L65E auto. Rcvd 01/05/2021. Legal 04/20/2023. Build Thread. Sold 11/9/2023.

  6. #6
    cobra Handler skullandbones's Avatar
    Join Date
    Jul 2011
    Location
    Superstition Mtn foothills 5 miles west of Gold Canyon AZ
    Posts
    2,686
    Post Thanks / Like
    Blog Entries
    19
    Well. I've got egg on my face so to speak. I found a roll of foam in a plastic envelope about 7x1.5 inches at the bottom of my insulation and rubber seal box. I had pretty much dismissed it as extra foam for filling small gaps in the aluminum in various places of the cockpit (mentioned in manual). It is part # 13712 Foam Weatherstrip. So then I went back to the manual trying to find the instructions. I have looked over and over and still missed it on pg 128 but the part number was there so I saw that. I guess I was looking for a header to identify it but it was in the general instructions for "Rubber Seals on Aluminum". As plain as day, Attention! So thanks edwardb. I wish I had seen the little label that says 1/2" x 1" expanded to 2" on the edge of the foam. That might have gotten my attention more.

    I have my doors/hinges off now to make this a little easier (used the alignment hole idea thanks, Jeff K). I hope my experience is as good as MTTech's when I get the space filled. I have a feeling there will be some bleeding involved though.

    I have another thought about the expandable foam. I was thinking that with the rocker panels and doors filled with this high grade closed foam product, I might add some safety factor in case of a side impact. That may be a stretch but I still might do it just for the insulation and sound dampening. That can't hurt!

    Also, if anyone else has other ideas or experiences they want to share about this subject, I'm interested to hear what you have to say and think. I learn something new everytime I get into one of these discussions. It's pretty cool. Thank you, WEK.
    FFR MkIII 302 (ATK), EFI 75mm TB with custom box plenum chamber, 24# injectors, 4 tube BBK ceramic, cold air sys, alum flywheel, crane roller rockers, T5, Wilwood pedals, custom five link with Watt's link, 4 rotors, coil overs, power steering with Heidt valve, alum FFR rad, driver's crash bar mod, mini dead pedal mod, quick release steering wheel hub #6046

  7. #7
    Not a waxer Jeff Kleiner's Avatar
    Join Date
    Feb 2011
    Location
    Bloomington, Indiana
    Posts
    8,094
    Post Thanks / Like
    Here's an exerpt from my "indy14" build thread discussing the square foam Mark mentioned:

    Quote Originally Posted by JKleiner View Post
    Big milestone:
    Steve, my friend Aaron (aaron44) and another buddy came by yesterday afternoon and we dropped the body on! It's well on it's way to looking like a real car now:


    One area on my car which was very difficult to seal after the body was on was the gap between the body and chassis in front of the doors. The gooey stuff FFR provides did not spring enough to fully fill the voids (plus is just a pain to work with!). I think this solution is going to work well. I picked up some medium soft foam weatherstripping intended for sealing window air conditioner units in their openings and applied it to each side using 3M Super 77 before installing the body.


    Ran from the end of the bulb seal to the bottom of the footbox on the paseenger side:


    On the driver's side I ran it all the way up and across the top of the footbox to meet the bulb seal at the cowl:


    It is soft enough to compress almost to nothing without deforming the body and fills the gap fully:


    That's it for now---back out to get busy on pipes, splash panels, nose aluminum and the hinged body panels!

    Jeff
    It works well. I'll do the same when the body goes on the car I'm building for Aaron and one of these days when I R&R mine.

    Cheers,
    Jeff

  8. #8
    Senior Member CraigS's Avatar
    Join Date
    Feb 2011
    Location
    Blacksburg, Va
    Posts
    4,732
    Post Thanks / Like
    I will third the AC foam. I find it's just the right density. You can squeese it down to maybe 1/2 inch if needed. But it's not so strong a spring back that it will push things out of position. Not sure about the MkIV, but on the previous bodies one needed to be real careful sealing ahead of the door hinges so as not to push the body out and mess w/ door body fit.
    FFR MkII, 408W, Tremec TKO 500, 2015 IRS, DA QA1s, Forte front bar, APE hardtop.

  9. #9
    Senior Member MPTech's Avatar
    Join Date
    Feb 2011
    Location
    St. Louis, MO
    Posts
    1,186
    Post Thanks / Like
    Blog Entries
    8
    Be careful with that expanding foam, if you go that route. I've heard stories that it deformed the body and doors.
    If you do use it, look for the low expanding type.

    I plan to use the low expanding foam in my doors later, for sound deadening. One of my friends in the club did it and it greatly improved the "thud" when you close the door!
    F5R #7446: MK4, 302, T5 midshift, 3.55 Posi IRS, 17" Halibrands
    Delivered 4/4/11, First start 9/29/12, Licensed 4/24/13, off to PAINT 2/15/14!! Wahoo!

  10. #10
    Senior Member 68GT500MAN's Avatar
    Join Date
    Feb 2011
    Location
    Fresno, CA
    Posts
    1,808
    Post Thanks / Like
    No foam in my MKIII. These cars were hot, smelly and loud back in the 60's. That is the way I like it. YES it does get HOT here in the Central Valley, so I did install Cobra Earl's foot box vents. By the way, when I drove CSX3035 on a 105 degree day in the summer of 2009, it was exactly like I said, but who noticed, I was driving THE car.
    Just my opinion,
    Doug

  11. #11
    cobra Handler skullandbones's Avatar
    Join Date
    Jul 2011
    Location
    Superstition Mtn foothills 5 miles west of Gold Canyon AZ
    Posts
    2,686
    Post Thanks / Like
    Blog Entries
    19
    I did stuff a couple of pool noodles (boooooo.....) in the space as a way of getting around the giant hair dryer syndrome. So even though it may or may not be my final solution, I wanted to report that my latest drive was very pleasant compared to the last one without the spaces filled. I had Trish shine a light from the forward wheel wells back toward where the "insulation" was and no light came thru. I think there may be some tweeking to do with silicone or expandable foam but not nearly as much as I thought. Anyway, I had to make another trip to the MVD to straighten out the error on my new title. They insisted on titling it as a 2013 SPCON even with me complaining like crazy. Well, long story short they updated it to 1965 SHELBY SPCON. So after the correction, I took my first real pleasure drive up Hwy 88 toward the mountain lakes so I could calibrate my speedometer. There are mile markers on that state hwy. The good news is that even with blazing sun and 90+ temp, I was perfectly comforable in the cockpit with nothing else done. I'm sure I will confine my driving to early morning or after six trips until the fall but that will be plenty of time to work out the bugs and get some seat time in the roadster. Thanks, WEK.

    Also, I think it may have made the sound a little more muffled but not sure about that. When it hits about 4k on the rev meter, it starts to hurt my ears so no help there except ear plugs.
    FFR MkIII 302 (ATK), EFI 75mm TB with custom box plenum chamber, 24# injectors, 4 tube BBK ceramic, cold air sys, alum flywheel, crane roller rockers, T5, Wilwood pedals, custom five link with Watt's link, 4 rotors, coil overs, power steering with Heidt valve, alum FFR rad, driver's crash bar mod, mini dead pedal mod, quick release steering wheel hub #6046

  12. #12
    Senior Member AZPete's Avatar
    Join Date
    Feb 2011
    Location
    Scottsdale, AZ
    Posts
    2,374
    Post Thanks / Like
    All good: now registered as a 1965, no more hot air and a mountain drive. I found ear plugs are a necessity! Use them before your ears are damaged.
    Pete
    818S/C : Chassis #25 with 06 WRX 2.5 turbo, ABS, cruise, PS, A/C, Apple CarPlay, rear camera, power windows & locks, leather & other complexities. Sold 10/19 with 5,800 miles.
    Mk3 Roadster #6228 4.6L, T45, IRS, PS, PB, ABS, Cruise, Koni's, 17" Halibrands, red w/ silver - 9K miles then sold @ Barrett-Jackson Jan 2011 (got back cash spent).

  13. #13
    cobra Handler skullandbones's Avatar
    Join Date
    Jul 2011
    Location
    Superstition Mtn foothills 5 miles west of Gold Canyon AZ
    Posts
    2,686
    Post Thanks / Like
    Blog Entries
    19
    Hey Pete,

    Yeah. I will have to give you a ring today and talk about the cars. You helped me get re-energized on my build when you visited me some time ago. Sometimes it just takes a little encouragment by someone who has been down the same road, so to speak. I was beginning to think you would get your 818 and have it built before I got on the road with mine. But now it will be a race to the finish for the paint and bodywork. Since you have a head start with the no paint panels, it will be close. Should be interesting seeing the first 818 in the valley in the mix with all the roadsters. See ya, WEK.
    FFR MkIII 302 (ATK), EFI 75mm TB with custom box plenum chamber, 24# injectors, 4 tube BBK ceramic, cold air sys, alum flywheel, crane roller rockers, T5, Wilwood pedals, custom five link with Watt's link, 4 rotors, coil overs, power steering with Heidt valve, alum FFR rad, driver's crash bar mod, mini dead pedal mod, quick release steering wheel hub #6046

  14. #14
    Senior Member
    Join Date
    Jan 2013
    Posts
    110
    Post Thanks / Like
    Blog Entries
    1
    I purchased an MKII (3033) last summer and was very surprised with the cockpit heat. So this winter I went to work to correct the problem. Here is what I did
    1. Painted headers and j-pipe with VHT paint and wrapped with DEI titanium hear wrap
    2. Used GE expanding foam to fill all the gaps
    3. Applied ez cool mat to the firewalls and foot boxes

    I have driven the car several times and there is no longer a heat problem. All projects can be done pretty cheap and do not require any pro help. Enjoy
    #3033

  15. #15
    cobra Handler skullandbones's Avatar
    Join Date
    Jul 2011
    Location
    Superstition Mtn foothills 5 miles west of Gold Canyon AZ
    Posts
    2,686
    Post Thanks / Like
    Blog Entries
    19
    Hi ricobrafan,

    That's very interesting getting a car in that state of construction. I changed my plan for using shorty headers and j pipes and got the ceramic coated 4x4 headers (there goes the budget build). That was my first strategy similar to what you did in the engine compartment. I think it can make a 50 degree difference. It's better to reduce the heat as much as possible or shield it before it starts heat soaking thru the barriers. I super insulated my footboxes, tunnel, firewall, and cockpit alum. But there still was the problem with all the gaps which I had just not thought much about until that first drive. So I guess you and I were kind of in the same phase of construction. Mine is definitely not finished by a long shot. I am using the insulating foam in the rocker panels and will probably do the doors too. I like the solid feel that it gives (just did one side so far). BTW, I think I will go back and put alum heat shields between the header tubes and the footbox panels but that will be a month or two as there are many mini projects that are higher on the priority list. I'm trying to work and drive. I took so long to get it on the road, I don't want to take it down so it is not drivable for a long period. Hope you are having as much fun as I am! See ya, WEK.
    FFR MkIII 302 (ATK), EFI 75mm TB with custom box plenum chamber, 24# injectors, 4 tube BBK ceramic, cold air sys, alum flywheel, crane roller rockers, T5, Wilwood pedals, custom five link with Watt's link, 4 rotors, coil overs, power steering with Heidt valve, alum FFR rad, driver's crash bar mod, mini dead pedal mod, quick release steering wheel hub #6046

  16. #16
    Junior Member
    Join Date
    Jul 2011
    Posts
    8
    Post Thanks / Like
    good topic,often overlooked,there are a lot of companies that make a lot of good products,Kool Mat have some great shielding,its a lot easier to do when building the car.I suggest anyone building a kit car to install shielding under the muffler,cats,flooring,inside the doors and wells if you have headers,sidepipes,speaking off side pipes,Kool cat has some nice shielding material,you could have a aluminum fab shop bend the shields then using the 3M adhesive attach the shielding,insulation.The shield would have a space between for air to flow.Insulating for both noise and heat makes it fun to drive.Their is special paint,gold sheeting works real good,expensive ,but I'm sure their are cheaper foils available.I think we should all explore this area of the build,early on,rather then deal with it later.

  17. #17
    Member
    Join Date
    Feb 2011
    Posts
    30
    Post Thanks / Like
    Quote Originally Posted by Godscountry View Post
    good topic,often overlooked,there are a lot of companies that make a lot of good products,Kool Mat have some great shielding,its a lot easier to do when building the car.I suggest anyone building a kit car to install shielding under the muffler,cats,flooring,inside the doors and wells if you have headers,sidepipes,speaking off side pipes,Kool cat has some nice shielding material,you could have a aluminum fab shop bend the shields then using the 3M adhesive attach the shielding,insulation.The shield would have a space between for air to flow.Insulating for both noise and heat makes it fun to drive.Their is special paint,gold sheeting works real good,expensive ,but I'm sure their are cheaper foils available.I think we should all explore this area of the build,early on,rather then deal with it later.
    I have had my Mark II for a number of years and tried a few different things to seal the body to the chassis. I found the most effective foam to be memory foam. I bought a memory foam pillow at Wal-Mart, cut it vertically and stuffed it down each side. The foam is easy to place and shapes itself to fill the leaks.

  18. #18
    Senior Member Avalanche325's Avatar
    Join Date
    Nov 2011
    Location
    Jax Beach, FL
    Posts
    2,103
    Post Thanks / Like
    Are there any issues with the A/C or memory foam getting wet?

Posting Permissions

  • You may not post new threads
  • You may not post replies
  • You may not post attachments
  • You may not edit your posts
  •  

Replica Parts

Visit our community sponsor