FormaCars

Visit our community sponsor

Thanks Thanks:  0
Likes Likes:  0
Page 24 of 34 FirstFirst ... 142223242526 ... LastLast
Results 921 to 960 of 1358

Thread: RM1Sepex Build Thread

  1. #921
    Senior Member Silvertop's Avatar
    Join Date
    Mar 2011
    Location
    Forest Lake MN
    Posts
    880
    Post Thanks / Like
    Quote Originally Posted by RM1SepEx View Post
    I'm running stock tires from the donor 205-50-16 Direzza on the front and 225-55-16 on the back 15 mm spacers on the front and 1.5 inches on the rear. Clearance is tight but workable however the tires are about 1/3 worn so the diameter is less than a new tire. Long term I'm going to 17's in the proper sizes...
    Thanks for the response. Since my plan (which could change, I suppose) is to stick with the Subie rims, and since YOUR clearances are very tight at the front even with tires that are somewhat worn, it would probably be prudent for me to drop down to 205/45 - 16 on the front, which will give me a tire diameter of 23.3", well under the 24" max that FFR recommends. This puts me 2/5 of an inch closer to the ground, which I don't much care for, given that I will have a front splitter, which further reduces my ground clearance. I suppose I can find a way to raise it back up again with suspension adjustments, or some sort of shim......

    Apologies for pulling your build thread off topic.

  2. #922
    Senior Member Tamra's Avatar
    Join Date
    Apr 2014
    Location
    Shelton, CT
    Posts
    1,011
    Post Thanks / Like
    Quote Originally Posted by RM1SepEx View Post
    Tis a sad day we lost BNAS for the foreseeable future as an autocross lot. It was the biggest/best on the East Coast. Back to smaller lots and Loring AFB up in Limestone once a year for a big weekend event.
    What happened? That's really too bad. Guess maybe you'll have to come down to Devens
    Tamra
    Building 818SR #297 picked up 10/25/14 with Andrew (xxguitarist)
    First start 12/21/14, First "drive" 1/17/15
    First Dyno at EFI Logics 3/7/15- 310whp at 15psi for break in, full spool by ~3500rpm!
    First autocross 3/29/15
    1st Registered 818 in Connecticut 7/24/2015. 9 months - 1 day from kit pickup!

  3. #923
    Senior Member RM1SepEx's Avatar
    Join Date
    Jul 2011
    Location
    Freeport, ME
    Posts
    3,801
    Post Thanks / Like
    Quote Originally Posted by Tamra View Post
    What happened? That's really too bad. Guess maybe you'll have to come down to Devens
    They are doing everything that they can to "reclaim" the real estate and fill it with new tenants. Apparently they filled more space and our limited income opportunity became unneeded.

    It really just begged for a full time multi use facility. Driving school with Miatas, winter driving, kart racing etc... the adjacent hanger is absolutely huge!

    Devins doesn't allow my shifter... Though I may go down with the 818 or one of the Miata in the future. I was going to sell my 1990-94 mongrel but I'm thinking it will be a perfect backup car for Karen and myself. Miata work well in all but blizzard conditions and driving one in the winter is an excellent way to improve driving skills. I have absolutely no respect for my 1993 Del Sol, its a rat!

    Its 5 hrs from here to Loring in Limestone but well worth the trip!
    Dan

    818S #17 Picked up 8/1/13 First start 11/1/13 Go Kart 3/28/14

  4. #924
    K3LAG's Avatar
    Join Date
    May 2013
    Location
    Greensburg, PA
    Posts
    552
    Post Thanks / Like
    Quote Originally Posted by RM1SepEx View Post
    Wow

    I ran into the same thing on mine, I measured 8 inches with the tape hooked on the inside of the tubing, and have the exact same issue with my door latches... so we are in the same place!!! yet my humps fit tight but don't need a cut out

    What is the edge to edge on the outside of your roll bar tubes? We are missing something, they are not using that many molds and I can't imagine that they vary that much.
    Dan,

    Finally got back to the car after being a bit under the weather. I measured the width of the roll bar. We measured center-to-center across the front of the roll bar where it attaches to the frame. It's about 45.5".

    Out of curiosity I also looked to see how far we would have to move the body back for the engine cover to clear the roll bar. It looks like it would have to move back nearly a full inch. No way that would work.

    How is your fit coming?

    Larry

  5. #925
    Senior Member RM1SepEx's Avatar
    Join Date
    Jul 2011
    Location
    Freeport, ME
    Posts
    3,801
    Post Thanks / Like
    Larry, I've been under the weather yet again too... :-(

    here goes nothing

    I think the 5/8 measurement for the lower front of the side panels is as Azpete IDed "just a starting point"

    I added some cloth under the front edge of the engine cover, used a buck to fix the shape, sitting flat = FUBAR My body's gel coat cracked due to stress at the hoop cutouts...

    I ended up moving the sides back about 3/8 +/-, the side panels are as far back as I can put them, the edges line up with the door latch brackets. It is EXTREMELY important that the body has the right "curve" to it. The engine cover should sit on the car so that the side "ears" are parallel to the ground. Metalmaker ID'ed the key, the height of the rear of the engine cover. As you lift it in the back these "ears" twist making the cover widen at the roll bars and narrow at the outside edge where it sits in the side panel grooves. See his thread, he ended up with a brace 8 inches tall supporting the rear of the cover. My final brace isn't done yet. I need some spacer in the front center to support the engine cover as well. I've bent my side panel supports to better match the body's shape and added some 1/4 inch plastic spacers to minimize stress as I hold it down. When they are flat and parallel to the ground they cause stress on the fiberglass when you tighten screws in place.

    We need to make sure that the engine cover sits higher on the side panels and the rubber weatherstripping. There is quite a bit of clearance that is obtained doing these things. Making the engine cover arc in the center gives more even gap spacing, as the cover flattens you get narrow front gaps widening towards the rear.

    Next the nose, bringing the side panels back pulls the nose back as well as the fender bottom to side panel location is fixed. Align the body lines, I used tape to define the line and make it easy. If you look through many threads everyone has problems getting the nose back to the radiator frame assy. Even with my side panels farther back my nose doesn't reach the radiator frame, I need an aluminum bracket to "adjust" the position. The hood has the same issue as the engine cover, it needs support in the rear to cause it to arc more, it flattens during storage.

    P1120347.JPG P1120344.JPG P1120345.JPG P1120346.JPG

    Larry the roll bar has about 1/8 clearance in the photos, before I support the back of the engine cover, I'll have plenty of clearance and will add some rubber under the cover to geep it off the roll bar when driving

    notes

    you can see plastic spacers holding up the front center of the engine cover in the second photo & in the last photo the angle makes it look like the bracket sticks out, from a full side view it is flush with the edge of the side panel
    Last edited by RM1SepEx; 01-17-2015 at 09:19 AM.
    Dan

    818S #17 Picked up 8/1/13 First start 11/1/13 Go Kart 3/28/14

  6. #926
    Senior Member
    Join Date
    Oct 2012
    Posts
    556
    Post Thanks / Like
    Which weatherstripping is used, and where is it mounted? On the covers or on the quarter panels? Also, I am assuming that the perimeters of all three covers have to be trimmed to lie flat. Correct?

  7. #927
    Senior Member RM1SepEx's Avatar
    Join Date
    Jul 2011
    Location
    Freeport, ME
    Posts
    3,801
    Post Thanks / Like
    the 1/2 moon stick on rubber strips that came with the kit are stuck on the front fender returns, the trunk and engine cover, basically all of those flat surfaces that have a body panel close down on them. You can see it in their photos

    yes virtually every fiberglass piece needs trimming somewhere to fit

    see the rubber strips on Wayne's 818 post 942

    http://thefactoryfiveforum.com/showt...6-power/page24
    Last edited by RM1SepEx; 01-17-2015 at 03:05 PM.
    Dan

    818S #17 Picked up 8/1/13 First start 11/1/13 Go Kart 3/28/14

  8. #928
    Senior Member
    Join Date
    Jan 2012
    Posts
    1,112
    Post Thanks / Like
    Did you put in a hood support. The FFR one did wonders for my hood which sat flat for 10 months. Going to work on the wiper install soon now that I got my front end fitting with livable gaps.

  9. #929
    Senior Member RM1SepEx's Avatar
    Join Date
    Jul 2011
    Location
    Freeport, ME
    Posts
    3,801
    Post Thanks / Like
    Yes, about an inch taller than the FFR aluminum one with the rubber on the top... I put an aluminum "post" off the center of the 1 inch tubing... It is 5 inches tall. I think I will replace this lightweight aluminum with an aluminum post with adjustable rubber top... We all need to realize that the panels are a bit flimsy for high speeds as delivered. I'll hinge the front of the hood again :-( and add a prop rod. I think a couple of lightweight ribs will stiffen the hood some as well.

    P1120113.JPG
    Dan

    818S #17 Picked up 8/1/13 First start 11/1/13 Go Kart 3/28/14

  10. #930
    Senior Member
    Join Date
    Jan 2012
    Posts
    1,112
    Post Thanks / Like
    Ok I see what you did. I put the FFR where you put your taller hood support with the wiper install in mind. It worked out for me. It's only clecoed in place right now put its nice and snug especially with the adjustable quick latches.

  11. #931
    Senior Member RM1SepEx's Avatar
    Join Date
    Jul 2011
    Location
    Freeport, ME
    Posts
    3,801
    Post Thanks / Like
    The FFR piece was made to cover the access for the brake master and support the hood at the edge of the windshield
    Dan

    818S #17 Picked up 8/1/13 First start 11/1/13 Go Kart 3/28/14

  12. #932
    Senior Member
    Join Date
    Oct 2012
    Posts
    556
    Post Thanks / Like
    What is this FFR supplied support that you are mentioning? I can't find it.

  13. #933
    Senior Member AZPete's Avatar
    Join Date
    Feb 2011
    Location
    Scottsdale, AZ
    Posts
    2,374
    Post Thanks / Like
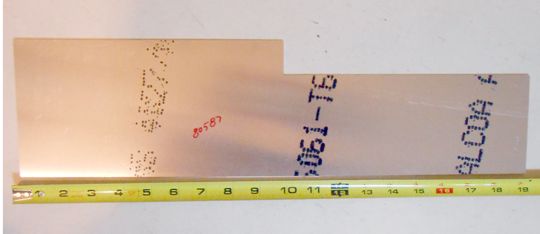
    The FFR hood support is part #80587. You can call FFR for it or just make it yourself because it's just a flat piece of aluminum that you could cut to fit as you like then put a piece of bulb seal along the top edge. I couldn't find a photo of one installed but someone else might post that.


    Edit: Go up to Dan's Post #929 for a photo of this installed onto the windshield flange.
    Last edited by AZPete; 01-19-2015 at 04:15 PM. Reason: photo in #929
    818S/C : Chassis #25 with 06 WRX 2.5 turbo, ABS, cruise, PS, A/C, Apple CarPlay, rear camera, power windows & locks, leather & other complexities. Sold 10/19 with 5,800 miles.
    Mk3 Roadster #6228 4.6L, T45, IRS, PS, PB, ABS, Cruise, Koni's, 17" Halibrands, red w/ silver - 9K miles then sold @ Barrett-Jackson Jan 2011 (got back cash spent).

  14. #934
    Senior Member RM1SepEx's Avatar
    Join Date
    Jul 2011
    Location
    Freeport, ME
    Posts
    3,801
    Post Thanks / Like
    Quote Originally Posted by AZPete View Post
    The FFR hood support is part #80587. You can call FFR for it or just make it yourself because it's just a flat piece of aluminum that you could cut to fit as you like then put a piece of bulb seal along the top edge. I couldn't find a photo of one installed but someone else might post that.


    Edit: Go up to Dan's Post #929 for a photo of this installed onto the windshield flange.
    Hell I have two of them...
    Dan

    818S #17 Picked up 8/1/13 First start 11/1/13 Go Kart 3/28/14

  15. #935
    Senior Member RM1SepEx's Avatar
    Join Date
    Jul 2011
    Location
    Freeport, ME
    Posts
    3,801
    Post Thanks / Like
    Shifter is done, first gen MR2, rebuilt, installed under custom aluminum 1/4 plate.

    Shifter cables http://www.boatersland.com/telccx43307.html

    clamps http://www.mcmaster.com/#2695k85/=w3ugmq

    At transaxle: 4 inch bell crank for "twist" motion with 3/8 OD, 1/4 ID oilite bushing from Ace, cut stock FFR shift bracket vertical mount for twist, used horizontal for pivot for bell crank, modified the bulkhead tab for in/out replaced tab with two holes for clamp listed above, mounted clamp for twist through bell crank in 2 x 2 x 1/8 aluminum angle mounted under FFR shift bracket. Used 1/4 - 28 female rod ends and FFR provided ball stud ends where appropriate. My FFR bracket is shifted 1.5 inch forward and my shift arm is flipped so the bracket is forward and it is welded to the shift coupler.

    At Shifter: Drilled MR2 shifter for 3/8OD, 1/4 ID oilite bushing, shortened as required. Cut off peg from stock twist motion arm, drilled for 1/4 through hole. Used 1/4 -28 female rod ends to connect to cables. Cables clamped with McMaster clamps listed above. Hung shifter ball socket 1/2 under plate to limit up angle on cables.

    P1120401.JPG P1120398.JPG

    Shift action is very direct and throw is damn short! The Teleflex cables make a HUGE difference!
    Attached Images Attached Images
    Last edited by RM1SepEx; 02-28-2017 at 07:09 PM.
    Dan

    818S #17 Picked up 8/1/13 First start 11/1/13 Go Kart 3/28/14

  16. #936
    Moonlight Performance
    Hindsight's Avatar
    Join Date
    May 2014
    Location
    Atlanta
    Posts
    3,402
    Post Thanks / Like
    Very nice! Thanks for sharing the details and sources.

    Did you rebuild the Mr2 shifter and if so, were the bushings and main ball readily available from the dealer?

  17. #937
    Senior Member RM1SepEx's Avatar
    Join Date
    Jul 2011
    Location
    Freeport, ME
    Posts
    3,801
    Post Thanks / Like
    Everything is available, however I found that clean, wire brush the ball, regrease and reassemble did wonders. Bob found that you can buy a new ball & shaft etc dirt cheap on ebay.

    Bob noticed the large clearance hole, the cup needs to be held down, here is an updated photo showing it being done and that I shimmed the assemby down to reduce the angle of the cables.

    P1120405.JPG

    http://www.ebay.com/itm/Toyota-MR2-m...0ef50a&vxp=mtr

    You could do it as well with this setup reversed P1120374.JPG for sale $350 shipped in continental US ($50 off FFR $ and free shipping)
    Dan

    818S #17 Picked up 8/1/13 First start 11/1/13 Go Kart 3/28/14

  18. #938
    Senior Member Tamra's Avatar
    Join Date
    Apr 2014
    Location
    Shelton, CT
    Posts
    1,011
    Post Thanks / Like
    Looks great! Can you post a video? How's the side to side play while in gear now?
    Tamra
    Building 818SR #297 picked up 10/25/14 with Andrew (xxguitarist)
    First start 12/21/14, First "drive" 1/17/15
    First Dyno at EFI Logics 3/7/15- 310whp at 15psi for break in, full spool by ~3500rpm!
    First autocross 3/29/15
    1st Registered 818 in Connecticut 7/24/2015. 9 months - 1 day from kit pickup!

  19. #939
    Moonlight Performance
    Hindsight's Avatar
    Join Date
    May 2014
    Location
    Atlanta
    Posts
    3,402
    Post Thanks / Like
    Quote Originally Posted by RM1SepEx View Post
    Bob noticed the large clearance hole, the cup needs to be held down, here is an updated photo showing it being done and that I shimmed the assemby down to reduce the angle of the cables.
    Thanks for all the info and links Dan. I didn't quite follow the sentence above though. Could you elaborate a bit?

  20. #940
    Senior Member RM1SepEx's Avatar
    Join Date
    Jul 2011
    Location
    Freeport, ME
    Posts
    3,801
    Post Thanks / Like
    look at 1st photo in post 935, then the one in post 937

    the shifter has a ball on the lower end and sits in a plastic cup, the ball is held in the cup with a circlip. The cup is held down by the top plate and my aluminum plate is thicker, so the hole had to be wider to allow the ball to rotate to get into gear. It is so wide that the cup wasn't held down well, I added a thin piece of aluminum to hold it down and you can see the ball is lower and held down in the last photo.

    Notice that Bob's shifter uses the blue plate used to hold down the ball. You can see it on the EBay link. I didn't machine my plate with an angled profile to the side of the hole.

    Perhaps video soon, right now it doesn't like sliding into second and I can start the engine to try a slight trans shaft movement, my harness is out at IWire
    Dan

    818S #17 Picked up 8/1/13 First start 11/1/13 Go Kart 3/28/14

  21. #941
    Moonlight Performance
    Hindsight's Avatar
    Join Date
    May 2014
    Location
    Atlanta
    Posts
    3,402
    Post Thanks / Like
    Ok I think I understand. So the real issue is that the OEM top plate that the ball cup mounts to, is just very thin and allows too much flex?

  22. #942
    Senior Member RM1SepEx's Avatar
    Join Date
    Jul 2011
    Location
    Freeport, ME
    Posts
    3,801
    Post Thanks / Like
    no, it has mounts for bulkhead fittings and custom Toyota cables, can't work w/o modifications for the Teleflex cables, tho I'm sure it could be done, we both chose a different route, tons of ways to skin a cat ya know. I drilled bushed and used the rod ends and clamp mounts on both ends, Bob used clevis parts from McMaster and bulkhead on one end, clamp on the other.

    If I was to start over I might just try the teleflex cables in the stock FFR lengths, they are just designed so much better, they have a sheath design that eliminates the slop inherent to the cheap control cables. The optional billet FFR shifter is much nicer than the plastic one too and eliminates its flex. It may make someone happy. It also could be reversed easily too you would just need two bell cranks, the push pull one with straight equal lengths and pivoting in the middle.

    My problem is owning a virtual fleet of 4 Miata, they have short throws and essentially no linkage, I wanted to get a close to that as possible.
    Dan

    818S #17 Picked up 8/1/13 First start 11/1/13 Go Kart 3/28/14

  23. #943
    818 Junkie... bstuke's Avatar
    Join Date
    Feb 2011
    Location
    Atlanta, GA
    Posts
    469
    Post Thanks / Like
    Got most of my body on yesterday. Went for a spin and couldn't figure out why it kept popping out of 2nd or reverse. Finally realized that it was hitting the rear cowl. Now I have a nice square hole in the rear vent area!
    818R For Sale!
    818R Sale Thread
    PADI Master Scuba Diver Trainer, PADI TecRec Gas Blender Instructor, Operations Manager - DNS Diving, Grand Cayman

  24. #944
    Moonlight Performance
    Hindsight's Avatar
    Join Date
    May 2014
    Location
    Atlanta
    Posts
    3,402
    Post Thanks / Like
    Quote Originally Posted by RM1SepEx View Post
    My problem is owning a virtual fleet of 4 Miata, they have short throws and essentially no linkage, I wanted to get a close to that as possible.
    Never owned a Miata but my thought has always been that foot and hand controls need to be as good as possible for best driving enjoyment. A really nice steering wheel, shift knob, well bled brakes, and crisp shifter action with no slop will make a tremendous difference in the feeling of driving a car.

    I ordered a used MR2 shifter on eBay today so within a month or two, I'll be joining you and Bob. I'm sure like you both did, I'll borrow a little from your experiences and also fab up some things of my own.

  25. #945
    Administrator
    Wayne Presley's Avatar
    Join Date
    Feb 2011
    Location
    Enterprise Alabama
    Posts
    2,804
    Post Thanks / Like
    Blog Entries
    3
    Quote Originally Posted by RM1SepEx View Post
    no, it has mounts for bulkhead fittings and custom Toyota cables, can't work w/o modifications for the Teleflex cables, tho I'm sure it could be done, we both chose a different route, tons of ways to skin a cat ya know. I drilled bushed and used the rod ends and clamp mounts on both ends, Bob used clevis parts from McMaster and bulkhead on one end, clamp on the other.

    If I was to start over I might just try the teleflex cables in the stock FFR lengths, they are just designed so much better, they have a sheath design that eliminates the slop inherent to the cheap control cables. The optional billet FFR shifter is much nicer than the plastic one too and eliminates its flex. It may make someone happy. It also could be reversed easily too you would just need two bell cranks, the push pull one with straight equal lengths and pivoting in the middle.

    My problem is owning a virtual fleet of 4 Miata, they have short throws and essentially no linkage, I wanted to get a close to that as possible.
    Or you could by my set up with the cables coming out the rear with a billet shifter
    Wayne Presley www.verycoolparts.com
    Xterminator 705 RWHP supercharged 4.6 DOHC with twin turbos

  26. #946
    818 Junkie... bstuke's Avatar
    Join Date
    Feb 2011
    Location
    Atlanta, GA
    Posts
    469
    Post Thanks / Like
    Very happy with my VCP shifter..
    818R For Sale!
    818R Sale Thread
    PADI Master Scuba Diver Trainer, PADI TecRec Gas Blender Instructor, Operations Manager - DNS Diving, Grand Cayman

  27. #947
    Senior Member RM1SepEx's Avatar
    Join Date
    Jul 2011
    Location
    Freeport, ME
    Posts
    3,801
    Post Thanks / Like
    Quote Originally Posted by bstuke View Post
    Got most of my body on yesterday. Went for a spin and couldn't figure out why it kept popping out of 2nd or reverse. Finally realized that it was hitting the rear cowl. Now I have a nice square hole in the rear vent area!
    yup, too long as designed, I checked out their cars at FFR and the rear mesh is damaged. I just flipped it and shortened it 1.5 inches, no interference now.
    Dan

    818S #17 Picked up 8/1/13 First start 11/1/13 Go Kart 3/28/14

  28. #948
    818 Junkie... bstuke's Avatar
    Join Date
    Feb 2011
    Location
    Atlanta, GA
    Posts
    469
    Post Thanks / Like
    Quote Originally Posted by RM1SepEx View Post
    shortened it 1.5 inches
    End of the day, end of my wits, 2-3 beers, didn't think of shortening it... It is easy enough to get the rear cowl off and do that soon.

    Thank for the tip.
    818R For Sale!
    818R Sale Thread
    PADI Master Scuba Diver Trainer, PADI TecRec Gas Blender Instructor, Operations Manager - DNS Diving, Grand Cayman

  29. #949
    Member projectrally's Avatar
    Join Date
    Dec 2011
    Location
    Portland, ME
    Posts
    93
    Post Thanks / Like
    So Dan, how does your MR-2 setup compare to the Miatas? I've got the same bias, and want the same result...

  30. #950
    Senior Member RM1SepEx's Avatar
    Join Date
    Jul 2011
    Location
    Freeport, ME
    Posts
    3,801
    Post Thanks / Like
    can't tell until I have it running again but it is soooo much better than the std FFR parts, the plastic shifter flexes and the long looped cables are cheap and they suck. The Teleflex cables eliminate the cable to sheave clearance, facing rear and the bell crank get rid of the loops. I think that Waynes or the FFR backwards with bell cranks/levers as required is best. The FFR billet that I have with the levers would be tighter than the MR2 I think.... Wayne's needs a bell crank and I don't know the quality of his cables....
    Dan

    818S #17 Picked up 8/1/13 First start 11/1/13 Go Kart 3/28/14

  31. #951
    Senior Member wleehendrick's Avatar
    Join Date
    Jul 2012
    Location
    Encinitas, CA
    Posts
    1,653
    Post Thanks / Like
    Blog Entries
    2
    Quote Originally Posted by RM1SepEx View Post
    Wayne's needs a bell crank and I don't know the quality of his cables....
    The cables Wayne provides are high quality, and a bell crank for the lateral motion would probably help, but the little bit of slop I have actually appears to be coming from some play in the K-tuned shifter itself.

  32. #952
    Senior Member RM1SepEx's Avatar
    Join Date
    Jul 2011
    Location
    Freeport, ME
    Posts
    3,801
    Post Thanks / Like
    Thanks for the update Lee, I expected as much. I think even with the loops the cables make a HUGE improvement, the FFR ones are very sloppy. My FFR sourced K-tuned shifter had some slop too, adding a couple shims tightened it right up!
    Dan

    818S #17 Picked up 8/1/13 First start 11/1/13 Go Kart 3/28/14

  33. #953
    Senior Member wleehendrick's Avatar
    Join Date
    Jul 2012
    Location
    Encinitas, CA
    Posts
    1,653
    Post Thanks / Like
    Blog Entries
    2
    Quote Originally Posted by RM1SepEx View Post
    Thanks for the update Lee, I expected as much. I think even with the loops the cables make a HUGE improvement, the FFR ones are very sloppy. My FFR sourced K-tuned shifter had some slop too, adding a couple shims tightened it right up!
    I can't compare Wayne's cables to the FFR cables, since I never got them (they were back-ordered, and I told them not to ship since I didn't need them), but they are nice and solid.

    I may try shimming the pivot on the shifter that has a little slop, but that's low priority for me... I can do that anytime; I want to get this car running!

  34. #954
    Member tebriel's Avatar
    Join Date
    Feb 2015
    Location
    WI
    Posts
    33
    Post Thanks / Like
    I'm a little late to the game here, but Dan did you think about rotating the compressor housing to point towards the IC and eliminate some bends on your piping?

  35. #955
    Senior Member RM1SepEx's Avatar
    Join Date
    Jul 2011
    Location
    Freeport, ME
    Posts
    3,801
    Post Thanks / Like
    Quote Originally Posted by tebriel View Post
    I'm a little late to the game here, but Dan did you think about rotating the compressor housing to point towards the IC and eliminate some bends on your piping?
    coulda, shoulda, woulda, I took the easy way out!

    Now I'm remounting the body, anyone else having non symmetrical hump issues? The right one is about 8 inches high, has tons of bar clearance, the left, 7 1/2 or so inches and not much clearance at all. Squaring the engine cover front to back is a challenge as well.

    P1120422.JPG P1120424.JPG

    If I look under the engine cover it just barely clears the tubes running from the roll bar back to the frame under the humps
    Dan

    818S #17 Picked up 8/1/13 First start 11/1/13 Go Kart 3/28/14

  36. #956
    Senior Member Silvertop's Avatar
    Join Date
    Mar 2011
    Location
    Forest Lake MN
    Posts
    880
    Post Thanks / Like
    Quote Originally Posted by RM1SepEx View Post
    I'm running stock tires from the donor 205-50-16 Direzza on the front and 225-55-16 on the back 15 mm spacers on the front and 1.5 inches on the rear. Clearance is tight but workable however the tires are about 1/3 worn so the diameter is less than a new tire. Long term I'm going to 17's in the proper sizes...
    Dan, where did you go to find 1 1/2" spacers? The biggest ones I'm finding are 25mm (1"). Are you putting two spacers together -- two 20's or a 25 plus a 15?

  37. #957
    Senior Member RM1SepEx's Avatar
    Join Date
    Jul 2011
    Location
    Freeport, ME
    Posts
    3,801
    Post Thanks / Like
    You can't use studs that long. The spacer bolts to the hub and the spacer has studs that hold the wheel...

    I did a quick ebay search http://www.ebay.com/itm/38mm-1-5-Hub...98bace&vxp=mtr

    I don't remember who I bought mine from but they are just like these
    Dan

    818S #17 Picked up 8/1/13 First start 11/1/13 Go Kart 3/28/14

  38. #958
    Senior Member Silvertop's Avatar
    Join Date
    Mar 2011
    Location
    Forest Lake MN
    Posts
    880
    Post Thanks / Like
    Quote Originally Posted by RM1SepEx View Post
    You can't use studs that long. The spacer bolts to the hub and the spacer has studs that hold the wheel...

    I did a quick ebay search http://www.ebay.com/itm/38mm-1-5-Hub...98bace&vxp=mtr

    I don't remember who I bought mine from but they are just like these
    Thanks, Dan. They DO make hardened studs long enough to go straight through 1 1/2" of spacers. AJW is marketing some right now. Are you suggesting that studs that long would be too highly stressed? Regardless, I do like the look of the spacers you pointed me at. How are those working out for you? Are your tires still entirely within the wheel wells? You are running 225/55 -16's, while I will be on 225/50-16's. Seems to me that the actual tire width in the formula winds up being a ratio of profile to actual width. Are your 55 profile tires going to be wider, narrower, or the same as my 50 series tires? I'm sure I can figure this out myself, but I thought I'd toss it out there. Sorry about pulling your thread a little off-topic. I know there's a better place for this question, but I thought I would put it where I knew you would see it.

  39. #959
    Senior Member Silvertop's Avatar
    Join Date
    Mar 2011
    Location
    Forest Lake MN
    Posts
    880
    Post Thanks / Like
    Quote Originally Posted by Silvertop View Post
    Thanks, Dan. They DO make hardened studs long enough to go straight through 1 1/2" of spacers. AJW is marketing some right now. Are you suggesting that studs that long would be too highly stressed? Regardless, I do like the look of the spacers you pointed me at. How are those working out for you? Are your tires still entirely within the wheel wells? You are running 225/55 -16's, while I will be on 225/50-16's. Seems to me that the actual tire width in the formula winds up being a ratio of profile to actual width. Are your 55 profile tires going to be wider, narrower, or the same as my 50 series tires? I'm sure I can figure this out myself, but I thought I'd toss it out there. Sorry about pulling your thread a little off-topic. I know there's a better place for this question, but I thought I would put it where I knew you would see it.
    Just figured out that last question checking specs on Tire Rack. Width will be same same regardless of profile. A 225 is a 225......... So the only issue is whether your tires are entirely within the wheel wells.........

  40. #960
    Senior Member RM1SepEx's Avatar
    Join Date
    Jul 2011
    Location
    Freeport, ME
    Posts
    3,801
    Post Thanks / Like
    Posted a photo somewhere... they are flush, I went with 55s to get slightly taller gearing figuring that the stock gearing was too low for such a light car and at the time the 818R seemed to have trouble applying power out of corners with race rubber. This car needs wider rubber...

    studs that long are too stressed IMHO. Studs are made to be loaded in shear, when they are that long you can add bending stresses too.
    Dan

    818S #17 Picked up 8/1/13 First start 11/1/13 Go Kart 3/28/14

Page 24 of 34 FirstFirst ... 142223242526 ... LastLast

Posting Permissions

  • You may not post new threads
  • You may not post replies
  • You may not post attachments
  • You may not edit your posts
  •  

Martin's Dent and Collision Shop

Visit our community sponsor