Midwest Classic Insurance

Visit our community sponsor

Thanks Thanks:  2
Likes Likes:  10
Page 2 of 7 FirstFirst 1234 ... LastLast
Results 41 to 80 of 280

Thread: Goldwing's 818 Street, The Phoenix

  1. #41
    Senior Member Bob_n_Cincy's Avatar
    Join Date
    Sep 2012
    Location
    Cincinnati OH
    Posts
    3,904
    Post Thanks / Like
    Don't do what I did.
    Spent a day doing all the brake lines (abs included) Very neatly.
    A total of about 16 fittings. About 10 leaked under pressure. I now have an eastwood flaring tool, but haven't tried it yet.
    Bob

  2. #42
    Senior Member DodgyTim's Avatar
    Join Date
    Apr 2013
    Location
    Brisbane, Australia
    Posts
    289
    Post Thanks / Like
    The Eastwood will fix it, I'm a big fan
    Just be careful to cut square, I dress the ends with a sanding wheel, then make sure there lube on the end

    Oh, and always check to make sure that you've remembered to put the fitting on first
    Ask me how I know

  3. #43
    Senior Member Goldwing's Avatar
    Join Date
    Nov 2012
    Location
    Medina, OH
    Posts
    744
    Post Thanks / Like
    I read too many discussions here about flares leaking and grabbed the eastwood kit on sale around Christmas time. Even the pros laugh that remembering to put the fitting on the line first is the toughest part. That so very much sounds like something I would (and will very soon) do.

  4. #44
    Senior Member Goldwing's Avatar
    Join Date
    Nov 2012
    Location
    Medina, OH
    Posts
    744
    Post Thanks / Like
    Bob, I didn't find the instructions very helpful. This video I found made a lot more sense to me:

    http://youtu.be/AnQJIjM0EBo

  5. #45
    Member
    Join Date
    Jan 2014
    Location
    Indianapolis/Beech Grove, IN
    Posts
    38
    Post Thanks / Like
    Quote Originally Posted by Goldwing View Post
    Bob, I didn't find the instructions very helpful. This video I found made a lot more sense to me:

    http://youtu.be/AnQJIjM0EBo
    You know your a car guy when you see a tool and simply say, "That thing is beautiful!"

  6. #46
    Junior Member Outwest's Avatar
    Join Date
    Nov 2012
    Posts
    24
    Post Thanks / Like
    I have a flaring tool very similar to that, I love it, it does everything including the bubble flares.

  7. #47
    Senior Member Goldwing's Avatar
    Join Date
    Nov 2012
    Location
    Medina, OH
    Posts
    744
    Post Thanks / Like
    Practiced a little today. Beautiful indeed.

    I'll dig a little, but can anyone verify which setting to use for the 10mm brake line nuts? Perhaps pulling the instructions back out of the trash will answer that though.

  8. #48
    Senior Member Goldwing's Avatar
    Join Date
    Nov 2012
    Location
    Medina, OH
    Posts
    744
    Post Thanks / Like
    Ugh, either I was too tired today, or I stink at brake lines. Flares looked great, kept forgetting to put the damn fittings on before flaring. Such a fail day, lol, but progress was made. Lines from master to ABS unit done. I'm working left to right on the wheel lines. FR done. RL halfway there. I put the proportioning valves at the top of the vertical frame member next to the flexible line bracket. The knobs sit flush with the top of the frame when open all the way. Pics to come as I finish.

  9. #49
    Senior Member
    Join Date
    Feb 2013
    Location
    Bowling Green OHIO
    Posts
    178
    Post Thanks / Like
    Blog Entries
    2
    I saved all my abs items, are you (Goldwing & Bob n cincy) running abs without power brakes. i am thinking i will just get the dummied down system working first and see how that does. is a flaring tool still needed if you just do the manual brakes with no abs? i got the eastwood benders but didnt spring for the flaring tool thinking i may not need it.

  10. #50
    Senior Member
    Join Date
    Feb 2013
    Location
    Bowling Green OHIO
    Posts
    178
    Post Thanks / Like
    Blog Entries
    2
    Quote Originally Posted by Goldwing View Post
    I did pick up some of those fittings. My plan was to use FFR lines up front cutting one end off to length, and slipping one of those metric jobs on before flaring. Metric on the ABS, sae at the valves. Repeat to the wheels. I purchased a roll to run the rears. I'll run one down each side of the car. Being new to flaring (I like to learn), I wanted to minimize joints (I hate to fail and deal with leaks). Ok who doesn't. I think the term used elsewhere was "brake flare hell." Lol.
    you purchased a roll to run to the rears? is this a roll of flexible brake line? is there such a thing? i often wondered why not have flex running the full distance. i have seen mixed thoughts on the flex with give in the lines and all..... with flex there would be less leak points for sure.

  11. #51
    Senior Member Bob_n_Cincy's Avatar
    Join Date
    Sep 2012
    Location
    Cincinnati OH
    Posts
    3,904
    Post Thanks / Like
    Quote Originally Posted by dougkirkbride View Post
    I saved all my abs items, are you (Goldwing & Bob n cincy) running abs without power brakes. i am thinking i will just get the dummied down system working first and see how that does. is a flaring tool still needed if you just do the manual brakes with no abs? i got the eastwood benders but didnt spring for the flaring tool thinking i may not need it.
    My plan is to run the ABS with manual brakes. ( the abs unit doesn't care)
    Yes a good flaring tool is required if you make your own brake lines.
    The leaky fitting don't care if manual or power brakes.

    If no ABS and use the supplied pre-flared lines with the metric to american threads adaptors, you don't need the flaring tool.
    I didn't like this method.
    Bob

  12. #52
    Senior Member AZPete's Avatar
    Join Date
    Feb 2011
    Location
    Scottsdale, AZ
    Posts
    2,374
    Post Thanks / Like
    Like Bob, I made a nice system with my old "bar" flaring tool, but they leaked so I bought the Eastwood tool. Pricy but it makes perfect flares = no,leaks = the first time.
    818S/C : Chassis #25 with 06 WRX 2.5 turbo, ABS, cruise, PS, A/C, Apple CarPlay, rear camera, power windows & locks, leather & other complexities. Sold 10/19 with 5,800 miles.
    Mk3 Roadster #6228 4.6L, T45, IRS, PS, PB, ABS, Cruise, Koni's, 17" Halibrands, red w/ silver - 9K miles then sold @ Barrett-Jackson Jan 2011 (got back cash spent).

  13. #53
    Senior Member
    Join Date
    Oct 2012
    Posts
    556
    Post Thanks / Like
    What is your opinion of wheel size (diameter) with ABS? Can we stagger wheel/tire size front to rear and not cause a problem with the ABS system?

  14. #54
    Senior Member Xusia's Avatar
    Join Date
    Oct 2011
    Location
    Eugene, OR, USA
    Posts
    2,343
    Post Thanks / Like
    ABS isn't looking at the relative speed of each wheel. It looks at individual rates of deceleration. So it should work fine. I have a staggered setup and will be using ABS.

  15. #55
    Senior Member Bob_n_Cincy's Avatar
    Join Date
    Sep 2012
    Location
    Cincinnati OH
    Posts
    3,904
    Post Thanks / Like
    Quote Originally Posted by tmoretta View Post
    What is your opinion of wheel size (diameter) with ABS? Can we stagger wheel/tire size front to rear and not cause a problem with the ABS system?
    Below is a paragraph out of the Subaru Service manual.


    Is says that the ABS starts at 8%. So 24.6" fronts and 25.1" rears is a 2.0% change. So no issue.

    Bob
    Attached Images Attached Images

  16. #56
    Senior Member Goldwing's Avatar
    Join Date
    Nov 2012
    Location
    Medina, OH
    Posts
    744
    Post Thanks / Like
    Let's see, where to start?

    Yes, I'm running ABS with the manual brakes. As the brake booster is entirely independent from ABS, it doesn't effect the operation. The booster just magnifies your foot's pressure to the master cylinder. Like Bob said, no issue.

    The roll I bought to run the rears was metal hard brake line. I bought the more expensive alloy metal brake line roll that bends more easily, but to confirm it isn't "flexible" line. I feel that would introduce too much brake pedal sponginess. A foot and a half of flex line at each wheel yields about 6' of ( relatively) expandable brake line. Running this as primary brake line would multiply that number quickly to 40 feet. Likely resulting in a bad brake pedal feel. I agree, probably not a good idea.

    Bob hit the staggered setup question well. A slight 2-3% difference will likely be fine. If it does act up after balancing the system, just pull the fuse. In my opinion, It won't hurt the system if deactivated.

    No flaring should be required to run FFR's system. Just bending. If you run ABS, you'll need more hard brake line, 15 or so 10 mm brake line nuts, a flaring tool, and a second proportioning valve which is easy to find on amazon using the part number on the one supplied.

  17. #57
    Senior Member Goldwing's Avatar
    Join Date
    Nov 2012
    Location
    Medina, OH
    Posts
    744
    Post Thanks / Like
    Since we had a rare 50 degree spell today, I POR 15'd the uprights so I can finally remount my dust shields and calipers. That is if I haven't kicked too many bolts or brake pieces around leaving me with too few pieces to figure out how to reassemble them. They've been in the way. Back to flaring tomorrow during the snow storm. Back to winter, the break in weather was nice.

  18. #58
    Senior Member Goldwing's Avatar
    Join Date
    Nov 2012
    Location
    Medina, OH
    Posts
    744
    Post Thanks / Like
    Here's the brake line routing. I had to take an educated guess on where to mount the ABS unit and proportioning valve to not be in the way later. I had the valves straight up at first, but searching more pictures around the site, it appeared the windshield surround might be in the way, so I tilted them forward for better access. I only used one bolt to allow for changes. I see now the was a good move.

    image.jpg
    image.jpg
    image.jpg

  19. #59
    Senior Member Goldwing's Avatar
    Join Date
    Nov 2012
    Location
    Medina, OH
    Posts
    744
    Post Thanks / Like
    I got a little further buttoning up the brake lines tonight, routing the front flex lines and ABS wires. I used the brackets on the ABS wires. The smaller bracket I bolted to the FFR upright bracket after grinding off the little wings. The larger bracket with the wire loop, I trimmed as well and mounted that on the upper sway bar mount bolt, as shown. It allows the ABS wire to reach the same area the flex brake line goes to.

    image.jpg
    image.jpg
    Rich

    818S in progress. 2007 WRX sedan donor.
    Powered up: 7-8-14, First Start: 7-20-14, Go kart: 8-19-14

  20. #60
    Tazio Nuvolari wannabe Scargo's Avatar
    Join Date
    Nov 2013
    Location
    south-central CT
    Posts
    1,611
    Post Thanks / Like
    Maybe it's just me, but I would be very careful about brake lines touching metal. My feeling is they're soft and they could possibly vibrate and wear through fairly easily and quickly. I would want them isolated and well supported. Beyond that, I've had metal fuel lines fatigue and crack from vibration. Perhaps I am a worry wart. It's hard to tell in some of the pictures whether lines are really touching or not.

  21. #61
    Senior Member Goldwing's Avatar
    Join Date
    Nov 2012
    Location
    Medina, OH
    Posts
    744
    Post Thanks / Like
    Close, but not touching. The bend towards the mounting tab seems to be enough at this point to keep it off the upper arm, but you're right, worth paying attention to.
    Rich

    818S in progress. 2007 WRX sedan donor.
    Powered up: 7-8-14, First Start: 7-20-14, Go kart: 8-19-14

  22. #62
    Senior Member Goldwing's Avatar
    Join Date
    Nov 2012
    Location
    Medina, OH
    Posts
    744
    Post Thanks / Like
    I took the plastic spiral hose protector off the old clutch flex line, cut it into 2 pieces, and lined the front flex brake lines where it runs close to the front upper A arm bracket as extra insurance against rubbing. I haven't determined if the 818 altered clutch line will require protection yet. I ran that line to the rear upper left corner of the engine bay for bleed free engine pulls.

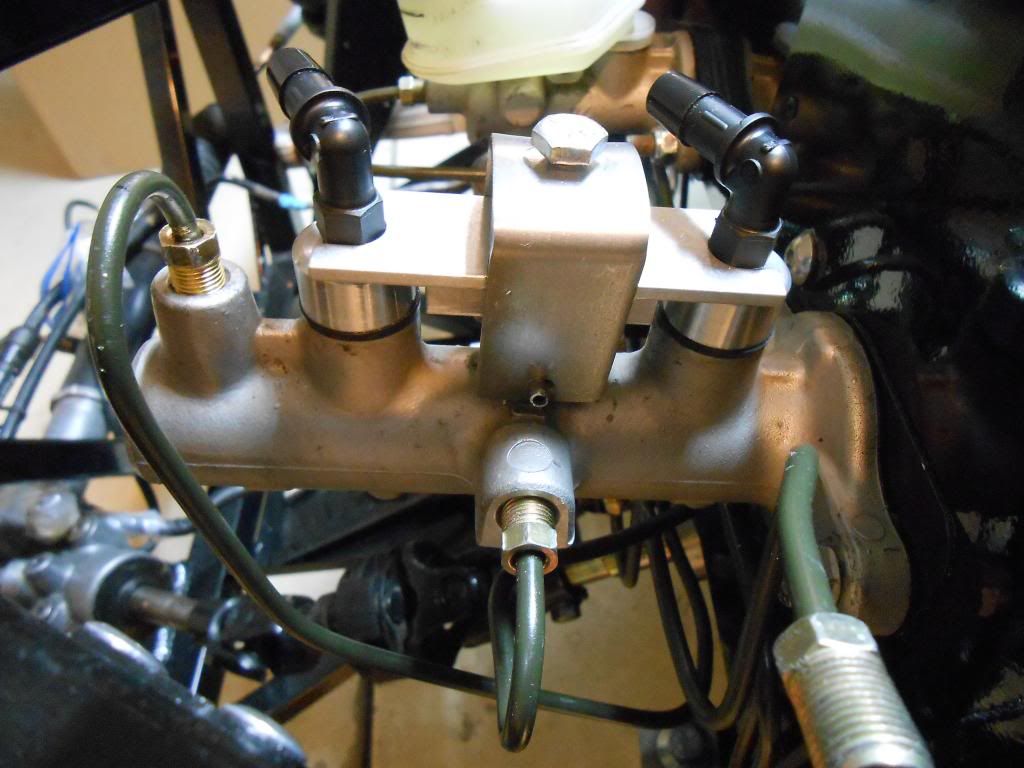
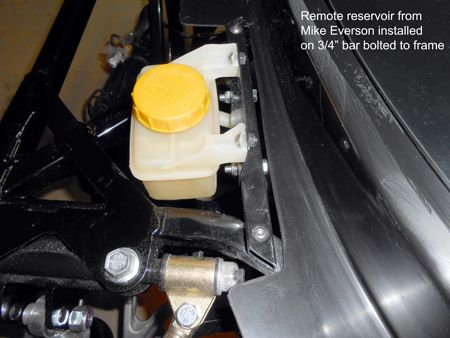
    I tested the motul power bleeder through Michael Everson's remote brake/clutch reservoir kit tonight. I don't have the reservoir permanently mounted yet and won't until the windshield surround is in and wipers are installed. I was able to successfully bleed everything using the recommended (for wrx, not the supplied reservoir, specifically) ford 3 prong adapter. It was too tight to fit as supplied. I swapped in a thinner O-ring on the adapter and got it to fit leak free. Still very snug. The remote kit connection seeped just a tiny bit (at the master connectors) under the power bleed pressure of 10 psi, but not enough to drip during the entire process. Very clearly will not be an issue under normal gravity conditions. Other than the zip-tied-for-now reservoir, it's a clean look. It minimizes the look of the tilted brake master as well in my opinion.

    Further, thanks for the recommendations in the forum for the eastwood brake flare kit. I had only 2 leaks, and as it turned out, I hadn't tightened those down all the way, lol. That's the trouble with multiple days working on one system I guess. That made it leak free on the first try. No brake flare leak he11! This forum is an awesome place!

    image.jpg
    image.jpg
    Rich

    818S in progress. 2007 WRX sedan donor.
    Powered up: 7-8-14, First Start: 7-20-14, Go kart: 8-19-14

  23. #63
    Tazio Nuvolari wannabe Scargo's Avatar
    Join Date
    Nov 2013
    Location
    south-central CT
    Posts
    1,611
    Post Thanks / Like
    And you have contributed an idea I like: wrapping lines in critical spots. I found this black polyethylene wrap that looks as if it will fit around metal brake line pretty well. 33 feet for $8.78 with Amazon Prime.
    41FCvt7T6qL.jpg

  24. #64
    Senior Member Goldwing's Avatar
    Join Date
    Nov 2012
    Location
    Medina, OH
    Posts
    744
    Post Thanks / Like
    If anyone copies my work with the remote brake reservoir, do not do exactly as I did. Use the tee to split between the clutch and a brake master input, not split so that the same reservoir line goes to both brake master inputs. This sacrifices the redundancy in the brake system. You want one reservoir tube going to separate brake inputs. Send a split to the clutch master. Thanks Bob! More reasons to like this forum! I'll post a pic when I get to swap the lines.
    Rich

    818S in progress. 2007 WRX sedan donor.
    Powered up: 7-8-14, First Start: 7-20-14, Go kart: 8-19-14

  25. #65
    Senior Member AZPete's Avatar
    Join Date
    Feb 2011
    Location
    Scottsdale, AZ
    Posts
    2,374
    Post Thanks / Like
    Rich, you referred to the zip-tied-for-now reservoir. I also did not like the zip-tied fittings to the master for mike's remote reservoir kit. I bent a steel piece to fit over the pin in the master that held the OE plastic reservoir and then tapped a hole for a set screw to hold the adapter down onto the master cylinder.

    818S/C : Chassis #25 with 06 WRX 2.5 turbo, ABS, cruise, PS, A/C, Apple CarPlay, rear camera, power windows & locks, leather & other complexities. Sold 10/19 with 5,800 miles.
    Mk3 Roadster #6228 4.6L, T45, IRS, PS, PB, ABS, Cruise, Koni's, 17" Halibrands, red w/ silver - 9K miles then sold @ Barrett-Jackson Jan 2011 (got back cash spent).

  26. #66
    Senior Member Goldwing's Avatar
    Join Date
    Nov 2012
    Location
    Medina, OH
    Posts
    744
    Post Thanks / Like
    I like that a lot better Pete! I was actually referring to the remote reservoir bottle itself, which I sloppily zip tied to the frame by the left front wheel until the actual mounting spot can be determined, but I'm glad you misunderstood, lol. I like your mod to Mike's mod. It's clean looking and more secure.
    Rich

    818S in progress. 2007 WRX sedan donor.
    Powered up: 7-8-14, First Start: 7-20-14, Go kart: 8-19-14

  27. #67
    Senior Member Goldwing's Avatar
    Join Date
    Nov 2012
    Location
    Medina, OH
    Posts
    744
    Post Thanks / Like
    Ok, question: I worked on the 2wd conversion today and found the book missed a few washers that I'm pretty sure come out. When I removed exactly as listed in the manual, the locking collar didn't fit flush with the rearmost shaft, and didn't have the splined surfaces fully engaged. I removed an additional washer (shown slid back in the first pic below) which had everything lining up much more nicely, with the locking collar sitting flush with the rearmost splined shaft (see lower pic). So finally the question: I was correct to do this, right? I feel pretty certain, but transmissions are expensive...

    image.jpg
    image.jpg
    Rich

    818S in progress. 2007 WRX sedan donor.
    Powered up: 7-8-14, First Start: 7-20-14, Go kart: 8-19-14

  28. #68
    Senior Member AZPete's Avatar
    Join Date
    Feb 2011
    Location
    Scottsdale, AZ
    Posts
    2,374
    Post Thanks / Like
    Rich, oops, wrong zip-ties. Maybe this photo will help. For the reservoir, I was not thinking so much of appearance but for a way to remove & reinstall the windshield without draining & bleeding the brake system each time. (Can't help you with the tranny question.)

    818S/C : Chassis #25 with 06 WRX 2.5 turbo, ABS, cruise, PS, A/C, Apple CarPlay, rear camera, power windows & locks, leather & other complexities. Sold 10/19 with 5,800 miles.
    Mk3 Roadster #6228 4.6L, T45, IRS, PS, PB, ABS, Cruise, Koni's, 17" Halibrands, red w/ silver - 9K miles then sold @ Barrett-Jackson Jan 2011 (got back cash spent).

  29. #69
    Senior Member Goldwing's Avatar
    Join Date
    Nov 2012
    Location
    Medina, OH
    Posts
    744
    Post Thanks / Like
    Thanks. I will keep that mount in mind. I remember seeing that in your build thread, I think. My hesitation is not knowing where the wipers will end up. I just want to move/reroute the lines once, without having it interfere with the wiper mount. Kind of a know what I don't know scenario.
    Rich

    818S in progress. 2007 WRX sedan donor.
    Powered up: 7-8-14, First Start: 7-20-14, Go kart: 8-19-14

  30. #70
    Senior Member AZPete's Avatar
    Join Date
    Feb 2011
    Location
    Scottsdale, AZ
    Posts
    2,374
    Post Thanks / Like
    I'm also waiting for FFR to release their wiper kit and I hope my reservoir is not in the way.
    818S/C : Chassis #25 with 06 WRX 2.5 turbo, ABS, cruise, PS, A/C, Apple CarPlay, rear camera, power windows & locks, leather & other complexities. Sold 10/19 with 5,800 miles.
    Mk3 Roadster #6228 4.6L, T45, IRS, PS, PB, ABS, Cruise, Koni's, 17" Halibrands, red w/ silver - 9K miles then sold @ Barrett-Jackson Jan 2011 (got back cash spent).

  31. #71
    Senior Member Goldwing's Avatar
    Join Date
    Nov 2012
    Location
    Medina, OH
    Posts
    744
    Post Thanks / Like
    Ok, so I spent some time thinking about the shift linkage today and how to gain a little extra rear space and possibly protect the linkage in the event of a mild fender bender and came up with something. I'm using the K-tuned shifter from very cool parts, but I don't think it matters, what I came up with should be doable with either the FFR shifter plan or Very Cool Parts K-Tuned setup, with another mod, and it is cheap. I'll try to verify that as I have time. The idea was to flip the FFR shift bracket so the bolt-on part prongs face towards the transmission. It quickly became clear the oem attachment wasn't going to work, so I looked around the garage for ideas. I had a 1-1/4" draw bar for a trailer hitch I no longer had. Measured it. It was just a shave thicker than the space inside the shifter bracket. Aha moment. I sawed off a cube from the end of the draw bar, drilled a 5/8" hole offset from center, then drilled the hole for the lock pin with a size "O" drill bit (slightly larger than 5/16"). The offset allows for drilling and tapping for the ball joint shift connector, and to move its attachment point over to where it would have been if using the oem piece. That ball joint that taps into the block is moved closer to the cable mount, so my plan is to move that bracket one bolt spacing forward. For The K-tuned setup, that's pretty much the end of it. The FFR setup will require some modding to the cable mount bracket as the lever end of the shifter bracket doesn't move forward much. I'll play with that after I finish fabbing it up, I have limited tooling, not quite metalmaker's array, lol. I JB welded the block into the shift bracket tonight, so I guess I'm committing. I'll drill and tap the ball joint connector and another spot just for security. Finally, my thought for the fender bender was to bolt a bar across the transmission plate between the modded shifter bracket and the end plate. Space it such that it sits just beyond the free play in the shift selector. The idea is that a light rear end collision would push the shift selector in to the bar which would transfer the forces to the transmission case offering some internal protection. Here's a pic of the progress so far. It gains an inch and a half of extra rear room as shown in the pic.

    image.jpg
    Rich

    818S in progress. 2007 WRX sedan donor.
    Powered up: 7-8-14, First Start: 7-20-14, Go kart: 8-19-14

  32. #72
    PLATNUM Supporting Member
    wallace18's Avatar
    Join Date
    Apr 2012
    Location
    Trenton, Florida
    Posts
    5,382
    Post Thanks / Like
    Great Idea.

  33. #73
    Senior Member Xusia's Avatar
    Join Date
    Oct 2011
    Location
    Eugene, OR, USA
    Posts
    2,343
    Post Thanks / Like
    I don't understand completely. I look forward to pictures of the completed setup.

  34. #74
    Senior Member
    Join Date
    Oct 2012
    Posts
    556
    Post Thanks / Like
    I re-drilled the shaft itself with a titanium carbide 5/16" bit. The U shaped fitting now sits right up against the shoulder on the shaft. Gained about 3/4 inch.

  35. #75
    nkw8181's Avatar
    Join Date
    Sep 2013
    Location
    Dallas, TX
    Posts
    762
    Post Thanks / Like
    What is this about a wiper kit??I am ordering the race windscreen as well as the windshield and want to be able to easily swap will the wipers be an issue?
    Nolan
    65 coupe Gen 3 "Phoenix" build
    http://thefactoryfiveforum.com/showt...032#post297032

    818 s (with r windscreen ) 350 rwhp. Registered and street legal (SOLD)

  36. #76
    Tazio Nuvolari wannabe Scargo's Avatar
    Join Date
    Nov 2013
    Location
    south-central CT
    Posts
    1,611
    Post Thanks / Like
    Quote Originally Posted by tmoretta View Post
    I re-drilled the shaft itself with a titanium carbide 5/16" bit. The U shaped fitting now sits right up against the shoulder on the shaft. Gained about 3/4 inch.
    Can't trump Ti carbide drill bit. Awesome!
    nkw8181They're talking about the other end of the car.

  37. #77
    Senior Member Goldwing's Avatar
    Join Date
    Nov 2012
    Location
    Medina, OH
    Posts
    744
    Post Thanks / Like
    As far as the wipers go, just heard they are in development. Eric fabbed up his own using the oem unit with one wiper arm. I'm not sure about how it mounts. It might be as simple as removing the arm when using the race windscreen. I'm committed to getting them work with or without FFR's help. Just hope they figure out a plan before I need it!
    Rich

    818S in progress. 2007 WRX sedan donor.
    Powered up: 7-8-14, First Start: 7-20-14, Go kart: 8-19-14

  38. #78
    Senior Member Goldwing's Avatar
    Join Date
    Nov 2012
    Location
    Medina, OH
    Posts
    744
    Post Thanks / Like
    image.jpg

    Here's a pic of my mod to the shifter arm from a few angles. It's a block of steel from a solid 1-1/4" hitch drawbar, filling the gap between the prongs that would mount inside the oem shift bracket and turned around. I drilled the shift rod hole with a 5/8" drill bit, then carefully aligned and drilled the spring lock pin hole with a size "O" drill bit. I drilled the hole for the FFR ball mount using a size "3" drill bit, then tapped it with a 1/4"-28 thread. I used another bolt on the other side for insurance. Just picked out something from the bucket and tapped threads for it too. It was a 6mm-1 bolt thread if anyone cares. The JB weld holding the block in place should be all that's needed to hold it in there. This setup is for the K-tuned shifter. My best guess to use this idea for the FFR shifter setup would be to drill the shifter rod hole all the way through and mount it with the FFR shift bracket (red) facing the transmission and pointed down. Then determine where the spring retaining clip hole should be. It will need to be further from the red area. More explanation on why it would be flipped in a bit. My little girl wants to play.
    Rich

    818S in progress. 2007 WRX sedan donor.
    Powered up: 7-8-14, First Start: 7-20-14, Go kart: 8-19-14

  39. #79
    Senior Member Goldwing's Avatar
    Join Date
    Nov 2012
    Location
    Medina, OH
    Posts
    744
    Post Thanks / Like
    image.jpg

    In place.
    Rich

    818S in progress. 2007 WRX sedan donor.
    Powered up: 7-8-14, First Start: 7-20-14, Go kart: 8-19-14

  40. #80
    Senior Member Goldwing's Avatar
    Join Date
    Nov 2012
    Location
    Medina, OH
    Posts
    744
    Post Thanks / Like
    image.jpg

    The top frames shows the mod I had to do to the cable mount bracket. The K-tuned bracket flips the lever upwards to work and provides a new cable mount for the new position. As such, you cut off the corresponding cable mount. Because this mod moves the other cable mount forward on the car, the cable mount bracket needs to move too. I just bolted the rear bracket hole into the forward transmission hole and drilled a new hole for rear transmission bolt location. These holes are 40mm apart. I placed the oem bracket next to my new bracket and drilled the hole for the ball mount 40 mm forward. Just line up the spring pin holes for reference. I also tilted the bracket before drilling as shown. This lines up the push pull of the cable with the shift selector rod better. Just eyeballed the angle.
    Rich

    818S in progress. 2007 WRX sedan donor.
    Powered up: 7-8-14, First Start: 7-20-14, Go kart: 8-19-14

Page 2 of 7 FirstFirst 1234 ... LastLast

Posting Permissions

  • You may not post new threads
  • You may not post replies
  • You may not post attachments
  • You may not edit your posts
  •  

Replica Parts

Visit our community sponsor