Forte's

Visit our community sponsor

Thanks Thanks:  2
Likes Likes:  10
Page 3 of 7 FirstFirst 12345 ... LastLast
Results 81 to 120 of 280

Thread: Goldwing's 818 Street, The Phoenix

  1. #81
    Senior Member Goldwing's Avatar
    Join Date
    Nov 2012
    Location
    Medina, OH
    Posts
    744
    Post Thanks / Like
    Because the shift bracket is essentially just flipped around, the k tuned bracket lines up nicely. No additional mod required, I hope, lol. As shown in the lower frame above.
    Last edited by Goldwing; 03-13-2014 at 07:14 PM.
    Rich

    818S in progress. 2007 WRX sedan donor.
    Powered up: 7-8-14, First Start: 7-20-14, Go kart: 8-19-14

  2. #82
    Senior Member Goldwing's Avatar
    Join Date
    Nov 2012
    Location
    Medina, OH
    Posts
    744
    Post Thanks / Like
    Anyone who tries this with the FFR setup, these are my thoughts in getting that to work. Like above, drill the large shift rod hole all the way through the whole setup then mount it with the red FFR bracket facing the transmission pointed downward. By keeping the same orientation, both ball mounts will move forward the same amount. Then move the cable mount bracket forward a corresponding amount. I think tilting the bracket as I did for the push/pull cable might mess up the angles for the rotation cable, so leave it level or at least consider how that would affect the other cable before drilling away. Skipping holes and moving the 40mm ought to work for simplicity, it definitely works for the push/pull cable. Since the rotational cable mounts to the bendable end of the bracket, there should be some adjustment range there. Bottom line, this should work for either setup.

    The offset for the shift rod hole was as far over as I could do while maintaining a similar wall thickness to the oem bracket sleeve. The purpose again was to push the cable end ball mount (towards the driver's side) to the original position. The FFR setup should allow for the greatest increase in space as for the k-tuned setup I didn't want the spring pin to be too close to the union if my block and the FFR bracket. The FFR setup won't have that issue, you could slide it all the way onto the rod, just use a thick enough block to reach the original hole. Or, get more space by drilling a new hole further in.

    I hope that explains it well enough. If not, just ask. I might look into bob's transmission case mod next winter. A lot of space gained there. Enough for a concealed bumper bar I believe.
    Rich

    818S in progress. 2007 WRX sedan donor.
    Powered up: 7-8-14, First Start: 7-20-14, Go kart: 8-19-14

  3. #83
    Senior Member Goldwing's Avatar
    Join Date
    Nov 2012
    Location
    Medina, OH
    Posts
    744
    Post Thanks / Like
    I've been sidelined the last two weeks with a bad ankle sprain. I hobbled out today to start tying up a few things before installing the Boyd gas tank. (I felt I had to mention "Boyd" lest I get a few excited about the backordered tanks, lol). I painted the coolant line for the oil cooler and installed a new O-ring on the oil cooler. I had the common oil and dirt-caked oil cooler indicative of the $3 O-ring failure. I wish I hadn't followed the manual's recommended rear brake line routing of tucking it inside the rear corner of the cockpit. This tank looks to be a bit tight against those lines. I don't want to have to redo the line routing.

    image.jpg
    Rich

    818S in progress. 2007 WRX sedan donor.
    Powered up: 7-8-14, First Start: 7-20-14, Go kart: 8-19-14

  4. #84
    Senior Member AZPete's Avatar
    Join Date
    Feb 2011
    Location
    Scottsdale, AZ
    Posts
    2,374
    Post Thanks / Like
    Rich, my Boyd tank is also close to the brake lines but there's still enough room inside the rear corners. I protected the lines with rubber tubing so they won't rub the tank or the frame.
    818S/C : Chassis #25 with 06 WRX 2.5 turbo, ABS, cruise, PS, A/C, Apple CarPlay, rear camera, power windows & locks, leather & other complexities. Sold 10/19 with 5,800 miles.
    Mk3 Roadster #6228 4.6L, T45, IRS, PS, PB, ABS, Cruise, Koni's, 17" Halibrands, red w/ silver - 9K miles then sold @ Barrett-Jackson Jan 2011 (got back cash spent).

  5. #85
    Senior Member Goldwing's Avatar
    Join Date
    Nov 2012
    Location
    Medina, OH
    Posts
    744
    Post Thanks / Like
    Good to hear there is some room. I didn't get to try the fit, just some eyeballing. The hose idea sounds like a good one.
    Rich

    818S in progress. 2007 WRX sedan donor.
    Powered up: 7-8-14, First Start: 7-20-14, Go kart: 8-19-14

  6. #86
    Senior Member Goldwing's Avatar
    Join Date
    Nov 2012
    Location
    Medina, OH
    Posts
    744
    Post Thanks / Like
    Well, I'm starting to regain my mobility as my ankle heals. I used the 06 wiring guide thread to ID most of the connectors over the weekend and finished my modification to the rear firewall the last few days as well. Another local builder helped with the bending needs. (Thanks Chris!). I cut the upper firewall piece along the shelf, making it an inch shallower. I overlapped the pieces and installed rivnuts to make the now center panel removeable for easy engine and fuse access. The middle panel got about a 12-15 degree steeper bend where the shelf is as well as a slight bend near the bottom to match the lower panel's angle better. I had to install a little brace in the lower panel after tightening the floor bolts. There was so much heat warping on the steel tray from the frame welding, the lower panel really wanted to lean forward.

    image.jpg
    image.jpg

    EDIT: This firewall mod was in conjunction with the Boyd tank to move the wall back about 3". Trying to fit my semi-wookie frame into the 818! Rather than just bending the upper firewall piece a bit extra, I made the cut because it was interfering with my seat at the shelf corner. This gave me just a little extra room.
    Last edited by Goldwing; 04-16-2014 at 01:32 AM.
    Rich

    818S in progress. 2007 WRX sedan donor.
    Powered up: 7-8-14, First Start: 7-20-14, Go kart: 8-19-14

  7. #87
    Senior Member Goldwing's Avatar
    Join Date
    Nov 2012
    Location
    Medina, OH
    Posts
    744
    Post Thanks / Like
    Ok, I've been MIA for a while. I've still been at it, but working on the wire harness doesn't lend itself to play-by-play updates. " ...and today a rerouted the GreenBlack wire that goes to who knows what, from .." Well, there just didn't seem to be much to report. I didn't diet all that much, just moved, lengthened, or cut out stuff so the connectors I did identify should reach their destination. I moved the harness to the car from my back room a few days ago. I reused the firewall pass through plug on the ABS run and ran most stuff through that going to the front except power and headlights which got their own pass through. I mounted the ECU in the original bracket above the Boyd fuel tank in the passenger side with some water-proofing efforts on that side, leaving all fuel lines on the driver's side to limit electronics mixing with fuel fumes in the event of a leak. I still haven't nailed down where to mount the fuse panel. The relay box sits between the ECU and the fuel level sender.
    Rich

    818S in progress. 2007 WRX sedan donor.
    Powered up: 7-8-14, First Start: 7-20-14, Go kart: 8-19-14

  8. #88
    Senior Member Goldwing's Avatar
    Join Date
    Nov 2012
    Location
    Medina, OH
    Posts
    744
    Post Thanks / Like
    The last 2 days I've worked on the cooling system and found a few things worth noting. One, a Gates 22158 hose fits very nicely on the lower rad port and wraps nicely above the battery to point down below the steering joints. It clears the bellows, but could use a bit of extra space via the common rad lifting spacer mods.

    image.jpg

    I used 2 45 degree angles to address the self-burping issue a few have raised. Since my engine was installed before hearing about Wayne's recommendation of tapping a port on the engine water outlet, and I didn't want to pull the engine just for that, I found these:

    image.jpg
    image.jpg
    image.jpg

    They're from a VW VR6 cooling system. I routed the engine water outlet uphill and the little tap should grab any air pockets and send them to the coolant reservoir. I ran the stock burp line (previously from the rad) to the little port. My plan is to tie the one from the radiator and a second of these 45's sitting on top of the radiator (highest point in front) to the coolant reservoir as well. Any thoughts on this routing? (Upper radiator burp port, radiator inlet mod port, engine outlet mod port all to coolant reservoir bottle on top of the engine?) The idea is self burping and trouble free operation. I had some doubts about the run from the front to the rear, wondering if it would do any good.
    Rich

    818S in progress. 2007 WRX sedan donor.
    Powered up: 7-8-14, First Start: 7-20-14, Go kart: 8-19-14

  9. #89
    Senior Member
    Join Date
    Feb 2011
    Posts
    607
    Post Thanks / Like
    Looks great. Why can't you tap the water outlet with the engine in the car? I did it and all I had to do was remove the intake.

  10. #90
    Senior Member Goldwing's Avatar
    Join Date
    Nov 2012
    Location
    Medina, OH
    Posts
    744
    Post Thanks / Like
    Tight fit with the "extra" firewall. I don't have room with the tools I have on hand. Sure, that's a good reason to go out and buy another tool, lol, but I have purchased a few tools lately. Have to draw a line somewhere.
    Rich

    818S in progress. 2007 WRX sedan donor.
    Powered up: 7-8-14, First Start: 7-20-14, Go kart: 8-19-14

  11. #91
    Senior Member
    Join Date
    Feb 2011
    Posts
    607
    Post Thanks / Like
    I hear ya. I have an "extra" firewall as well so it forced me to tap the pipe at an 11 o'clock position vs the 2 o'clock that Wayne mentioned.

    Last edited by GUNS; 06-17-2014 at 06:58 PM.

  12. #92
    Senior Member Goldwing's Avatar
    Join Date
    Nov 2012
    Location
    Medina, OH
    Posts
    744
    Post Thanks / Like
    That'll take care of it. I was feeling a bit lazy, lol. The pieces were cheap.
    Rich

    818S in progress. 2007 WRX sedan donor.
    Powered up: 7-8-14, First Start: 7-20-14, Go kart: 8-19-14

  13. #93
    Senior Member Goldwing's Avatar
    Join Date
    Nov 2012
    Location
    Medina, OH
    Posts
    744
    Post Thanks / Like
    I considered Rori's spacers, a very elegant solution for raising the radiator for steering bellows clearance, but decided to just use a few spacers. Combined with the Gates 22158 hose (Ford F350 I think) I didn't need a lot of extra clearance. I have 3/8" in the steering position when the bellows sit the proudest. Should be good enough. Buttoned up the main cooling lines and burp lines tying the front burp lines to the burp line coming from the engine coolant outlet. Just tee'd it off. Just have the coolant expansion tank to install and that system is done.

    image.jpg
    image.jpg
    image.jpg

    If anyone likes the Mishimoto radiator, look for the newer one with plug and play wiring. This one has only 2 wires for each fan, meaning I'll have one fan speed only (no low).
    Rich

    818S in progress. 2007 WRX sedan donor.
    Powered up: 7-8-14, First Start: 7-20-14, Go kart: 8-19-14

  14. #94
    Senior Member Goldwing's Avatar
    Join Date
    Nov 2012
    Location
    Medina, OH
    Posts
    744
    Post Thanks / Like
    So, I found these to wrap up a few sections of wire harness I may not be done with yet. Zipper close, absorb vibrations, reasonable price (I'm not wrapping the whole harness) I just don't see a down side.

    http://www.lakeside.com/Home-Improve...ch&categoryId=

    Otherwise, I'm still working the harness into the frame, and finally after a 4 month backorder wait, received my rear wheel spacers (10mm) and longer stud kit. The rear studs are a bit of a pain to change compared to the front, but happily, everything fits! I put 17x8 wheels in front, and 17x9 in the rears with low 50s offset, and 10mm spacers. Always nice to find that advice obtained here was indeed good advice. Thanks again Factory Five forum community!
    Rich

    818S in progress. 2007 WRX sedan donor.
    Powered up: 7-8-14, First Start: 7-20-14, Go kart: 8-19-14

  15. #95
    Senior Member Goldwing's Avatar
    Join Date
    Nov 2012
    Location
    Medina, OH
    Posts
    744
    Post Thanks / Like
    I hit a milestone today with the first start! I may have a dead alternator and a small coolant leak, but the engine fired right up! It's nice to know I didn't mess up the wiring. The coolant burp lines from the radiator and the engine coolant outlet pipe worked flawlessly. Thank you Wayne for the tips in setting up the system for easy coolant system burping.
    image.jpg
    image.jpg
    Rich

    818S in progress. 2007 WRX sedan donor.
    Powered up: 7-8-14, First Start: 7-20-14, Go kart: 8-19-14

  16. #96
    Senior Member Goldwing's Avatar
    Join Date
    Nov 2012
    Location
    Medina, OH
    Posts
    744
    Post Thanks / Like
    You can see from the gauge cluster pic in the previous post where I put my fuse panel. When I moved the wire harness to the car from where I did the work, the pocket above the pedal box was the path of least resistance. Hopefully the dash will lay nicely over it. I'll have to fashion an access door panel.
    Rich

    818S in progress. 2007 WRX sedan donor.
    Powered up: 7-8-14, First Start: 7-20-14, Go kart: 8-19-14

  17. #97
    Senior Member Goldwing's Avatar
    Join Date
    Nov 2012
    Location
    Medina, OH
    Posts
    744
    Post Thanks / Like
    I worked on sorting the center console today with the VCP K-tuned shifter. Since I'm planning to eventually run AC, running the shift cables under the intake manifold was not going to work. As such, I ran them over the left heads past the oil dipstick and fill tubes. This moves the shifter itself rearward a little, cramping things at the rear of the console when using the K-tuned shifter, unmodified. Since I'm also using the Boyd tank, I had extra rearward room for the parking brake. I modified the parking brake bracket in 3 spots.
    1-squared the passenger side foot parallel to the ground.
    2-trimmed and eased (beveled via file) the rear edge to prevent damaging the shift cables over time
    3-cut the front to move the foot to the center so as not to interfere with the bolt pattern of the k-tuned shifter plate and so that it will mount underneath said plate. I tapped a third hole in the rear mount plate for the shifter to bolt the parking brake front foot down.
    Finally, this put the rearmost mount hole (ebrake) past the end of the center console frame, so I bridged the hole with a short piece of steel. Feels solid.

    This made room up front for one cup holder if I use FFR's dash transition. If I trim that transition piece or make a new one, I may still try to squeeze a 2nd cup holder up there.

    image.jpg
    image.jpg
    Rich

    818S in progress. 2007 WRX sedan donor.
    Powered up: 7-8-14, First Start: 7-20-14, Go kart: 8-19-14

  18. #98
    Senior Member Goldwing's Avatar
    Join Date
    Nov 2012
    Location
    Medina, OH
    Posts
    744
    Post Thanks / Like
    My cup holder has a light ring below the outer bezel, which got me thinking...

    image.jpg
    image.jpg

    I took a piece of lexan or polycarbonate that I had laying around and cut it just oversized on the table saw with a fine carbide tipped blade set prouder than usual. Then sanded the edges with sandpaper glued to my table saw surface using the rip fence as a guide to keep the edges square. 120-220-600-1500-2000 grits. Then cutout areas needed for the shifter mounting holes, moving parts, etc. with a dremel using a router attachment and drill bit, rotozip style. Areas adjacent cutouts have bright spots, I wonder if anyone else applies the idea, if a simple rectangle along the perimeter sans cutouts would turn out a bit nicer. I started making two, only one made it.
    Rich

    818S in progress. 2007 WRX sedan donor.
    Powered up: 7-8-14, First Start: 7-20-14, Go kart: 8-19-14

  19. #99
    Senior Member Frank818's Avatar
    Join Date
    Jun 2013
    Location
    QC, Canada
    Posts
    5,732
    Post Thanks / Like
    Now that's an off the chart thinking, I like that! Could be even more kick a** with a colored LED.
    Frank
    818 chassis #181 powered by a '93 VW VR6 Turbo GT3582R
    Go-karted Aug 5, 2016 - Then May 19+21, 2017
    Tracked May 27/July 26, 2017
    Build time before being driveable on Sep 27, 2019: over 6000h
    Build Completed Winter 2021

  20. #100
    Senior Member AZPete's Avatar
    Join Date
    Feb 2011
    Location
    Scottsdale, AZ
    Posts
    2,374
    Post Thanks / Like
    You're seriously sick, Rich.
    818S/C : Chassis #25 with 06 WRX 2.5 turbo, ABS, cruise, PS, A/C, Apple CarPlay, rear camera, power windows & locks, leather & other complexities. Sold 10/19 with 5,800 miles.
    Mk3 Roadster #6228 4.6L, T45, IRS, PS, PB, ABS, Cruise, Koni's, 17" Halibrands, red w/ silver - 9K miles then sold @ Barrett-Jackson Jan 2011 (got back cash spent).

  21. #101
    Senior Member Goldwing's Avatar
    Join Date
    Nov 2012
    Location
    Medina, OH
    Posts
    744
    Post Thanks / Like
    Quote Originally Posted by Frank818 View Post
    Now that's an off the chart thinking, I like that! Could be even more kick a** with a colored LED.
    I may go that route, just haven't decided on overall color scheme yet. In the pic, I just have a flashlight aimed at it from underneath for the effect.

    AZPete, thanks, I think.
    If you're referring to the sanding, it's just the edges needing sanding only requiring a few swipes on each side. Most of my projects involve wood, making this more comfortable than most of this build, lol. From concept to flashlight-lit pic all fit in one naptime for my little girl.
    Rich

    818S in progress. 2007 WRX sedan donor.
    Powered up: 7-8-14, First Start: 7-20-14, Go kart: 8-19-14

  22. #102
    Member
    Join Date
    Feb 2011
    Location
    Australia
    Posts
    66
    Post Thanks / Like
    Another way of finishing the edge is to drag the top edge of a hacksaw blade (or the shape edge of a stanley knife blade) along the perspex edge and it should turn out clear. The blade edge on the perspex should be angled away from you as you draw the blade towards yourself using two hands. It takes practise and a steady hand(s) to maintain the straightness of the edge. You could try it on the piece that didn't make it.
    As for the lights you could always wire it to the door switches and have a couple of lights in the foot wells that match the light under the shifter, seeing as there is no roof mounted interior light.

  23. #103
    Senior Member Goldwing's Avatar
    Join Date
    Nov 2012
    Location
    Medina, OH
    Posts
    744
    Post Thanks / Like
    Footwell lights are really convenient. I added them to my outback years ago when I was doing a lot of road trips. They really helped find things you dropped or to put shoes back on when getting close to home. That car was so badly lit inside, it needed help. Footwell lights are now on the list. I'm torn between wiring the shifter bezel light to the dimming dash circuit (via the CD player illumination wire that conveniently reaches, or the doors. I guess it could be both, dimmed for driving/glare, but via diodes or separate lights, full bright with the doors.

    Thanks for adding alternate polishing advice xatudor. It may come in handy.
    Rich

    818S in progress. 2007 WRX sedan donor.
    Powered up: 7-8-14, First Start: 7-20-14, Go kart: 8-19-14

  24. #104
    Senior Member AZPete's Avatar
    Join Date
    Feb 2011
    Location
    Scottsdale, AZ
    Posts
    2,374
    Post Thanks / Like
    AZPete, thanks, I think.
    I should have added this so you'd know that I'm amazed at your innovation.

    818S/C : Chassis #25 with 06 WRX 2.5 turbo, ABS, cruise, PS, A/C, Apple CarPlay, rear camera, power windows & locks, leather & other complexities. Sold 10/19 with 5,800 miles.
    Mk3 Roadster #6228 4.6L, T45, IRS, PS, PB, ABS, Cruise, Koni's, 17" Halibrands, red w/ silver - 9K miles then sold @ Barrett-Jackson Jan 2011 (got back cash spent).

  25. #105
    Senior Member Goldwing's Avatar
    Join Date
    Nov 2012
    Location
    Medina, OH
    Posts
    744
    Post Thanks / Like
    Thanks for that, Pete!

    Today I spent working on the front alignment. Honestly, with limited tooling, I felt like a clown trying to pick up one too many items. Fix toe in, screw up steering center, fix that, caster and camber goes off, fix that steer center is off again. But like a dog, I just went round and round until I finally caught my own tail. Am I alone in this?!?

    I never got to touch the rear. I'll still take it in when I'm roadworthy, just want to get everything as close as I can before any go karting. No surprises!

    Oh I did finally have to switch the front LCA rear mounts to put the hump wing back on bottom as was pointed out previously in this thread to get caster in to spec. I could only push 2* without it, quite shy of the 3-4* recommended by FFR. Once flipped it was in high 3's.
    Rich

    818S in progress. 2007 WRX sedan donor.
    Powered up: 7-8-14, First Start: 7-20-14, Go kart: 8-19-14

  26. #106
    Senior Member Goldwing's Avatar
    Join Date
    Nov 2012
    Location
    Medina, OH
    Posts
    744
    Post Thanks / Like
    Rear pre-alignment is done. May I suggest to everyone in the manual to scratch off the rear caster box that says "N/A" and put something in there like "parallel" to remind you to set the lateral links parallel wrt level, as it involves similar adjustments (to caster). It is also a place you are likely to notice it and not forget. I guess a few guys have had handling surprises at highway speed and those who seem to know suspension (Wayne of VCP among them) suggested this adjustment which solved their issue. I don't fully understand the dynamics of this, just passing along what I've read here in the forums.
    Rich

    818S in progress. 2007 WRX sedan donor.
    Powered up: 7-8-14, First Start: 7-20-14, Go kart: 8-19-14

  27. #107
    Senior Member
    Join Date
    Feb 2013
    Location
    Bowling Green OHIO
    Posts
    178
    Post Thanks / Like
    Blog Entries
    2
    [QUOTE=Goldwing;162381]I hit a milestone today with the first start! I may have a dead alternator and a small coolant leak, but the engine fired right up! It's nice to know I didn't mess up the wiring. The coolant burp lines from the radiator and the engine coolant outlet pipe worked flawlessly. Thank you Wayne for the tips in setting up the system for easy coolant system burping.
    /QUOTE]


    congrats on the first start rich! had to be nice to hear that motor run again.

  28. #108
    Senior Member Frank818's Avatar
    Join Date
    Jun 2013
    Location
    QC, Canada
    Posts
    5,732
    Post Thanks / Like
    Rich, about your k-tuned shifter, I see you installed it with the k-tuned plate over the alu console. What do you have inside the console under the shifter's plate? Did you put the black box with k-tuned writings on it in there or you just kept the cable parts and trashed away the k-tuned box?
    Frank
    818 chassis #181 powered by a '93 VW VR6 Turbo GT3582R
    Go-karted Aug 5, 2016 - Then May 19+21, 2017
    Tracked May 27/July 26, 2017
    Build time before being driveable on Sep 27, 2019: over 6000h
    Build Completed Winter 2021

  29. #109
    Senior Member Goldwing's Avatar
    Join Date
    Nov 2012
    Location
    Medina, OH
    Posts
    744
    Post Thanks / Like
    Thanks Doug! Absolutely!

    Frank, I kept it as it came underneath the console, just installed what is essentially a large lexan washer with the shift cable mount collars and shift levers untouched. There is a black box that the shift knob attaches to. Is that what you're referring to? If so, it's there. It angles forward on mine while I've seen others angled towards the back. Since mine is mounted a bit more rearward due to my shift cable having to go around the left side of the engine (not over it), it felt better mounted forward. You can see just part of of the block in the backlit pic, but the previous post shows it better.
    Rich

    818S in progress. 2007 WRX sedan donor.
    Powered up: 7-8-14, First Start: 7-20-14, Go kart: 8-19-14

  30. #110
    Senior Member Frank818's Avatar
    Join Date
    Jun 2013
    Location
    QC, Canada
    Posts
    5,732
    Post Thanks / Like
    Rich I am talking about this box, just to make sure we talk about the same thing.

    Box.jpg
    Frank
    818 chassis #181 powered by a '93 VW VR6 Turbo GT3582R
    Go-karted Aug 5, 2016 - Then May 19+21, 2017
    Tracked May 27/July 26, 2017
    Build time before being driveable on Sep 27, 2019: over 6000h
    Build Completed Winter 2021

  31. #111
    Senior Member Goldwing's Avatar
    Join Date
    Nov 2012
    Location
    Medina, OH
    Posts
    744
    Post Thanks / Like
    Oh, we are talking about different things. I have never seen that lower box. Didn't come with my VCP kit from Wayne.
    Rich

    818S in progress. 2007 WRX sedan donor.
    Powered up: 7-8-14, First Start: 7-20-14, Go kart: 8-19-14

  32. #112
    Senior Member Frank818's Avatar
    Join Date
    Jun 2013
    Location
    QC, Canada
    Posts
    5,732
    Post Thanks / Like
    Seriously? Very interesting... I'll PM Wayne to make sure I am not missing anything, just in case.
    Frank
    818 chassis #181 powered by a '93 VW VR6 Turbo GT3582R
    Go-karted Aug 5, 2016 - Then May 19+21, 2017
    Tracked May 27/July 26, 2017
    Build time before being driveable on Sep 27, 2019: over 6000h
    Build Completed Winter 2021

  33. #113
    Senior Member wleehendrick's Avatar
    Join Date
    Jul 2012
    Location
    Encinitas, CA
    Posts
    1,653
    Post Thanks / Like
    Blog Entries
    2
    My shifter didn't come with the lower box either, just the top plate. I don't think the box would fit between the 818 console rails.

  34. #114
    Senior Member Frank818's Avatar
    Join Date
    Jun 2013
    Location
    QC, Canada
    Posts
    5,732
    Post Thanks / Like
    Quote Originally Posted by wleehendrick View Post
    My shifter didn't come with the lower box either, just the top plate. I don't think the box would fit between the 818 console rails.
    It actually does. But not if you insert it from the top. It's 2-3mm too wide. That reminds me, I don't even know if from the side it can slide in either, have to check.
    Maybe cuz I was an early adopter and got it drop shipped from k-tuned it has that lower box. Eager to see what Wayne says about that but hey I just need to leave it aside.
    Frank
    818 chassis #181 powered by a '93 VW VR6 Turbo GT3582R
    Go-karted Aug 5, 2016 - Then May 19+21, 2017
    Tracked May 27/July 26, 2017
    Build time before being driveable on Sep 27, 2019: over 6000h
    Build Completed Winter 2021

  35. #115
    Senior Member Goldwing's Avatar
    Join Date
    Nov 2012
    Location
    Medina, OH
    Posts
    744
    Post Thanks / Like
    I guess I don't have any use for the box, so no worries in my case. It'll be covered by the center tunnel aluminum. Might be neat to use it elsewhere if the opportunity arose, but no worries.

    With AZPete dealing with front tire clearance issues, and having chosen the same size tires as was previously the FFR recommended size of 215/45-17, I dug one of my tires out of the shed to check. Uh-oh. Me too. I'm considering the options.

    1) Bob is considering the wagon mount holes with the sedan arms but leaves a few potential issues of shock length, steering rack length, fender clearance? Since I'm already running a 10mm spacer, I could drop the spacer if fender clearance became an issue.

    2) slotting the rear mount to move it outward a little more since the clearance problem is the tire hitting the outside firewall corner aluminum and the lower frame behind the tire. This preloads the front mount, but leaves other issues mostly alone. This changes the pivot geometry just a little. I don't know what effect that might have on the road.

    3) inserting a spacer between the steel pivot arm and the rear of the control arm (pic below). This maintains the pivot geometry mimicking the STI arms, but still stressing the front mount a bit. I pulled the bolts and turned the wheel to the stop and a 5/16" gap was created. So a 5/16" to 3/8" spacer would be needed if the front mount can handle it. Longer bolts would also be needed due to the spacer. I'm guessing the spacer could work at 5/16" since the upper arm would be adjusted forward as much as it allows anyway to control caster from getting too high, also helping clearance. I'm leaning towards this approach at the moment.

    4) buying STI arms. I need to check again what the differences are. How much caster does it add?

    5) putting a spacer on each end of the steering rack to limit travel. I need to look into that to understand the complexity of it. While I don't like the idea of limiting steering range, it seems the simplest fix.

    6) buying new tires and still possibly need a smaller adjustment.

    I may try a smaller 1/4" spacer and combine that with aluminum modification as was done by others. The lower frame is only an issue with the suspension fully uncompressed. Since I don't plan on jumping the 818 especially at full steering lock, perhaps this won't be that big a deal?
    Rich

    818S in progress. 2007 WRX sedan donor.
    Powered up: 7-8-14, First Start: 7-20-14, Go kart: 8-19-14

  36. #116
    Senior Member
    Join Date
    Mar 2014
    Location
    Vacaville, CA
    Posts
    157
    Post Thanks / Like
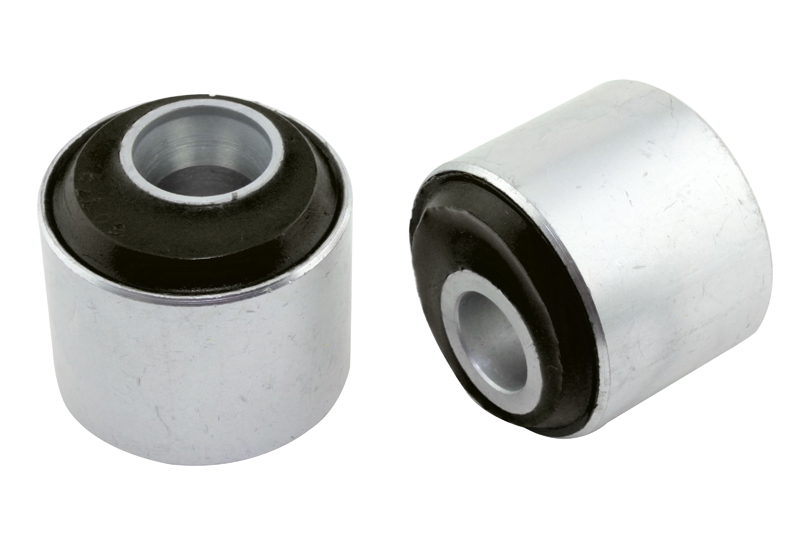
    You could also try offset bushing in the control arm.
    Whiteline KCA375
    Attached Images Attached Images

  37. #117
    Senior Member Frank818's Avatar
    Join Date
    Jun 2013
    Location
    QC, Canada
    Posts
    5,732
    Post Thanks / Like
    Rich, and for those reading through this thread, the K-tuned box I got and you didn't, we don't care about it. The U brackets yes we do but the under box is not used. I think the K-Tuned thread gives that info as well. And I guess now those buying the kit from VCP just don't get that piece which is unused.
    Frank
    818 chassis #181 powered by a '93 VW VR6 Turbo GT3582R
    Go-karted Aug 5, 2016 - Then May 19+21, 2017
    Tracked May 27/July 26, 2017
    Build time before being driveable on Sep 27, 2019: over 6000h
    Build Completed Winter 2021

  38. #118
    Senior Member Goldwing's Avatar
    Join Date
    Nov 2012
    Location
    Medina, OH
    Posts
    744
    Post Thanks / Like
    Boog, yep, might need those.

    Frank, thanks for reporting back. Ignorance was bliss I guess.
    Rich

    818S in progress. 2007 WRX sedan donor.
    Powered up: 7-8-14, First Start: 7-20-14, Go kart: 8-19-14

  39. #119
    Senior Member Goldwing's Avatar
    Join Date
    Nov 2012
    Location
    Medina, OH
    Posts
    744
    Post Thanks / Like
    I played around with a spacer today. Ideally, I would need to make it wedge shaped, so as not to distort the rear bushing as well. A 3/8" spacer in this spot:
    image.jpg
    moved the caster up to 5* with -.5* camber with the upper arm running out of forward adjustment. I didn't get to check toe, but I went from tire interference to tire rub status. The firewall spot could be modified to clear as it stands. If I could modify the upper arm to gain more adjustment I may just get there. I need a thinner left hand thread backing nut in the forward upper arm or thin the one I have. I'll see where I'm at when I get caster back into spec (bringing the upper ball joint forward improving tire clearance.)
    Rich

    818S in progress. 2007 WRX sedan donor.
    Powered up: 7-8-14, First Start: 7-20-14, Go kart: 8-19-14

  40. #120
    Senior Member Bob_n_Cincy's Avatar
    Join Date
    Sep 2012
    Location
    Cincinnati OH
    Posts
    3,903
    Post Thanks / Like
    Quote Originally Posted by Goldwing View Post
    I played around with a spacer today. Ideally, I would need to make it wedge shaped, so as not to distort the rear bushing as well. A 3/8" spacer in this spot:
    image.jpg
    moved the caster up to 5* with -.5* camber with the upper arm running out of forward adjustment. I didn't get to check toe, but I went from tire interference to tire rub status. The firewall spot could be modified to clear as it stands. If I could modify the upper arm to gain more adjustment I may just get there. I need a thinner left hand thread backing nut in the forward upper arm or thin the one I have. I'll see where I'm at when I get caster back into spec (bringing the upper ball joint forward improving tire clearance.)
    Rich
    to get the shortest, it is important the top arms adjusting couplers start on each bolt at the same time. Each thread (Lh & RH) goes half way through the coupler.
    Bob
    Last edited by Bob_n_Cincy; 07-29-2014 at 09:12 PM.

Page 3 of 7 FirstFirst 12345 ... LastLast

Posting Permissions

  • You may not post new threads
  • You may not post replies
  • You may not post attachments
  • You may not edit your posts
  •  

Martin's Dent and Collision Shop

Visit our community sponsor