FormaCars

Visit our community sponsor

Thanks Thanks:  0
Likes Likes:  0
Results 1 to 27 of 27

Thread: Need help with roadster hood, doesn't seem to fit properly

  1. #1
    Member
    Join Date
    Oct 2013
    Location
    Dothan, AL
    Posts
    60
    Post Thanks / Like

    Unhappy Need help with roadster hood, doesn't seem to fit properly

    I have a MkIV roadster I am building.

    Today I mounted the hood hinges and did some rough trimming to the edge of the hood to get it to just fit in the body, so the gaps are still pretty tight, but they clear the body without making contact. The problem is the hood seems to be too flat, and not curved enough to fit the body. I used two rubber spacers on the windshield edge, and the center of the hood lines up flush with the body along the windshield edge. The hood hinges are adjusted so that the leading edge of the hood also sits flush.

    However, the side edges are up almost above the body, and it's even worse at the two corners near the windshield. I can push down and flex the hood so that the edge goes down flush, and it is not making any contact, so there's nothing holding the side edges up other than the fact that the hood is not curved enough.

    I don't know if I need to try to put a ratchet strap around it to try to gently pull the curve tighter and let it sit for a few days or what. I have never done fiberglass body work before, so I don't really know what I need to do. My intent was simply to get the edges cut down just enough to clear, so I could align the hinges and then install the latches.

    Would installing the latches do the trick? Do the hoods normally sit a little flat until the latches pull it down? I am concerned because right now the center of the back edge of the hood fits flush, and if the latches pull the outer edges down, I am afraid this will pull the center down too, to the point it's not sitting flush.

    Anyway, here's some pictures to show what I mean. I had pretty poor lighting, but I think I got good enough pictures to show the issue.


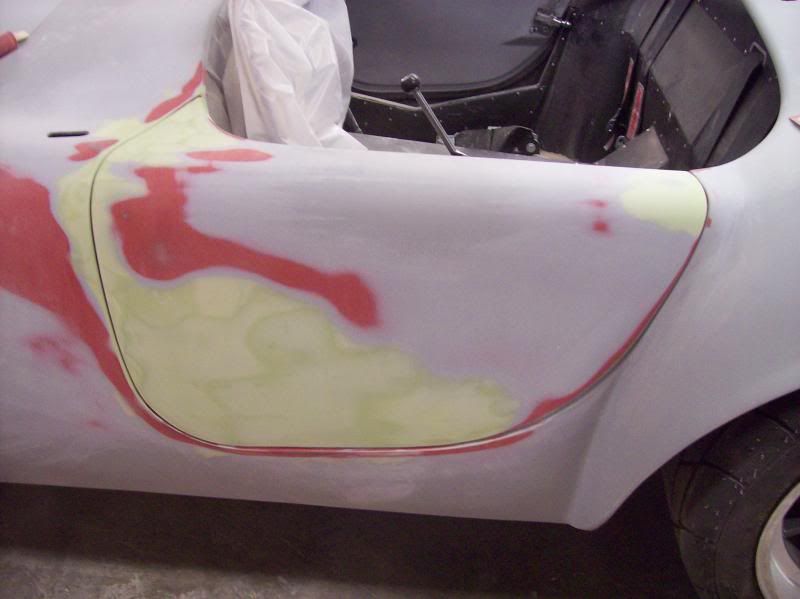
    Here's the passenger side rear "corner." You can see that it is sitting up well above being flush:


    I can push down with my thumb and make it sit flush. Hard to see in the picture, due to lighting, sorry.


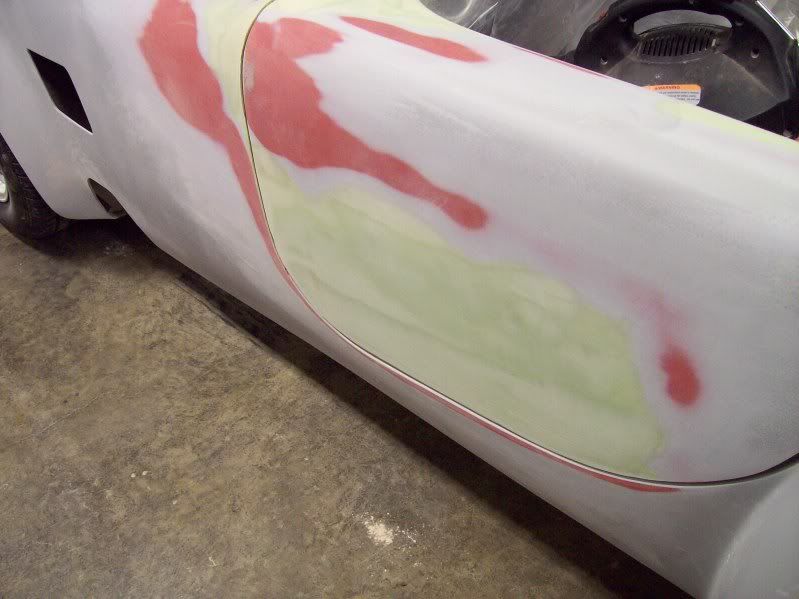
    Here's the whole passenger side edge:


    And the driver side edge:


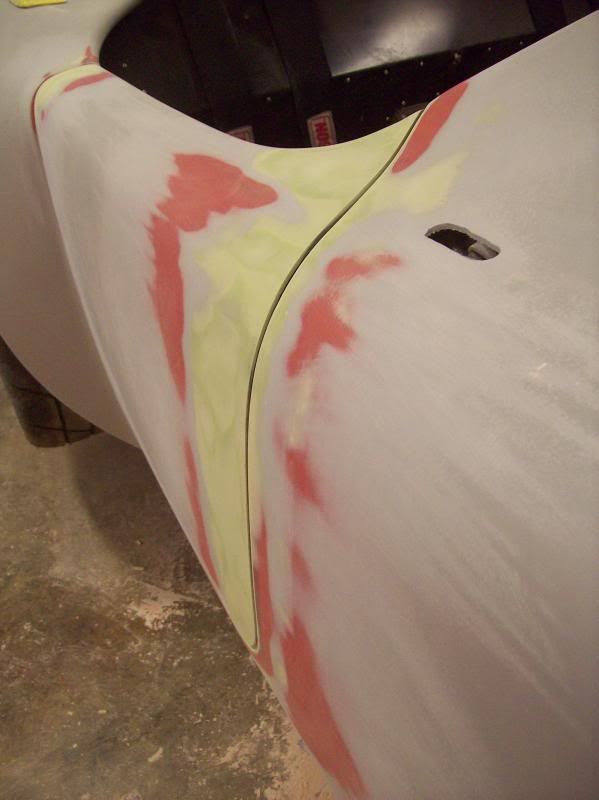
    Driver's side corner by windshield:


    And again, I can push down with my thumb to make it fit flush:


    So, I am seeking advice from the forum. Like I said, it just appears that the hood is too "flat," and doesn't quite fit the curve of the body. Is there something I need to do to round out the hood a little and get the edges to sit flush? Or is this just going to take 1/4" thick spackling of body filler to level out? The hood fits flush at the front and rear edges in the center, it's just the two side edges just sit way too high up, and are not flush. I have made sure nothing is physically contacting it and pushing it up, it just seems like the hood is not curved enough.

    Ideas? Suggestions? How do I fix this?

  2. #2
    Member
    Join Date
    Oct 2013
    Location
    Dothan, AL
    Posts
    60
    Post Thanks / Like
    Sorry for double post...couldn't attach all the pictures in one shot. (Really, mods? 7 pictures is all you can link to in one post? Seems silly...)

    Anyway, you can see the rear edge by the windshield fits flush with the rubber bumpers underneath:


    And the front edge fits flush with how the hinges are aligned:


    So...suggestions?


    Edit...I pulled the hood into a tighter curve and cinched it up tight with a ratchet strap. Everything fits pretty much flush now. I'll let it sit like that for a while, maybe it will take the shape. Still interested if anyone has any suggestions, though.
    Last edited by pyronuc; 02-24-2014 at 08:00 PM.

  3. #3
    Not a waxer Jeff Kleiner's Avatar
    Join Date
    Feb 2011
    Location
    Bloomington, Indiana
    Posts
    8,069
    Post Thanks / Like
    Get the latches installed; they'll help pull the corners down kinda' like you're doing with your thumb in the photos. If you have installed the gas struts be sure that they are not bottoming out and pushing the middle up along the long sides; I've had it happen to both Mk3s and Mk4s. If you're fitting well along the front and rear edges but the body is low along the long sides you can use some of the rubber bumpers between the 3/4" square tubing and the underside of the hood opening flange to flex the body upwards to the hood. After you get it as close as possible via these methods it's time for the Rage!

    Jeff

  4. #4
    Member
    Join Date
    Oct 2013
    Location
    Dothan, AL
    Posts
    60
    Post Thanks / Like
    Thanks for the suggestions. I may have to just measure and mount my latches, and see how it does with them installed. If not, I think placing some rubber shims underneath the edge of the body, like you said, may help. Other than that, I guess it will just be up to using some body filler (Rage, I assume?).

    Just a point to note. I do not intend to do the final fitting and body work on this thing. My goal is to get edges cut down just enough so that everything will fit, so I can get latches and stuff installed and aligned. Whoever I get to do my paint and body work will hopefully know how to make all the edges flush and seamless. That's my hope, anyway.

    Like I said, I've got a ratchet strap around the widest point of the hood right now, pulling it into a tighter curve. I don't know if fiberglass will set and take a form, but it lines up beautifully with a little tension from the ratchet strap.

  5. #5
    Member cobraguy13's Avatar
    Join Date
    Sep 2013
    Location
    Mesquite, Texas
    Posts
    30
    Post Thanks / Like
    Do you have the body completely fasten to the frame? And if so is the engine hitting the center of the hood or have you already cut the hole in the hood to give the necessary clearance. I have built 3 MkIVs with high school students and have found the only problem with the hood is usually the mounting of the hinges. That being said make sure you have put the hinges together correctly or fitting the hood will be impossible.

  6. #6
    Member
    Join Date
    Oct 2013
    Location
    Dothan, AL
    Posts
    60
    Post Thanks / Like
    The body is connected at the front and rear quick jack points, but is not riveted underneath the doors. All of the rubber bulb seals and such are installed underneath the body. The hood hinges seem to be aligned perfectly. The hood opens and closes properly with no binding. With the hood closed, the leading edge is centered and sits flush with the nose. The rear edge, in the center, sits flush with the body with a small rubber spacer under the hood. All of the gaps are still tight, but they are cut back enough that nothing is touching, except for the hood hinges and the rubber spacer. There is no engine installed, so nothing is pushing up on the hood, besides, if that was the case, the rear edge would not sit flush in the middle. The gas struts for the hood hinges are installed, but they do not bottom out. Everything seems to be aligned properly, and the hood sits flat and flush along the center line. It's just the sides and rear corners sit too high up, but there is nothing under them. The hood is just not curved enough. With a ratchet strap cinched around the widest part of the hood, it is pulled into a tighter curve and everything fits perfectly. I tried sticking some spacers underneath the edge of the fender, and it does close the gap at the rear corners, but makes the rest of the hood sit too low.

    I think the real problem here is that this hood is too flat. I don't know if it's just sort of warped over time (if that's even possible) or what. If I can just get the hood to curve just a little bit more, and stay that way (like it is with the ratchet strap around it) it would be perfect. Otherwise it's going to take gallons of body filler to level the fenders out high enough to sit flush.

    I did mention that the latches are not installed yet, so we'll see how it sits once I install those. Maybe those will pull it down tight.

    Just another point of curiosity...are the rubber spacers meant to only be temporary and get replaced by some type of weatherstripping? Or do the rubber spacers stay in place and the hood sits without a seal along the edge? I mean, obviously the engine bay is open underneath, there's the gills, and the hood scoop, so I know it's not exactly air tight, but it just seems like there should be some type of weatherstripping. But if it shows it in the build manual, I've missed it somehow, because I don't see anything about weatherstripping except for the bulb seal around all the aluminum panels, the rubber edge piece for under the doors, and the bulb seal for the trunk. Is anything supposed to go under the hood?

  7. #7
    Senior Member riptide motorsport's Avatar
    Join Date
    Feb 2011
    Location
    Fort Lauderdale Fl.
    Posts
    3,296
    Post Thanks / Like
    The hood gets a foam D shaped seal. Some put it on the body, some put it on the hood itself. Install everything like permanent and adjust as best you can get it...it should be close. Your body guy will take it from there.....hth. Steven
    FFR Daytona Type 65 Coupe
    67 427 Cobra
    57' Belair
    72 Pinto Wagon ,306" 1/4 miler
    34 5 window coupe Ford
    2003 Mustang GT
    99' ZX9
    85 Goldwing

    All toys still in the Scuderia!


    Every Saint has a past..................every sinner a future

    Don't take yourself so seriously........no one else does.

    You never see a motorcycle parked outside a Psychiatrists office.

  8. #8
    Member
    Join Date
    Oct 2013
    Location
    Dothan, AL
    Posts
    60
    Post Thanks / Like
    You know...taking a second look at it, I think maybe the hood latches are just what I need. I read online, and there is pretty much no way to "bend" the fiberglass and make it take a new shape, so I took the ratchet strap off. I didn't really think that would work, but it did let me see how the hood would fit if it was slightly more curved. Without the ratchet strap, it seems like pressing down in the area where the hood latches will pushes everything into alignment. The passenger side edge along the side still sits just a little higher, but probably well within what a good sanding and body filler job will be able to match it up.

    I wonder how stiff the D shaped seal is (I don't recall seeing anything like it in the big pile 'o' parts I have, so I may have to see about ordering some). If I have the rubber spacers in place, pressing down on the hood latch area seems to work, but if I remove the spacers, the center line edge of the hood near the windshield goes down too low. I need to make sure something is pressing up in the middle at the rear, and then the hood latches can press down on the outer edges and it should sit pretty close to flush.

    I guess the next thing to do is to fit the hood latches and see how that goes. In the mean time, I'm not going to stress over it, I guess. A good paint/body guy who knows how to work with fiberglass should be able to get it all sorted out. It's not THAT far off, I guess, and the hood latches should make up the difference and get it pretty close.

    I'm still all ears if anyone else has any suggestions, though, but I'm thinking maybe it will work out alright once I get the latches in place.

  9. #9
    Not a waxer Jeff Kleiner's Avatar
    Join Date
    Feb 2011
    Location
    Bloomington, Indiana
    Posts
    8,069
    Post Thanks / Like
    It sounds like you're finding out what I mentioned earlier; pulling the hood down with the latches goes a long way towards bringing the contours together. Once again, rubber bumpers above and below can also help. FFR does NOT provide a seal of any kind, "D" or otherwise, for around the hood opening and it is not actually required although some builders add it. I've used a nice "D" type from Mike Everson on the hood (and doors) of previous builds.

    Jeff

  10. #10
    cobra Handler skullandbones's Avatar
    Join Date
    Jul 2011
    Location
    Superstition Mtn foothills 5 miles west of Gold Canyon AZ
    Posts
    2,686
    Post Thanks / Like
    Blog Entries
    19
    Hi pyronuc,

    Of course, you don't want to take a grinder to the edges and then find that you have cut an edge down too much but you can do some minor work on the underside of the edges that touch the body. It will allow the hood to sit down a little more. I'm saying to ease the edges of the underside. Now the edges are router cut by a robot and are very sharp. That's not the way the edge will be after body work. If you notice on the flanges where the hood sit, you might be able to see some pressure marks where the hood is resting more than other places. I have primer so it is easy to see the pressure points at this time. You will be surprised how a little adjustment at one point affects the other areas. That's why you don't want to get too aggressive with the removal of material. Just to put it in perspective, I am driving mine in primer which is not usually the way it goes. However, you will find that the fitment of the hood, doors, and truck are as challenging as anything else you will do on this project. One other note, I think you said you don't have the body attached at all points so if that is correct you should not expect the hood to fit at this point. It could change some when the body is pulled down at all points. There is some adjustability there too. Good luck, WEK.
    FFR MkIII 302 (ATK), EFI 75mm TB with custom box plenum chamber, 24# injectors, 4 tube BBK ceramic, cold air sys, alum flywheel, crane roller rockers, T5, Wilwood pedals, custom five link with Watt's link, 4 rotors, coil overs, power steering with Heidt valve, alum FFR rad, driver's crash bar mod, mini dead pedal mod, quick release steering wheel hub #6046

  11. #11
    Senior Member Norm B's Avatar
    Join Date
    Mar 2012
    Location
    Head of St Margarets Bay, Nova Scotia
    Posts
    969
    Post Thanks / Like
    My hood was exactly the same. The latches helped a lot but, I still wasn't happy with the fit. I used a ratchet strap like you did and then heated both sides of the hood with a heat gun where it needed a little more curve to match the body. Let it cool and now it fits perfectly.
    Fiberglass will bend a little if the resin hasn't been cured for too long and you get it hot to the touch. Heat it gradually with the heat gun moving constantly. Alternate between the top and bottom of the hood and be careful not to get it any hotter than you can touch. I've seen guys use a space heater instead of a heat gun and get excellent results.

    Good Luck
    Norm

  12. #12
    Senior Member 68GT500MAN's Avatar
    Join Date
    Feb 2011
    Location
    Fresno, CA
    Posts
    1,808
    Post Thanks / Like
    Back in the day of the MKII it was common to support the center of the hood and use sandbags on the edges to re-shape the hood contour. I do not know if this would work with the newer hoods.
    Doug

  13. #13
    Junior Member
    Join Date
    Apr 2012
    Location
    Celina, Ohio
    Posts
    16
    Post Thanks / Like
    My car was kind of similar. If I remember correctly, I think I put a shim on top of the 3/4" tube to raise the body up slightly on the passenger side to meet the hood better. Might give that a try? I will post a photo if I can find one.

  14. #14
    Senior Member Dave Howard's Avatar
    Join Date
    Feb 2012
    Location
    North Bay, Ontario
    Posts
    534
    Post Thanks / Like
    Installing the latches and having proper rubber spacer installed near the center line of the hood to keep it flush did the trick for my similar issues.

  15. #15
    Senior Member CraigS's Avatar
    Join Date
    Feb 2011
    Location
    Blacksburg, Va
    Posts
    4,728
    Post Thanks / Like
    The back of the hood near the windshield is easy: rubber bumpers in the center and the latches pull down the corners. The front is the problem. I have no actual experience w/ this but I have read many posts over the years where heat and time and shims etc would re-shape the hood. I think that your ratchet strap across the hood at the front might be the cure for the front corners. Also I recommend you read WEKs post again. If your body man hasn't done FFRs before you really need to be ahead of the game. You don't want to end up w/ a great paint job on parts that don't fit together. RE: hood. Notice that the opening the hood nestles into does not have vertical sides. It gets narrower at the bottom so the edges of the hood should be shaped the same or, at least, have a much more rounded off bottom edge than top edge. Also the shape of the hood as you look down from the top needs to be matched to the overall shape of the opening especially the corners. You probably don't want to get involved w/ filler,etc. but I would do the hood, door and trunk lid fitting 100% before giving it to the painter.
    FFR MkII, 408W, Tremec TKO 500, 2015 IRS, DA QA1s, Forte front bar, APE hardtop.

  16. #16
    Not a waxer Jeff Kleiner's Avatar
    Join Date
    Feb 2011
    Location
    Bloomington, Indiana
    Posts
    8,069
    Post Thanks / Like
    Quote Originally Posted by CraigS View Post
    ... You probably don't want to get involved w/ filler,etc. but I would do the hood, door and trunk lid fitting 100% before giving it to the painter...
    Sorry Craig but I have to disagree. You can't get it anywhere close to 100% fitted before filling. In some areas the body needs filling, other places the movable panel (door, hood, trunklid) needs it. The bodies dive in as they approach the moving panel, especially so at the front of the doors and you really can't adjust or set gaps until this has been corrected. Here are driver's door pics from two different Mk4s---you can see that they are somewhat consistent in the areas that had to be built up to become flush at the door to body intersection:


    I don't finalize the gaps until after all of the contour work has been done:


    My recommendation is to only give enough gap so that the panel will move before sending it to have the body done and leave the final fitting and setting of the gaps for your painter.

    Cheers,
    Jeff

  17. #17
    Member
    Join Date
    Oct 2013
    Location
    Dothan, AL
    Posts
    60
    Post Thanks / Like
    Just for clarification, the whole front edge of my hood seems to fit perfectly flush. Gaps are not finalized, but are shaved down just enough to clear. Now, I'm pretty sure a sanding block would show that the fit isn't completely flush, but it's pretty damn close. The center of the windshield edge, with a rubber spacer seems to fit just as flush. The only part that is a problem is the two "corners" near the windshield edge, where the latches will go. Already the hood seems to have "settled" a bit, and the gap is not as bad even now. I took the ratchet strap off shortly after I put it on because I didn't see a point. Pushing down gently where the latches will go makes everything sit flush, so I think that's all it needs. Obviously before paint it will need filler, block sanding, etc. But I think the alignment and curvature of the hood will be perfectly acceptable. The latches should pull it all into alignment.

    And yes, I do know the lip on the body narrows as you go down, and I know the importance of having the spacers to put the hood in the right plane before setting gaps to keep from having them too short. I am of the mindset that I need to get everything shaved down just enough to fit, so I can connect up all hinges and latches and stuff, and get everything into a gross alignment. Then I will let the professional paint/body people use filler, block sand, set all gaps etc, profile the edges to round them, and paint. I figure if I shave it down just enough to fit and hook it all up together, some one that knows what they're doing with fiberglass bodywork and paint can work their magic.

    I don't know if the hood being too wide at first, and yet sitting on the body maybe caused it to settle a little bit and flatten (pressure on the outer edges only), but it seems plausible. Now that it is shaved to fit the body, is sitting on rubber spacers, and has an air gap all around, maybe it is starting to relax into a more proper curve. The outer rear corners still sit up just a little high (maybe 1/8 to 1/4 inch), but they press down flush where the latches should hold them properly. The front edge seems to be spot on, the way the hinges are adjusted.

  18. #18
    Member
    Join Date
    Oct 2013
    Location
    Dothan, AL
    Posts
    60
    Post Thanks / Like
    One other thing I've noticed about the hood hinges, though...

    If I raise the hood up (moves smoothly and fluidly with no binding, really smooth action) completely, and then set it back down, the front edge will be just the tiniest bit high. Maybe 1/16" or 1/32" high. I can push down, and feel the hood hinge go down just a bit further and it sits flush. its like the short links of the hinge don't lay down all the way when you open the good and close it again. But just a gentle nudge and they sit down flat and the alignment is spot on.

    Anyone else experience this? Is it normal? I'm thinking the hood hinge bolts may be adjusted just a little too tight, and its keeping the shorter front links from completely collapsing until you push them down. I'm just a bit anal retentive and a perfectionist, and so that bothers me a little more than it probably should. it doesn't seem like they are out of alignment, just maybe tight and not settling all the way down. I think I'll back the nuts off another 1/4 to 1/2 turn and see if that fixes it. I don't want it loose enough to be wobbly, but it should be loose enough to close all the way down on its own.

    Its really not a huge amount that it sits up, but it is noticeable, and I can definitely get just that last little 1/16 - 1/32 inch by gently pushing the hinge all the way down. Just going to take some tweaking to get perfect, I guess.

  19. #19
    Senior Member CraigS's Avatar
    Join Date
    Feb 2011
    Location
    Blacksburg, Va
    Posts
    4,728
    Post Thanks / Like
    Maybe the best answer is somewhere between Jeff's and mine. My main concern is based on two FFRs that I know of that were painted by guys who did a real nice paint job but had no clue about fitting the doors and hood etc. One we spent many hours trying to get the hood adjusted so it didn't hit the body as it closed. We managed that but there are a couple of spots where the clearance is only about 1/16 inch. Really the hood needed to have maybe 3/16 taken off the entire rear edge and the rear corners contoured better. The other has door fit problems.
    RE: your question about the front of the hood moving upward after open/close. There is a thread here or the other forum about 4-6 weeks ago discussing tightening up the slop in the hood hinges. That may be helpful if you can find it.
    FFR MkII, 408W, Tremec TKO 500, 2015 IRS, DA QA1s, Forte front bar, APE hardtop.

  20. #20
    EFI Rules and Carbs Drool Arrowhead's Avatar
    Join Date
    Feb 2011
    Location
    Stillwater, NY
    Posts
    599
    Post Thanks / Like
    Quote Originally Posted by pyronuc View Post
    One other thing I've noticed about the hood hinges, though...

    If I raise the hood up (moves smoothly and fluidly with no binding, really smooth action) completely, and then set it back down, the front edge will be just the tiniest bit high. Maybe 1/16" or 1/32" high. I can push down, and feel the hood hinge go down just a bit further and it sits flush. its like the short links of the hinge don't lay down all the way when you open the good and close it again. But just a gentle nudge and they sit down flat and the alignment is spot on.
    This is why I like to use the bumpers rather than the D shaped weather strip. The bumpers can be cut down to custom size as needed so the hood will sit in the same place every time. You have no control with the D foam strip, although I have used thick wire or vacuum tubing slipped inside to provide a solid support were needed (and I might do this on the one I'm currently working on). I may look nicer when you open the hood, but I'd rather have something that supports the hood so it sits flush every time it's closed.

  21. #21
    Not a waxer Jeff Kleiner's Avatar
    Join Date
    Feb 2011
    Location
    Bloomington, Indiana
    Posts
    8,069
    Post Thanks / Like
    Quote Originally Posted by CraigS View Post
    Maybe the best answer is somewhere between Jeff's and mine. My main concern is based on two FFRs that I know of that were painted by guys who did a real nice paint job but had no clue about fitting the doors and hood etc...
    Point taken Craig; I've seen the same as you---many times. My answer assumes that the painter can not only shoot the car but will also be diligent and put in the effort to make everything match and fit. You can put one of these together and get the panels to open, close and latch but the "out of the box" shapes and fit are far from ideal.

    Jeff

  22. #22
    cobra Handler skullandbones's Avatar
    Join Date
    Jul 2011
    Location
    Superstition Mtn foothills 5 miles west of Gold Canyon AZ
    Posts
    2,686
    Post Thanks / Like
    Blog Entries
    19
    Quote Originally Posted by pyronuc View Post
    One other thing I've noticed about the hood hinges, though...

    If I raise the hood up (moves smoothly and fluidly with no binding, really smooth action) completely, and then set it back down, the front edge will be just the tiniest bit high. Maybe 1/16" or 1/32" high. I can push down, and feel the hood hinge go down just a bit further and it sits flush. its like the short links of the hinge don't lay down all the way when you open the good and close it again. But just a gentle nudge and they sit down flat and the alignment is spot on.

    Anyone else experience this? Is it normal? I'm thinking the hood hinge bolts may be adjusted just a little too tight, and its keeping the shorter front links from completely collapsing until you push them down. I'm just a bit anal retentive and a perfectionist, and so that bothers me a little more than it probably should. it doesn't seem like they are out of alignment, just maybe tight and not settling all the way down. I think I'll back the nuts off another 1/4 to 1/2 turn and see if that fixes it. I don't want it loose enough to be wobbly, but it should be loose enough to close all the way down on its own.

    I'm experiencing this with everything installed. I have tried readjusting the tension on the hinge bolts and it helps a little but does not solve the issue. I will try moving the hinge down a little (may have to remove and elongate adjustment slots). At this point I have to press the left front corner down a little after closing the hood. My hood has not been cut down a lot so there may be a little fitting to do but the hinge not lowering the hood enough is a head scratcher at this point. Again, it's one of those things where you make a little adjustment in one place and it affects another point on the other side (a real balancing act). Good luck, WEK.

    Its really not a huge amount that it sits up, but it is noticeable, and I can definitely get just that last little 1/16 - 1/32 inch by gently pushing the hinge all the way down. Just going to take some tweaking to get perfect, I guess.
    Mine is doing that with everything installed. My next move is to lower the left hinge a little by removing and elongating the adjustment slots (no more adjustment left). I will see at that point if that solve the problem. So for now I have to lower the hood and then press the left corner down in front. Also, I have not cut my hood down to the finished size but it won't be much as it fits everywhere except the left side equidistant from the front and rear corners. BTW, I tried tightening and loosening the hinge bolts but it only had a minor effect on the issue. Good luck and keep this thread going, WEK.
    FFR MkIII 302 (ATK), EFI 75mm TB with custom box plenum chamber, 24# injectors, 4 tube BBK ceramic, cold air sys, alum flywheel, crane roller rockers, T5, Wilwood pedals, custom five link with Watt's link, 4 rotors, coil overs, power steering with Heidt valve, alum FFR rad, driver's crash bar mod, mini dead pedal mod, quick release steering wheel hub #6046

  23. #23
    Member
    Join Date
    Oct 2013
    Location
    Dothan, AL
    Posts
    60
    Post Thanks / Like
    Yeah, I tried playing with the hinge supports last night. I still have a little room on mine. I tried lowering just the front two mount bolts (both hinges need adjusting) and that seemed to pull the hood down snug on a rubber spacer, and everything seemed to line up okay, except for my slightly raised rear corners, which was expected. The only problem was, when I tried to reopen the hood, since the mounts were at a different angle (pointing down towards the front), the leading edge of the hood didn't want to lift off or the rubber spacer before it moved backwards. I'm thinking hinge adjustment is still what I need to work on, but I'm going to try lowering the back two bolts also, and come back up just a hair on the front. That way it will tip the hinge mount back a little bit, to be more level. I'm hoping that lowering the hinge all around just a little will bring it down snug on the rubber, but still clear when opening the hood.

    As far as slop in the hinges, I am aware of the issue of getting the washers seated correctly, and I'm good there. I don't have any wobble in the hinges like they're loose. But when the hood is closed, You can reach through the grille and push the front edge of the hood up and down about 1/16 of an inch, maybe 1/8. Its basically the front levers, the small ones, being able to pivot up and down slightly. I'm thinking if I can get the hood to just rest on the rubber at the maximum upward deflection of the hood (hinges pulled down), it won't matter if the hood could move further downward, because the rubber spacer will keep it pushed up. Basically, when I initially set up my hinges, it was with the hinge fully compressed. So the hood was on the rubber, hinges compressed and bolted down. Since the hinge (even when folded) can extend just that little bit, it seems like it makes my mounts sit up a little high so the hood can also be pushed up just a little. I want to align my hinges where it just sits on the rubber with the hinges pulled downward, and try that. I think I was on to the right idea yesterday, I just made the mistake of only adjusting the front mounting point, instead of both. I think the whole hinge will need to be lowered slightly, to keep the angle right, but take out the slack, and not drag the front edge on the rubber when opening.

    I hope all that makes some king of sense how I explained it. I'll report back when I get a chance to play with it again and let you guys know how it goes.
    Last edited by pyronuc; 02-27-2014 at 03:27 PM.

  24. #24
    Member
    Join Date
    Oct 2013
    Location
    Dothan, AL
    Posts
    60
    Post Thanks / Like
    Just an update. The other day I got around to playing with the hood hinge again. I lowered the hinges, both on the front and rear bolts, and I feel like the hinge operation is pretty close to perfect now. It closes down on the rubber bumpers, and the front edge does not sit up to be pushed down anymore. When you close the hood, the front edge just pulls straight down onto the rubber bumper, so the up-and-down slack in the hinges is pulled tight now. The hinges still open and close smoothly. I am out of adjustment room on the front bolts, so if I find I need to lower them any more, I'll have to file the slots a little deeper or find some other way to lower the hinges. But it seems like I have them adjusted pretty much optimally, now.

    I still have the issue where the rear corners sit up a little high, but I think that will be taken care of with the hood latches.

  25. #25
    EFI Rules and Carbs Drool Arrowhead's Avatar
    Join Date
    Feb 2011
    Location
    Stillwater, NY
    Posts
    599
    Post Thanks / Like
    Glad you got it figured out pyronuc, sloppy hinges can throw you off doing panel alignment on any car, not just a FFR. One thing I noticed was the washers still don't take up all the slack in the shoulder bolts. I happened to have a box of washers that were just the right thickness to take up the extra slack on the front hinge bolt so I added them to all eight hinge bolts and it help quite a bit in making the hood come down more consistent. Per FFR tech a wave washer would also work well to remove any slop from the shoulder bolt.

  26. #26
    cobra Handler skullandbones's Avatar
    Join Date
    Jul 2011
    Location
    Superstition Mtn foothills 5 miles west of Gold Canyon AZ
    Posts
    2,686
    Post Thanks / Like
    Blog Entries
    19
    Thanks for the heads up. I know now to also head in that direction of lowering the hinge. I wasn't sure it would work but sounded logical. Of course, the bodies fit slightly different from project to project so there will be some variation in each case. At this point my body couldn't be any further down on the chassis rails but they are not exactly even from side to side. It's a real balancing act!!!
    FFR MkIII 302 (ATK), EFI 75mm TB with custom box plenum chamber, 24# injectors, 4 tube BBK ceramic, cold air sys, alum flywheel, crane roller rockers, T5, Wilwood pedals, custom five link with Watt's link, 4 rotors, coil overs, power steering with Heidt valve, alum FFR rad, driver's crash bar mod, mini dead pedal mod, quick release steering wheel hub #6046

  27. #27
    Member
    Join Date
    Oct 2013
    Location
    Dothan, AL
    Posts
    60
    Post Thanks / Like
    Yeah, its an issue of tweak, tweak, tweak. I'm just anal retentive and a perfectionist, and I just can't seem to get things perfect enough to quit fooling with them. Overall quality is definitely good, though, its just a lot of find tuning and tweaking.

    I don't know if my hinges may have been made earlier or later than anyone else's, but I don't really have any slop in the hinges as far as the bolts bottoming out on the washers. I think I just had my hinges adjusted up too high.

Tags for this Thread

Posting Permissions

  • You may not post new threads
  • You may not post replies
  • You may not post attachments
  • You may not edit your posts
  •  

Martin's Dent and Collision Shop

Visit our community sponsor