Boig Motorsports

Visit our community sponsor

Thanks Thanks:  0
Likes Likes:  0
Page 2 of 6 FirstFirst 1234 ... LastLast
Results 41 to 80 of 220

Thread: David's Mk4 Build Thread

  1. #41
    Junior Member otis's Avatar
    Join Date
    Feb 2011
    Location
    Stillwater,MN
    Posts
    5
    Post Thanks / Like
    Awesome exhaust flange solution. I wish I had thought of that for my dart pro 1 heads. I am still waiting for custom exhaust headers to be made.

    Rob

  2. #42
    Senior Member
    Join Date
    Feb 2011
    Location
    Bourne-Cape Cod, MA
    Posts
    813
    Post Thanks / Like
    Wow, That is some really creative and smart thinking. I am impressed. Not sure what direction my personal next build will take, but I am very interested in how thesey Coyote engines play out.

    I spoke with Joe Leone at the open house........err moochfest rather..... and he explained your solution , Nice work.

    Terminator? or Coyote??? HMMM decisions decisons. I am leaning toward new technology and brand new parts with the Coyote.. Since I won't likely do my own build now until next fall, I have time and this will allow for more development of these type parts.

  3. #43
    Junior Member Larry N. Johnson's Avatar
    Join Date
    Feb 2011
    Location
    Saratoga Springs, UT
    Posts
    25
    Post Thanks / Like
    David,

    Did you get a shallower pan yet?
    If not try Farra Snook at SoFast Racing in Oregon.
    He has maybe more mod-motor experience than anyone else installing in FFR cars.
    His business number is 541-928-5858.

    Regards,
    LNJ

  4. #44
    Administrator David's Avatar
    Join Date
    Feb 2011
    Location
    Eldo CA
    Posts
    443
    Post Thanks / Like
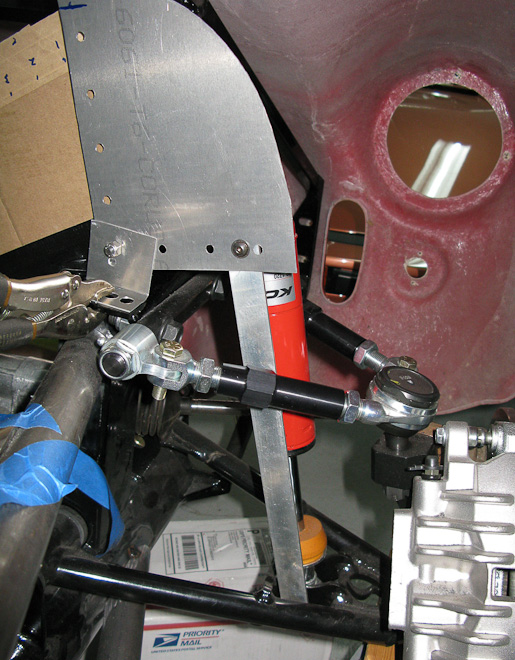
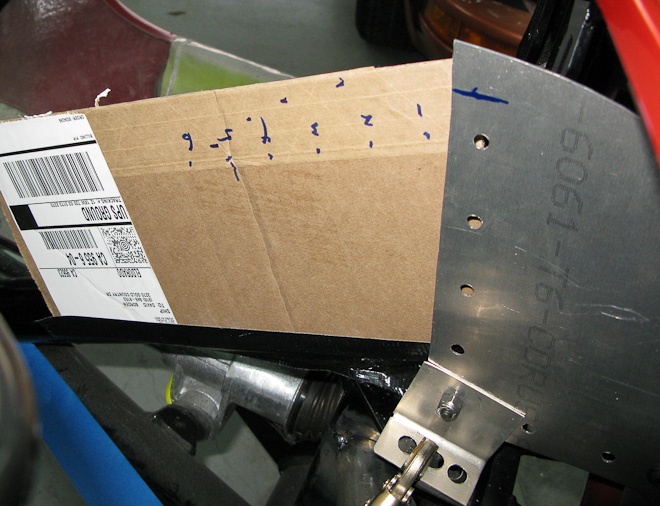
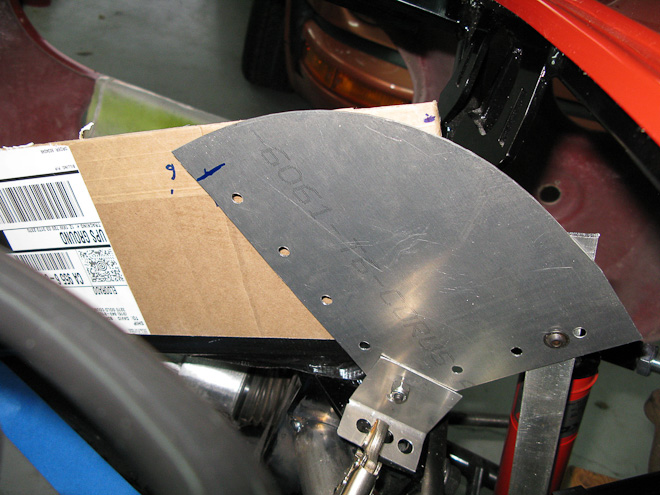
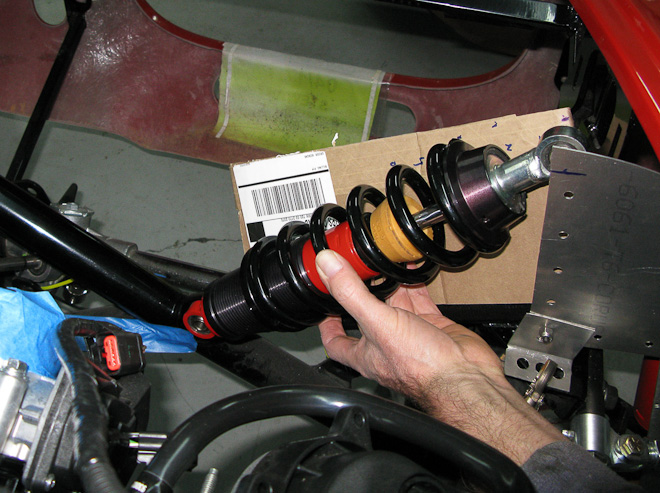
    I have been contemplating fabricating rocker arm suspension for my MK4 build so spent some time today checking to see if I could get it packaged so that it all would work without cutting the frame and still get the motion ratios I want. The goal is to get around 1:1 motion ratio (wheel to shock travel).

    It appears from what I did today that I should be able to get the packaging and motion ratios I need and it should be 100% bolt on!


    Pictures at full droop. I have a rough scale on the cardboard to check the travel of the spindle/hub compared to the shock travel.


    With 5 inches of hub travel, shows 5 inches of shock travel and from my rough test
    today, the travel is pretty linear.


    This is the approx location and angle of the shock mounting. I would make a billet alum saddle that will clamp on the X to support the lower shock mount.

    Im still somewhat torn on doing this but am leaning towards it. I think it would be pretty freaking cool looking and it has some benefit of getting the motion ratio to approx 1:1.

    The rocker would be shaped somewhat like an L with a large fillet and be machined out of aluminum and have bearings pressed into it for the pivot.

    The pivot bracket would be made from steel and bolt to the top of the upper control arm mount. It would most likely require the SAI mod or the new FFR spindles to work.

    Most likely would be doing something similar to the rear suspension as well.

    I’d definitely appreciate folks giving my feedback on whether I should go for it or not. Let me know what you all think!

    David
    Mk4 Build Thread: http://thefactoryfiveforum.com/showthread.php?141-David-s-Mk4-Build-Thread

    GTM Project Build site: http://www.gtmbuild.com

    Few Cool GTM Parts: http://www.gtmbuild.com/parts.htm

  5. #45
    MKIII #5835 Someday I Suppose's Avatar
    Join Date
    Feb 2011
    Location
    Stanhope, NJ
    Posts
    783
    Post Thanks / Like
    I think it would certainly be different, but since everything else on this car is so stock why the heck not :-)

    A quick thought that popped into my mind on the pivot, are you going to keep them that circular shape? Couldn't it be more of a triangle and keep the ratio as you have it?

    My only real concern I think I would have in the bearing area is just doing it in such a way that the pivot can't twist at all, but I am sure your going to throw it into Solidworks and do that fancy stuff with it anyhow.

    The last question I had is where the shock end mounts? I think your going to basically the center of the X brace, but when I first looked at it, I thought you were going to the opposite side which would cause an criss cross issue when you do the other side.

    -Scott
    MKIII #3835 IRS, Anderson Performance 408 Levy T-5 Trans, Team III Wheels
    Paint completed November 2010, passed NJ State Safety Inspection June 21st, Tagged and First Drive 7/1/2011

  6. #46
    Senior Member THE ITALIAN's Avatar
    Join Date
    Feb 2011
    Location
    Coastal So Cal
    Posts
    229
    Post Thanks / Like
    I think ,due to the frame mods that have already been thought out and done ..
    DONT STOP THERE!
    THIS CAN BE THE NEXT standard IN GOING all the way ! Since I have an early and rare D BORDEN
    " modded "frame , I for one want to see it. Q >> how many more will you do?
    You may regret not doing it after it is finished,besides it will LOOK TRICK and let's face it, we want to watch.
    There is a build in my future and I need tips and besides this will be the flagship in power and most important ,handling.
    Mike

  7. #47
    Member John F's Avatar
    Join Date
    Feb 2011
    Location
    N. Dighton
    Posts
    31
    Post Thanks / Like
    Nice work, David. I've been sporadically following this on Corner Carvers, but it's nice to see it here where the pics are already opened
    John

    A fine is a tax for doing wrong. A tax is a fine for doing right.

  8. #48
    Administrator David's Avatar
    Join Date
    Feb 2011
    Location
    Eldo CA
    Posts
    443
    Post Thanks / Like
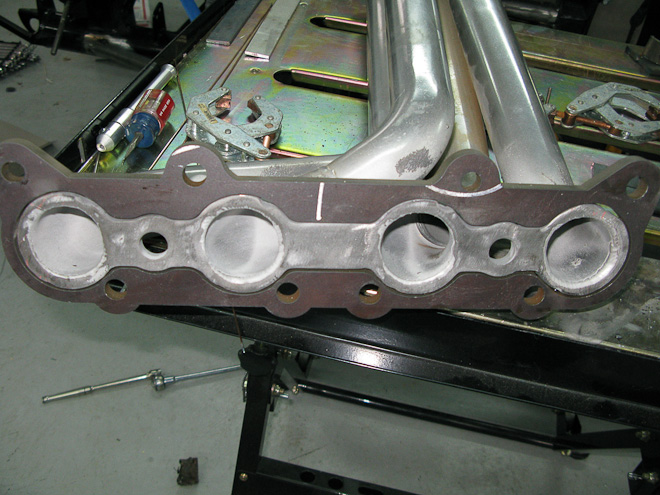
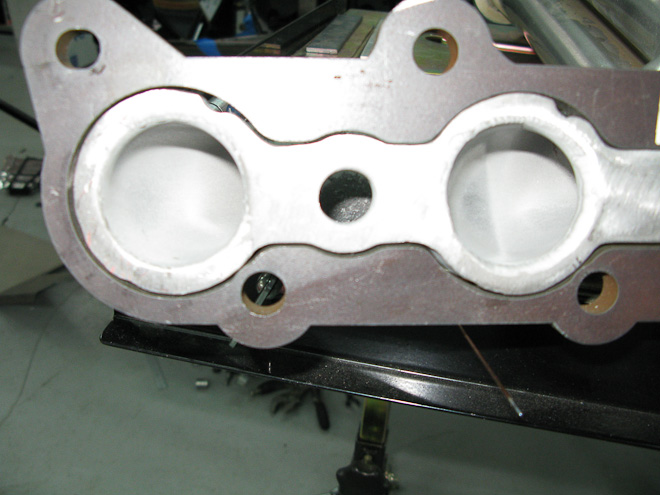
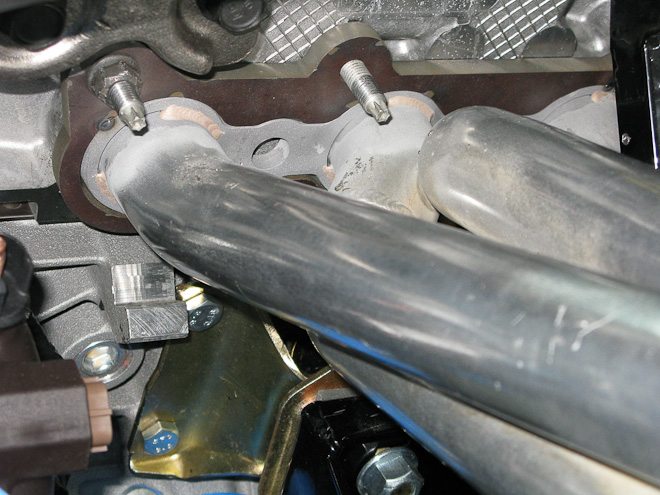
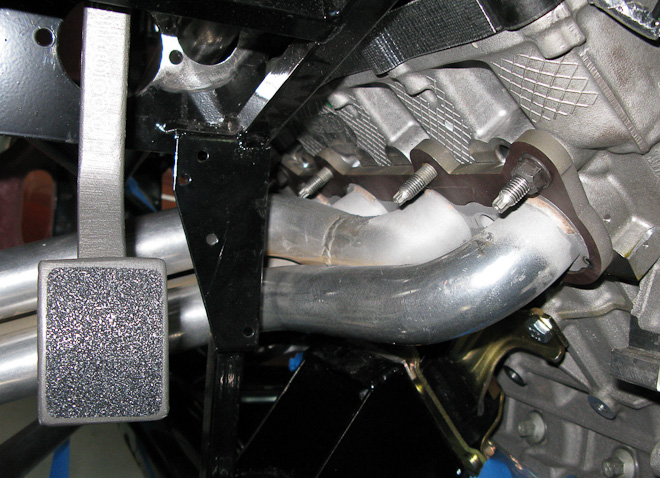
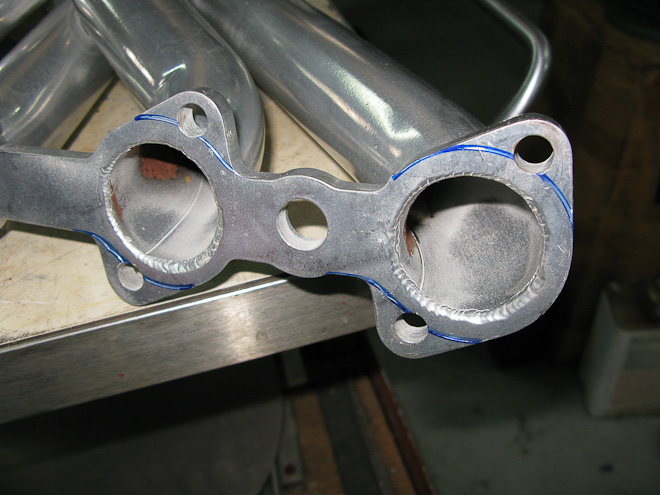
    Glenn was kind enough to cut me a revised part in steel the other day and I was able tack them on the on the headers and do test fit. I opened up the tolerances about .040" around the perimeter to give a bit of room for adjustment and make it easier to fit.


    It was a bit of a challenge to get the coating off, but was able to do so with some silicone carbide material in my bead blaster. Once complete I tacked them in place. Im pretty happy with the outcome.


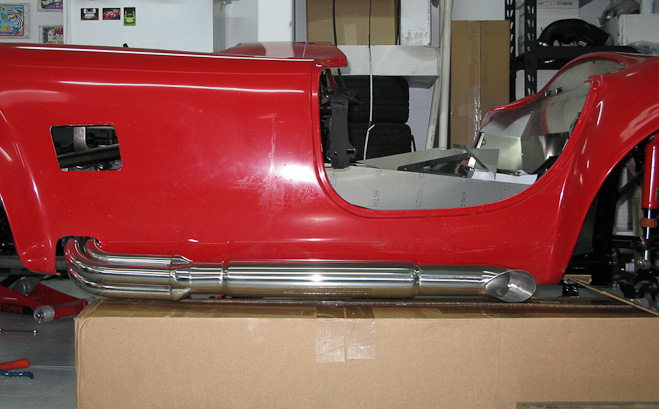
    Not sure how the headers fit with the stock 4.6, but Im pretty happy with the outcome with the test fit. The headers are back a bit, but nothing trimming the hole for headers wont fix.


    I spoke to Glenn and he said he would be willing to make these adapters for folks if needed. Shoot him a PM if interested.

    Let me know what you all think.

    David
    Mk4 Build Thread: http://thefactoryfiveforum.com/showthread.php?141-David-s-Mk4-Build-Thread

    GTM Project Build site: http://www.gtmbuild.com

    Few Cool GTM Parts: http://www.gtmbuild.com/parts.htm

  9. #49
    Trick Tool Maker, Super Moderator Hankl's Avatar
    Join Date
    Feb 2011
    Location
    Northern CA
    Posts
    671
    Post Thanks / Like
    Blog Entries
    1

    David,

    Off the wall! I love it!!

    Hank
    “If you didn’t have enough time to do it right the first time. How come you always have time to go back and do it again?” FFR1000186CP

    Understeer is when you hit the wall with the front of the car and oversteer is when you hit the wall with the rear of the car.
    Horsepower is how fast you hit the wall and torque is how far you take the wall with you.

  10. #50
    MKIII #5835 Someday I Suppose's Avatar
    Join Date
    Feb 2011
    Location
    Stanhope, NJ
    Posts
    783
    Post Thanks / Like
    David, awesome solution buddy, love it. Those pics really make you realize how close the headers are to the footbox as well. I know you said the headers are back just a bit, do you foresee any issues with them hitting the footboxes once the sheet metal is in place?

    -Scott
    MKIII #3835 IRS, Anderson Performance 408 Levy T-5 Trans, Team III Wheels
    Paint completed November 2010, passed NJ State Safety Inspection June 21st, Tagged and First Drive 7/1/2011

  11. #51
    Junior Member
    Join Date
    Feb 2011
    Location
    Cambridge, MA
    Posts
    8
    Post Thanks / Like
    Looks great David! Given the proximity of the headers to your footbox, are you planning to wrap them or use some sort of additional heat shielding?

  12. #52
    Senior Member riptide motorsport's Avatar
    Join Date
    Feb 2011
    Location
    Fort Lauderdale Fl.
    Posts
    3,296
    Post Thanks / Like
    Fantasic work! steven
    FFR Daytona Type 65 Coupe
    67 427 Cobra
    57' Belair
    72 Pinto Wagon ,306" 1/4 miler
    34 5 window coupe Ford
    2003 Mustang GT
    99' ZX9
    85 Goldwing

    All toys still in the Scuderia!


    Every Saint has a past..................every sinner a future

    Don't take yourself so seriously........no one else does.

    You never see a motorcycle parked outside a Psychiatrists office.

  13. #53
    Administrator David's Avatar
    Join Date
    Feb 2011
    Location
    Eldo CA
    Posts
    443
    Post Thanks / Like
    Quote Originally Posted by Someday I Suppose View Post
    David, awesome solution buddy, love it. Those pics really make you realize how close the headers are to the footbox as well. I know you said the headers are back just a bit, do you foresee any issues with them hitting the footboxes once the sheet metal is in place?

    -Scott
    There appears to be plenty or room Scott but good question though.

    Anyone willing to measure the distance between the front of their footbox and the header tubes?

    David
    Mk4 Build Thread: http://thefactoryfiveforum.com/showthread.php?141-David-s-Mk4-Build-Thread

    GTM Project Build site: http://www.gtmbuild.com

    Few Cool GTM Parts: http://www.gtmbuild.com/parts.htm

  14. #54
    Super Moderator oldguy668's Avatar
    Join Date
    Feb 2011
    Posts
    848
    Post Thanks / Like
    Blog Entries
    2
    Just a quick FYI on the pan. Champ got it back from the plater and discovered a glitch when they mocked up the pickup and pump. They had to reweld something and it's got to go back to the plater. So, I'm going to lose another week before I get it and mount it up.

    Now for a question: Can I mount the power distribution box and the computer on the passenger footbox so I can reserve the space behind the dash for my 3 ISIS modules? I can't seem to get my hands on a control package to check it for myself.
    "Loyalty to the country always. Loyalty to the government when it deserves it".

    Mark Twain

  15. #55
    Junior Member
    Join Date
    Feb 2011
    Posts
    1
    Post Thanks / Like
    do you have to have the car before you get a # from dmv? how long do you have to get it built after you get a #? I'm in Freestone, CA by the coast and i'm trying to get all the details before i start building my dream car. I'll be following your build. Thank you

    Mike M
    Freestone, CA

  16. #56
    Administrator David's Avatar
    Join Date
    Feb 2011
    Location
    Eldo CA
    Posts
    443
    Post Thanks / Like
    Quote Originally Posted by oldguy668 View Post
    Just a quick FYI on the pan. Champ got it back from the plater and discovered a glitch when they mocked up the pickup and pump. They had to reweld something and it's got to go back to the plater. So, I'm going to lose another week before I get it and mount it up.

    Now for a question: Can I mount the power distribution box and the computer on the passenger footbox so I can reserve the space behind the dash for my 3 ISIS modules? I can't seem to get my hands on a control package to check it for myself.
    Joe, sounds good on the champ pan! This stuff takes time...

    There should be room for it there and from what I understand, they are designed for underhood environment. Actually a great place for it is mounted to the upper 3/4 tube around the pass footbox area with a custom bracket. You'll barely see it and wont need to splice any wires either(already mocked it up to test) I could probably figure something out to make for folks to make mounting easy. If its 2D, Glenn may be willing to cut them and sell. I have the harness so I can get measurements.

    David
    Mk4 Build Thread: http://thefactoryfiveforum.com/showthread.php?141-David-s-Mk4-Build-Thread

    GTM Project Build site: http://www.gtmbuild.com

    Few Cool GTM Parts: http://www.gtmbuild.com/parts.htm

  17. #57
    Administrator David's Avatar
    Join Date
    Feb 2011
    Location
    Eldo CA
    Posts
    443
    Post Thanks / Like
    Im starting to get a bit more weekend time as Mary is feeling better and work has gotten back to normal…

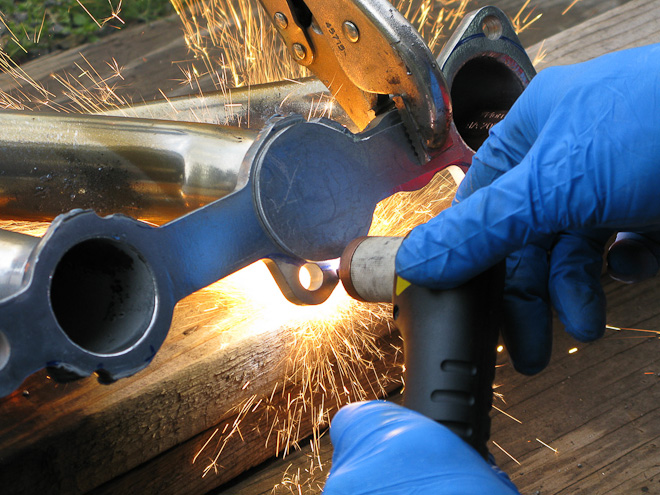
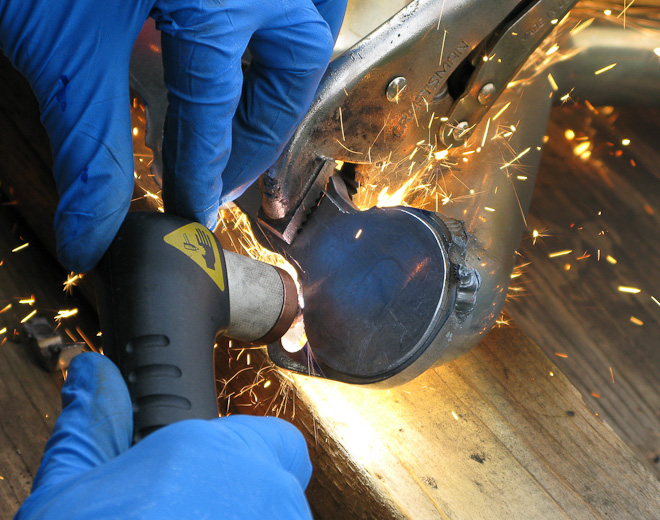
    Cutting down the flange on the first set of headers took quite a bit of work as I worked through a process. The 2nd set went much quicker. I created a simple template that is clamped onto the face of the flange and is used as a guide for a plasma cutter. I was able to get much closer without fear or cutting to far making the cleanup much much quicker.


    After centering the adapter flange over the header flange and marking the area that needed to be cut away with a sharpie…


    I tool my little guide plate and vise gripped it centered in the mark and started making my cuts.


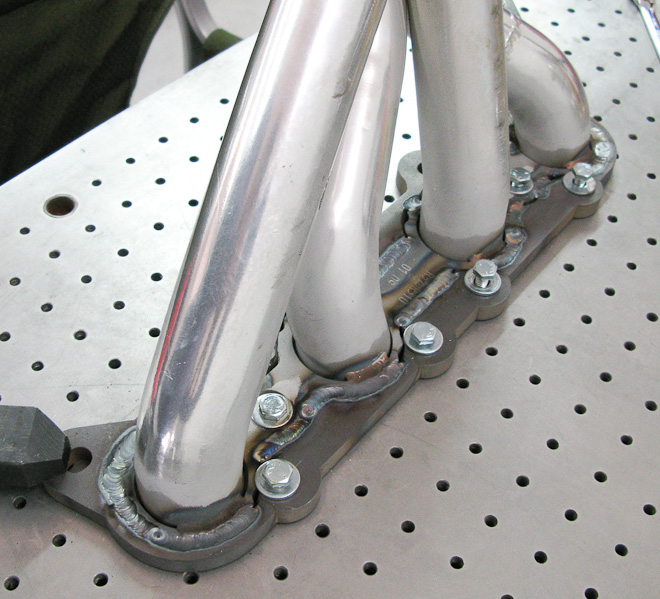
    After cleaning up the existing flange with a flapper wheel so the adapter flange slipped easily over it, I was ready to chamfer. Using a carbide burr, I ground a heavy chamfer on the adapter flange that went down about .25 inch with each of the top stud holes. I ran about a 1/8” chamfer around the rest of the adapter flange and I was ready to weld.


    Glenn hooked my up with a freaking cool table with drilled and tapped holes that made bolting the flange down cake… I couldn’t have been easier.(thanks Glenn!) I went around and did some reasonable tacks around the joint and then went to town. I used filler rod for the large chamfers and just fusion welded the rest of it.

    Its not done yet, but close. Just need to close up the areas close to the hold down bolts and a few other tight spots and I will be ready to fully weld the other one.

    Thanks again to Glenn for helping us out and cutting these parts and selling them to the guys who need them. I know running that water jet is not cheap with the time it takes to cut 3/8 plate and the garnet costs… He probably makes just enough to buy lunch with every set he sends out.(no kidding)

    Hopefully I can get the other set finished up this weekend and start making some forward progress. 

    David
    Mk4 Build Thread: http://thefactoryfiveforum.com/showthread.php?141-David-s-Mk4-Build-Thread

    GTM Project Build site: http://www.gtmbuild.com

    Few Cool GTM Parts: http://www.gtmbuild.com/parts.htm

  18. #58
    Senior Member astglenn's Avatar
    Join Date
    Feb 2011
    Location
    Rescue CA
    Posts
    142
    Post Thanks / Like
    I saw the work this morning. It looks really good. Dave has shown great craftsmanship and mad design abilities. If he gets tired of being a professional, really smart guy, I could use him in the shop. We can't tell anyone though. He would be a pariah here. His parents were married.

  19. #59
    MKIII #5835 Someday I Suppose's Avatar
    Join Date
    Feb 2011
    Location
    Stanhope, NJ
    Posts
    783
    Post Thanks / Like
    David, looks awesome man, congrats on a job well done and one small step in the Coyote build :-)

    _Scott
    MKIII #3835 IRS, Anderson Performance 408 Levy T-5 Trans, Team III Wheels
    Paint completed November 2010, passed NJ State Safety Inspection June 21st, Tagged and First Drive 7/1/2011

  20. #60
    Administrator David's Avatar
    Join Date
    Feb 2011
    Location
    Eldo CA
    Posts
    443
    Post Thanks / Like
    Thanks guys appreciate it!

    David
    Mk4 Build Thread: http://thefactoryfiveforum.com/showthread.php?141-David-s-Mk4-Build-Thread

    GTM Project Build site: http://www.gtmbuild.com

    Few Cool GTM Parts: http://www.gtmbuild.com/parts.htm

  21. #61
    Junior Member
    Join Date
    Mar 2011
    Posts
    29
    Post Thanks / Like
    How did the "flatness" of the header flange hold up to the welding? Do you need to mill them flat for the gaskets to hold up?

    By the way nice work too!
    Last edited by cozmacozmy; 03-17-2011 at 12:07 PM. Reason: spelling

  22. #62
    Administrator David's Avatar
    Join Date
    Feb 2011
    Location
    Eldo CA
    Posts
    443
    Post Thanks / Like
    Quote Originally Posted by cozmacozmy View Post
    How did the "flatness" of the header flange hold up to the welding? Do you need to mill them flat for the gaskets to hold up?

    By the way nice work too!
    It held up very well by bolting to the table and came out virtually flat. Just a few thou off from what I can tell so far. I still have a bit more to weld, but so far its looking really good. I have a feeling it will end up flatter than it started. I def dont think I will need to mill them.

    Glenn used really high quality steel on the adapters, so I think that has something to do with it.

    David
    Mk4 Build Thread: http://thefactoryfiveforum.com/showthread.php?141-David-s-Mk4-Build-Thread

    GTM Project Build site: http://www.gtmbuild.com

    Few Cool GTM Parts: http://www.gtmbuild.com/parts.htm

  23. #63
    Senior Member
    Join Date
    Mar 2011
    Posts
    213
    Post Thanks / Like
    impressive thread. wow

  24. #64
    Junior Member
    Join Date
    Feb 2011
    Location
    Bay Village, Ohio
    Posts
    11
    Post Thanks / Like
    Hi David,

    Were the flanges water jet or laser cut? And I am not suprised that your parents were married. As to engineering............I hope you are not too well learnned. Cause if you were all you would know is what won't work. What we need in this country is more people that want to invent new and better things and ways. Like Kelly Johnson, who was in charge of the P-38, P/F 80 and SR-71 and much moore although not an Aeronotical Engineer.

  25. #65
    Richard Oben's Avatar
    Join Date
    Feb 2011
    Location
    Kansas City MO
    Posts
    279
    Post Thanks / Like
    David, it appears you blasted the flange just enough to get a good weld, is that correct?
    If so do you plan to recoat of just paint that part of the header? Let me know, Richard.
    Richard Oben FFR builder www.northracecars.com

    Need help finishing your project we can help here or at your shop.

    FFR GTM #34 first GTM with working AC. 400 hp LS1 w/G50
    FFR coupe 3617CP 331 Stack EFI T-5 IRS Cobra brakes, AC/heat.
    Both cars by NRC, we can build (and have built) any FFR product.
    We also make and sell a ton of great parts for the FFR community.
    Brake kits, AC systems, #1 supplier of Team III wheels.

  26. #66
    Administrator David's Avatar
    Join Date
    Feb 2011
    Location
    Eldo CA
    Posts
    443
    Post Thanks / Like
    Quote Originally Posted by Richard Oben View Post
    David, it appears you blasted the flange just enough to get a good weld, is that correct?
    If so do you plan to recoat of just paint that part of the header? Let me know, Richard.
    Yep, you got it.. Ive heard that if you dont get that coating completely off you can have problems welding so I just blasted it with silicone carbide to be sure. It was tough stuff. I do plan to re coat the headers. I should have wrapped some some of that heat shield around the header tubes when I used the plasma. It ended up messing up the coating on the tubes so needed to blast that clean as well. If one was careful, they wouldnt even need to get into the coating on the tubes, but not sure its worth being careful since re coating will protect the whole header.

    David
    Mk4 Build Thread: http://thefactoryfiveforum.com/showthread.php?141-David-s-Mk4-Build-Thread

    GTM Project Build site: http://www.gtmbuild.com

    Few Cool GTM Parts: http://www.gtmbuild.com/parts.htm

  27. #67
    Administrator David's Avatar
    Join Date
    Feb 2011
    Location
    Eldo CA
    Posts
    443
    Post Thanks / Like
    Quote Originally Posted by Art Totten View Post
    Hi David,

    Were the flanges water jet or laser cut? And I am not suprised that your parents were married. As to engineering............I hope you are not too well learnned. Cause if you were all you would know is what won't work. What we need in this country is more people that want to invent new and better things and ways. Like Kelly Johnson, who was in charge of the P-38, P/F 80 and SR-71 and much moore although not an Aeronotical Engineer.
    Sorry for the delay Art! Hahaha, you funny dude Im barely learned.... maybe thats my problem! They were cut with a water jet by Glenn Evans. (ASTGlenn) I think you'd love that guy! Stupid smart like you and a kick to hear his stories.

    David
    Mk4 Build Thread: http://thefactoryfiveforum.com/showthread.php?141-David-s-Mk4-Build-Thread

    GTM Project Build site: http://www.gtmbuild.com

    Few Cool GTM Parts: http://www.gtmbuild.com/parts.htm

  28. #68
    Senior Member astglenn's Avatar
    Join Date
    Feb 2011
    Location
    Rescue CA
    Posts
    142
    Post Thanks / Like
    Quote Originally Posted by David View Post
    Sorry for the delay Art! Hahaha, you funny dude Im barely learned.... maybe thats my problem! They were cut with a water jet by Glenn Evans. (ASTGlenn) I think you'd love that guy! Stupid smart like you and a kick to hear his stories.

    David
    HA! My problem is that I seem to select Stupid from the bucket of available options, when I need smart. The adverse is proportionally true. Err wait...

  29. #69
    Richard Oben's Avatar
    Join Date
    Feb 2011
    Location
    Kansas City MO
    Posts
    279
    Post Thanks / Like
    Our plan is VHT paint the flange area and save the coating on the tubes. It has been our exprience that the tubes and flange turn sort of grey from the heat anyway so painting them should be fine. Seems a shame to have to recoat for something that will never be seen. JMHO, Richard.
    Richard Oben FFR builder www.northracecars.com

    Need help finishing your project we can help here or at your shop.

    FFR GTM #34 first GTM with working AC. 400 hp LS1 w/G50
    FFR coupe 3617CP 331 Stack EFI T-5 IRS Cobra brakes, AC/heat.
    Both cars by NRC, we can build (and have built) any FFR product.
    We also make and sell a ton of great parts for the FFR community.
    Brake kits, AC systems, #1 supplier of Team III wheels.

  30. #70
    Senior Member astglenn's Avatar
    Join Date
    Feb 2011
    Location
    Rescue CA
    Posts
    142
    Post Thanks / Like
    Quote Originally Posted by Richard Oben View Post
    Our plan is VHT paint the flange area and save the coating on the tubes. It has been our exprience that the tubes and flange turn sort of grey from the heat anyway so painting them should be fine. Seems a shame to have to recoat for something that will never be seen. JMHO, Richard.
    This seems sensible. To be honest, if the high heat rattle can work is well executed with a heated part and warm paint, I see little long term difference, other than the price.

  31. #71
    Richard Oben's Avatar
    Join Date
    Feb 2011
    Location
    Kansas City MO
    Posts
    279
    Post Thanks / Like
    Had the fab shop guys so the work. Had the edge of the flanges blasted just the edge, masked the pipes, cut the flange with the ubercool template and then welded it all up. Shot the flange with VHT and it looks great, I will see if I can get a pic. The customer was in a hurry to get them so they left without me snapping one.

    Also, the oil pan button is up and working. We will have pans in about a month. HTH, Richard.
    Richard Oben FFR builder www.northracecars.com

    Need help finishing your project we can help here or at your shop.

    FFR GTM #34 first GTM with working AC. 400 hp LS1 w/G50
    FFR coupe 3617CP 331 Stack EFI T-5 IRS Cobra brakes, AC/heat.
    Both cars by NRC, we can build (and have built) any FFR product.
    We also make and sell a ton of great parts for the FFR community.
    Brake kits, AC systems, #1 supplier of Team III wheels.

  32. #72
    Senior Member astglenn's Avatar
    Join Date
    Feb 2011
    Location
    Rescue CA
    Posts
    142
    Post Thanks / Like
    Quote Originally Posted by Richard Oben View Post
    Had the fab shop guys so the work. Had the edge of the flanges blasted just the edge, masked the pipes, cut the flange with the ubercool template and then welded it all up. Shot the flange with VHT and it looks great, I will see if I can get a pic. The customer was in a hurry to get them so they left without me snapping one.

    Also, the oil pan button is up and working. We will have pans in about a month. HTH, Richard.
    Cool. Seems like they are working well for everyone so far. David and I really tried to revise the thing so it was as user friendly as possible. Joe Leone (Oldguy688) actually had the idea of the full sized template. I just run the waterjet. I let the smart guys work out the details!

  33. #73
    Junior Member
    Join Date
    Feb 2011
    Location
    Sacramento
    Posts
    19
    Post Thanks / Like
    I would like to know the answer to MikeMckena's question about DMV #'s too.
    Last edited by doughboy; 03-30-2011 at 01:57 PM.

  34. #74
    Junior Member
    Join Date
    Feb 2011
    Location
    Sacramento
    Posts
    19
    Post Thanks / Like
    I will be following along to see how the a/c install goes. It gets hot here in Sacramento as you know. My buddies drive vettes and they all have a/c so I don't want to be left out in the HEAT.

  35. #75
    Administrator David's Avatar
    Join Date
    Feb 2011
    Location
    Eldo CA
    Posts
    443
    Post Thanks / Like
    Quote Originally Posted by MikeMcKena View Post
    do you have to have the car before you get a # from dmv? how long do you have to get it built after you get a #? I'm in Freestone, CA by the coast and i'm trying to get all the details before i start building my dream car. I'll be following your build. Thank you

    Mike M
    Freestone, CA
    Mike, sorry for the delay. I missed this questions...

    At the very least, you need the Certificate of Origin from FFR, which generally means you need the car to get that. If you need it asap once you order, make sure to request it. It can take a few to get it after the car is ordered if not due to processing time at FFR.

    David
    Mk4 Build Thread: http://thefactoryfiveforum.com/showthread.php?141-David-s-Mk4-Build-Thread

    GTM Project Build site: http://www.gtmbuild.com

    Few Cool GTM Parts: http://www.gtmbuild.com/parts.htm

  36. #76
    Administrator David's Avatar
    Join Date
    Feb 2011
    Location
    Eldo CA
    Posts
    443
    Post Thanks / Like
    Quote Originally Posted by doughboy View Post
    I will be following along to see how the a/c install goes. It gets hot here in Sacramento as you know. My buddies drive vettes and they all have a/c so I don't want to be left out in the HEAT.
    Agreed 100%. Im near sac as well and it does get hot here... thats why I plan to install AC. I hope to get started on the bracketry fairly soon. Working on getting some models that should help making the brackets. I'll post as I know more.

    David
    Mk4 Build Thread: http://thefactoryfiveforum.com/showthread.php?141-David-s-Mk4-Build-Thread

    GTM Project Build site: http://www.gtmbuild.com

    Few Cool GTM Parts: http://www.gtmbuild.com/parts.htm

  37. #77
    MKIII #5835 Someday I Suppose's Avatar
    Join Date
    Feb 2011
    Location
    Stanhope, NJ
    Posts
    783
    Post Thanks / Like
    David,

    Was watch some Top Gear today and they had a Pagani Zonda R on it, I happened to notice the suspension on it, and I thought of what your trying to do. I found a couple images on the net, I thought it was interesting that they are using two sections with the heim of the shock sandwhiched between the two halves of the pivot arm.

    Rear Suspension


    On the front though it is interesting as the pivot arm is mounted directly to the upper a-arm which eliminates the need for a shaft where the shock would have been but also removes two pivot points.


    Not sure if you could do something similar as a retrofit to the a-arms on the MKIV but thought I would share.

    _Scott
    MKIII #3835 IRS, Anderson Performance 408 Levy T-5 Trans, Team III Wheels
    Paint completed November 2010, passed NJ State Safety Inspection June 21st, Tagged and First Drive 7/1/2011

  38. #78
    Member
    Join Date
    Feb 2011
    Location
    Stratham, NH
    Posts
    69
    Post Thanks / Like
    David,

    The 4.6L 3V is close in design to the Coyote. I've got A/C and P/S on the front of my 2010 Mustang engine and the only mod I had to do (so far) was cut the steering shaft and move the lower u-joint back to clear the P/S pulley. Is the front of the Coyote that different?

    The problem I'm now trying figure out is how to fit the Ford Racing air filter/MAF assembly into the engine bay. It's too big and angles far left. I imagine finding some shorter pieces will work, but then does that mess up what the computer expects from the MAF?

    John

  39. #79
    Senior Member chrisarella's Avatar
    Join Date
    Apr 2011
    Location
    Clearwater, FL
    Posts
    172
    Post Thanks / Like
    JGP got me thinking...

    Will you be getting this thing tuned after the build. I'd imagine there would be good gains from tuning considering the off-the-shelf mapping from Ford isn't really appropriate for the roadster (different exhaust and intake config, no cats, probably more air flow, etc.). And we all know the factory makes compromises for fuel economy and emissions so I'm sure there is room in the ceiling for more gains.
    Chris
    Mark IV Roadster #7679
    Coyote 5.0, T56, Hydraulic Clutch, IRS, Torsen Diff, Wilwoods, Hydraboost, ABS Power Brakes, Power Steering, & tons more extras.

  40. #80
    Senior Member The Stig's Avatar
    Join Date
    Feb 2011
    Location
    Charlotte, NC
    Posts
    2,004
    Post Thanks / Like
    Hi Dave,

    I thought I would "stop in" and see what kind of magic you've been stirring up lately. I'm always amazed at the ingenuity and just plain smart thinking that you consistently demonstrate. Great job on the build. I was also glad to read that Mary is feeling better, and I hope you are too Buddy!

    Did you get a chance to attend the Huntington Beach Cruise In?

    Congrats on the sweet build Dave. I can't wait to see it completed!
    The Stig

    Some say, that I only know two facts about ducks, (both being wrong); and that if I could be bothered, I could solve the "da Vinci Code" in 47 seconds...
    All I know is that I'm called "The Stig".
    GTM #0081

Page 2 of 6 FirstFirst 1234 ... LastLast

Posting Permissions

  • You may not post new threads
  • You may not post replies
  • You may not post attachments
  • You may not edit your posts
  •  

Brown County Customs

Visit our community sponsor