Very Cool Parts

Visit our community sponsor

Thanks Thanks:  0
Likes Likes:  0
Page 3 of 6 FirstFirst 12345 ... LastLast
Results 81 to 120 of 220

Thread: David's Mk4 Build Thread

  1. #81
    Senior Member E-Ticket Ride's Avatar
    Join Date
    Feb 2011
    Location
    Huntington Beach, California
    Posts
    132
    Post Thanks / Like
    Howdy Dave!
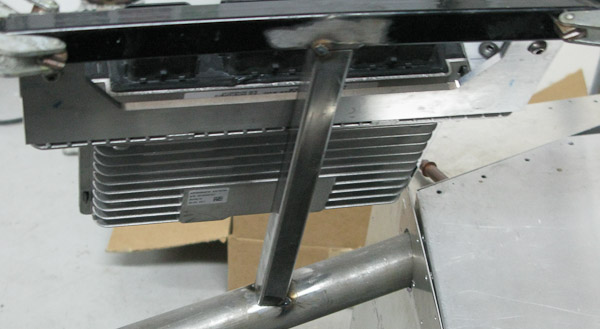
    I have been following this thread with great interest. As part of my own planning and research I was wondering if you were planning on an oil cooler? There was a great article on the Coyote in the March 2010 5.0 Mustang & Super Ford magazine:

    http://www.mustang50magazine.com/tec...ine/index.html

    About mid article they had the following:

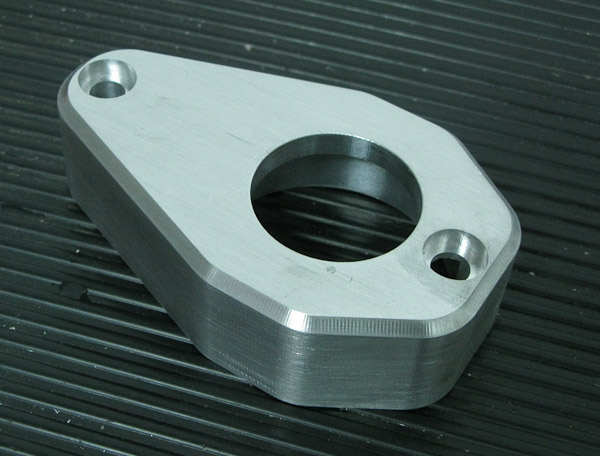
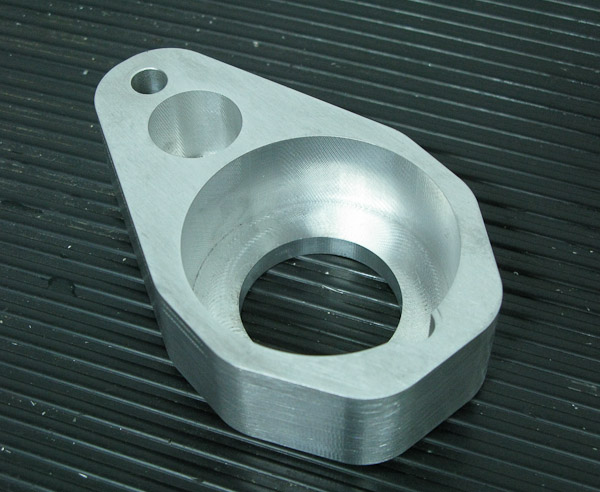
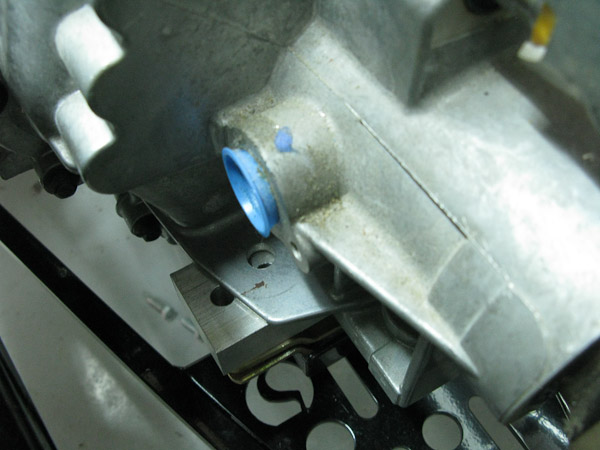
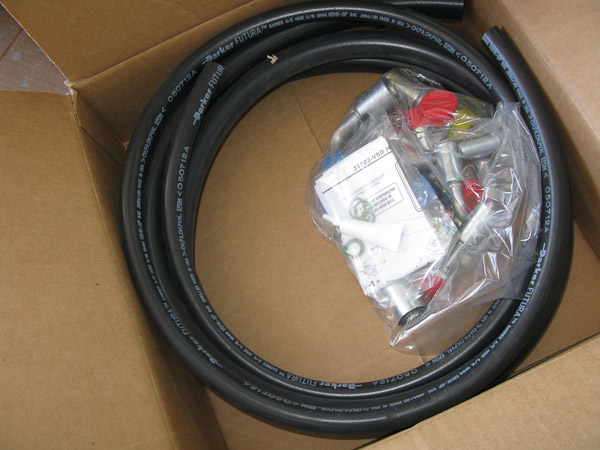
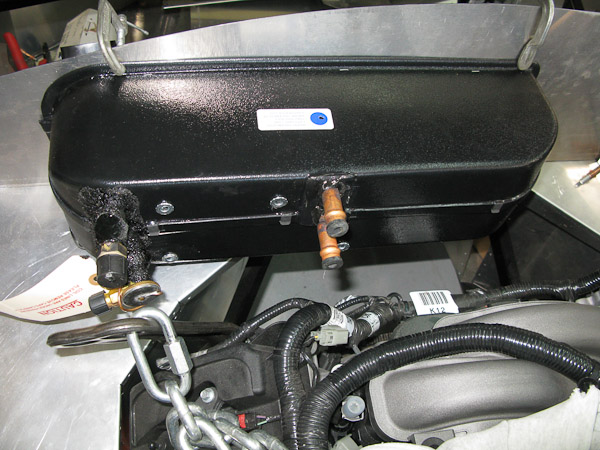
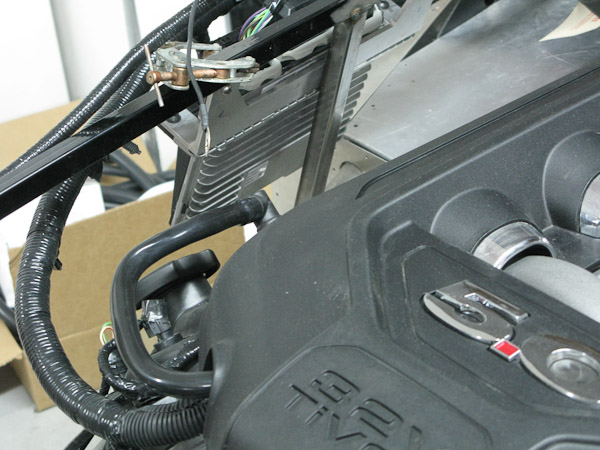
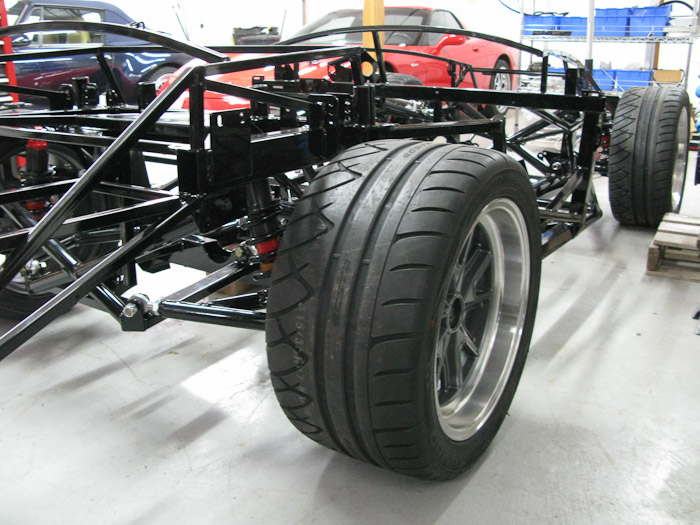
    "Consideration was given to an external oil cooler, but ultimately it was decided not to penalize all Coyote buyers for the occasional antics of a miniscule fraction of owners. Oil temperature rises precipitously when the Coyote is revved more than 4,500 rpm for extended periods, and then an external oil-to-air cooler is vital. But those conditions can only be reached on a road-racing track, so the expensive cooler was ditched and engine management strategies were used to protect the engine during hot idles. However, the mounting area for the cooler was "protected" during the 2011 Mustang's development. That makes it easier for the open-trackers among us to fit a cooler (highly recommended by Coyote engine designers), and tells you something about Ford's intentions for special editions of the Coyote-powered Mustangs.
    And don't worry about the occasional open-track without an oil cooler. The engineers say the oil cools quickly as soon as you take your foot out of it, and the engine management will limit the torque output if the oil gets too hot."

    Would you think it would be necessary for occasional Autocross? I'm not planning on road racing.
    Also - I know you listed a TR-3650 for a tranny, but what rear gears are you planning? 3.55's or 3.27's?

    TIA
    Chris Lewis
    Confidence: The feeling you have before you truly understand the situation. FFR 7652 Mk IV Base Kit w/IRS: ordered 10/19/2011; Arrived 11/19/2011. Coyote, Trans & headers Installed 9/11/17. First Start 12/19/17, First Go-cart 3/2/18. Aligned and go-karting. Working the interior now. Happy customer of FFR, North RaceCars, Forte's, and Breeze.
    Chris Lewis

  2. #82
    Richard Oben's Avatar
    Join Date
    Feb 2011
    Location
    Kansas City MO
    Posts
    279
    Post Thanks / Like
    Not to speak for David but for an occasional autocross you will never get the oil hot enough to be a problem. HTH, Richard.
    Richard Oben FFR builder www.northracecars.com

    Need help finishing your project we can help here or at your shop.

    FFR GTM #34 first GTM with working AC. 400 hp LS1 w/G50
    FFR coupe 3617CP 331 Stack EFI T-5 IRS Cobra brakes, AC/heat.
    Both cars by NRC, we can build (and have built) any FFR product.
    We also make and sell a ton of great parts for the FFR community.
    Brake kits, AC systems, #1 supplier of Team III wheels.

  3. #83
    Blue Oval Scribe Mustang Man's Avatar
    Join Date
    Feb 2011
    Location
    Lakeland, FL
    Posts
    526
    Post Thanks / Like
    But remember Richard, these engines use a thinner oil, 5W20 in the case of the new Coyote...

    Mark
    Modified Mustangs & Fords Project Snake Charmer

    FFR5310 Mk 3 Roadster
    Tungsten Gray/Silver Stripes

  4. #84
    Senior Member ClemsonS197's Avatar
    Join Date
    Feb 2011
    Location
    Marietta, GA
    Posts
    346
    Post Thanks / Like
    Got any pictures of the brake/clutch pedal? Curious if you used a 05+ Mustang box or got wilwoods to work with the hydraulic throw out? Thanks.
    MK3.1 #7076 - Under Construction....
    Coyote 5.0/Solid 8.8/Tremec 3650
    How to:
    Coyote Power Steering
    05-09 T3650 in a Roadster

  5. #85
    Senior Member Presto51's Avatar
    Join Date
    Feb 2011
    Location
    Catonsville, Maryland
    Posts
    578
    Post Thanks / Like
    Is David alright??

    Looks like his last post on this thread was about five months ago. I know that he has had serious life challenges this year.

    I just hope everything is alright
    "May you be in heaven a full half hour before the Devil knows you're dead"

  6. #86
    President, Factory Five Racing Dave Smith's Avatar
    Join Date
    Feb 2011
    Location
    Barrington, RI
    Posts
    1,811
    Post Thanks / Like
    Blog Entries
    2
    I spoke to Dave recently and its been a rough road this year for him with family, friends, his buddy Tim and other stuff. Life is ebb and flow and I would simply say to Dave Borden, that while there has been difficulty, all of us are your friends and appreciate everything youve done for the community. I, for one, cant wait to see his completed Mk4!!!!
    Dave Smith, FFR 001
    President
    Factory Five Racing

  7. #87
    Administrator David's Avatar
    Join Date
    Feb 2011
    Location
    Eldo CA
    Posts
    443
    Post Thanks / Like
    Hey Guys... Dave pretty much nailed it. Mary and I are doing well, but work has been really busy and other things out of our control this year have been pretty tough. Other than that, we are great and feel very blessed. I really appreciate the concern, and apologize for my absence and lack of response.

    With that said, I have been making some progress on the roadster and will provide my typical update and pictures in the near future.

    A quick summary:

    Quiet Ride came and templated the entire roadster for their complete insulation kit. After speaking with Tim, meeting him and his son and seeing how they put the kit together, Im really looking forward to having their kit in my car... I believe the visit will be covered in a future magazine article.

    Russ Thompson came up a few weeks ago and we completed the planned chassis mods in the front outlined earlier. This includes a couple new tubes as well. Im really happy with the finished product. We also, finished the plan for the re-routed steering and made the changes to the footbox to make that happen and did a partial test fit. I just need a few couplers and a bit of fab to complete it, but the heavy lifting is over.

    We also planned out and templated all the changes to the aluminum for the new mods, along with fitting existing panels where possible. Russ took the templates, and in typical Russ Thompson fashion fabbed up some beautiful panels that fit great. Im really really happy with the outcome on this and huge thanks to Russ for his help. It was the kick start I needed. It had taken significant head scratching and thought to plan it out.

    One of the more exciting things for me recently was designing the AC and Alternator assembly on the passenger side of the motor. Initially I was going to put PS on the pass side with the AC, but Im not sure I can make that work due the belt routing and a few other issues. Still a chance but I wont know till I get the ac compressor mounted and can map it out. Current plan is PS where the alt normally goes. This should really help with PS line routing as well.

    I was able to obtain a model of the Coyote block and design my assembly directly on that in Solidworks. I measured and modeled the AC compressor, Alternator and front pulley and then built my bracketry to mount it all. While it may be second nature to some folks in the business, it was really fun and challenging on my first go at it. The first base plate I machined was dead nuts accurate and bolted up perfectly. As I progressed, I made a number of design changes and I am hopeful this last one should do it or be very close.

    Im in the process of creating the CAM files for machining the pieces(time consuming as well) as I need to make a few fixture plates for a couple of the pieces. I hope to machine some of it this weekend for a test fit. If this ends up really working out, I may talk to somebody about having these parts made if there is a need for it.

    I'll try and post some pictures of all this in the near future... again, thanks for checking in with me, its greatly appreciated!

    Chris, regarding the oil temp issue, I wouldn’t worry about it for autocross. I would think even the occasional track day shouldn’t be an issue... I guess time will tell, but I don’t plan to add a cooler at this time.

    David
    Mk4 Build Thread: http://thefactoryfiveforum.com/showthread.php?141-David-s-Mk4-Build-Thread

    GTM Project Build site: http://www.gtmbuild.com

    Few Cool GTM Parts: http://www.gtmbuild.com/parts.htm

  8. #88
    Senior Member The Stig's Avatar
    Join Date
    Feb 2011
    Location
    Charlotte, NC
    Posts
    2,004
    Post Thanks / Like
    Hi Dave. Welcome back. Glad to hear that you've been able to make some progress on the Roadster.

    It's even better to hear that you guys are doing well, and coming out of the back side of all the craziness of the year.

    Take care,

    Mike
    The Stig

    Some say, that I only know two facts about ducks, (both being wrong); and that if I could be bothered, I could solve the "da Vinci Code" in 47 seconds...
    All I know is that I'm called "The Stig".
    GTM #0081

  9. #89
    Senior Member Presto51's Avatar
    Join Date
    Feb 2011
    Location
    Catonsville, Maryland
    Posts
    578
    Post Thanks / Like
    David thanks for the update. Glad everything is alright.

    Can’t speak for every forum member, but I for one, marvel at your craftsmanship and ingenuity, I really learn a lot though your builds and experience.

    Ron
    "May you be in heaven a full half hour before the Devil knows you're dead"

  10. #90
    Super Moderator

    Join Date
    Feb 2011
    Location
    Richmond, ca.
    Posts
    393
    Post Thanks / Like
    Dave, you know I always love coming up to vist You and Mary, AND it's always fun helping out on a friends project. Making some patterns and fabing some panels is sorta like comfort food! :-) See you at Snakes!

  11. #91
    Senior Member chrisarella's Avatar
    Join Date
    Apr 2011
    Location
    Clearwater, FL
    Posts
    172
    Post Thanks / Like
    Hi Dave. Glad to hear things are going well. I'm still lurking in the winds waiting to see how this turns out. Also wating for FFR to make this motor choice a little simpler for us later this year (hoping/praying) since I am sure this will become the gold-standard for motor choices going forward.

    As for some earlier comments regarding an oil cooler, I for one WILL be going with one. I live in FL and won't rely upon the ECU alone. I'll also be looking into some form of custom CAI setup since under-hood temps also pose challenges here in the deep South. Nevermind the heat coming off the motor, the heat coming off the road is hot enough in the summer months to fry an egg. LOL

    And if Dave, Glen, or anyone else steps up up and starts offering parts to make the Coyote a drop-in/bolt-on install I'm game. I sold my car this past week and have the cash in the bank waiting for to pull the trigger.
    Chris
    Mark IV Roadster #7679
    Coyote 5.0, T56, Hydraulic Clutch, IRS, Torsen Diff, Wilwoods, Hydraboost, ABS Power Brakes, Power Steering, & tons more extras.

  12. #92
    Administrator David's Avatar
    Join Date
    Feb 2011
    Location
    Eldo CA
    Posts
    443
    Post Thanks / Like
    Quote Originally Posted by chrisarella View Post
    Hi Dave. Glad to hear things are going well. I'm still lurking in the winds waiting to see how this turns out. Also wating for FFR to make this motor choice a little simpler for us later this year (hoping/praying) since I am sure this will become the gold-standard for motor choices going forward.

    As for some earlier comments regarding an oil cooler, I for one WILL be going with one. I live in FL and won't rely upon the ECU alone. I'll also be looking into some form of custom CAI setup since under-hood temps also pose challenges here in the deep South. Nevermind the heat coming off the motor, the heat coming off the road is hot enough in the summer months to fry an egg. LOL

    And if Dave, Glen, or anyone else steps up up and starts offering parts to make the Coyote a drop-in/bolt-on install I'm game. I sold my car this past week and have the cash in the bank waiting for to pull the trigger.
    Hey Chris,

    I agree 100% this motor will be that standard for those who want a modern drivetrain!

    Honestly, no reason why you shouldnt pull the trigger now. All the pieces are available now. Wayne offers a CAI, so thats covered. He was going to send me one to test fit, so I need to check on that... but Im sure he is ready or almost ready to sell them.

    There is a solution for the headers right now with the adapter flanges. Richard Oben could probably have them modded for you. Regardless, I have no doubt that FFR will offer headers for the car and Id guess they are working on them now or will be in the near future.

    Just do it man...

    David
    Mk4 Build Thread: http://thefactoryfiveforum.com/showthread.php?141-David-s-Mk4-Build-Thread

    GTM Project Build site: http://www.gtmbuild.com

    Few Cool GTM Parts: http://www.gtmbuild.com/parts.htm

  13. #93
    Administrator David's Avatar
    Join Date
    Feb 2011
    Location
    Eldo CA
    Posts
    443
    Post Thanks / Like
    A quick update... Spent yesterday machining some updated parts for the AC and Alternator mounts. Today I did a test fit and its perfect so I am set there.

    Also, after getting the new parts machined and installed, I did some more experimenting with the PS pumps I have on the drivers side with AC locked in place, and it appears I can make that work as well. Its really tight, like .5 -.375 of an inch in all directions with my chassis mods... but it should be fine. I took some measurements modelled up the 4.6 PS pump and threw it in the assembly to get some perspective and did some rough mock ups in the shop this morning, and it looks like I have two options. One with a mini alternator and the AC on the pass side and the PS on the drivers side... or PS and AC on the pass side and the stock Ford Alt on the drivers side.

    The good news is I have a few options and the design is close enough that I can move forward with some other stuff now.

    David
    Mk4 Build Thread: http://thefactoryfiveforum.com/showthread.php?141-David-s-Mk4-Build-Thread

    GTM Project Build site: http://www.gtmbuild.com

    Few Cool GTM Parts: http://www.gtmbuild.com/parts.htm

  14. #94
    Senior Member chrisarella's Avatar
    Join Date
    Apr 2011
    Location
    Clearwater, FL
    Posts
    172
    Post Thanks / Like
    I think FFR is going to be putting a Coyote in the cars they are building for Spike TV so I'm holding out for a little bit longer. I'll probably place an order in the coming weeks and tell them not to ship any supporting parts until they're ready. It's going to take me a little while getting the rolling chassis done so I won't need to have the motor in the car until some time early 2012.

    I plan on prefitting all of the aluminum panels with clecos and powder coating everything before rivoting them so that is going to add time. Any idea where to get colored blind rivots (not to be confused with the color-blind plain rivots LOL)? I want the rivots to be practically invisible when installed. I know, no one will see them but I will.

    I'm also doing some other upgrades like IRS. I'm on the fence about a tranny though. I know the TKO500/600 are okay and would do the job but I'm considering a Tremec TR-6060. I know I don't want to inherit the headaches that come with the MT-80, and I'm pretty sure the Tremec TR-3650 you got is rated at 360 ft-lbs of TQ which doesn't make me feel all warm and fuzzy with Coyote's 390 ft-lb TQ estimates. I've blown tranny's before and don't want to take any chances. Any thoughts on here?

    One more question: If I don't mod the chassis how should I be setting up the Alt, pwer steering, and AC? I know you're working through different issues but wanted to make sure I'm looking at this right.

    Thanks for taking the lead.
    Last edited by chrisarella; 09-09-2011 at 10:38 PM.
    Chris
    Mark IV Roadster #7679
    Coyote 5.0, T56, Hydraulic Clutch, IRS, Torsen Diff, Wilwoods, Hydraboost, ABS Power Brakes, Power Steering, & tons more extras.

  15. #95
    Member
    Join Date
    Aug 2011
    Location
    NJ
    Posts
    34
    Post Thanks / Like
    Looks great, cant wait to see the go-cart!
    Factory Five fan since 1995 and Ford nut since birth.

  16. #96
    Senior Member Jester's Avatar
    Join Date
    Mar 2011
    Posts
    493
    Post Thanks / Like
    Hi Dave

    I am up in Canada and I am building a Mk4 with a Coyote. I test fitted the engine yesterday and I was looking for a PS & AC set up for this engine.

    Are you selling the brackets etc for this? If so an you let me know what PS pump & AC compressor are required - and timing etc.

    Thx

    Matt

  17. #97
    Senior Member chrisarella's Avatar
    Join Date
    Apr 2011
    Location
    Clearwater, FL
    Posts
    172
    Post Thanks / Like
    Quote Originally Posted by Jester View Post
    Hi Dave

    I am up in Canada and I am building a Mk4 with a Coyote. I test fitted the engine yesterday and I was looking for a PS & AC set up for this engine.

    Are you selling the brackets etc for this? If so an you let me know what PS pump & AC compressor are required - and timing etc.

    Thx

    Matt
    Copy that. Inquiring minds want to know.

    BTW, I bought mine. Just waiting for it to be ready for delivery.
    Chris
    Mark IV Roadster #7679
    Coyote 5.0, T56, Hydraulic Clutch, IRS, Torsen Diff, Wilwoods, Hydraboost, ABS Power Brakes, Power Steering, & tons more extras.

  18. #98
    Administrator David's Avatar
    Join Date
    Feb 2011
    Location
    Eldo CA
    Posts
    443
    Post Thanks / Like
    Long overdue update!

    After a long delay, Ive gotten some momentum back on the car. My good friend Russ Thompson and Dan LePage have come over to help and that gave me the kick in the butt I needed to get moving again.


    Russ after a long day of tube fitting and panel making… Russ Rocks

    First a few things that were done quite a while ago but have not posted details of.

    Tim Cox from Quiet Ride Systems came out and last year and they took photos of the templating and install process for the Feb 2012 Kit Car builder magazine. The had a nice article about Tims company and products and the process used to install it. Its incredible the amount of time it takes just to template the car. They were here the entire day, and still plan to come one more time before finalizing the kit. Once I was able to see these guys lay it all out and what it takes to build a kit out, I was really impressed. Very high quality products. They don’t add much weight but really reduce the cockpit noise and heat. While the kit costs money it’s a big time saver for sure. That’s what I am looking forward to the most.


    Got the diagonals in the side of the chassis along with a new addition I didn’t post about. The diagonals are critical to the chassis stiffness I did.


    After some more experimentation Solidworks FEA reports the addition from the center of the X to the tubes alongside of the engine increased the torsional stiffness another 7 or so percent if I remember correctly. It was significant and just couldn’t go that far without taking advantage of it. Some may not like the looks, personally I think it looks pretty cool. Especially once its all welded and powder coated.


    An example of one of our templates. Russ made this panel and a few more as well. The dudes a craftsman…


    Modifying the stock panels to create a template for a new panel, also something Russ created.


    Mk4 Build Thread: http://thefactoryfiveforum.com/showthread.php?141-David-s-Mk4-Build-Thread

    GTM Project Build site: http://www.gtmbuild.com

    Few Cool GTM Parts: http://www.gtmbuild.com/parts.htm

  19. #99
    Administrator David's Avatar
    Join Date
    Feb 2011
    Location
    Eldo CA
    Posts
    443
    Post Thanks / Like

    New panels… Im pleased with how they look. Its different, but not so different that it will throw people familiar with the car.


    Rest of the panels drilled and fitted.

    I have been mulling over how to do the steering. I had to route the steering differently from stock due to the chassis mods. I also wanted to move the steering in board 1 inch like my original Mark I to give a bit more hand clearance.


    In order to make it work, I had to create a bearing carrier that would allow me to run the steering right above a chassis tube I installed. I knew how I wanted to make the bearing carrier, I just wasn’t sure how to make it compact to avoid motor clearance issues. Russ had the idea of creating the saddle separate so that it could be through bolted. It was the final piece of the puzzle.. and again, thanks Russ!

    I spent this last weekend making the part. I was originally going to use a needle bearing, however, the shaft was .005” larger than ¾ inch and the needle bearing I bought would not work, so I created one out of Delrin. The Delrin worked perfectly. It’s incredibly tight but also very smooth action. The saddle bolts to the chassis and the bearing carrier bolts to the saddle.


    Here are a few pics of the finished product. One added benefit is that I have the option of changing the angle and the height of the steering wheel by moving a joint closer to the wheel.

    Overall, Ive been really pleased with the progress… Let me know what you think!

    David
    Mk4 Build Thread: http://thefactoryfiveforum.com/showthread.php?141-David-s-Mk4-Build-Thread

    GTM Project Build site: http://www.gtmbuild.com

    Few Cool GTM Parts: http://www.gtmbuild.com/parts.htm

  20. #100
    Member kabacj's Avatar
    Join Date
    Mar 2011
    Location
    Long Island
    Posts
    1,103
    Post Thanks / Like
    Nice design on the steering shaft bearing David. I need a CNC at home. It opens up worlds of fabrication options. Of course its not easy even with the right tools.

    Just thinking about welding up that bearing. Might be good to make a steel bearing to use when you weld up the setup. The tight tolerances you have are not going to be very tolerant of any misalignment as a result of the welds cooling.

    With the steel bearing your steering shaft becomes a jig that locates the mount. Then after everything is cool you can press out the steel and press in the delrin.

    Just an idea. Love the build.

    John
    XTF #2
    build start date June 19 2023

    GTM # 344
    Build Start December 2010
    First track day April 2013

  21. #101

    Join Date
    May 2011
    Location
    Pittsburgh, PA
    Posts
    729
    Post Thanks / Like
    That's really cool, David. I also moved my steering shaft inboard by 1" to accommodate frame stiffening mods. It sure takes a lot of thought to make everything fit!

    I've incorporated your "lower footbox to base of front suspension" bars into my coupe frame and added accompanying diagonal bars, although mine run upward from the front suspension to the bar above, rather than downward. My guess is that the diagonal bar as you've run it would make the chassis stiffer than how I've run it since it does a better job of bracing against flex induced by the upper control arm. I don't see my diagonal bar doing that as effectively, and I may make the diagonal bars a full "X." Thanks for sharing your designs and work.

  22. #102
    MKIII #5835 Someday I Suppose's Avatar
    Join Date
    Feb 2011
    Location
    Stanhope, NJ
    Posts
    783
    Post Thanks / Like
    David, very cool build for sure, the pillow block is great, love moving the wheel in an inch, notes for the next build (as if). Keep it up!!
    MKIII #3835 IRS, Anderson Performance 408 Levy T-5 Trans, Team III Wheels
    Paint completed November 2010, passed NJ State Safety Inspection June 21st, Tagged and First Drive 7/1/2011

  23. #103
    Senior Member
    Join Date
    Sep 2011
    Location
    Tampa Fl
    Posts
    118
    Post Thanks / Like
    Blog Entries
    1
    WOW!! Just wen't through the whole post and am very impressed with this build so far!! Keep up the great work David. Hope to see more pic's soon, thanks!! P.S. Glad to hear that everything is better on the home front and hope it stays that way for all of you!!

  24. #104
    Administrator David's Avatar
    Join Date
    Feb 2011
    Location
    Eldo CA
    Posts
    443
    Post Thanks / Like
    Long overdue update.

    We had family from out of town this weekend, but took monday off to relax and get some work done on the car.

    I finished the AC and PS mount today. It feels like Ive been working on this forever, but Ive had to make several changes the further in to it.

    Initially, I was going to use the ford pump, but decided that the Saginaw/LS1 pump would be a better fit since one can be obtained to support the needed 7000+ rpm and also has options to tune the flow and pressure along with being considerably lighter. You can source these pumps from either Turn One, or KRC Pumps among others.

    While it was felt the LS1 pump was a better fit, the pulley is huge at 6.5 inches and created some serious clearance challenges which has taken quite a bit of time to work through.(the 6.5 inch pulley is needed for the higher RPM)

    There are fractions of an inch clearance with pretty much everything in the area... The block, timing cover, AC pump, PS pump, all three pulleys along with the frame in several areas.

    I re-designed the upper and lower AC pump mounts a few times to fix clearance issues. The last change lowered and rotated the AC pump to provide needed space between the PS and AC pulley.

    Once the AC pump was in the desired location, a plate was machined with a grid of holes allowing me to try different PS pivot locations to get a good throw for belt adjustment along with keeping clear of stuff. I had to clear two tubes of the frame, the AC pulley and allow for belt routing around a idler pulley without the belt touching... its close.


    (didnt have wide enough material, so I welded a couple pieces together and machined the bead off. )

    Once the best location was found, I marked it and then transferred the hole locations and marks to the finished model and machined the part this afternoon.


    The slot was machined on the the back with a pocket allowing the bolt head to be captured so a single wrench could be used to tighten the pump in place once adjusted.

    After it was all bolted up, I went about locating the idler pulley by putting the PS pump at both adjustment extremes and centering the pulley to obtain the best belt clearance. Should be good where it is now.


    Here it is all mocked up. You can also see the frame changes that were made to make the clearance needed for the PS pump and pulley.

    There has been progress on several other fronts as well with the brakes and integrating the hydroboost which I will post on later.

    On another note, Ive been thinking of making a mount just for the LS1 pump and no AC tucked close into the block. Possibly one for the Ford pump as well... Ive done 90% of the work, so it would be a pretty light project... we'll see.

    David
    Mk4 Build Thread: http://thefactoryfiveforum.com/showthread.php?141-David-s-Mk4-Build-Thread

    GTM Project Build site: http://www.gtmbuild.com

    Few Cool GTM Parts: http://www.gtmbuild.com/parts.htm

  25. #105
    Factory Five Distributor Hammink Performance's Avatar
    Join Date
    Oct 2011
    Location
    Ommen, The Netherlands
    Posts
    210
    Post Thanks / Like
    that looks realy good !
    Distributor of Factory Five for Europe
    www.hamminkperformance.com

  26. #106
    MKIII #5835 Someday I Suppose's Avatar
    Join Date
    Feb 2011
    Location
    Stanhope, NJ
    Posts
    783
    Post Thanks / Like
    David, looks good, dang on close tolerance for sure. I would think for sure with the popularity of this motor that the additional pump mounts would be something people are interesed in. It just seems wrong to me to go with a Coyote and manual steering!
    MKIII #3835 IRS, Anderson Performance 408 Levy T-5 Trans, Team III Wheels
    Paint completed November 2010, passed NJ State Safety Inspection June 21st, Tagged and First Drive 7/1/2011

  27. #107
    Administrator David's Avatar
    Join Date
    Feb 2011
    Location
    Eldo CA
    Posts
    443
    Post Thanks / Like
    Thanks Scott, agreed. Im suprised that no-one else has commented on it.

    On another note, had a productive day in the shop yesterday working on parts for the re-worked brakes.

    I want this car to be as production like as possible, so that meant going with power brakes. With that said, its very important to me that the brakes modulate well and have a decent pedal feel. Due to all the chassis mods, I was unable to use the regular vacuum booster, so decided to go with the hydroboost.

    For several reasons the goal was to use the wilwood pedal box. The trans I am using is from a 2005+ mustang and comes stock with a hydraulic clutch and the wilwood unit supports that. My end goal is to use the hydroboost in addition to the dual masters on the wilwood pedal assembly. Ive got the solid models worked out for that, so its just a matter of time before I get to it. As it sits, I can use the stock master for the hydroboost as well.

    As implemented, one of the issues with using the wilwood pedal box in the FFR and coverting it to power brakes, is the pedal ratio is wrong wrong wrong at around 6 - 6.5:1. This is a ratio for manual brakes and with a booster designed for a car that is well over a 1000lbs heavier than the FFR would make for very touchy brakes that would be hard to modulate.

    I designed and machined a mount for the hydroboost that corrects the pedal ratio and puts is around 3.5 - 4:1. This should make a big difference in pedal feel and modulation.


    The back, where the large nut is threaded to hold the hydroboost to the adapter.


    Mocked up with the hydroboost on the FFR chassis.
    Mk4 Build Thread: http://thefactoryfiveforum.com/showthread.php?141-David-s-Mk4-Build-Thread

    GTM Project Build site: http://www.gtmbuild.com

    Few Cool GTM Parts: http://www.gtmbuild.com/parts.htm

  28. #108
    Administrator David's Avatar
    Join Date
    Feb 2011
    Location
    Eldo CA
    Posts
    443
    Post Thanks / Like


    A view from under the drivers footwell showing the alignment of the hydroboost with the wilwood pedal and the new pedal ratio.


    Looking straight down from the top of the footbox. Alignment is great.

    I still havent decided if I am going to machine a new pedal or modify the wilwood unit. A new pedal has been modeled up and nearly complete though, so that option shouldnt be too challenging to finish.


    As mentioned before, the trans comes with a hydraulic clutch. It also has a different type of shifting mechanism as can be seen at the back of the trans. Ive been working on a solution so have a pretty decent idea on what is going to be done for that.

    The trans mount is different as well, so I needed to design an adapter. I did this several months ago, but neglected to post on it.


    It appears to be a simple bar, but there is significant clearancing on the top of the part to clear a large rib in the transmission case. I'll post pics once I pull the motor and trans.

    I was able to use the stock trans mount provided by FFR and I didnt need to modify the V support under the chassis. The adapter I have pictured is my first prototype and is not bolted up in these pics. The adapter will bolt to the trans, and then the mount will be bolted to the adapter.

    Let me know what you think.

    David
    Mk4 Build Thread: http://thefactoryfiveforum.com/showthread.php?141-David-s-Mk4-Build-Thread

    GTM Project Build site: http://www.gtmbuild.com

    Few Cool GTM Parts: http://www.gtmbuild.com/parts.htm

  29. #109
    Trick Tool Maker, Super Moderator Hankl's Avatar
    Join Date
    Feb 2011
    Location
    Northern CA
    Posts
    671
    Post Thanks / Like
    Blog Entries
    1
    Nice work David, glad to see you "Back At It".

    Hank
    “If you didn’t have enough time to do it right the first time. How come you always have time to go back and do it again?” FFR1000186CP

    Understeer is when you hit the wall with the front of the car and oversteer is when you hit the wall with the rear of the car.
    Horsepower is how fast you hit the wall and torque is how far you take the wall with you.

  30. #110
    Member
    Join Date
    Jul 2011
    Posts
    78
    Post Thanks / Like
    Blog Entries
    1
    Hi Dave!
    real nice work! especially changes on the frame stiffness. Did you do anything more to the safty and on the back?
    I am stripping my MK3.1 that winter and would do such changes, but I can not develope these...

  31. #111
    Administrator David's Avatar
    Join Date
    Feb 2011
    Location
    Eldo CA
    Posts
    443
    Post Thanks / Like
    Here's a long overdue update.

    I recently learned that Whitby is now selling the AC system that I designed my Coyote and PS mounts for! I called Jeff up and ordered it. I had been worried in the back of my mind that the gentleman who was selling it before may stop selling it and I would not have a source for it. Now that Whitby is selling the kit, I feel much better about using it since the support will be there in the future.


    Unpacking the box was a bit like an early Christmas. Everything was well packed and arrived in good shape.


    I was pleasantly surprised to see that the hoses are not premade to length. I wanted my hoses to be routed cleanly and pre-made hoses would have been an issue, at least in my situation with a different motor.

    You simply plan your routing, cut to length, press in the proper fittings and mark the fitting and the line for the proper angle. Once complete, take the lines to a local AC shop and have them crimped.
    Mk4 Build Thread: http://thefactoryfiveforum.com/showthread.php?141-David-s-Mk4-Build-Thread

    GTM Project Build site: http://www.gtmbuild.com

    Few Cool GTM Parts: http://www.gtmbuild.com/parts.htm

  32. #112
    Administrator David's Avatar
    Join Date
    Feb 2011
    Location
    Eldo CA
    Posts
    443
    Post Thanks / Like


    Dan LePage came over a few weeks ago and we worked on mounting the evaporator. No issues with clearance. Actually it all fits really really well. Much better than I anticipated.

    Despite all the stuff in the engine bay its fitting well and I think once in for good, it will all look like its meant to be.
    Mk4 Build Thread: http://thefactoryfiveforum.com/showthread.php?141-David-s-Mk4-Build-Thread

    GTM Project Build site: http://www.gtmbuild.com

    Few Cool GTM Parts: http://www.gtmbuild.com/parts.htm

  33. #113
    Administrator David's Avatar
    Join Date
    Feb 2011
    Location
    Eldo CA
    Posts
    443
    Post Thanks / Like


    Here's an example of a couple tabs I machined today to finish mounting the ECU. The slot allowed me to bend it to the proper angle. After getting that correct, it was TIG welded it in place.


    I finally decided where I am going to mount it. I was going to splice the harness and mount it under the passenger footbox, but decided to leave the it intact and mount it just in front of the passenger footbox on the .75" tube.


    This location keeps the harness way up high and out of site and allows for great routing along the top of the 2x2 dash tubing over to the drivers footbox.

    Let me know what you think of it. I was talking to Jeff Collins from Whitby and he said he was interested in making them if there was an interest.

    David
    Mk4 Build Thread: http://thefactoryfiveforum.com/showthread.php?141-David-s-Mk4-Build-Thread

    GTM Project Build site: http://www.gtmbuild.com

    Few Cool GTM Parts: http://www.gtmbuild.com/parts.htm

  34. #114
    Senior Member CraigS's Avatar
    Join Date
    Feb 2011
    Location
    Blacksburg, Va
    Posts
    4,732
    Post Thanks / Like
    Dave, are you going to build some sort of insulating box for the ECU? Sitting right over the headers it will be hot especially in traffic. Since you are doing AC maybe a hose like Earl's footbox fresh air system feeding from the brake inlet would work.
    FFR MkII, 408W, Tremec TKO 500, 2015 IRS, DA QA1s, Forte front bar, APE hardtop.

  35. #115
    Administrator David's Avatar
    Join Date
    Feb 2011
    Location
    Eldo CA
    Posts
    443
    Post Thanks / Like
    Craig, not sure at this point. Im going to have a friend of mine log some temp reading for me with his car to see what kind of temps we are talking. IF they are higher than what ford recommends, then I will created a shield or get some air flowing to them.

    David
    Mk4 Build Thread: http://thefactoryfiveforum.com/showthread.php?141-David-s-Mk4-Build-Thread

    GTM Project Build site: http://www.gtmbuild.com

    Few Cool GTM Parts: http://www.gtmbuild.com/parts.htm

  36. #116
    Administrator David's Avatar
    Join Date
    Feb 2011
    Location
    Eldo CA
    Posts
    443
    Post Thanks / Like


    Happy... loaded up ready to take the frame to the powder coaters. Frame was dropped off a almost 2 weeks ago, and I am picking it up tomorrow along with the aluminum panels!

    After all this time, I will actually be able to bolt parts up for good! Ive had the Coyote in and out of the car at least 5 time. My hope is to get the car in a roller by the end of the weekend.

    Goal before new years is rolling chassis, brakes with all aluminum mounted, engine in as well. Russ Thompson is coming up between Christmas and New Years and has offered a hand which I am really excited about. We work well together and get lots done.

    David
    Mk4 Build Thread: http://thefactoryfiveforum.com/showthread.php?141-David-s-Mk4-Build-Thread

    GTM Project Build site: http://www.gtmbuild.com

    Few Cool GTM Parts: http://www.gtmbuild.com/parts.htm

  37. #117
    Administrator David's Avatar
    Join Date
    Feb 2011
    Location
    Eldo CA
    Posts
    443
    Post Thanks / Like
    Had a very productive weekend on the car.


    Frame looks freaking awesome…


    Whitby Spherical bearings for the rear spindles. The Spherical bearing kit uses monoballs as the bushing which offer no resistance, but also have no deflection.

    Friends Matt and Uwe took on the project of installing the bearings which originally had Urethane bushings installed, they were brand new. Ive never really been a fan of them as every set Ive seen installed seize up and really mess up the rear suspension making it way tighter than it should be. These were no different. Mine were brand new and never had been on a car. Despite this, it took a press to get the metal sleeve out of the bushing… and a fair amount of force at that. They had been lubricated as well. Not sure what the deal is with the rear knuckles and these bushings. The front FFR control arm bushings made urethane were nice and smooth.


    Rear control arms and shocks installed with the Whitby Spherical bearings installed.


    Rear camber adjusters.


    Front suspension, spindles and shocks installed.
    Mk4 Build Thread: http://thefactoryfiveforum.com/showthread.php?141-David-s-Mk4-Build-Thread

    GTM Project Build site: http://www.gtmbuild.com

    Few Cool GTM Parts: http://www.gtmbuild.com/parts.htm

  38. #118
    Administrator David's Avatar
    Join Date
    Feb 2011
    Location
    Eldo CA
    Posts
    443
    Post Thanks / Like


    Wilwood 6 Piston calipers and 2 piece rotors installed.


    Damn those brakes look good! I purchased the Kit from my friend Jeff Collins at Whitby as I had some credit with him. Its the same Kit that FFR sells. Everything came well packed with good instrucitons. All the hardware comes packaged direct from Wilwood. Im pretty sure this is a FFR specific kit only. Absolutely no wheel clearance issues at all. I really didn't think I was going to go this route honestly... but couldn't help myself.


    She’s on her wheels!


    Needed to modify the pedal box to clear the steering shafts new location.
    Mk4 Build Thread: http://thefactoryfiveforum.com/showthread.php?141-David-s-Mk4-Build-Thread

    GTM Project Build site: http://www.gtmbuild.com

    Few Cool GTM Parts: http://www.gtmbuild.com/parts.htm

  39. #119
    Administrator David's Avatar
    Join Date
    Feb 2011
    Location
    Eldo CA
    Posts
    443
    Post Thanks / Like


    Cut the clutch cable end off of the pedal box and made a new stop for the pivot shaft.


    This is going to be the new location of the clutch slave.


    Clutch pedal machined for clutch slave clevis I’ll end up making.


    New routing of steering.

    At least from my perspective, I/we got a great amount done. Really happy with the progress... and as my Friend Russ Thompson has said, this is the fun part of the build! Im really fired up about making progress on the project... woo hoo!

    David
    Mk4 Build Thread: http://thefactoryfiveforum.com/showthread.php?141-David-s-Mk4-Build-Thread

    GTM Project Build site: http://www.gtmbuild.com

    Few Cool GTM Parts: http://www.gtmbuild.com/parts.htm

  40. #120
    Junior Member BULLITT428's Avatar
    Join Date
    Mar 2011
    Location
    North Vancouver Canada
    Posts
    19
    Post Thanks / Like
    David:


    I read your site here twice just to make sure I got everything your doing to your build. I'm so impressed with your workmanship and the time and skill your putting into your build.If I didn't live so far away I would love to come buy and look at the work you have done. I have got some great Ideas form you and what your doing hope you don't mind if I use some of the modes you have added to your chassis. Just wondering if I have any questions would you be Okay to answer back if I run into any problems. The first one I would like to ask is on your IRS, your upper control arm looks like it has been machined to adjust your camber? Where did you get these or where can I get a set or did you do this yourself. I would really be keen on knowing more on this. Keep up the work David I'm enjoying what your doing!


    Ed.
    FFR 7570, 402sr ROUSH 455HP, TKO 5 speed, Wilwood brakes, IRS 327gears Torsen Diff, Forte's Hydraulic Clutch, 15to1 AGR Power steering rack and lots more it never seems to end?

    TEMPTATION: because willpower is no match for Horsepower!

Page 3 of 6 FirstFirst 12345 ... LastLast

Posting Permissions

  • You may not post new threads
  • You may not post replies
  • You may not post attachments
  • You may not edit your posts
  •  

Stewart Transport

Visit our community sponsor