-
firewall between engine and fuel tank
Is anybody installing a firewall between the engine and fuel tank. I thought I saw mechie do one but when I skimmed thru his build thread I didn't see anything unless I missed it. I was thinking it is a good idea to keep junk from gathering up in that area?
-
Senior Member

Are you saying FFR does not provide alu panels to rivet on the frame between the engine and fuel tank?
I have not looked at that at all yet, cuz to me it was simple logic to have one.
Frank
818 chassis #181 powered by a '93 VW VR6 Turbo GT3582R
Go-karted Aug 5, 2016 - Then May 19+21, 2017
Tracked May 27/July 26, 2017
Build time before being driveable on Sep 27, 2019: over 6000h
Build Completed Winter 2021
-
Senior Member

Tom Wallace did the firewall n his first car.
3392513%20008b.jpg
But it is not part of FFR design.
Bob
-
I think most of us did some sort of firewall: 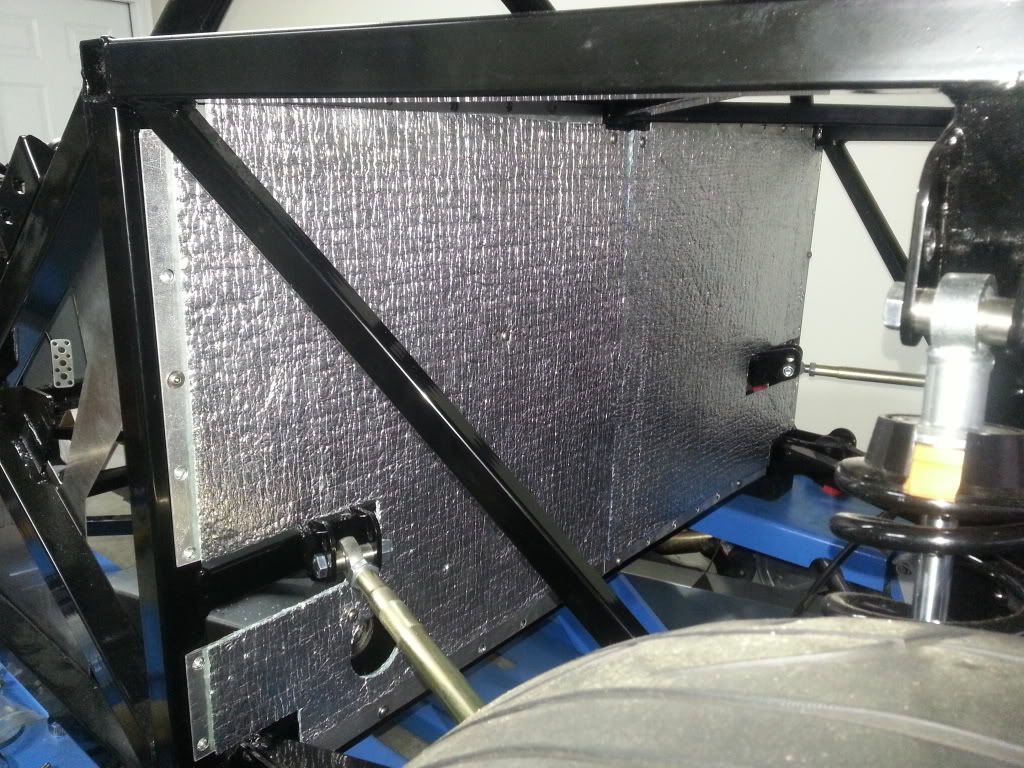
There are a lot of things on this car that you would think would have been logical, like seat belt mounting points to name just one.
-
Senior Member
I checked the manual and it seems the fuel tank is exposed to the engine side. No FW. Unbelievable. Why did I see this just now.
Frank
818 chassis #181 powered by a '93 VW VR6 Turbo GT3582R
Go-karted Aug 5, 2016 - Then May 19+21, 2017
Tracked May 27/July 26, 2017
Build time before being driveable on Sep 27, 2019: over 6000h
Build Completed Winter 2021
-
Senior Member

Why is it "unbelievable? Look underneath your car, it's visible from the ground. Most production cars have the exhaust pipes and muffler tucked right under the tank. Think about it, the panel is called a firewall and is installed between the tank and passengers to provide a firewall.
What is your concern?
-
Senior Member
I am not concerned about heat. More about impact. Most cars if not almost all have something between the fuel tank and engine so in case of an impact it would need a bigger impact for the engine to reach the tank. Maybe I am being paranoiac here, but I have always been with people who privileged a lot of safety around the fuel tank, lines and etc., especially we don't have a bumper on the 818. It's not a problem, I can build a FW easily, I just didn't think FFR would designed it that way, but then again there are many things they designed in a way most of us never thought, so we work around it, no issue, just impressed based on what I've always been living with.
EDIT: I also don't think I can register the car without a FW between the tank and engine. I have to double check, but I will build one anyway.
Last edited by Frank818; 08-31-2014 at 08:12 AM.
Frank
818 chassis #181 powered by a '93 VW VR6 Turbo GT3582R
Go-karted Aug 5, 2016 - Then May 19+21, 2017
Tracked May 27/July 26, 2017
Build time before being driveable on Sep 27, 2019: over 6000h
Build Completed Winter 2021
-
I installed a sheet of 1/8" aluminum between the engine and tank - just the lower part (10" X 36"). Gives me a little extra protection and still allows full access for all the wiring, fuel hoses and e-brake cables. I used riv nuts instead of rivets for my two piece FFR supplied firewall for easier removal.
-
Senior Member

I added a firewall between the engine and the fuel tank for looks, not safety. I put it in after installing the engine, which was not smart. Do it before mounting your engine, but try to make it removable just in case. Mine has 3 triangles fastened with #10 rivnuts so I can remove sections. Now inside the firewall is the ECU, relays and wires - all protected from water - and it is insulated for sound control. Actually, to reach the wiring it will be easier to remove the seats, then the upper firewall on the cockpit side.
818S/C : Chassis #25 with 06 WRX 2.5 turbo, ABS, cruise, PS, A/C, Apple CarPlay, rear camera, power windows & locks, leather & other complexities. Sold 10/19 with 5,800 miles.
Mk3 Roadster #6228 4.6L, T45, IRS, PS, PB, ABS, Cruise, Koni's, 17" Halibrands, red w/ silver - 9K miles then sold @ Barrett-Jackson Jan 2011 (got back cash spent).
-
Senior Member

I started working on the firewall today. I bought a big sheet of aluminum and am cutting it into 4 panels like Bob's.
-
Frank I was looking at a firewall more to keep road debris from getting up in there then for impact protection.
Thx for the pics.
-
I made a lower firewall that is riveted on. The upper firewall will be bolted in place.
-
Senior Member

Originally Posted by
Samiam1017

Frank I was looking at a firewall more to keep road debris from getting up in there then for impact protection.
Thx for the pics.
Good point, I didn't think about that one.
Frank
818 chassis #181 powered by a '93 VW VR6 Turbo GT3582R
Go-karted Aug 5, 2016 - Then May 19+21, 2017
Tracked May 27/July 26, 2017
Build time before being driveable on Sep 27, 2019: over 6000h
Build Completed Winter 2021
-
Senior Member

I would think if impact is your concern, then instead of 1/8" aluminum you would use steel plate of some type. Perhaps, an alloy of some sort. Alternatively, perhaps a CSK panel, if the material is available on the open market.
-
Senior Member

I have almost finished the install of my rear engine firewall, the design is in 3 pieces and is removable from the tank/seating area, it's 1/8 aluminum with tinsel strength greater than 1/8 steel, but the stretch factor is not as great as steel. I used plate nuts to install the firewall instead of rivnuts
WP_20140831_003.jpg WP_20140831_0041.jpg
Tony Nadalin
2018 SOVREN Big Bore Champion
2015 SCCA Oregon Region VP3 Champion
2012 ICSCC ITE Class Champion
FFR MkII Challenge Car, Spec Racer, Street Legal, SCCA, ICSCC and NASA Racing
818R Build in progress
-
Senior Member

I also riveted an Al panel on just the lower 10", since I don't anticipate removing this piece. I also insulated it, this may be overkill for thermal (since the manifold has a heat shield) but it can't hurt, and should prevent most road crap from getting into the tank area. I'm debating on putting an upper FW in place.
-
I installed a FW in 2 pc with rivnuts that can be removed with the engine in, as well as side pieces permanently riveted in.
If I need extra space in front of the engine to do some work..... I can remove the panels for extra space. Hopefully won't ever need to.....
My reasoning was also to keep the dirt and debris out, add noise reduction and impact protection.
Removable sections. Cleko'd in place before drilling for rivnuts.
I used a piece of 1/8 - 1/4 in aircraft aluminum. Stronger than steel.
DSCF4600.jpg
Here it is with the thermal layer in place
DSCF4623.jpg
And attaching the last side pieces which will be riveted. I still have enough space for ebrake cables and fuel lines.
DSCF4630.jpg
-
Senior Member
Your thermal layer looks a lot like Eastwood's, but it's not, right?
Frank
818 chassis #181 powered by a '93 VW VR6 Turbo GT3582R
Go-karted Aug 5, 2016 - Then May 19+21, 2017
Tracked May 27/July 26, 2017
Build time before being driveable on Sep 27, 2019: over 6000h
Build Completed Winter 2021
-
A piece of card board should do the trick! Jk. but the only reason I would put one is so if any of the wires come loose they won't go into the alternator belt.
-
I put mine on the inside, behind the tank. I used light gauge aluminum. My thought is appearance, debris, and heat deflection. I may add some material to the back side.
Firewall.JPG
If I need to move it to the backside of the cage for any reason, please let me know.
-
Senior Member
Originally Posted by
thall818
I used light gauge aluminum.
1/8"?
Frank
818 chassis #181 powered by a '93 VW VR6 Turbo GT3582R
Go-karted Aug 5, 2016 - Then May 19+21, 2017
Tracked May 27/July 26, 2017
Build time before being driveable on Sep 27, 2019: over 6000h
Build Completed Winter 2021
-
Frank, I used 19 gauge. It's the same stuff the interior panels are made of. Essentially I purchased more than I need when I cut my new panels inside for the Boyd tank mod. I just figured if I screwed up, I didn't want to go buy more. Well, the panels were good and I was staring at a 4' x 4' piece of aluminum, so I figured I would enhance the look of the engine compartment.
The bad news is that it doesn't add any impact protection. The good news is that it doesn't add much weight. LOL
-
Originally Posted by
Frank818
Your thermal layer looks a lot like Eastwood's, but it's not, right?
Its called Cool it - thermotech.
found it on amazon
-
thought i would post a few pics of my firewall before i put the motor in and cover up all the work  this will be the third and hopefully final time the motor goes in before i gocart it. the small canister on the left is my fuel filter. i plan on running all fuel lines through that side. the empty holes are for grommets and parking/shifter lines. the only item i am unsure of location now is the vap can, i think i am doing a homeade pvc one similar to one i have seen in a mk thread.
image.jpg
image.jpg
The scotchbrite pad on a drill trick i saw in another thread added a nice touch to spruce it up from plain alluminum finish.
-
PLATNUM Supporting Member


-
Senior Member
Oh No! Doug, you made a removable firewall with triangles that is just like mine . . . but much better! Now my black powder coated panels look boring. Please don't drive your 818 to Arizona, okay?
818S/C : Chassis #25 with 06 WRX 2.5 turbo, ABS, cruise, PS, A/C, Apple CarPlay, rear camera, power windows & locks, leather & other complexities. Sold 10/19 with 5,800 miles.
Mk3 Roadster #6228 4.6L, T45, IRS, PS, PB, ABS, Cruise, Koni's, 17" Halibrands, red w/ silver - 9K miles then sold @ Barrett-Jackson Jan 2011 (got back cash spent).
-
Originally Posted by
AZPete
Oh No! Doug, you made a removable firewall with triangles that is just like mine . . . but much better! Now my black powder coated panels look boring. Please don't drive your 818 to Arizona, okay?
ha..powder coat would be nice, more durable. i took the easy way out. actually i wish i was driving to AZ....... its going to be a whopping 13 degrees tomorrow here. at least you can drive yours all year round, my season will be about 6 months or so.
-
Senior Member
I did the same design, but with rattle can paint instead of the gorgeous turned aluminum. Very nice job!
-
Wow this is kind of an old thread but useful info to new builders. Hopefully I can get a response
I plan on doing an added "firewall" panel as well. My question is: any of you folks that put it on the engine side, did it significantly impact later assembly like coolant lines, general access etc.?
Thanks for any additional info
-
Senior Member

Originally Posted by
driveslikejehu
Wow this is kind of an old thread but useful info to new builders. Hopefully I can get a response
I plan on doing an added "firewall" panel as well. My question is: any of you folks that put it on the engine side, did it significantly impact later assembly like coolant lines, general access etc.?
Thanks for any additional info
Putting a firewall on the engine side of the frame only really impacts the shifter, assuming you're not using the 18' long cables FFR provides. All coolant lines pass through the "sidesails" (aka rocker panels) and don't have to go through the firewall.
-
Post Thanks / Like - 0 Thanks, 1 Likes
-
I plan to have one section removable, at least at first, to route cables, etc.
My question really is about; is there any harm in losing that 1-1/2" in front of the engine. Maybe a small point, but I've had occasion that I would give a lot for another inch to fit a hand in. I guess there's not much you need to get to in that area after its all assembled?
-
Senior Member
Originally Posted by
driveslikejehu
I plan to have one section removable, at least at first, to route cables, etc.
My question really is about; is there any harm in losing that 1-1/2" in front of the engine. Maybe a small point, but I've had occasion that I would give a lot for another inch to fit a hand in. I guess there's not much you need to get to in that area after its all assembled?
I have no direct experience yet but believe a timing belt change is going to require pulling the engine regardless. Others may have a different opinion. I had enough trouble replacing the timing belt with the engine on a hoist that I would never want to try to tackle it in the car.
-
Post Thanks / Like - 1 Thanks, 0 Likes
-
Senior Member
This is my firewall afer 2 years of running. I have 3 removable panels from the cockpit side, after I remove the seats. Never had a need to do that. Only routine maintenance on the front of the engine is adjusting belt tension. That is pretty easy with the limited access. Like Fletch (Brian) said. To do a timing belt change you need to yank the engine. With the removable top engine covers and rear bumper, pulling the enging isn't that hard. I don't know how tough it is to remove the roof on an 818C.
Bob
fw.jpg
-
Post Thanks / Like - 1 Thanks, 0 Likes


 Thanks:
  Likes:


 Reply With Quote


