-
03-11-2017, 11:22 AM
#121
Senior Member

Great progress! I bet it's motivating knowing everything is now a final assembly.
Adam _____ Instagram @PopesProjects____
YouTube Channel
818 SRX - #91
Arrived 01/02/2014
First Start 10/31/2016
First Drive 05/22/2017
Registered 10/25/2019 BRAP818
-
03-11-2017, 11:51 AM
#122

Originally Posted by
Hindsight

Coming along really well! Nice to see a fully carpeted interior.
Thanks! Yeah, i had to order some more from FFR to cover everything.
-
03-11-2017, 11:53 AM
#123
Originally Posted by
Canadian818
Great progress! I bet it's motivating knowing everything is now a final assembly.
Thanks! Yes definitely, the mid assembly was very very de-motivating. I probably could have had everything done last year if I didn't know I had to take it all apart again during the first build process.
-
03-11-2017, 12:54 PM
#124
-
03-11-2017, 01:06 PM
#125
-
03-11-2017, 01:31 PM
#126
Coolant lines and HVAC system - Experiment, possible engine overheating solution?
Almost forgot one of my experimental systems. I am using the Vintage Air 66005-VUZ-A Gen II Mini System for my A/C and heating. https://www.amazon.com/gp/product/B0...?ie=UTF8&psc=1. The problem with this system, as you may have read elsewhere, is that it comes with a valve that is either open or closed. The Subaru coolant system must continue to run a loop to the coil that is inside the car. So typically others have replaced the 2 way valve with a 3 way or run tubing configurations to make this work.
I have a theory that the loop tubing that FFR has you put in the top engine coolant manifold to the smaller suction on the water pump causes a drop in coolant efficiency. If you own a subaru, you know that hot air is typically always coming out the side vents. This is because the coil inside the car is continuously dispersing heat. In the FFR, there is nothing to do this.
To fix this issue, in my car, the smallest diameter tubing for coolant is right off the engine. I used the supplied FFR corrugated stainless tubes right off the engine down to hose fittings, then into aluminum 90 degree bends that I welded to the side tubes factory five provides. From there to the radiator, the inside diameter is larger. So I welded barb fittings into these 90 degree bends back at the engine. Rather than installing FFR's U bend tubing for the coolant, I route the manifold connection down to the new barb fitting in the 90 degree bend going to the front radiator on the right side of the car. The suction of the water pump is connected to a barb fitting in the return 90 degree on the left side of the car. This means that even before the thermostat opens, there is a continuous slow flow of coolant up to the radiator. It may take my car longer to warm up now, but I am hopeful that my engine is getting as much cooling as possible.
For the vintage air HVAC system, I am relying solely on the small pressure differential across the radiator to pull a little coolant through the coil. I welded another barb fitting in the right side coolant line just below the HVAC system and installed another barb fitting in the left side coolant line running back to the engine. The Vintage Air valve is installed in this circuit to close and open as needed. If I can't get enough flow, then I will buy a little pump and replace the valve with a pump that the Vintage air system will turn off and on as needed.
Please don't judge me on these welds. I was in a hurry and did not properly clean the aluminum the first time.


-
03-11-2017, 01:41 PM
#127
-
03-11-2017, 01:47 PM
#128
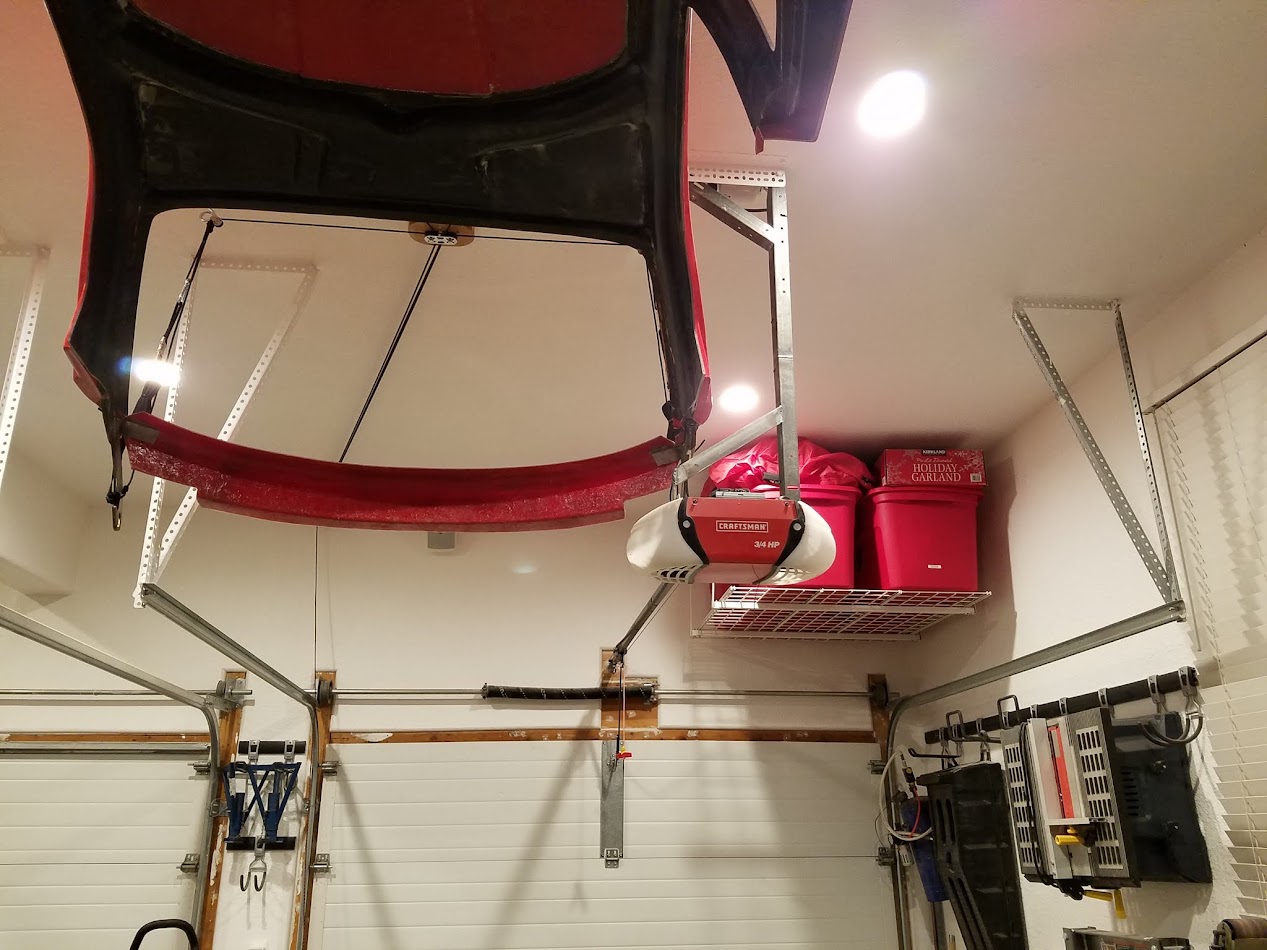
Hardtop Storage
Since the registration process takes so long for a kit, I decided to store my hardtop until next fall. Plus I wan't to get it painted before I install windows on it and I need a windshield for the inspection. I purchased a jeep roof pulley system. It was expensive, but saved me the time of finding all the individual pieces. https://www.amazon.com/gp/product/B0...?ie=UTF8&psc=1 I should be able to back my car in and lower on top.
I also had to modify my garage door support to allow the hardtop to sit perfectly between my lights. Eventually I hope to get a screw type garage door opener and a high lift track system.

-
03-11-2017, 01:54 PM
#129
-
03-11-2017, 02:13 PM
#130
-
03-11-2017, 02:18 PM
#131
Headlight light cutoff leveling tip!!!
Even though Factory Five spent a lot of time creating these headlights, the rotation of the projector cutoff line is way off!!! I do not believe that you can adjust the cutoff angle later. Before gluing the projector into the housing, get a dremel cutout bit and make the three projector mounting holes oblong. I bolted my housings on the car and held the projectors in the housing while on. I could then rotate the housing to adjust the angle of the light cutoff. I used hot glue and coated each of the three projector mounting clips and held it in place while the hot glue dried. I then took the entire assembly with the projectors temporarily held in place off the car. I used plastic epoxy and coated the 3 clips. I had to remove a little hot glue from one clip at a time to get good epoxy contact with the clips.
-
03-11-2017, 02:20 PM
#132
I also used windshield super fast dry urethane to fill the gaps between the rear projector mount and the housing. It can fill large voids, you just build it up pass by pass.


Last edited by bbjones121; 03-11-2017 at 02:25 PM.
-
03-11-2017, 02:49 PM
#133
-
03-11-2017, 02:50 PM
#134
Resting before body prep
I now have a little time to get the body ready for paint. My color scheme will be Subaru World Rally Blue body, Gloss black (including carbon fiber bits) accents, Matte Gunmetal metal components, and a touch of bare aluminum here and there.

-
03-11-2017, 06:08 PM
#135
Senior Member

Your update has included several creative mods that will help me and others. Though I've completed my shifter, E-brake, and HVAC coolant lines, I admire your work. I also found that it's necessary to paint the headlight lenses - carefully - and just ordered a set of the "Suck & Clamp" clamps for other projects. Thanks for spending my money!  My only problem with your post is the empty parking lot at the DMV. I'm jealous because my DMV had a line of 12 people at 7 AM all waiting for inspections by one slow-moving, grouchy agent. Very nice work and great descriptions.
818S/C : Chassis #25 with 06 WRX 2.5 turbo, ABS, cruise, PS, A/C, Apple CarPlay, rear camera, power windows & locks, leather & other complexities. Sold 10/19 with 5,800 miles.
Mk3 Roadster #6228 4.6L, T45, IRS, PS, PB, ABS, Cruise, Koni's, 17" Halibrands, red w/ silver - 9K miles then sold @ Barrett-Jackson Jan 2011 (got back cash spent).
-
03-11-2017, 06:23 PM
#136
Originally Posted by
AZPete
Your update has included several creative mods that will help me and others. Though I've completed my shifter, E-brake, and HVAC coolant lines, I admire your work. I also found that it's necessary to paint the headlight lenses - carefully - and just ordered a set of the "Suck & Clamp" clamps for other projects. Thanks for spending my money!
My only problem with your post is the empty parking lot at the DMV. I'm jealous because my DMV had a line of 12 people at 7 AM all waiting for inspections by one slow-moving, grouchy agent. Very nice work and great descriptions.
Thanks Pete! I wouldn't have known where to begin with some of my build and especially the HVAC if it wasn't for your extremely helpful thread and guide. I have gotten some great ideas from your build as well and will continue to since I am not complete yet. I was extremely thankful that there was no line at the inspection, I would have had to reschedule if there was since I was running late. I believe that the county office will be a different story when I go there next.
-
03-28-2017, 05:38 PM
#137
Oh man, what a great build thread!! Thanks for the detail!
-
03-28-2017, 06:13 PM
#138
Senior Member

Really looks like a Ferrari (rear end, color, style and 4 tips)!
Frank
818 chassis #181 powered by a '93 VW VR6 Turbo GT3582R
Go-karted Aug 5, 2016 - Then May 19+21, 2017
Tracked May 27/July 26, 2017
Build time before being driveable on Sep 27, 2019: over 6000h
Build Completed Winter 2021
-
03-29-2017, 09:03 AM
#139
Senior Member

Excellent attention to detail and great tips on the head lights!
-
03-29-2017, 09:09 AM
#140
Headlight screws were kept loose? Why did you do that? How did the bucket get held on then? I'll probably end up doing something like you. I don't like the permanence to several of FFR's solutions for things that will likely require servicing (like, an LED dying). What tape are you using?
Thanks.
-
03-29-2017, 10:08 AM
#141
Originally Posted by
Mechie3
Headlight screws were kept loose? Why did you do that? How did the bucket get held on then? I'll probably end up doing something like you. I don't like the permanence to several of FFR's solutions for things that will likely require servicing (like, an LED dying). What tape are you using?
Thanks.
You could probably epoxy or fiberglass the screws in place like some others have done, but it makes getting the nut off the back very difficult. The screws on the outside of the headlight buckets are not perpendicular to the body, so it prevents you from pulling the bucket straight back to remove. Without significant modifications to the back rim of headlight bucket to make a nut sit flush on a surface, I think it would be nearly impossible to pull the bucket straight off the body with 8 permanent studs.
3m VHB 1/2 wide mounting tape is what I used. It fits the mounting lip edge perfectly.
If I need to remove my lenses, I just run a razor blade along outside of lens to cut a thin bead of black silicone caulk, then just pull the double sided tape off. I can then still use a screw driver topside instead of trying to get at a tiny nut on the back side.
Just FYI. If you need to do minor touch up or replace LED lights, you can remove the projector easily from the back and get a small hand to reach in.
-
03-29-2017, 10:14 AM
#142
Nice build and the car looks great, just in time to enjoy it this spring.
-
03-29-2017, 11:35 AM
#143
Thanks everyone. I actually got a VIN rejection letter Thursday last week, the DMV forgot to include a copy of my $3.50 fee receipt and the form from the Colorado State Patrol was missing a comment in the notes section stating that there is no VIN found. Thankfully I didn't have to go back to the DMV, I just directly mailed it to the state office. I just hope it didn't put me in the back of the pile again.
-
03-29-2017, 11:37 AM
#144
I was upset at first about the deficiencies they rejected it for, but considering that nobody at the DMV knew what to do for a kit, I should feel lucky...
-
03-29-2017, 03:13 PM
#145
Ahh, loose meaning not epoxied in place. I thought you meant not tightened and couldn't figure out how that worked. Thanks. I think this is the route I'll take.
-
03-29-2017, 09:10 PM
#146
Awesome build thus far!
Just one thing I noticed. Wrapping cast iron manifolds is not recommended as it makes them more prone to cracking.
-
03-29-2017, 09:15 PM
#147
Originally Posted by
Shawn818c
Awesome build thus far!
Just one thing I noticed. Wrapping cast iron manifolds is not recommended as it makes them more prone to cracking.
Thanks. I am hoping it has heat cycled slot. The crossover pipe is stainless ceramic coated I think. I will keep the spare I have just in case.
-
04-02-2017, 11:39 AM
#148
Originally Posted by
Mechie3
Ahh, loose meaning not epoxied in place. I thought you meant not tightened and couldn't figure out how that worked. Thanks. I think this is the route I'll take.
Yeah sorry that is what I meant, not epoxied or fiberglass in place. Way easy to unscrew. You have to work a little on the countersinking. Some are angled.
-
08-18-2018, 01:17 PM
#149
-
08-18-2018, 01:31 PM
#150
-
Post Thanks / Like - 0 Thanks, 2 Likes
-
08-18-2018, 09:47 PM
#151
-
08-18-2018, 10:01 PM
#152
-
08-18-2018, 10:10 PM
#153
-
Post Thanks / Like - 0 Thanks, 1 Likes
-
08-19-2018, 11:15 AM
#154
Really nice work and great build posts !
How do you like the SPARCO seats? I am considering
the same.
-
08-19-2018, 11:23 AM
#155
Originally Posted by
Jim Haar
Really nice work and great build posts !
How do you like the SPARCO seats? I am considering
the same.
I like them alot. They can slide forward and recline. I made the rails so they tilt up going forward allowing the cushion to go over top of chassis bar if needed. The recline lever is tight, but fits. It is nice to be able to tilt them forward to access behind the seats.
-
08-19-2018, 12:19 PM
#156
Sounds good , did you use the Sparco sliders ?
-
08-19-2018, 12:23 PM
#157
Originally Posted by
Jim Haar
Sounds good , did you use the Sparco sliders ?
Yep
-
10-06-2018, 05:55 PM
#158
-
10-06-2018, 05:57 PM
#159
-
10-07-2018, 07:57 PM
#160

Yes, I love Technology

BB - re the grill material from Amazon - I was looking at that for the same purpose a while back but had not decided yet. Looks good but wondering now that you have seen it in person - do you recommend it? Thanks!


 Thanks:
  Likes:


 Reply With Quote


