Boig Motorsports

Visit our community sponsor

Thanks Thanks:  0
Likes Likes:  3
Page 2 of 5 FirstFirst 1234 ... LastLast
Results 41 to 80 of 161

Thread: bbjones121 - Denver build

  1. #41
    Senior Member
    Join Date
    Mar 2011
    Location
    Denver, CO
    Posts
    1,362
    Post Thanks / Like

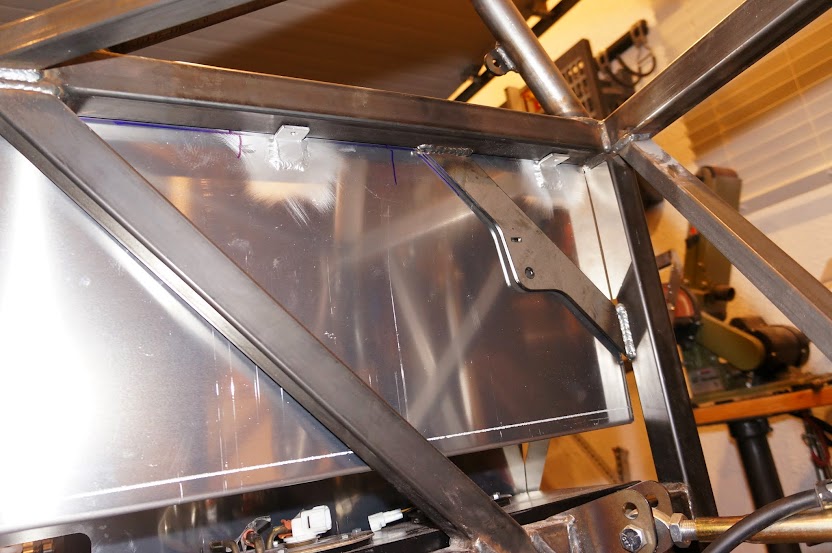
    Firewall Install

    I am trying to keep my interior rivet free, so i will be welding my firewall to one piece. I welded tabs to the backside to attach.


  2. #42
    Senior Member
    Join Date
    Mar 2011
    Location
    Denver, CO
    Posts
    1,362
    Post Thanks / Like

    Firewall


    Going to brush all the aluminum, I tested a spot.
    Last edited by bbjones121; 05-01-2015 at 11:01 PM.

  3. #43
    Senior Member
    Join Date
    Mar 2011
    Location
    Denver, CO
    Posts
    1,362
    Post Thanks / Like

    Rear Brake Lines and ABS

    Started the rear brake lines. Since I will be powder-coating the chassis later, I purchased a bunch of small rivnuts, 6-32. Let me just tell you that this size is a pain in the ..... The tool bit has broken on me twice already, you really can't squeeze too hard. I just have some bolts that I weld on the tip.


    Welded the tabs on the chassis.


    Thankfully I saved the original hardware for the ABS line. It bolts right into the rear trailing arm.

  4. #44
    Senior Member FFRSpec72's Avatar
    Join Date
    Feb 2011
    Location
    Kirkland, WA
    Posts
    2,255
    Post Thanks / Like
    Build is looking real nice, I like what you have done with rear firewall, I don't like rivets/rivnuts either. Whast kind of welder do you have for the aluminum ?
    Tony Nadalin
    2018 SOVREN Big Bore Champion
    2015 SCCA Oregon Region VP3 Champion
    2012 ICSCC ITE Class Champion
    FFR MkII Challenge Car, Spec Racer, Street Legal, SCCA, ICSCC and NASA Racing
    818R Build in progress

  5. #45
    Senior Member
    Join Date
    Mar 2011
    Location
    Denver, CO
    Posts
    1,362
    Post Thanks / Like
    Quote Originally Posted by FFRSpec72 View Post
    Build is looking real nice, I like what you have done with rear firewall, I don't like rivets/rivnuts either. Whast kind of welder do you have for the aluminum ?
    Thanks.

    It is an Everlast 200dv. If you talk to them, they can work with you on price. I think for about 1400 I got the dual voltage model, upgraded pedal, upgraded gas regulator, upgraded tig torch, plus the another tig torch with the thumb current adjuster,I love it. Used an old Lincoln a bit back in the day and i wouldn't give this Everlast up. The functionality is insane. It has great warranty, pretty nice Siemens IGBTs I think.

    For aluminum you can adjust everything and you can use a sharp point on your electrode. You can weld the bottoms of pop cans difficultly. The next model up can do it easily.

    Does it sounds like I researched a bit?

  6. #46
    Senior Member
    Join Date
    Mar 2011
    Location
    Denver, CO
    Posts
    1,362
    Post Thanks / Like

    Firewall complete

    Finished welding it as one piece. By the way...this was a PITA. I do not recommend trying to weld it together unless the two pieces line up perfect. I had to beat the thing back flat as it warped like crazy.
    Underside welds:


    Topside Welds and brushing look:


  7. #47
    Senior Member AZPete's Avatar
    Join Date
    Feb 2011
    Location
    Scottsdale, AZ
    Posts
    2,374
    Post Thanks / Like
    Beautiful work, especially since we didn't see you beating it back into shape.
    818S/C : Chassis #25 with 06 WRX 2.5 turbo, ABS, cruise, PS, A/C, Apple CarPlay, rear camera, power windows & locks, leather & other complexities. Sold 10/19 with 5,800 miles.
    Mk3 Roadster #6228 4.6L, T45, IRS, PS, PB, ABS, Cruise, Koni's, 17" Halibrands, red w/ silver - 9K miles then sold @ Barrett-Jackson Jan 2011 (got back cash spent).

  8. #48
    Senior Member
    Join Date
    Mar 2011
    Location
    Denver, CO
    Posts
    1,362
    Post Thanks / Like
    Quote Originally Posted by AZPete View Post
    Beautiful work, especially since we didn't see you beating it back into shape.
    Thanks, haha. Yeah, the fixups from the f...ups are better done in secret. Plus I don't really feel too inclined to grab the camera for those events; I feel more like throwing it and that wouldn't be good.

  9. #49
    Senior Member
    Join Date
    Mar 2011
    Location
    Denver, CO
    Posts
    1,362
    Post Thanks / Like

    ABS module and front brake lines

    Using OEM line snap holders, proportion valves within reach of driver. I reused the metric threaded connections from the donor and re-flared all connections.


    Last edited by bbjones121; 06-15-2015 at 10:07 PM.

  10. #50
    Senior Member Bob_n_Cincy's Avatar
    Join Date
    Sep 2012
    Location
    Cincinnati OH
    Posts
    3,903
    Post Thanks / Like
    Quote Originally Posted by bbjones121 View Post
    Using OEM line snap holders, proportion valves within reach of driver. I reused the metric threaded connections from the donor and re-flared all connections.
    Great job on the brake lines. It takes a lot of time and patients.
    Your proportioning valve will not be within reach of the driver unless you have super long arms or are not wearing seat belts.
    Bob
    818S #22 Candy Blue Frame, Front Gas Tank, 2.5L Turbo, Rear radiator, Shortened Transmission, Wookiee Compatible, Console mounted MR2 Shifter, Custom ECU panel, AWIC soon
    My Son Michael's Turbo ICE Build X22 http://thefactoryfiveforum.com/showt...rts-818S-Build
    My Electric Supercar Build X21 (on hold until winter) http://thefactoryfiveforum.com/showt...e-Build-Thread

  11. #51
    Senior Member
    Join Date
    Mar 2011
    Location
    Denver, CO
    Posts
    1,362
    Post Thanks / Like
    Thanks. Yeah, these took forever. Plus relandscaping our front yard didn't help.

    Sorry, that is what I meant. Taking seatbelt off, then reaching up there. I just wanted them to be reachable inside the windshield.

  12. #52
    Senior Member
    Join Date
    Mar 2011
    Location
    Denver, CO
    Posts
    1,362
    Post Thanks / Like
    Since I haven't powder coated chassis yet, I am also trying to make every brake line easy to remove.

    I still wish I were further along.The summer will be over before I know it

  13. #53
    Senior Member Bob_n_Cincy's Avatar
    Join Date
    Sep 2012
    Location
    Cincinnati OH
    Posts
    3,903
    Post Thanks / Like
    I also just noticed that your passenger side lower control arm bushings is in upside down. This will reduce the tire-firewall clearance.
    Bob
    818S #22 Candy Blue Frame, Front Gas Tank, 2.5L Turbo, Rear radiator, Shortened Transmission, Wookiee Compatible, Console mounted MR2 Shifter, Custom ECU panel, AWIC soon
    My Son Michael's Turbo ICE Build X22 http://thefactoryfiveforum.com/showt...rts-818S-Build
    My Electric Supercar Build X21 (on hold until winter) http://thefactoryfiveforum.com/showt...e-Build-Thread

  14. #54
    Senior Member
    Join Date
    Mar 2011
    Location
    Denver, CO
    Posts
    1,362
    Post Thanks / Like
    Quote Originally Posted by Bob_n_Cincy View Post
    I also just noticed that your passenger side lower control arm bushings is in upside down. This will reduce the tire-firewall clearance.
    Bob
    Is it really? Crap. I did flip bolts so flange head would be against aluminum?

  15. #55
    Moonlight Performance
    Hindsight's Avatar
    Join Date
    May 2014
    Location
    Atlanta
    Posts
    3,402
    Post Thanks / Like
    Very clean brake line routing!

  16. #56
    Senior Member AZPete's Avatar
    Join Date
    Feb 2011
    Location
    Scottsdale, AZ
    Posts
    2,374
    Post Thanks / Like
    Very nice work. The projects that take much longer than I think they should are also the projects I'm most proud of. I'll bet you've come back to admire your brake lines.
    818S/C : Chassis #25 with 06 WRX 2.5 turbo, ABS, cruise, PS, A/C, Apple CarPlay, rear camera, power windows & locks, leather & other complexities. Sold 10/19 with 5,800 miles.
    Mk3 Roadster #6228 4.6L, T45, IRS, PS, PB, ABS, Cruise, Koni's, 17" Halibrands, red w/ silver - 9K miles then sold @ Barrett-Jackson Jan 2011 (got back cash spent).

  17. #57
    Senior Member
    Join Date
    Mar 2011
    Location
    Denver, CO
    Posts
    1,362
    Post Thanks / Like
    Thanks guys!

    Good point on looking back.

  18. #58
    Senior Member
    Join Date
    Mar 2011
    Location
    Denver, CO
    Posts
    1,362
    Post Thanks / Like
    Are my control arm bushings backwards? I thought I was following everything correctly.

  19. #59
    Senior Member
    Join Date
    May 2012
    Location
    Suisun City, CA
    Posts
    851
    Post Thanks / Like
    Quote Originally Posted by bbjones121 View Post
    Are my control arm bushings backwards? I thought I was following everything correctly.
    It looks like your driver side is correct (straight portion on top), but your passenger side upside down (it has the fillet on top).
    818S - #67 (SOLD IT!)
    Delivered: 18 November 2013
    Go Karted: 29 December 2013
    Titled/Registered: 28 March 2014
    Finished: NEVER!
    341 hp @ 4844 RPM / 389 tq @ 3717 RPM

  20. #60
    Senior Member
    Join Date
    Mar 2011
    Location
    Denver, CO
    Posts
    1,362
    Post Thanks / Like
    Wow, Thank you guys for pointing this out. I would never have caught it.

  21. #61
    Senior Member Frank818's Avatar
    Join Date
    Jun 2013
    Location
    QC, Canada
    Posts
    5,732
    Post Thanks / Like
    Those are great brake lines!!! I wish you'd do mines.
    Frank
    818 chassis #181 powered by a '93 VW VR6 Turbo GT3582R
    Go-karted Aug 5, 2016 - Then May 19+21, 2017
    Tracked May 27/July 26, 2017
    Build time before being driveable on Sep 27, 2019: over 6000h
    Build Completed Winter 2021

  22. #62
    Senior Member
    Join Date
    Mar 2011
    Location
    Denver, CO
    Posts
    1,362
    Post Thanks / Like

    Engine

    It has been awhile and I have lots of photos to add. Where to start...
    How about engine?
    Putting it back together.


    Powder coated the head covers in two part. Prismatic colors orange and then a clear coat.


  23. #63
    Senior Member
    Join Date
    Mar 2011
    Location
    Denver, CO
    Posts
    1,362
    Post Thanks / Like

    Crank Pulley

    I figured it would be a good time to color match my brake calipers and engine heads with some other pieces. Even though you can't really see this, the black color of my Perrin lightweight crank was boring.

    Taped off the letters so I would keep the Perrin words. Here is it just after powdercoating the orange, but before the clear coat.


    With tape removed


  24. #64
    Senior Member
    Join Date
    Mar 2011
    Location
    Denver, CO
    Posts
    1,362
    Post Thanks / Like

    Coolant Mod

    I kept going back and forth on this on, but ultimately decided to weld up an extrusion and drill down through it. I was thinking about just getting an aluminum barb fitting, but whatever...this worked. I didn't want any obstruction down inside the coolant passage. kinda ugly weld, but hard to build up an aluminum weld pretty.


  25. #65
    Senior Member
    Join Date
    Mar 2011
    Location
    Denver, CO
    Posts
    1,362
    Post Thanks / Like

    Alternator Bracket

    So out of the entire WRX of parts in the basement, I have only sold one part to this date, the power steering pump. Guess what was part of that pump I did not remove before shipping it off... the alternator tensioner!!!

    I went ahead and made a simple one. I plan to powdercoat or spray paint it black.


  26. #66
    Senior Member
    Join Date
    Mar 2011
    Location
    Denver, CO
    Posts
    1,362
    Post Thanks / Like

    Fuel Lines and Rails

    Again, I thought the black Perrin color was boring, so I taped off the existing Perrin sticker (thankfully this is a high temp sticker) and powdercoated away.


    I couldn't find a good place to put the fuel pressure regulator, so I actually drilled and tapped one of the air intake manifold tabs.


  27. #67
    Senior Member
    Join Date
    Mar 2011
    Location
    Denver, CO
    Posts
    1,362
    Post Thanks / Like

    Air Intake

    The Cobb air intake filter and neck put the intake in a perfect spot. I plan to shield off the engine from this later.


  28. #68
    Senior Member
    Join Date
    Mar 2011
    Location
    Denver, CO
    Posts
    1,362
    Post Thanks / Like

    Powder Coating Steps - CV shafts

    I actually took pictures of the entire process with the CV shaft powder coating. It is amazing how the colors change. The orange is very dull when it is first cured, but when the clear coat cures, it almost sparkles. The white powder is the clear coat before it is baked.

    CV housings sandblasted first.


  29. #69
    Senior Member
    Join Date
    Mar 2011
    Location
    Denver, CO
    Posts
    1,362
    Post Thanks / Like
    I wish I had photos of my transmission, what a pain in the a... I had to take it apart 3 times after adjusting the backlash and sealing. Beware, the 02 and 03 wrx cv stubs have an internal c clip. This is not the c clip that you just tug on really hard and it eventually pops out, this is a real c clip that you have to use a c clip pliers to remove. Unfortunately mine was clipped inside my Cusco LSD, so I had to take that apart along with the tranny to get to the clips.

  30. #70
    Senior Member AZPete's Avatar
    Join Date
    Feb 2011
    Location
    Scottsdale, AZ
    Posts
    2,374
    Post Thanks / Like
    Very nice work. I appreciate the detail you took in properly cleaning and powder coating many of the parts, like pulley and CV housings, that most of us just installed. Nice.
    818S/C : Chassis #25 with 06 WRX 2.5 turbo, ABS, cruise, PS, A/C, Apple CarPlay, rear camera, power windows & locks, leather & other complexities. Sold 10/19 with 5,800 miles.
    Mk3 Roadster #6228 4.6L, T45, IRS, PS, PB, ABS, Cruise, Koni's, 17" Halibrands, red w/ silver - 9K miles then sold @ Barrett-Jackson Jan 2011 (got back cash spent).

  31. #71
    Senior Member
    Join Date
    Mar 2011
    Location
    Denver, CO
    Posts
    1,362
    Post Thanks / Like
    Quote Originally Posted by AZPete View Post
    Very nice work. I appreciate the detail you took in properly cleaning and powder coating many of the parts, like pulley and CV housings, that most of us just installed. Nice.
    Thanks Pete. Any testing of the stock ac compressor yet?

  32. #72
    Mechie3's Avatar
    Join Date
    May 2012
    Location
    Indianapolis
    Posts
    5,174
    Post Thanks / Like
    I like all the color added to the normally boring colored parts (like CV's).
    Zero Decibel Motorsports
    Check out my new website!
    www.zerodecibelmotorsports.com
    www.facebook.com/zero.decibel.motorsports

  33. #73
    Senior Member Bob_n_Cincy's Avatar
    Join Date
    Sep 2012
    Location
    Cincinnati OH
    Posts
    3,903
    Post Thanks / Like
    Michael And I set up an oven and bought the equipment to do powder coating.
    After a month or so of using it, we determined that it takes a lot of time to disassemble, clean, prep, coat, reassemble and clean the equipment after each part.
    It was really slowing down our build. So we went to cheap, easy, and quick rattle cans. "because racecar"

    BBjones, Your stuff looks awesome.
    Bob
    818S #22 Candy Blue Frame, Front Gas Tank, 2.5L Turbo, Rear radiator, Shortened Transmission, Wookiee Compatible, Console mounted MR2 Shifter, Custom ECU panel, AWIC soon
    My Son Michael's Turbo ICE Build X22 http://thefactoryfiveforum.com/showt...rts-818S-Build
    My Electric Supercar Build X21 (on hold until winter) http://thefactoryfiveforum.com/showt...e-Build-Thread

  34. #74
    Senior Member
    Join Date
    Mar 2011
    Location
    Denver, CO
    Posts
    1,362
    Post Thanks / Like
    Quote Originally Posted by Bob_n_Cincy View Post
    Michael And I set up an oven and bought the equipment to do powder coating.
    After a month or so of using it, we determined that it takes a lot of time to disassemble, clean, prep, coat, reassemble and clean the equipment after each part.
    It was really slowing down our build. So we went to cheap, easy, and quick rattle cans. "because racecar"

    BBjones, Your stuff looks awesome.
    Bob
    Thanks. Yeah, the prep work sucks. I have almost given up so many times. The brake calipers were one of the worst. I finished them up and the clear coat started spider web cracking. I was completely upset and settled on having to reblast them and start over. I actually just charged them up and sprayed one more coat of clear on them and thankfully the powder only stuck inside the cracks. I was able to bake and they turned out perfect.

  35. #75
    Senior Member
    Join Date
    Mar 2011
    Location
    Denver, CO
    Posts
    1,362
    Post Thanks / Like

    Dual twin tip exhaust!

    I feel like this is one of my most rewarding steps. I feel like second to style, among brakes and headlights, comes the exhaust of a sports car. The look of the exhaust is very important to me, it says if a car has some beefy guts or if it is all for looks. I feel like the kit really lacks in the headlight and exhaust department, but that is where customization comes in play. Every major sports car out there typically has dual exhaust. Among the high hitters are quad exhaust systems. Most WRX's you see on the road are quad exhaust, so I figured why not...

    After months of studying every known exhaust system and setup in a 2.5l WRX I finally settled on one setup, that is a Nameless exhaust. I have a subaru legacy gt with a Borla exhaust. I love the way it sounds for my legacy, but I just didn't feel that the deep rumble would be suited for a small little sports car. In fact, when you start looking, almost every exhaust system you get for a subaru makes it very deep and rumbly. Another big issue is the amount of space we have in the 818. Most systems wouldn't fit. I believe the Nameless exhaust system sounds perfect. It has a little burble to it, but it gets pretty loud and poppy like a racecar should. The biggest advantage are the tiny mufflers they have.

    I had been talking with Nameless about just purchasing the tips and muffler with a stub out, but hadn't heard back from them. I started looking for used and found a very good price on some. This system has the 5" diameter mufflers, the rolled lip 3.5" tips, and staggered/angled configuration.


  36. #76
    Senior Member
    Join Date
    Mar 2011
    Location
    Denver, CO
    Posts
    1,362
    Post Thanks / Like

    Exhaust fab

    I am still learning how to weld up stainless. I can't believe how low of current you weld, I set my tig to 50 amps and am only about half-3/4 pressing down on the footpedal.


  37. #77
    Senior Member
    Join Date
    Mar 2011
    Location
    Denver, CO
    Posts
    1,362
    Post Thanks / Like

    Exhaust Bumper Location


  38. #78
    Moonlight Performance
    Hindsight's Avatar
    Join Date
    May 2014
    Location
    Atlanta
    Posts
    3,402
    Post Thanks / Like
    Woah, very nice! It never occurred to me to 180 the main pipe to get more space and alignment for the mufflers and tips. Those are really nice looking tips too, and I like the low and wide placement. It has an effect of widening the look of the car. Looking forward to seeing it finished.

  39. #79
    Senior Member mikeb75's Avatar
    Join Date
    Sep 2013
    Posts
    685
    Post Thanks / Like
    Superb work there! Looking forward to seeing & hearing the finished product.
    818SC chassis #206 EJ207 2.0L VF37 twin scroll || Cusco type RS 1.5 LSD || Wilwood pedal box (firewall attach) || Wilwood superlite front calipers
    BUILD Phase 1: 6/6/2014 car delivered || 5/24/2015 first start || 6/7/2015 go karted || 4/20/2016 hard-top-topped || 10/25/2016 registered || 11/18/2016 inspected & complete
    BUILD Phase 2: 3/8/2017 EJ207v8 || 5/29/2017 re-first re-start || 7/17/2017 re-assembled with race car bits

  40. #80
    Senior Member Canadian818's Avatar
    Join Date
    Nov 2011
    Location
    Edmonton, Alberta
    Posts
    1,378
    Post Thanks / Like
    Great work!
    Adam _____ Instagram @PopesProjects____ YouTube Channel
    818 SRX - #91
    Arrived 01/02/2014
    First Start 10/31/2016
    First Drive 05/22/2017
    Registered 10/25/2019 BRAP818

Page 2 of 5 FirstFirst 1234 ... LastLast

Posting Permissions

  • You may not post new threads
  • You may not post replies
  • You may not post attachments
  • You may not edit your posts
  •  

Replica Parts

Visit our community sponsor