-
08-28-2016, 12:22 AM
#321


Next I had to attach the L channel to the inside of the hood in the right place to hold the outboard half-ear. I began by installing the inboard half ear by attaching it temporarily to the stock FFR location.
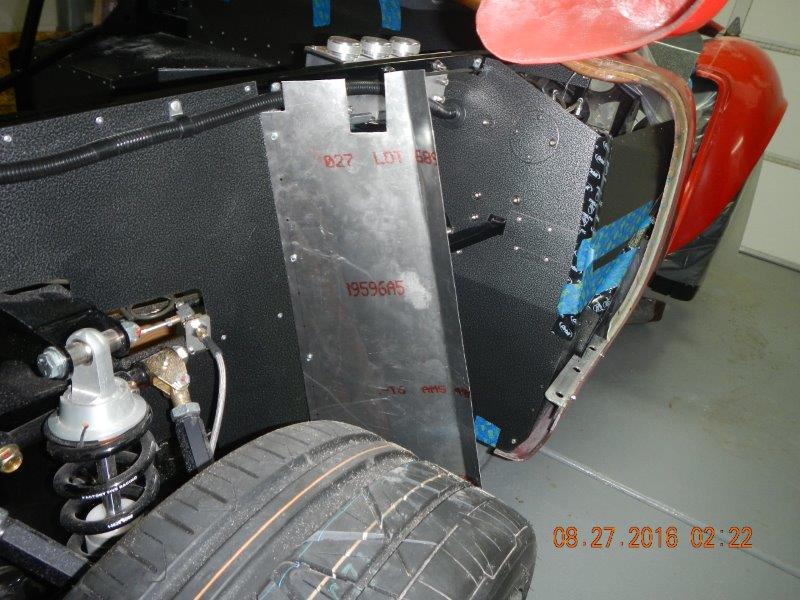
I then closed the hood. I found I had to trim the very bottom of the inboard half-ear to match the bottom of the body. That done, I attached the outboard half-ear to the inboard one, lining up and overlapping the 1" extensions on each piece. I held them in place with a c-clamp while I drew a line along the inside of the body to know where the outboard half ear should be attached.
Because of the curves and the distance from any other places that clamps might be attached, I decided the only way to hold the L channel in place to fit it and to ultimately bond it to the hood is to drill more holes in the hood. Oh well, I'm getting pretty good at filling holes with HSRF filler. Whats a few more holes!! I started by attaching the L channel at the top inside of the hood. I then worked my way around until I had attached it one 3" section at a time.
After attaching the L channel all the way down to the bottom, I temporarily installed the outboard half ear to see if I was all going to fit and work. When the hood is closed, it fits perfectly and looks really good. I am thinking of adding a support on the back side of the inboard ear to stabilize it.
The hood even closes smoothly even with the ears installed. However, the ears do scrape against each other and sound a bit rough. I had already thought of that, and after they are powder coated, the edges will be covered with rubber edge molding. They will still have to rub together to close, but they won't sound so bad.
Last edited by Jazzman; 08-28-2016 at 12:42 AM.
-
08-28-2016, 05:02 AM
#322
Carl

Jazzman,
Great modification and execution ...
Carl
Mk 4 Roadster
October 25, 2012 - Kit Arrives
April 8, 2013 - Build Starts
August 23, 2015 - Rolling Chassis/Engine & Transmission Installed
March 26, 2016 - Go Cart
-
09-03-2016, 11:19 PM
#323
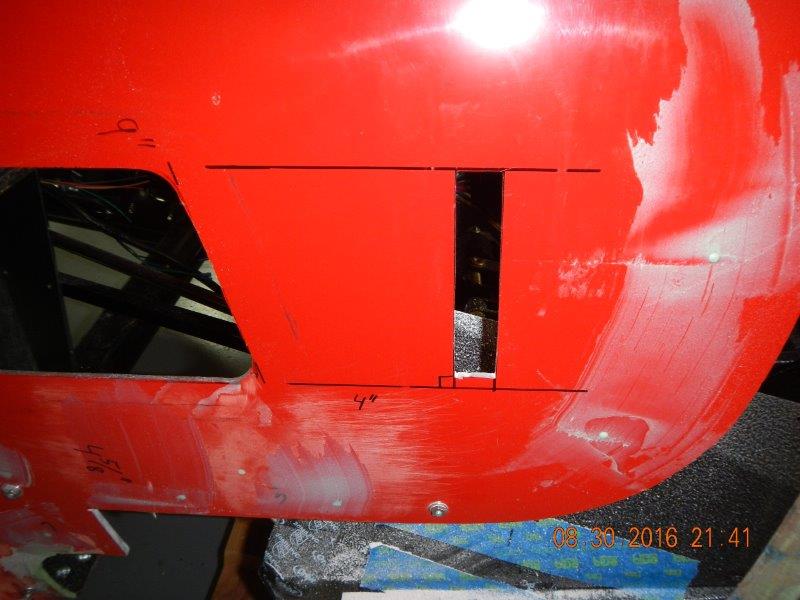
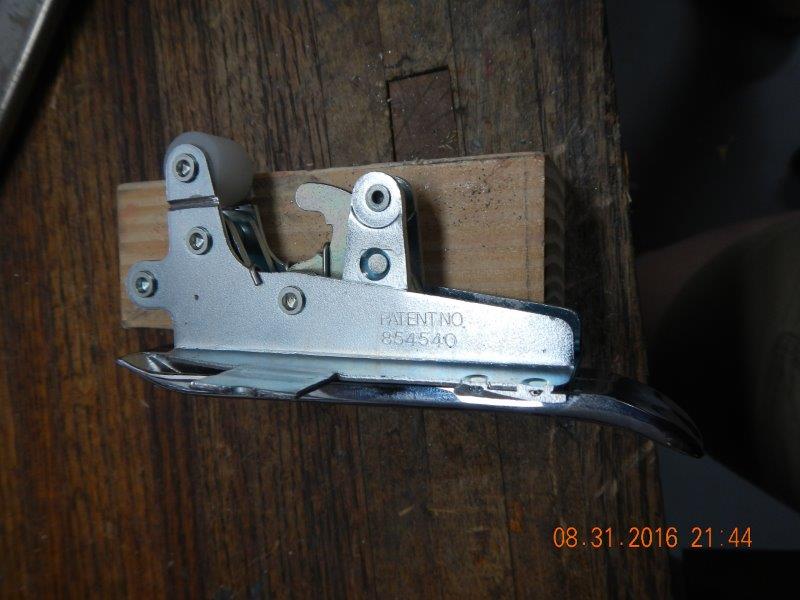
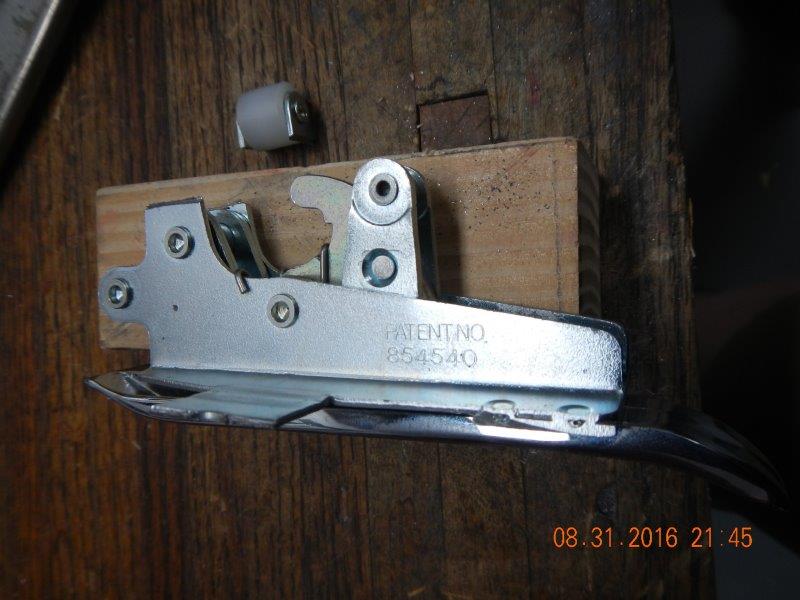
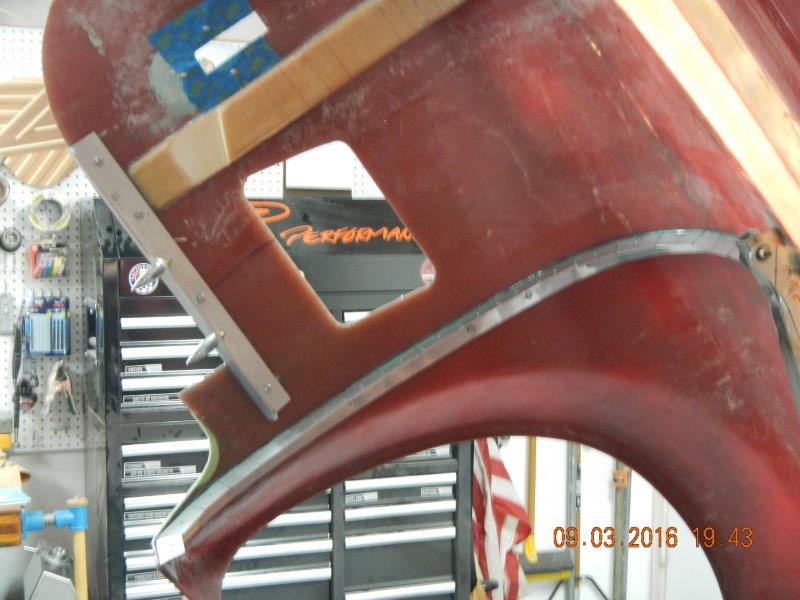
I have been working steadily, but so much of this is now uncharted territory that it takes quite a bit of thinking time in addition to the work time. The unavoidable next task had to be figuring out how to use the hood latches that I had ordered from FFR. These are the same side latches that FFR uses on their Type 65 coupe. I thought and figured for several days about how to best get these things to work. The biggest problem is there is just too little space between the inside of the hood and the outside wall of the footboxes. I think I have it pretty much figured out, but it is still a work in progress. First I had to address the actual mounting of the latch itself.
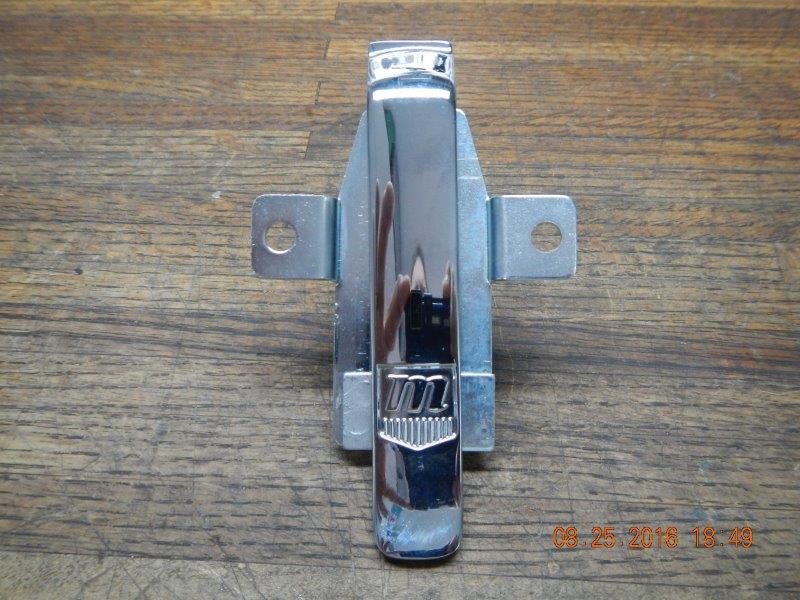
The wings sticking out on the sides of the latch frame sit forward of the bottom hole on the latch frame which is behind the "M" on the front of the latch itself. I am not sure what exactly these things are attached to on the 65 Coupe, but on the inside of the hood on the Roadster, it is just a flat surface. All the mounting tabs need to be in the same plane. I started by literally hammering the wings back flat. By doing this, all the holes are now in the same plane. The wing that is to be closest to the front of the car on each side needed to be shortened. I cut off the wing eliminating the pre=drilled hole, and then realized I cut off the wrong side. So I cut off the other side to match. No problem, there is more than enough room to drill new holes of the correct size in the remaining wing area. Now the latch seemed to be ready to install.
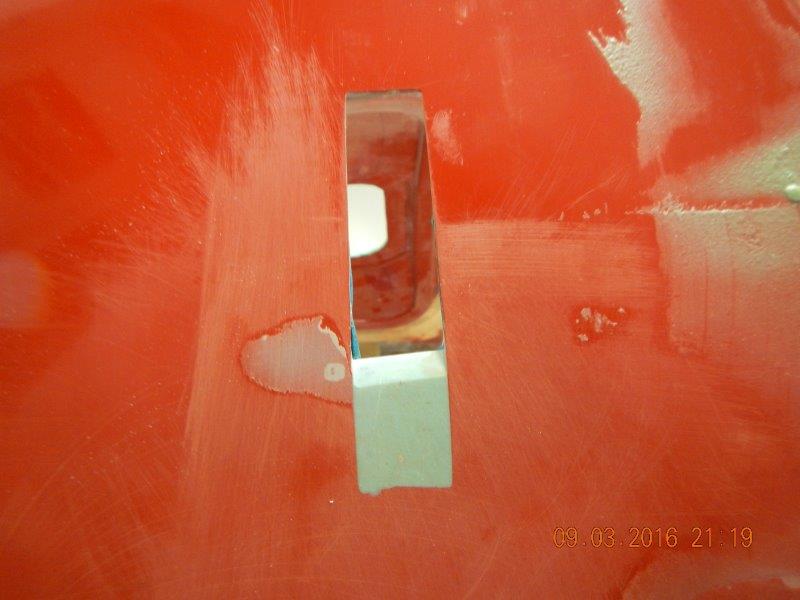
It became clear that I simply was not going to know how tight it would be inside there until I actually decided upon a location and cut the hole for the latch. I laid it out on the side of the hood. When I was comfortable with the look, I cut the hole undersized, then used files and sandpaper to increase the hole to it's final size.
The latch handle finally fit nicely after a significant amount of sanding. I put it in to test the fit, then realized I had cut the hole too long! Luckily, I had to put a perforated disc behind that area anyway to attach the latch to, so I just held the disk in place with tape, and laid HSRF to fill in the hole.
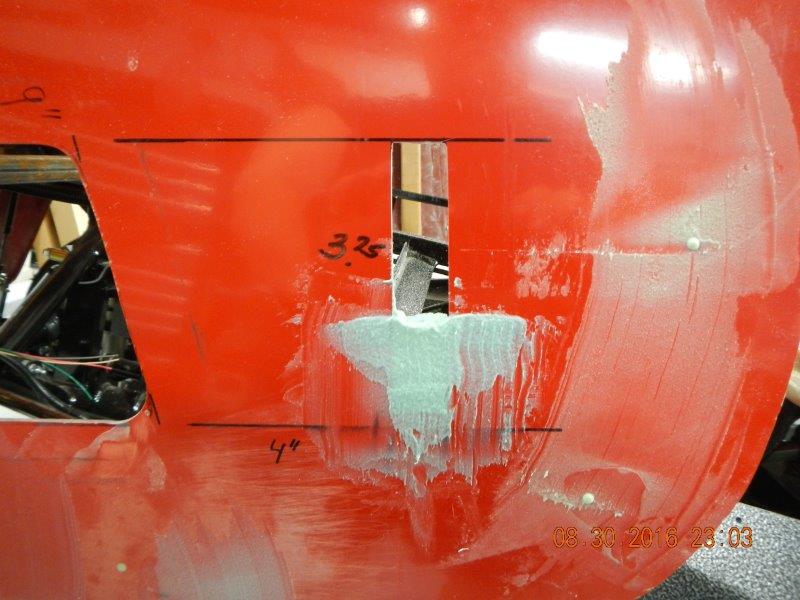
HSRF is good stuff. Yes it is like sanding granite, but the end result is sweet.
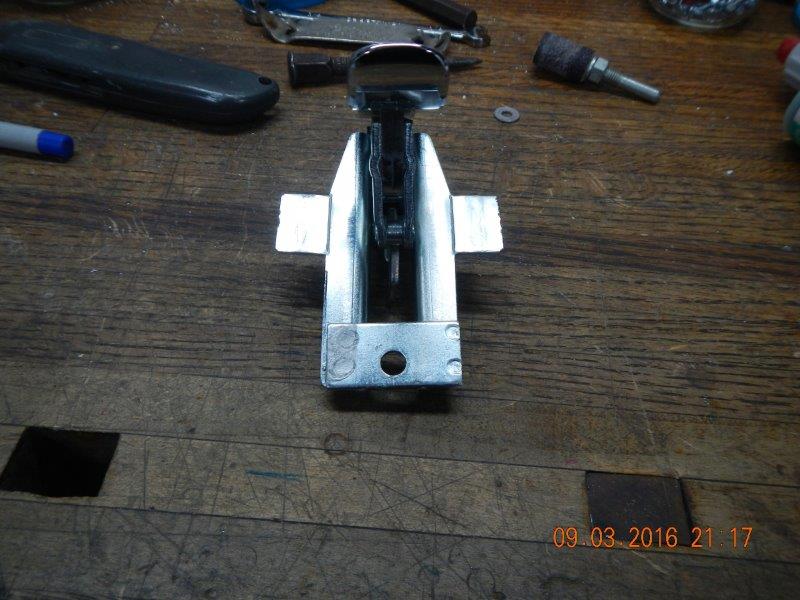
After getting the hole cut, I put tape on the side of the footbox in the area where the latch might attach. I drew lines through the latch hole to see where the latch needed to be on the side of the footbox. Sadly, there was just not enough space in there for the full latch. Without a major modification of the outside of the wall of each footbox, there was just no way to get the latch between the hood and the footbox panel. The solution was to remove the white plastic roller from the latch mechanism.
With that white roller gone, the only remaining interference is the actual J hook that actually latches the hood. I think I have a work around for that, but it is still in the works. More on that later.
Last edited by Jazzman; 09-03-2016 at 11:45 PM.
-
09-04-2016, 12:24 AM
#324
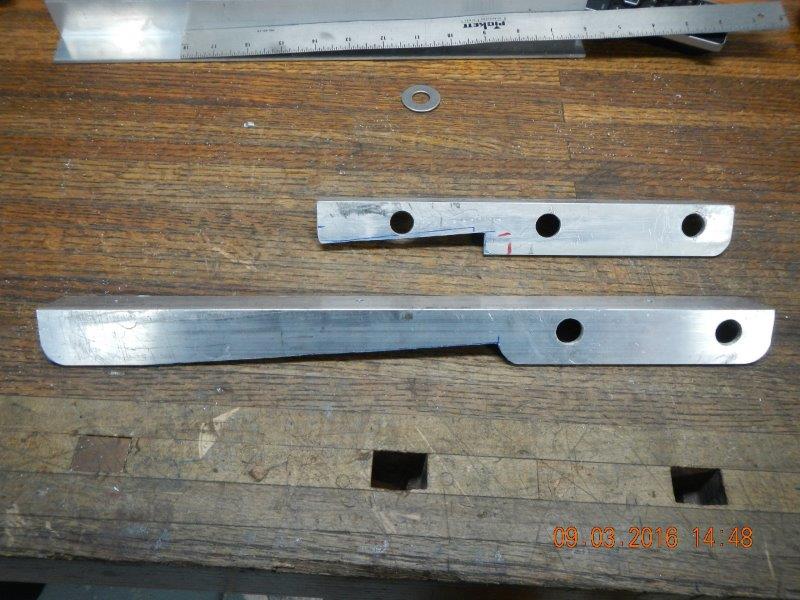
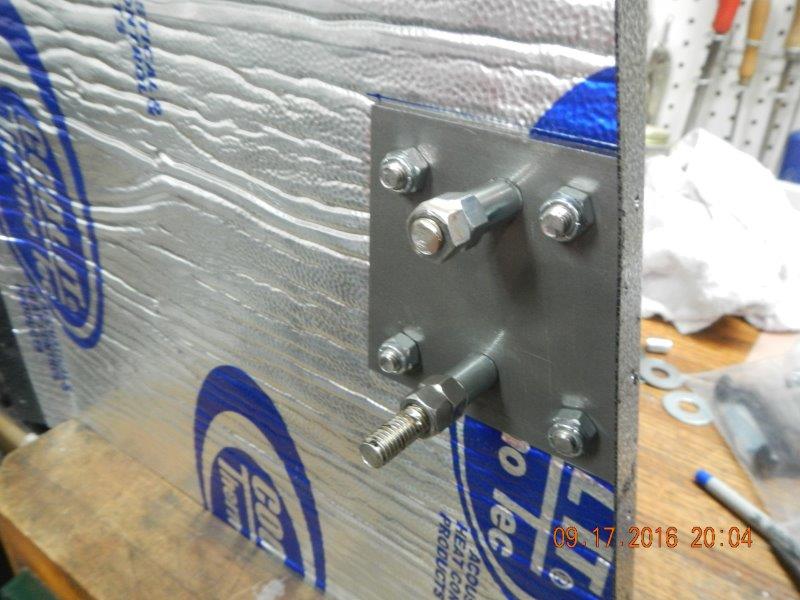
In order to finish all the stuff attached to the hood, I decided to go back and remake a couple of pieces. The lower aluminum L channel that forms the receiver for the "fangs" was originally 10" long. It is adequate at that length, but I decided that I wanted the L channel to extend farther back along the inside of the body to act as a stiffening rib for the area where the fangs meet the body. I remade both of the lower receiving pieces, eliminating the rear most holes that I ended up not needing, and extending the overall length to 16". I guess practice does make improvement, because the new receivers fit even better than the original ones.
I am glad I went to the effort to remake these pieces. They new ones look better and work better than the originals.
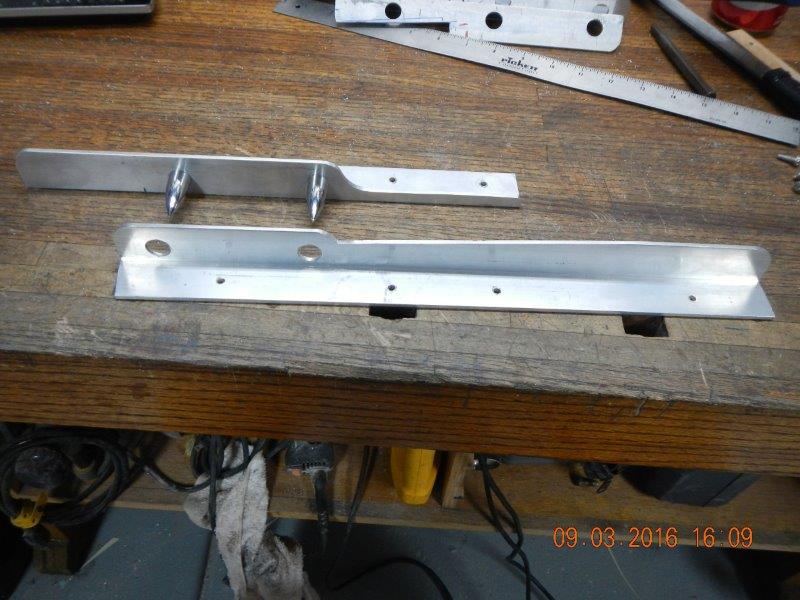
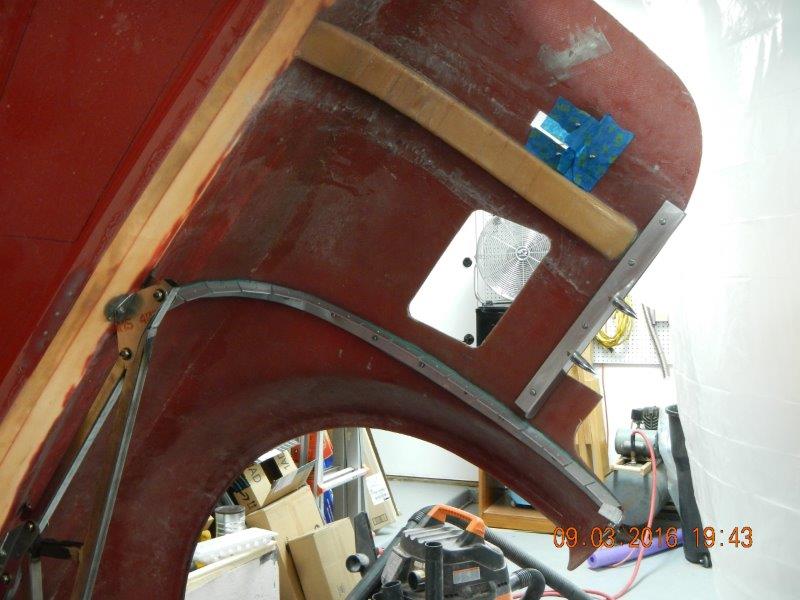
I pulled out the 3M Composite and Metal Bonding cement to attach the various pieces to the underside of the hood. I removed the upper "Fang" mounting from each side of the hood and the aluminum L channel that has been segmented and bent to hold the outside half of the front splash guards securely to the inside of the hood. Once again I noticed how nicely this method stiffened up the outside of the hood. With these outside plash guards in place, the sides of the hood are very solid. With them removed, the sides of the hood have noticeable movement. I had to cut and polish one side off of four perforated disks to make them ready to hold the sides of the hood latches. To make sure the Bonding Cement would hold securely, I ran each surface of aluminum that would be bonded with 80 grit sandpaper to rough up the surface. I also wiped down all surfaces with acetone to make sure it was all clean. I laid out all the attaching bolts, nuts and washers to make sure I would not have to hunt for them. I knew the splash guard attachment channel would take quite a bit of time to fit and bolt into place. (I was right!!) I didn't want anything to slow me down. Once all was laid out, I hooked up the mixing nozzle to the Bonding cement dispenser and began attaching pieces. I first attached the perforated disks, then moved to the splash guard mounts. Finally, I bonded the upper Fang holder to the hood. I used acetone on a rag to wipe off the excess bonding cement from all the pieces. It looks like everything was bonded just as expected.
I intentionally put bonding cement around each of the areas where a bolt goes through the hood to hold the piece in place while the cement hardens. After it hardens thoroughly, I will take off the nuts and washers from the outside, then use the di-grinder to grind off all the bolts to just below the level of the hood surface. I will lay HSRF filler over each bolt end to conceal it. By leaving these bolts cemented inside the fiberglass hood surface, I hope that this will increase the strength of the bond between the aluminum piece and the fiberglass hood.
-
09-04-2016, 05:43 PM
#325
Steve >> aka: GoDadGo

You Are Truly A Braver Man Than Me When It Comes To Over The Top Mods!
You understand the meaning of Go Big Or Go Home!
You need to change your name to Go Big Jazzman!
Cool Stuff!
-
09-04-2016, 11:31 PM
#326

Originally Posted by
GoDadGo

You need to change your name to Go Big Jazzman! Cool Stuff!
Considering my size, the "Go Big" is implied!!  Thanks for the kind words of support. You are rebel just like me. Your "Darkside Roadster" is also inspiring, albeit to a different group. I am no mans expert on bowtie engines, but I hear and read extremely good things. We both will end up being loved by some, hated by others, for not being "traditional". I say honor the past by learning from it, growing beyond it, moving to a higher level because of it. Perhaps one day the "Darkside" will ride side by side with the "Flip Top". Then we will truly have achieved an enlightened society!! Keep up the good work Dad!
-
09-05-2016, 03:26 AM
#327
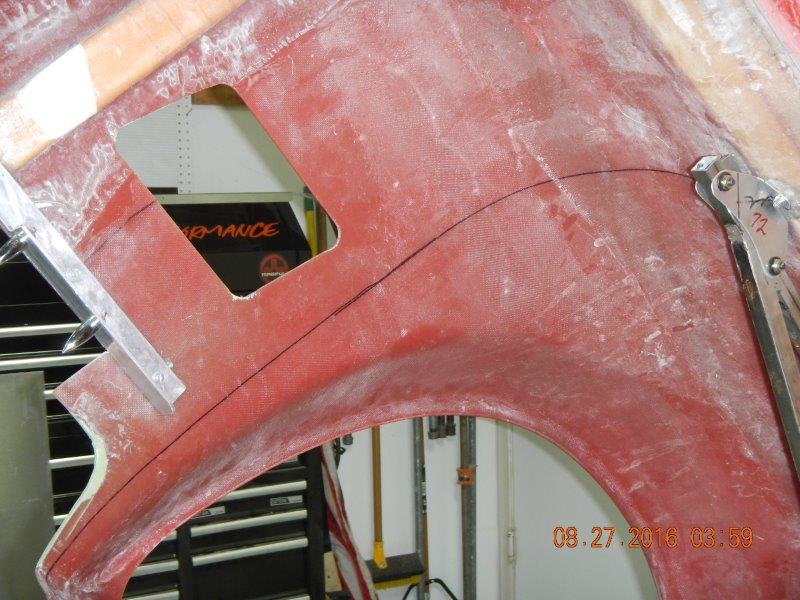
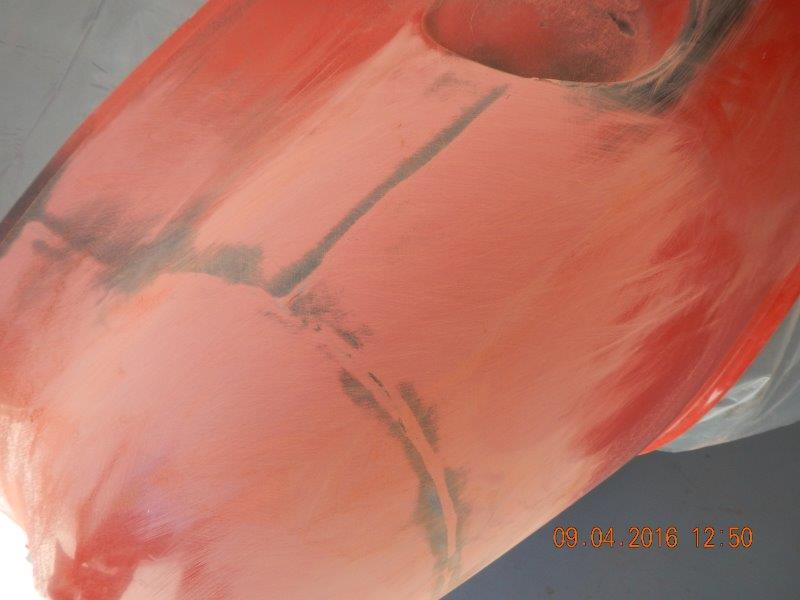
Made another mess today, but the good kind. The extreme heat has finally broken, and today was the first day cool enough to leave all the doors open. It was in the high 90's today, still plenty warm, but with a nice breeze, it was a beautiful day. I was in the pool four times! Because I could leave the doors open, I decided it was time to attack those annoying parting seams on the body. I put away everything that was not absolutely necessary, and pulled out the sander. I took down the lines with 80 grit on the palm sander just to get down to a workable level. Then I pulled out the sanding block to make sure they were shaped correctly. After sanding to a shaped I knew was close, but I also knew was not quite finished, I gave the area a very light "skim coat" of black primer.
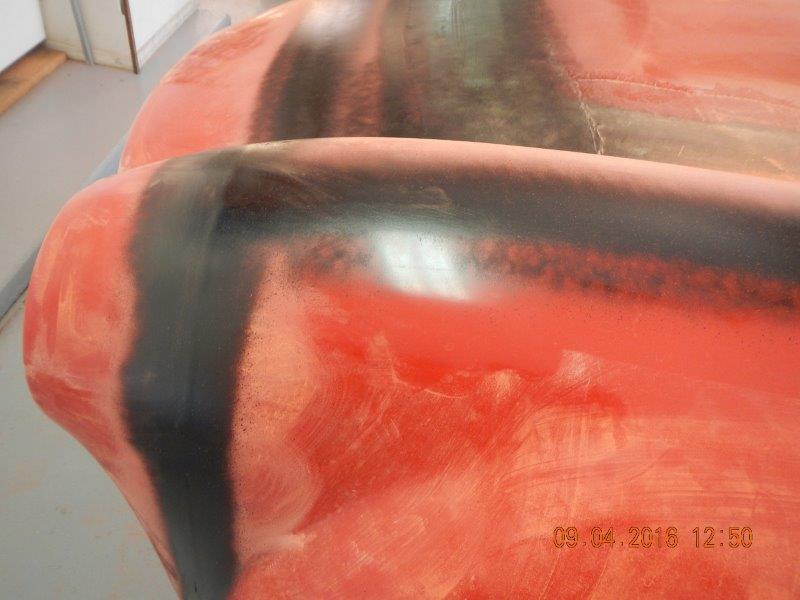
After block sanding away the primer, it left clear marks of the areas that are still low. (Anything still black is low because the sandpaper hasn't hit it.)
It has been nearly 30 years since I did any body work, but it was nice to see how quickly it came back to me. Never sand in straight lines, always on the 45 degree angles. Keep moving. Long strokes. It was not quite so nice to remember clearly how hard this work is! Jeff and Jeff, you guys are ironmen in my book! It is satisfying work, though.
after sanding a goodly portion of the areas that had been skim coated, I broke for lunch. After lunch I came back and applied very thin layers of HSRF filler. I must have mixed in not quite enough hardener, because it took forever for the HSRF to harden. I went on to other projects and will come back to sanding later. It did harden, it just took longer than expected.
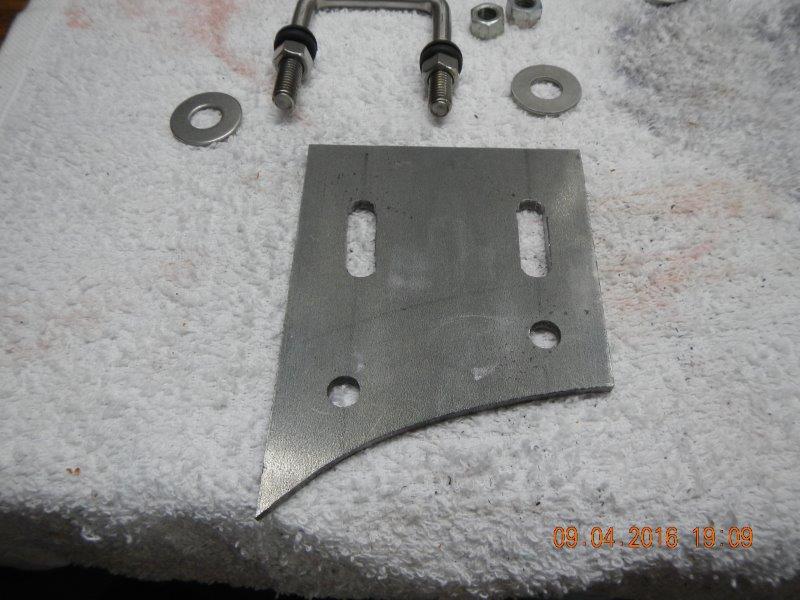
The side latches for the hood is the next item staring at me, begging for resolution. I started with the DS, because I have figured out how to do that side. I still am not solid on how I will do the PS. Similar method, but it will require its own unique solution. I first took 3/16" steel plate 4" wide an cut a piece shaped like the outside frame tube of the DS footbox.
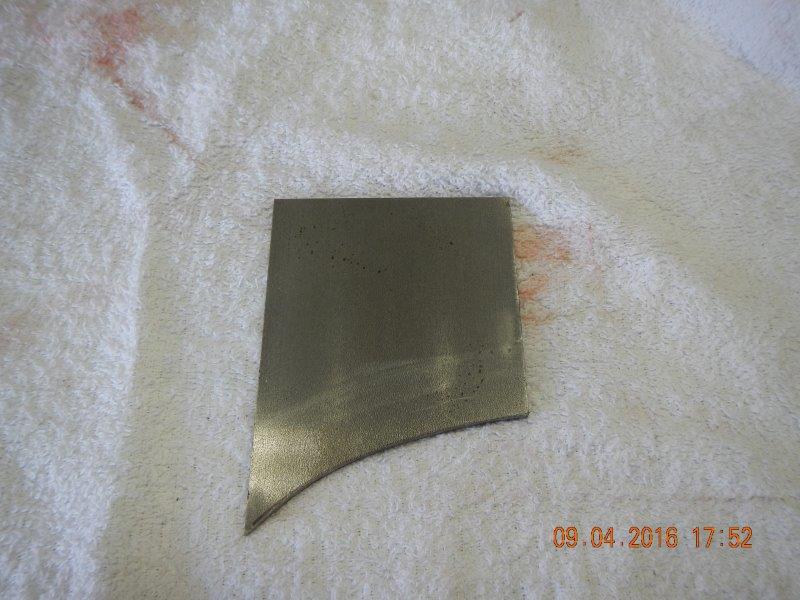
I then marked a line to represent the top of the frame bar, and vertical lines to show where the vertical adjustment holes will go.
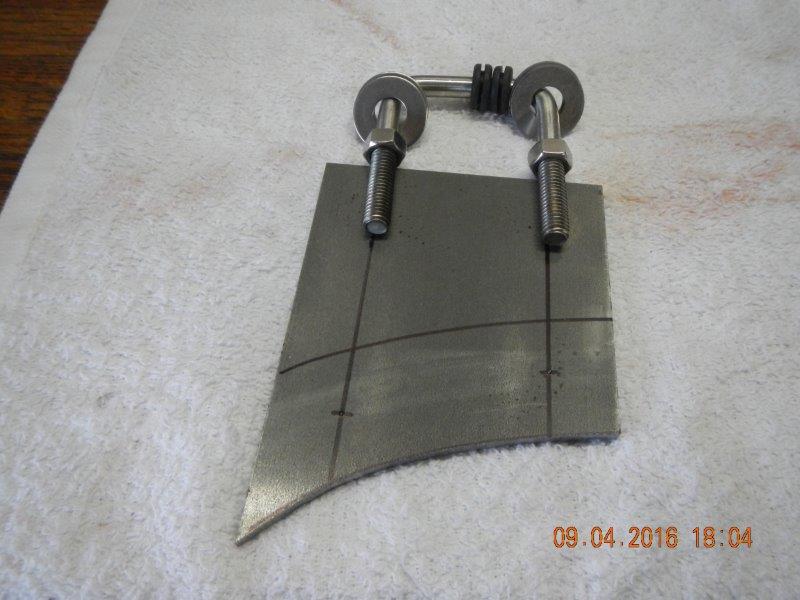
I drilled holes to accommodate the size of the U bold legs, and drilled similar holes to attach this piece to the inside of the frame rail.
A few minutes with the sabre saw and a hard metal blade, and the holes on the top become a slot to offer up and down adjustability. Ok, to be fair, it also included a few minutes with a metal file to smooth the inside edges of the slots.
to be continued . . .
Last edited by Jazzman; 09-05-2016 at 03:29 AM.
-
09-05-2016, 03:46 AM
#328
-
09-05-2016, 03:57 AM
#329
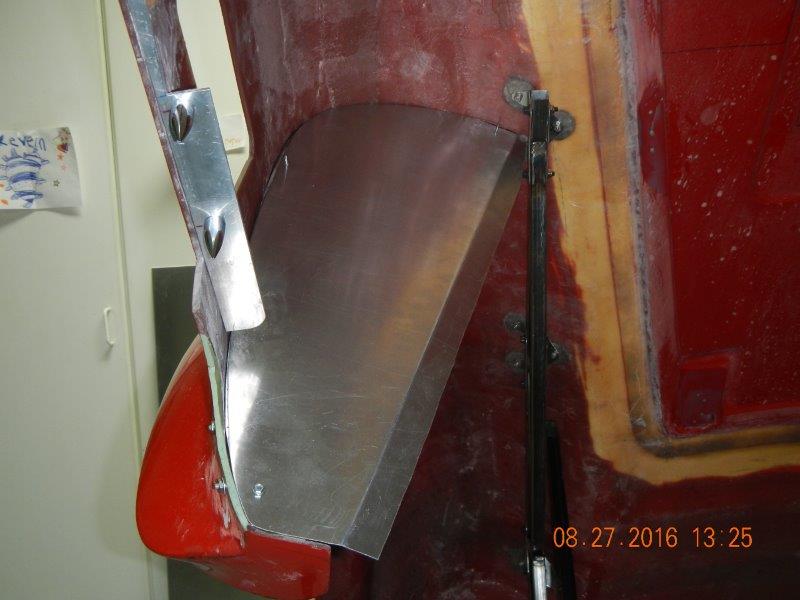
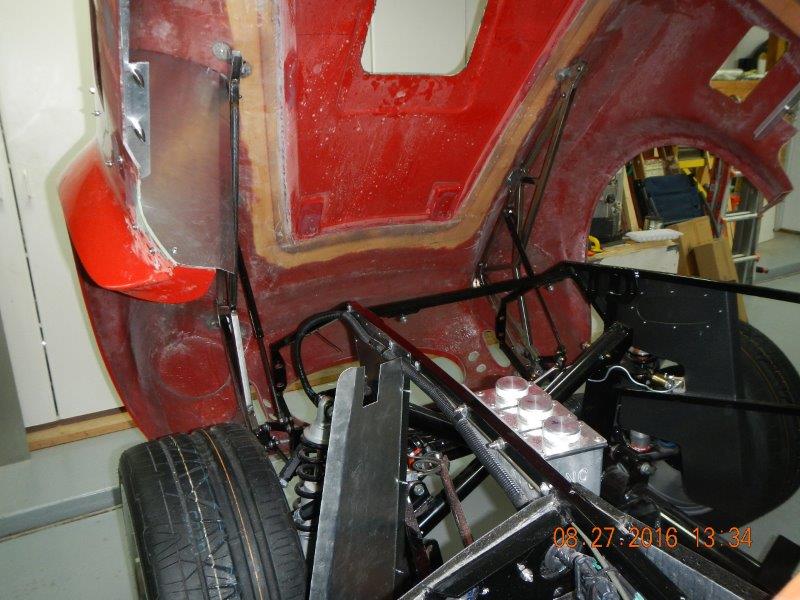
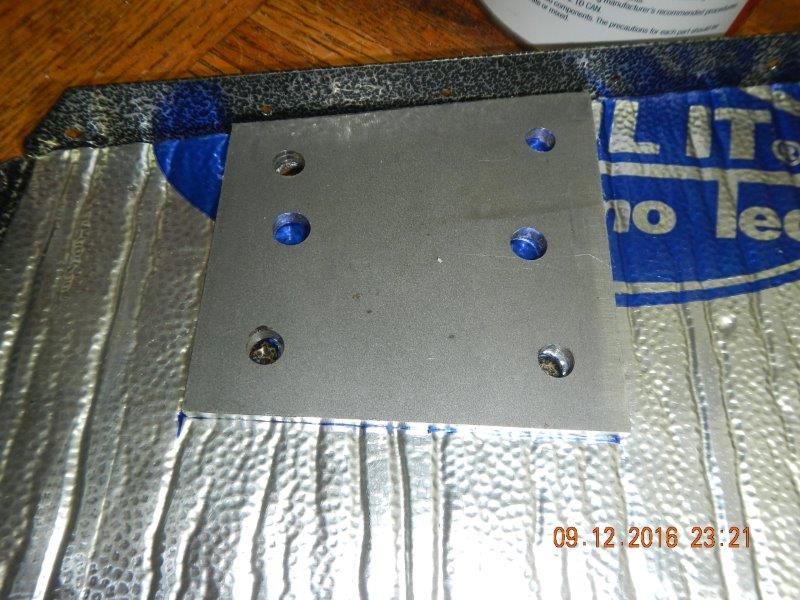
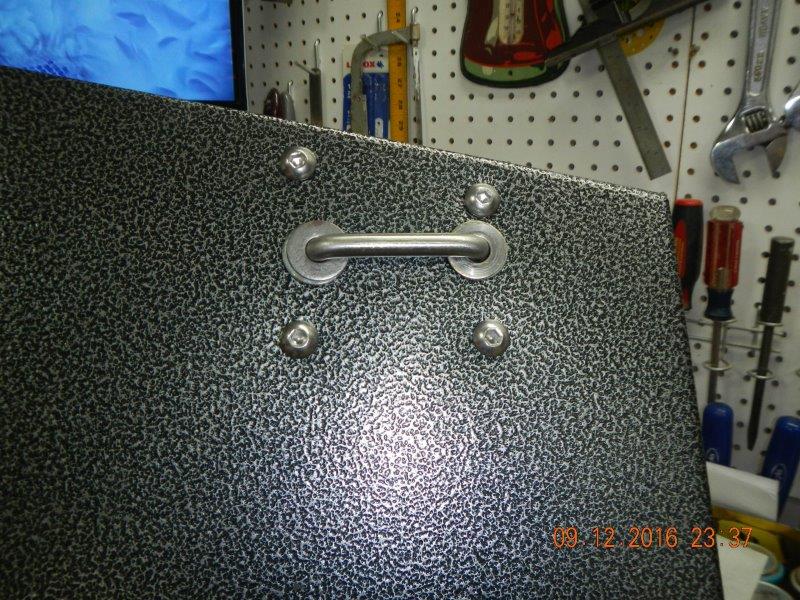
Here is how it looks on the inside of the hood:
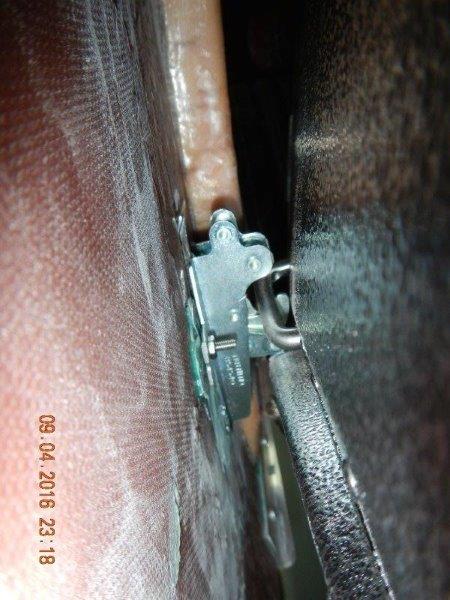
It works very well, and holds the sides of the hood extremely tightly. I think it will work very nicely. When it is time to powder coat parts, I will remove this plate and have it coated black.
Last edited by Jazzman; 09-05-2016 at 10:14 AM.
-
09-05-2016, 06:03 AM
#330
Senior Member

nice fabrication! looking good
MK4 #8900 - complete kit - Coyote, TKO600, IRS - Delivered 6/28/16 First Start 10/6/16 Go cart - 10/16/16 Build completed - 4/26/17 - 302 days to build my 302 CI Coyote Cobra - Registered and street legal 5/17/17
Build Thread
http://thefactoryfiveforum.com/showt...e-build-thread
PHIL 4:13 INSTAGRAM - @scottsrides
-
09-05-2016, 06:37 AM
#331
I really appreciate these detailed post with pictures, this will really help when I start my build. Keep up the good work.
-
09-05-2016, 10:13 AM
#332
Originally Posted by
Polecat
I really appreciate these detailed post with pictures, this will really help when I start my build. Keep up the good work.
I am more than happy to do it. Are you considering doing a flip top?
-
09-05-2016, 11:38 PM
#333
-
09-13-2016, 03:29 AM
#334
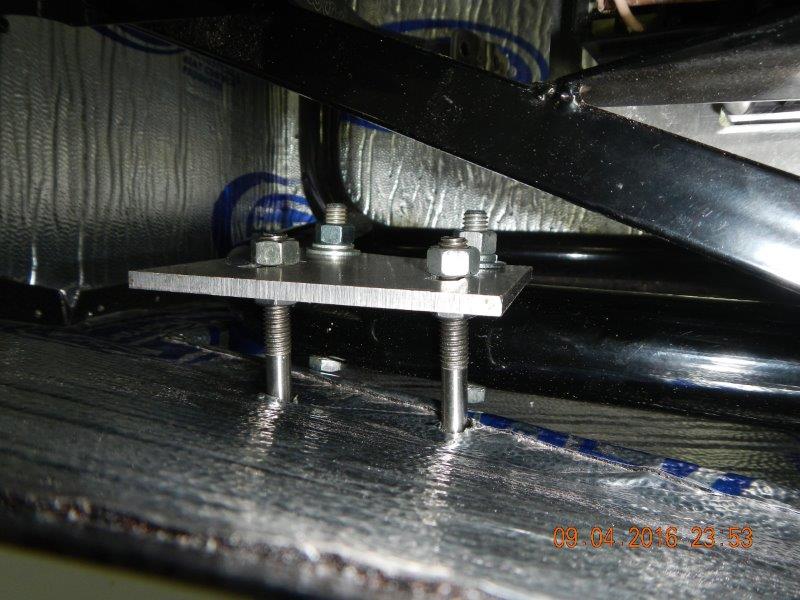
It seems forever since I had some time to work on the Roadster. Too much work, too much travel, is getting in the way of my progress. Tonight I finally got back at it. It took me a while to figure out my next step in the process. While out of town, I received my new tube of composite/metal bonding cement. I affixed the PS fang receiver to the inside of the body and bolted it into place. I also cemented the perforated discs that will hold the PS hood latch in place. With them drying, I turned my attention to the PS hood latch system. I began by cutting a piece of steel 4"x4", and angled the top cut to match the angle of the top of the outside PS footbox panel.
I drilled the holes to attach this piece of steel to the inside of the PS footbox panel. The four on the outside corners will be bolted to the aluminum panel, adding rigidity. The center two are where the "U" bolt will pass through creating attachment bar that the latch will connect to.
As you can see in the picture below, the legs of the "U" bolt are not threaded far enough up the legs to tighten them to the steel plate. The right leg shows the problem, the left, the solution. I will put a bushing over the legs to tighten down against the steel plate.
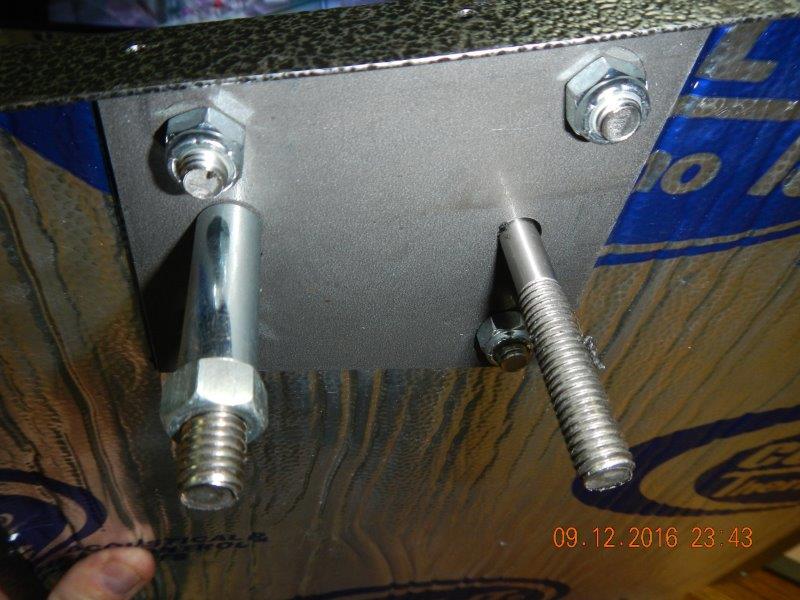

Here is a front view of almost how it will look when it is fully installed. I still need to replace the three washers with the correct size stainless steel washes. I also am going to cut down the bushing that goes over the leg of the "U" bolt, and cut off the excess threaded material after the new washers are installed. The bad news is that I fear that the entire mounting plate and holes are too high. I will install the system, install the body, then evaluate what should be done.
-
09-13-2016, 10:07 AM
#335
Member

Originally Posted by
Jazzman
Some may wonder why I am keeping this build log. I have little to offer when compared to the depth of experience that others show daily on this forum. However, I will make mistakes and learn lessons that these "experts" will not make. Therefore, I keep this log in the hope that the less experienced builders will be able to learn from my "rookie" mistakes.
Thanks Jazzman for doing the build log!
-
09-13-2016, 06:58 PM
#336
Great documentation! Subscribed and following along.
-
09-13-2016, 07:50 PM
#337
Kevin-
Awesome work as always. I really like the locking mechanism, and the work you did to make it all work! Nicely done.
I also like your plate. I have to say that if I saw it on your pick-up truck, I might scratch my head and wonder why... Makes a bunch of sense on the roadster though!!
I really enjoy seeing your work. I truly admire what you are doing, and I look forward to seeing it all completed! The build thread has been awesome to follow, and your hard work is evident in your posts. Keep up the good work brother!
Regards,
Steve
-
09-14-2016, 12:17 AM
#338
Originally Posted by
Doug Cunningham
Great documentation! Subscribed and following along.
I am humbled that anyone would subscribe to my thread! Thank you for the compliments. I hope that you have the opportunity to do this project. Believe me, I am having the greatest amount of fun in this build. I am already worrying about what I will do when this build is done, and I haven't even started the wiring!
-
09-14-2016, 02:23 PM
#339
cobra Handler

Great work, Kevin. It's really starting to look like a complete system. At first, I had trouble following but you must have had a vision.
Continued good luck,
WEK.
FFR MkIII 302 (ATK), EFI 75mm TB with custom box plenum chamber, 24# injectors, 4 tube BBK ceramic, cold air sys, alum flywheel, crane roller rockers, T5, Wilwood pedals, custom five link with Watt's link, 4 rotors, coil overs, power steering with Heidt valve, alum FFR rad, driver's crash bar mod, mini dead pedal mod, quick release steering wheel hub #6046
-
09-18-2016, 12:31 AM
#340
A whole lot of work has conspired to get in the way of my progress, but slow progress has been made none the less. I finished up the PS latch and cut off the "U" bolt on the back side. I need to buy a pair of nylock nuts to truly finish it, but for now, it's as far as its going to go. On to bigger things.
Yesterday I went to a local Mustang performance shop and pick up (drumroll please!) MY MOTOR!! So exciting. They loaded it all up with a forklift and I was on my way.
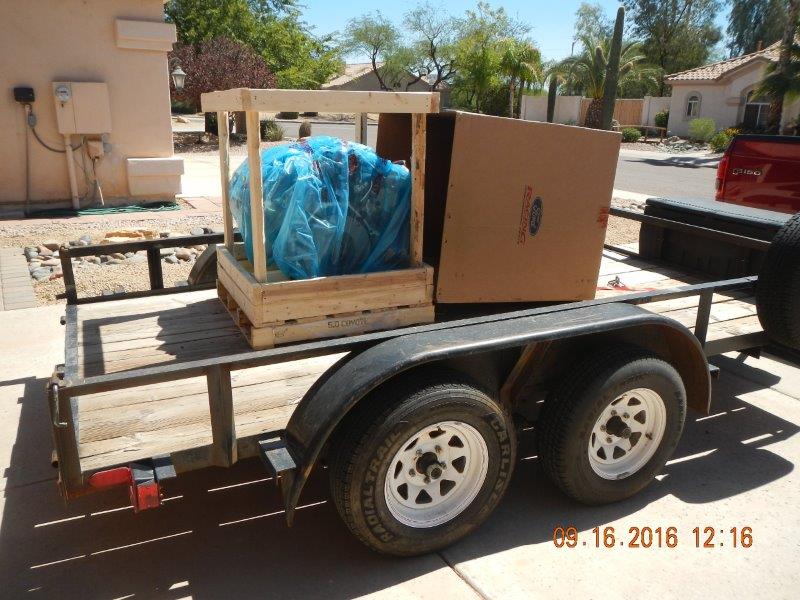


After just a bit of encouragement with a hammer and a knife to cut away the plastic bag, the palate was remove from the bottom of the engine, and the wood frame that holds it was the only support left. I could finally set the engine down on the ground, or more accurately on two furniture dollies. (Makes it easier to roll around the shop.)
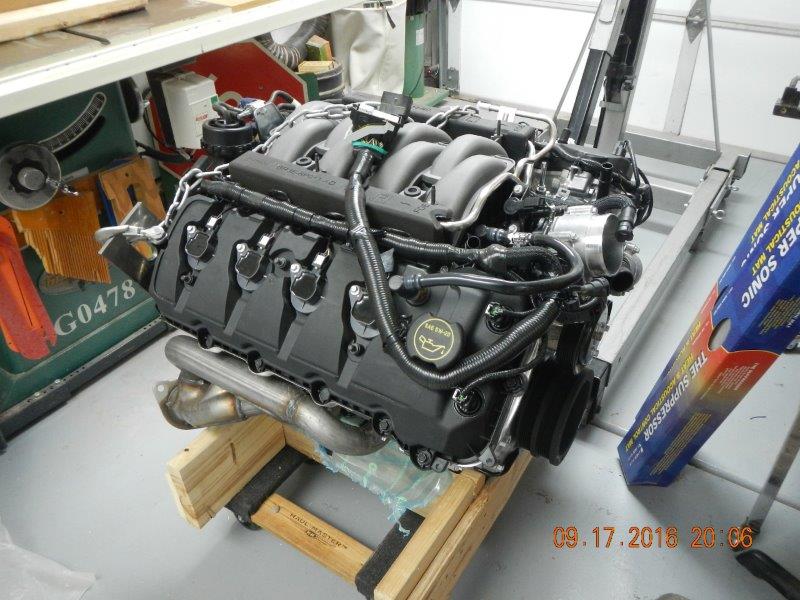
I finally had a chance to look at it. Yes, it is big. No, it's not the prettiest engine ever designed. The strangest part is that it came with one exhaust manifold. I didn't really expect any, and I will be adding other manifolds anyway, but to have one but not the other was truly unexpected. Just to find out why, I called the supplier. He told me that Ford can't ship with the engines with both manifolds because the other one has the Catalytic converter. (I have no idea why not, but since I am not using it anyway, it really doesn't matter.) I tried to remove the one manifold, and found I need a deeper 15mm socket. (Can someone please explain to me why an American engine made by an American company for use in an American Car uses metric fittings?!! I have a full set of deep ASE sockets!)
While picking up the engine, I also picked up the Tremec Transmission.
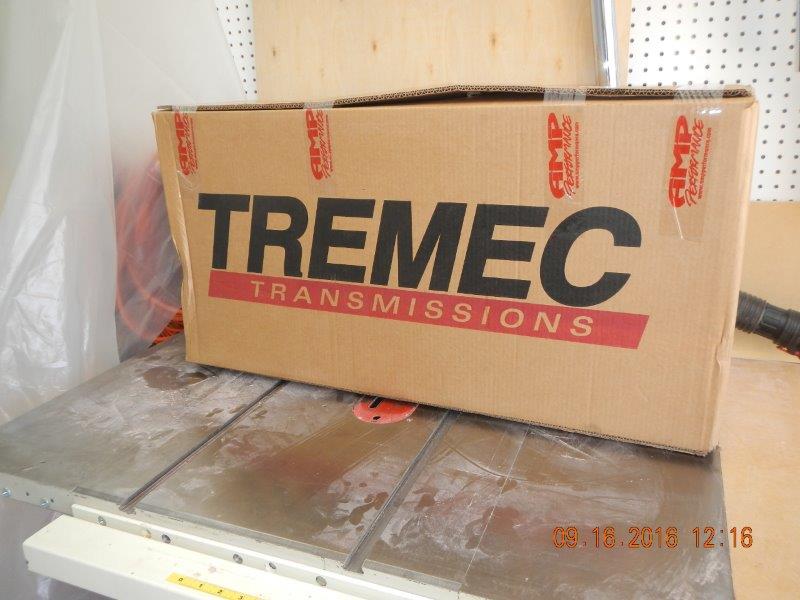
I decided to get everything done at once so I wouldn't have to take the tranny in for any changes. I had the mid-shift kit installed. It remains to be seen if it will be exactly where I want it, but as best I can tell it should be right. I also had a "strength & smoothness" upgrade done. I am not entirely sure it was worth the cost, but I wanted a smooth operating tranny. Years ago I had a Mustang that had the heaviest clutch and transmission I have ever seen, including several large trucks!! I wanted to be sure this one is smooth as glass! The Tremec TKO-600 now has carbon fibre lining, brass synchro's, and bronze Shift fork pads, fingers, and shift rails. Sadly, I can't show you any of this stuff!
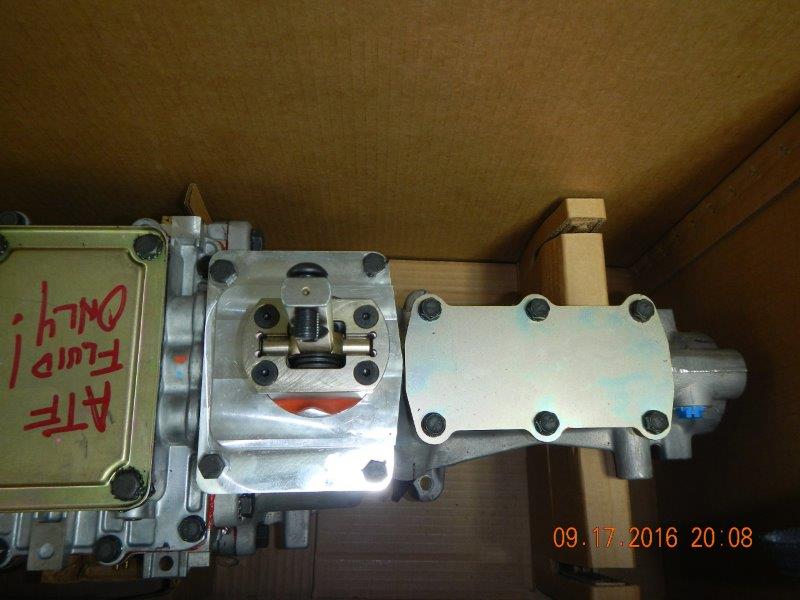
Because of all this carbon fibre stuff etc, I am supposed to use only Mercon V Automatic Transmission Fluid. I questioned this because it is clearly a manual transmission, but he confirmed, ATF fluid only. I learn something new every day.
Last edited by Jazzman; 09-18-2016 at 12:56 AM.
-
09-18-2016, 06:14 AM
#341
Senior Member

Congrats on your new Coyote! I remember the excitement of receiving mine and opening it for the first time almost a year ago now. Some responses -- It will look better with the covers on it. Really! But there is a lot going on with it, that's for sure. Spend the time with a neat installation and hide as much as you can around it. Makes a difference and doesn't look too bad once done. Yes, it's a metric engine. Every fastener on it from my experience. Pretty normal nowadays, even for American car companies. Most are built for the world market. Interesting explanation about the missing header. Yes, it has the catalytic converter in it. I was told "too expensive" for not providing. Not because they couldn't. Doesn't matter as you said. For the TKO, the mods didn't change the fluid recommendation. Stock Tremec is "We recommend GM Synchromesh part #12345349, or Dexron III / Mercon Spec ATF fluid for all TKO transmissions." I have the modded TKO from Liberty's. Also has carbon fiber blocker rings, etc. On my second one actually. I'm running the GM Syncromesh now with an AC Delco part number. I haven't found it in any local retail stores (actual branded, not compatible) but it's available on-line at Summit, Amazon, etc. Jegs actually has the best price right now: http://www.jegs.com/i/Chevrolet-Perf...00333/10002/-1. It's a little more expensive than other options, but only need three quarts and it lasts a long time, so not too worried about it. Just don't think about putting in the fluid until the trans is in the car. BTW, did they also cut off the rear mount for you?
Last edited by edwardb; 09-18-2016 at 07:39 AM.
Build 1: Mk3 Roadster #5125. Sold 11/08/2014.
Build 2: Mk4 Roadster #7750. Sold 04/10/2017.
Build Thread
Build 3: Mk4 Roadster 20th Anniversary #8674. Sold 09/07/2020.
Build Thread and
Video.
Build 4: Gen 3 Type 65 Coupe #59. Gen 3 Coyote. Legal 03/04/2020.
Build Thread and
Video
Build 5: 35 Hot Rod Truck #138. LS3 and 4L65E auto. Rcvd 01/05/2021. Legal 04/20/2023.
Build Thread. Sold 11/9/2023.
-
09-18-2016, 07:21 AM
#342
Senior Member
Great to see the engine at home. I have also been scratching my head about the single header! Now I am scratching my head wondering what to do with it. I cant stand to throw it away but really have no other use for it!
I found after I put the transmission in that the fill plug was so tight I could not budge it with the limited leverage available in the limited space. Even put my biggest torque wrench on it. I ended up just taking the top plate off and pouring the fluid in that way. However you intend to fill it you might want to just loosen the plug once and put it back in before installing the transmission in the car. Not sure how I will ever get mine loosened at this point if I needed to. I plan to make the transmission tunnel top removable so I will always have to rely on that I guess if I need to change out the fluid.
MK4 #8900 - complete kit - Coyote, TKO600, IRS - Delivered 6/28/16 First Start 10/6/16 Go cart - 10/16/16 Build completed - 4/26/17 - 302 days to build my 302 CI Coyote Cobra - Registered and street legal 5/17/17
Build Thread
http://thefactoryfiveforum.com/showt...e-build-thread
PHIL 4:13 INSTAGRAM - @scottsrides
-
09-18-2016, 09:48 AM
#343
Carl
Jazzman,
Great detail ... thanks for posting the detail and the photos ...
On Post #333 you mention 3M Panel Bonding Cement ...is this the stuff you are using to bond all metal, etc to the fiberglass?
Does it work better than HSRF?
Thanks,
Mk 4 Roadster
October 25, 2012 - Kit Arrives
April 8, 2013 - Build Starts
August 23, 2015 - Rolling Chassis/Engine & Transmission Installed
March 26, 2016 - Go Cart
-
09-18-2016, 09:50 PM
#344
Originally Posted by
carlewms
On Post #333 you mention 3M Panel Bonding Cement ...is this the stuff you are using to bond all metal, etc to the fiberglass? Does it work better than HSRF?
I can't speak with great authority about the chemical processes of each product, but I can speak to it in real experience. For perforated items such as the attachment discs, both seem to be quite adequate. However, if you make a mistake with the panel bonding cement, you can just heat it with a torch and it turns into a gummy substance that can be easily removed. If you make a mistake with HSRF, you are in for some serious sanding and grinding to get it out. For solid items such as bonding aluminum or steel to fiberglass and Vinylester resin, the bonding Cement works much better. I did scuff up the aluminum on the surface to be attached, but the cement holds great!
If you need a more detailed explanation of the chemical processes, MikeInAtlanta is your guy. He knows more about this stuff than I ever will.
-
09-18-2016, 10:14 PM
#345
Wiring - AKA "Intimidation 101"!
I cracked open the box of wiring that came with the Coyote Engine. Is it just me, but $1500 doesn't buy as much a I remembered!! Here's the good stuff. The computer (what you are really buying!), a couple of clutch switches, and a surprisingly cheap feeling gas pedal.
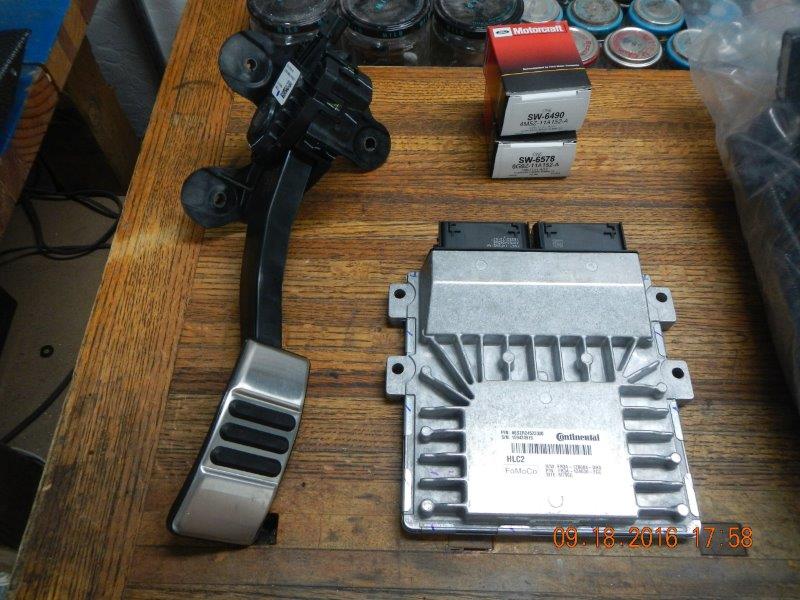
A very intimidating package of wires and plugs, a couple of rubber gaskets, and a lot of plugs.
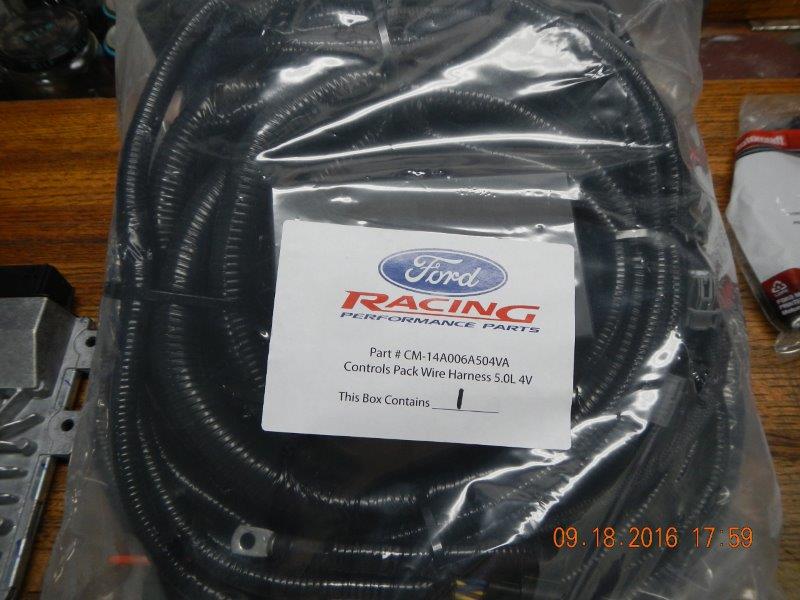
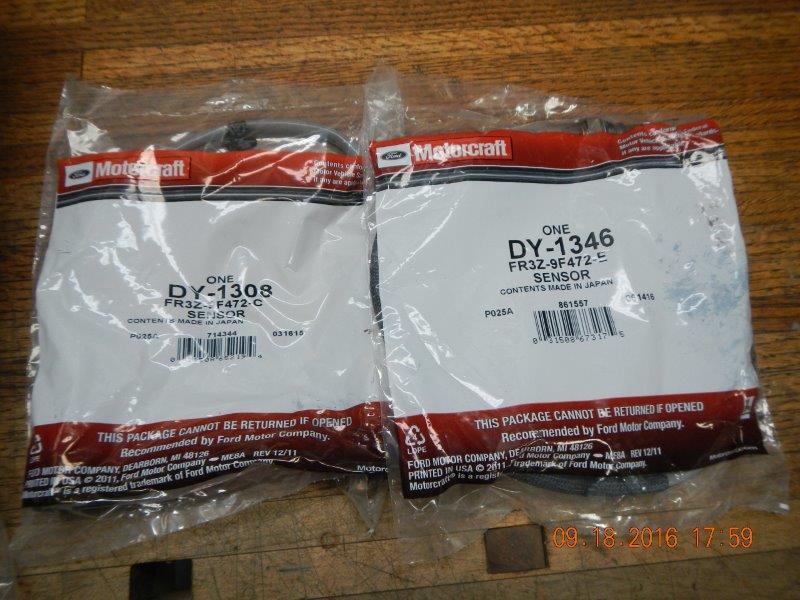
and a couple of exhaust sensor wires, at least one of which I have learned is going to be too short to be used.
And here is the pile of stuff that is of no earthly use on this project!!
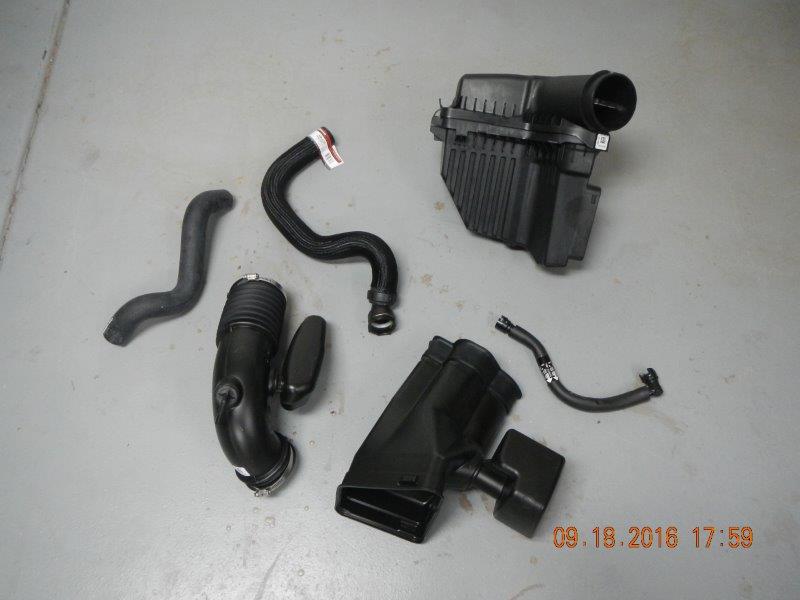
Notice that there is no printed directions, no schematic, no wiring diagram. Thankfully FFR has been kind enough to develop an installation guide. I already have that, and now I have to figure out where everything goes. I have also downloaded some other stuff from the various forums. I do wish there was something definitive from Ford, but they really aren't boxing these up for our purposes.
-
09-18-2016, 10:55 PM
#346
Senior Member
Originally Posted by
Jazzman
I cracked open the box of wiring that came with the Coyote Engine. Is it just me, but $1500 doesn't buy as much a I remembered!! Here's the good stuff. The computer (what you are really buying!), a couple of clutch switches, and a surprisingly cheap feeling gas pedal... and a couple of exhaust sensor wires, at least one of which I have learned is going to be too short to be used.
And here is the pile of stuff that is of no earthly use on this project!!
Notice that there is no printed directions, no schematic, no wiring diagram. Thankfully FFR has been kind enough to develop an installation guide. I already have that, and now I have to figure out where everything goes. I have also downloaded some other stuff from the various forums. I do wish there was something definitive from Ford, but they really aren't boxing these up for our purposes.
Not sure why Ford doesn't ship the instructions with the controls pack, but they have them on their website. This is the one you want: https://performanceparts.ford.com/do...-6017-504V.pdf. The latest Factory Five Coyote installation instructions are useful, but there is a ton of detail in the Ford instructions not provided in the FF instructions. Plus there are some differences between the two you will want to look at. Specifically the start circuit, fan circuit, and power circuit. I opted more toward the Ford approach. Also you have a decision to make about the radiator cooling installation. Like FF shows with a traditional T-filler and overflow tank, or the Ford design with a couple more hoses and an expansion tank with the cap in the tank.
The DBW module is a pretty normal automotive style sensor, made mostly from plastic. It works. A better looking and more compact version is available from Lokar for $400+, but everything I've read says they're the same technically. No actual performance difference. There's also another Ford DBW module from a van that some use. It's a little smaller, but similar construction.
Don't throw away that stuff too soon. The MAF sensor needs to be removed and used. You may decide you want to use that PCV hose. Or at least the fittings. I ended up using pieces from both of the supplied radiator hoses.
As for the O2 sensors, you can get an extension (not expensive) and use both that were provided. The longer one works great on the DS, but even the longer way is a bit short on the PS. If you want it hidden. Either extend the cable itself (not fun I found out) or just go with an extension cable. These comments are for GP Headers BTW. Shorty headers might be different.
Not really for our purposes? This is exactly intended for a street rod or project car installation. I do agree though I'm not sure why they include the stock cold air induction system. I'll bet almost no one uses it. That's one of the first things guys take out of stock Mustangs. ")
Last edited by edwardb; 09-18-2016 at 11:14 PM.
Build 1: Mk3 Roadster #5125. Sold 11/08/2014.
Build 2: Mk4 Roadster #7750. Sold 04/10/2017.
Build Thread
Build 3: Mk4 Roadster 20th Anniversary #8674. Sold 09/07/2020.
Build Thread and
Video.
Build 4: Gen 3 Type 65 Coupe #59. Gen 3 Coyote. Legal 03/04/2020.
Build Thread and
Video
Build 5: 35 Hot Rod Truck #138. LS3 and 4L65E auto. Rcvd 01/05/2021. Legal 04/20/2023.
Build Thread. Sold 11/9/2023.
-
09-19-2016, 02:08 AM
#347
Thanks, EdwardB, always looking out for me!! I haven't thrown out anything. I sort of wondered if I might scrounge some parts for other purposes. Thanks for the link. I know I had it at one point, but I was going to have to go look for it again. You saved me some searching. Thanks again!!
-
09-19-2016, 02:29 AM
#348
-
09-19-2016, 02:33 AM
#349
Quick note on the header missing from the cat side. There's a federal law that wont let you resell used cats. I had a family member with a Dodge diesel that had the cats $$$ removed. Found out while trying to acquire used .Could only get new.
-
09-19-2016, 02:43 AM
#350
Yeah, that sounds like something silly enough to require a federal law. It makes even more sense considering that this is a NEW engine, not a used one. I am glad it is something I don't need anyway. Thanks for the chuckle Stevo.
-
09-19-2016, 08:48 AM
#351
Kevin-
Very exciting getting the engine and all the other bits together. I am still amazed that the Coyote fits in our cars; they are huge!
I look forward to reading your posts as you finish things up. It's been a great build thread!
Regards,
Steve
-
Post Thanks / Like - 1 Thanks, 0 Likes
-
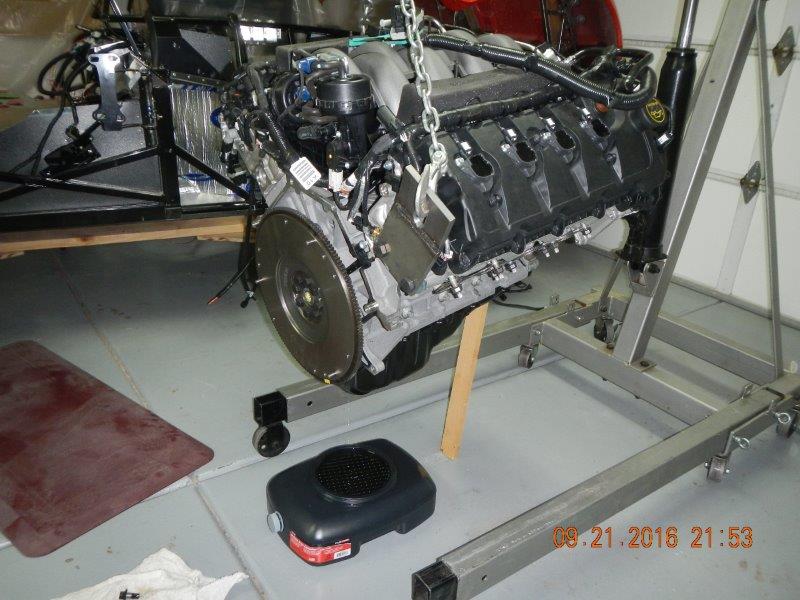
09-22-2016, 03:27 AM
#352
Coyote Installation
Here we go! I don't have an engine stand, so I am just working off of the engine hoist. I freed the engine from the wooden stand. It turns out that there was three straps attached to the engine, but only one of those straps was actually attached to the stand! I also removed the one and only header. It turns out that the engine provider wants to buy it back from me. He will pair it with a matching one that has the CAT converter, then sell the pair to someone else. Fine with me, I probably would throw it away anyway!

I drained the oil out the engine, and just let it hang there and drain for almost two hours. I got most of the oil out.
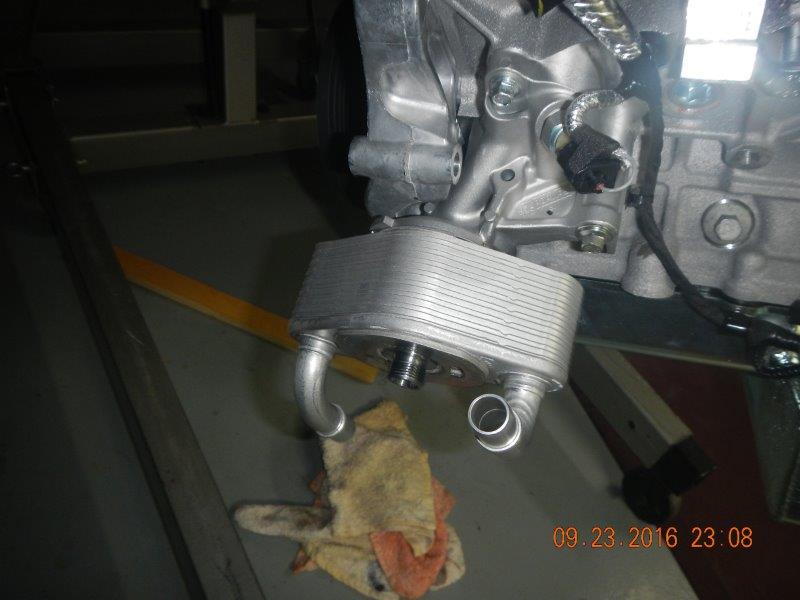
I carefully unplugged the low oil sensor wire from the tan plug on the DS of the pan. I unscrewed the tan plug, and installed it into the new Moroso Oil pan. Using a 10mm socket, I removed most of the bolts holding the stock oil pan on the engine. There were three longer bolts which required a 13mm closed end box wrench. After removing those bolts, a light tap on the pan freed it from the engine. There was a very small amount of oil in the bottom of the pan, as well as some metal shavings that had been caught in the oil during the first test run of the engine after initial construction of the engine.
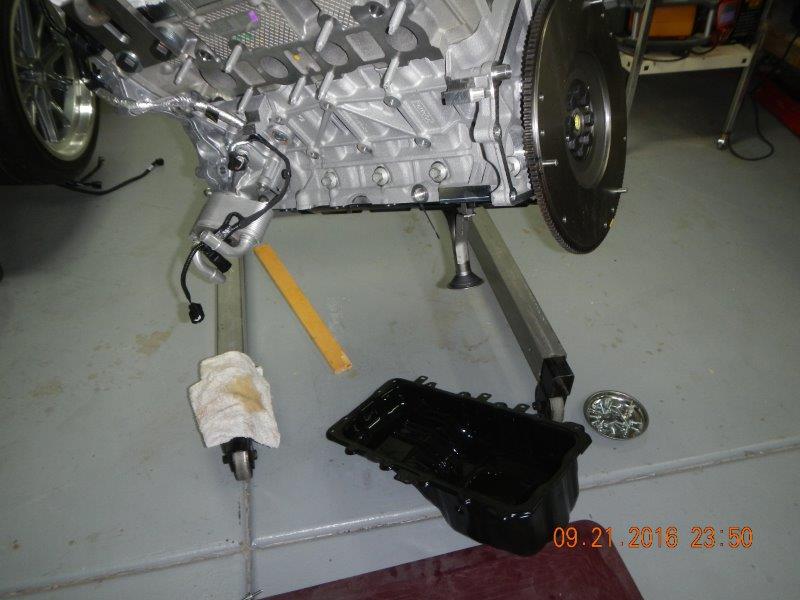
I turned my attention to the new Moroso oil pan. To avoid problems, I decided to grind out the area of conflict with the oil dip stick. The oval hole on the left needs to have part of the wall opened up.
I removed the inner top of the pan to gain access to the area to be ground away. I used the die grinder and a carbide bit to create a space for the dip stick to pass by.
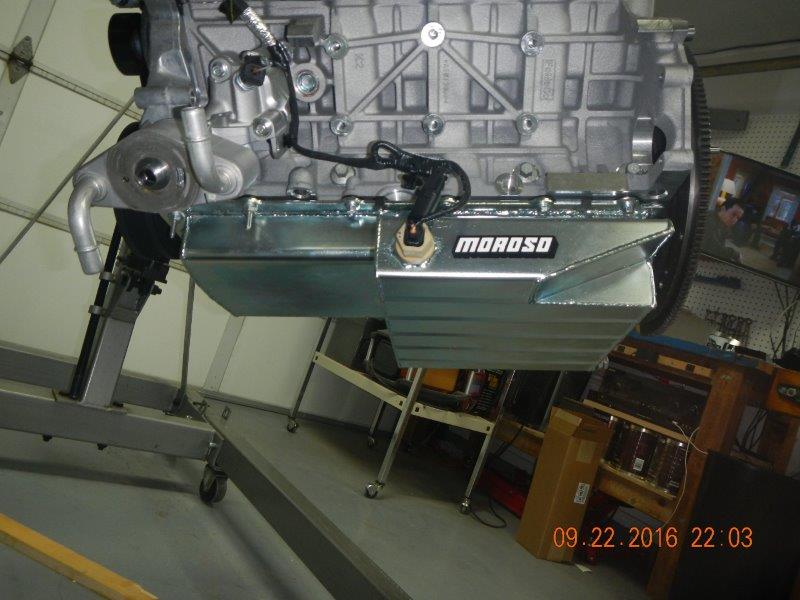
After smoothing out the area, I used a magnet to collect up as many of the metal shavings as I could get. Then I washed the entire Moroso oil pan with soap and hot water. After drying thoroughly, I then use compressed air to blast out every last corner to be sure all the metal shavings were removed. The new pan is now ready to go. (not to mention it has a shiny, streak free finish and a lemony scent!!)
-
Post Thanks / Like - 0 Thanks, 1 Likes
-
09-22-2016, 03:38 AM
#353
-
09-22-2016, 04:19 AM
#354
Senior Member
That bolt was a real pain to get out. I managed it with a socket I had to get it started and a open ended wrench but it took a while.
I couldn't tell in the pic but did you notch that rear lift plate where it might come close to conflicting with the PS footbox?
MK4 #8900 - complete kit - Coyote, TKO600, IRS - Delivered 6/28/16 First Start 10/6/16 Go cart - 10/16/16 Build completed - 4/26/17 - 302 days to build my 302 CI Coyote Cobra - Registered and street legal 5/17/17
Build Thread
http://thefactoryfiveforum.com/showt...e-build-thread
PHIL 4:13 INSTAGRAM - @scottsrides
-
09-22-2016, 04:21 AM
#355
Not a waxer

Originally Posted by
Jazzman
...but I really don't like grinding on a brand new engine inside the oil pan area!!
Understandable, but it wouldn't bother me a bit to grind down a socket to fit
Jeff
-
09-23-2016, 01:01 AM
#356
Originally Posted by
Jeff Kleiner
Understandable, but it wouldn't bother me a bit to grind down a socket to fit
Jeff
I thought about that, but the space between the two was so narrow, I was afraid that the walls of the socket would buckle. In the end I VERY carefully took a small file and slowly filed away the mold mark while vacuuming away the metal filings with my shop vac with the cone shaped attachment on it. That thing will suck up your toenails if you are not careful. After a few minutes of careful filing in a very uncomfortable position, I was able to slip a 10mm deep socket over the bolt head and get it loose. I really don't know exactly how they got it in there in the first place!
Putting the new oil pickup line in was entirely straightforward. Slip it in, put the bolts back in, tighten them up. No strain there, except for the very uncomfortable body position trying to line it up and get the bolts in correctly. The fact that I wear tri-focal glasses to see clearly at short distances compounds the problem. Trying to get clear focus on an item at the very bottom of the engine is an interesting challenge!
From there it should have been all downhill, but working alone, on the underside of an engine hanging on the hoist, nothing is easy. Once I figured a way to juggle the new pan, a bolt, and the socket wrench, I finally got the pan mated to the engine. I left all the bolts loose while I hand threaded each one to make sure it was not cross threaded. All the bolts went in very easily. Then was just a matter of tightening them all. I realized after I got all done that I neglected to use blue Loctite on them. Since they didn't have any to begin with, it didn't occur to me. Do you think I should remove each one and Loctite them? It sure is easier to do it now than it will be when the engine is all installed.
Newbie lesson: You know why the professionals have those nice engine stands that safely hold the engine and make it possible to spin it around while working on it? Because it makes sense! Yes, you can change the oil pan from the bottom while it hangs from the hoist, but it sure would have been easier if I could have spun the engine around so I would have been working on the top of the engine where I could see everything clearly. Because I haven't yet worked on an engine in that way, I can't be sure, but it sure seems like that particular project would have been easier on and engine stand.
Now I have to figure out how to set the engine down. I am sure that Moroso makes a great oil pan, but I am also pretty sure they didn't design it to hold the weight of the entire engine. More's the pity, since the bottom of it is flat. Oh well. I will either have to remake the wooden stand that came in the crate, or just buy a metal stand. They are pretty cheap. I don't know how comfortable I am leaving the engine hanging on the hoist. I seems solid. Hmmm.
All the remaining parts have been selected. I am going to review my order tomorrow after a good nights rest, and then pull the trigger on the rest of the parts. That's a nerve wracking job, making sure you don't forget anything. Correction, I know I will forget something. I just don't want it to be anything too obvious!
-
09-23-2016, 04:34 AM
#357
Senior Member
I also forgot lock tite on the first go. Went back and added it. I was wondering about the effectiveness in that situation. The common tip when trying to remove a lock tite bolt is to add heat if needed....so if you are putting it in an area that gets hot is it just going to negate the lock tite in the first place?? I have no idea but it couldn't hurt.
I also thought that oil pickup and pan job would have been much easier upside down on a stand but now that you are done you will not need one any further so it is nice not to spend the money.
The quicker you get the engine in the car the less time you have to worry about it hanging. Haha
MK4 #8900 - complete kit - Coyote, TKO600, IRS - Delivered 6/28/16 First Start 10/6/16 Go cart - 10/16/16 Build completed - 4/26/17 - 302 days to build my 302 CI Coyote Cobra - Registered and street legal 5/17/17
Build Thread
http://thefactoryfiveforum.com/showt...e-build-thread
PHIL 4:13 INSTAGRAM - @scottsrides
-
09-23-2016, 09:20 AM
#358
Heat is applied to remove RED loctite. BLUE loctite can generally be removed just with additional effort. The blue stuff just keeps the bolts from vibrating out. The heat generated in your oil pan is not adequate to release red Loctite.
Edit: Wow, that sounded really formal and harsh!! Can you tell I was rushing to get out to a meeting. Sorry. To loosen something with RED Loctite on it, you have to apply torch level heat. I avoid red Loctite if at all possible.
Last edited by Jazzman; 09-23-2016 at 11:42 AM.
-
09-24-2016, 01:07 AM
#359
Ok, I give up. How do you get this thing off?!!!
Earlier this evening I took out all the oil pan bolts one by one and added blue Loctite to each of them. May not be necessary, but call me paranoid, I don't want them falling out at the wrong time!!
-
09-24-2016, 02:24 AM
#360
While waiting for a myriad of engine parts to arrive from Summit, I am working on the items I have on hand. First up, engine mounts. On page 23 of the most recent Coyote Engine Installation Instructions from FFR, they reference several 1/2" thick engine mount spacers, #16249, #16250, and #16251. These appear in the drawings to be 1/2" thick pieces of solid steel. Maybe it is because it is after midnight, but I don't ever remember seeing any parts even close to those shapes, and I think I would remember pieces of 1/2" thick solid steel, even if only due to the weight. I rechecked my inventory, and I couldn't even find these parts listed. Does anyone know what box they should have been in, or what else they would have been packed with? I know EdwardB used a Whitby 3/8" spacer, and I am not sure if the spacer he references is for the same purpose. I think so. I may have to contact FFR on Monday.


 Thanks:
  Likes:


 Reply With Quote


