-
07-04-2016, 07:42 PM
#321
Senior Member


Originally Posted by
edwardb

You're not the first to ask me about those. They are Avery Dennison #10045 Cable Tie Mounts. I got them from McMaster, their part number 7566K13. Comes in a bag of 100, so you'll have plenty for the next build.

I anchor them with 3/16 inch aluminum rivets. The hole in the mount needs to be drilled out just slightly. Depending on the specific 3/16 rivet, some will drop down into the countersink. Others need to be adjusted. If so, I put them in the drill press, and with it turning a couple swipes with a file and they fit perfectly. I usually make up 10-20 at a time, and just have them available. Makes a really clean and strong installation.
See above.
-
07-04-2016, 08:13 PM
#322
Senior Member

Originally Posted by
Duke
You're not the first to ask me about those. They are Avery Dennison #10045 Cable Tie Mounts. I got them from McMaster, their part number 7566K13. Comes in a bag of 100, so you'll have plenty for the next build. I anchor them with 3/16 inch aluminum rivets. The hole in the mount needs to be drilled out just slightly. Depending on the specific 3/16 rivet, some will drop down into the countersink. Others need to be adjusted. If so, I put them in the drill press, and with it turning a couple swipes with a file and they fit perfectly. I usually make up 10-20 at a time, and just have them available. Makes a really clean and strong installation.
See above.
Yes, that's what I've posted before. Still the parts I would recommend, but one comment. I had a local builder ask me about these and ordered/received them since I received mine a little over three years ago. I learned the Avery Dennison #10045 part number has apparently changed slightly since then. It has the same cable and tie capacity, and is still for a #8 (roughly 3/16-inch) screw. So will still work OK. But the overall part is slightly smaller and the head of a 3/16-inch rivet may need to be trimmed more than I described before. Maybe a 1/8-inch rivet would be OK?
Last edited by edwardb; 07-04-2016 at 08:17 PM.
Build 1: Mk3 Roadster #5125. Sold 11/08/2014.
Build 2: Mk4 Roadster #7750. Sold 04/10/2017.
Build Thread
Build 3: Mk4 Roadster 20th Anniversary #8674. Sold 09/07/2020.
Build Thread and
Video.
Build 4: Gen 3 Type 65 Coupe #59. Gen 3 Coyote. Legal 03/04/2020.
Build Thread and
Video
Build 5: 35 Hot Rod Truck #138. LS3 and 4L65E auto. Rcvd 01/05/2021. Legal 04/20/2023.
Build Thread. Sold 11/9/2023.
-
Post Thanks / Like - 0 Thanks, 1 Likes
-
07-04-2016, 08:18 PM
#323
Senior Member
^^ Funny you mention that. I almost added to my post that I found that 1/8" rivets work very well with the ones I have. I did have to get a round head rivet tool because the hex head one I had didn't let the rivet seat all the way down into the plastic clip. I used Stanley rivet tool mr77c (from local Ace Hardware) and found it works perfectly with them.
-
07-09-2016, 08:16 PM
#324
Senior Member
This Week's Update
While the Coyote seems to start and run perfectly, one thing I had noticed was that the MIL (Malfunction Indicator Light) did not appear to be working properly. I called Ford Racing tech support. But Ray, the person they thought could help, was on vacation until next week. I started a separate thread on both forums looking for the experience of others. Seems no one else had it working either. With further study and experimenting, I was able to get it working.
I hadn't noticed it before, but the version of instructions I received with the controls pack last October had incorrect and conflicting info about the MIL. This week I downloaded the version from the Ford Performance website -- which I have to assume is the most current -- and compared it page by page. Some of the discrepancies related to the MIL are fixed, but there's still a contradiction. At the top of page 15, it says to connect blunt lead 4 (MIL) to the negative lead on the indicator. In the middle of the same page it says to connect blunt lead 9 (ground) to the negative lead on the indicator. Now I'm no EE, but pretty sure you need to pick one or the other.
When I wired the build initially, I wired the MIL with the positive lead to blunt lead 4 and the negative lead to ground. The table on page 14 of the instructions suggests that's how it should be wired. But it doesn't work if wired that way. This week I disconnected my previous work and jumpered it to be a ground switching circuit. Hooked the blunt lead 4 to the negative lead on the indicator and the positive lead to an ignition switched 12V source. Of the several ways it's suggested to be wired, that one seemed the most consistent.
At first I didn't think this worked either because the indicator light only flashed briefly when the key was turned, rather than staying lit until the engine starts as the instructions say on page 7. I tried pulling the MAF sensor connector, but that only created a no-start condition and no DTC's. So I pulled the throttle body connector. Although a bit ragged (no surprise) the engine started and the light popped on. Yea! Scanned the ODB port and had two TPS related codes. Plugged the connector back in, cleared the codes, started the engine, and the light turned back off. I repeated the sequence again with the same result.
I'm now satisfied that the MIL is working correctly other than not staying lit until the engine starts. That isn't a problem. The flash tells you it's alive and there aren't any stored codes. Just different than what the instructions say. Note that it does just barely glow all the time the Coyote PCM is powered on. You can't see it in the daylight, and it's just barely visible at night. I measured a little over two volts on the light all the time. But full voltage is applied when there's a fault, so there's no missing it. Not too excited about intentionally introducing faults because I'm a complete amateur and don't want to hurt anything. So happy to stop. Today I took out the jumpers and made the wiring changes permanent.
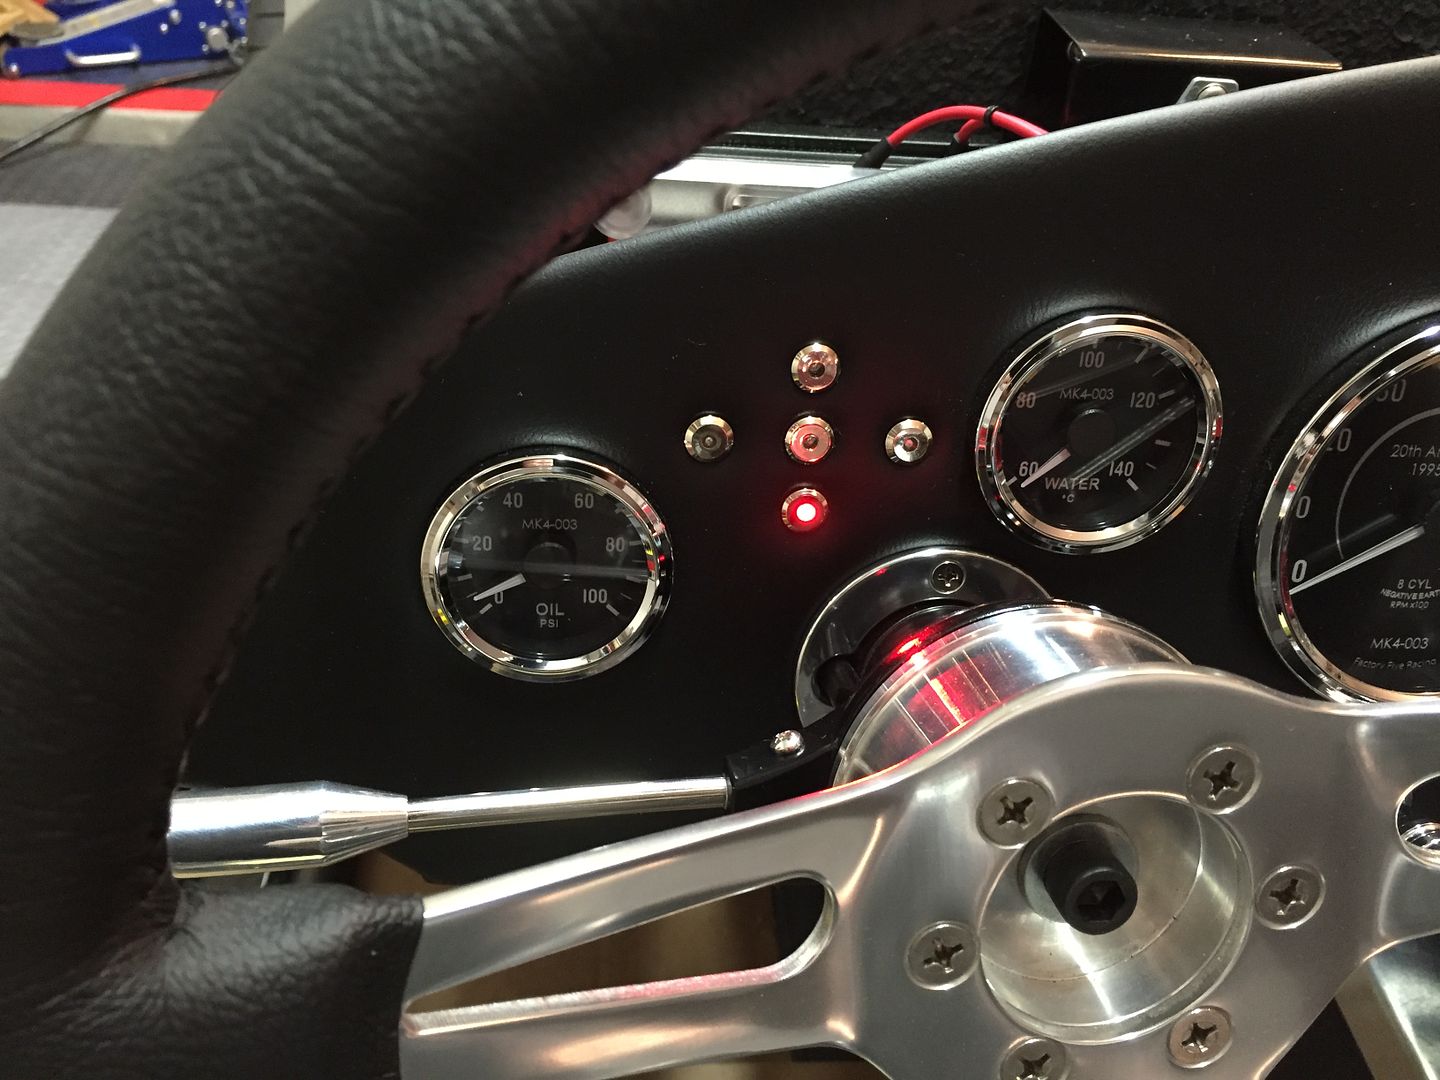
Here's proof my MIL is working. This is with DTC’s P0122 and P0223 thrown when I disconnected the throttle body connector. With the codes cleared, the MIL turned back off. Note this is not the LED provided with the Coyote controls pack. It’s one that matches the other indicators on my dash from Watson’s Streetworks.
One other comment FWIW. While speaking to Ford Racing about the MIL problem, he asked me if I was using a custom tune in my installation. I said "not yet" but would in the future if driveability isn't OK or I think I need to find more power. He cautioned that I should get a new tune regardless, and that I risked damage to the engine if I didn't. He said the non-stock intake and to a lessor extent the non-stock exhaust may cause the A/F to be off enough to cause damage. I said I thought the PCM would adjust the A/F, and he said yes but maybe not enough. He said it was OK to start and run, but not to put any load on it until it was dyno tuned. Frankly this surprises me. Some on the forum agree with this, others have reported long term use and mileage with no issues. There are at least two very well known tuners in my area. Still thinking about this one.
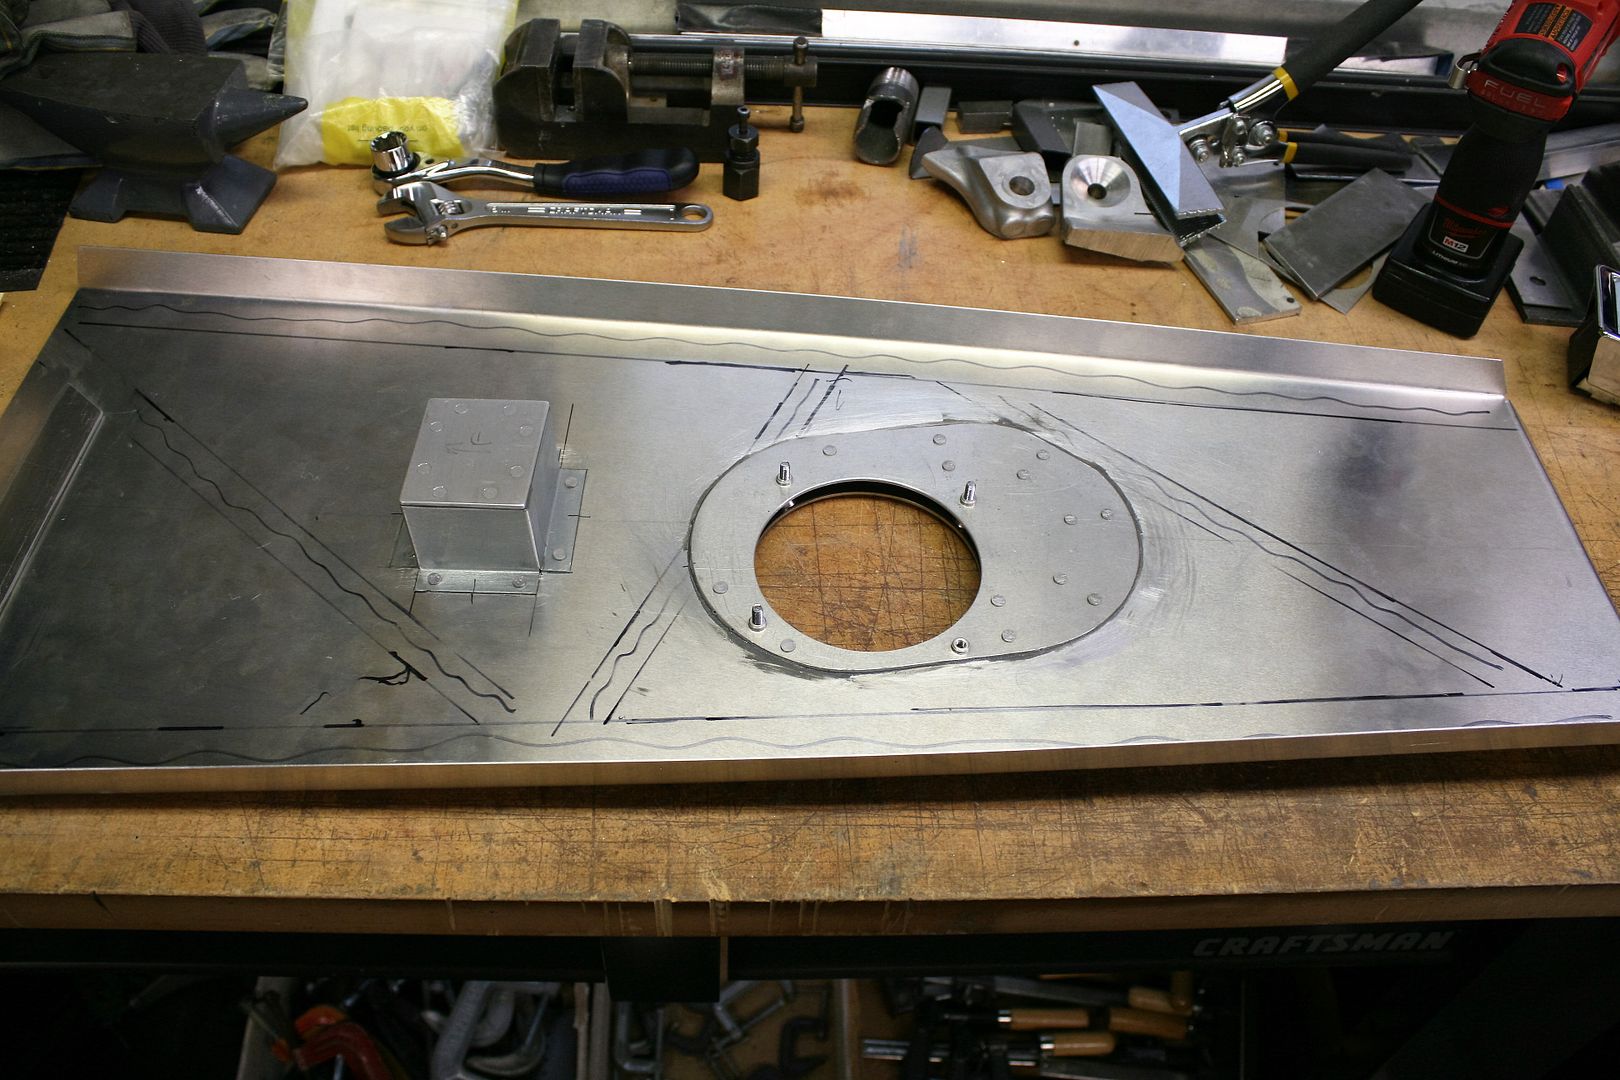
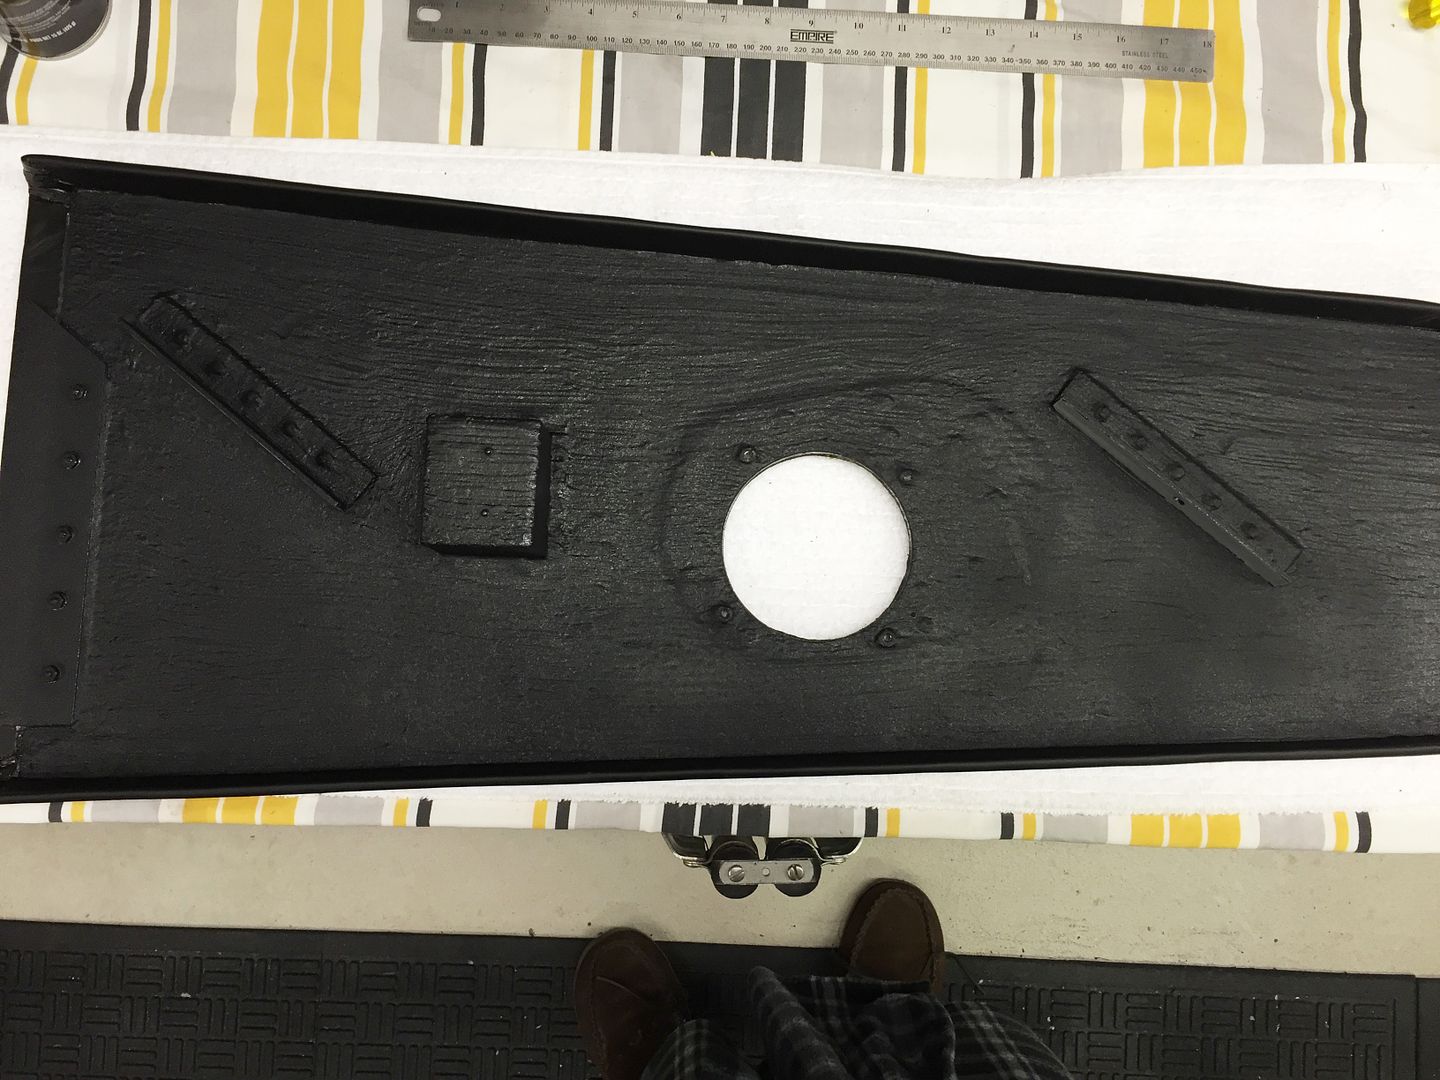
Meanwhile, back on the build, I've also been working on the transmission cover. I filled the existing cutout and made a new round one where needed for my TKO rear shifter. I’m planning to cover it with 1/8-inch foam padding and leather, same as the dash, so it’s necessary for it to be smooth and flat. I’m also installing a traditional looking ashtray (convenience bin???) like the originals and like my last build. I like the classic look, and it’s handy for storing really small stuff. I use it for my ear plugs. But since there’s a lot of air pressure in the transmission tunnel and the ashtray isn't sealed at all, I bent a small box out of sheet metal and aluminum for it to sit in and attached to the bottom of the transmission cover. Still a little more left to finish this up, but close.
Doubler used to hold the patch in place and box for the ashtray.
Fitting the trim pieces:

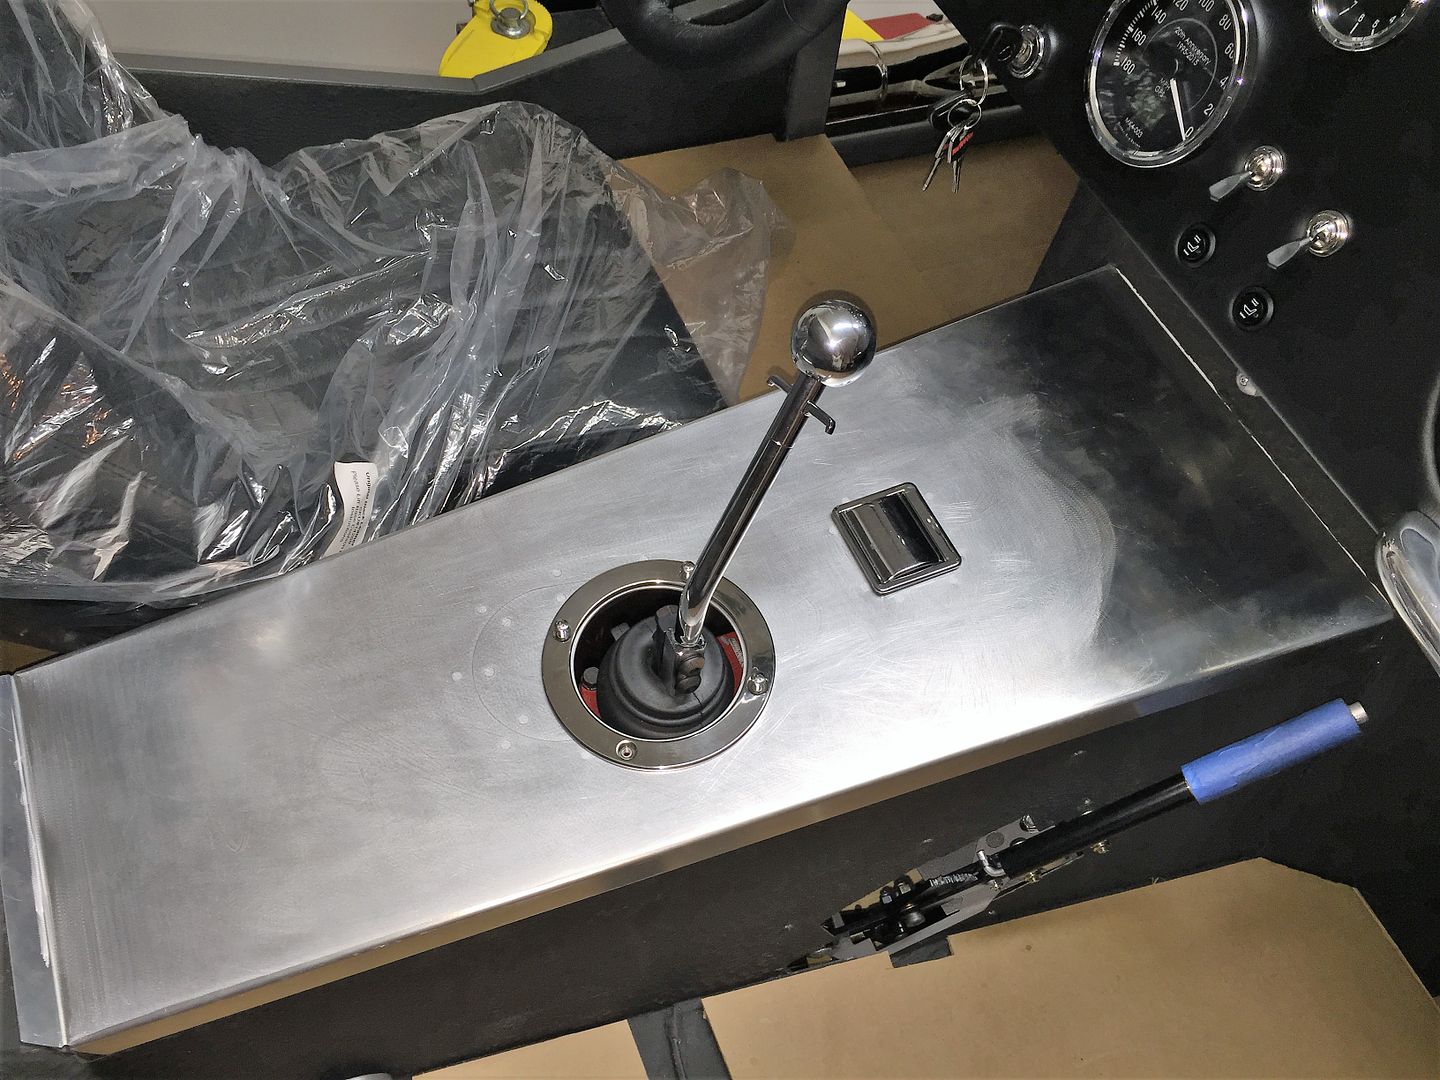
What it looks like in the cockpit. I’ll be using a shift lever boot from Mike Everson, same as my last build.
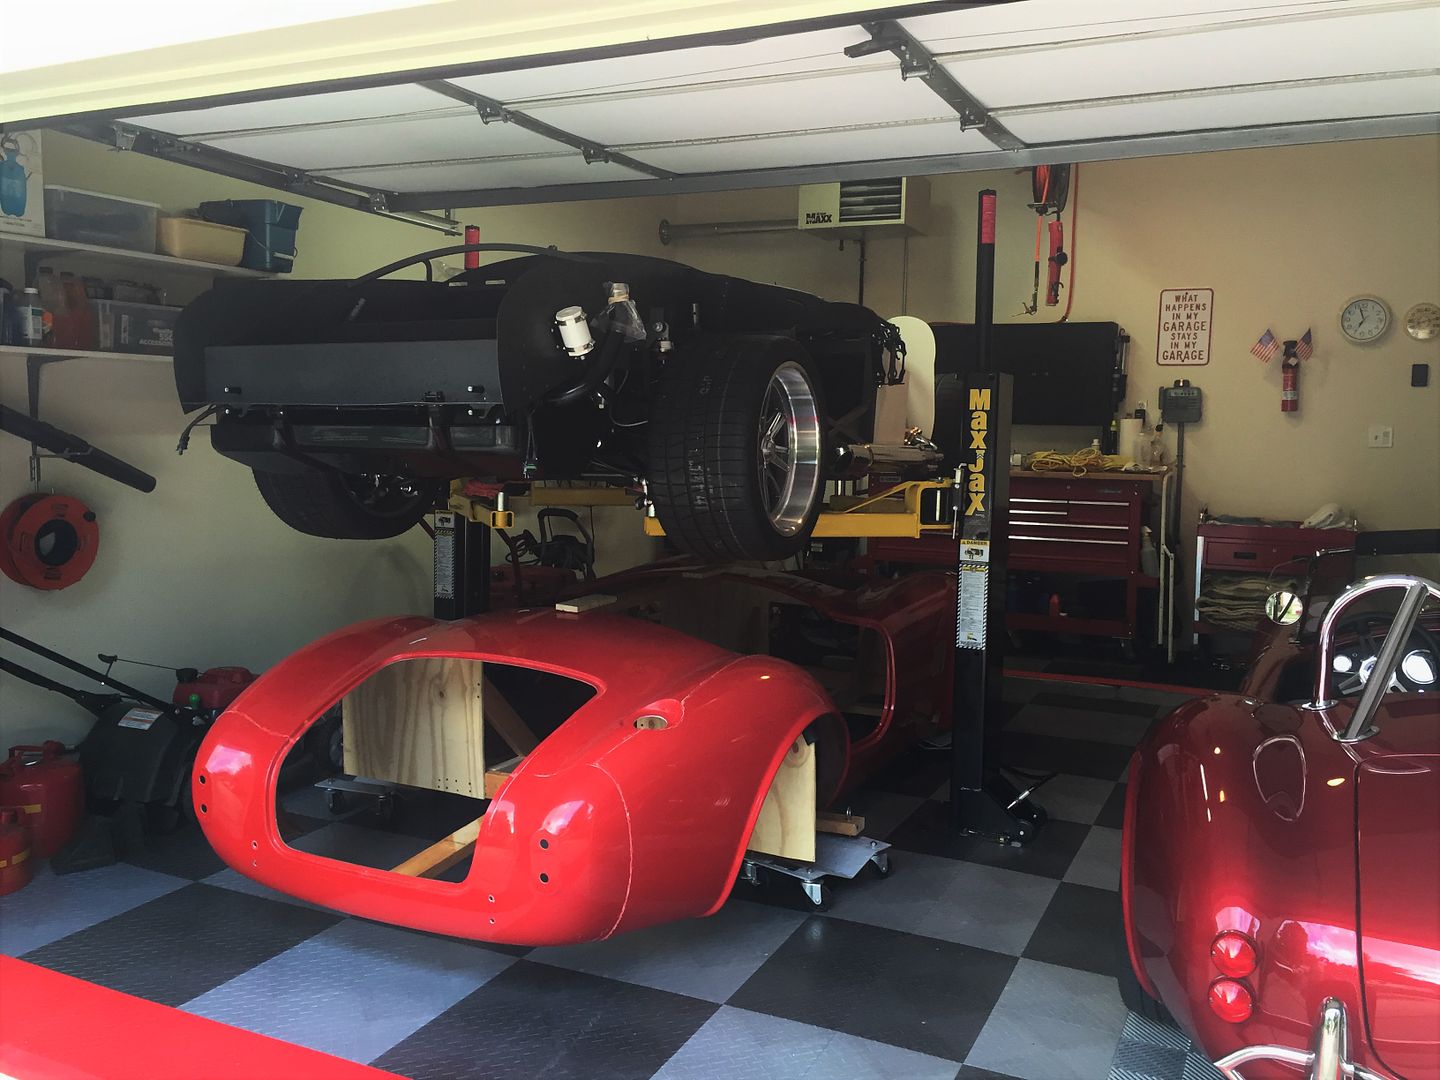
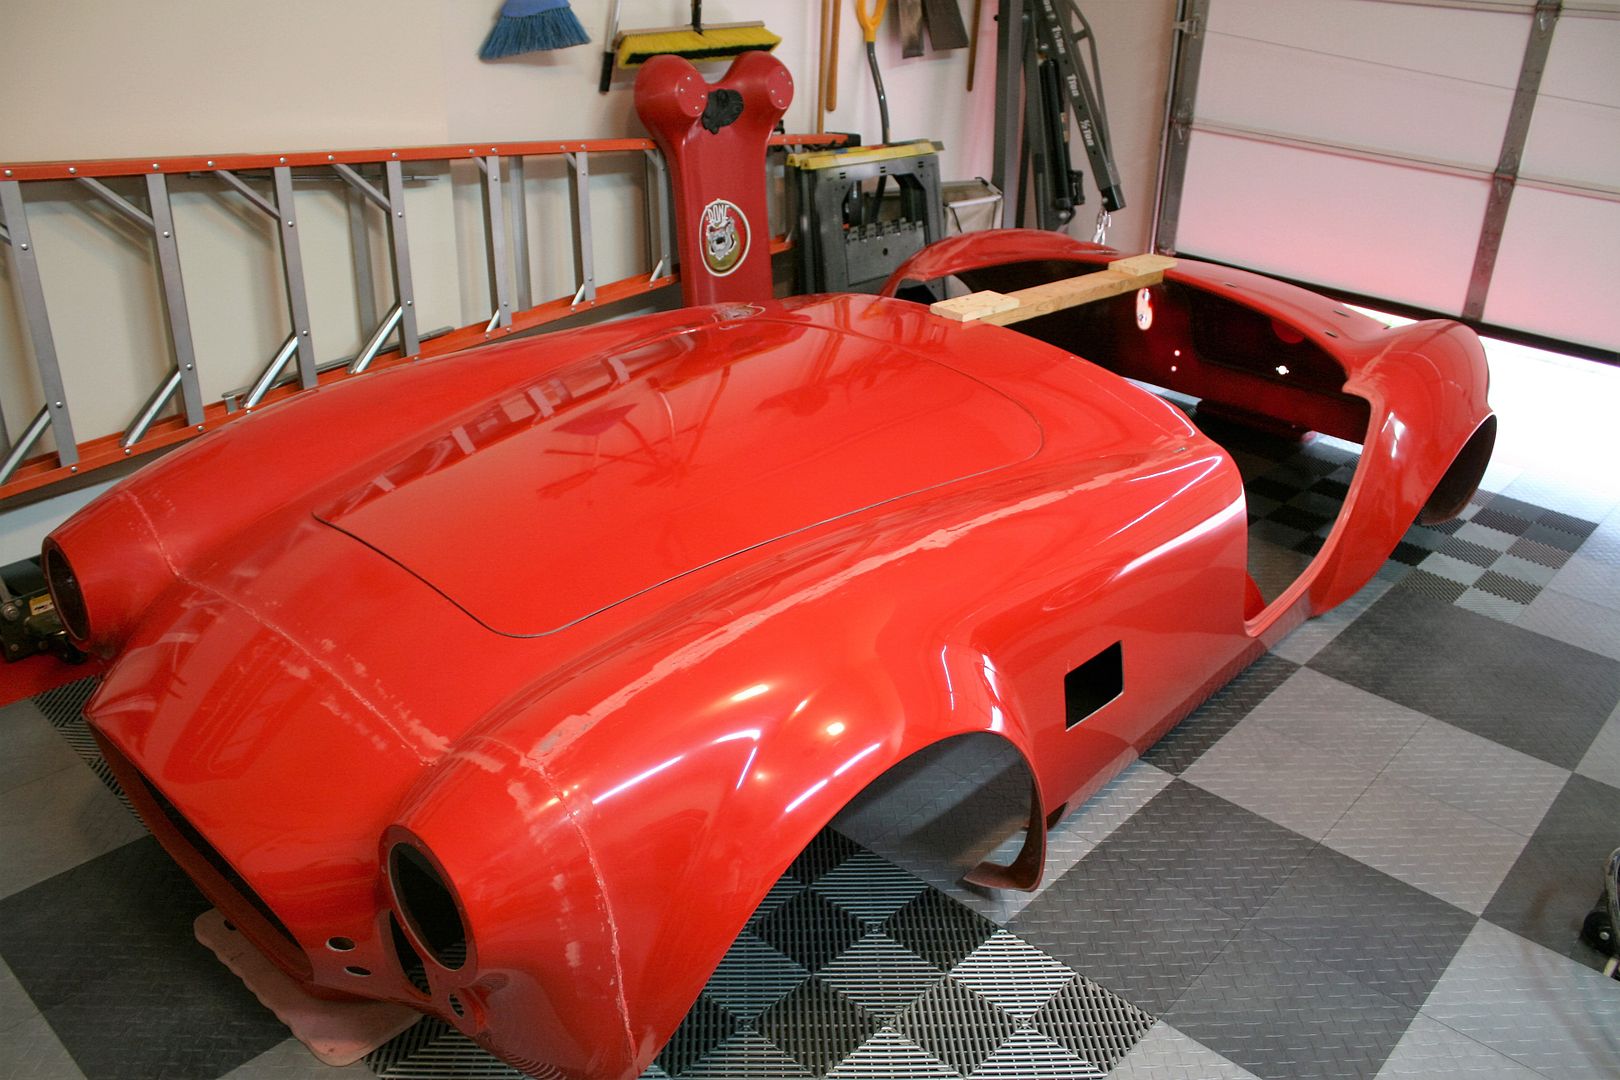
Today we retrieved the body from the storage unit where it’s been hanging since last summer. Another pretty big milestone in the build. Felt good getting it over here. Next up is to get it trimmed and fitted. Usually the body is stored over the chassis, but I’m switching things up a bit this time.
Also today FedEx dropped a small package from Factory Five. I hadn’t heard about this. FF made a technical change to the 2015 IRS and obviously thought it was important enough to send to previous purchasers. Great customer service FF! If you have the 2015 IRS and haven’t received, I’m assuming you will soon. Should be pretty easy and quick to remove the old parts and install the new ones. I’m hoping it doesn’t change the rough alignment I’ve already completed.

Will be out of town for a few days this coming week, but still hope to get started with the body work.
Last edited by edwardb; 07-10-2016 at 12:33 AM.
Reason: Typos
Build 1: Mk3 Roadster #5125. Sold 11/08/2014.
Build 2: Mk4 Roadster #7750. Sold 04/10/2017.
Build Thread
Build 3: Mk4 Roadster 20th Anniversary #8674. Sold 09/07/2020.
Build Thread and
Video.
Build 4: Gen 3 Type 65 Coupe #59. Gen 3 Coyote. Legal 03/04/2020.
Build Thread and
Video
Build 5: 35 Hot Rod Truck #138. LS3 and 4L65E auto. Rcvd 01/05/2021. Legal 04/20/2023.
Build Thread. Sold 11/9/2023.
-
07-10-2016, 07:10 AM
#325
Senior Member
Wiring Spreadsheet
Now that I have the wiring (I hope!) done and all seems to be working OK, here's a spreadsheet that has everything. Including how I hooked up the 2015 Coyote. Includes the most recent changes to get the MIL working. Note, for the record, there are some differences between this and the FF Coyote installation instructions. (1) Coyote harness and PCM/PDB is used for the start function and cooling fan vs. RF harness (affected wires removed), (2) no firewall solenoid, and (3) master disconnect installed. Hopefully this will be a resource to others with similar builds.
Note this is a .zip file. Open the zip after downloading and the spreadsheet will be there. Also note there are four different tabs in the worksheet.
EdwardB_Coyote_Build_Wiring.zip
Last edited by edwardb; 07-26-2016 at 06:20 AM.
Build 1: Mk3 Roadster #5125. Sold 11/08/2014.
Build 2: Mk4 Roadster #7750. Sold 04/10/2017.
Build Thread
Build 3: Mk4 Roadster 20th Anniversary #8674. Sold 09/07/2020.
Build Thread and
Video.
Build 4: Gen 3 Type 65 Coupe #59. Gen 3 Coyote. Legal 03/04/2020.
Build Thread and
Video
Build 5: 35 Hot Rod Truck #138. LS3 and 4L65E auto. Rcvd 01/05/2021. Legal 04/20/2023.
Build Thread. Sold 11/9/2023.
-
Post Thanks / Like - 1 Thanks, 1 Likes
-
07-10-2016, 08:46 AM
#326
Member

Thanks for the updates on the wiring. I really enjoy reading your build thread and appreciate all the detailed information contained within your updates. It is very helpful to first time builders like myself that are planning very similar coyote builds. Thank you.
-
07-11-2016, 10:05 AM
#327
Senior Member
2015 IRS Tech Update Installed
Originally Posted by
edwardb
Also today FedEx dropped a small package from Factory Five. I hadn’t heard about this. FF made a technical change to the 2015 IRS and obviously thought it was important enough to send to previous purchasers. Great customer service FF! If you have the 2015 IRS and haven’t received, I’m assuming you will soon. Should be pretty easy and quick to remove the old parts and install the new ones. I’m hoping it doesn’t change the rough alignment I’ve already completed.
Got the revised pieces installed today. Pretty easy. Took only about an hour or so, and that including removing and replacing the wheels/tires that I had previously installed. I thought about trying to do the installation without removing the wheels, but it's pretty tight quarters and you need room to loosen/tighten that 100 ft/lbs bolt plus you'd have to hold up everything once the bolt was pulled. So decided against it. The new fitting places the Heim joint exactly the same distance from the knuckle, so I'm satisfied my preliminary alignment wasn't affected. The only minor glitch was the new instructions say to re-use the washers from the previous installation. But my previous installation parts and instructions didn't say anything about washers, and I didn't have any 5/8-inch hardened washers in stock. Quick Lowes run and good to go.
Last edited by edwardb; 07-11-2016 at 10:08 AM.
Build 1: Mk3 Roadster #5125. Sold 11/08/2014.
Build 2: Mk4 Roadster #7750. Sold 04/10/2017.
Build Thread
Build 3: Mk4 Roadster 20th Anniversary #8674. Sold 09/07/2020.
Build Thread and
Video.
Build 4: Gen 3 Type 65 Coupe #59. Gen 3 Coyote. Legal 03/04/2020.
Build Thread and
Video
Build 5: 35 Hot Rod Truck #138. LS3 and 4L65E auto. Rcvd 01/05/2021. Legal 04/20/2023.
Build Thread. Sold 11/9/2023.
-
07-17-2016, 02:54 AM
#328
Senior Member

A comment about the sluggish throttle pedal from a few posts back. If you are using the Ford Racing pedal, the foot pad is on a spring and pivots on the end of the pedal arm. I removed the spring and secured the foot pad to the pedal arm with a simple zip tie. In doing this, the pedal is much more responsive.
So you'll be in line to give charity rides at London next year????? I gave a dozen with my Coyote then drove it 10 hours back across the border to Northern Ontario. My Coyote/TKO/Moser power train is a beast. What a blast. There's no other car show I'm aware of that lets you rod your car while law enforcement watches at the turn out lane. Hoping to be back more frequently.
-
07-17-2016, 07:07 AM
#329
Senior Member
Originally Posted by
Dave Howard
A comment about the sluggish throttle pedal from a few posts back. If you are using the Ford Racing pedal, the foot pad is on a spring and pivots on the end of the pedal arm. I removed the spring and secured the foot pad to the pedal arm with a simple zip tie. In doing this, the pedal is much more responsive.
So you'll be in line to give charity rides at London next year????? I gave a dozen with my Coyote then drove it 10 hours back across the border to Northern Ontario. My Coyote/TKO/Moser power train is a beast. What a blast. There's no other car show I'm aware of that lets you rod your car while law enforcement watches at the turn out lane. Hoping to be back more frequently.
I have the FF provided foot pedal grafted onto the Ford Racing DBW module like the instructions show, with a few differences I noted earlier. I haven't noticed it as much with more recent starts. Maybe I'm getting used to it or the engine is learning and responding more. Right now, it seems pretty connected. But I'll take a look at it. Thanks for the tip.
London is a blast. We've gone 4-5-6 years in a row now (don't remember exactly...) and always have a great time. Especially this year with the perfect weather. I've done some charity rides as well. I don't know what I like more. The actual drive or the reaction of the riders. Great times. I don't know that I'll be taking the brand new build on the rides next year. It will have almost no miles on it by that time.
Build 1: Mk3 Roadster #5125. Sold 11/08/2014.
Build 2: Mk4 Roadster #7750. Sold 04/10/2017.
Build Thread
Build 3: Mk4 Roadster 20th Anniversary #8674. Sold 09/07/2020.
Build Thread and
Video.
Build 4: Gen 3 Type 65 Coupe #59. Gen 3 Coyote. Legal 03/04/2020.
Build Thread and
Video
Build 5: 35 Hot Rod Truck #138. LS3 and 4L65E auto. Rcvd 01/05/2021. Legal 04/20/2023.
Build Thread. Sold 11/9/2023.
-
07-18-2016, 07:54 PM
#330
Senior Member
Still Working
Was away from home several days last week, so progress was slowed. But still plugging away. My main focus has been working on the body. Because of the dust, I prefer to work outside on the drive. But it’s been pretty warm (by Michigan standards) so my main work time has been earlier in the day for a few hours at a time. I have the hood, trunk and door openings all trimmed and straight. All the light openings are ready for fixtures. Also knocked down the parting lines, but will leave the final work for the painter. That’s about all I can do with it right side up. So today took it off the body buck for hopefully the last time. Tomorrow I’ll flip it over on its back and do the perimeter, wheel lips, cockpit front and back, front grille openings, etc. At that point, will be ready to drop on the chassis for the first time.
I also finished the transmission tunnel cover. I came up with a method for the mounting to be hidden. I painted two coats each of Lizard Skin sound and heat insulation on the bottom. Today I took it to the auto upholstery shop I use. They’re going to install the leather. I decided some stitching along the corners would look nice and that’s not something I can do. It’s supposed to be done later this week, so I’ll post some pictures when it’s done. They’re also stitching the pockets for the leather door panels I made.
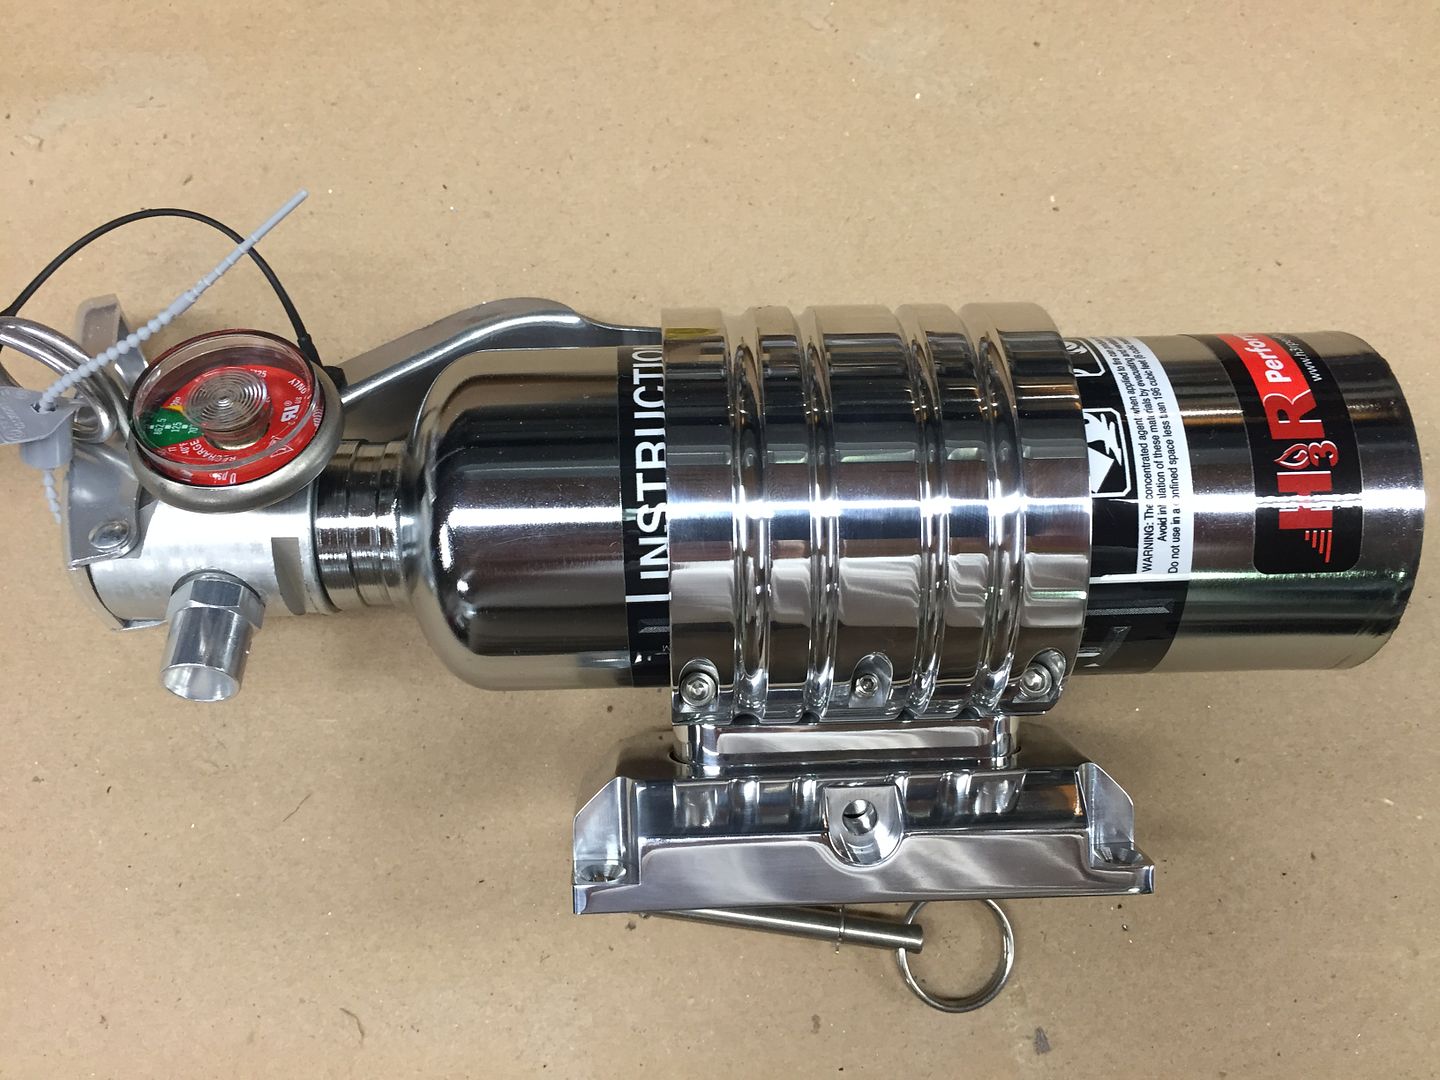
While we were in Cleveland last week for my wife’s annual checkup, I made the obligatory run down to Summit Racing in Tallmadge. I wanted to pick up the fire extinguisher and mounting. The sales tax for a local purchase is cheaper than the hazmat charge to ship it, so that was a good excuse to visit. I’m using the same H3R Performance HalGuard 1.4 pound bottle I’ve used before, but wanted to look at a couple different mounts. Another advantage of visiting in person. But I ended up with the same polished band and flat surface mounts I’ve used before. Not cheap (how many times have I said that?) but they’re very nice quality.
One last comment about Coyote tuning. I’ve mentioned this in a couple of my updates plus the recommendation from Ford Racing to do a custom tune or risk damage to the engine. I’ve been in touch with a couple local dyno shops recommended by Ford, and they either don’t work on the crate version of the Coyote or don’t have any appointment openings for months. So I’ve done some preliminary research and looks like a remote tune is the way to go. Lots of information in this thread. http://www.ffcars.com/forums/45-ford...-jms-dyno.html. The tuner I’m seriously considering only tunes with log files and I need the build to be legal and on the road to capture the data. So won’t be doing anything until next year. One of the main learning points here IMO is that any build with a Coyote needs to include a tune in the budget. Somewhere in the $500 - $700 range is probably where to start. Note this includes a hardware device (there are several different varieties) to load the tunes, collect logs, and also can be used as a real time monitor, read and clear DTC's, etc. I know there are many that run Coyotes without custom tunes. But the overwhelming feedback is that it should be part of a Coyote build.
Last edited by edwardb; 07-19-2016 at 06:29 AM.
Build 1: Mk3 Roadster #5125. Sold 11/08/2014.
Build 2: Mk4 Roadster #7750. Sold 04/10/2017.
Build Thread
Build 3: Mk4 Roadster 20th Anniversary #8674. Sold 09/07/2020.
Build Thread and
Video.
Build 4: Gen 3 Type 65 Coupe #59. Gen 3 Coyote. Legal 03/04/2020.
Build Thread and
Video
Build 5: 35 Hot Rod Truck #138. LS3 and 4L65E auto. Rcvd 01/05/2021. Legal 04/20/2023.
Build Thread. Sold 11/9/2023.
-
07-19-2016, 09:08 PM
#331
Originally Posted by
edwardb
Yes, that's what I've posted before. Still the parts I would recommend, but one comment. I had a local builder ask me about these and ordered/received them since I received mine a little over three years ago. I learned the Avery Dennison #10045 part number has apparently changed slightly since then. It has the same cable and tie capacity, and is still for a #8 (roughly 3/16-inch) screw. So will still work OK. But the overall part is slightly smaller and the head of a 3/16-inch rivet may need to be trimmed more than I described before. Maybe a 1/8-inch rivet would be OK?
Thanks,
Bill
-
07-21-2016, 12:03 PM
#332
Senior Member
It's On
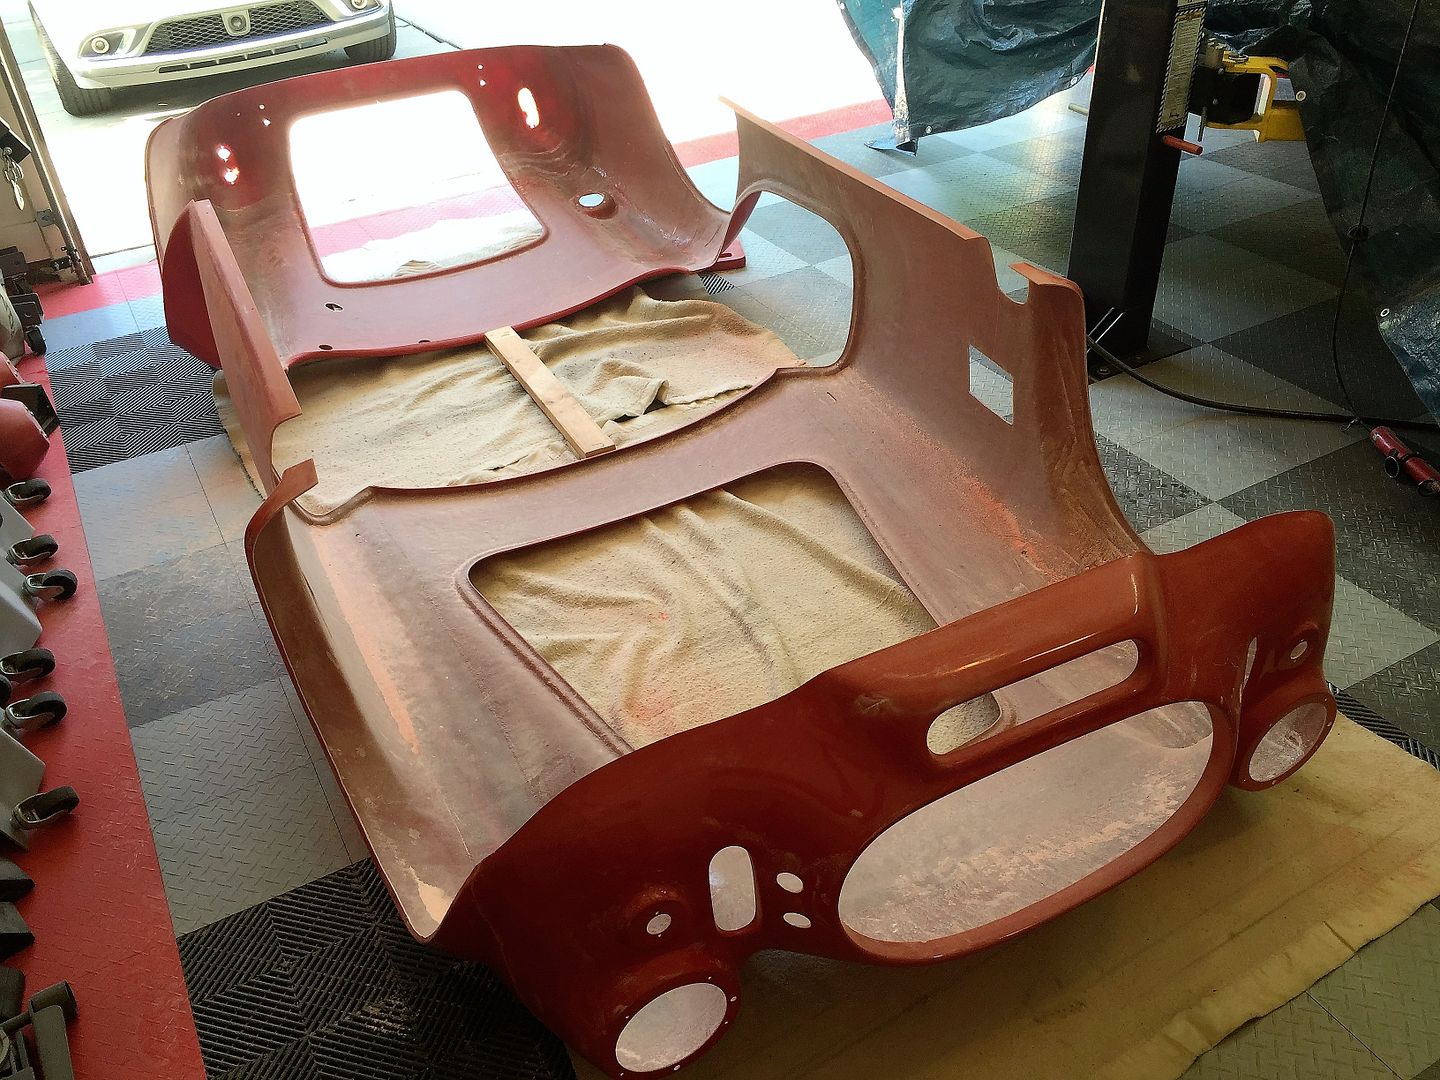
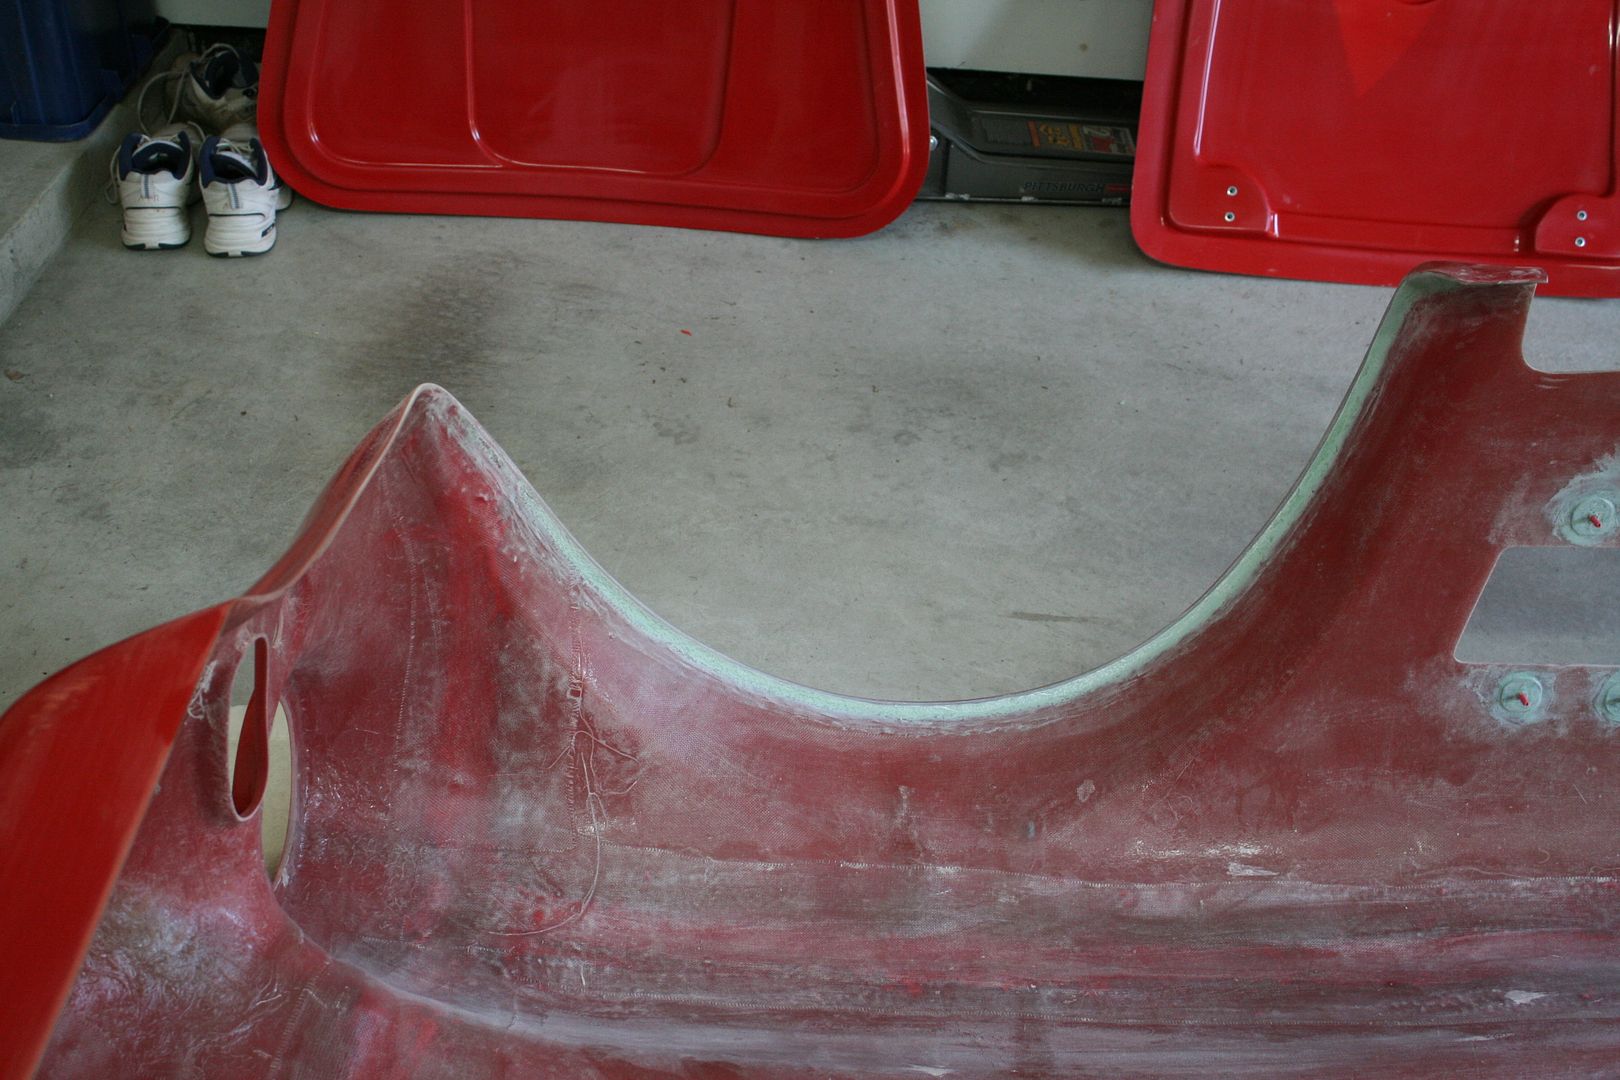
Body prep is underway in earnest. Managed to be right in the middle of the hottest days so far this summer, so moved indoors. Temporarily banished #7750 over to it's off-site storage location and threw a tarp over the new build. I'm totally trashing my garage but it will clean up easy enough. I'm about 3/4 of the way around the perimeter getting everything straight, wheel openings trimmed, etc. I'm doing most of the work with different size drum sanders on a corded drill, a belt sander, and various sanding blocks and straightedges. This isn't my most favorite part of the build, but I'll deliver the build to the painter essentially ready to fill, prime and paint. Sorry for the crummy smartphone picture.
Last edited by edwardb; 07-21-2016 at 12:13 PM.
Build 1: Mk3 Roadster #5125. Sold 11/08/2014.
Build 2: Mk4 Roadster #7750. Sold 04/10/2017.
Build Thread
Build 3: Mk4 Roadster 20th Anniversary #8674. Sold 09/07/2020.
Build Thread and
Video.
Build 4: Gen 3 Type 65 Coupe #59. Gen 3 Coyote. Legal 03/04/2020.
Build Thread and
Video
Build 5: 35 Hot Rod Truck #138. LS3 and 4L65E auto. Rcvd 01/05/2021. Legal 04/20/2023.
Build Thread. Sold 11/9/2023.
-
07-21-2016, 12:43 PM
#333
Would you mind posting a bit more detail and photos of what you are doing to "get the body ready". What are you doing to the wheel wells? Where else are you shaping? What other areas have you found that should be addressed to make the body "ready for fill, prime, and paint". Thank you!
-
07-21-2016, 08:19 PM
#334
Senior Member
Originally Posted by
Jazzman
Would you mind posting a bit more detail and photos of what you are doing to "get the body ready". What are you doing to the wheel wells? Where else are you shaping? What other areas have you found that should be addressed to make the body "ready for fill, prime, and paint". Thank you!
What areas need to be addressed? Easy answer. Everything. 
OK, that might not be the answer you're looking for. The body is trimmed out of the mold (I guess...) but pretty much nothing is straight or even. I go over the entire perimeter and every single opening. One of my goals is nothing touches the body for the first time after it's painted, so that includes the lights, roll bar, windshield, etc. Here's a grocery list:
Trunk opening: Trim the lip to 1/2-inch all around.
Door openings: Trim the lip to 5/16 - 1/4-inch all around.
Hood opening: Cut off the bottom part of the lip to 5/16 - 1/4-inch all around.
Radiator opening, oil cooler opening, brake cooler openings: Trim all around making the lip parallel to the smallest dimension.
Body sides where they wrap under: Straighten.
Front body bottom wheel well to wheel well. Trim as necessary to have parallel behind the oil cooler opening and symmetrical curves to both wheel well openings.
Rear body bottom wheel well to wheel well. Similar to the front. Parallel to the trunk opening and symmetrical curves to both wheel well openings. Note for the entire body perimeter, I break the edges with a slight radius all the way around inside and outside. Your hands will thank you as you handle the body plus helps to not tear up bulb seal.
Wheel well openings. Here I first trim the lips to 5/16 - 3/8-inch all around. The fronts I taper to zero starting 6-inches or before it starts going around to the front. Hope that makes sense. I put a pretty strong radius on the outside all around all four. Later I'll be adding a filet of HSRF all around the inside of the lips, and put a radius on the inside. This gives the appearance of a rolled edge. Strong and good looking IMO. Here's a picture of what that will look like from my last build:
Headlights: Get centered on the pad, opening up the large hole as required. I drill the two relief holes and the mounting holes. Note I use small bolts rather than the self-tapping screws provided. Just a personal preference.
Front running lights/turn signals: Centered, open center hole so they sit flat. The Weaterpack connector fits through the larger hole.
Rear lights: Here you will find as most do that the pad is slightly smaller than the two lights mounted on each side. They overhang just slightly. Some guys don't like that, and will do the necessary body work to enlarge the pads. I haven't, and find that if they're carefully centered and mounted as close to each other as possible, it's just not that noticeable. But clearly others feel very differently. I adjust the holes as necessary to find the best position, and open up the center holes to clear the lights and also so that the Weatherpacks fit through. One other hint. The rear pads I've found aren't completely flat. They are bulged slightly outward. I try to make them a little flatter without removing too much material. This helps to improve the appearance of the overhang IMO.
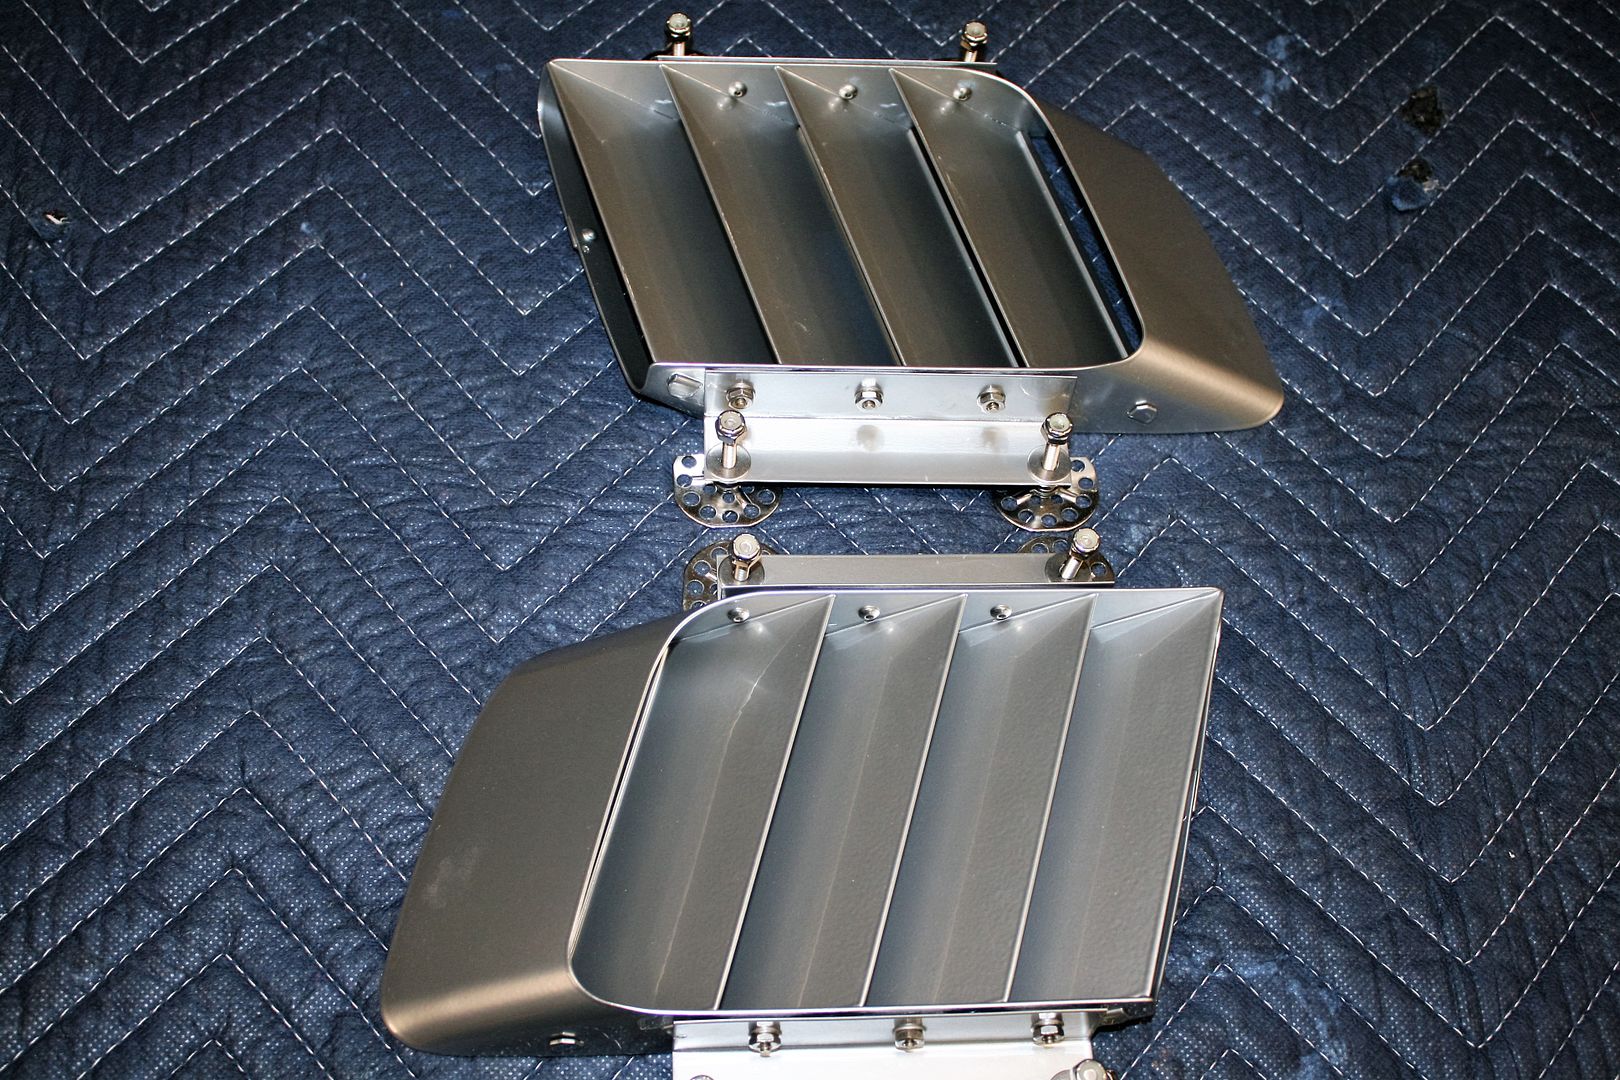
Side louver openings: I adjust them so the angle of the opening exactly matches the angle of the louvers and so that exactly the same amount of each louver is exposed.
Cockpit roll around dash: Straighten/clean as necessary and trim to provide dash clearance.
Cockpit roll around rear wall: Also straighten/clean and trim to provide rear wall clearance including carpet.
Side pipe openings: Adjust later after the body is on. Note they are purposely undersized for 4-into-4 headers.
Windshield post openings: Also adjust as necessary after the body is on and the windshield installed. You don't want the body touching the windshield side posts.
Roll bar openings: After the body is on.
And finally, just for good measure, I quickly go over the entire underside with heavy grit paper to knock off the high points, loose threads of glass, etc. Just makes it a bit neater for later when the trunk bedliner is applied. Note: Use a sanding block. Not just a folded piece of sandpaper. Fiberglass splinters hurt! Ask me how I know.
Also of course are fitting and mounting the hood, trunk, doors and latches. Cutting and mounting the hood scoop. Fitting and installing the splash guards. Fitting and installing the radiator surround.
I think that's about it.
Last edited by edwardb; 07-22-2016 at 07:28 AM.
Build 1: Mk3 Roadster #5125. Sold 11/08/2014.
Build 2: Mk4 Roadster #7750. Sold 04/10/2017.
Build Thread
Build 3: Mk4 Roadster 20th Anniversary #8674. Sold 09/07/2020.
Build Thread and
Video.
Build 4: Gen 3 Type 65 Coupe #59. Gen 3 Coyote. Legal 03/04/2020.
Build Thread and
Video
Build 5: 35 Hot Rod Truck #138. LS3 and 4L65E auto. Rcvd 01/05/2021. Legal 04/20/2023.
Build Thread. Sold 11/9/2023.
-
07-22-2016, 12:10 AM
#335
I think I'm sorry I asked!! Seriously, thank you for that laundry list. Now I have even more fun to look forward to!!
-
07-23-2016, 01:33 AM
#336
As I attempt to plan my first build, albiet a donor, EdwardB your attention to detail is impressive, and almost daunting. As I try to think of, and create checklists of things to do based on this build and #7750. I have poured over these 9 pages multiple times in the last few weeks. Just Wow! thank you for the great thread, ideas, and I really look forward to seeing the car when its complete.
-
07-23-2016, 06:35 AM
#337
Senior Member
Originally Posted by
handsometommy
As I attempt to plan my first build, albiet a donor, EdwardB your attention to detail is impressive, and almost daunting. As I try to think of, and create checklists of things to do based on this build and #7750. I have poured over these 9 pages multiple times in the last few weeks. Just Wow! thank you for the great thread, ideas, and I really look forward to seeing the car when its complete.
Thanks! And welcome to the forum. Good luck with your upcoming build. It's quite a journey. Just one hint. After a couple builds, I do like to change things, do mods, etc. Not as many as some, but certainly gets away from a stock build a bit and leaves quite a few supplied parts in the boxes. Most are strictly preferences. The stock parts absolutely work.
Build 1: Mk3 Roadster #5125. Sold 11/08/2014.
Build 2: Mk4 Roadster #7750. Sold 04/10/2017.
Build Thread
Build 3: Mk4 Roadster 20th Anniversary #8674. Sold 09/07/2020.
Build Thread and
Video.
Build 4: Gen 3 Type 65 Coupe #59. Gen 3 Coyote. Legal 03/04/2020.
Build Thread and
Video
Build 5: 35 Hot Rod Truck #138. LS3 and 4L65E auto. Rcvd 01/05/2021. Legal 04/20/2023.
Build Thread. Sold 11/9/2023.
-
07-25-2016, 04:41 PM
#338
Senior Member
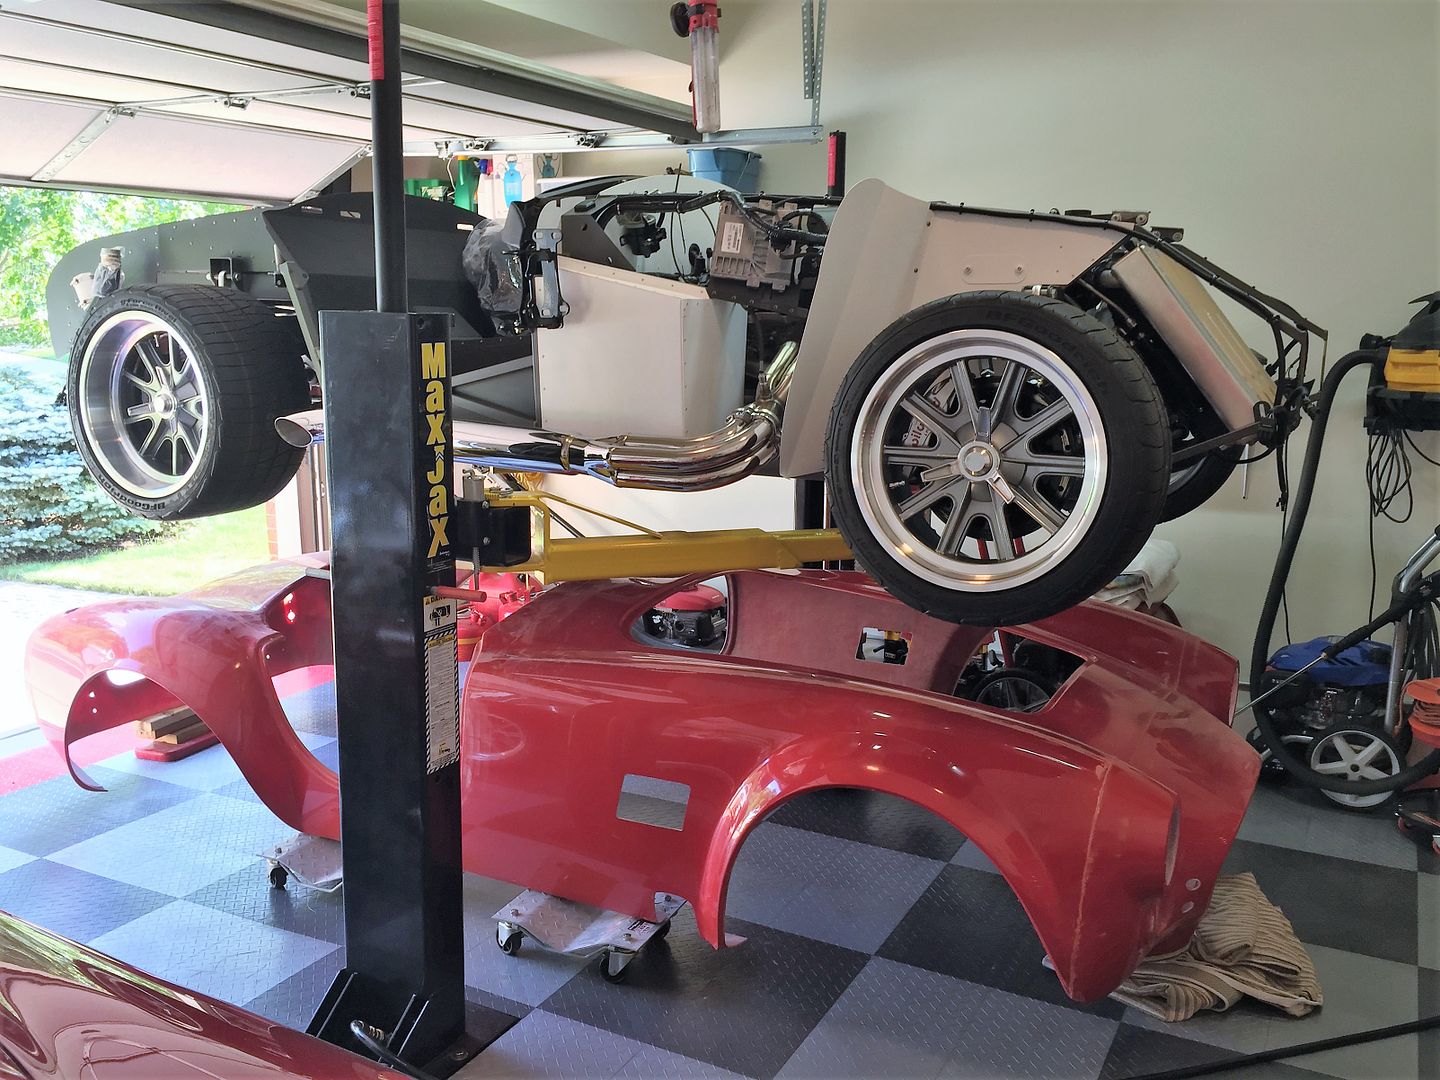
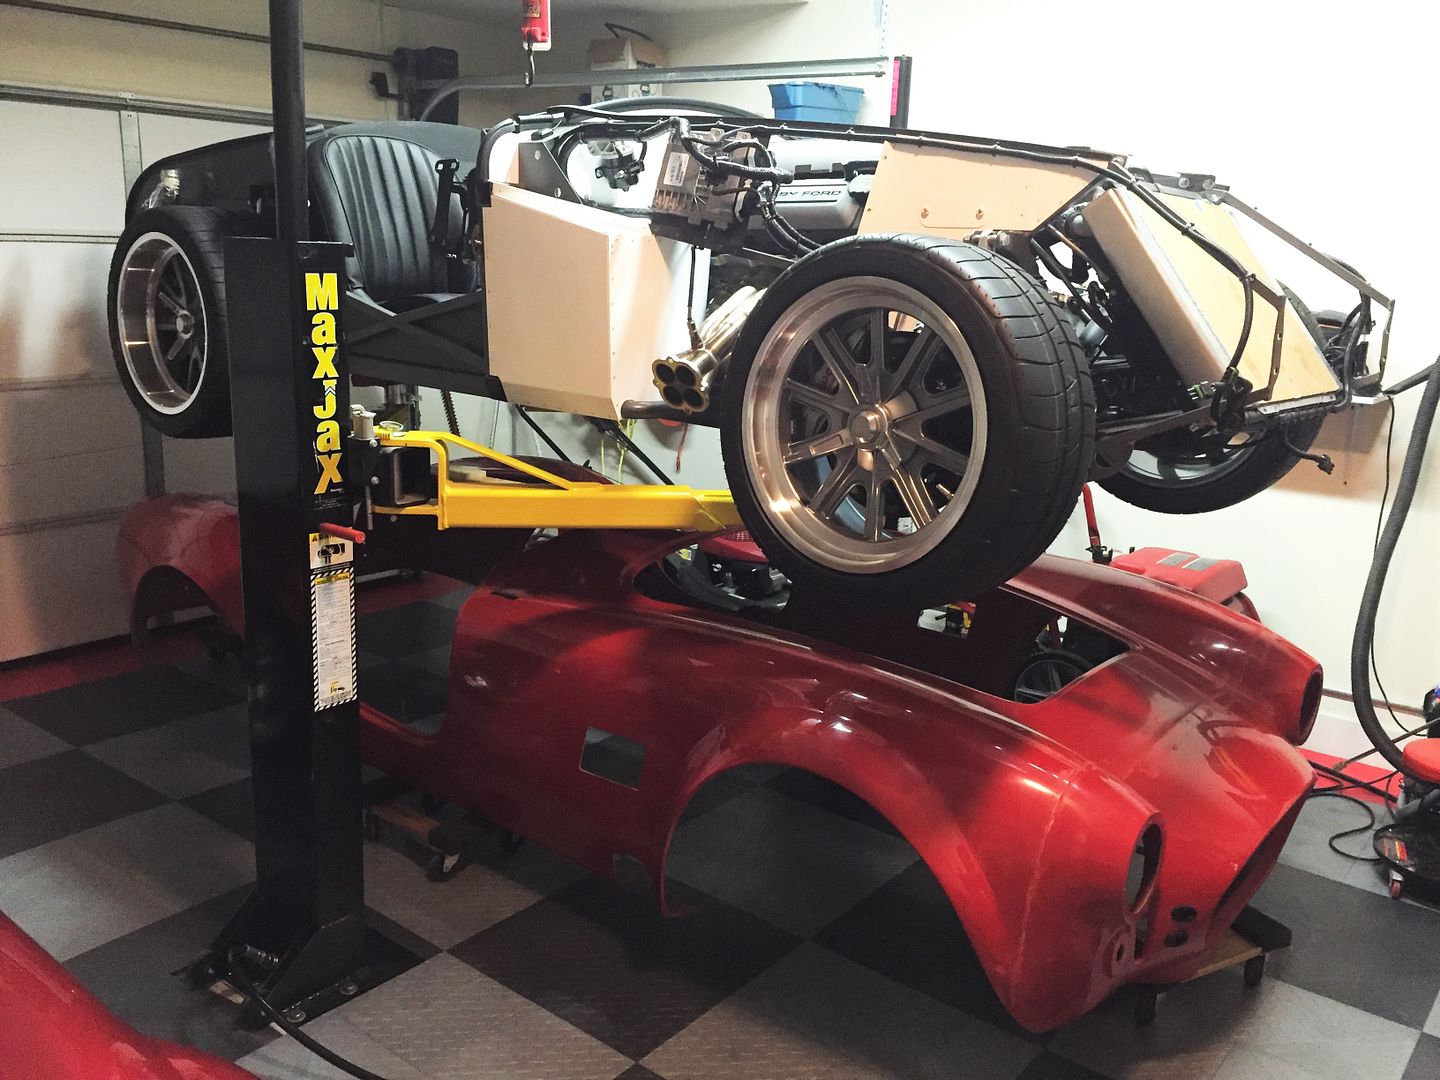
Body On Plus
Today the body is back on the chassis. First time it’s been there since we brought the kit home from FF almost one year ago.
Saturday I completed the first pass at all the body clean-up. Of the three Roadster bodies I’ve had, this one is probably the cleanest. The Mk3 really doesn’t count because the Mk4’s are so much better. But this is probably a bit better than #7750. Everything lines up across the parting lines. I knocked down the parting lines just enough to see they shouldn’t need any special treatment. Just the usual body filler with everything else. Hood and trunk lid look perfect. We'll see about the doors. I’ve got 4 small chips in the gel coat (underside of the radiator inlet, ends of the dash roll, one end of the rear cockpit roll) that I’ll touch up with HSRF and it should be good to go. Overall, I’m very pleased with the quality. I gave it a good solvent wash and then a bath with a hose and some Soft Scrub and a scouring pad. All the wax, mold release, whatever, should be gone.
Spent a little while cleaning all the dust in the garage and rolled the body in. Looking good.
Today I used the hooks that I have in my garage ceiling along with the rope lock pulleys I’ve used for previous builds to lift the body, roll the chassis under, and drop the body into place. If you take your time, it’s possible to do this by yourself, which I did. Warning: Do not try this without the center cockpit brace!!! Also, I wouldn't do this with a painted body. But no qualms at all with the unpainted body.
Ready to go on. Note I put some beach towels around the door hinge area. You need to spread the body as it’s dropping into place, and this protects the body and the chassis.
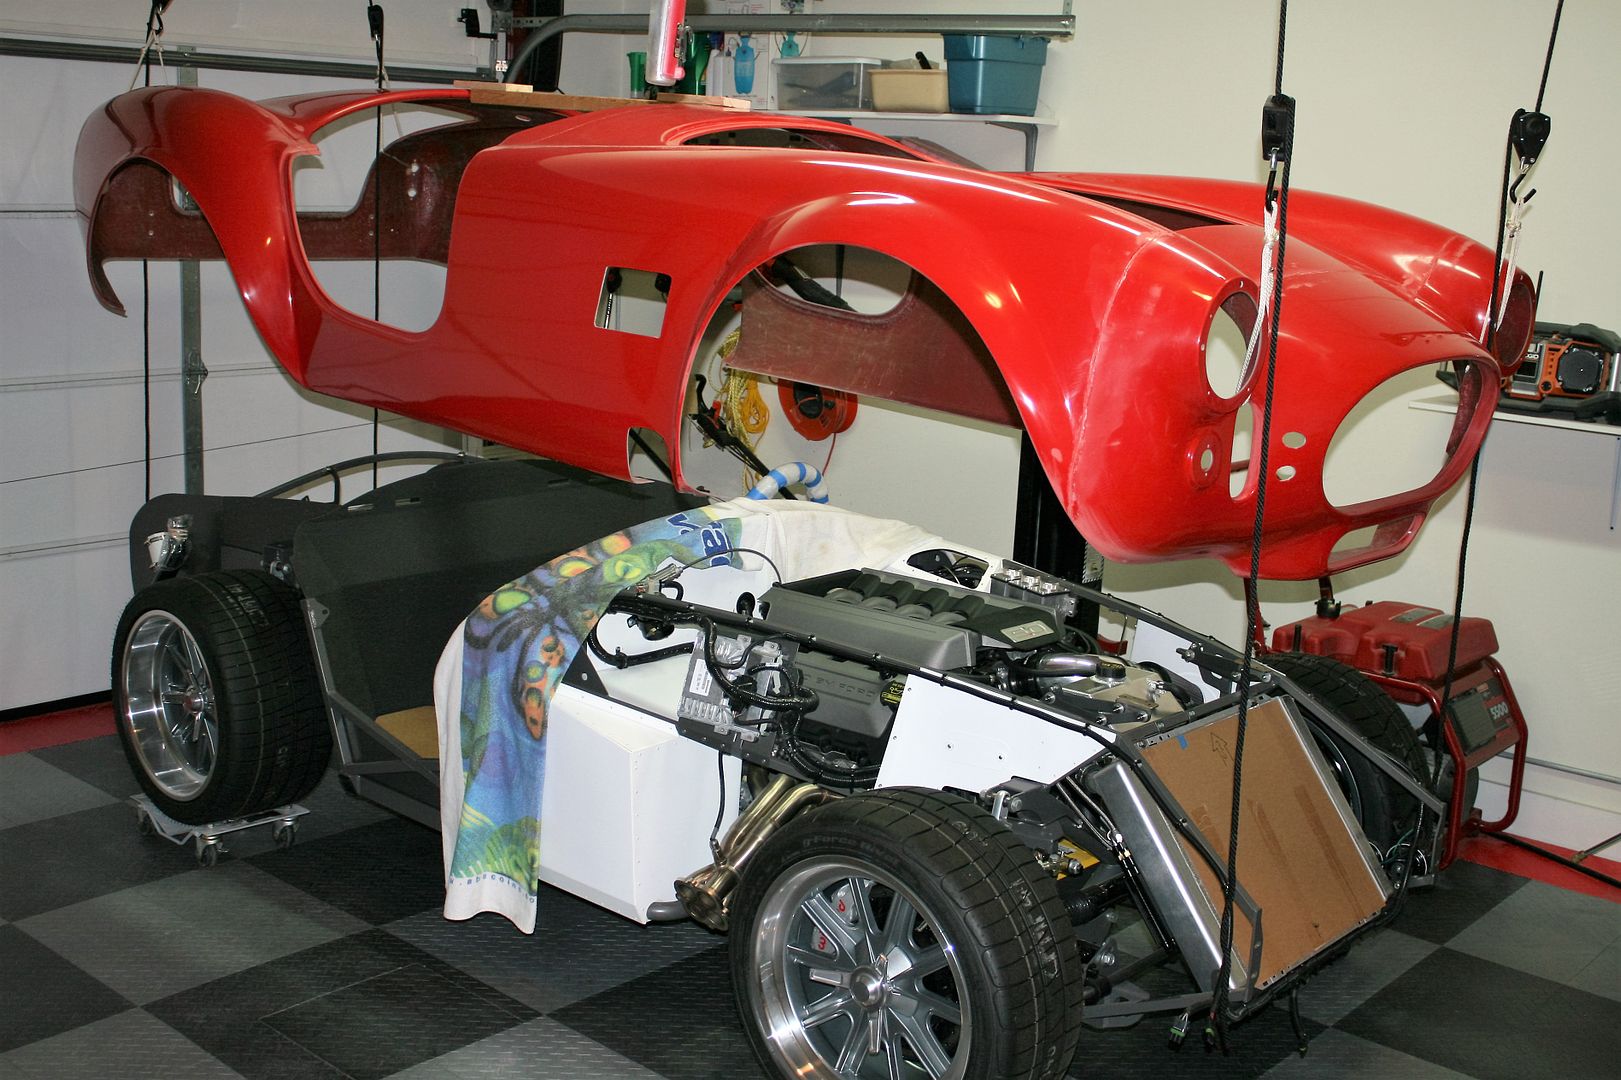
Drop the nose and hook it around the frame.
Then lower the rest of the way. Spreading the center as you go and then pulling the back around the trunks sides.
I installed this time without any of the bulb seal or cushioning, looking for any aluminum that might need to be trimmed plus any other adjustments. I had to re-position the horns a little bit. They were tight up against the back of the DS brake cooling inlet. I need to trim a little more off the rear cockpit roll. Still a little tight there. The dash ends are tight. But I’m not going to do anything yet. With the firewall bulb seal, hood surround cushion, and front QJ bolts, I think it will lift a little and be OK. We’ll see. Everything else looks pretty good. But I’ll be able to tell more in the next round with the bulb seal and cushioning. Interesting this is my first build where the front frame pieces lined up. My other two I had to bump the DS over an inch or so. Not this time. Good. The wheels lined up in the wheel wells pretty good. Offsets look good too. My ride height is at least an inch too high still, so the gap along the top is more than it will be once everything is adjusted. The GP Headers are pointed right into the pipe openings. Nice.
The heat and humidity have been pretty bad, so I’ve cut down my hours a bit. Just get too wiped. Supposed to cool down or at least lose some of the humidity later this week. I hope so. You hot climate guys probably think I’m a wimp.
Last edited by edwardb; 01-04-2017 at 08:33 AM.
Build 1: Mk3 Roadster #5125. Sold 11/08/2014.
Build 2: Mk4 Roadster #7750. Sold 04/10/2017.
Build Thread
Build 3: Mk4 Roadster 20th Anniversary #8674. Sold 09/07/2020.
Build Thread and
Video.
Build 4: Gen 3 Type 65 Coupe #59. Gen 3 Coyote. Legal 03/04/2020.
Build Thread and
Video
Build 5: 35 Hot Rod Truck #138. LS3 and 4L65E auto. Rcvd 01/05/2021. Legal 04/20/2023.
Build Thread. Sold 11/9/2023.
-
07-25-2016, 04:46 PM
#339
Senior Member
Body On Plus
In a previous update I mentioned I had taken my transmission cover to a local automotive upholstery shop to have some stitching sewn in the leather and then installed. Also had them do some stitching on the pockets of the door panels. Everything was done last week, just when promised (good place) and I have the pieces all done. Pretty happy with how they turned out.
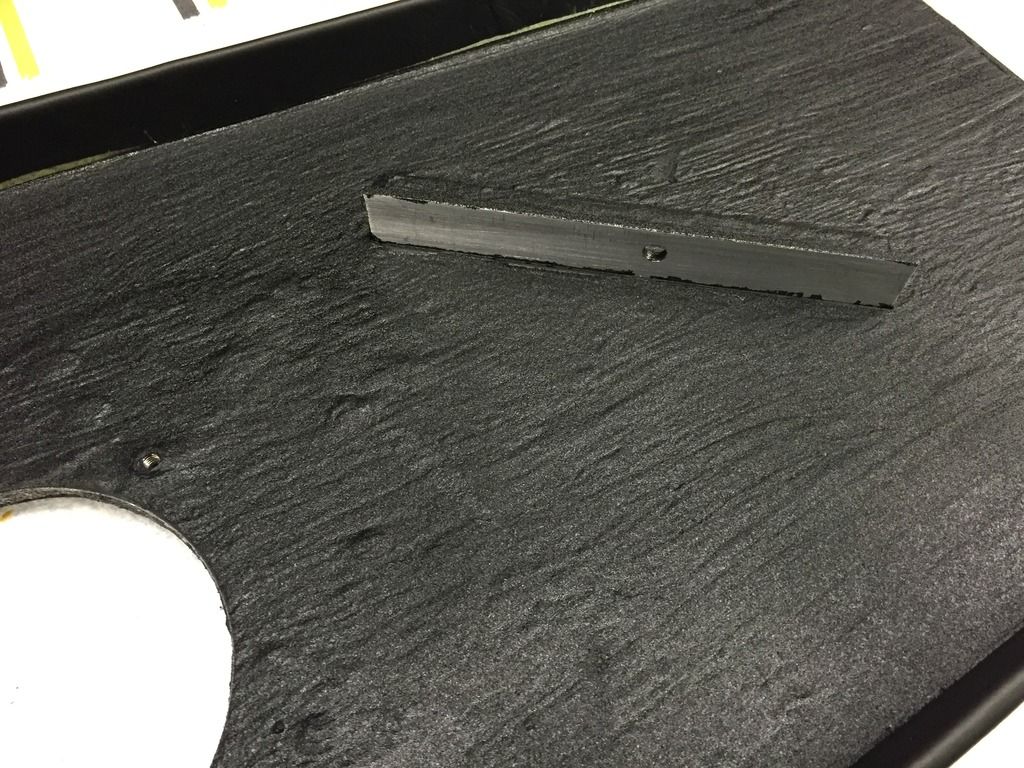
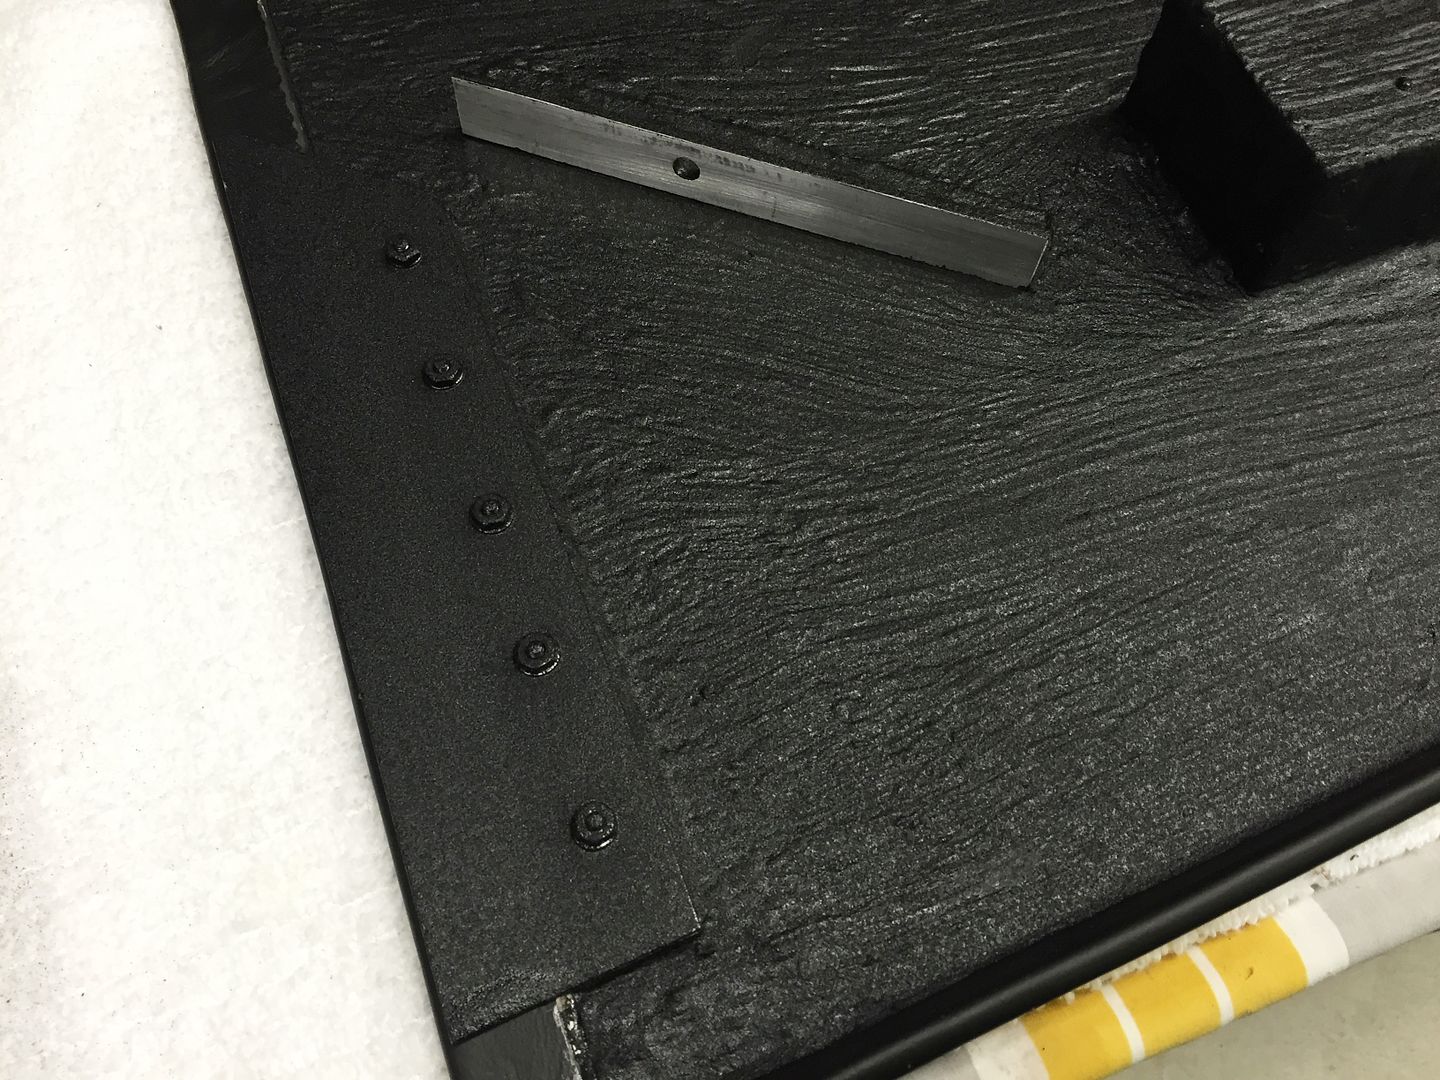
This is the bottom of the transmission cover. After installing a patch and getting the shifter hole in the right location and installing a box for the ash try to fit into, I worked on a way to make the mounting hidden. After some thought, came up with a pretty simple solution. I riveted two aluminum 90-degree angle pieces that line up with the 3/4-inch tubes in the tunnel. I also made a sandwich of .090 and .040 aluminum to go along the front. The front engages into the lower bend of the front tunnel A-shaped piece, then I put two 1/4-bolts through the angle pieces and into the transmission tunnel cross pieces. I located the two bolts where they’re easily accessible from the bottom. I’m very pleased with how solid this holds the cover in place. And all hidden.
Once assembly was completed and before the leather was applied, I brushed on two coats of Lizard Skin sound and two coats of Lizard Skin heat on the bottom. I like Lizard Skin a lot, but I don’t like to leave it exposed. Works best when covered IMO, like with carpet, etc. I happened to be poking around on their website, and found they said the same thing. They have a top coat product now (their part number 30101) so gave that a try. It’s solvent based, vs. the water based Lizard Skin product, and is similar to typical undercoating spray. Here it is all done. Not too pretty, but in this case who cares?
This is a closer view of the two brackets and the front mounting.
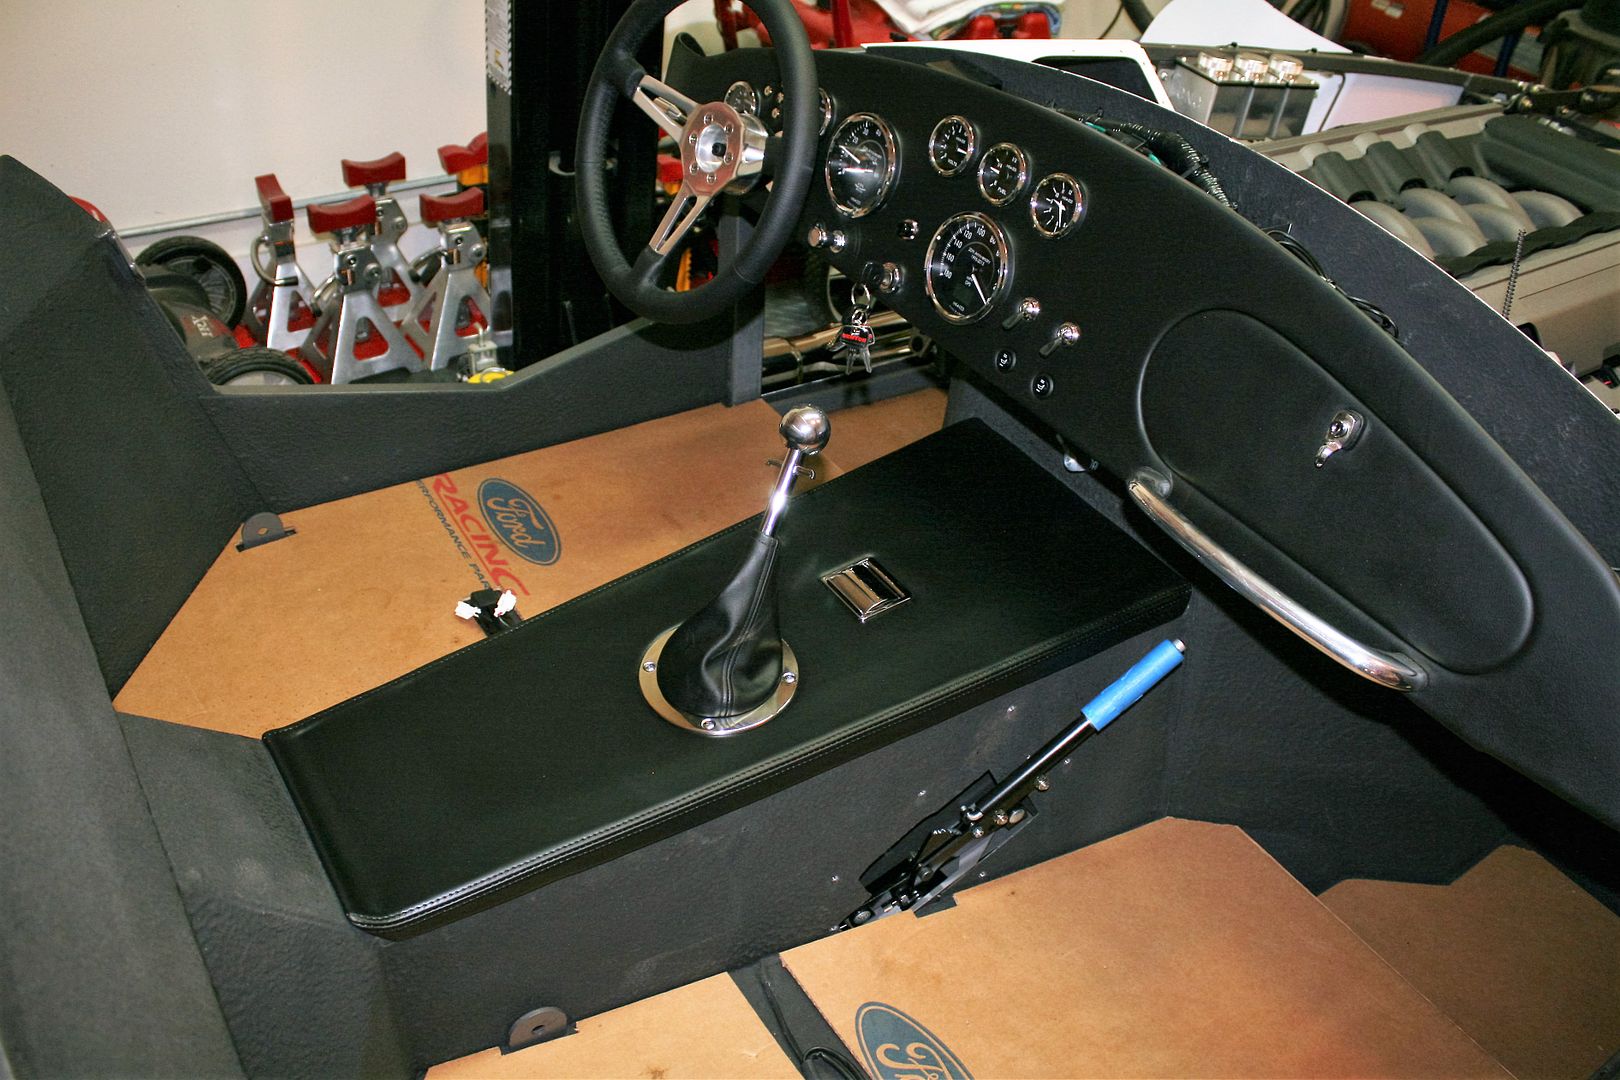
And finally, with the good side up and what it looks like in the cockpit.
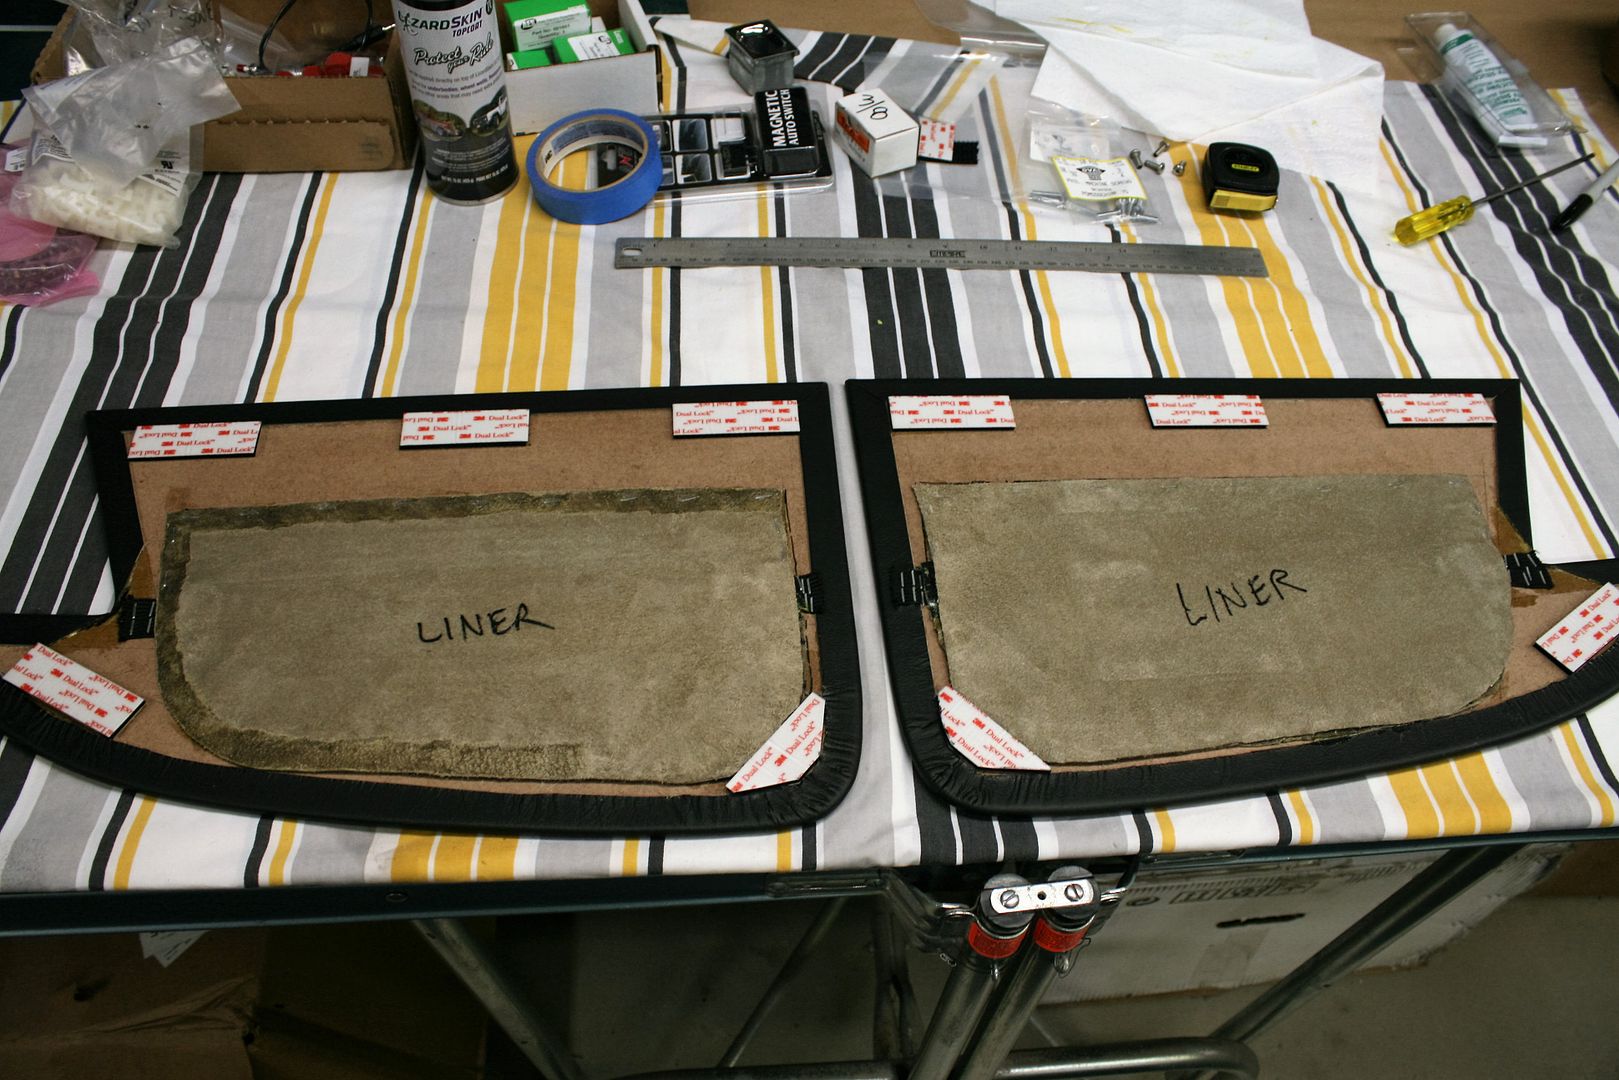
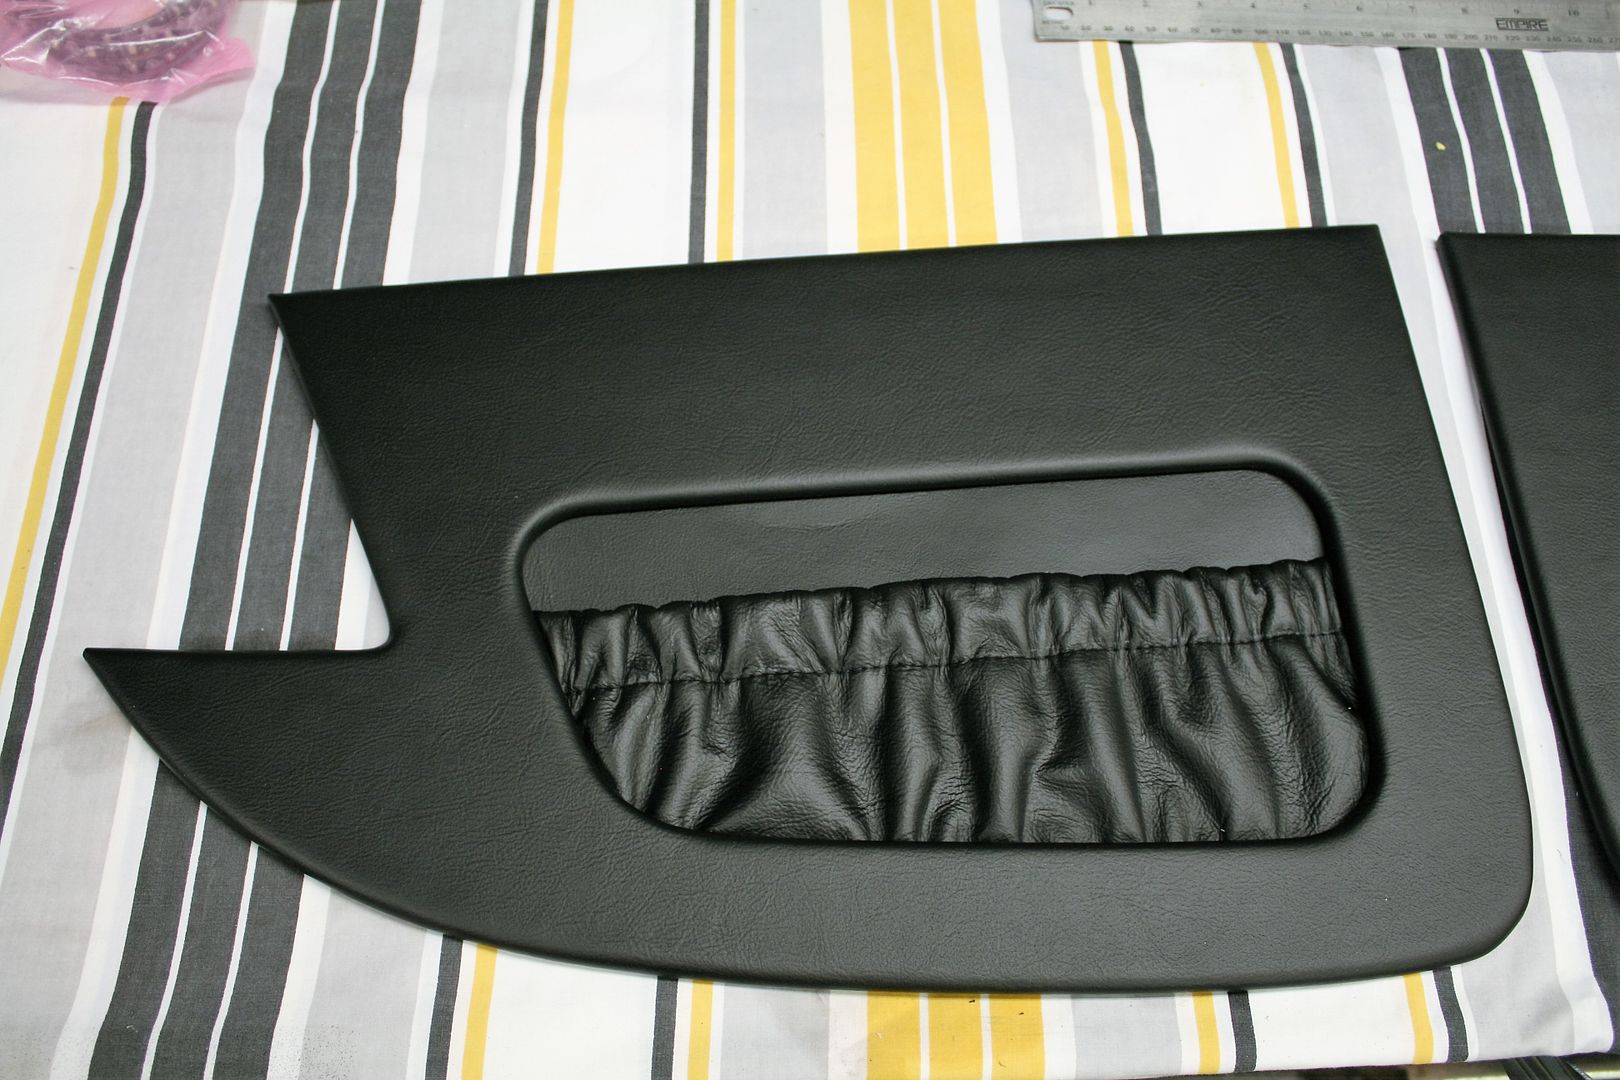
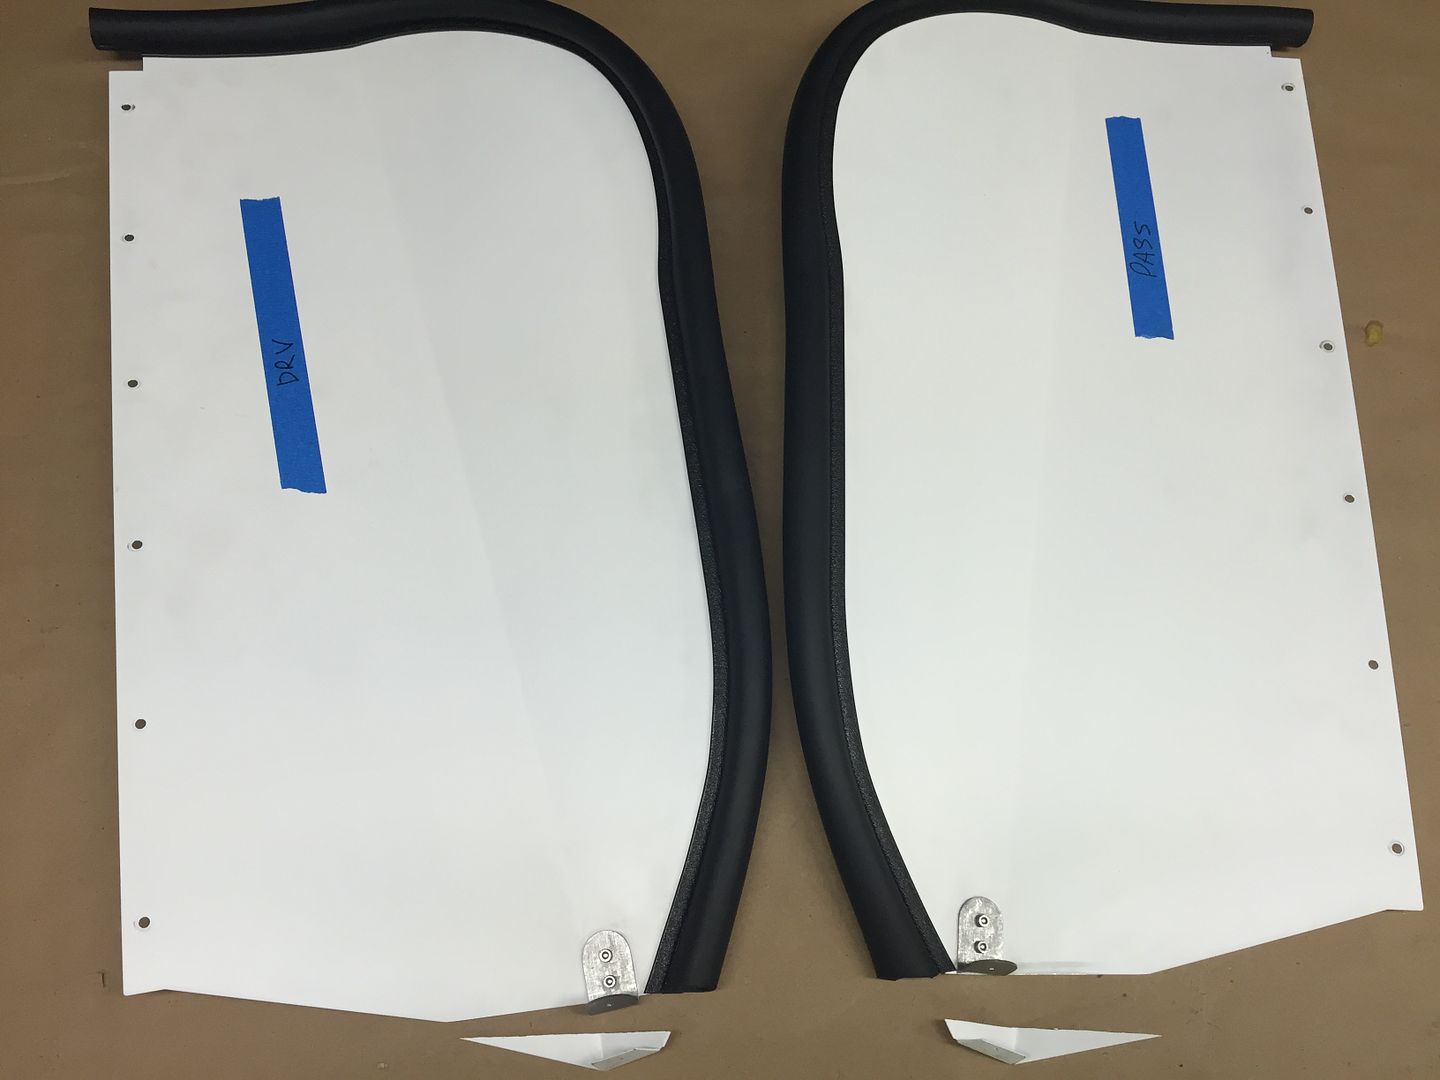
I also finished up the leather door panels. These are essentially copies of Herb’s door panels but made from the same leather hide as the dash and transmission cover. The upholstery shop stitched the pocket pieces and installed a piece of elastic. I stapled that in place with extra staples in the elastic band. Then glued and stapled a liner over that. I’m trying to have the mounting for these hidden as well. I had a little trouble with the Velcro Herb uses, so ended up with some finish screws through the panels on my last builds. (Maybe if my wife didn’t stuff those big water bottles in there…) Doing some more looking, I found a 3M product called Dual Lock. A little similar to Velcro except they’re molded from plastic and kind of snap together. 3M claims five times as strong as Velcro. They come in all different holding strengths and different adhesives. I picked a combination that seems would be strong enough and also has a high temp permanent adhesive. I put three pieces along the top and one in each corner. I wasn’t sure how it would stick to the Masonite, so wiped on some contact cement where they would go, let it mostly dry, and stuck it down. They’re also just thick enough to deal with the layers of leather on the back of the panels. I suspect they will be pretty hard to get off once I put them on the doors, but that’s OK. I’ve never had to get the other ones off. On purpose anyway.
Back of the two door panels:
One of the finished panels. Turned out pretty nice I think.
Tomorrow it’s back out into the sauna and will take off the body, make a few adjustments, put on the bulb seal and cushions, then back on. If all goes well, can start finalizing lots of things.
Last edited by edwardb; 07-26-2016 at 06:29 AM.
Build 1: Mk3 Roadster #5125. Sold 11/08/2014.
Build 2: Mk4 Roadster #7750. Sold 04/10/2017.
Build Thread
Build 3: Mk4 Roadster 20th Anniversary #8674. Sold 09/07/2020.
Build Thread and
Video.
Build 4: Gen 3 Type 65 Coupe #59. Gen 3 Coyote. Legal 03/04/2020.
Build Thread and
Video
Build 5: 35 Hot Rod Truck #138. LS3 and 4L65E auto. Rcvd 01/05/2021. Legal 04/20/2023.
Build Thread. Sold 11/9/2023.
-
07-27-2016, 08:02 PM
#340
Senior Member
First Pass Body Fitting Completed
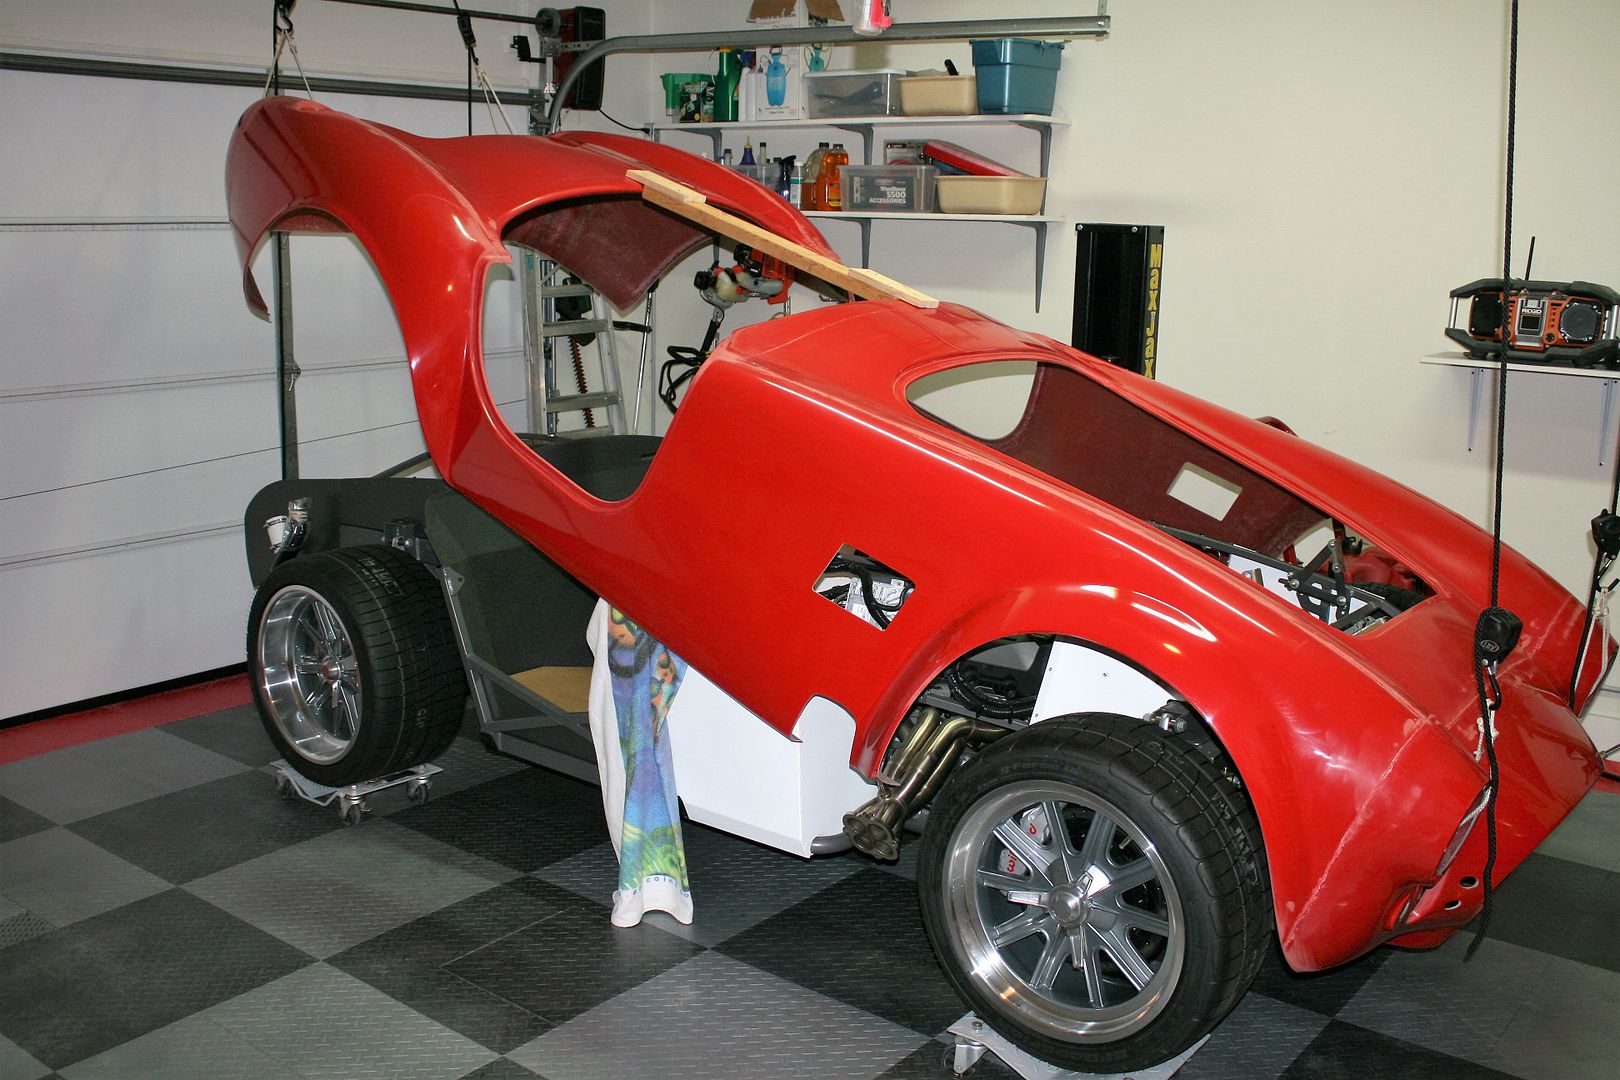
I've had the body off and on several times in the last couple days, making tweaks along the way, and am now happy with how it sits on the chassis. There were a number of questions and some dialogue on the other forum about what needed to be done. None here though. Brief summary: Needed a couple more tries at the trim on the rear cockpit roll to give proper clearance for the rear cockpit wall and pending carpet. Needed to re-do the curve on the ends of my dash so they fit properly into the underside of the body. My nice gentle curves needed to be made tighter. Because the PS is closed at the firewall, meant I had to trim about 1-inch off the end of the dash so it could make a tighter bend. I peeled back the leather on the end (learned that DAP Landau adhesive sticks really well...) cut off the aluminum, and re-wrapped the end. No one but me will know it was done plus it's hidden up under the body anyway. Also had to bump over the DS front frame horn about 1/2-inch. With the body centered by measuring from the chassis to the front wheel well lips the DS QJ mount interfered with the DS brake duct opening. Now moved over and fixed.
Now will get it back up on the lift and start fitting and finalizing things. Saw this view when I was on the ladder unhooking my locking rope pulleys from the ceiling. Pretty cool. Starting to really look like something now.

Build 1: Mk3 Roadster #5125. Sold 11/08/2014.
Build 2: Mk4 Roadster #7750. Sold 04/10/2017.
Build Thread
Build 3: Mk4 Roadster 20th Anniversary #8674. Sold 09/07/2020.
Build Thread and
Video.
Build 4: Gen 3 Type 65 Coupe #59. Gen 3 Coyote. Legal 03/04/2020.
Build Thread and
Video
Build 5: 35 Hot Rod Truck #138. LS3 and 4L65E auto. Rcvd 01/05/2021. Legal 04/20/2023.
Build Thread. Sold 11/9/2023.
-
08-05-2016, 05:36 PM
#341
Senior Member
Body Installation Details
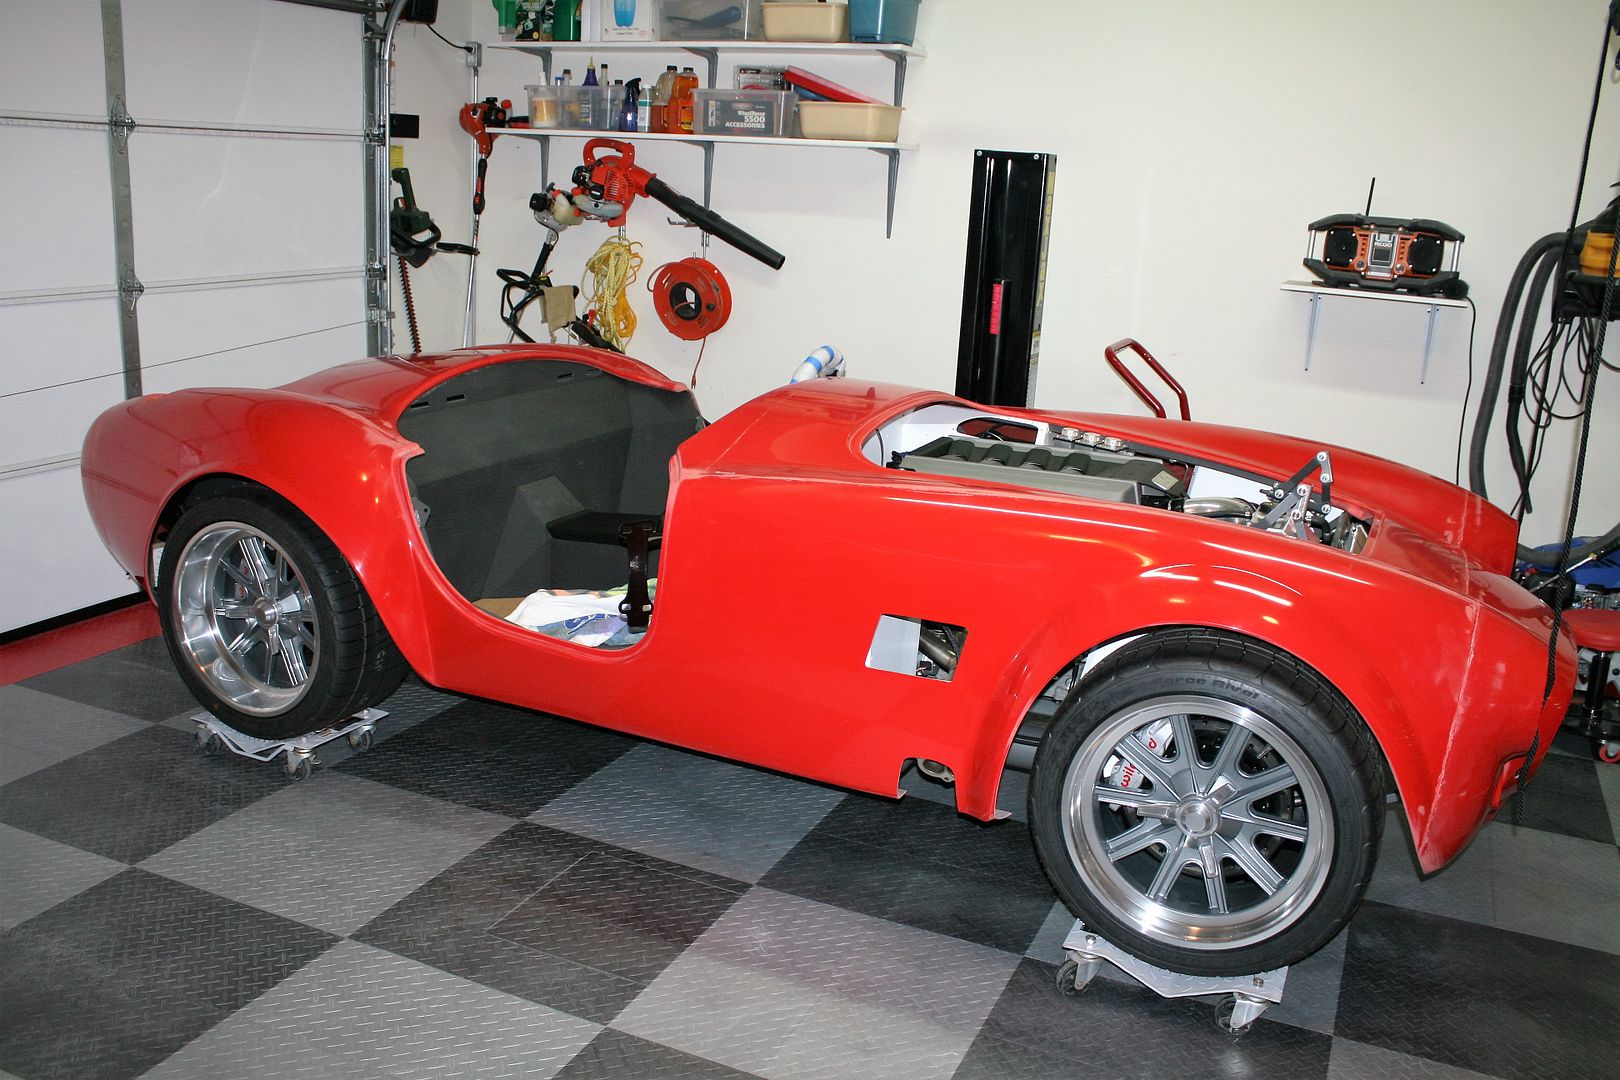
Plugging away trying to get ready for paint. Life has gotten in the way a little lately. We’re working on a real estate deal that could be real interesting and an amazing new space to work in. But all very preliminary and we’ll see what happens. Trying not to get my hopes up too much.
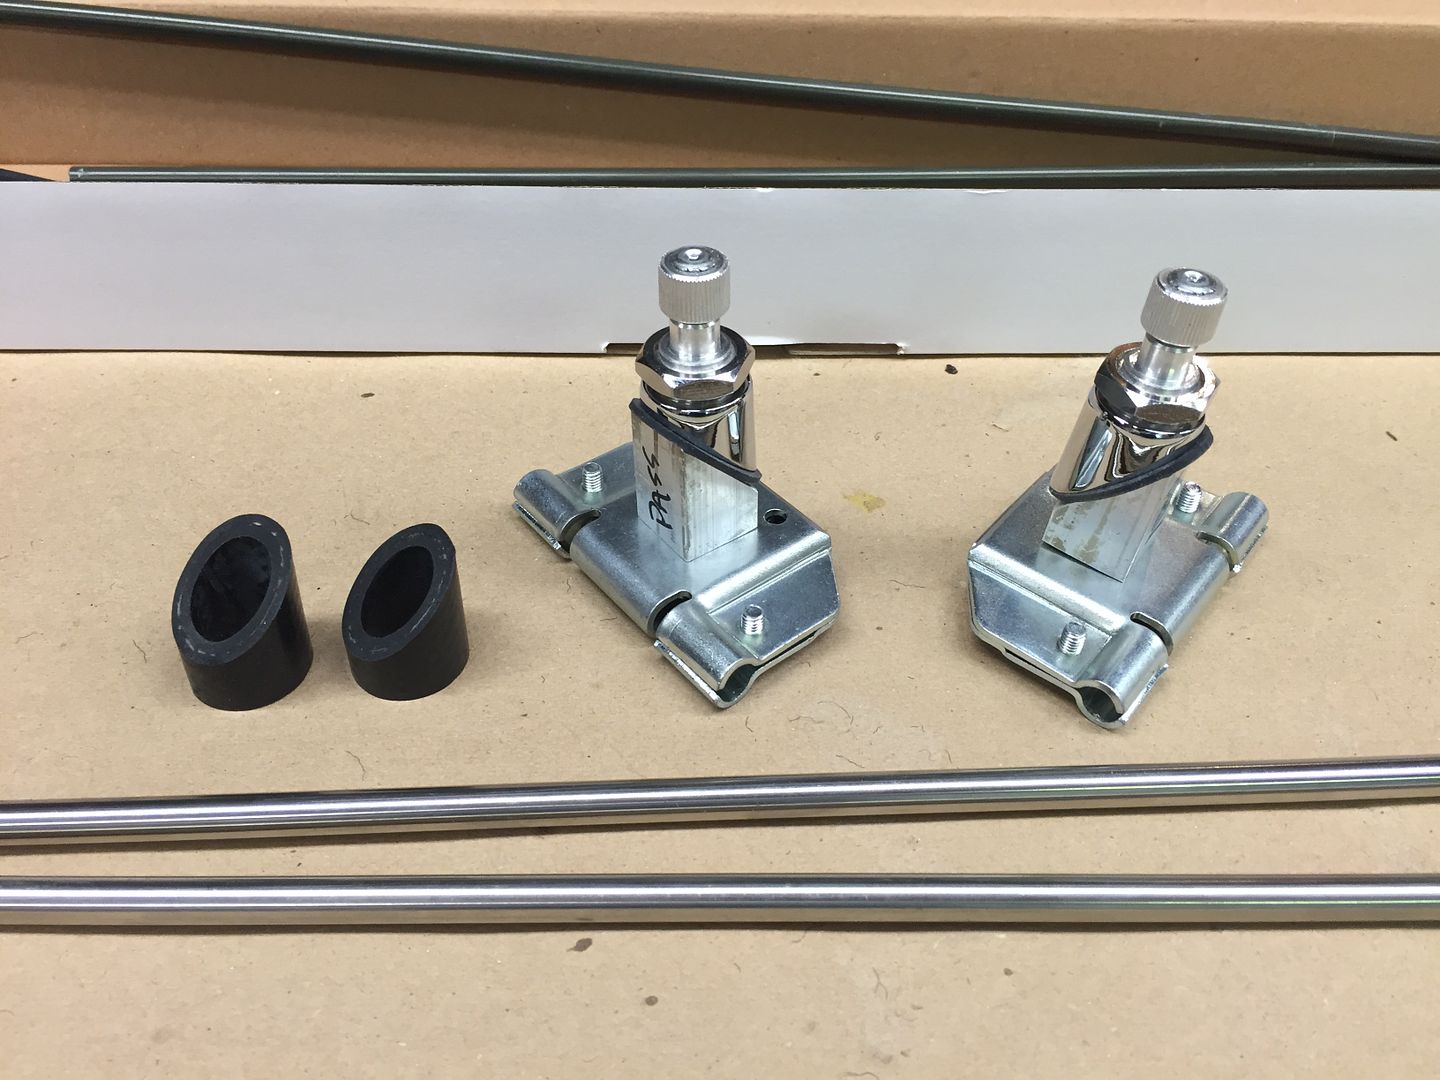
Meanwhile, working my way around getting everything set to take to the painter as a completed, fitted build. I’ve said this before, but I’ll say it again. My personal goal is nothing touches the finished paint job that hasn’t been mocked up and fitted before paint. It scares me (as it does the builder) every time I see a forum post about fitting something to a painted body. Even things like side exhaust cutouts, etc. Don't do that!  Once I was satisfied the body was in the right position front to back and centered side-to-side, first bolted in the rear quick jack mounts. I’m using a bumper and overriders in the back, and only overriders in the front. Using the couplers I previously showed on the back, cut my threaded rod and anchored down the rear. I had to adjust the precut holes a little. But not much. Just have rough hardware on there now, and will add 3/4-inch polished tubes from ********** later. But not until the trunk lid is fitted and confirm the rear valance is where it needs to be.
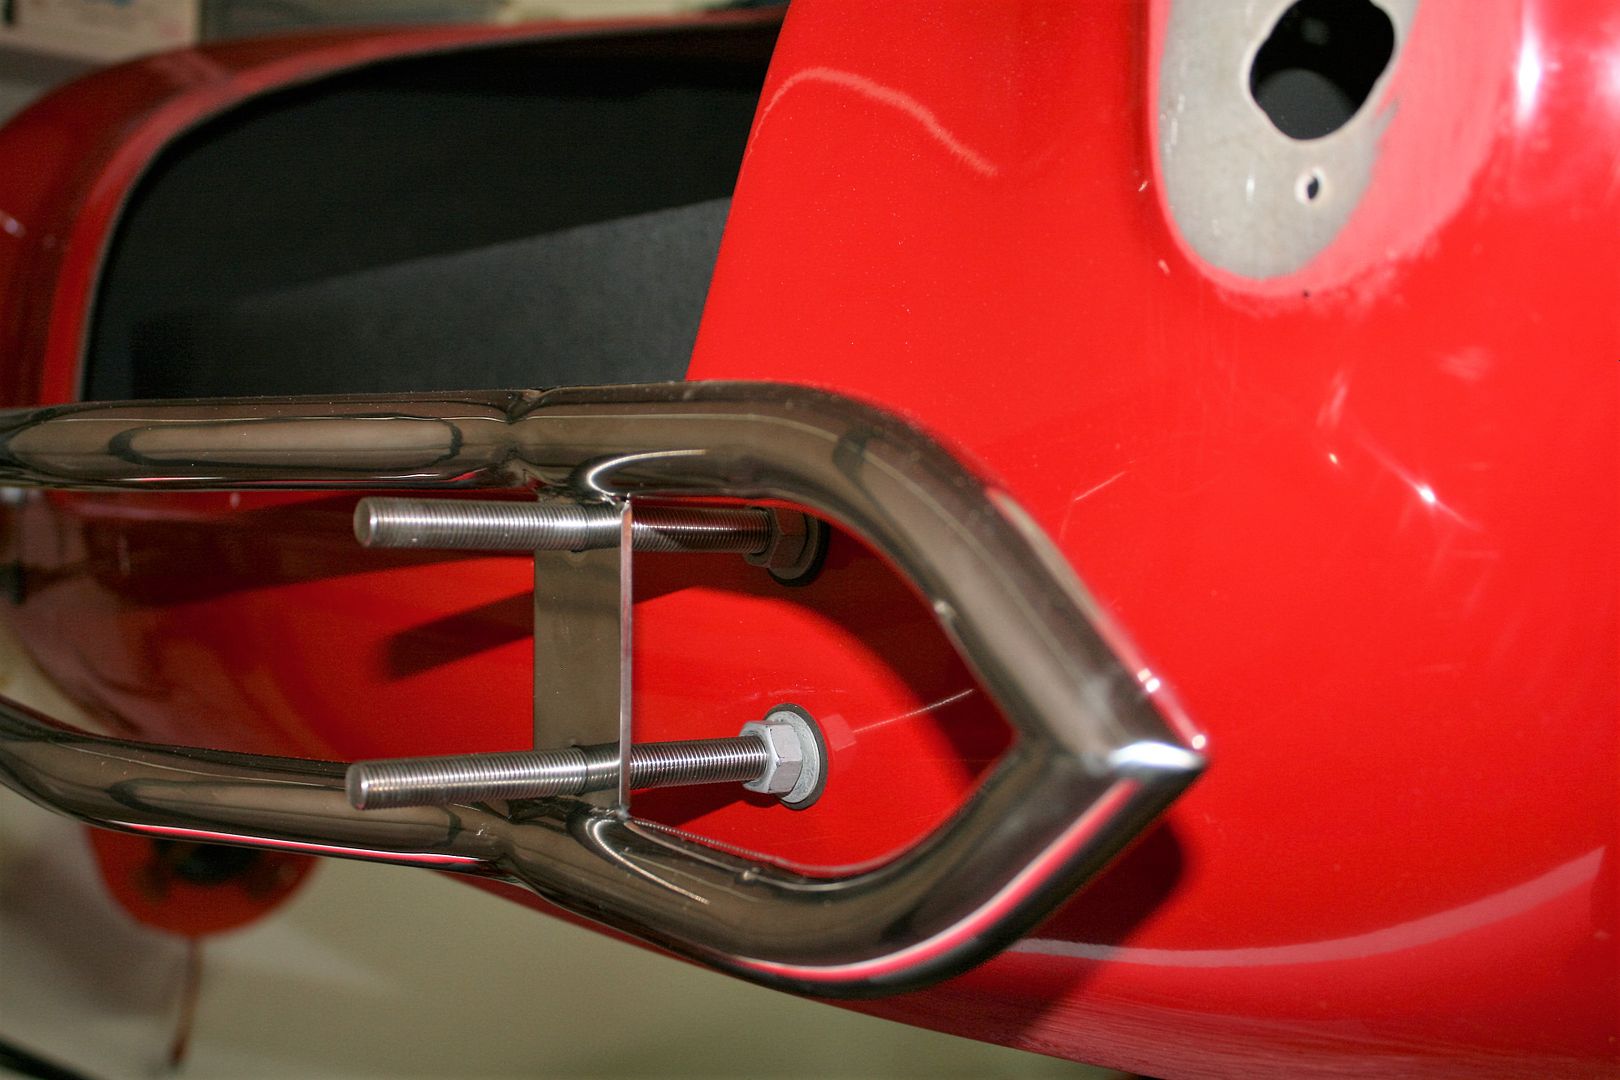
For the front, I’m using ********** grommets and 3/4-inch polished tubes along with the same 7/16-inch threaded rod as in the back. I did this same exact thing on my last two builds and it looks really clean and is amazingly strong. But the grommets need to be located and fitted properly. I propped up the front of the body so it was properly above the 3/4-inch hood surround tubes and the pre-cut QJ holes were properly aligned with the frame brackets. Then located and cut the holes for the grommets, cut the 3/4-inch tubing to the proper lengths, and mocked up the overriders. I like the new brackets that Factory Five designed and provided with this kit attaching the body using the running light location to the QJ bolts. But I'm probably not going to use them. This method is really strong, plus I'm also installing a Dark Water splitter like #7750. That too mounts on the QJ bolts. Just too much going on in there.
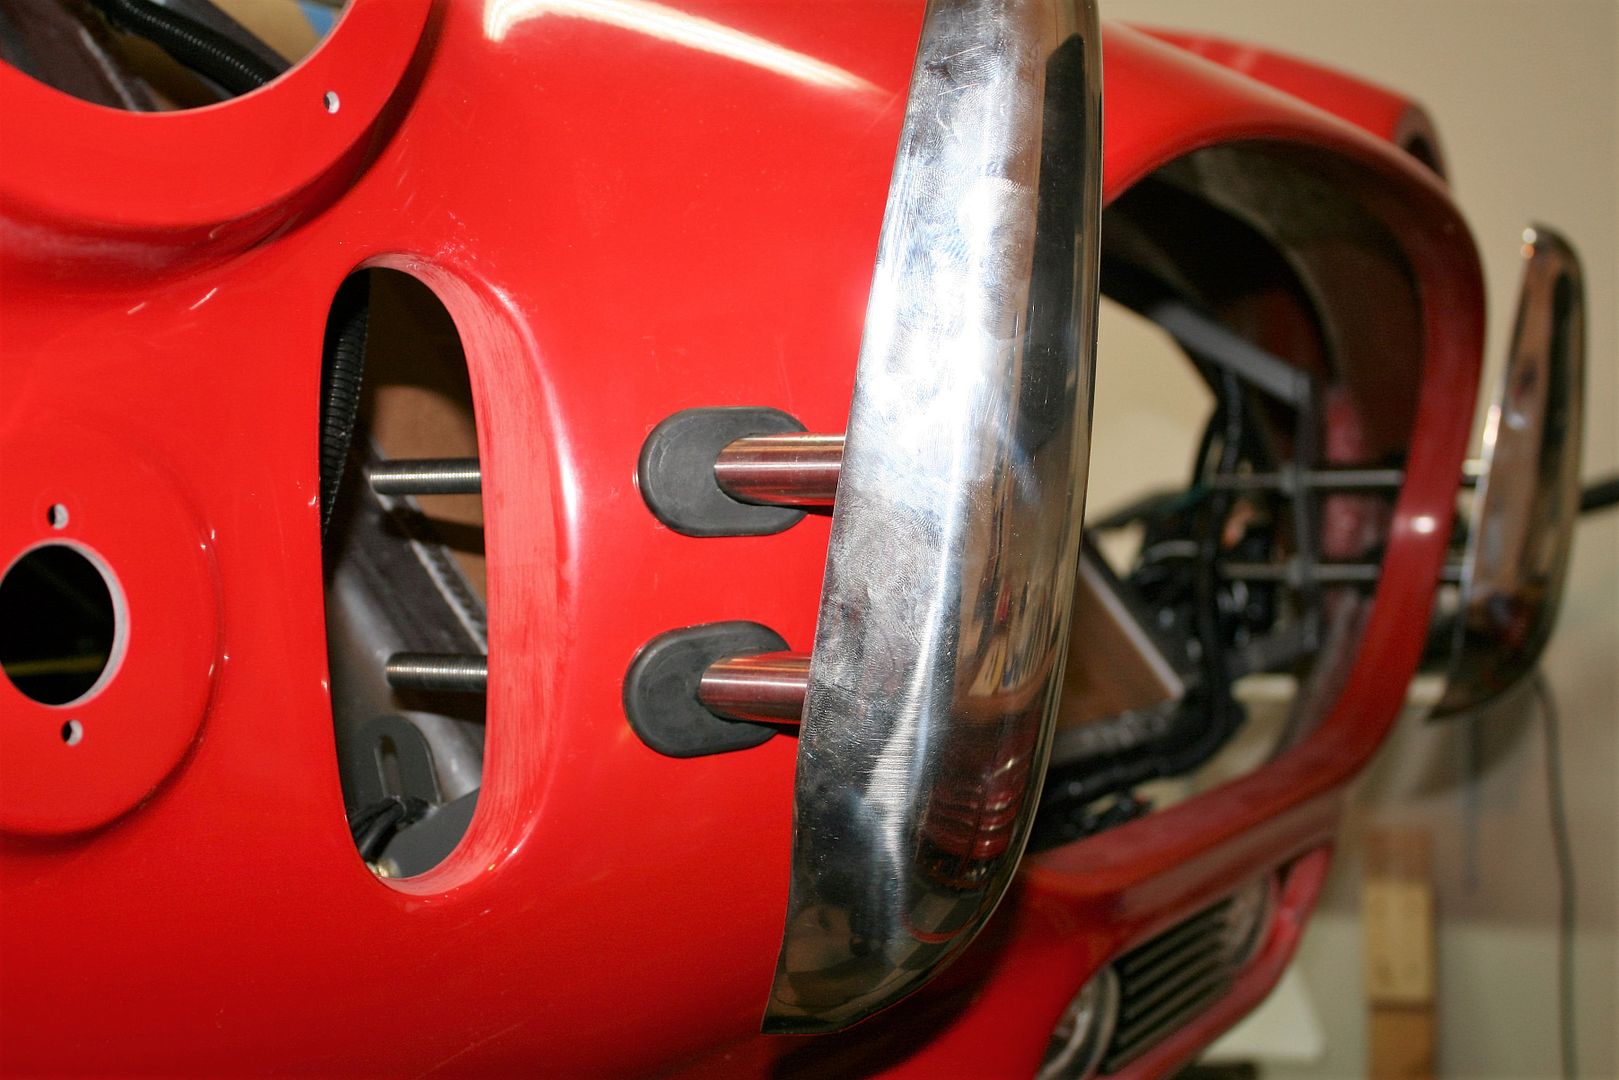
Note that since this installation is using threaded rod with nuts on the inside of the overriders, I drilled out the threads in the overrider mounting plates. Also note the angle of the overriders. To be reasonably authentic, they are supposed to be at roughly the same angle as the radiator opening on the body. The bracket welded inside the overriders is at an angle, but not quite enough. Easy enough to tip ‘em just a little more. Finally, this 3/4-inch tube from ********** is a bit different than what I’ve received from them before. It’s the same OD, but a much smaller ID (thicker wall) and not as highly polished. It will be OK. But the bushings I used before to center the tubes over the threaded rods no longer fit. I used several wraps of aluminum tape over the threaded rods at each end and that was all it took.
I also mounted the Tangent Technologies driving lights and SS grill kit. I showed the completed assembly in a previous update. Now just a case of locating it and drilling four holes for the mounting bolts. I briefly plugged in the Weatherpack and confirmed that it works properly. One of the few remaining electrical items I hadn’t checked yet. All good. Now back in the box until final assembly after paint.
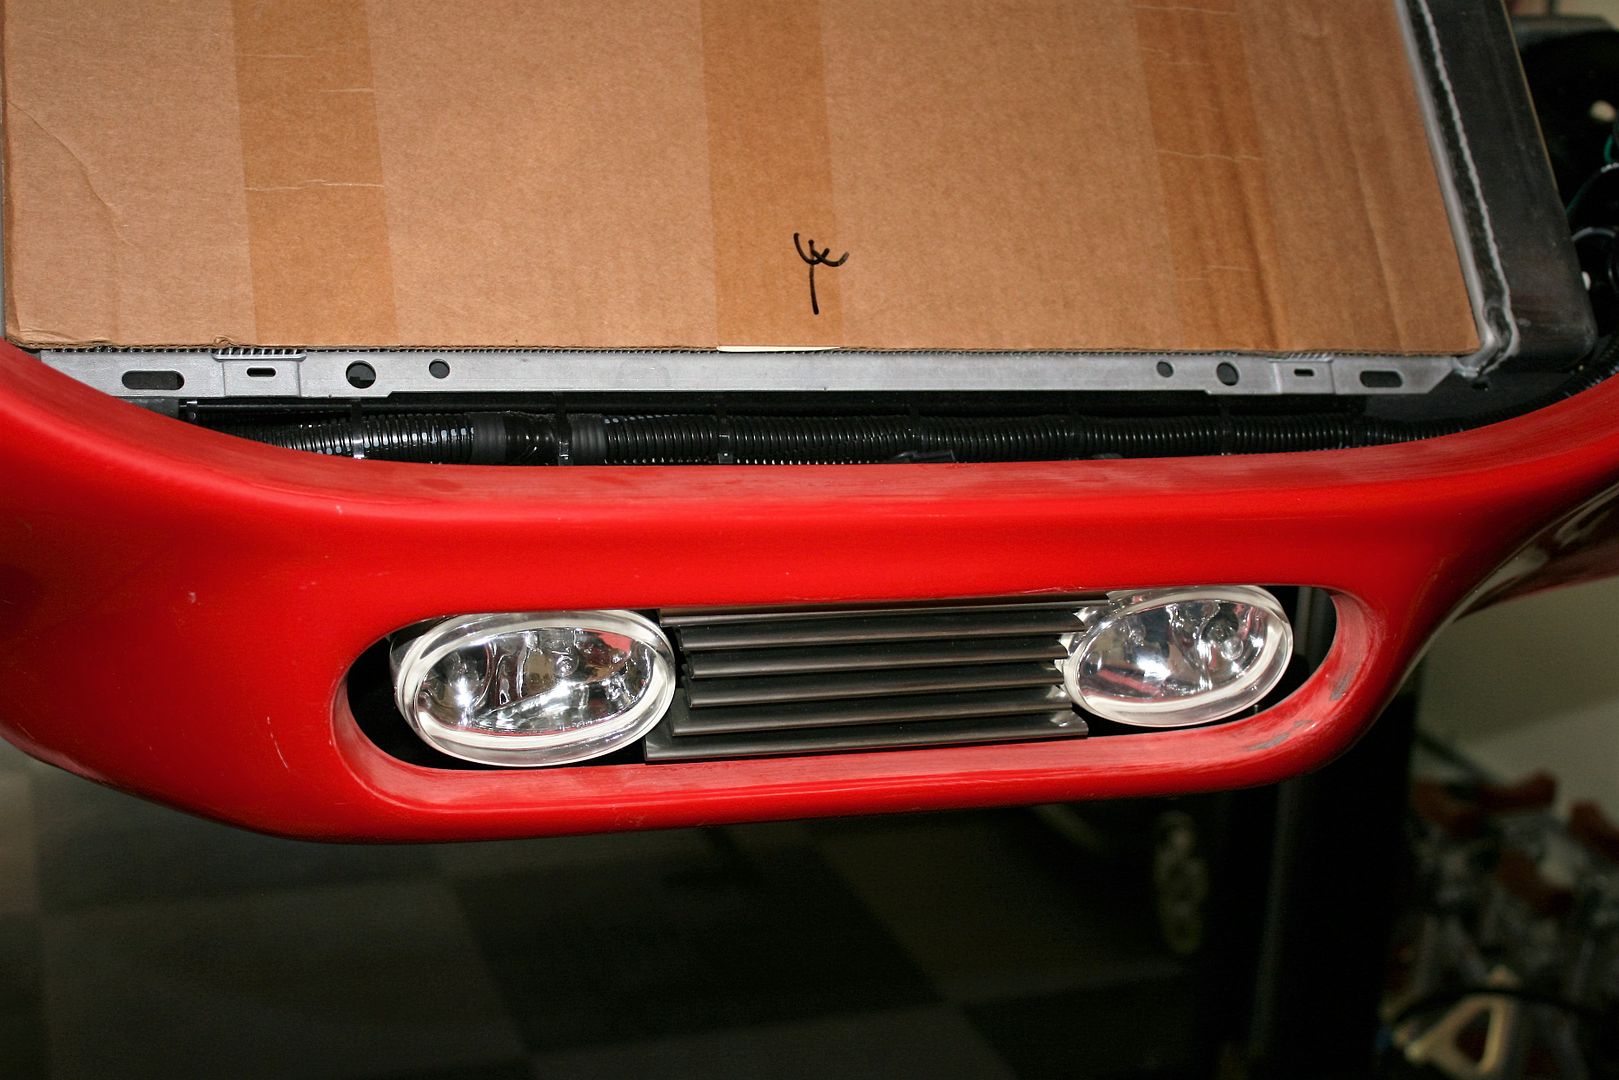
I installed the rear splash guards, also affectionately called elephant ears (for obvious reasons) and they fit pretty good. I think these must be slightly updated from previous ones. For both other builds they were too small and I had to make new ones or there would have been large gaps. Not so with these. I actually had trim them just a bit. Easy. I used my normal nutserts and 10-32 flanged SS screws to attach to the chassis. Haven't started on the front ones yet.
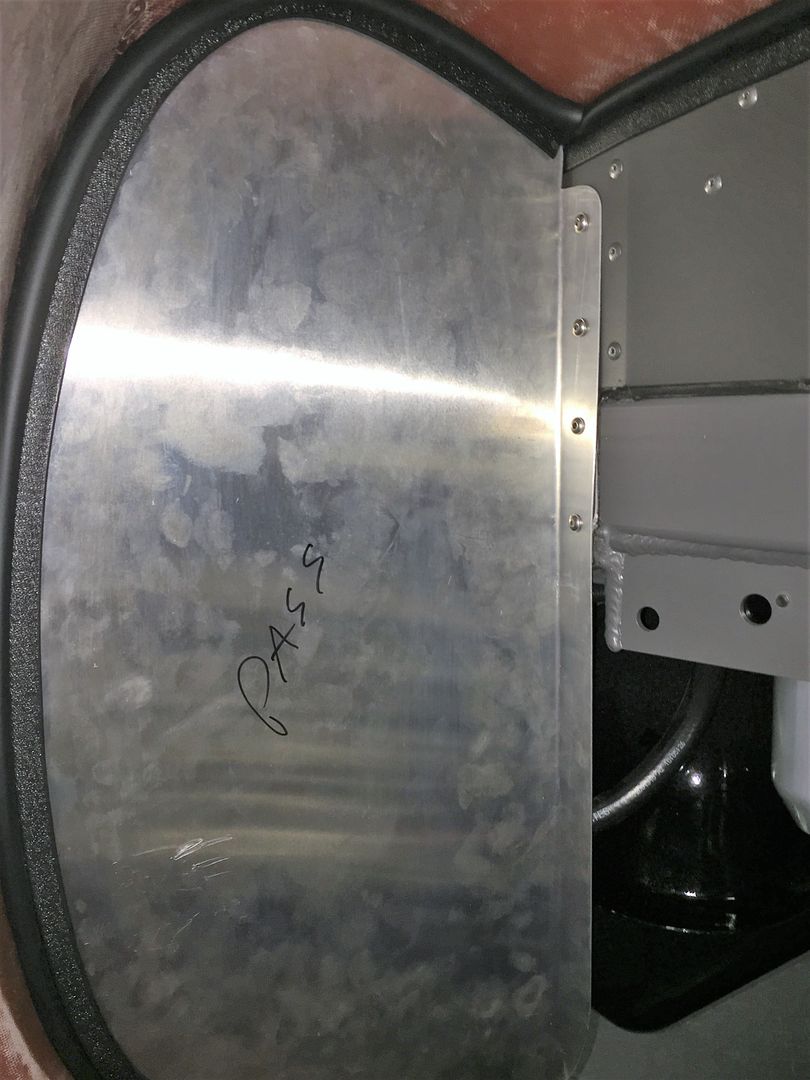
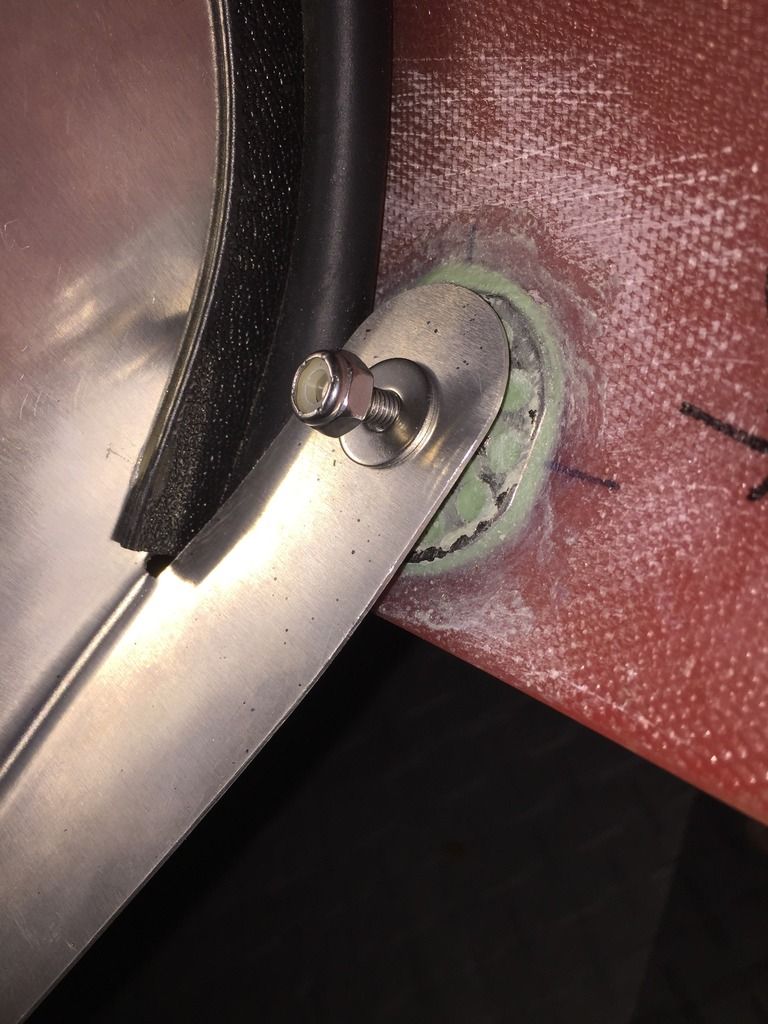
There is a tab on the bottom of the rear splash guards that gets attached to the body. Some guys leave that unattached (thread about that some months ago) but I want it attached. The usual method is a small bolt through the body. Although it’s well around toward the bottom, it still can be slightly visible. I decided on this build to not put a bolt through the body but instead use a 10-32 perforated base stud (97590A567 from McMaster) same as I use on the side louvers. Roughed up the body with 60 grit, cleaned, and bonded with HSRF. I don’t have the nut tightened all the way down, but you can get the idea here:
Last edited by edwardb; 08-05-2016 at 10:27 PM.
Build 1: Mk3 Roadster #5125. Sold 11/08/2014.
Build 2: Mk4 Roadster #7750. Sold 04/10/2017.
Build Thread
Build 3: Mk4 Roadster 20th Anniversary #8674. Sold 09/07/2020.
Build Thread and
Video.
Build 4: Gen 3 Type 65 Coupe #59. Gen 3 Coyote. Legal 03/04/2020.
Build Thread and
Video
Build 5: 35 Hot Rod Truck #138. LS3 and 4L65E auto. Rcvd 01/05/2021. Legal 04/20/2023.
Build Thread. Sold 11/9/2023.
-
08-05-2016, 05:37 PM
#342
Senior Member
Body Installation Details (continued)
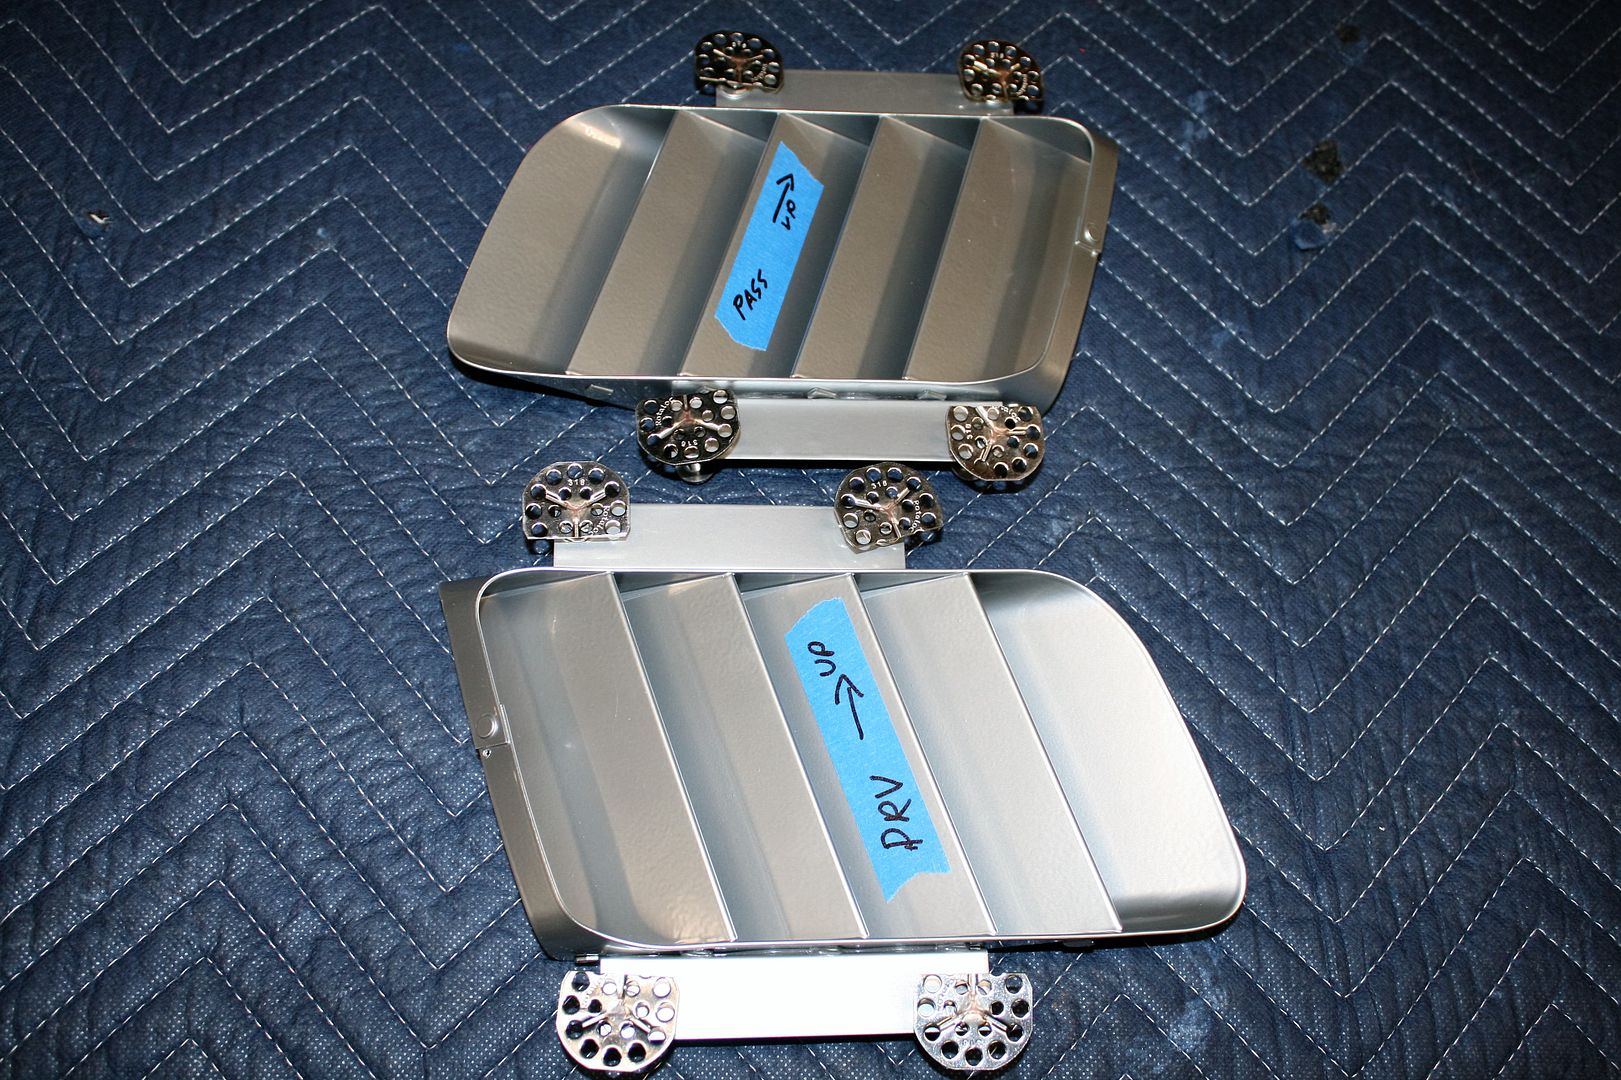
I prepped the side louvers for installation. I bought the upgraded ones from Factory Five. They’re the same thing as available from Whitby’s, I think also **********, etc. I had them silver powder coated when I did all my other powder coating. I attached the mounting brackets to the sides with 6-32 button head screws. The heads of the screws are on the inside and (mostly) hidden behind the louvers. I’ll glue the 10-32 perforated base studs to the body and clean up the opening to match the louvers when I have the body off for undercoat. I did trim a little bit off the base studs because they were too close to the opening.
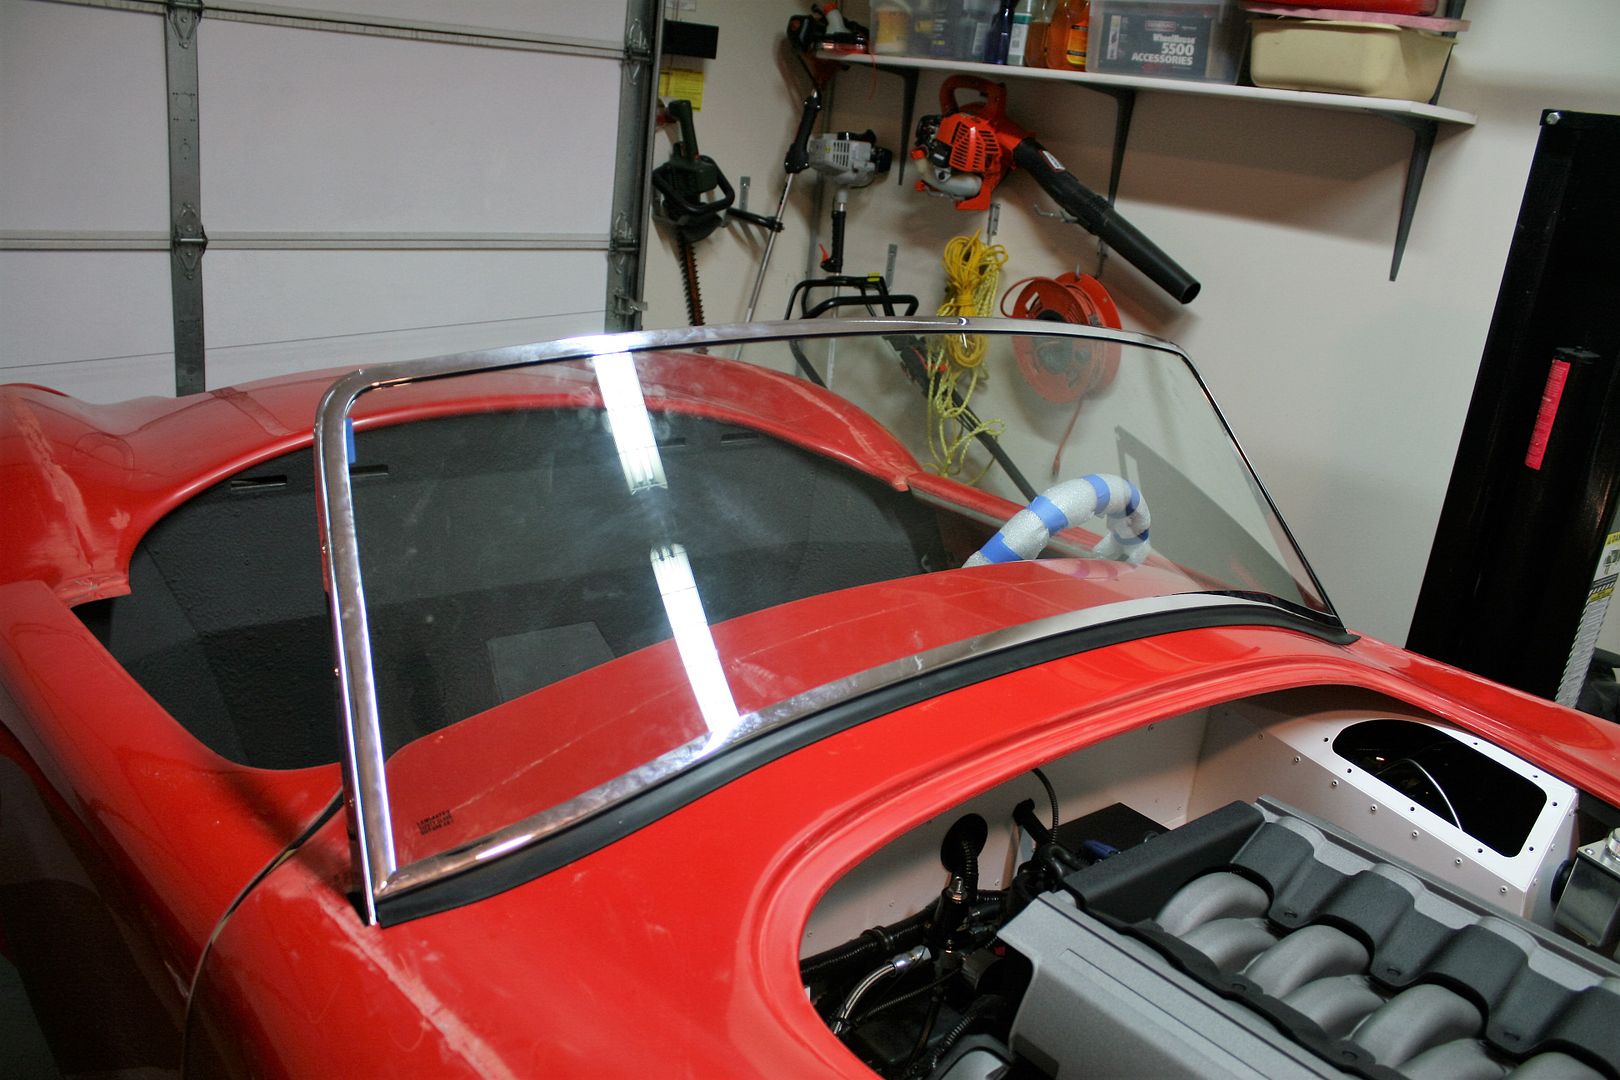
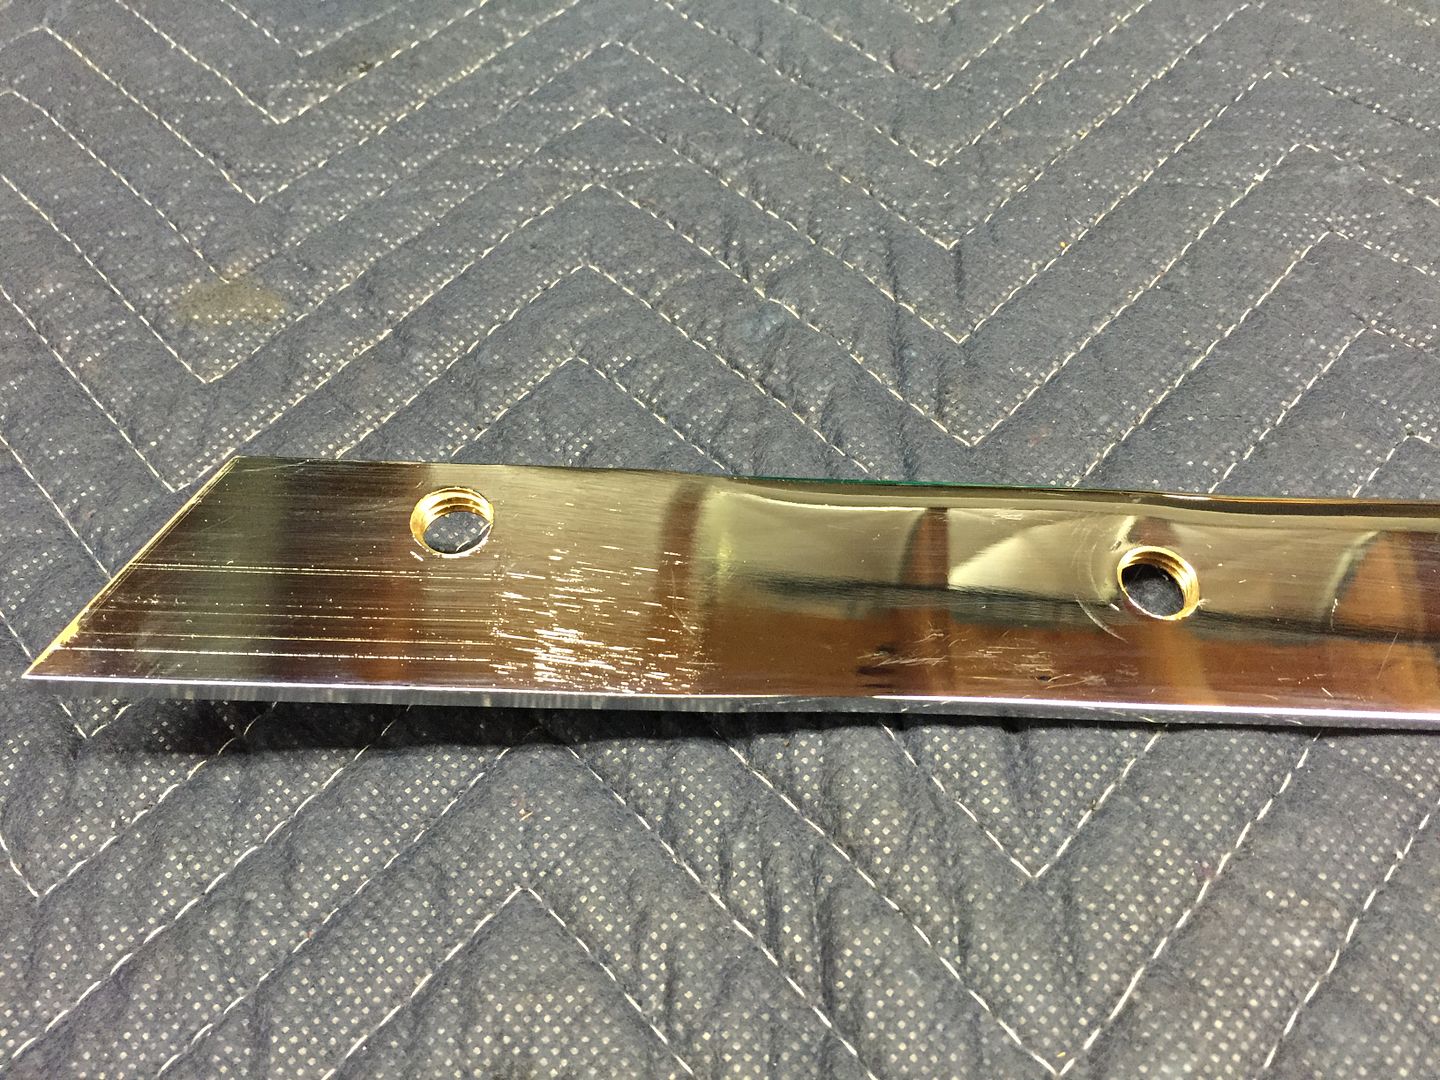
The last couple days I’ve been working on installing the windshield. These things can be a bit of a pain, to say the least. First order of business was to replace the brass strips in the ends with the SS pieces from Whitby. Those brass pieces are incredibly fragile. I managed to strip one of the holes just checking the fit of the side bars before taking it apart. Get it just a little cross threaded or get too heavy handed and the 2 to 3 turns of threads in the brass are gone. The SS strips went in pretty easily. They come with 10-32 chrome oval head screws. But unfortunately they are too short. (Had this problem on #7750 as well.) They supply 1/4-inch long screws but they need to be about 3/8-inch. Got those, had to adjust a few a bit more, and finally got the side bars attached. Quick note: Lots of scary talk on the forums about breaking the windshields with screws into the frame. Very true for the visor connections along the top. But not for the side bars. Those screws bottom out against the frame and the glass is on the other side of the metal. But still you have to be careful to get them started straight and not over-tighten. Even the SS ones. I trimmed 2-inches off the bottom of each side bar, and worked to get the body openings adjusted. My body is pre-cut, so the initial openings are there. After a few adjustments, the side bars slid into place. Another hint for first-timers: The final body openings are not straight front-to-back. They are angled some. They point out slightly, when looking from the back to the front. Lots of discussion about the right windshield angle. I’m aiming for 27-inches from the top windshield screw to the front of the rear door opening. This, BTW, is the dimension Factory Five provides for their premium top. I haven’t gotten any further. The bars seem to be matching up pretty well with the chassis mounting points, but need to look at this further and finish the mounting. I’ll shim them if needed. The goal is not put any stress on the glass. The good news is the windshield and gasket are fitting the contour of the body perfectly. The best of the builds I’ve had so far.
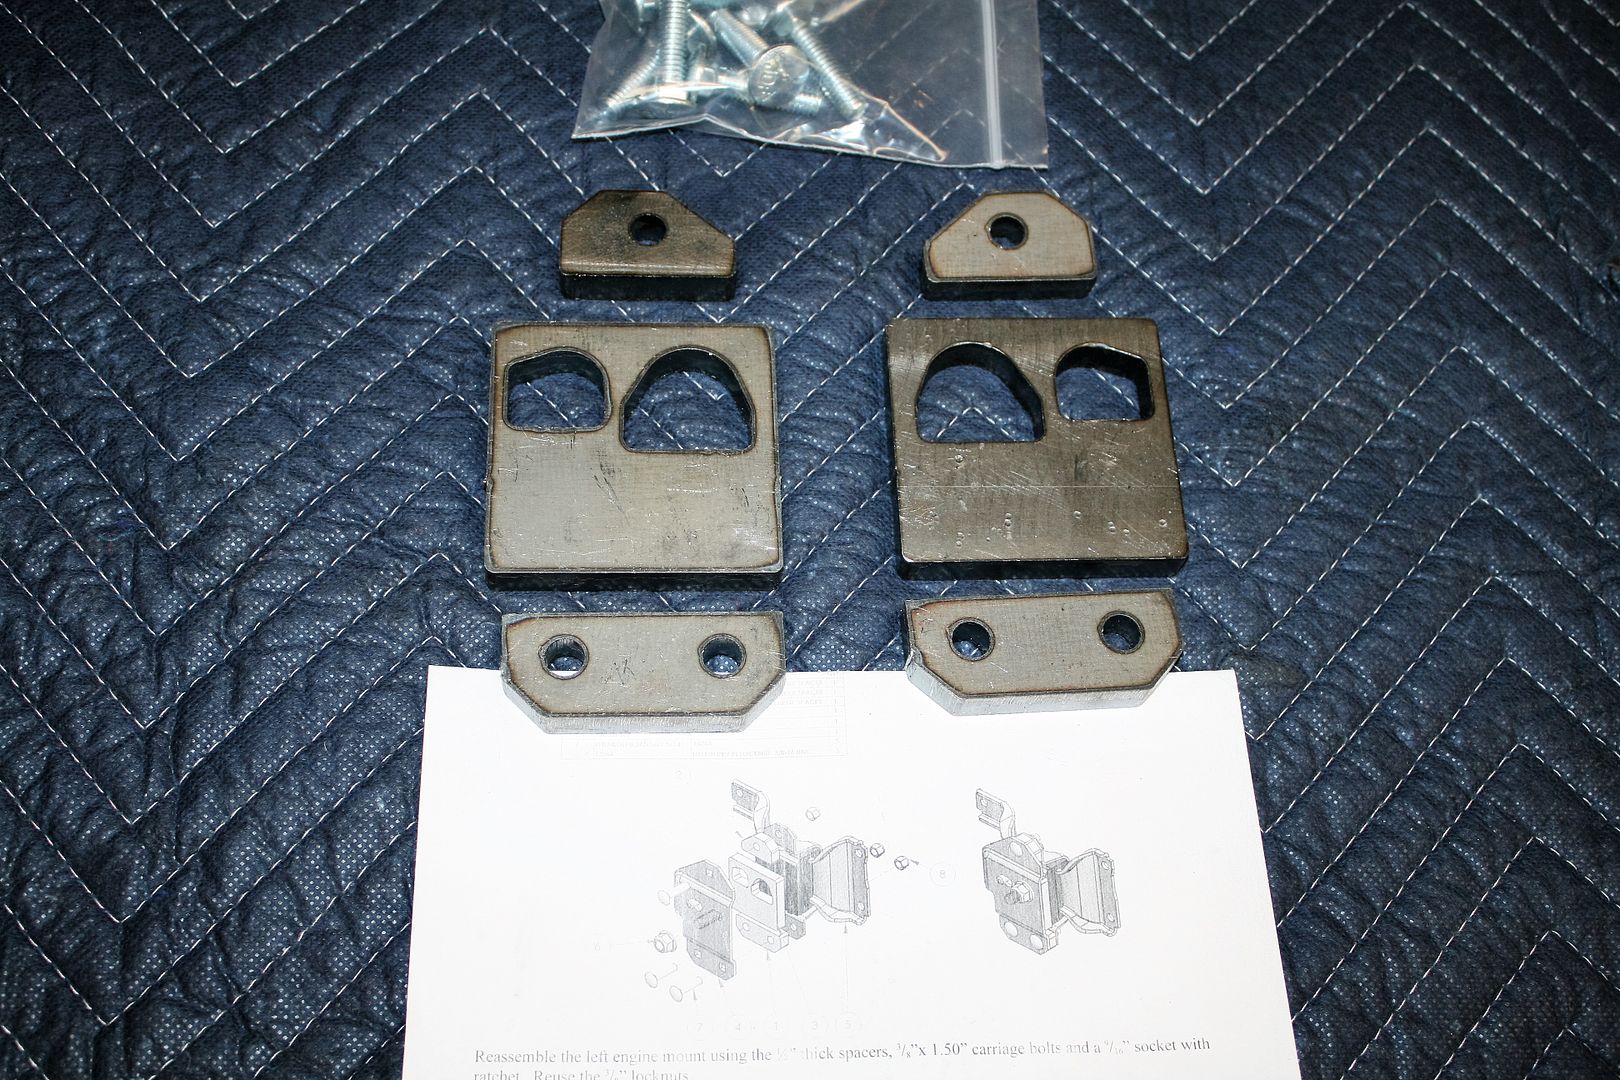
Last update comment. When Factory Five released their updated Coyote installation instructions to include the 2015 Coyote, they show using spacers on the engine mounts. But two differences from the past. They show using them on both sides. Before it was only on the DS. Plus they designed some new parts that sandwich into the motor mount. Better IMO than the spacer on top of the motor mount. Like their previous version and the Whitby ones I currently have installed. So several weeks ago I called and ordered a set of the new parts. Turned out to take a little longer than expected because the design was just released to production last week, and the first parts cut had to be approved by engineering. But they were ready yesterday, and they shipped them to me overnight. I was pleasantly surprised the spacers are steel vs. aluminum like what I have now. I’m planning to lift my engine just enough with the shop crane to slip out the motor mounts and current spacers, put in the new spacers, and (hopefully) fit the motor mounts back in. Looks pretty open, so I think I can do it without disturbing things too much. Also note the new spacers are 1/2-inch thick vs. the Whitby 3/8-inch thick spacers. This should help me get a slightly better alignment for my headers and side pipes and still keep the oil pan above the frame.
That’s it for now. Tomorrow is the one year anniversary since my kit arrived in the garage. I will never be able to build as fast as some. But I’m very pleased with the progress I’ve made to date.
Last edited by edwardb; 08-06-2016 at 06:19 AM.
Build 1: Mk3 Roadster #5125. Sold 11/08/2014.
Build 2: Mk4 Roadster #7750. Sold 04/10/2017.
Build Thread
Build 3: Mk4 Roadster 20th Anniversary #8674. Sold 09/07/2020.
Build Thread and
Video.
Build 4: Gen 3 Type 65 Coupe #59. Gen 3 Coyote. Legal 03/04/2020.
Build Thread and
Video
Build 5: 35 Hot Rod Truck #138. LS3 and 4L65E auto. Rcvd 01/05/2021. Legal 04/20/2023.
Build Thread. Sold 11/9/2023.
-
08-05-2016, 06:06 PM
#343
 Administrator

Looking great Paul.
..and as you know, it's about quality, not speed. Awesome as usual!
FFR 5369 Pin Drive, IRS, Trigos, Torsen, Wilwoods, FMS BOSS 302 "B" cam , Mass-flo. CA SB100 (SPCN) Registered
Delivered 4/23/06. "Finished" 4/2012 (still not done!)
-
08-05-2016, 07:02 PM
#344
Senior Member

Looks great Paul. Glad to see you got the spacers. I received a box of a couple backordered items this week and the spacers were listed on the pack list however they were not in the box. Not sure what happened there. Hope to have them soon. Great info in your posts. Thanks for such great detail.
MK4 #8900 - complete kit - Coyote, TKO600, IRS - Delivered 6/28/16 First Start 10/6/16 Go cart - 10/16/16 Build completed - 4/26/17 - 302 days to build my 302 CI Coyote Cobra - Registered and street legal 5/17/17
Build Thread
http://thefactoryfiveforum.com/showt...e-build-thread
PHIL 4:13 INSTAGRAM - @scottsrides
-
08-06-2016, 07:17 AM
#345

Steve >> aka: GoDadGo

Your 20th-anniversary build, along with your past project, has been a big help to me.
I really appreciate the fact that you've put so many pictures online, which is something that I just can't seem to get the knack of.
Finally, the impact on my car, even though I am a 1st time builder, doesn't look that way thanks to folks like you and other who are on this forum.
-
08-06-2016, 08:37 AM
#346
Edwardb,
I know I'm asking this late to the game, but any suggestion as to routing the 3AN SS hose for the hydrailic clutch thru the peddle box to the clutch slave cylinder?
-
Post Thanks / Like - 1 Thanks, 0 Likes
 Ed Mc
Ed Mc thanked for this post
-
08-06-2016, 03:19 PM
#347
Senior Member
Originally Posted by
ThickCobra
Edwardb,
I know I'm asking this late to the game, but any suggestion as to routing the 3AN SS hose for the hydrailic clutch thru the peddle box to the clutch slave cylinder?
I think I mentioned it a little. But this is what I did. I'm assuming we're talking about the hydraulic setup provide by Mke Forte for the Wilwood pedal box. The supplied SS hose has a straight fitting on one end and a 90 degree on the other. I found the 90 degree fitting worked best on the slave cylinder. That left the straight adapter for the MC. But here Mike provided a 90 degree adapter for the MC. I couldn't find an orientation I liked so ended up buying a straight adapter, Wilwood 220-6956. That worked perfect. The hose comes out the back of the MC, turns and goes along the 2-inch dash tube, through the footbox at the same location as the rear harness. Then down to the slave cylinder. It comes pretty close to the 3/4-inch diagonal tube in the engine compartment, so I used a padded clamp to hold it there.
Build 1: Mk3 Roadster #5125. Sold 11/08/2014.
Build 2: Mk4 Roadster #7750. Sold 04/10/2017.
Build Thread
Build 3: Mk4 Roadster 20th Anniversary #8674. Sold 09/07/2020.
Build Thread and
Video.
Build 4: Gen 3 Type 65 Coupe #59. Gen 3 Coyote. Legal 03/04/2020.
Build Thread and
Video
Build 5: 35 Hot Rod Truck #138. LS3 and 4L65E auto. Rcvd 01/05/2021. Legal 04/20/2023.
Build Thread. Sold 11/9/2023.
-
08-06-2016, 05:46 PM
#348
That's what I was looking for...the routing. Excellent, thanks. I hope you are enjoying your summer and some great weather in your 7750.
Jay
-
08-09-2016, 08:28 PM
#349
Senior Member
Motor Mounts and Windshield
Quick update. Yesterday I was able to get the new Factory Five engine mount spacers installed. I don’t recommend trying this on an installed engine. It wasn’t too bad, but certainly would have been easier before the engine was installed. But they weren't available or even known about (at least by me) when I installed the engine. I put the engine hooks back on the Coyote, loosened the motor mount and transmission bolts, and then used my shop crane to lift the engine in place just enough to squeeze out the motor mounts one at a time. The plan worked reasonably well. But once the spacers were installed, took even more clearance to get the mounts back in. Then things tended to go out of alignment a bit. But eventually got the job done, and very happy I did. I like this much better than the separate spacers I had before. The slightly extra height (1/2 vs. 3/8-inch thick) sets the engine up just a bit higher and allowed me to get my header heights from side-to-side nearly perfect and stay even with the 4-inch chassis tubes. Very happy camper and nice improvement by FF.
Here are couple pictures with the spacers installed in the mounts. I put some rattle can paint on them a few days ago before assembly. That bare steel would have rusted pretty quickly.
Passenger side. There isn't a gap between the large spacer and the mount like it looks in this picture. The edge is just rolled a bit.
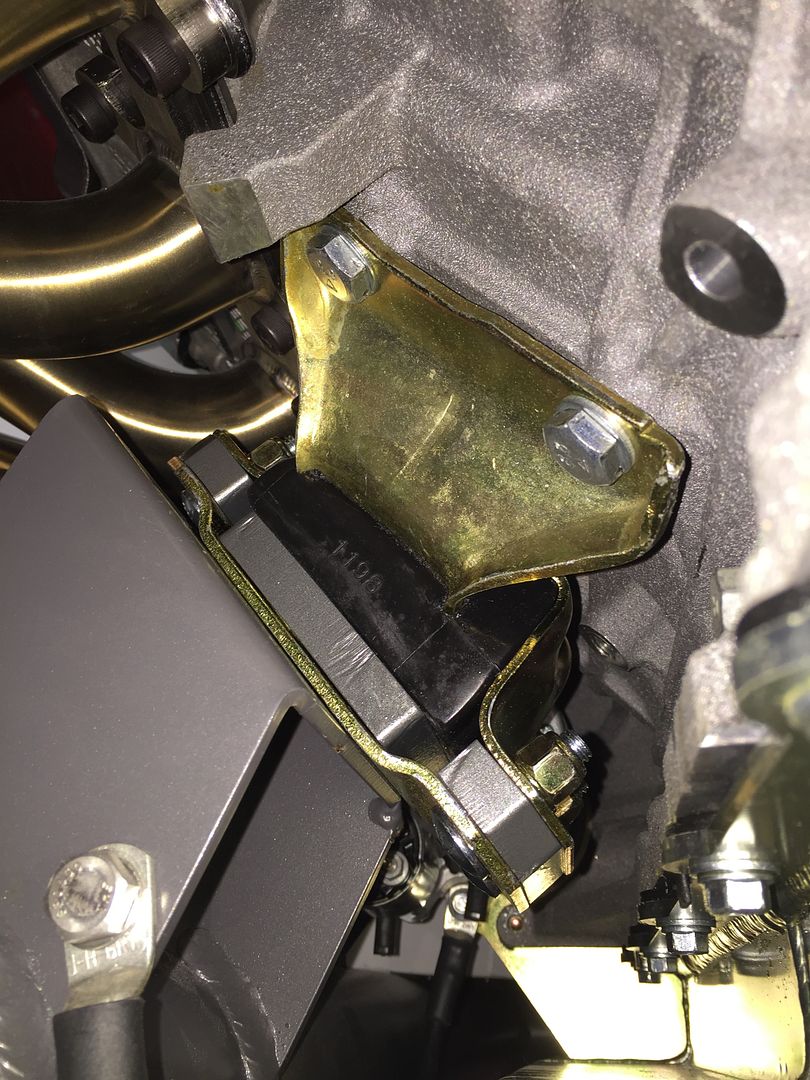
Driver side:
Today I finally wrapped up the windshield installation. Took a little more time than I expected to get the body cutouts just right. You don’t want the side bars touching the fiberglass body. But also don’t want to get the slots too big otherwise the plates won’t cover them completely or have a place for the mounting screw. Also took a little time to get the side bars aligned properly where they wrap around to the top of the windshield. I ended up with 1/8-inch spacers on both the top and bottom bolts to make the side bars the same width as the chassis mounts and keep from stressing the windshield. I put them on the DS side since it’s a bit easier to reach in there to install them. One tip that makes installing the windshield a whole bunch easier. Probably one of the best tips I’ve tried in a long time. Saw it somewhere on one of the forums and tried it for the first time. Instead of just drilling out the 1/2-inch holes in the windshield side bars, drill them 27/64-inch and cut threads with a 1/2-inch x 13 tap. Easy to cut threads in the brass. That way you only have to put in a bolt from one side in each of the holes when mounting and aligning the windshield. Way easier than bolt + nut + wrench on each side while chasing around a moving windshield. When tightened, they're nice and strong. But I’ll put a nut and washer on each bolt during final assembly.
I’m working my way down the list of final items before paint. Tomorrow I’m going to put in the wipers. The real estate deal I mentioned in my last update is progressing. We have a signed deal on the new place two miles away and now waiting to see if our current homestead will sell. Twice my current workspace, much higher ceiling, plus I can keep my trailer on site. Oh yea, my wife gets what she wanted as well. Hope we can close the deal. It’s a bit of a project but with where I’m at on the build not expecting my timeline to change.
Next week is Woodward Dream Cruise week here in the Detroit area. The world’s largest one-day automotive event, drawing an estimated 1.5 million people and 40,000 classic cars. While officially a one-day event (this year it's August 20th) it's actually pretty much a week long party. I have something going on nearly each day. The Great Lakes Cobra Club will be at the Comerica Bank in Birmingham if anyone wants to stop by. We'll be 60+ cars strong. Good times.
Last edited by edwardb; 08-09-2016 at 08:45 PM.
Build 1: Mk3 Roadster #5125. Sold 11/08/2014.
Build 2: Mk4 Roadster #7750. Sold 04/10/2017.
Build Thread
Build 3: Mk4 Roadster 20th Anniversary #8674. Sold 09/07/2020.
Build Thread and
Video.
Build 4: Gen 3 Type 65 Coupe #59. Gen 3 Coyote. Legal 03/04/2020.
Build Thread and
Video
Build 5: 35 Hot Rod Truck #138. LS3 and 4L65E auto. Rcvd 01/05/2021. Legal 04/20/2023.
Build Thread. Sold 11/9/2023.
-
08-09-2016, 09:41 PM
#350
Steve >> aka: GoDadGo
You Do Great Work & Your Attention To Detail Is Fantastic!
But you already knew that.
-
08-10-2016, 05:36 PM
#351
Administrator
FFR 5369 Pin Drive, IRS, Trigos, Torsen, Wilwoods, FMS BOSS 302 "B" cam , Mass-flo. CA SB100 (SPCN) Registered
Delivered 4/23/06. "Finished" 4/2012 (still not done!)
-
08-10-2016, 07:46 PM
#352
Senior Member
Originally Posted by
David Hodgkins
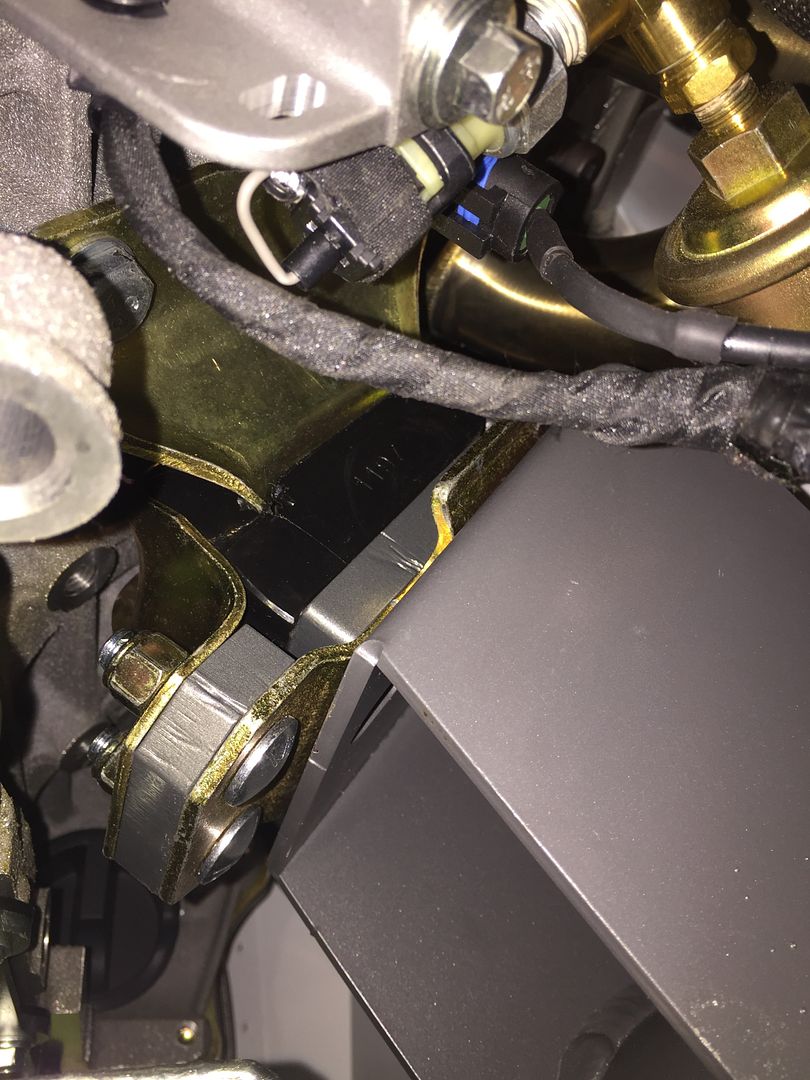
Question for you sir. Is that the engine ground strap? If it is, are you going to grind off the paint under the strap end?
OK, that's funny. When I saw how prominent that engine ground strap connection was in the picture I posted of the motor mount, I thought "Someone is going to tell me I need to grind off the powder coat because there's no bare metal showing." Sure enough!
The powder coat is removed under that lug. Pretty much the entire footprint of the lug. What I do is mount the lug, then tape around the perimeter, take the lug back off, and then remove the coating inside the tape outline. I use wire brush attachments on a Dremel. It cuts the powder coat relatively easily and allows me to follow the outline pretty closely. Plus the wire brush doesn't cut into the steel, so leaves the surface nice and flat for good contact. Did all the grounds on the chassis the same way. I'll take the bolt out and prove it if I have to ") but I'd prefer not to.
but I'd prefer not to.
BTW, the ground wire discussed here is coming from one of the mounting bolts on the starter. You can just see the other end in the background of the picture. There was already a hole drilled in the motor mount at this location, so opened it up slightly, threaded it, and used it for the chassis ground. I have a second ground wire on the engine from a threaded location on the engine block to the main ground location on the chassis 4-inch tube that includes the battery ground and also the main ground wire from the Coyote harness.
I appreciate knowing that people are following my build thread and noting the details. Got this one covered, but keep the comments and questions coming!
Last edited by edwardb; 08-10-2016 at 08:00 PM.
Build 1: Mk3 Roadster #5125. Sold 11/08/2014.
Build 2: Mk4 Roadster #7750. Sold 04/10/2017.
Build Thread
Build 3: Mk4 Roadster 20th Anniversary #8674. Sold 09/07/2020.
Build Thread and
Video.
Build 4: Gen 3 Type 65 Coupe #59. Gen 3 Coyote. Legal 03/04/2020.
Build Thread and
Video
Build 5: 35 Hot Rod Truck #138. LS3 and 4L65E auto. Rcvd 01/05/2021. Legal 04/20/2023.
Build Thread. Sold 11/9/2023.
-
08-17-2016, 04:38 PM
#353
Senior Member
This Weeks Update
This is supposed to be Woodward Dream Cruise week here in SE Michigan. We got off to a good start with a kick-off barbecue last Sunday. But now two days in a row of events washed out due to rain. I’m sure there are lots of people out there having a good time. But open top Roadsters stay in the garage. More stuff Friday and the big event on Saturday. We’ll see what happens.
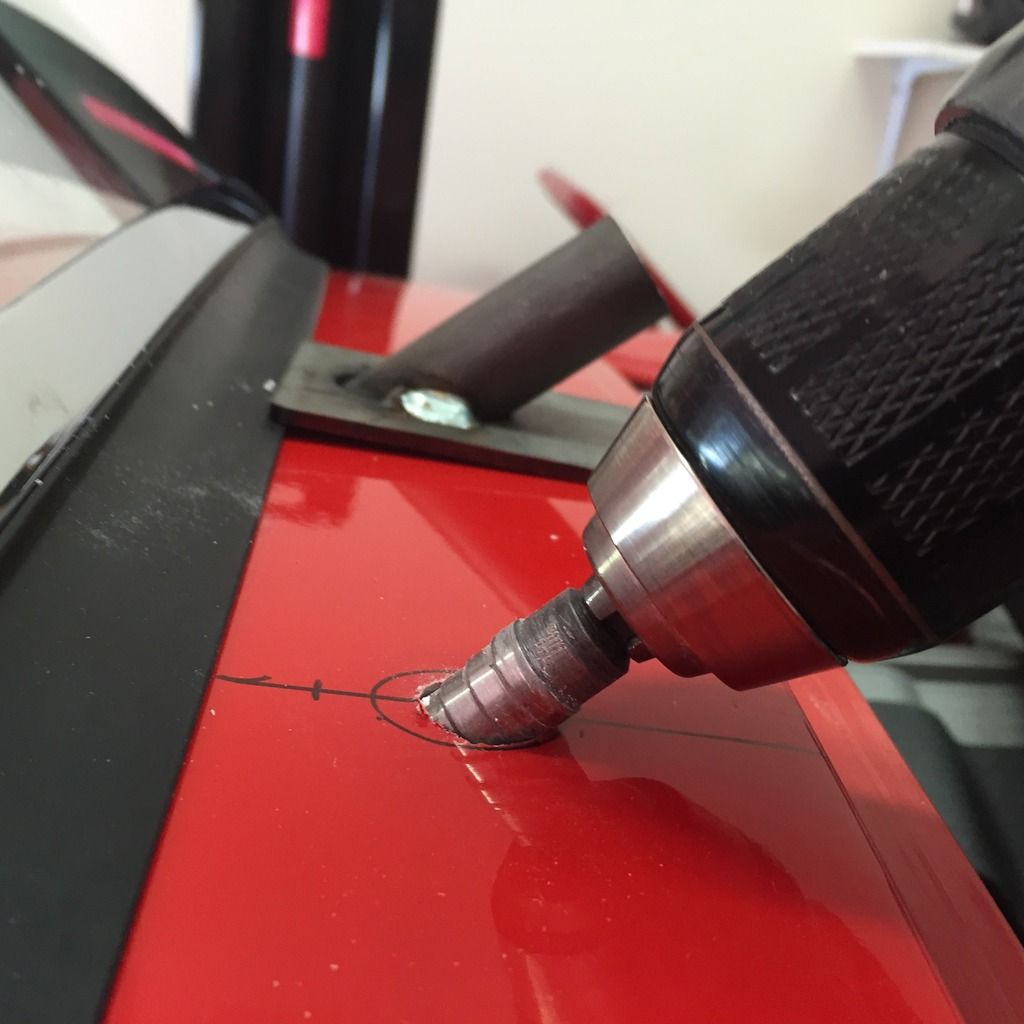
In the meantime, still plodding along trying to get the body ready for paint. With the body and windshield installed, located and cut the wiper box holes in the body. I admit to being a big chicken with that drill jig. I just can’t bring myself to use it directly to drill that big of a hole. Really don’t want it catching, jumping around, whatever. Plus fiberglass really is easy to work with.
I locate the holes and use the rubber gasket to trace the outline. Then after a small pilot hole, use a step bit to drill as much of the hole as I can. I keep the jig always in view to confirm the proper angle. It’s not super critical.
Then after using some round files to get close to the line, which takes just a few minutes, I use a small sanding drum to clean up the hole. I just happen to have one that is almost exactly the right final size.
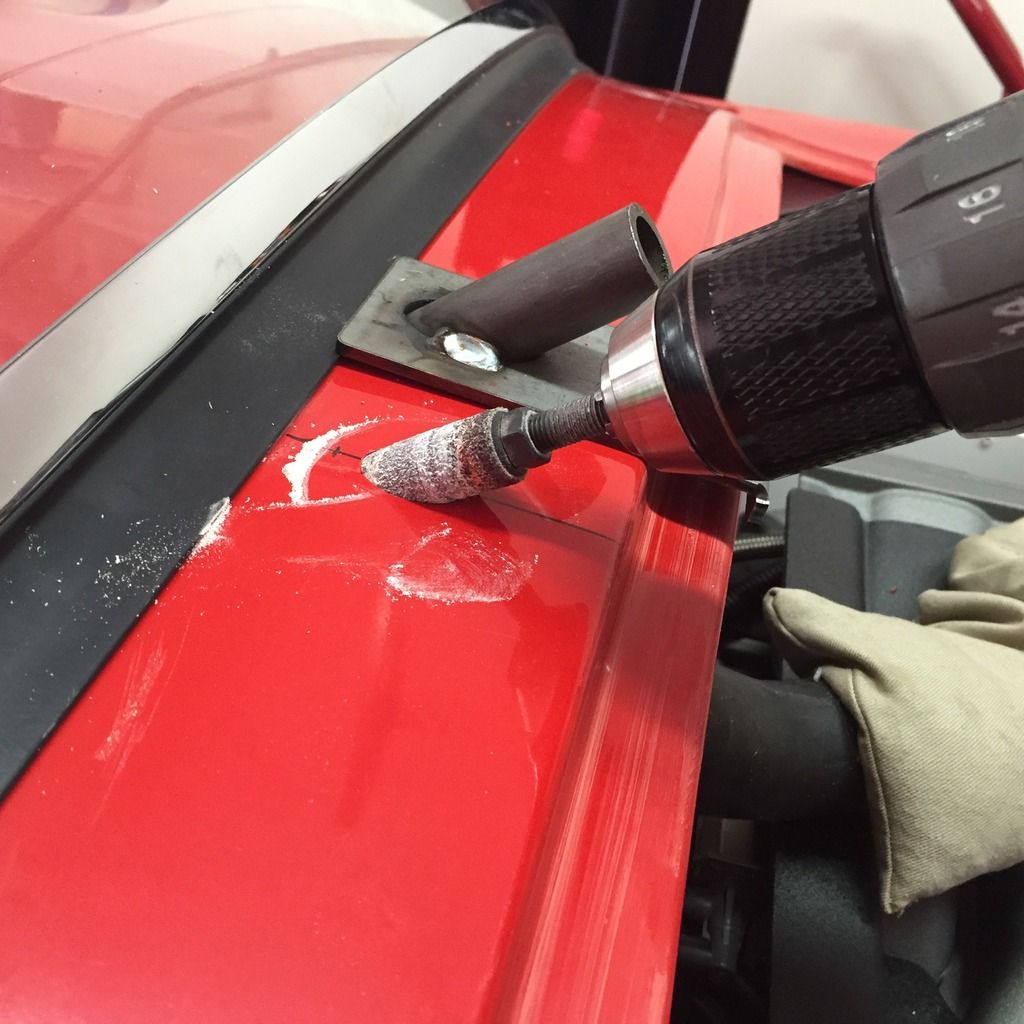
Final product. Literally just takes a few minutes and no drama. Fits the wheel box perfectly.

I tried to use the angle spacers that FF provided. They are much improved over previous ones. But still just wasn’t happy with how they fit or held the angle. So made my own again from 3/4-inch square aluminum tubing. Have used this same approach on all three builds. With a little trial and error, they fit very well and hold the angle solidly. In the foreground is the metal tubing that FF now supplies in the wiper kit. Nice fit for the cable and similar to the fuel line tubing approach I’ve done before. Plus they’re nice and shiny. Can’t beat that! I’ll finalize the tubing with the body off. Just easier to see and reach everything.
Next up I located and mounted the seats. I’m not using any tracks (haven’t found them necessary) and I mount both sides as far back as possible. Works for me. The mistake I’ve seen people make though is they mount the seats without the body installed. Potentially a big mistake! They end up pretty close to the rear door opening (by the striker) so you want the body in place to prevent any interference. After getting them where I wanted, I mounted them with four bolts each. The front two are into the steel seat pan, with the inside one very near the main chassis 4-inch tube. The back outside is through the large 2-inch square tube. The back inside I tap threads into the top center of the main chassis 4-inch tube. This makes a nice solid mount. Note: The back outside bolt may need to be further toward the center if you have 3-link or 4-link. The LCA mounting brackets are right under the area where I placed the bolts here. That bracket isn’t there for an IRS chassis like this one.
Driver’s side:
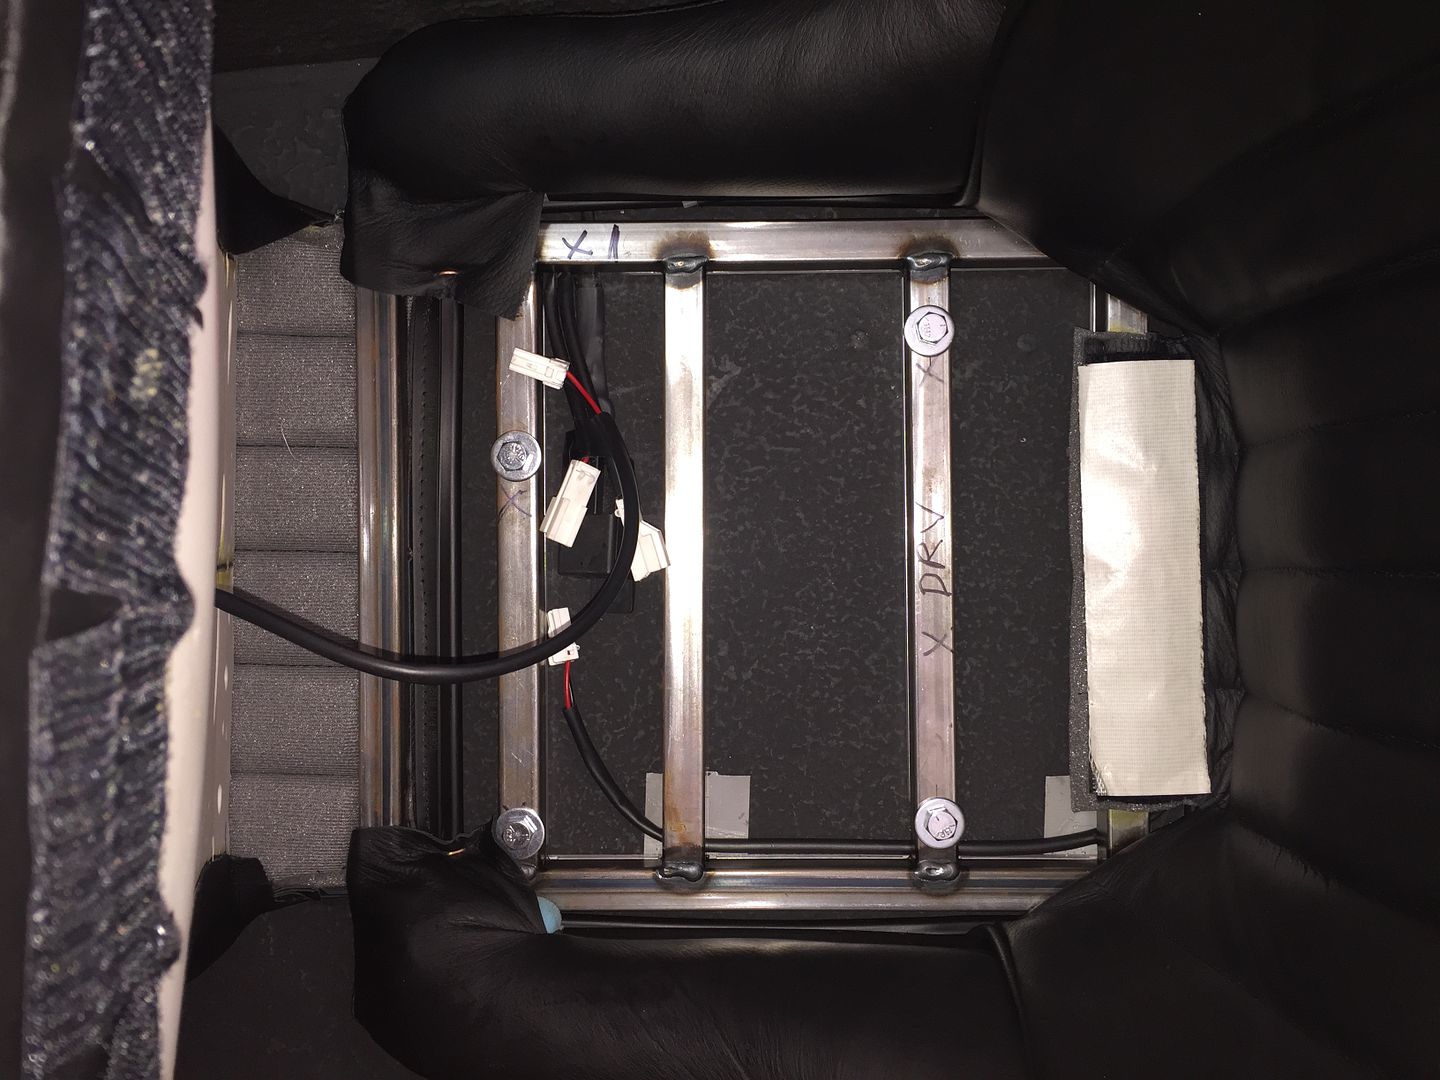
Passenger side:
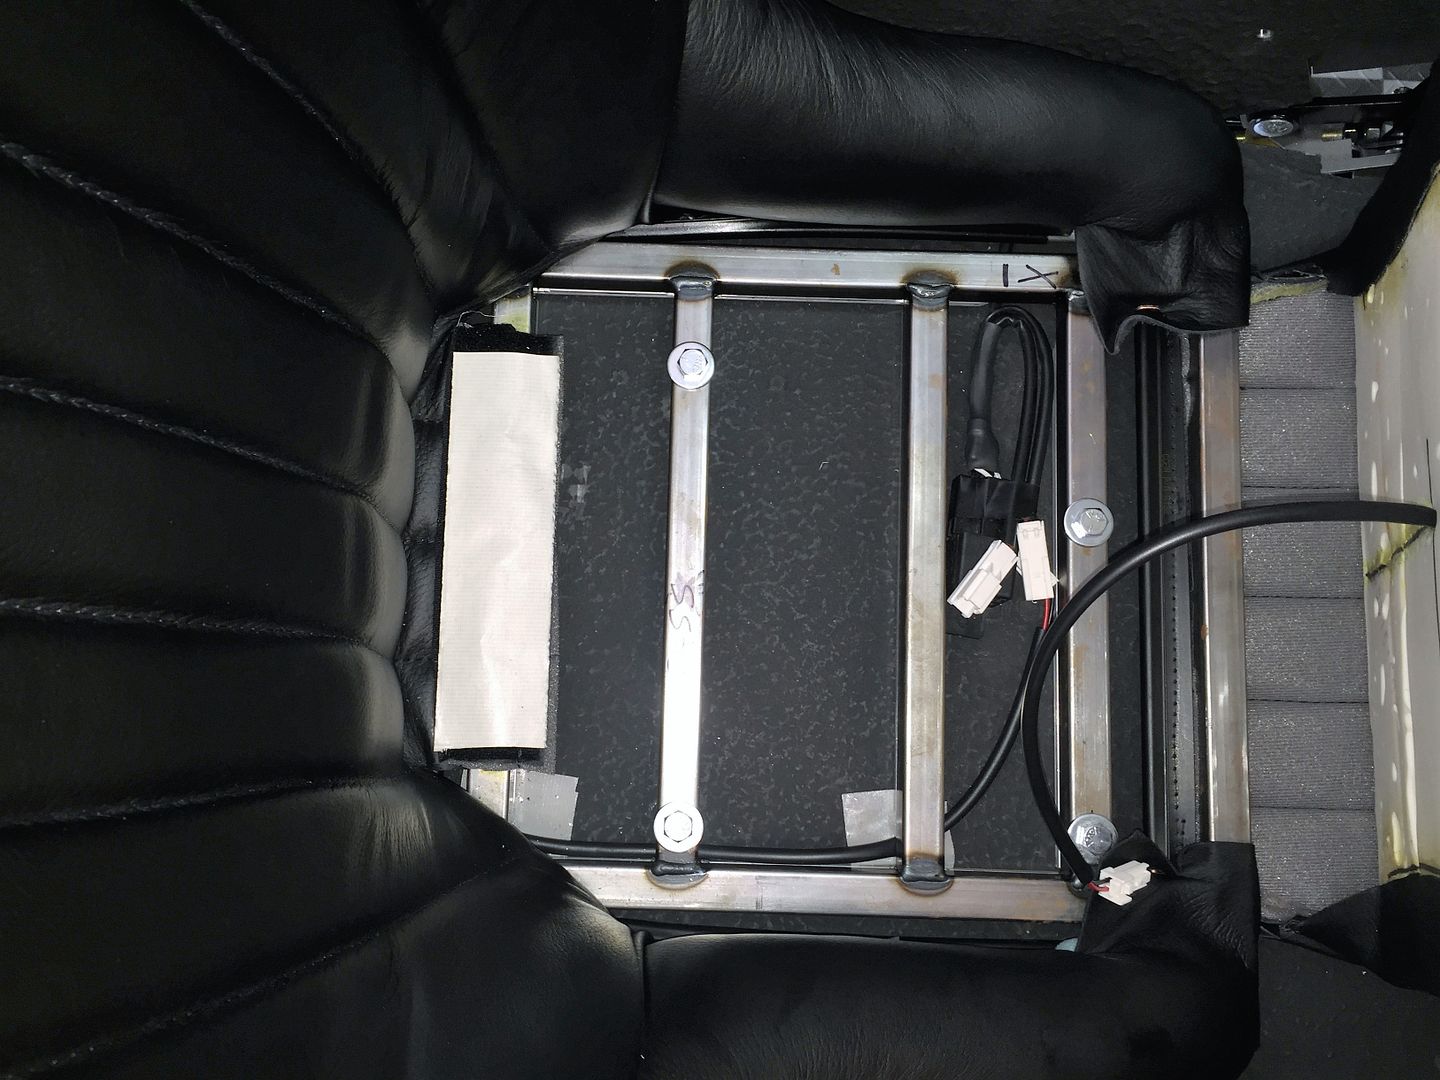
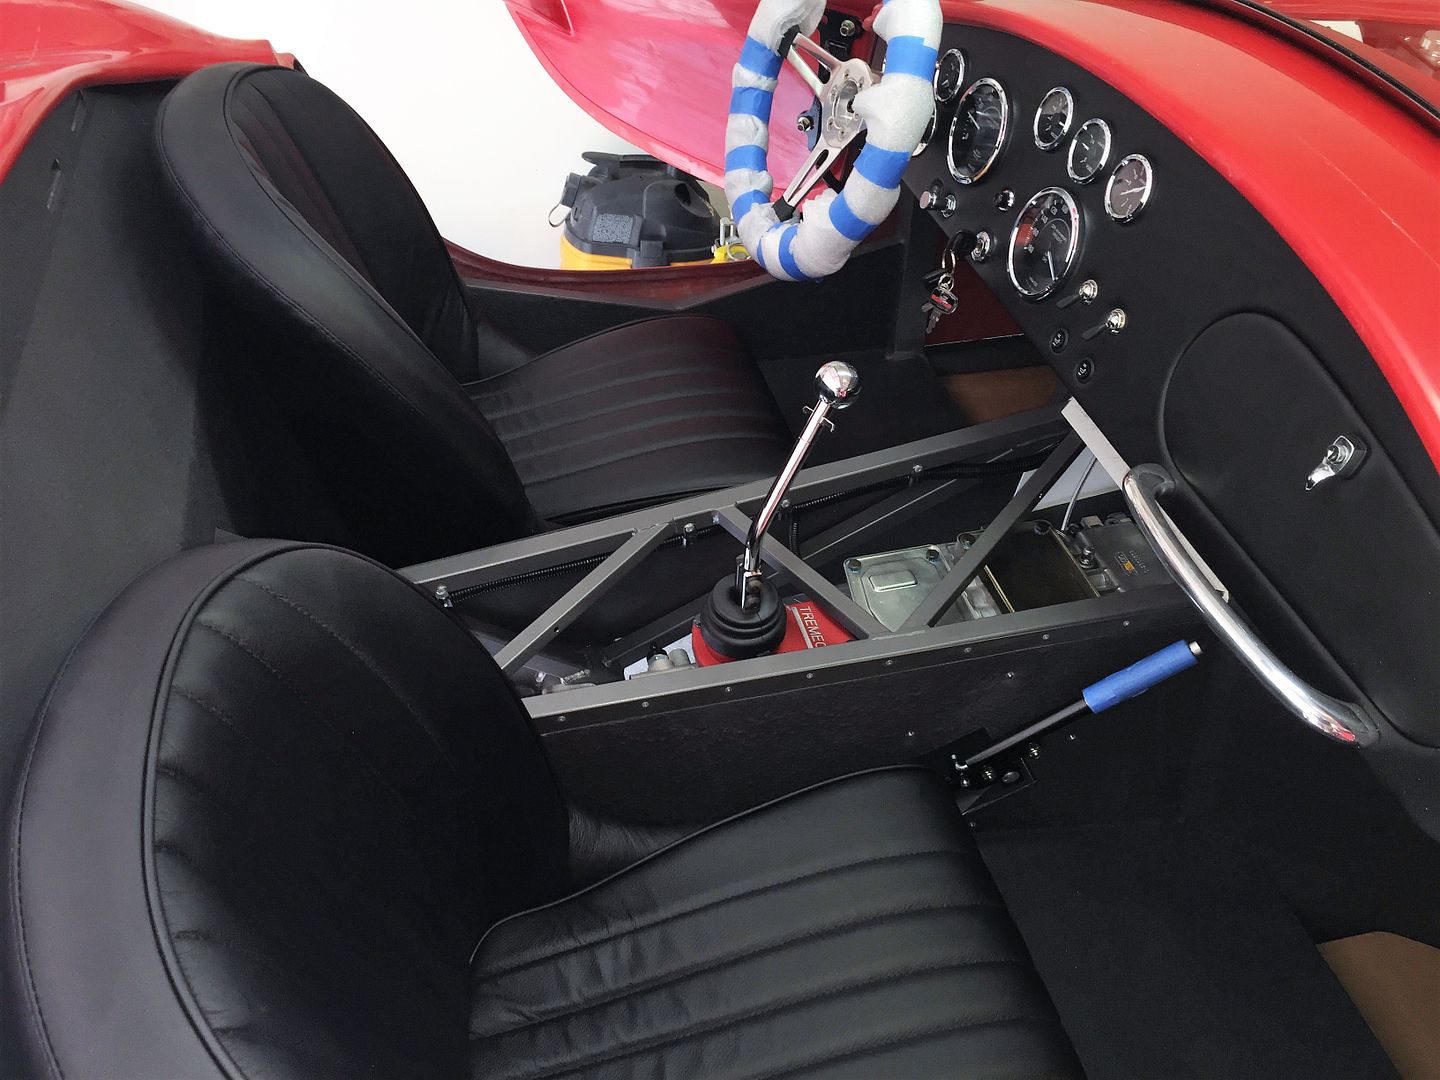
Seats now installed. The interior is looking more complete all the time.
Last edited by edwardb; 08-17-2016 at 05:40 PM.
Build 1: Mk3 Roadster #5125. Sold 11/08/2014.
Build 2: Mk4 Roadster #7750. Sold 04/10/2017.
Build Thread
Build 3: Mk4 Roadster 20th Anniversary #8674. Sold 09/07/2020.
Build Thread and
Video.
Build 4: Gen 3 Type 65 Coupe #59. Gen 3 Coyote. Legal 03/04/2020.
Build Thread and
Video
Build 5: 35 Hot Rod Truck #138. LS3 and 4L65E auto. Rcvd 01/05/2021. Legal 04/20/2023.
Build Thread. Sold 11/9/2023.
-
08-17-2016, 04:41 PM
#354
Senior Member
This Week's Update
Next I went after the front splash guards. For whatever reason, I have always struggled with these. I’m now 3-for-3 messing around with these more than I would like. I’ve read all the threads and tried everything. This time around, the very top was OK, but they weren’t really wide enough at the top side, too wide at the bottom side, and overall too long. They absolutely wouldn’t fit into the available opening without cutting off the bottom some which includes the little mounting tab. I tried messing with the bend, flattening them out some. Tried adjusting the angle on the F-panel. And tried every possible location in the actual body. All helped a little I guess, but in the end I still had some gaps around the top and top side. I would have just made new ones (done that before…) but since these were already powder coated white from FF as part of the Anniversary package, really wanted to use them. What I did was order some larger bulb seal from McMaster. Part number 1120A191 which has a 1-inch bulb vs. the FF supplied 3/4-inch bulb. That is going to work. With the bottom cut off I fit to the body and riveted on two new tabs made from the famous donor fan mounting strips FF provides. I’ve lost track how many little parts I’ve made from those pieces. Nice mild steel that is easy to work with and more durable than something made from .040 aluminum. Final results, and they fit quite well:
Finally, today I took everything back apart and lifted off the body for I think the last time. I have a punch list of things to do to the body, including the truck bedliner. Then it’s back on the chassis for final panel fit and ready for the painter.
One last non-build related update, but in the end has significant impact. I’ve mentioned the possibility of a real estate deal and a possible new improved workplace. Well, looks like it’s going to happen. Our current home is under contract. Only took about 10 days and deal looks solid. The deal on the new place that started all of this has a couple details remaining, but is also about wrapped up. So we have the not so enviable task of moving all our possessions about 2 miles north starting in a couple weeks. We’re excited about it because it’s a ranch all on one level which is exactly what my wife needs. It is however a bit of a fixer, so between moving and doing the initial remodel work, my build is going to take a lower priority and even will have a bit of a time out I think. Probably several months at least. We’ll see what that really means over the next week or two as things get firmed up. But I’m not going to rush the build. It will still be there after we move. There really is a house involved with this deal, but here’s the good part for the hobby: 950+ square foot finished garage with a 14-foot ceiling. It’s a truss roof, so it’s wide open. No posts, beams, etc. The previous owner wasn't a car guy, but he could have been! We can’t get in unless our agent is with us, but I did sneak up there and snap a picture with #7750 lurking at the doors. Looks right at home. With only one DD (which can now always have a space) I think I will have enough room. Also, since it's more in the country plus a large lot (2.8 acres) I can keep my trailer on site. I think this could work. 
Last edited by edwardb; 08-17-2016 at 04:52 PM.
Build 1: Mk3 Roadster #5125. Sold 11/08/2014.
Build 2: Mk4 Roadster #7750. Sold 04/10/2017.
Build Thread
Build 3: Mk4 Roadster 20th Anniversary #8674. Sold 09/07/2020.
Build Thread and
Video.
Build 4: Gen 3 Type 65 Coupe #59. Gen 3 Coyote. Legal 03/04/2020.
Build Thread and
Video
Build 5: 35 Hot Rod Truck #138. LS3 and 4L65E auto. Rcvd 01/05/2021. Legal 04/20/2023.
Build Thread. Sold 11/9/2023.
-
08-17-2016, 05:15 PM
#355
I will reserve full "Congratulations" until the house deal is completed. (Don't want to jinx it!!) However, I am so pleased for you. Those 14' ceilings will give you plenty of storage and work area. I don't envy you the process of moving, I remember it all too vividly, but it sounds like the reward will be worth the process. We certainly understand how your build will take a back seat to your other family priorities. There are so many of us that view you as one of the pantheon of experts who both knows his stuff and is willing to share with anyone who is interested. I view this short pause in your build as a good thing for the rest of us: it will give us time to catch up to you!!  Your move may not be specifically "build related", but you are most certainly a treasured member of the FFR family. Please occasionally update us on the progress of your move. I will look forward to seeing photos of your projects' new home, the blank slate that will become your new man cave!
-
08-17-2016, 05:18 PM
#356
Paul-
That is certainly great news on the house and garage! I hope the final remaining items are resolved smoothly and without much fuss. I know how much moving is a pain, having done so more times than I care to admit. However, I hope it goes well for you, and you get settled in quickly.
We'd love to follow along if you choose to have us!
Regards,
Steve
-
08-18-2016, 05:55 AM
#357
Senior Member
Thanks for the very kind words and best wishes guys! We've moved more times than I'd like to remember. Three corporate relo's and a couple times on our own. Each time I was reminded how much work it is. We're just going to hunker down and get through it. With a good pay-off at the end. One of the benefits is with more room I'm not going to pursue selling #7750, at least for now. I'll keep the updates coming, although probably a little less frequently.
Build 1: Mk3 Roadster #5125. Sold 11/08/2014.
Build 2: Mk4 Roadster #7750. Sold 04/10/2017.
Build Thread
Build 3: Mk4 Roadster 20th Anniversary #8674. Sold 09/07/2020.
Build Thread and
Video.
Build 4: Gen 3 Type 65 Coupe #59. Gen 3 Coyote. Legal 03/04/2020.
Build Thread and
Video
Build 5: 35 Hot Rod Truck #138. LS3 and 4L65E auto. Rcvd 01/05/2021. Legal 04/20/2023.
Build Thread. Sold 11/9/2023.
-
08-18-2016, 01:37 PM
#358
Senior Member

Good luck with the move and let us know when you get situated. Love the progress on the anniversary build and don't want to miss out. The tranny cover and doors turned out top notch. What a nice touch.
-
08-21-2016, 02:24 PM
#359
Senior Member

Congrats on the new place. It looks like your going to have plenty of space to work and collect! While moving can certainly be a pain, think of all the fun you will have setting up that new garage. ********** has some nice garage accessories and a cobra neon light coming....congrats and thanks again for all the detail and posting. It's been a tremendous help. Cheers
-
08-21-2016, 07:25 PM
#360
Senior Member
Originally Posted by
RickP
Good luck with the move and let us know when you get situated. Love the progress on the anniversary build and don't want to miss out. The tranny cover and doors turned out top notch. What a nice touch.
Originally Posted by
Paul_M
Congrats on the new place. It looks like your going to have plenty of space to work and collect! While moving can certainly be a pain, think of all the fun you will have setting up that new garage. ********** has some nice garage accessories and a cobra neon light coming....congrats and thanks again for all the detail and posting. It's been a tremendous help. Cheers
Thanks guys. Appreciate the good wishes.
Build 1: Mk3 Roadster #5125. Sold 11/08/2014.
Build 2: Mk4 Roadster #7750. Sold 04/10/2017.
Build Thread
Build 3: Mk4 Roadster 20th Anniversary #8674. Sold 09/07/2020.
Build Thread and
Video.
Build 4: Gen 3 Type 65 Coupe #59. Gen 3 Coyote. Legal 03/04/2020.
Build Thread and
Video
Build 5: 35 Hot Rod Truck #138. LS3 and 4L65E auto. Rcvd 01/05/2021. Legal 04/20/2023.
Build Thread. Sold 11/9/2023.


 Thanks:
  Likes:


 Reply With Quote


