Boig Motorsports

Visit our community sponsor

Thanks Thanks:  4
Likes Likes:  9
Page 1 of 5 123 ... LastLast
Results 1 to 40 of 168

Thread: 20th Anniversary MK4 Build Thread - #10 of 20 - #8697

Hybrid View

Previous Post Previous Post   Next Post Next Post
  1. #1

    Join Date
    Jun 2015
    Location
    Parker, TX
    Posts
    287
    Post Thanks / Like

    20th Anniversary MK4 Build Thread - #10 of 20 - #8697

    Well, I ordered my kit online on Saturday June 18th, 2015 (Best Fathers Day gift ever!) and it was finally delivered by Jim at Stewart around 3:30pm on Friday September 18th just as the kids were getting off the school buses. The kit was completed by FFR on August 22nd so it was within my expectations for the Stewart delivery times based on other experiences I have read on these forums. Now that I have everything here and I have locked in on some key aspects of my build, I thought it was high time I created my Build Thread - so here it goes.


    First, a little about the planned build. I really liked the idea of having 427 cubes but I did not think there was enough room for the big block so I locked in on a stroked 351w with a TKO-600 early in the process. I also really liked the idea of having the Ford Racing aluminum block but the incremental cost and the complete lack of practicality left me torn. I also struggled with Carb vs EFI and then what kind of EFI... I struggled with the decision to build the engine myself or have it built by one of the forum vendors. My old man and his crew threatened to pull my 'Man Card' if I let someone else build it so there was no pressure in that decision.

    Here is a pic of the crew from the early 70's on one of our weekend motorcycle/camping trips - (I'm the twerp on my great-uncles knee in the red Toughskins).


    They were pretty serious gear heads when the Cobra was dominating the race circuits so they are my first line of information and my sounding board for ideas I read on the forums. All that to say that I have struggled on the details of the engine but I have landed in a place that I'm comfortable with. The crew does a lot more talking than working these days so I went with what I consider the 'practical' route and ordered a Forte 427 DART SBF with a Holley Terminator EFI. I think with a 20th Anniversary Mk4 in my garage, my 'Man Card' is safe.

    Some of the build plan is still up in the air but I'll update this post whenever I make a decision on something new (or I read it on Edwardb's build log since i'm shamelessly following his lead):

    Build List:
    20th Anniversary Kit - http://www.factoryfive.com/whats-new...ster-revealed/
    Passenger Roll Bars
    Wind Wings
    Body Cut-outs
    Forte DART 427w
    Forte TKO-600 with .64 OD
    Forte Holley Terminator EFI
    Forte Hydraulic Clutch
    Forte Seat Heaters
    Howe Racing Ball Joints - Edwardb inspired
    Moog Tie-Rod ends - Edwardb inspired
    Breeze Power Steering Rack

    Need to figure out or buy:
    Headers
    All the bling under the hood
    Tires
    Paint (final color and whether to do it myself or pay a professional)
    Security and maybe electronic start features.
    Visors
    I'll add to this list as well...

    I'll post more details over the next few days until I get caught up.
    Attached Images Attached Images
    Last edited by RRussellTx; 10-12-2016 at 08:36 PM. Reason: testing images

  2. #2
    Member BobCarter's Avatar
    Join Date
    Jun 2015
    Location
    Springfield, MO
    Posts
    98
    Post Thanks / Like
    Welcome to the 20th Anniv. Club! I too am a first time builder and have found Edwardp's experience very valuable. If you have some folks with experience near by beleive me they will come in handy. Mounting the center section is a perfect example of having the right tools and the right experience to draw upon. Getting allll the parts is a challenge. Eventually I think they will arrive but it demands working a plan that is flexible. Good luck! Have fun! This will be a memory builder for all of us.

  3. #3
    Senior Member edwardb's Avatar
    Join Date
    Feb 2011
    Location
    Lake Orion, Michigan
    Posts
    10,568
    Post Thanks / Like
    Congratulations on your kit delivery! I was 95% sure of doing a 427 SBF build with mine before I veered off and went Coyote. Will be very interested to follow your build. The plan sounds great. That DART setup should be excellent. I'm assuming Forte is going to get it completely assembled and dyno'd for you. That takes a lot of drama out of the whole engine thing. Just be patient with the whole process, and enjoy the build. The end result is fantastic. But getting there is too.
    Build 1: Mk3 Roadster #5125. Sold 11/08/2014. Build 2: Mk4 Roadster #7750. Sold 04/10/2017. Build Thread
    Build 3: Mk4 Roadster 20th Anniversary #8674. Sold 09/07/2020. Build Thread and Video. Build 4: Gen 3 Type 65 Coupe #59. Gen 3 Coyote. Legal 03/04/2020. Build Thread and Video
    Build 5: 35 Hot Rod Truck #138. LS3 and 4L65E auto. Rcvd 01/05/2021. Legal 04/20/2023. Build Thread. Sold 11/9/2023.

  4. #4
    Senior Member 6t8dart's Avatar
    Join Date
    Apr 2015
    Location
    Irving, TX
    Posts
    545
    Post Thanks / Like
    Welcome to the TX roadster build club! I just started working on mine a month ago. Mine isn't a 20th Aniv edition, but my whole budget was less than that kit cost, so I'm slumming it with a donor build.

  5. #5
    Senior Member
    Join Date
    May 2014
    Location
    Burlington, WI
    Posts
    689
    Post Thanks / Like
    Blog Entries
    1
    Welcome to the 20th A club. I am #4 of 20 and also a first time builder. My family is as excited as I am. As it turns out, I am also going with the Dart 427 from Mike Forte. I know the drama surrounding his new dyno...finally up and running. It sounds like Mike has put up with a lot from the dyno supplier. Your engine may in fact be sitting next to mine. I'm not in a hurry to get it as I am quite a ways from needing it. Tko 600, hydraulic clutch and PS from Forte. I am coming to appreciate the forum. Hard to imagine building the Cobra without support.

    Congratulations.

  6. #6

    Join Date
    Jun 2015
    Location
    Parker, TX
    Posts
    287
    Post Thanks / Like
    Thanks for the warm welcome. I have spent my spare time in the garage instead of on the computer but I really need to get caught up on this log or I never will.

    First, I purchased the differential and knuckles/hubs online from different ebay suppliers right after I bought the kit. I wanted the 3.31 to go with the high torque 427 and TKO-600. I bought the steel differential because FF indicated that it was supported and went with the manual transmission. The ebay seller did not indicate if it was manual or automatic.

    The seller shipped the differential with the bolts partially threaded in the aluminum rear cover which damaged the threads during shipping. The seller bought me a new rear cover and took care of the issue. While I was replacing the cover I got to see inside. Here are some pics of the differential:


    This is what is behind the vent on the rear cover - it has a small flat cover the attaches with one small screw.

    [

    I also clean up the knuckles nice and clean like Edwardb - it was not too hard and they turned out pretty nice.


    My current problem with the differential is that the driveshaft adapter does not fit properly. The adapter is slightly too large to fit in the indentation of the differential flange. I will follow up with factory five to find out if they have seen this before. My fear is that there are more than one kind of differential flange and they may need different kinds of adapters. They list different kinds in the instructions (clear zinc for automatics and yellow coated zinc for manual) but mine is all black. I'm sure it will get taken care of but worst case I'll be reaching out to Denny's driveshaft to see if they can help.
    Attached Images Attached Images
    Last edited by RRussellTx; 07-30-2017 at 02:16 PM.

  7. #7

    Join Date
    Jun 2015
    Location
    Parker, TX
    Posts
    287
    Post Thanks / Like
    While waiting for the kit, I ordered several parts and some new toys to help with the build:

    Hand rivet gun, pneumatic rivet gun and rivet nut gun:


    And my new cleco collection:


    I stocked the keezer and the fridge for the 'free labor' I expect to come and help:


    And then I got the garage all ready to receive the kit:


    After that, I just had to wait for the Stewart truck to arrive with my kit:


    He showed up just in time for the girls to help with the unloading process after they got home from school:


    And in short order is was tucked away in the garage!
    Last edited by RRussellTx; 07-30-2017 at 02:29 PM.

  8. #8

    Join Date
    Jun 2015
    Location
    Parker, TX
    Posts
    287
    Post Thanks / Like
    I spent the rest of the evening unpacking boxes and checking packing lists. It looked ok at first but then little things started to look off (like I received 6 springs but only 2 of the 20th anniversary Koni's instead of 4 but I received 2 of the regular front Koni shocks). Nothing was damaged but I could tell I needed to spend a great deal more time going through the inventory process so I shut that down and started the process to get the body off so I could take pictures of everything and check everything out and get that out of the way. I already had the body bucks cutout and the materials on hand but I wanted to get the kit before I set the height on everything. Within a few hours I had the body buck built and the body off:


    After that, I spent all day Sunday going through the manual and basically pre-assembling everything to make sure I understood the build and that I have the right parts. I figured out that I don't have the IRS LCA hardware and that I really don't like the IRS differential bushings. They don't seem like they will last very long and I really don't look forward to removing that differential after it is installed. I'll be looking for alternatives there...


    I figure it will take a week or two to get through this inventory and get everything tagged and stored with a list of items that I want to replace. Until then, I'm just going to lay low and take it slow so I don't miss something or forget where everything goes. More than one person has said to be patient and I understand why now that the kit is here.

    I'll post again when the inventory is complete.
    Last edited by RRussellTx; 07-30-2017 at 02:31 PM.

  9. #9
    Senior Member edwardb's Avatar
    Join Date
    Feb 2011
    Location
    Lake Orion, Michigan
    Posts
    10,568
    Post Thanks / Like
    Great update and progress! Couple comments. The Ford literature specifically states that aluminum center sections are on automatic cars, and cast iron on manual cars. So your center section is from a manual, same as mine. That driveshaft adapter is an expensive part (>$100) so I would expect (demand) FF to resolve it. The one I received, also black, fit my iron case center section perfectly. I just did a little Googling. What Ford has going there is call a Guibo Joint (also sometimes spelled Giubo) which they designed into this setup. It's some kind of rubber donut to take up shock and smooth out the drivetrain. Common on European cars, apparently not as common on U.S. cars. Also see that a 2015 Mustang performance upgrade is to replace this part with a solid adapter and treat it like a traditional pinion flange. So I expect FF is getting them from somewhere. The Driveshaft Shop is one company that talks about this.

    I'm surprised about your comments regarding the IRS differential bushings. I have mine completely installed, as I'm sure you saw in my build thread. With the poly bushings, metal sleeves, and everything installed and torqued down, that thing isn't going anywhere. It's extremely rigid. FWIW, I have the Mustang frame for the complete IRS, which has the Ford version of the mountings. They are similar if not slightly less rigid. Granted, one of the performance upgrade in high horsepower Mustangs is to replace those mounts with solids. But that's a much heavier car and way beyond stock power. Personally, I don't think there's anything to worry about.

    The pictures of the cover removed from the center section are interesting. Looks similar to the older style 8.8 inside. Would be an interesting side-by-side since supposedly the new one is larger and beefier. The vent tube baffling is also interesting. I haven't seen this addressed in any instructions. Any thoughts about what you're going to do? Mustangs have a pretty long hose that attaches to the nipple and goes who knows where. I'm not sure that's needed here, but seems like it should have something.

    One other real minor point. I assume you have your elevated body buck high enough to clear the firewall and dash. But it looks close. Be careful if/when you have the steering wheel installed. It stands higher than the firewall or dash, and it's easy to run into it and (just maybe) scratch it up a bit. One of those "ask me how I know" statements.
    Last edited by edwardb; 09-22-2015 at 12:18 AM.
    Build 1: Mk3 Roadster #5125. Sold 11/08/2014. Build 2: Mk4 Roadster #7750. Sold 04/10/2017. Build Thread
    Build 3: Mk4 Roadster 20th Anniversary #8674. Sold 09/07/2020. Build Thread and Video. Build 4: Gen 3 Type 65 Coupe #59. Gen 3 Coyote. Legal 03/04/2020. Build Thread and Video
    Build 5: 35 Hot Rod Truck #138. LS3 and 4L65E auto. Rcvd 01/05/2021. Legal 04/20/2023. Build Thread. Sold 11/9/2023.

  10. #10

    Join Date
    Jun 2015
    Location
    Parker, TX
    Posts
    287
    Post Thanks / Like
    Quote Originally Posted by edwardb View Post
    Great update and progress!
    Thanks!

    Quote Originally Posted by edwardb View Post
    What Ford has going there is call a Guibo Joint (also sometimes spelled Giubo) which they designed into this setup.
    I'm all too familiar with the guibo joint, I put about 200,000 on a 94 325is and replaced this part multiple times' along with other failed suspension parts. I finally put race suspension parts with the urethane bushings and did not need to replace anything until I finally sold it. Granted most of the miles were put on before I swaped the suspension parts but they seemed to withstand the abuse better.

    Quote Originally Posted by edwardb View Post
    I'm surprised about your comments regarding the IRS differential bushings. I have mine completely installed, as I'm sure you saw in my build thread. With the poly bushings, metal sleeves, and everything installed and torqued down, that thing isn't going anywhere. It's extremely rigid.
    It may seem rigid now but I watched too many IRS Mustang YouTube videos about the wheel hop issues they have under full load. With well over 400hp and over 24 inches of rubber on the ground I think it will be much less rigid. I am very concerned about the wheel hop issue primarily because of the amount of effort to rectify it down the road. To your point - it's probably fine but if it's not then we have to pull that bad boy out or live with it until it wears out and then pull it out.

    Maybe one of the forum vendors can figure out how to source some solid bushings for us. The guys that are going to put these cars on the track will want them for sure.


    Quote Originally Posted by edwardb View Post
    The vent tube baffling is also interesting. I haven't seen this addressed in any instructions. Any thoughts about what you're going to do? Mustangs have a pretty long hose that attaches to the nipple and goes who knows where. I'm not sure that's needed here, but seems like it should have something.
    I actually have that part in hand. It has a rubber 90 degree tube at the differential end and what appears to be some kind of a filter/one way valve at the other end with hard plastic tubing in between with various mounts and guards along the way. I plan on cutting out the middle and replacing the center with tubing that will allow me to route it somewhere out of the way under the car. It was about a $12 part so it's a cheap experiment.


    Quote Originally Posted by edwardb View Post
    I assume you have your elevated body buck high enough to clear the firewall and dash. But it looks close. Be careful if/when you have the steering wheel installed. It stands higher than the firewall or dash, and it's easy to run into it and (just maybe) scratch it up a bit. One of those "ask me how I know" statements.
    Thanks for the heads up and I'll watch that closely. I have a few inches between the firewall and the body buck but I wanted it high enough to clear the car but low enough to go through the door and its a tight squeeze. I can make up a little room if/when I build the chassis dolly but for now it works fine.
    Last edited by RRussellTx; 07-30-2017 at 02:33 PM.

  11. #11
    Senior Member
    Join Date
    May 2014
    Location
    Burlington, WI
    Posts
    689
    Post Thanks / Like
    Blog Entries
    1
    Great update and pics. I'll be looking at the adapter today as I also have the 3.31 center section which is cast iron. I'll also be interested to see whether the vent needs to be addressed. BTW, nice to have a shop dedicated to the build and have to say, luv the keezer.

  12. #12

    Join Date
    Jun 2015
    Location
    Parker, TX
    Posts
    287
    Post Thanks / Like
    Rolling Chassis - to see if I fit...

    As I mentioned a couple of posts back - King stopped by over the holidays and I had a hard time getting in and out of his car (AKA - it was never going to happen). I climbed in like I would my DD and my left leg was NOT going to get over door sill. Anyway, since I had my tires mounted and most of my suspension done, I thought I would roll it out and see if i could get into mine. I did figure out an easy way to get in and out but I do need to support myself on the center console and the body behind the door. Anyway, here is a pic of me pulling out some cleco's so I can get the seat in:


    And another shot without the body:


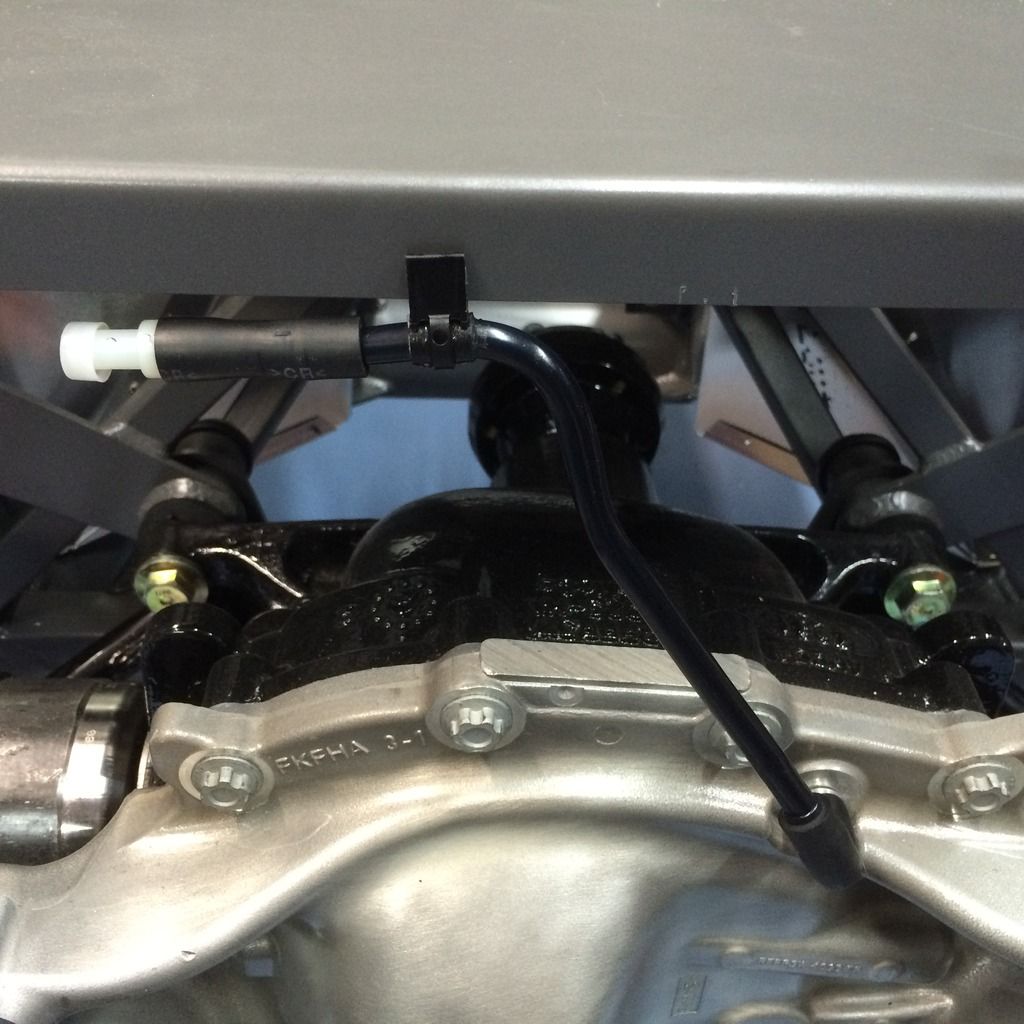
    You can almost see the Diff Vent Tube in that shot but here is a better look. I just trimmed the 2015 Mustang Vent and heated it up a bit to get the bend a little straighter. I did not have to move the clip although the test fit left a little bite mark on the right...
    Last edited by RRussellTx; 07-30-2017 at 03:11 PM.

  13. #13
    Senior Member
    Join Date
    Apr 2013
    Location
    Albuquerque, NM
    Posts
    184
    Post Thanks / Like
    Quote Originally Posted by RRussellTx View Post

    You can almost see the Diff Vent Tube in that shot but here is a better look. I just trimmed the 2015 Mustang Vent and heated it up a bit to get the bend a little straighter. I did not have to move the clip although the test fit left a little bite mark on the right...
    I'm clearly not an expert on the topic(especially with this particular diff) but one comment about the vent tube routing/layout. With the checkball/one-way vent on the end, the only way it works as designed is if it's mounted vertical. Most have a small plastic/poly ball in them the seats properly based the situation: car upright/no pressure escaping, car upright/vent out under pressure, car sideways or upside down, etc....
    The line coming out of the diff is at about 11o'clock position with the vent at 9o'clock. It looks like if you move the line to 2o'clock, the vent will be upright at 12o'clock and can still be mount on the same surface. All of this being said, it may not really matter that much based on the baffle on the inside of the diff for the vent. Oh, and by keeping the car shiny side up....

    Beautiful build, I'll be continuing to follow as you make progress.

    -TJ

  14. #14

    Join Date
    Jun 2015
    Location
    Parker, TX
    Posts
    287
    Post Thanks / Like
    Powder Coating Setup:

    I want to thank everyone that posted about how simple it is to get started with your own Powder Coating setup. It really is VERY cheap and easy to get setup. I went with the Eastwood Dual Voltage HotCoat Powder Coating Gun
    Item #11676 and a pound of the #10107 Powder High Gloss Black. That set me back about $120 - all I needed then was an Oven to bake it in. I considered the little Eastwood Oven but I was afraid it would be too small so I took to Craigslist and found a 1950's Vintage Oven for $35 bucks. It was in great shape but it still had the 1950's wiring... I took it apart enough to get a modern extension cord hooked up and I placed the oven on a little dolly so I can roll it under my shop workbench. So now, for a little over $150, I'm all set for powder coating small parts.

    Here are some pics of my new toy:


    And here is a pic of one of the parts I have powder coated so far:


    The oven has a Dual Rotisserie and an Automatic Shutoff timer - pretty fancy for a Powder Coating Rig...
    i am going to try the Clear Powder next to see how it seals Aluminum.
    Last edited by RRussellTx; 07-30-2017 at 03:06 PM.

  15. #15
    Member BobCarter's Avatar
    Join Date
    Jun 2015
    Location
    Springfield, MO
    Posts
    98
    Post Thanks / Like
    Today I checked the fit off the adapter I received with my kit. I too have a adapter (Black) that does not fit. Its outside diameter is greater than the ID of the center section yoke. To Edwardp's comment- My center section is cast iron, wonder why my black adapter doesn't fit my cast iron center section? Called Vinny at FFR, he's sending me the "right one". Anxious to see what the "right one" will be.


    [QUOTE=edwardb;212405]Great update and progress! Couple comments. The Ford literature specifically states that aluminum center sections are on automatic cars, and cast iron on manual cars. So your center section is from a manual, same as mine. That driveshaft adapter is an expensive part (>$100) so I would expect (demand) FF to resolve it. The one I received, also black, fit my iron case center section perfectly. I just did a little Googling. What Ford has going there is call a Guibo Joint (also sometimes spelled Giubo) which they designed into this setup. It's some kind of rubber donut to take up shock and smooth out the drivetrain. Common on European cars, apparently not as common on U.S. cars. Also see that a 2015 Mustang performance upgrade is to replace this part with a solid adapter and treat it like a traditional pinion flange. So I expect FF is getting them from somewhere. The Driveshaft Shop is one company that talks about this.

  16. #16
    Senior Member CraigS's Avatar
    Join Date
    Feb 2011
    Location
    Blacksburg, Va
    Posts
    4,728
    Post Thanks / Like
    RRussel, be sure to stay on FFR about those Konis. When Edward posted about them I did a quick google. WOW, the DA Konis are approximately $950 each.
    FFR MkII, 408W, Tremec TKO 500, 2015 IRS, DA QA1s, Forte front bar, APE hardtop.

  17. #17
    Senior Member
    Join Date
    May 2014
    Location
    Burlington, WI
    Posts
    689
    Post Thanks / Like
    Blog Entries
    1
    Great update and pics. I'll be looking at the adapter today as I also have the 3.31 center section which is cast iron. I'll also be interested to see whether the vent needs to be addressed. BTW, nice to have a shop dedicated to the build and have to say, luv the keezer.

  18. #18

    Join Date
    Jun 2015
    Location
    Parker, TX
    Posts
    287
    Post Thanks / Like

    Tires:

    I also went ahead and picked up my tires last month. I went with the BFGOODRICH G-FORCE RIVAL S tires. I have had several sets of these in the past and I like the performance/price/treadwear combination that they provide. I picked up the P315/30ZR-18 for the rear and P245/40ZR-18s for the front. They are fat and sticky!


    Last edited by RRussellTx; 07-30-2017 at 03:09 PM.

  19. #19
    Senior Member chopthebass's Avatar
    Join Date
    Oct 2013
    Location
    Calgary, Canada
    Posts
    941
    Post Thanks / Like
    Couldn't you get your garage floor a little cleaner!
    Finally started my build the beginning July. 2015!

  20. #20
    Senior Member jayguy's Avatar
    Join Date
    Feb 2011
    Location
    Las Vegas
    Posts
    234
    Post Thanks / Like
    Awesome setup you have, and looks like it's going to be a great build! Shiner Bock! Great beer! I'm just starting to brew at home, and I think that's going to be a recipe I'll try to find/perfect. It's a great beer.

    Glad you guys are blazing the trail with the new IRS. It's still a couple years away (how many years have I been saying that?) but I want to do the '33 with the IRS, and by the time I'm ready, you guys will have ironed out all of the wrinkles. Thanks!


    Jay

  21. #21

    Join Date
    Jun 2015
    Location
    Parker, TX
    Posts
    287
    Post Thanks / Like
    ChopTheBass - did I miss a spot?


    JayGuy
    Quote Originally Posted by jayguy View Post
    Awesome setup you have, and looks like it's going to be a great build! Shiner Bock! Great beer! I'm just starting to brew at home, and I think that's going to be a recipe I'll try to find/perfect. It's a great beer.
    Thanks! I generally like to have a couple of home brew kegs in the keezer but I just have not made the time lately. I like the Caribou Slobber (medium) and the Big Honkin Stout (dark) extract recipes from Northern Brewer. There is a homebrew store in town where I can pick up the ingredients so I don't actually order from there though.

  22. #22

    Join Date
    Jun 2015
    Location
    Parker, TX
    Posts
    287
    Post Thanks / Like
    Thanks for the tips on the brake lines guys. I may try them both since I have the materials on hand.

    Edwardb,
    I went with the 245's because I was not familiar enough with the car yet to know if the 275's would fit. I will certianly try the wider option for the next set if it will fit after I get everything dialed in. One of the things I like about the BF Goodrich Rivals is a very thick bead right around the rim. It saved me from curb rash in the past. The problem with the 245's is that there is less than 1/8th" overhang on the bead. The rears have a little over 1/4" and I ran a bit more than that on my last car.

    Also, thanks for the e-brake info - very helpful as always!

  23. #23

    Join Date
    Jun 2015
    Location
    Parker, TX
    Posts
    287
    Post Thanks / Like
    Rear Suspension is Complete!!:

    I did receive the Axles and Rear Wilwood brakes right before Christmas. I was so happy to get something that I could actually finish! I was able to get the rear end 100% complete.
    Everything looks just like Edwardb's outstanding photos so I'm going to skip those photos for now. Although I did get the obligatory shot of the safety wire - (like Edwardb - don't look too close).


    I'm still waiting on the front Brakes - Jay said that Wilwood is having issues with the Rotors or something... I also don't have the emergency brake cables. I thought maybe they were going to come with the brakes but they were not in the shipment from Wilwood. If anyone can tell me the FFR part number or which box it came in I could double check my paperwork but after a good hour of searching, I really don't think it made in on my list of parts.

    I have also made quite a bit of progress drilling the panels. I have also generated and ordered my initial list of parts for the rear brake lines but I'm still not 100% sure how I'm going to exit the DS footbox with the rear brake lines so ideas are welcome. I have also practiced bending and flaring the Stainless Brake lines and I do love the Eastwood flare tool. Perfect flares every time. I did have some challenges getting the bends exactly right so I ordered some 3/32" X 36" aluminum TIG welding rods to bend as a template (like cardboard before sheet metal), I'll see how that works after my brake line parts show up.

    Hopefully the next updates will include front brakes and maybe even news about my motor from Forte.

    Happy New Year everyone!
    Last edited by RRussellTx; 07-30-2017 at 03:13 PM.

  24. #24
    2bking's Avatar
    Join Date
    Jul 2013
    Location
    Garland, Texas
    Posts
    799
    Post Thanks / Like
    Quote Originally Posted by RRussellTx View Post
    I have also practiced bending and flaring the Stainless Brake lines and I do love the Eastwood flare tool. Perfect flares every time. I did have some challenges getting the bends exactly right so I ordered some 3/32" X 36" aluminum TIG welding rods to bend as a template (like cardboard before sheet metal), I'll see how that works after my brake line parts show up.
    I like the look of the 18 inch rims and low profile tires. And where is the picture of you in the seat?

    I used the brake lines supplied with the kit for mockup and then bent the stainless.
    King
    Roadster #8127, ordered 7/12/13, received 9/11/13
    http://thefactoryfiveforum.com/showt...4-Coyote-Build

  25. #25
    Senior Member edwardb's Avatar
    Join Date
    Feb 2011
    Location
    Lake Orion, Michigan
    Posts
    10,568
    Post Thanks / Like
    Lots of great updates and progress! Cool seeing the chassis sitting down on the wheels and tires. I don't remember stoves like that (and I'm kind of from the 50's too... ) but what a perfect setup for powder coat. I might have to try that one of these days. Love the tires. Those are the exact ones that are on my short list when I think about tires in a few months. I see you chose the 245/40ZR18 for the fronts. Did you look at the 275/35ZR18's? 275's are generally at the upper limit for the front, if not too wide. But in the listings I could find, appear to be very similar in size to the 245's given the lower aspect ratio. Just curious. The 315's look perfect. I too like the 18 inch wheels and low profile. It's a different look, and one the traditionalist's may question. But it fits the overall modern theme of the build.
    Like what you did with the diff breather. May copy that one. For the e-brake cables, my kit delivery also did not have them. They weren't on the manifest anywhere or on the POL shortage. Included them on the missing parts list I sent to FF and I received them shortly after. The part number on the cables is "14690 2015W." I've got them installed per the routing in the IRS instructions, and mocked up with the handle a few days ago. All seems OK. Hopefully you received the little clips required to attach the cable ends to the Wilwood e-brake caliper lever. Another powder coat opportunity since they're bare steel. I used a rattle can.

    I'm still thinking about how to route the rear brake lines out of the footbox. My two other builds had the MC outside the footbox, so this is a first for me as well. Right now I'm thinking to bring both front and rear out of the footbox together. The front stopping at the 3/4 inch tube and going forward to the front wheels. The rear on down to the bottom of the footbox and then to the back along the outside of the 4 inch chassis tube. Similar to what FF shows in their build videos, and what I've seen from a number of other builds. I've seen a couple of builds where they take them down inside the footbox before exiting to go back on the 4 inch chassis tube. But I really don't want to bury them in there. Like 2bking, I used the FF supplied brake lines for mockup and then duplicated in stainless. For the 3/8 inch fuel lines on my last build, I bought a roll of 3/8 inch copper tubing at Home Depot (about $15 as I recall) and used that to mock up the various fuel line pieces. It bends easily by hand. Then duplicated in stainless. Planning to do the same this time around.
    Last edited by edwardb; 01-04-2016 at 07:50 AM.
    Build 1: Mk3 Roadster #5125. Sold 11/08/2014. Build 2: Mk4 Roadster #7750. Sold 04/10/2017. Build Thread
    Build 3: Mk4 Roadster 20th Anniversary #8674. Sold 09/07/2020. Build Thread and Video. Build 4: Gen 3 Type 65 Coupe #59. Gen 3 Coyote. Legal 03/04/2020. Build Thread and Video
    Build 5: 35 Hot Rod Truck #138. LS3 and 4L65E auto. Rcvd 01/05/2021. Legal 04/20/2023. Build Thread. Sold 11/9/2023.

  26. #26
    Senior Member
    Join Date
    May 2014
    Location
    Burlington, WI
    Posts
    689
    Post Thanks / Like
    Blog Entries
    1
    RRussellTx,

    Can I ask how you cleaned up the hubs. Both yours and Edwardb's look fantastic.

  27. #27

    Join Date
    Jun 2015
    Location
    Parker, TX
    Posts
    287
    Post Thanks / Like
    Quote Originally Posted by ThickCobra View Post
    Can I ask how you cleaned up the hubs. Both yours and Edwardb's look fantastic.
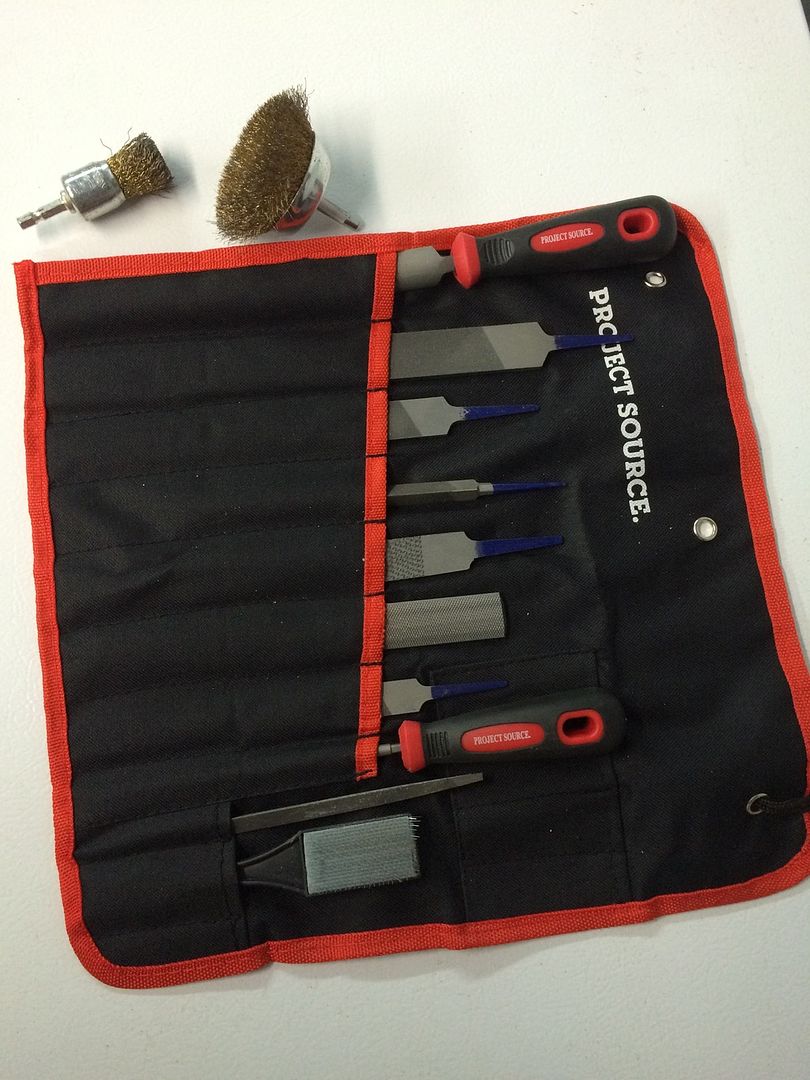
    I basically followed Edwardb's instructions. For the knuckles, I used a little file kit from the local big box and a couple of FINE wire brushes for the drill motor. I think Edwardb also used some Emory cloth but his are a little nicer than mine. For the hubs I just cleaned them up with the same wire wheel and put a coat or two of the black POR15. Not hard at all, just took a few hours on a lazy Sunday afternoon.
    Last edited by RRussellTx; 07-30-2017 at 02:34 PM.

  28. #28
    Senior Member
    Join Date
    May 2014
    Location
    Burlington, WI
    Posts
    689
    Post Thanks / Like
    Blog Entries
    1
    Quote Originally Posted by RRussellTx View Post
    I basically followed Edwardb's instructions. For the knuckles, I used a little file kit from the local big box and a couple of FINE wire brushes for the drill motor. I think Edwardb also used some Emory cloth but his are a little nicer than mine. For the hubs I just cleaned them up with the same wire wheel and put a coat or two of the black POR15. Not hard at all, just took a few hours on a lazy Sunday afternoon.
    Thanks, appreciated.

  29. #29
    Senior Member
    Join Date
    May 2014
    Location
    Burlington, WI
    Posts
    689
    Post Thanks / Like
    Blog Entries
    1
    I have a few questions pertaining to the build, which may be of interest to others.

    1. Should there be no rivets drilled thru the main frame members...the large tubes?
    2. Should there be no rivets run thru the 11" x 13" plates beneath the ds and ps floor pans? If you do, the rivet will be exposed to the elements. It appears these plates replaced 3/4" cross members.
    3. Should the frame be level? I noticed that, although my jack stands were all set on the same notch, and the frame appeared level, it was not. And as we build and torque bolts, etc.,is being level important. I chose to level mine with shims.

    Input?

  30. #30
    Senior Member edwardb's Avatar
    Join Date
    Feb 2011
    Location
    Lake Orion, Michigan
    Posts
    10,568
    Post Thanks / Like
    My input FWIW:

    1. I put a row of rivets for the big floor pieces into the main 4 inch chassis tubes. That's the only piece I recall over the main tube. Just make sure to hit the high point down the center so the pieces stay flat. I generally use the FF recommended spacing: Every 3 inches into steel frame members. Every 2 inches for panel-to-panel.

    2. Go ahead and put some beads of adhesive on it when installing the panels, but no reason to put rivets into that piece. There are plenty of other frame members around for rivets. That plate is mainly intended for your seat bolts. Also if you use the anti-submarine belt in the center/front of the Simpson harness (you should!) it will bolt into the front of that plate.

    3. Doesn't matter. You won't be changing the shape of the frame with the assembly. My garage slopes a bit toward the door (like it's supposed to) and also a bit toward the sides. Nothing to worry about.
    Build 1: Mk3 Roadster #5125. Sold 11/08/2014. Build 2: Mk4 Roadster #7750. Sold 04/10/2017. Build Thread
    Build 3: Mk4 Roadster 20th Anniversary #8674. Sold 09/07/2020. Build Thread and Video. Build 4: Gen 3 Type 65 Coupe #59. Gen 3 Coyote. Legal 03/04/2020. Build Thread and Video
    Build 5: 35 Hot Rod Truck #138. LS3 and 4L65E auto. Rcvd 01/05/2021. Legal 04/20/2023. Build Thread. Sold 11/9/2023.

  31. #31

    Join Date
    Jun 2015
    Location
    Parker, TX
    Posts
    287
    Post Thanks / Like
    Well, after almost 5 months since my kit was 'ready', I have received my very last back-ordered part today (door latches)!
    I received the front brakes last week and got them installed over the weekend without any issues and received the e-brake cables yesterday.

    Now - where is that engine from Forte?

  32. #32
    Senior Member
    Join Date
    May 2014
    Location
    Burlington, WI
    Posts
    689
    Post Thanks / Like
    Blog Entries
    1
    Thanks for the quick reply and input. As for item #3, I should have been clearer. My frame sits perpendicular to the main door. That is, sideways. And yes, the floor appropriately slopes toward the main door. There must be some flex to the frame because when I placed a level on the front radiator 3/4" tube is showed one side off level. While a level placed on the back trunk area, in several places, showed it level. Shimming the front leveled everything out and its all good. May not make sense but, thats what I found.

  33. #33
    Senior Member edwardb's Avatar
    Join Date
    Feb 2011
    Location
    Lake Orion, Michigan
    Posts
    10,568
    Post Thanks / Like
    Quote Originally Posted by ThickCobra View Post
    Thanks for the quick reply and input. As for item #3, I should have been clearer. My frame sits perpendicular to the main door. That is, sideways. And yes, the floor appropriately slopes toward the main door. There must be some flex to the frame because when I placed a level on the front radiator 3/4" tube is showed one side off level. While a level placed on the back trunk area, in several places, showed it level. Shimming the front leveled everything out and its all good. May not make sense but, thats what I found.
    I guarantee there is no flex in the frame. Rule that out. But I'm not going to say every part is exactly level to each other. I assume the radiator tube you're talking about is the one just in front of the hood hinges with the two short pieces of 3/4 inch tube the radiator attaches to. Take a look and I'll bet you'll find that part isn't level to the rest of the chassis. Every chassis I've had that piece was welded slightly low on the PS, including my new 20th Anniversary chassis. Just looked. It doesn't hurt anything.
    Build 1: Mk3 Roadster #5125. Sold 11/08/2014. Build 2: Mk4 Roadster #7750. Sold 04/10/2017. Build Thread
    Build 3: Mk4 Roadster 20th Anniversary #8674. Sold 09/07/2020. Build Thread and Video. Build 4: Gen 3 Type 65 Coupe #59. Gen 3 Coyote. Legal 03/04/2020. Build Thread and Video
    Build 5: 35 Hot Rod Truck #138. LS3 and 4L65E auto. Rcvd 01/05/2021. Legal 04/20/2023. Build Thread. Sold 11/9/2023.

  34. #34

    Join Date
    Jun 2015
    Location
    Parker, TX
    Posts
    287
    Post Thanks / Like
    Well, I don't have much of an update but it's been a few weeks since I recorded my build progress so here is the latest.

    I went through most of the build manual along with the packing lists and compared them to the parts I received. I pre-assembled as much as I could and that helped me account for everything. The only other item I found missing was the spacers for the front lower ball joint. I was able to pick those up on Amazon and avoid the FFR dependency.

    I sent the updated list of what I was missing In addition to the original back order list (rear LCA hardware, 2 Koni's, wrong wheels, bumper hoops) to FFR about a week and a half ago and I was notified after a few days that the request had been submitted to shipping.

    I have not received any of the back ordered parts from the initial delivery or the added items that I sent a week and a half ago so I decided to call them today and get an update. He could not give me any firm dates on the key items that I need for the rear suspension but it sounds like it will be at least a month before I get the shocks, sway bars and axles.

    Meanwhile, I have finished up the front suspension and power steering rack (except for the back ordered sway bars). I installed the differential which I posted in Edwardb's IRS thread and I have the pedal box and master cylinders initially installed. I say initially because I have a bit of the issue with the clutch arm hitting the chassis. I am not happy about the options that include cutting stuff and I know FFR says it's just fine so I'm trying to convince myself of that or think of another option.

    Another issue is that I have the Breeze Power Steering Rack and I also ordered the Offset Rack Mounting Kit but it was harder to line up than the differential was and after looking it over I decided it was not really necessary so I installed it with the delivered bushings. I thought that was just fine until King stopped by this weekend and pointed out the boot rub issue... I spent the rest of the afternoon pulling it out and widening the slotted DS PS Rack mount holes in the chassis so the rack would fit. Now the rack is installed with Mounting Kit and no boot rub.

    I have been trying to work on filler work while I wait on the items I need in order to follow the build manual but I really think it's best to stand down for a little while until I get the needed parts and build it more methodically.

    Suggestions/ideas on a 3 compartment reservoir are welcome along with words of encouragement to get through the backorder blues!

  35. #35

    Join Date
    Jun 2015
    Location
    Parker, TX
    Posts
    287
    Post Thanks / Like
    I finally received an update from Forte! He completed the engine a couple of weeks ago and I think he is getting ready to ship it out. Attached are the results from the Dyno...
    Screen Shot 2016-02-07 at 8.12.45 PM.png

  36. #36

    Join Date
    Jun 2015
    Location
    Parker, TX
    Posts
    287
    Post Thanks / Like
    i also cut the ears off the rear knuckles and ground them down into a more molded look (busy work).


    And got some of the bare metal parts Powder Coated:


    Here is a shot looking down on the boot rub issue AFTER the fix:


    And token shots of the front suspension:

    Last edited by RRussellTx; 07-30-2017 at 02:40 PM.

  37. #37
    Senior Member edwardb's Avatar
    Join Date
    Feb 2011
    Location
    Lake Orion, Michigan
    Posts
    10,568
    Post Thanks / Like
    Sorry to hear you're not making better progress with backorders. I'm down to just the Wilwood brakes, as already mentioned. But it was a full two months after delivery. I called FF and emailed frequently (ask them...) and always received a friendly response. But often without firm promise dates. It's easy to get discouraged. Hang in there! I guess I'm a little surprised about their response to the clutch arm/chassis interference issue. If they don't think it's a problem, then probably why it hasn't been fixed. The interference does exist. No two ways around it. The only way it wouldn't be a problem IMO is if your clutch throw doesn't require the pedal to be pushed down that far (not my experience) or if you raised the pedal up enough to get full release before interference. This would make the clutch higher than the brake, which I also don't like. My suggestion is if you don't want to modify anything at this point, no problem. Wait until you have everything installed, plumbed, etc. and see how it turns out. You should leave the DS footbox outside panels off until the very end of your build anyway, so it would be easy enough to address it later.

    Your cleaned up rounded knuckles look great! Looks like they came out of the mold that way. Nice work. I'm surprised you had trouble installing the steering rack and Breeze bushings. Interesting how everyone's experience can be different. It was nothing like installing the IRS center section for me. Now that was hard.

    For the triple reservoir, many of us have used the CNC piece. Their part number 1483. I used the double on my first build, and the triple on the last build and will use it again on the new build. In addition to being a nice looking and very functional piece, I really like their pressure cap for bleeding. Check their part number 1459A. Easiest way to bleed the brakes and clutch I've ever found.

    For more work, you're stopped about where I was a couple weeks ago. Other things you can work on? Gas tank, radiator, and you could basically complete the instrument panel if you wanted to. You can also start drilling and cleco'ing aluminum panels.

    My Coyote engine arrived yesterday. I'll be updating my build thread in the next few days.
    Build 1: Mk3 Roadster #5125. Sold 11/08/2014. Build 2: Mk4 Roadster #7750. Sold 04/10/2017. Build Thread
    Build 3: Mk4 Roadster 20th Anniversary #8674. Sold 09/07/2020. Build Thread and Video. Build 4: Gen 3 Type 65 Coupe #59. Gen 3 Coyote. Legal 03/04/2020. Build Thread and Video
    Build 5: 35 Hot Rod Truck #138. LS3 and 4L65E auto. Rcvd 01/05/2021. Legal 04/20/2023. Build Thread. Sold 11/9/2023.

  38. #38

    Join Date
    Jun 2015
    Location
    Parker, TX
    Posts
    287
    Post Thanks / Like
    edwardb,

    Thanks for the CNC tip and the words of encouragement! I know you feel my pain!
    Looking forward to your next update - they always give me some things to do.

  39. #39

    Join Date
    Jun 2015
    Location
    Parker, TX
    Posts
    287
    Post Thanks / Like

    Brakes are complete!

    Also, the brakes are just about complete. Here are a few pics of the finished product:

    DS Front:


    PS Front:


    At Reservoir:


    Footbox Panel:


    Pedal Box:


    Inside Footbox:


    Looking down on the DS Rear:


    I used the Gardner-Westcott Chrome Fittings and Stainless Steel Lines flared with the Eastwood Flare Tool. I also use the Ron Francis Brake Light Pressure Switch (SW32). This was my first attempt at brake lines and I'm pretty happy with the results. There is a pretty good pile of rejected attempts but I finally got a few runs that I was happy with. I still have some work to do getting the rear brake lines through the footbox floor but that should be pretty easy compared to the rest of it.

    Really looking forward to getting the engine so I can be sure of the fuel line routing and the general fit for the engine compartment panels.
    Last edited by RRussellTx; 07-30-2017 at 03:20 PM.

  40. #40
    Administrator David Hodgkins's Avatar
    Join Date
    Feb 2011
    Location
    Corona del Mar, CA
    Posts
    6,064
    Post Thanks / Like
    Blog Entries
    7
    I just wanted to chime in and say I'm following the build and it looks great so far! I do have one question: What kind of rivets are those on your f-panel?

    Regarding filler work you have a ton of drilling for all the panels in front of you so that's a good thing to get out of the way and the brake lines are another fun project to tackle. BTW nice work on those Knuckles! Are you going to spray them with a clear or leave them raw? (Oops I guess that's 2 questions...)


    FFR 5369 Pin Drive, IRS, Trigos, Torsen, Wilwoods, FMS BOSS 302 "B" cam , Mass-flo. CA SB100 (SPCN) Registered
    Delivered 4/23/06. "Finished" 4/2012 (still not done!)


Page 1 of 5 123 ... LastLast

Posting Permissions

  • You may not post new threads
  • You may not post replies
  • You may not post attachments
  • You may not edit your posts
  •  

Martin's Dent and Collision Shop

Visit our community sponsor