FormaCars

Visit our community sponsor

Thanks Thanks:  0
Likes Likes:  4
Page 1 of 3 123 LastLast
Results 1 to 40 of 116

Thread: Kai-Rod's #236 Build Page

  1. #1
    Senior Member Kai-Rod's Avatar
    Join Date
    Feb 2011
    Location
    Hanau, Germany
    Posts
    109
    Post Thanks / Like

    Kai-Rod's #236 Build Page

    I have seen quite a few really nice build pages which helped me a lot with my build. I am now starting my own build page with this photo taken at Hammink Performance in the Netherlands the day that I picked my kit up. I am working with a MAC computer and still have not figured it out. So things will take a while. I have done a few things different on my Rod and hope to be able to show you some of that here soon.

    Kai
    Hanau/Germany
    Rides & Projects: 54 F100 347SBF/Auto; 65 Galaxie FB 446FE/5-Speed; 67 Mustang Convertible 306SBF/Auto; 07 Mustang GT Convertible 4.6 3V/Auto; #236 FFR Hot Rod 4.6 2V/5-Speed

  2. #2
    Webmaster, FFR
    Join Date
    Feb 2011
    Location
    Middleboro, MA
    Posts
    1,835
    Post Thanks / Like
    Thanks for sharing the pic! Jan and Freek at Hammink Performance are great guys. Can't wait to see more of your build. Good luck!
    Dave Lindsey
    FFR's Mad Dog

  3. #3
    33 Hot Rod Builder geoffav's Avatar
    Join Date
    Feb 2011
    Location
    Enterprise, AL
    Posts
    458
    Post Thanks / Like
    Kai, great to see you here man. I just exchanged some messages with Freek a few days ago. Keep the pics coming and we hope to see some pics from HP too.

  4. #4
    Senior Member Kai-Rod's Avatar
    Join Date
    Feb 2011
    Location
    Hanau, Germany
    Posts
    109
    Post Thanks / Like
    OK. More photos. These are from August 2010.

    At first you need to know that this is a joint wife/husband project. My wife Kerstin is also wrenching. The only difference between the two of us is that she reads the manual and then wonders how it should work while I do not read manuals, get it wrong, wonder for a while and then somehow get it fixed.


    That is our barn. Ready for the new project.


    And this just after the Rod moved in. We bought some real cheap carpet so that it feels more like a living room and you can get on your knees or back without getting dirty.


    ... more to come soon.
    Last edited by Kai-Rod; 02-25-2011 at 01:10 PM.
    Kai
    Hanau/Germany
    Rides & Projects: 54 F100 347SBF/Auto; 65 Galaxie FB 446FE/5-Speed; 67 Mustang Convertible 306SBF/Auto; 07 Mustang GT Convertible 4.6 3V/Auto; #236 FFR Hot Rod 4.6 2V/5-Speed

  5. #5
    Senior Member Kai-Rod's Avatar
    Join Date
    Feb 2011
    Location
    Hanau, Germany
    Posts
    109
    Post Thanks / Like
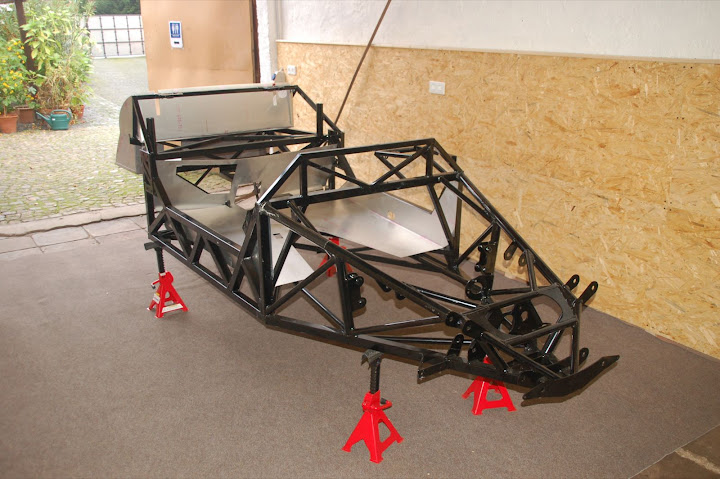
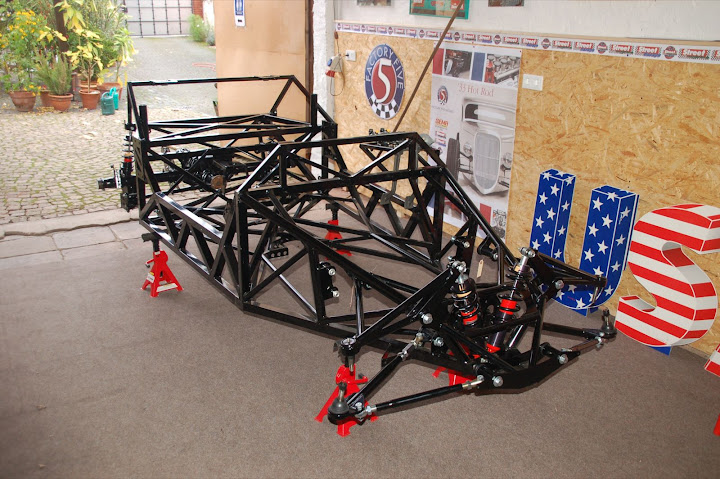
    Then it was time to install the front and rear suspension. We also added some posters and other stuff to the walls.


    The rear end is from a 2003 Mustang GT. Could not believe how rusty and dirty it was.


    ... more to come.
    Kai
    Hanau/Germany
    Rides & Projects: 54 F100 347SBF/Auto; 65 Galaxie FB 446FE/5-Speed; 67 Mustang Convertible 306SBF/Auto; 07 Mustang GT Convertible 4.6 3V/Auto; #236 FFR Hot Rod 4.6 2V/5-Speed

  6. #6
    Senior Member Kai-Rod's Avatar
    Join Date
    Feb 2011
    Location
    Hanau, Germany
    Posts
    109
    Post Thanks / Like
    Rear end painted and ready to install.


    Front end ready to install.


    Almost attached to the suspension.


    Front and rear end installed.


    ... more to come.
    Kai
    Hanau/Germany
    Rides & Projects: 54 F100 347SBF/Auto; 65 Galaxie FB 446FE/5-Speed; 67 Mustang Convertible 306SBF/Auto; 07 Mustang GT Convertible 4.6 3V/Auto; #236 FFR Hot Rod 4.6 2V/5-Speed

  7. #7
    Senior Member Kai-Rod's Avatar
    Join Date
    Feb 2011
    Location
    Hanau, Germany
    Posts
    109
    Post Thanks / Like
    Suspension installed and brake installation started. Mounted the wheels for the first time.


    2nd time the body gets put in place. Many more times to come.


    Fire wall mocked up. Some trimming was required to make it fit the body.


    ... starts to look like a car. ... but way to go ...


    ... more to come.
    Kai
    Hanau/Germany
    Rides & Projects: 54 F100 347SBF/Auto; 65 Galaxie FB 446FE/5-Speed; 67 Mustang Convertible 306SBF/Auto; 07 Mustang GT Convertible 4.6 3V/Auto; #236 FFR Hot Rod 4.6 2V/5-Speed

  8. #8
    Senior Member Kai-Rod's Avatar
    Join Date
    Feb 2011
    Location
    Hanau, Germany
    Posts
    109
    Post Thanks / Like
    Pedalbox and brake lines. For the latter you need lotsa time in order to make it look nice (even so they are more or less invisible later).


    ... enough for today. I am too slow with this computer stuff ...
    Kai
    Hanau/Germany
    Rides & Projects: 54 F100 347SBF/Auto; 65 Galaxie FB 446FE/5-Speed; 67 Mustang Convertible 306SBF/Auto; 07 Mustang GT Convertible 4.6 3V/Auto; #236 FFR Hot Rod 4.6 2V/5-Speed

  9. #9
    Senior Member Kai-Rod's Avatar
    Join Date
    Feb 2011
    Location
    Hanau, Germany
    Posts
    109
    Post Thanks / Like
    That's my engine and tranny combo out of a 2003 Mustang GT which some GI stationed in Germany rolled down a hill when enjoying the German country roads.


    This is the first roll out. Needed to turn the car around in order to install the engine.

    The wheels are Italian made EtaBeta in size 20x9" up front and 20x10" in the rear. They are left overs from our 07 Mustang. I plan to get smaller ones for the front, but for now I am using what I have.


    OK. Time to go to work. More to come over the weekend.
    Kai
    Hanau/Germany
    Rides & Projects: 54 F100 347SBF/Auto; 65 Galaxie FB 446FE/5-Speed; 67 Mustang Convertible 306SBF/Auto; 07 Mustang GT Convertible 4.6 3V/Auto; #236 FFR Hot Rod 4.6 2V/5-Speed

  10. #10
    Senior Member Kai-Rod's Avatar
    Join Date
    Feb 2011
    Location
    Hanau, Germany
    Posts
    109
    Post Thanks / Like
    Now the engine. Be prepared to install it and remove it a couple of times. So far I did it four (4) times. Guess one more time and I am done.

    The biggest problem on the 4.6 2V is that the water outlet hits the suspension. I had mine cut and re-welded in a different angle. I also had to relocate the oil filter. At first there is no room for a normal size filter and at second you could never get to t when the body and side panels are on.


    Kai
    Hanau/Germany
    Rides & Projects: 54 F100 347SBF/Auto; 65 Galaxie FB 446FE/5-Speed; 67 Mustang Convertible 306SBF/Auto; 07 Mustang GT Convertible 4.6 3V/Auto; #236 FFR Hot Rod 4.6 2V/5-Speed

  11. #11
    33 Hot Rod Builder geoffav's Avatar
    Join Date
    Feb 2011
    Location
    Enterprise, AL
    Posts
    458
    Post Thanks / Like
    Great pics.

  12. #12
    Senior Member Kai-Rod's Avatar
    Join Date
    Feb 2011
    Location
    Hanau, Germany
    Posts
    109
    Post Thanks / Like
    Now a couple of details. First the prep and the mounting (actually just holding) the grill and radiator. Everything fits OK, but things are tight. Certainly we also realized that the grill shell has this raised eye brow on the driver side. I think it is pretty bad as you can see it right away. Not sure if and what I will do against it. Guess it is lotsa work to fix that problem.


    Here you can see my already cut water outlet and the short oil filter that even does not fit as the motor mount is in the way. Only solution is a relocation kit. I got the cheapest one from TransDapt and mounted my filter low on the fire wall driver side. The hoses (not the best looking ones) have the correct length and the filter can easily be reached from below.


    This is the angle the water pipe needs to be welded back together. I also shortened the whole thing.


    And now two pics after the welding. Looks great I think. One reason for that is because I did not do the welding, but a profi welder.


    Here you can see the front of the engine. I got the A/C delete from Ford, but the pulley was too large. I also have the P/S delete from a great guy in CT who has a very nice FFR Roadster and did not need the delete anymore. As far as I figured it out the delete is not available anymore. Guess now one needs to make its own. Coming back to the passenger side, I also exchanged the other small pulley as the belt touched the frame. I just went to NAPA and bought the smallest available pulley and luckily it works great with enough clearance. When time allows I might re-address the pulley / belt thing and try to eliminate a few to make the belt shorter.


    ... more to come.
    Kai
    Hanau/Germany
    Rides & Projects: 54 F100 347SBF/Auto; 65 Galaxie FB 446FE/5-Speed; 67 Mustang Convertible 306SBF/Auto; 07 Mustang GT Convertible 4.6 3V/Auto; #236 FFR Hot Rod 4.6 2V/5-Speed

  13. #13
    Senior Member Kai-Rod's Avatar
    Join Date
    Feb 2011
    Location
    Hanau, Germany
    Posts
    109
    Post Thanks / Like
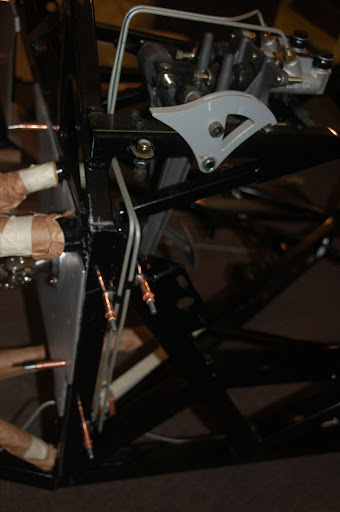
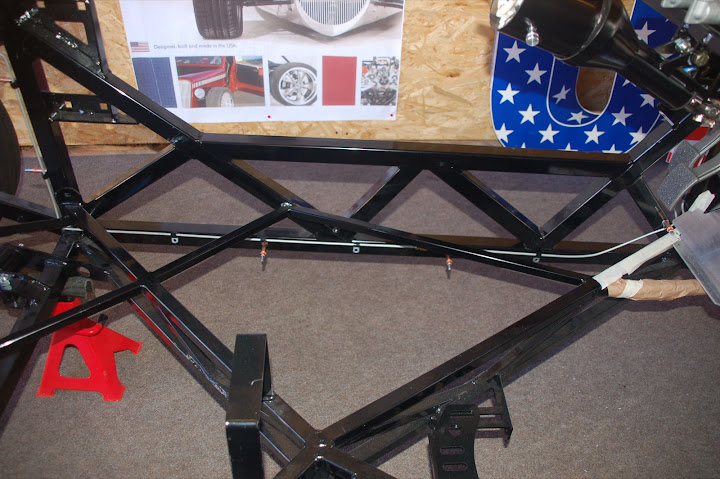
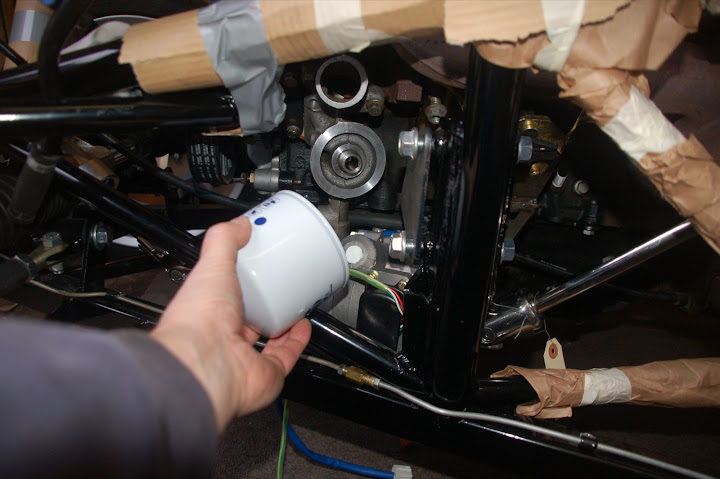
    We had first planned to use different reservoirs for the brakes, but then decided to mount the stock ones. Everything can be mounted pretty easily.

    Also in the picture is my idea about reducing the fire wall flex. Quite simple. Just an aluminum bar. Let's if this works.


    ... more to come.
    Kai
    Hanau/Germany
    Rides & Projects: 54 F100 347SBF/Auto; 65 Galaxie FB 446FE/5-Speed; 67 Mustang Convertible 306SBF/Auto; 07 Mustang GT Convertible 4.6 3V/Auto; #236 FFR Hot Rod 4.6 2V/5-Speed

  14. #14
    Senior Member Kai-Rod's Avatar
    Join Date
    Feb 2011
    Location
    Hanau, Germany
    Posts
    109
    Post Thanks / Like
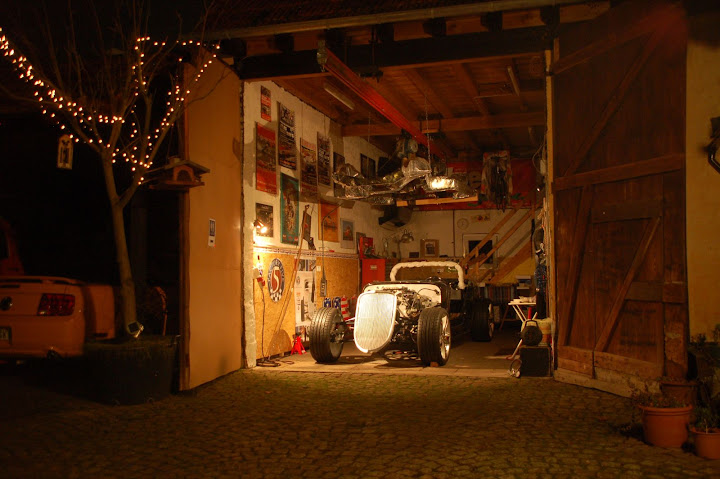
    This photo was taken in November 10. Just before the snow hit. This is what I would see when I look out of my bedroom window when the barn door is open.

    Kai
    Hanau/Germany
    Rides & Projects: 54 F100 347SBF/Auto; 65 Galaxie FB 446FE/5-Speed; 67 Mustang Convertible 306SBF/Auto; 07 Mustang GT Convertible 4.6 3V/Auto; #236 FFR Hot Rod 4.6 2V/5-Speed

  15. #15
    Senior Member Kai-Rod's Avatar
    Join Date
    Feb 2011
    Location
    Hanau, Germany
    Posts
    109
    Post Thanks / Like
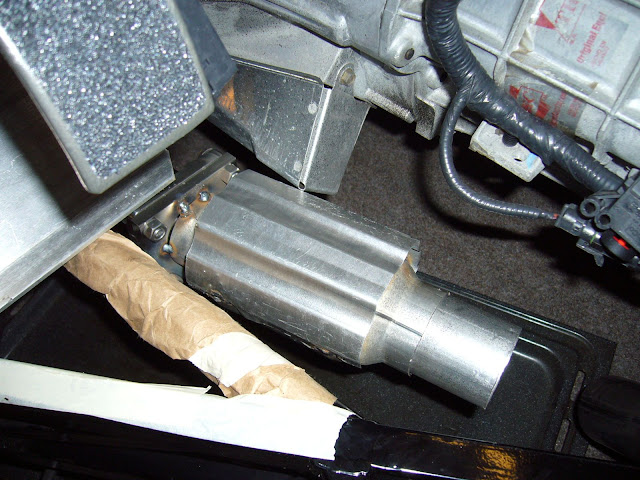
    Here is the heater. We have used the one that FFR offers for the Roadster. The whole things needs to go behind the dash (different to the Roadster where half sits in the engine compartment). I have made my own mounts. The fan sucks the air from the engine compartment thru this neat little home made billet grill and the 3" flex hose.


    Kai
    Hanau/Germany
    Rides & Projects: 54 F100 347SBF/Auto; 65 Galaxie FB 446FE/5-Speed; 67 Mustang Convertible 306SBF/Auto; 07 Mustang GT Convertible 4.6 3V/Auto; #236 FFR Hot Rod 4.6 2V/5-Speed

  16. #16
    Senior Member Kai-Rod's Avatar
    Join Date
    Feb 2011
    Location
    Hanau, Germany
    Posts
    109
    Post Thanks / Like
    Now we are in December 2010. Worst snow since 20 years. It blew under the door into the barn. No reason not to continue the project. Just a few more layers of clothing needed.


    Now it was time for the exhaust. Not an easy thing when you want to use two cats on each side and then a muffler behind it. I also use all four O2 sensors.

    The cats are from NAPA. Just bought the replacement units they have for the same years my engine is from (2003).

    I wanted the pre-cats as close as possible to the down pipes. So I went inwards with a slight angle towards the tranny.


    Then I went thru the frame. Pretty tight. I had to grind a little away from the tranny mount. I also hammered the pipes (all 2 1/4") a bit in order to get a little clearance.


    Then cam the main cat and another 45 degree angle in order to get thru the frame again.


    Both side are equal by a few millimeter. This takes lotsa time. Believe me.


    The exhaust hangar is home made using poly bushings (actually shock eye bushings cut in half and massaged a little bit).

    Kai
    Hanau/Germany
    Rides & Projects: 54 F100 347SBF/Auto; 65 Galaxie FB 446FE/5-Speed; 67 Mustang Convertible 306SBF/Auto; 07 Mustang GT Convertible 4.6 3V/Auto; #236 FFR Hot Rod 4.6 2V/5-Speed

  17. #17
    Senior Member Kai-Rod's Avatar
    Join Date
    Feb 2011
    Location
    Hanau, Germany
    Posts
    109
    Post Thanks / Like
    Night shift in January 2011 after the snow has gone.


    Here is a shot of the oil filter relocation kit I mentioned before. It clears the steering nicely. Might change the hoses later for nice braided ones.


    Here you can see the routing of the radiator hoses. I might change the hose clamps to some better ones later.


    Bought a Spectre cold air kit for a 2003 Mustang so that I have something in order to get the engine running. It sure won't fit the car like this. Hope that cutting the main pipe somewhere near the oil filler cap and adding another 45 degree bend will bring the air filter someplace between engine and radiator.

    Kai
    Hanau/Germany
    Rides & Projects: 54 F100 347SBF/Auto; 65 Galaxie FB 446FE/5-Speed; 67 Mustang Convertible 306SBF/Auto; 07 Mustang GT Convertible 4.6 3V/Auto; #236 FFR Hot Rod 4.6 2V/5-Speed

  18. #18
    Senior Member Kai-Rod's Avatar
    Join Date
    Feb 2011
    Location
    Hanau, Germany
    Posts
    109
    Post Thanks / Like
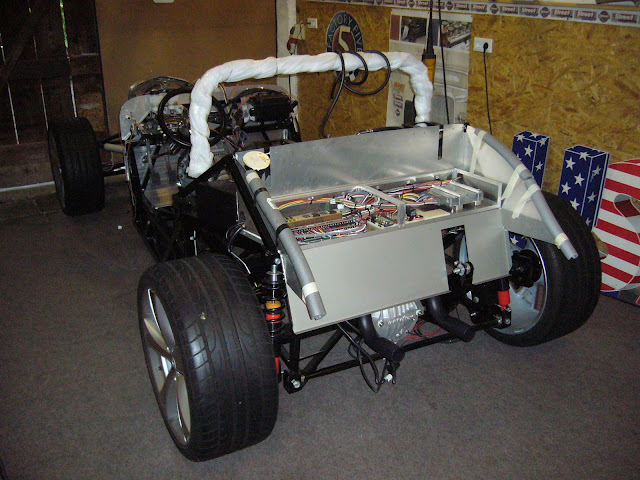
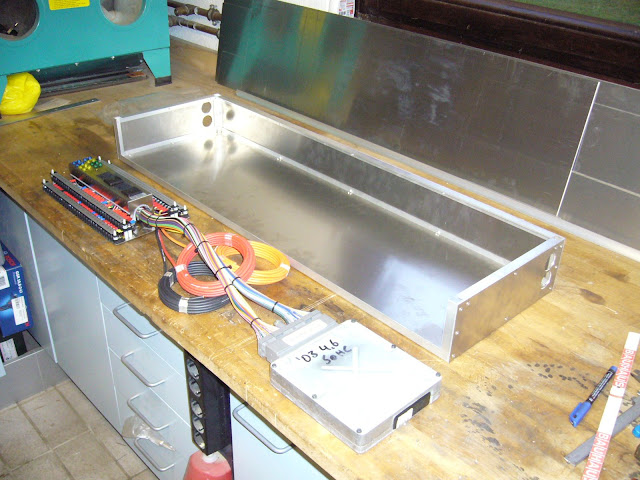
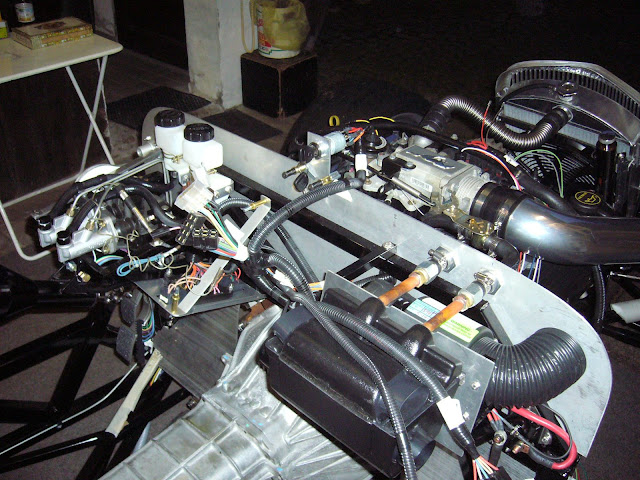
    I decided to go the The Detail Zone Telorvek Panel route for my engine wiring. First looked at the Wire Diet, but since I did not have a complete original wiring loom and also had some damaged parts I decided against it.

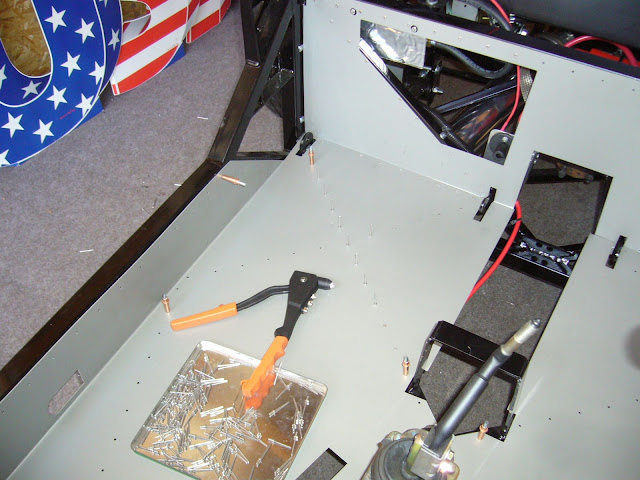
    Here I am building a box for the panel to put into the trunk.


    I have two holes each side with grommets (not yet installed here) in the left and right panels.


    And that is how it sits in the trunk. I have again two holes each side with grommets in the trunk side panels.

    Kai
    Hanau/Germany
    Rides & Projects: 54 F100 347SBF/Auto; 65 Galaxie FB 446FE/5-Speed; 67 Mustang Convertible 306SBF/Auto; 07 Mustang GT Convertible 4.6 3V/Auto; #236 FFR Hot Rod 4.6 2V/5-Speed

  19. #19
    Senior Member Kai-Rod's Avatar
    Join Date
    Feb 2011
    Location
    Hanau, Germany
    Posts
    109
    Post Thanks / Like
    February 2011. Time to complete the exhaust. I used Magnaflow 4" round mufflers after I made many different mufflers out of card board just to find out that nothing would fit. Except these Magnaflows. Hope they are not too noisy. Don't get me wrong. I love noisy cars, but the German inspection people don't.

    I then went over the axle, down left and right of the rear end cover (changed to a nice one from Trickflow) and then out the rear. Exhaust tips are yet to be selected. Right now I think two twins would look kinda cool.


    Last edited by Kai-Rod; 02-26-2011 at 04:17 PM.
    Kai
    Hanau/Germany
    Rides & Projects: 54 F100 347SBF/Auto; 65 Galaxie FB 446FE/5-Speed; 67 Mustang Convertible 306SBF/Auto; 07 Mustang GT Convertible 4.6 3V/Auto; #236 FFR Hot Rod 4.6 2V/5-Speed

  20. #20
    Senior Member Kai-Rod's Avatar
    Join Date
    Feb 2011
    Location
    Hanau, Germany
    Posts
    109
    Post Thanks / Like
    Can't use the stock taillights since we must have yellow turn signals. We also need a rear fog light and back up lights.

    Here's a few paper taillights based on Hella units. We will probably go with the two small ones and then add the rear fog light and back up lights somewhere under the license plate.


    We are also playing around with the dash. Again using paper. This is our current favorite.

    Kai
    Hanau/Germany
    Rides & Projects: 54 F100 347SBF/Auto; 65 Galaxie FB 446FE/5-Speed; 67 Mustang Convertible 306SBF/Auto; 07 Mustang GT Convertible 4.6 3V/Auto; #236 FFR Hot Rod 4.6 2V/5-Speed

  21. Likes theidlemind liked this post
  22. #21
    Senior Member Kai-Rod's Avatar
    Join Date
    Feb 2011
    Location
    Hanau, Germany
    Posts
    109
    Post Thanks / Like
    Done. Now we are current. These photos were taken today.

    See the mini dashboard with just the ignition switch ?


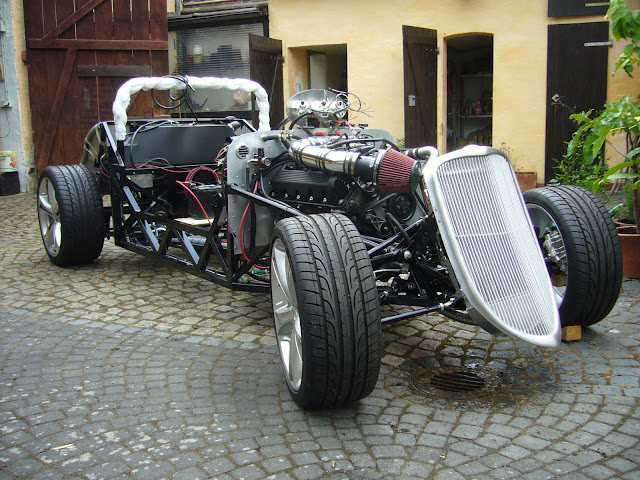
    Here as close look. I wired the starter as well as the battery cable, turned the key and the engine turned over. Wow. The first small part of the electrical system is working.


    OMG. This is still a major chaos. Plan is to attach all cables, run the engine and the re-do the whole wiring to make it look good.


    ... now my thread is current. Good night !
    Kai
    Hanau/Germany
    Rides & Projects: 54 F100 347SBF/Auto; 65 Galaxie FB 446FE/5-Speed; 67 Mustang Convertible 306SBF/Auto; 07 Mustang GT Convertible 4.6 3V/Auto; #236 FFR Hot Rod 4.6 2V/5-Speed

  23. #22
    Tech Manager, FFR
    Join Date
    Feb 2011
    Posts
    211
    Post Thanks / Like
    Kai - it's looking great!! Nice to see all of the details of your progress, particularly w/respect to getting it on the street in Germany.

    Beste Gruesse aus Wareham,

    Jason @ FFR

  24. #23
    Senior Member Kai-Rod's Avatar
    Join Date
    Feb 2011
    Location
    Hanau, Germany
    Posts
    109
    Post Thanks / Like
    We just got back from two great weeks in the US. Flew to LAX, drove to Las Vegas, spent three days at the NASCAR event (Ford won with Carl Edwards - Great !), took an RV and drove to Phoenix for three days at the Goodguys event in Scottsdale, took the RV back to LA and spent the two last days right on the beach in Huntington Beach, our favorite town.

    I bought the correct MAF for my engine, completed the provisional wiring, attached the battery, turned the key and it fired right up and idled like a new car. I started it a couple of times and let it run just a few seconds as I have no water in it. I also have no gauges whatsoever and have not clue if I have oil pressure or anything. Now I will educate me a little bit about the SCT Programmer I have got to read out te failure codes.

    Here's another photo of the completed chaos called engine wiring. Plan is to add water and let it run a little bit before I remove all the wiring and start all over again making it look good.

    What a great day !!!

    Last edited by Kai-Rod; 03-19-2011 at 11:40 AM.
    Kai
    Hanau/Germany
    Rides & Projects: 54 F100 347SBF/Auto; 65 Galaxie FB 446FE/5-Speed; 67 Mustang Convertible 306SBF/Auto; 07 Mustang GT Convertible 4.6 3V/Auto; #236 FFR Hot Rod 4.6 2V/5-Speed

  25. #24
    Senior Member 68GT500MAN's Avatar
    Join Date
    Feb 2011
    Location
    Fresno, CA
    Posts
    1,808
    Post Thanks / Like
    Thanks for posting all of the progress photo's. It looks like your build is comming along nicely.
    Doug

  26. #25
    Senior Member Kai-Rod's Avatar
    Join Date
    Feb 2011
    Location
    Hanau, Germany
    Posts
    109
    Post Thanks / Like
    Thanx Doug ... and also Thanx Jason .... it is always rewarding to get a thumbs up from you guys.

    Now the fun starts (and I mean it) to tidy the cables. Hope to get this done over the next week or so.
    Kai
    Hanau/Germany
    Rides & Projects: 54 F100 347SBF/Auto; 65 Galaxie FB 446FE/5-Speed; 67 Mustang Convertible 306SBF/Auto; 07 Mustang GT Convertible 4.6 3V/Auto; #236 FFR Hot Rod 4.6 2V/5-Speed

  27. #26
    Senior Member PhyrraM's Avatar
    Join Date
    Feb 2011
    Posts
    1,468
    Post Thanks / Like
    Great build! Sounds like you had a fun trip too.

  28. #27
    33 Hot Rod Builder geoffav's Avatar
    Join Date
    Feb 2011
    Location
    Enterprise, AL
    Posts
    458
    Post Thanks / Like
    I just got around to looking at the whole thread. Wow, some very creative solutions. Keep the pics coming it looks awesome.

  29. #28
    Senior Member thebeerbaron's Avatar
    Join Date
    Feb 2011
    Location
    NYC
    Posts
    403
    Post Thanks / Like
    Blog Entries
    25
    Quote Originally Posted by Kai-Rod View Post
    Thanx Doug ... and also Thanx Jason .... it is always rewarding to get a thumbs up from you guys.

    Now the fun starts (and I mean it) to tidy the cables. Hope to get this done over the next week or so.
    Fun build! I do not envy you the task of getting the thing road inspected though...

    Maybe it's a bit late for this, but I thought this article was a brilliant way of creating a wiring harness. Basically use some wire or vacuum hose to determine the routing and length of your harness, then attach that to pegboard. Use the wire or hose as a guide for your actual wires, and use the pegboard to keep it all coherent as you go along.

    Good luck!

  30. #29
    Senior Member Kai-Rod's Avatar
    Join Date
    Feb 2011
    Location
    Hanau, Germany
    Posts
    109
    Post Thanks / Like
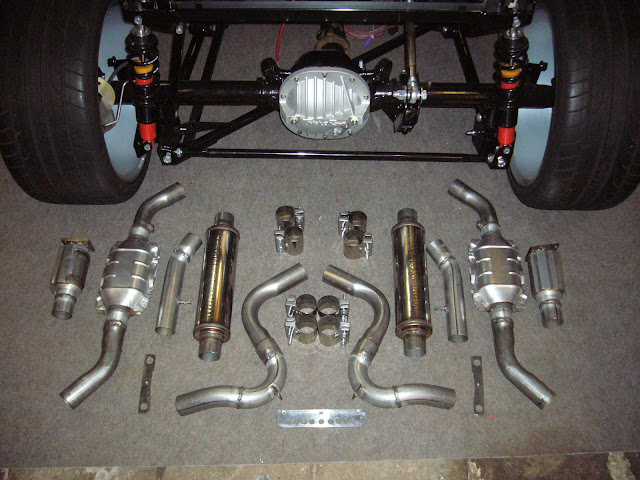
    OK. Now all the wiring is removed and I just removed the complete exhaust. See all the parts in below photo. All parts will be ceramic coated. I will also have the bottom of the floor pans and the trunk panel.

    Kai
    Hanau/Germany
    Rides & Projects: 54 F100 347SBF/Auto; 65 Galaxie FB 446FE/5-Speed; 67 Mustang Convertible 306SBF/Auto; 07 Mustang GT Convertible 4.6 3V/Auto; #236 FFR Hot Rod 4.6 2V/5-Speed

  31. #30
    Junior Member
    Join Date
    Mar 2011
    Posts
    7
    Post Thanks / Like
    Thanks for the updates. It's an interesting build. I am following it from Chicago, IL.

  32. #31
    Senior Member Kai-Rod's Avatar
    Join Date
    Feb 2011
    Location
    Hanau, Germany
    Posts
    109
    Post Thanks / Like
    Spring is arriving and there was a lot to do other than working on the car. Changed the tires on the 07 Mustang. Yes, we have real snow tires mounted to the original 18" wheels. Now we are rolling on the 20" American Racings wrapped in Dunlops.

    I did drill all the aluminum floor panels and now they are ready for ceramic coating on the under side. Hope this will help to keep the heat created by the cats away from my legs and butt.

    Next will be there wiring. Need to do some additions to my trunk mounted engine control box.


    Kai
    Hanau/Germany
    Rides & Projects: 54 F100 347SBF/Auto; 65 Galaxie FB 446FE/5-Speed; 67 Mustang Convertible 306SBF/Auto; 07 Mustang GT Convertible 4.6 3V/Auto; #236 FFR Hot Rod 4.6 2V/5-Speed

  33. #32
    Senior Member Tom Veale's Avatar
    Join Date
    Mar 2011
    Location
    Wisconsin
    Posts
    449
    Post Thanks / Like
    Thanks Kai, This is a great tutorial you are creating. We've just finished melting the most recent snow here in Wisconsin, so my car is still hibernating. I put the battery charger on it yesterday and now am awaiting a really good April Shower to rinse the residual salt off the roads so that #007 can come out and play. I have a bit over 5000 km on my car so far. You're going to enjoy the car once finished and ready for the autobahn.

    Best of luck,
    Tom

  34. #33
    Senior Member Kai-Rod's Avatar
    Join Date
    Feb 2011
    Location
    Hanau, Germany
    Posts
    109
    Post Thanks / Like
    Its been a while since my last post. Not that I did not do anything, but there was not much to talk about. Just a bunch of little time consuming jobs.

    Now I have my exhaust and the floor pans back from the ceramic coating. Main point was to get the heat under control. They choose a flat black coat for the exhaust parts and a flat silver for the floor boards saying that this should work the best.

    Put the exhaust back in yesterday and did a couple of wiring jobs today. Had hoped I could get the trunk panels in, but broke three (3) drill bits and then drilled right thru my left thumb when the first bit broke. Bad luck, but I am OK.

    Here's all the coated parts.


    Here are the Magnaflow mufflers and all the mounting hardware.


    All in the car. Hope I have enough clearance. It is all very tight.


    Now I just need to select the tail pipes. I want two twins. My wife thinks two singles are enough.


    One of the rear O2 Sensors. Used some fire proof cable shield where the wires go over the exhaust pipe.


    The trunk floor is coated, but the trunk rear is not. Wanted all coated that is close to the exhaust.


    More details to come in a moment ...
    Kai
    Hanau/Germany
    Rides & Projects: 54 F100 347SBF/Auto; 65 Galaxie FB 446FE/5-Speed; 67 Mustang Convertible 306SBF/Auto; 07 Mustang GT Convertible 4.6 3V/Auto; #236 FFR Hot Rod 4.6 2V/5-Speed

  35. #34
    Senior Member Kai-Rod's Avatar
    Join Date
    Feb 2011
    Location
    Hanau, Germany
    Posts
    109
    Post Thanks / Like
    30 Old School BMW V12 powered Ford Coupe of a friend visited yesterday. Very cool ride and all home made with a million of cool details.

    Kai
    Hanau/Germany
    Rides & Projects: 54 F100 347SBF/Auto; 65 Galaxie FB 446FE/5-Speed; 67 Mustang Convertible 306SBF/Auto; 07 Mustang GT Convertible 4.6 3V/Auto; #236 FFR Hot Rod 4.6 2V/5-Speed

  36. Likes theidlemind liked this post
  37. #35
    Senior Member Kai-Rod's Avatar
    Join Date
    Feb 2011
    Location
    Hanau, Germany
    Posts
    109
    Post Thanks / Like
    My lower control arm dust boots are completely wasted. And this after less than a year. Read on the other forum that others had the same and that there is a replacement. Hope that that parts lasts longer.


    My Spectre Cold Air Intake was sticking out the side badly. I had used the one which was designed for the 2003 Mustang (from which I had the motor). I know bought a 90 degree turn, a 6" long straight pipe as well as a 22 degree turn. The latter may have to be replace by a 45 or so. Need to see how the hood and the side panels will clear this. May be it s good enough.


    I have drilled and tapped a 1/8" NPT next to the water neck for the temp sender for the Classic Instrument gauges I will use.


    Here you can see that the oil pressure sender for the Classic Instrument gauges fit nicely with plenty of clearance.


    More to come the next days. Need to get new drill bits and maybe a metal glove in order to keep my fingers safe.
    Kai
    Hanau/Germany
    Rides & Projects: 54 F100 347SBF/Auto; 65 Galaxie FB 446FE/5-Speed; 67 Mustang Convertible 306SBF/Auto; 07 Mustang GT Convertible 4.6 3V/Auto; #236 FFR Hot Rod 4.6 2V/5-Speed

  38. #36
    Senior Member MPTech's Avatar
    Join Date
    Feb 2011
    Location
    St. Louis, MO
    Posts
    1,186
    Post Thanks / Like
    Blog Entries
    8
    Very cool Kai, thanks for sharing your pics and build with us!
    Keep up the good work!
    F5R #7446: MK4, 302, T5 midshift, 3.55 Posi IRS, 17" Halibrands
    Delivered 4/4/11, First start 9/29/12, Licensed 4/24/13, off to PAINT 2/15/14!! Wahoo!

  39. #37
    Senior Member Kai-Rod's Avatar
    Join Date
    Feb 2011
    Location
    Hanau, Germany
    Posts
    109
    Post Thanks / Like
    Now that the exhaust is back in it was time to do the final wiring of my motor electronics. First I covered the area with some heat and sound insulation.


    Then I put my aluminum box back in and fixed with two bolts.


    Then I bolted my Telvorek panel and my ECM in place.


    And this what it looked like after a couple of hours of wiring. I did run every wire with a small loop just in case I need a few inches of wire later.


    And a close look at the panel.


    Another close look at the fuel pump relay and fuse as well as three distribution bars I have for ground, battery 12V as well as 12V from the ignition switch.


    And the best: it worked right away. Turned the key and the engine started like a new car. Love it !

    More in a moment.
    Kai
    Hanau/Germany
    Rides & Projects: 54 F100 347SBF/Auto; 65 Galaxie FB 446FE/5-Speed; 67 Mustang Convertible 306SBF/Auto; 07 Mustang GT Convertible 4.6 3V/Auto; #236 FFR Hot Rod 4.6 2V/5-Speed

  40. Likes theidlemind liked this post
  41. #38
    Senior Member Kai-Rod's Avatar
    Join Date
    Feb 2011
    Location
    Hanau, Germany
    Posts
    109
    Post Thanks / Like
    One view from distance showing the trunk mounted electronic box.


    We will not be using the Autometer gauges. We got a three gauge set from Classic Instruments with a Kph Speedo, a Tach and a Quad. In order to provisionally mount the I made a little dashboard out of an aluminum sheet.


    The Tach is not yet working. Need one of the adapter boxes like the one from Autometer. It's on my wish list at Summit Racing for my next order.

    Now that I had oil pressure as well as water temp I ran the engine and changed the water a couple times before I will be filling the system with anti freeze / water mix.


    ... more in a moment.
    Kai
    Hanau/Germany
    Rides & Projects: 54 F100 347SBF/Auto; 65 Galaxie FB 446FE/5-Speed; 67 Mustang Convertible 306SBF/Auto; 07 Mustang GT Convertible 4.6 3V/Auto; #236 FFR Hot Rod 4.6 2V/5-Speed

  42. #39
    Senior Member Kai-Rod's Avatar
    Join Date
    Feb 2011
    Location
    Hanau, Germany
    Posts
    109
    Post Thanks / Like
    I was wondering about fitting a battery from the beginning. For sure it had to be small. Much less tall than the Optima suggested by FFR. So after some feedback from other builders I got me one of these tiny Odyssey batteries. I build a little tray out of aluminum so that it cannot slide left / right. The stock hold down fixes it front / rear OK. Now since the battery cable supplied is too short to reach the battery I made a small aluminum panel to mount a cut off switch for the battery.


    Next I started to rivet the floor boards (both sides ceramic coated to keep the heat from the cats away as much as possible).


    The big gaps I covered with a gum type permanent flexible stuff I got here in Germany. The smaller gaps and all seems I closed with automotive silicon.


    Then we put a layer of noise and heat insulation onto the floor. We'll see if this is good enough or if we need to add some more over the area where we have the cats under the floor.


    ... and now I am fighting the tranny cover. Hope to figure this out over the next couple of days.

    And now I am watching NASCAR ! I am a 99 fan ...
    Kai
    Hanau/Germany
    Rides & Projects: 54 F100 347SBF/Auto; 65 Galaxie FB 446FE/5-Speed; 67 Mustang Convertible 306SBF/Auto; 07 Mustang GT Convertible 4.6 3V/Auto; #236 FFR Hot Rod 4.6 2V/5-Speed

  43. #40
    Senior Member Kai-Rod's Avatar
    Join Date
    Feb 2011
    Location
    Hanau, Germany
    Posts
    109
    Post Thanks / Like
    The past couple of weeks I was busy with many different details on the 33 and finally went go carting this weekend. Before I show you this here are more details of what I did before.

    My tranny cover needed plenty of cutting and will need a lot of new fiberglass. One of the bolts on the side of my Tremec hit the cover. As did the vent of the tranny. Also the shifter did not clear at all. The latter required a big hole.


    Time for some cutting. First the tail lights. We decided against three and will go with just two round HELLA lights with regular bulbs. Just looks so much better than LEDs we think. The two fit nicely into the place where the LEDs were to go.


    I also cut the access hole for the brake reservoirs. And when we put the body back on I realized that my reservoirs were mounted too high and about a couple tenth of an inch too far to the centre of the car. A new bracket was needed. Another two hours went by.


    ... more to come.
    Kai
    Hanau/Germany
    Rides & Projects: 54 F100 347SBF/Auto; 65 Galaxie FB 446FE/5-Speed; 67 Mustang Convertible 306SBF/Auto; 07 Mustang GT Convertible 4.6 3V/Auto; #236 FFR Hot Rod 4.6 2V/5-Speed

Page 1 of 3 123 LastLast

Posting Permissions

  • You may not post new threads
  • You may not post replies
  • You may not post attachments
  • You may not edit your posts
  •  

Brown County Customs

Visit our community sponsor