Very Cool Parts

Visit our community sponsor

Thanks Thanks:  0
Likes Likes:  0
Page 3 of 4 FirstFirst 1234 LastLast
Results 81 to 120 of 145

Thread: Gene's MKIV Build Thread

  1. #81
    Senior Member
    Join Date
    Oct 2015
    Posts
    128
    Post Thanks / Like
    This week I started on the radiator installation. I am using the radiator from the donor car a 94 Mustang.
    Imitating William Spencer's radiator protector screen, I got a 24 X 24 expanded metal sheet from home depot. I cut it to fit and coated it with clear POR-15. I attached it with nylon mounting rods from O'Reilly's.


    The next step was to mount the radiator on the frame. I immediately noticed that a plastic mount tab on the radiator interfered with the frame. So I got out my handy hand saw and cut it off.
    Before


    After


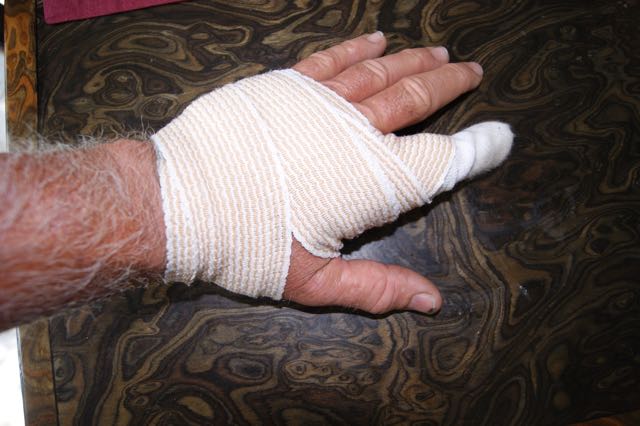
    Unfortunately, I cannot be trusted with even manual cutting tools. As the saw went through the plastic it continued into my hand. Four stitches later, I got back to work.

  2. #82
    Senior Member
    Join Date
    Oct 2015
    Posts
    128
    Post Thanks / Like
    As it turned out, the first tab wasn't the only one to interfere with the installation. A lower tab on the same side also hit the frame.


    I was able to remove this one with a cutoff blade on my angle grinder without doing any more bodily harm. I reinstalled the radiator and discovered that the drain hose port also interferes with the installation.


    It prevents the radiator from being properly aligned with the tabs on the frame.
    Oh well, pull the radiator off again and see if I can relocate the drain port.

  3. #83
    Senior Member
    Join Date
    Feb 2011
    Location
    Myrtle Beach, SC
    Posts
    2,108
    Post Thanks / Like
    Gene-

    Sorry about your hand/finger! I hate to admit it, but I have been there myself...

    How do you like the clear POR -15?

    Keep up the good work!

    Regards,

    Steve

  4. #84
    Senior Member
    Join Date
    Oct 2015
    Posts
    128
    Post Thanks / Like
    More than 20 years ago someone gave me a radiator overflow tube repair kit. I don't remember who or why and I have never used it.


    At least 10 times over the years I almost threw it away. Now I'm glad I didn't. In about 15 minutes, I was able to cut off the old overflow tube and add a new o'ring sealed tube.


    The radiator fits. Tomorrow I will confirm the fit and finish the installation.


    \

  5. #85
    Senior Member
    Join Date
    Oct 2015
    Posts
    128
    Post Thanks / Like
    After looking at the location of the radiator cap, I wondered if I could reach it after the body was on. I called FFR and they confirmed that I wouldn't be able to reach it. Good thing it only took a few minutes and no money to relocate the overflow tube. I also discovered that the lower outlet on my radiator is 1.75" and the corrugated hose won't fit.
    I ordered a 1.75 to 1.5 reducer and joiner from Pegasus Racing to address the hose issue and an inline filler neck from Summit to take care of the cap issue.

  6. #86
    Senior Member
    Join Date
    Oct 2015
    Posts
    128
    Post Thanks / Like
    Installed the bypass fuel pressure regulator on the firewall. When I ran the fuel pump I had 6psi at the carb and no leaks. Yippee.


    I then roughed in the heater hoses.


    The heater came with 90 degree 5/8 inch inlet and outlet pipes.


    I think I will go with straight pipes out of the heater. One 5/8 inch and one 3/4 inch to match the engine outlets. I'll be looking for those pipes in the next few days.

  7. #87
    Senior Member
    Join Date
    Oct 2015
    Posts
    128
    Post Thanks / Like
    After doing some research, I've decided to go with an electric heater control valve and 45 degree pipes. They should be here in a few days.

    I finished the upper radiator hose with filler neck. The manual says for the stock radiator, route the hose through the F panel. However, with the radiator cap limiting how far I could move the radiator towards the passenger side, I routed mine directly into the engine compartment.


    I also mocked up a bracket for my TFI coil. Just two 1X1 aluminum tubes with plastic end cap. I will mount it on top of the passenger side foot box.


  8. #88
    Senior Member
    Join Date
    Oct 2015
    Posts
    128
    Post Thanks / Like
    After a three week road trip to the experimental aircraft association fly-in and another two weeks hanging out with my granddaughter, I am finally back to work on the roadster. Yesterday I tried to connect the neutral safety switch but when I turned the key nothing happened. After a little trouble shooting, I discovered that the tags on the wires for the brake switch and the neutral safety switch were switched (no pun intended). After connecting the proper wires to the switch, I tried again. Again the engine wouldn't crank. With some more trouble shooting, I remembered that I hadn't installed the engine ground (The trouble with taking three weeks off). After adding the ground, the engine cranks in neutral but not in gear. That's the way it's supposed to work. It only took five times longer than it should have.

  9. #89
    Carl carlewms's Avatar
    Join Date
    May 2012
    Location
    Nokesville, VA
    Posts
    1,125
    Post Thanks / Like
    Gene,

    I have forgotten that I had it hooked up and then could not figure out why the engine would not crank ... until I realized the transmission was not in neutral ... �� But before I did I managed to check everything else that I THOUGHT was stopping it from cranking.
    Mk 4 Roadster
    October 25, 2012 - Kit Arrives
    April 8, 2013 - Build Starts
    August 23, 2015 - Rolling Chassis/Engine & Transmission Installed
    March 26, 2016 - Go Cart

  10. #90
    Senior Member
    Join Date
    Oct 2015
    Posts
    128
    Post Thanks / Like
    Carl, I guess thats part of the building experience.
    Quote Originally Posted by carlewms View Post
    Gene,

    I have forgotten that I had it hooked up and then could not figure out why the engine would not crank ... until I realized the transmission was not in neutral ... �� But before I did I managed to check everything else that I THOUGHT was stopping it from cranking.

  11. #91
    Senior Member
    Join Date
    Oct 2015
    Posts
    128
    Post Thanks / Like
    For the last couple of days I have been trying to design the layout for the dashboard. The gages are of course easy. The switches are another story. I had no idea how many switches I had. I have an ignition switch, a headlight switch, a wiper switch, a heater temperature switch, a heater blower switch, gage light switch, turn signal switch, headlight dimmer switch and a horn switch. Finding a layout that looks ok and still lets me get to all of them easily is an interesting experience. But I do kind of enjoy trying different arrangements. Eventually I will have to make a final decision but I'm having fun.

    It does slow down progress on the car but in-between layouts I am doing a little. Today I installed the wiper motor.


    On the subject of switches, I do have a question. I have the Factory Five Electric Gauge Set. It came with a water temperature sending unit. I will need to get a cooling fan thermo switch. Do I need to get a separate sending unit or can I use the sending unit that came with the gauge set. If I can use the existing one how is it wired.

  12. #92
    Senior Member 6t8dart's Avatar
    Join Date
    Apr 2015
    Location
    Irving, TX
    Posts
    545
    Post Thanks / Like
    Quote Originally Posted by Gene View Post
    After doing some research, I've decided to go with an electric heater control valve and 45 degree pipes. They should be here in a few days.

    I finished the upper radiator hose with filler neck. The manual says for the stock radiator, route the hose through the F panel. However, with the radiator cap limiting how far I could move the radiator towards the passenger side, I routed mine directly into the engine compartment.


    Gene, I see a potential problem...your filler cap is below the level of the top hose, the cap needs to be at the highest point in the whole system to vent trapped air. This could lead to overheating and steam pockets. its easy to fix, go to an auto parts store and look for a radiator hose from a mustang or ford truck, they have a 90 bend right after the water neck, then attach the filler to it.

  13. #93
    Senior Member
    Join Date
    Oct 2015
    Posts
    128
    Post Thanks / Like
    Thank you ! Thank You! Thank You!
    I was a little concerned about that when I installed it.
    As soon as I saw your comment, I knew you were right. Today I took your advice and added the radiator hose and relocated the filler cap.


    Quote Originally Posted by 6t8dart View Post
    Gene, I see a potential problem...your filler cap is below the level of the top hose, the cap needs to be at the highest point in the whole system to vent trapped air. This could lead to overheating and steam pockets. its easy to fix, go to an auto parts store and look for a radiator hose from a mustang or ford truck, they have a 90 bend right after the water neck, then attach the filler to it.

  14. #94
    Senior Member
    Join Date
    Oct 2015
    Posts
    128
    Post Thanks / Like
    I finished the very crude mock up of the dash layout. I will use some Ron Francis switches that I won at a car show a few years ago for the rotary switches. They will be mounted on the front of the dash as will the horn button. The dash light control switch and all the toggle switches will be mounted below the dash.


  15. #95
    Senior Member
    Join Date
    Oct 2015
    Posts
    128
    Post Thanks / Like
    The next planning function will be the audio. I have visited quite a few auto stereo shops in the last couple of days. The first one I visited was about a quarter mile from my house. The seemed very knowledgeable. The next couple were staffed by people who knew next to nothing about their products. I did find one other shop where the guy knew about his product and also said he used to work at a shop very near Super Performance so he was familiar with cobras. He had some good recommendations but I think I will stay with the guy close to me.

    Their recommendations were as follows.

    Mount two Diamond Audio DE652 Coax speakers in the sheet metal behind the seats between the roll bars.
    Mount Helix Esprit E62C component speakers in the kick panels with the tweeter in the dash.
    Mount an ARC XDi 600.4 4 X 150 Channel 600 watt amplifier in the trunk.
    Also mount a Sony MEX-N5100BT receiver in the trunk.

    The receiver can be controlled by my smart phone to change sources (I-POD phone or radio) and to change radio channels.

    I am concerned about fitting the speakers in the kick panels. They are 6.5 inches in diameter and 2.5 inches deep. Has anyone mounted speakers like this? Are there any build threads that show the installation details?

    Thanks.

  16. #96
    Senior Member
    Join Date
    Oct 2015
    Posts
    128
    Post Thanks / Like
    It's been a relatively productive weekend. As I worked on the layout of the stereo, I decided that I could't fit 6.5 inch speakers anywhere up front. My current plan is to build a box to fit over the transmission tunnel and under the dashboard to hold 2 5.5 inch speakers. This will also allow me to possibly move the toggle switches from the bottom of the dash to the face of the speaker box. I will make a prototype and see how it looks.

    Meanwhile, I made the final routing of the battery cable. I routed it down from the trunk across the frame behind the differential.


    From there I routed it along the main frame tube to the front.


    I wrapped it around the frame near the footbox and back to the starter.


  17. #97
    Senior Member
    Join Date
    Oct 2015
    Posts
    128
    Post Thanks / Like
    I also mounted the horns from the donor mustang. I mounted them on the passenger side frame near the radiator.


    The other major accomplishment was the temporary mounting of the side pipes. I will need them when I take it for a test drive after I finish the dash layout and interior wiring.


  18. #98
    Senior Member
    Join Date
    Oct 2015
    Posts
    128
    Post Thanks / Like
    After looking at options for speakers for the stereo, I have decided to put two 6.5 inch composite speakers behind the seats, build a speaker box for two 5.25 inch component speakers with the tweeters in the dash. I went to Atlas Sheet Metal in Irvine and had them build the speaker box. The white material is just a temporary protective coating over aluminum.


    It will fit under the dash and over the transmission tunnel.


    It fits great but I do have to bend the front tab down to be flush with the top of the Transmission tunnel.

  19. #99
    Senior Member
    Join Date
    Oct 2015
    Posts
    128
    Post Thanks / Like
    I finally completed adding the speakers, switches and labels to my speaker box/switch panel.


    It fits under the dash and all switches are easy to reach.


    I also installed the rear speakers behind the seats.


    Now all I have to do is figure out how to get about 20 wires into the switch box and hooked up.

  20. #100
    Senior Member
    Join Date
    Oct 2015
    Posts
    128
    Post Thanks / Like
    I finished installing the stereo and amp.The Sony SongPal app lets me put the head unit in the trunk and control all the functions from my phone.
    It works great. Since the rear speakers are so close to our heads, I did have to turn the gain on the rear speakers all the way down and increase the gain on the front speakers to get a good balance.
    There is no problem with volume. No matter how much exhaust and wind noise there is, this system can overcome it. I may go deaf from excessive audio but that's OK


  21. #101
    Senior Member
    Join Date
    Oct 2015
    Posts
    128
    Post Thanks / Like
    After laying out the stereo and amp I began the counting task of wiring all the switches, gages and miscellaneous items like the radio and MSD box.
    Shortly after starting I realized that I need to get organized and make sure that I knew all the wire requirements and where each wire went. I made a spread sheet. I have listed 122 wire connections. I have identified which ones have a clear required location and which need to have a location identified before I continue. There are 14 connections yet to be identified. they include 12 volt switch, 12 volt B+ and ground connections.
    Now comes the challenge of making all those connections without having an untraceable spaghetti like mass of wires.

  22. #102
    Senior Member
    Join Date
    Oct 2015
    Posts
    128
    Post Thanks / Like
    I hate wiring.
    Over the last few days, I have been working on finishing the dash wiring. Because I am using a carburated engine and don't have any computers, there were several wires in the Ron Francis harness that I did't need. To eliminate these wires, I removed the wire looms and cut them off close to their connectors. Then I rebundled the wires combining several wire looms together.


    Even after rebundle, I still have a more of a wire mess than I want.
    I ran out of patience and decided to make sure everything worked before I finished bundling the rest of the wires. I connected all the switches and gages and everything works. I will improve the final wiring when I cover the dash board.


    I am happy with the layout except for one thing. I carefully laid out the positions for he indicator lights. They look great except that I forgot to check the location of the frame. The top light hole is right over the frame. It's a good thing the dash is covered. I will reposition the hole and try to fill in the extra hole before I cover the dash.

  23. #103
    Senior Member
    Join Date
    Oct 2015
    Posts
    128
    Post Thanks / Like
    Yesterday I installed the driver seat using the adjustable seat track. I mounted the tracks to the floor according to the installation instructions. When I went to put the seat on the tracks I had a hard time getting the hole alignment right. I found that I had to remove the racks and align everything on the bench. Then tighten all seat mounting bolts in the track with it on the bench. I then reinstalled the track on the floor and was able to get the seat mounted on the track.


  24. #104
    Senior Member
    Join Date
    Oct 2015
    Posts
    128
    Post Thanks / Like
    On Saturday I stated the engine in the car. I had a fuel leak from a fuel return line that I didn't completely tighten. I also had a coolant leak from from the radiator drain plug. To stop the drain plug leak, I used a rubber freeze plug in the radiator cap spout.


    With those leaks fixed, I restarted the engine and let it run till the thermostat opened. As soon as it opened, a new coolant leak showed up. This one was from the lower radiator hose. After retightening the fittings, the leak returned as soon as the thermostat opened. I decided that the corrugated steel hose was the cause of the problem. I replaced it with a rubber lower radiator hose that I made from a modified hose and the silicone reducing hoses I used with the corrugated hose. That solved that problem.

    When I drove the go cart up the block, I noticed a brake drag. Investigating that problem identified two problems. I had left a front caliper bolt loose. I also found that the rear driver side caliper wasn't shimmed properly. With the wheel on but not fully tightened, there was no interference. But when the wheel was fully tightened the caliper rubbed on the rotor. After re-shimming the caliper the problem was solved.

    Finally the go cart was ready to go.


    I took it for a drive to see a couple of friends. Then my neighbor who has been helpful throughout the build wanted a ride. The car runs really well. The stereo sounds great. However, the ride is a little bumpy. I suspect that the tires which sat on the donor car for 10 years with out being moved are no longer round. I will take the new Halibrand replica wheels from FFR and get new tires to see if that reduces the bumpy ride.


  25. #105
    Senior Member
    Join Date
    Oct 2015
    Posts
    128
    Post Thanks / Like
    I put new tires on the Halibrand wheels and took it for another ride. Amazing how much smoother the ride is with round wheels. I have put 12 miles on the go kart driving around the neighborhood.

    With no leaks and round tires. It was time to pull the dash off and cover it with vinyl. A little M3 90 spray adhesive and it was done. When cutting out the gage holes, I cut the holes 1/8 inch smaller than the opening and the gages all fit fine.


    I purchased additional dash support brackets from Breeze and used them to support the audio crossovers, additional USB and 12 volt ports. I also installed the heater outlets.


    I've reinstalled the steering wheel and will take it for a final check ride tomorrow.


    I think I am ready to get the front end aligned. Does anyone know a good shop in South Orange County CA. that is familiar with setting up the front end on an FFR roadster?

    Thanks.

  26. #106
    Senior Member
    Join Date
    Oct 2015
    Posts
    128
    Post Thanks / Like
    Today I visited an alignment shop that David Hodgkins recommended. They said to wait for the front end alignment until I had the body on and complete. They explained that the additional weight will affect the alignment. So I will wait for the alignment.
    I am continuing to do little jobs. I installed the shifter hole cover today.

  27. #107
    Senior Member edwardb's Avatar
    Join Date
    Feb 2011
    Location
    Lake Orion, Michigan
    Posts
    10,567
    Post Thanks / Like
    Quote Originally Posted by Gene View Post
    Today I visited an alignment shop that David Hodgkins recommended. They said to wait for the front end alignment until I had the body on and complete. They explained that the additional weight will affect the alignment. So I will wait for the alignment.
    I am continuing to do little jobs. I installed the shifter hole cover today.
    Well, not exactly... The added weight of the body will affect the ride height. That may affect the alignment. But if the ride height is adjusted back to what it was when the alignment was done, the alignment will be the same. It's a big advantage IMO to do the alignment with the body off. Everything is way easier to work on. Especially the first time when a lot of back and forth may be required to get everything dialed in. Not sure you received the best advice there.
    Last edited by edwardb; 11-21-2016 at 11:06 PM.
    Build 1: Mk3 Roadster #5125. Sold 11/08/2014. Build 2: Mk4 Roadster #7750. Sold 04/10/2017. Build Thread
    Build 3: Mk4 Roadster 20th Anniversary #8674. Sold 09/07/2020. Build Thread and Video. Build 4: Gen 3 Type 65 Coupe #59. Gen 3 Coyote. Legal 03/04/2020. Build Thread and Video
    Build 5: 35 Hot Rod Truck #138. LS3 and 4L65E auto. Rcvd 01/05/2021. Legal 04/20/2023. Build Thread. Sold 11/9/2023.

  28. #108
    Senior Member
    Join Date
    Oct 2015
    Posts
    128
    Post Thanks / Like
    Edward,
    Thanks for the feedback. I ask some of my hot rod friends for names of other shops to talk to.

  29. #109
    Senior Member
    Join Date
    Oct 2015
    Posts
    128
    Post Thanks / Like
    I discovered another challenge today. By adding the front stereo speakers and the crossover boxes, I've made it difficult to get to the back of the fuel gauge and clock.


    Both instruments use a gauge programing button.


    It probably isn't important on the fuel gauge but I will need to adjust the clock from time to time. I will need to use the programing button for that.
    Simple solution. I went to Speed Hut (FFR's gauge supplier) and ordered two more buttons. At $8.75 each it is cheap compared to the extra work to move the button from the speedometer to the other gauges.

  30. #110
    Senior Member
    Join Date
    Oct 2015
    Posts
    128
    Post Thanks / Like
    I added the additional gauge programing buttons. They are hidden under the dash board but are accessible.


  31. #111
    Senior Member
    Join Date
    Oct 2015
    Posts
    128
    Post Thanks / Like
    Last weekend I talked to several people who are experienced at front end alignment. They all said that I should absolutely wait till the body is finished before getting the front end aligned. So I will go ahead and put the body on soon.

  32. #112
    Senior Member
    Join Date
    Oct 2015
    Posts
    128
    Post Thanks / Like
    I installed the covers for the fuel pump and the fuel level sending units. I used Rivet nuts so I could get to them in the future if needed.


    I also used rivet nuts to install the top covers for the driver side foot box. I don't think I will be able to get at the screws on the large cover after the body is on, but I felt that if I ever need to get it off to access the master cylinders it would be better to make it removable.


  33. #113
    Senior Member
    Join Date
    Oct 2015
    Posts
    128
    Post Thanks / Like
    Yesterday my son came over and we put the body on the car.


    Unfortunately, I didn't realize that you couldn't get the quick jack bolts in with the nuts on the outside without dropping the gas tank. So, we dropped the tank and opened the fuel pump and sender covers to get the quick jack bolts in place.


  34. #114
    Senior Member
    Join Date
    Oct 2015
    Posts
    128
    Post Thanks / Like
    Today I loaded the car onto a trailer and headed to Jeff Miller's for body work and paint. I've seen other cars he has done and was very impressed.


    While I was there, Jeff removed the body and trimmed the dash and rear deck to make it a better fit.


    He then put the body back on and fit the doors, which involved adding and removing material to get the right fit.


    It will be several weeks for him to finish the car. I will have to remember how to play golf again.

  35. #115
    Straversi's Avatar
    Join Date
    Nov 2014
    Location
    Palos Verdes, CA
    Posts
    1,278
    Post Thanks / Like
    Congratulations and good luck with the golf game. I don't know of any good golf swing forums but there are always plenty of guys on the range that think their swing tips are valuable.
    Can't wait to see it after paint.
    -Steve
    Mk IV #8901 - Complete kit, Coyote, TKO-600, IRS. Ordered 5/23/16, Delivered 7/14/16, First Start 8/13/17, First Go-Kart 10/22/17, Registered and Completed 10/18/18. Build Thread: http://thefactoryfiveforum.com/showt...V-Coyote-Build Graduation Thread: https://thefactoryfiveforum.com/show...-Roadster-8901

  36. #116
    Senior Member
    Join Date
    Oct 2015
    Posts
    128
    Post Thanks / Like
    When I took the body to Jeff Miller, He pointed out that the seat positions would have to be moved. On the driver side, I followed the seat track instructions exactly. On the passenger side. I matched the position for the driver side even though I didn't use the adjustable seat track. Apparently the instructions are incorrect. I talked to Dave Smith about it at the Grand National Roadster Show. He apologized and said he would talk to his people about updating the instructions.

  37. #117
    Senior Member
    Join Date
    Oct 2015
    Posts
    128
    Post Thanks / Like
    While Jeff has the body, I went to work to fix the seat alignment. The locations for the new holes would have required drilling into or close to weld locations. Rather than add these extra holes, I got 1" x 3" x 1/8" aluminum plates and mounted them to the original holes. I ran new mounting bolts up through the plates to locate the seats and seat tracks.


    Then mounted the seat track.


    The new seat position leaves more room for the door to close.


  38. #118
    Senior Member
    Join Date
    Oct 2015
    Posts
    128
    Post Thanks / Like
    Once the seat location was fixed, I installed the carpet. However, since I plan to drive on long road trips, I had to have cup holders. The problem with the cup holders was that they interfered with the shift handle. I solved that problem by switching to a shorted, more vertical shift handle. It feels good and shortens the throw on shifts.


  39. #119
    Senior Member
    Join Date
    Oct 2015
    Posts
    128
    Post Thanks / Like
    The last thing to do before I got the body back was to cover the truck area. I decided to use the polymat material that several people on the forum recommended. It was easy to work with and I think it looks good.


    Now if it ever stops raining here in southern California, I will play some golf while I wait for Jeff to finish the paint.

  40. #120
    Senior Member RickP's Avatar
    Join Date
    Feb 2016
    Location
    Boyertown, PA
    Posts
    683
    Post Thanks / Like
    Looking good Gene. I'm sure your feeling the excitement if the final product.

Page 3 of 4 FirstFirst 1234 LastLast

Posting Permissions

  • You may not post new threads
  • You may not post replies
  • You may not post attachments
  • You may not edit your posts
  •  

Replica Parts

Visit our community sponsor