-
12-11-2019, 11:32 PM
#201

Yes, I love Technology

-
Post Thanks / Like - 2 Thanks, 8 Likes
-
12-12-2019, 07:24 AM
#202
Senior Member

All I can say is WOW!! Your skills are as varied as they are amazing. Thanks for sharing!
-
12-22-2019, 06:51 PM
#203
Yes, I love Technology
-
Post Thanks / Like - 1 Thanks, 2 Likes
-
12-23-2019, 09:12 AM
#204
-
01-02-2020, 12:59 PM
#205
Yes, I love Technology
-
Post Thanks / Like - 0 Thanks, 2 Likes
-
01-18-2020, 09:12 PM
#206
Yes, I love Technology
Silk purse from a sow's ear. My Pep-Boys closeout seats were downright cheap, but had terrible cloth, seams pulling apart just from test sittings. The gentleman at the upholstery shop that walked me through doing my own seat recoverings says they look close to pro, he'd get about $1500 each to do this. He also said he would never do the "hex quilt" by hand - would farm it to a computer sewing shop. Took me about a month of 1/2 day's each week day to complete both. Oh and a good chunk of one weekend to make the 818 emblems. It was all worth it. Much gratitude to Winston at S&S Upholstery in DeMotte Indiana.
...

...
And for sure, prices you pay for custom upholstery work are worth it. This involves a lot of detail, careful work, know-how and physical labor.
-
Post Thanks / Like - 0 Thanks, 8 Likes
-
01-19-2020, 11:07 AM
#207
Looks fantastic Art, your patience and perseverance is staggering.
-
01-19-2020, 03:55 PM
#208
Nice work Art! I think we all could learn a lot from you! You’ve built an 818 berlinetta.
-
01-19-2020, 05:31 PM
#209
-
01-30-2020, 06:18 PM
#210
Yes, I love Technology
Seats are in - yea!

Doors and windows roughed in, working on upholstering & controls going into the door cards.
-
Post Thanks / Like - 0 Thanks, 2 Likes
-
01-30-2020, 09:21 PM
#211
Senior Member

..way to go Art....you'll be sewing your own Hawaiian shirts in no time at all..
-
02-09-2020, 11:09 AM
#212
That's straight up stud work. Wow! I've always wanted to dabble in upholstery (it was my father's trade as a young man), but I never thought an "amateur" could get these results. Inspiring...dangerous ('cause now you have my head spinning)...but super good looking work!
Best,
-j
-
Post Thanks / Like - 0 Thanks, 1 Likes
-
02-09-2020, 06:46 PM
#213
Art, inspiring work! I've been thinking about selling my 818 project, but your creative solutions are making me want to re-tackle all the little things that have been bugging me about the build! I will be checking in more often now to see what else you come up with!
-
Post Thanks / Like - 0 Thanks, 1 Likes
-
02-09-2020, 07:53 PM
#214
Yes, I love Technology
Thanks guys ! ben1272 - hope you get back into it - think back to when you were first getting the project, resurrect that excitement. Worth it, not everyone builds a car.
-
Post Thanks / Like - 0 Thanks, 1 Likes
-
03-20-2020, 08:51 PM
#215
Yes, I love Technology
-
03-20-2020, 09:32 PM
#216
Yes, I love Technology
Body - Door - window seal
The coupe kit's window seal strips (hard flocked) that go on the upper window frame seemed too hard - and with the less than ideal window curve and travel behavior this compromises getting a good seal, at least in my build. I found this particular seal on Amazon seller "Seal Rubber" (after obtaining several kinds from multiple sources) that seemed to work well. Also the thickness of the frame has to be ground down to fit the supplied seal. Some grinding still has to happen with this alternate seal, but not as much. In addition, I'm using this same seal around the door frame to body, and some other places on my build.
Trim Seal with Side Bulb | PVC Plastic Trim with EPDM Rubber Bulb Seal | Fits 1/4” Edge, 3/8” Bulb Seal Diameter

This is a fairly soft rubber and when a side window is traveling upward it deforms this a lot during the first couple inches of contact along the rear edge of the window. To help prevent tearing the rubber, I will wrap just the affected area of rubber with Steele Rubber Products' Bowdrill tape 70-1175-65. This is old school stuff used way back in the day to help make tough but flexible seals for windows and such on cars.
There is plenty of forum info on the window fit, so I'm just listing a couple points on my build, this bit and a piece further below on the bronze regulator sliders. First to set the window to frame clearance I made some 1/2" thick wood blocks and just taped them in place to space the window from the frame while I played with the regulator mounts:

To use the same seal around the door frame to body, I bend open the u-channel part of the seal to become a flat piece that fits/traps between the inner plastic door card and the fiberglass door skin.
.
The next area to seal is a big open area just in front of the mirror mount steel plate.This area is a gap between the door inside wall and the outside wall of the dashboard, dash close off aluminum and the windshield frame. I made these aluminum pieces that fasten to the FFR parts which get mounted near to the sides of the dashboard. These extend the kickplate walls upward so the seals on the doors can contact these parts to seal all the way up the door sides...
.
Rubber seal supplied with the kit (or my version above) can now seal against this lower part to the body (the facing arrows in the below picture), But there is nothing to seal in the upper area (circled):

.
next post shows the fix
Last edited by aquillen; 03-21-2020 at 08:40 AM.
-
03-20-2020, 09:40 PM
#217
Yes, I love Technology
-
03-20-2020, 10:03 PM
#218
Yes, I love Technology
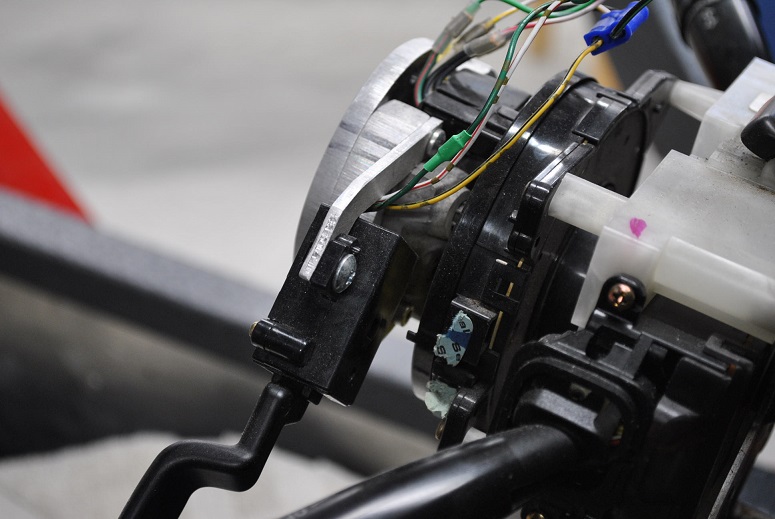
Windshield wiper
There is a wiper thread but I have a lot of pictures to post so rather than clog that thread I'm keeping it here. Will put a link on that thread. More wiper threads -
https://thefactoryfiveforum.com/show...556#post403556
https://thefactoryfiveforum.com/show...868#post243868
https://thefactoryfiveforum.com/show...l=1#post222064
https://thefactoryfiveforum.com/show...l=1#post211202
I could imagine someone wanting to make up a compact unit this same way - so lots of pix for U. Also, almost every thing from donor parts (my "donor" is the random Subaru parts pulled a my nearby LKQ yards). And so nearly every part I've pulled I have torn down, rebuilt the internals. In this case the wiper motor/gearbox was opened, cleaned, greased. The wiper pivot shaft was pulled, cleaned and greased, and I'll show how to get that apart if you want.
I wanted to use a donor unit, but fold it as small as I could. I've got a coolant air catch burp bottle, washer fluid bottle, remote reservoirs in there and want to move the battery in and out through the gap front and center without taking other things apart. So the motor/wiper guts needed to be compact. I also wanted no-cut on the hood and fully closed hood to boot. Some others have posted their wiper fits without cutting the hood, but not sure how they pull that off using the thickness of the wiper arm lower part. I only have 1/2 inch between the hood and glass.

.

.
A donor arm was chopped off a couple inches up from the pivot mount bolt. My new arms are of 1/4 x 1/2 aluminum, a very stiff version of alloy from McMaster Carr that I had in the junk box. The new arms are trapped onto the original arm via a pressed in place steel box I welded up.

.
Up top I have this -

.
A donor arm was chopped and bent to fit. Then welded to a flat plate, that was screwed from underneath with 4 alloy steel screws. The got cut flush to the aluminum bars then peened in place.

.
After all the fab a bit of powdercoat dressed it nicely

Last edited by aquillen; 03-21-2020 at 08:51 AM.
-
03-20-2020, 10:07 PM
#219
Yes, I love Technology
-
03-20-2020, 10:13 PM
#220
Yes, I love Technology
-
03-20-2020, 10:24 PM
#221
Yes, I love Technology
Clean and lube a wiper arm pivot bearing
There is a tiny clip ring at the top of the pivot shaft. Pry this out with a small knife tip, etc. Pull off the trapped washer, then push the entire shaft down and out of the housing. Use a long screwdriver to push out each of the plastic bushings (or leave them in place). Clean old grease out of the internal housing. Wheel bearing grease or waterproof motorcycle grease such as Belray (my fav) should work fine for another 20 years...

-
03-20-2020, 10:31 PM
#222
Yes, I love Technology
-
03-20-2020, 10:43 PM
#223
Yes, I love Technology
-
Post Thanks / Like - 0 Thanks, 3 Likes
-
03-21-2020, 08:31 AM
#224
Yes, I love Technology
-
Post Thanks / Like - 1 Thanks, 4 Likes
 DSR-3
DSR-3 thanked for this post
-
03-22-2020, 03:40 PM
#225
Incredible work, Art. If anything, these cars are pulling the creative juices out of us.
-
Post Thanks / Like - 0 Thanks, 1 Likes
-
03-23-2020, 12:33 PM
#226
Senior Member
Great job on the custom fiberglass work. I really want to try making fiberglass paints like that. What type of foam do you use and what type of release agent?
-
03-23-2020, 04:55 PM
#227
hey art you interested in making another set of those bronze window guides? id be interested in a set
-
03-23-2020, 05:07 PM
#228
Yes, I love Technology

Originally Posted by
Hobby Racer

Great job on the custom fiberglass work. I really want to try making fiberglass paints like that. What type of foam do you use and what type of release agent?
Foam was scraps from some packaging of furniture we got a while back. White super light weight is handy for this. On curvy stuff, I paint it with 5 minute epoxy - hobby shops have larger bottles of that. It cracks away from the fiberglass resin (polyester or vinylester) with ease. Once the 5 minute is hard then I lay on the glass (or carbon fiber) and resin. When all is done I remove the inside foam and tape/epoxy leaving the finished item.
Epoxy painted over foam might not peal away from an epoxy type laminating resin such as Fiberglast's epoxy products. But if it stays there it doesn't hurt either for many designs, or you can put a few coats of carnauba(sp?) wax on the epoxy/foam form for a mold release. The foam can be chewed out with tools or very easily dissolved away with acetone or several other solvents (takes very little solvent). Sometimes I use an econo can of brake cleaner.
Another release agent method is wrap the foam with either cellophane packaging tape or electrical tape. Either one will pull away from the hard resin with little effort. I use electrical tape for curvy stuff. Look for econo wide rolls of electircal tape at discount stores for example.
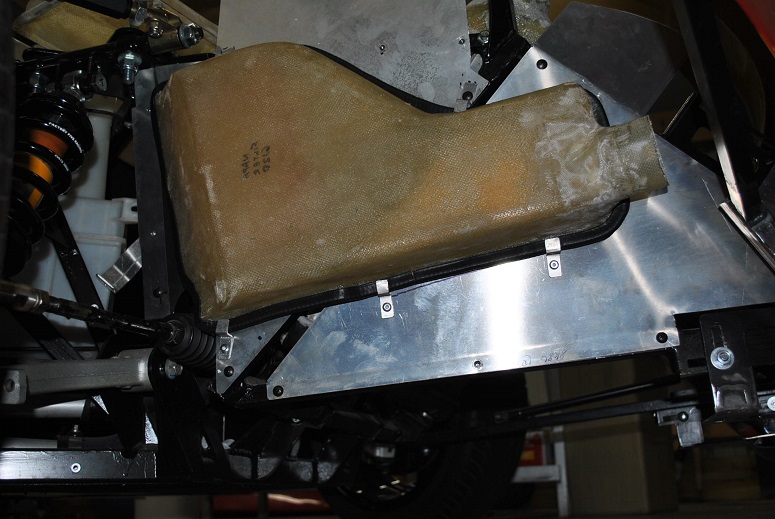
When you get fancier than the above it is time to look into real mold techniques using plug molds, female shells and wax/spray in mold release agents. The above are one-off items that need very little in prep nor high quality finish. I will soon post my airbox/airfilter in CF parts using the above technique and you'll see even the above can produce very nice looking finish parts.
Last edited by aquillen; 03-23-2020 at 05:41 PM.
-
Post Thanks / Like - 0 Thanks, 1 Likes
-
03-23-2020, 05:39 PM
#229
Yes, I love Technology
Originally Posted by
Newkitguy
hey art you interested in making another set of those bronze window guides? id be interested in a set
I've helped here and there some other tiny items for guys. Payback-forward - either way... You can have these for the postage - 15 minute job for me. PM me.
-
03-23-2020, 06:04 PM
#230
Art, you are a master builder! I’m flattered that you found my window excerpt worth emulating. I don’t know what you did as a career, but you are truly gifted!
-
Post Thanks / Like - 0 Thanks, 1 Likes
-
03-23-2020, 07:01 PM
#231
Originally Posted by
aquillen
I've helped here and there some other tiny items for guys. Payback-forward - either way... You can have these for the postage - 15 minute job for me. PM me.
Art shot you a PM thank you so much i appreciate it so much you are super gifted I would probably end up hurting myself if i tried emulating some of your work!
-
03-30-2020, 03:41 PM
#232
Originally Posted by
aquillen
I've helped here and there some other tiny items for guys. Payback-forward - either way... You can have these for the postage - 15 minute job for me. PM me.
Tiny? TINY?
I'd hardly call the help you provided me tiny. You, sir, are a giant among men.
-
03-30-2020, 10:06 PM
#233
Yes, I love Technology
I really just enjoy helping you guys out. It's the way I've always done for family, friends, neighbors and work partners. Somehow it has always been rewarding to me just as much. I recommend the method to anyone.
-
Post Thanks / Like - 0 Thanks, 1 Likes
-
04-06-2020, 05:23 PM
#234
Yes, I love Technology
J Bowman over in Ohio is building his 818S with an H6 and automatic. We trade ideas and sometimes parts (mostly him to me)...
He finished his engine wiring and had his first start over the weekend. And when he called me was he ever stoked and happy - it fired up on the first try.
So here is another 3.0 build running on the factory ECM, first start:
https://res.cloudinary.com/aq007/vid...4_0_i8i6gc.3g2
It's a cell phone format video so may not play on everything, but does work in (some ?) Windows Media versions, VLC players, and on my Linux it is fine...
Congrats Jamie !
-
Post Thanks / Like - 0 Thanks, 2 Likes
-
04-06-2020, 07:13 PM
#235
Art thank you so much I couldn't of done with out your help. you are brilliant and a great friend
-
Post Thanks / Like - 0 Thanks, 1 Likes
-
04-09-2020, 12:07 PM
#236
Art, I just spent several hours reading your build thread. This is amazing stuff. BTW, Ian says hi! That goofy Canadian lives across the street from me and we are good friends and constantly golfing together and giving each other sh*t by text.
-
04-09-2020, 07:54 PM
#237
Yes, I love Technology
Both of you should get into the 818 builds..... ynot? Ian and I go back a ways.
-
04-23-2020, 09:24 PM
#238
-
Post Thanks / Like - 0 Thanks, 2 Likes
-
04-23-2020, 09:37 PM
#239
Yes, I love Technology
-
Post Thanks / Like - 0 Thanks, 1 Likes
-
04-23-2020, 09:53 PM
#240
Yes, I love Technology
The buckets will be held by clamps that are trapped under studs epoxied from underneath. The buckets will have foam weatherstrip (plan as of today, subject to revision) between the hood and bucket top. The topside lens will be mounted to the top of the hood using an optically clear UV resistant silicone sealant which is designed for assembly of solar cells (hence high trust for this job, sold by McMaster-Carr). I don't plan to paint the lenses at all. The body paint will show up through the lens and from rough testing with some spray paint it should look fine. I'm halfway through making plaster of paris molds from the supplied lenses. I will then replicate those lenses so I can destructive test as necessary to heat and bend away at my replica lenses with abandon until I get a pair that fit the body line better.
I cut a circle at the nose for one of those nice FFR badges, where you see the backing plate I put under the cutout. The other plates are resting pads for under-hood support bumpers. The strip at the bottom is a teflon slider pad for the wiper arms - they just brush this location when the wiper is at rest. Allows me to keep the 1/2" clearance between the hood and window glass and sneak my wiper arm in between.
If you look close over on the right you can see a 2016 Camaro side marker mounted. I'll have to post some pix of all that later.

Last edited by aquillen; 04-23-2020 at 09:57 PM.


 Thanks:
  Likes:


 Reply With Quote