Very Cool Parts

Visit our community sponsor

Thanks Thanks:  0
Likes Likes:  0
Results 1 to 22 of 22

Thread: Drivers side door

  1. #1
    Senior Member
    Join Date
    May 2013
    Location
    Slidell la
    Posts
    311
    Post Thanks / Like

    Drivers side door

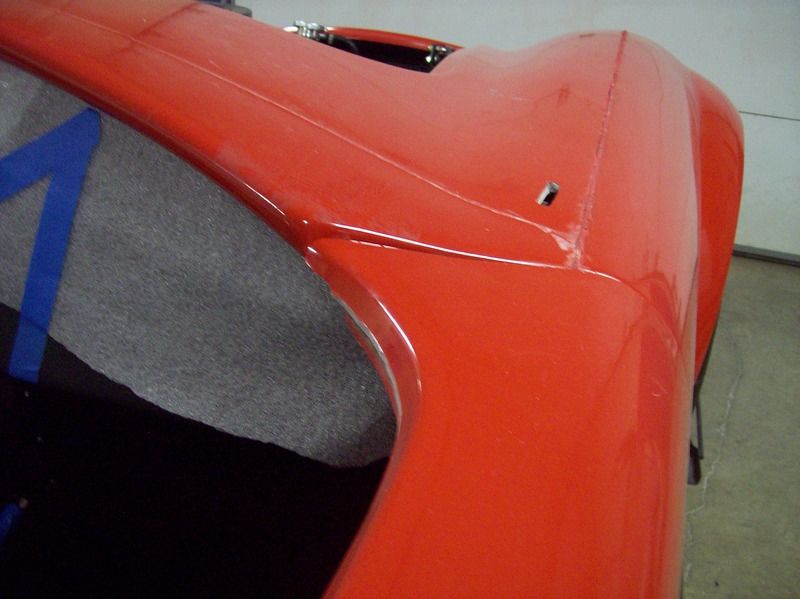
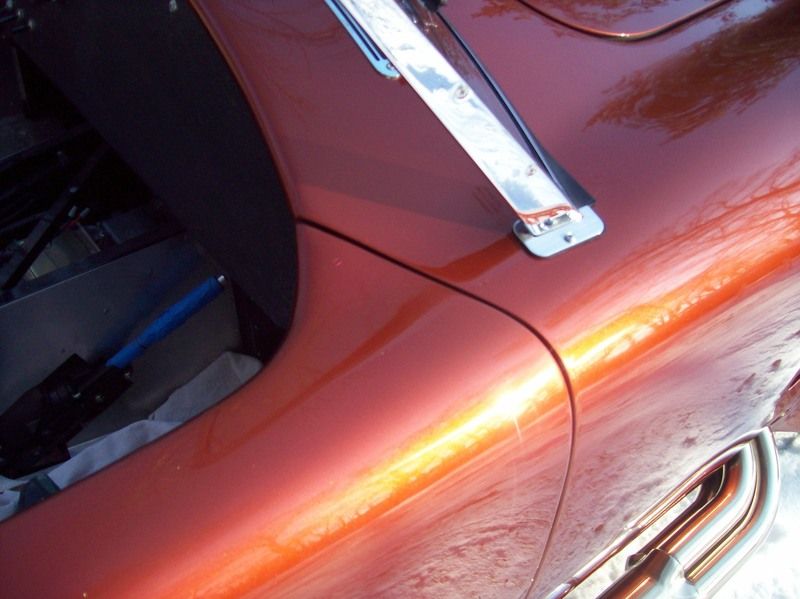
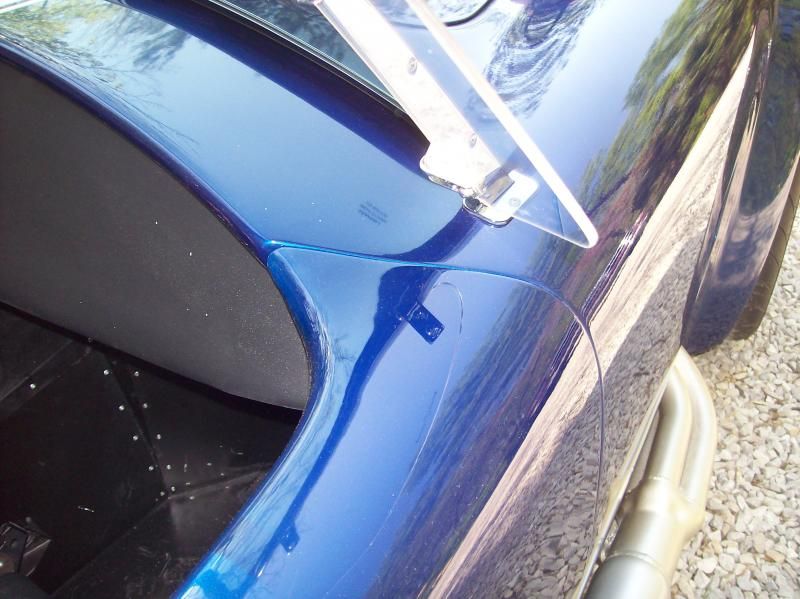
    Hello cobra gods.... Is the drivers side door twisted? I'm a trim carpenter and the only time I have this problem with a door it's because it's twisted,or warped.
    Mk4 # 8834 delivered 03/20/16 2015 IRS wildwood brake upgrade, 18"x9" front 18"X11" rear halibrand wheels, 390 FE, tko600

  2. #2
    Senior Member edwardb's Avatar
    Join Date
    Feb 2011
    Location
    Lake Orion, Michigan
    Posts
    10,576
    Post Thanks / Like
    Fitment of the driver's side door was an issue with the Mk3, and unfortunately still exists with the Mk4. It helps to mount the body bottom lip at the back of the door (in front of the rear wheel) out some. But in the end the lower front corner of the door will require some filler to match the body. This thread has some more info. Maybe someone else can post some pics. http://www.ffcars.com/forums/17-fact...thickness.html
    Build 1: Mk3 Roadster #5125. Sold 11/08/2014. Build 2: Mk4 Roadster #7750. Sold 04/10/2017. Build Thread
    Build 3: Mk4 Roadster 20th Anniversary #8674. Sold 09/07/2020. Build Thread and Video. Build 4: Gen 3 Type 65 Coupe #59. Gen 3 Coyote. Legal 03/04/2020. Build Thread and Video
    Build 5: 35 Hot Rod Truck #138. LS3 and 4L65E auto. Rcvd 01/05/2021. Legal 04/20/2023. Build Thread. Sold 11/9/2023.

  3. #3

    Steve >> aka: GoDadGo
    GoDadGo's Avatar
    Join Date
    Feb 2015
    Location
    Slidell, Louisiana
    Posts
    6,573
    Post Thanks / Like
    Blog Entries
    1
    I'm experiencing the same issue.
    I installed the two roll bars to make sure that the body is in the right spot.
    I'm hoping to split the difference by pulling the lower body out a bit and hope to fill the upper rear of the front left fender to compensate.
    Thanks Guys!

  4. #4
    Not a waxer Jeff Kleiner's Avatar
    Join Date
    Feb 2011
    Location
    Bloomington, Indiana
    Posts
    8,087
    Post Thanks / Like
    Quote Originally Posted by GoDadGo View Post
    I'm hoping to split the difference by pulling the lower body out a bit and hope to fill the upper rear of the front left fender to compensate.
    Thanks Guys!
    You're gonna' have to do that anyway across the top of the fender, over the cowl and on to the top of the door to get the lines to match up. Like I said in the linked thread you need to push the lower body all the way in at the front of the door and pull it out at the rear---

    Quote Originally Posted by JKleiner View Post
    I've had to fill the lower corner of plenty of 'em, both Mk3 and Mk4 and although they look bad in the raw it hasn't ever been necessary to go as thick as 1/4".

    Here's the process:
    The lower edge of the body needs to go in as far as possible at the front of the doors and be pulled out at the back of the doors (Use about 1/2" as a starting point). Hang the doors in the hole and adjust for the best fit. It's a balancing act between the top of the doors at the cowl, at the rear cockpit, and the lower front and rear. You aren't going to hit all 4 places and adjustments for one will affect others, often negatively. I shoot for the best at the two upper corners. As you pivot the bottom of the door outward to try to get it to match at the lower front corner you'll probably need to bring the body farther outward at the back to make them flush. Most likely you'll end up making a compromise and the lower corner of the door will still be sunken in. Here's the important final step before going to work on it with filler...add one of the rubber body bumpers to the door jamb at the front pretty much in line with the lower hinge arm. Before installing it permanently experiment by taping it in place a little higher or lower and by shaving it down as necessary to find the "sweet spot". You want just enough tension on it to help bring the body flush with the door but not so much that it causes the cowl to deflect or spring the door open. Give this a try and I bet you'll find that it helps minimize the amount of filling needed to keep the body line flowing! Thanks to my buddy Miller for sharing the body bumper secret with me (even though he said we weren't going to give away ALL of the tricks )
    Good luck!

    Jeff

  5. #5
    Senior Member
    Join Date
    May 2013
    Location
    Slidell la
    Posts
    311
    Post Thanks / Like
    I'm sure I'll win this battle, I just wasn't sure how much filler was to much. Mine looks pretty bad it's out about a half inch maybe three eighths. On top of that the gap at the bottom of the door is a half inch, so if I drop it down to get the 3/16ths the door is well below the cowl. I've seen pictures on ffr and mine looks worse. But I will win lol
    Mk4 # 8834 delivered 03/20/16 2015 IRS wildwood brake upgrade, 18"x9" front 18"X11" rear halibrand wheels, 390 FE, tko600

  6. #6

    Steve >> aka: GoDadGo
    GoDadGo's Avatar
    Join Date
    Feb 2015
    Location
    Slidell, Louisiana
    Posts
    6,573
    Post Thanks / Like
    Blog Entries
    1
    Quote Originally Posted by Hottrodder427 View Post
    I'm sure I'll win this battle, I just wasn't sure how much filler was to much. Mine looks pretty bad it's out about a half inch maybe three eighths. On top of that the gap at the bottom of the door is a half inch, so if I drop it down to get the 3/16ths the door is well below the cowl. I've seen pictures on ffr and mine looks worse. But I will win lol
    Donnie,
    You're the fit and finish lead on this one.
    I may need to drag my car to your side of the The Dell.

    Jeff,
    Thanks For The Expert Advice!
    Hope you are a glutton for punishment because it's got to be a pain to watch us first time builders.

  7. #7
    Not a waxer Jeff Kleiner's Avatar
    Join Date
    Feb 2011
    Location
    Bloomington, Indiana
    Posts
    8,087
    Post Thanks / Like
    Quote Originally Posted by Hottrodder427 View Post
    I'm sure I'll win this battle, I just wasn't sure how much filler was to much. Mine looks pretty bad it's out about a half inch maybe three eighths. On top of that the gap at the bottom of the door is a half inch, so if I drop it down to get the 3/16ths the door is well below the cowl. I've seen pictures on ffr and mine looks worse. But I will win lol
    One thing to be sure of before you get started is to assure that the dash ends that run beyond the hoop and tuck behind the hinges are not in contact with the underside of the cowl and pushing it up which will make the doors fit even worse than usual. If the dash was installed too high this will occur. There's no way around it though, they take bodywork to get a smooth transition of the lines between the main body, cowl and doors and to get proper gaps. They all need it and they all need pretty much the same thing. At first glance you'd think these photos are of the same car---they aren't but it it shows that I've had to almost exactly the same work to both:


    Once it's all done you will wind up with something like this with consistent lines and margins:


    Good luck with it!

    Jeff

  8. #8
    Not a waxer Jeff Kleiner's Avatar
    Join Date
    Feb 2011
    Location
    Bloomington, Indiana
    Posts
    8,087
    Post Thanks / Like
    Quote Originally Posted by GoDadGo View Post
    Jeff,

    Hope you are a glutton for punishment because it's got to be a pain to watch us first time builders.
    Not at all What's painful is to see guys head blindly down the wrong path so if some of us who have traveled the road before can help keep them pointed the right direction (like those early builders did for us) we're just paying it forward!

    Jeff

  9. #9

    Steve >> aka: GoDadGo
    GoDadGo's Avatar
    Join Date
    Feb 2015
    Location
    Slidell, Louisiana
    Posts
    6,573
    Post Thanks / Like
    Blog Entries
    1
    These shots really help!

    THANKS!

  10. #10
    Senior Member
    Join Date
    May 2013
    Location
    Slidell la
    Posts
    311
    Post Thanks / Like
    Hey Jeff, so how much filler is on top of the door next to the cowl
    Mk4 # 8834 delivered 03/20/16 2015 IRS wildwood brake upgrade, 18"x9" front 18"X11" rear halibrand wheels, 390 FE, tko600

  11. #11
    Not a waxer Jeff Kleiner's Avatar
    Join Date
    Feb 2011
    Location
    Bloomington, Indiana
    Posts
    8,087
    Post Thanks / Like
    Quote Originally Posted by Hottrodder427 View Post
    Hey Jeff, so how much filler is on top of the door next to the cowl
    I suppose if I say "Enough to make the lines flow smoothly" I'd sound like a wise ***! Here are a few pics of one that's typical that should give you some idea (these are all of the same car):


    .
    .
    Jeff

  12. #12
    Senior Member
    Join Date
    May 2013
    Location
    Slidell la
    Posts
    311
    Post Thanks / Like
    Okay Jeff, the third pic shows exactly what I needed to know. So filler is good at that thickness, or should I build it up with fiber glass
    Mk4 # 8834 delivered 03/20/16 2015 IRS wildwood brake upgrade, 18"x9" front 18"X11" rear halibrand wheels, 390 FE, tko600

  13. #13

    Steve >> aka: GoDadGo
    GoDadGo's Avatar
    Join Date
    Feb 2015
    Location
    Slidell, Louisiana
    Posts
    6,573
    Post Thanks / Like
    Blog Entries
    1
    Hey Donnie,
    I adjusted my door so that it mimics the fitment in Jeff's body shot pics.
    My plan is to finalize the body mounts (Underbody Rivet Nut Locations) so that I can get after the side-pipe placements.
    Drop by the house when you get a chance to take a look.


    Jeff,
    Factory Five suggests using Evercoat Rage Extreme, which is what my pal Ernie uses at his body shop.
    (Dependable Paint & Body / Slidell / La. / Established 1978)
    Is that what you use on your builds?
    Last edited by GoDadGo; 05-19-2016 at 11:46 AM.

  14. #14
    Not a waxer Jeff Kleiner's Avatar
    Join Date
    Feb 2011
    Location
    Bloomington, Indiana
    Posts
    8,087
    Post Thanks / Like
    Rage Gold. I've not used Extreme but according to both my supplier and my pal Jeff Miller (both of whom I trust completely) it is much more fluid than Gold and in circumstances where you're working on a vertical or rolling surface may tend to sag.

    Jeff

  15. #15

    Steve >> aka: GoDadGo
    GoDadGo's Avatar
    Join Date
    Feb 2015
    Location
    Slidell, Louisiana
    Posts
    6,573
    Post Thanks / Like
    Blog Entries
    1
    Thanks Jeff,

    Since I'm a Sheet Rock Floating Machine (Since Hurricane Katrina) the thinner product may be easier for me to use.

    Steve

  16. #16
    Senior Member
    Join Date
    May 2013
    Location
    Slidell la
    Posts
    311
    Post Thanks / Like
    Hey Steve, did your kit come with two nuts on each door hinge to hold the door to the body
    Mk4 # 8834 delivered 03/20/16 2015 IRS wildwood brake upgrade, 18"x9" front 18"X11" rear halibrand wheels, 390 FE, tko600

  17. #17

    Steve >> aka: GoDadGo
    GoDadGo's Avatar
    Join Date
    Feb 2015
    Location
    Slidell, Louisiana
    Posts
    6,573
    Post Thanks / Like
    Blog Entries
    1
    Yep, only two nuts per door, but the others are stored in one of the boxes in my den. (Good Luck To Me Finding Them)

    Also, I lifted up the nose of the car to align the front quick jack bolts holes.
    It shifted things around a little and it caused the gaps on the doors to be reduced a pretty good bit with the lower body sides pushed all the way in.
    The drivers door still needs the attention that Jeff outlined so while things look better, I'll still need to follow Jeff's door pics to get it done right.

    I think the bodies are pulled pretty quick from the molds and placed on the cars rather quickly.
    Since there is no support on the nose, other than the upper frame rails, I believe that the MK-4 and likely the FIA suffer from a bit of Droop Snoot!
    Last edited by GoDadGo; 05-19-2016 at 09:52 PM.

  18. #18
    PLATNUM Supporting Member
    wallace18's Avatar
    Join Date
    Apr 2012
    Location
    Trenton, Florida
    Posts
    5,382
    Post Thanks / Like
    Before you finish up your doors make sure you sit in the seat behind the wheel. Make sure you have enough elbow and shoulder room. I had to have my doors modified so I could be much more comfortable in the car. I noticed a fair amount of folks do this mod. I personally think it should be an option from FFR IMO. Here is a before and after shot of my doors.

    MK4116.JPGMK4133.JPGMK4136.JPGMK4151.JPG

  19. #19
    Senior Member edwardb's Avatar
    Join Date
    Feb 2011
    Location
    Lake Orion, Michigan
    Posts
    10,576
    Post Thanks / Like
    Quote Originally Posted by GoDadGo View Post
    [B]Also, I lifted up the nose of the car to align the front quick jack bolts holes. It shifted things around a little and it caused the gaps on the doors to be reduced a pretty good bit with the lower body sides pushed all the way in.
    The drivers door still needs the attention that Jeff outlined so while things look better, I'll still need to follow Jeff's door pics to get it done right. I think the bodies are pulled pretty quick from the molds and placed on the cars rather quickly.
    Since there is no support on the nose, other than the upper frame rails, I believe that the MK-4 and likely the FIA suffer from a bit of Droop Snoot!
    The bodies are made off-site (not by FF) and typically there is some time between when they are made and placed on the chassis for shipment. There have been pictures posted in the past of them lined up in storage. Bottom line, they are fully cured when shipped. FF only has the capacity to make smaller parts in house, like hoods, doors, etc. But your post is a little concerning. (1) The nose of the body doesn't sit on the hood surround ("upper frame rails?") it is held only by the quick jacks. Properly positioned, it's 1/4-3/8 inch (or so) above the 3/4-inch hood surround tubes. There is cushioning provided in the kit to fill this gap. Pulling the nose down will affect how the doors fit, as mentioned, and also the hood. (2) You shouldn't be trying to fit and gap the doors without the body located and attached. Including front and rear quick jacks. Typically the splash guards don't affect door spacing, but they do affect the pipe cutouts (often done at the same time) so I also have those installed as well.
    Build 1: Mk3 Roadster #5125. Sold 11/08/2014. Build 2: Mk4 Roadster #7750. Sold 04/10/2017. Build Thread
    Build 3: Mk4 Roadster 20th Anniversary #8674. Sold 09/07/2020. Build Thread and Video. Build 4: Gen 3 Type 65 Coupe #59. Gen 3 Coyote. Legal 03/04/2020. Build Thread and Video
    Build 5: 35 Hot Rod Truck #138. LS3 and 4L65E auto. Rcvd 01/05/2021. Legal 04/20/2023. Build Thread. Sold 11/9/2023.

  20. #20

    Steve >> aka: GoDadGo
    GoDadGo's Avatar
    Join Date
    Feb 2015
    Location
    Slidell, Louisiana
    Posts
    6,573
    Post Thanks / Like
    Blog Entries
    1
    EdwardB,

    I've got the Bubble & Foam weather stripping in place.
    I'll mount the body and get it right prior to doing the door gaps.
    Please know that I'll make sure that I get over to Donnie's house to check his out too.
    Variances from car to car is understood.
    The expert advice from you and other forum members is very much appreciated!

    Thanks All!

    Steve

  21. #21
    Out Drivin' Gumball's Avatar
    Join Date
    Feb 2011
    Location
    Blackberry Township, IL
    Posts
    2,653
    Post Thanks / Like
    As with everything on these cars, your patience will be rewarded.

    I did my own bodywork on my late Mk3.1 and was amazed to learn from a friend who owns a body shop just how sensitive the fitment of doors, hood, and trunk are with respect to slight changes in body location... even to the point where slight pressure at one point could move things way over on the other side of the car. As a result, I learned that it's very important to be patient when doing the body alignment and to document everything so that you can replicate that alignment when doing the final assembly after paint. Also, the more time spent on aligning everything to your liking, the less filler you will need. Of course, there will always be a need for some - and maybe even a little extra fiberglass and resin to extend panels to get gaps right.

    Here are a couple pics of my doors and cowl - my full bodywork thread can be found here.... http://thefactoryfiveforum.com/showt...is%27+bodywork

    Believe it or not, both of my doors have very little filler on them - just enough to give a good transition to the body at the top both front and back....


    Final product has a very thin layer of high-build primer that was blocked, along with the rest of the car, during the paint process - but what you see above is pretty much what's under the paint in these pics....


    Later,
    Chris

    "There are no more monsters to fear, and so, we have to build our own."
    Mk3.1 #7074

  22. #22

    Steve >> aka: GoDadGo
    GoDadGo's Avatar
    Join Date
    Feb 2015
    Location
    Slidell, Louisiana
    Posts
    6,573
    Post Thanks / Like
    Blog Entries
    1
    Hey Gang,

    I'll say this for Hottrodder427 too:
    The Input Received Regarding This Topic Has Been Fantastic!
    We now have the tools in our mental tool boxes to get this done right.

    Steve >> aka: GoDadGo

Posting Permissions

  • You may not post new threads
  • You may not post replies
  • You may not post attachments
  • You may not edit your posts
  •  

Stewart Transport

Visit our community sponsor