FormaCars

Visit our community sponsor

Thanks Thanks:  0
Likes Likes:  0
Results 1 to 4 of 4

Thread: Share some pics of your body work leading to rectangular tailights.

  1. #1
    Senior Member
    Join Date
    Oct 2012
    Location
    Tybee Island, GA
    Posts
    505
    Post Thanks / Like

    Share some pics of your body work leading to rectangular tailights.

    I'm a little unsure of what what body work needs to be done to lead into the rectangle tail lamp. I'm sanding away some of the platform that is there for the circle lamps to try to make a smooth transition. But really, I don't know what I'm doing here.

    Anyone have photos of work that they've done OR have any tips/templates?

    I've looked at Chris' 3.1 thread, but I don't have a kirkham sitting next to me like he did

    VIDEO https://www.youtube.com/watch?v=Bv5bVqR7-zY

    Thanks,
    Dave

    Last edited by DadofThree; 12-15-2016 at 02:09 PM.
    Dave
    Mk 3.1 - #6882 - 5.0L 302 - FiTech EFI - 3-Link - 3.08 Ratio - 15" Wheels
    Greenhorn and doing the best I can
    My photos are at: My Flickr acct
    Videos are at: YouTube Videos

  2. #2
    Out Drivin' Gumball's Avatar
    Join Date
    Feb 2011
    Location
    Blackberry Township, IL
    Posts
    2,653
    Post Thanks / Like
    Dave,

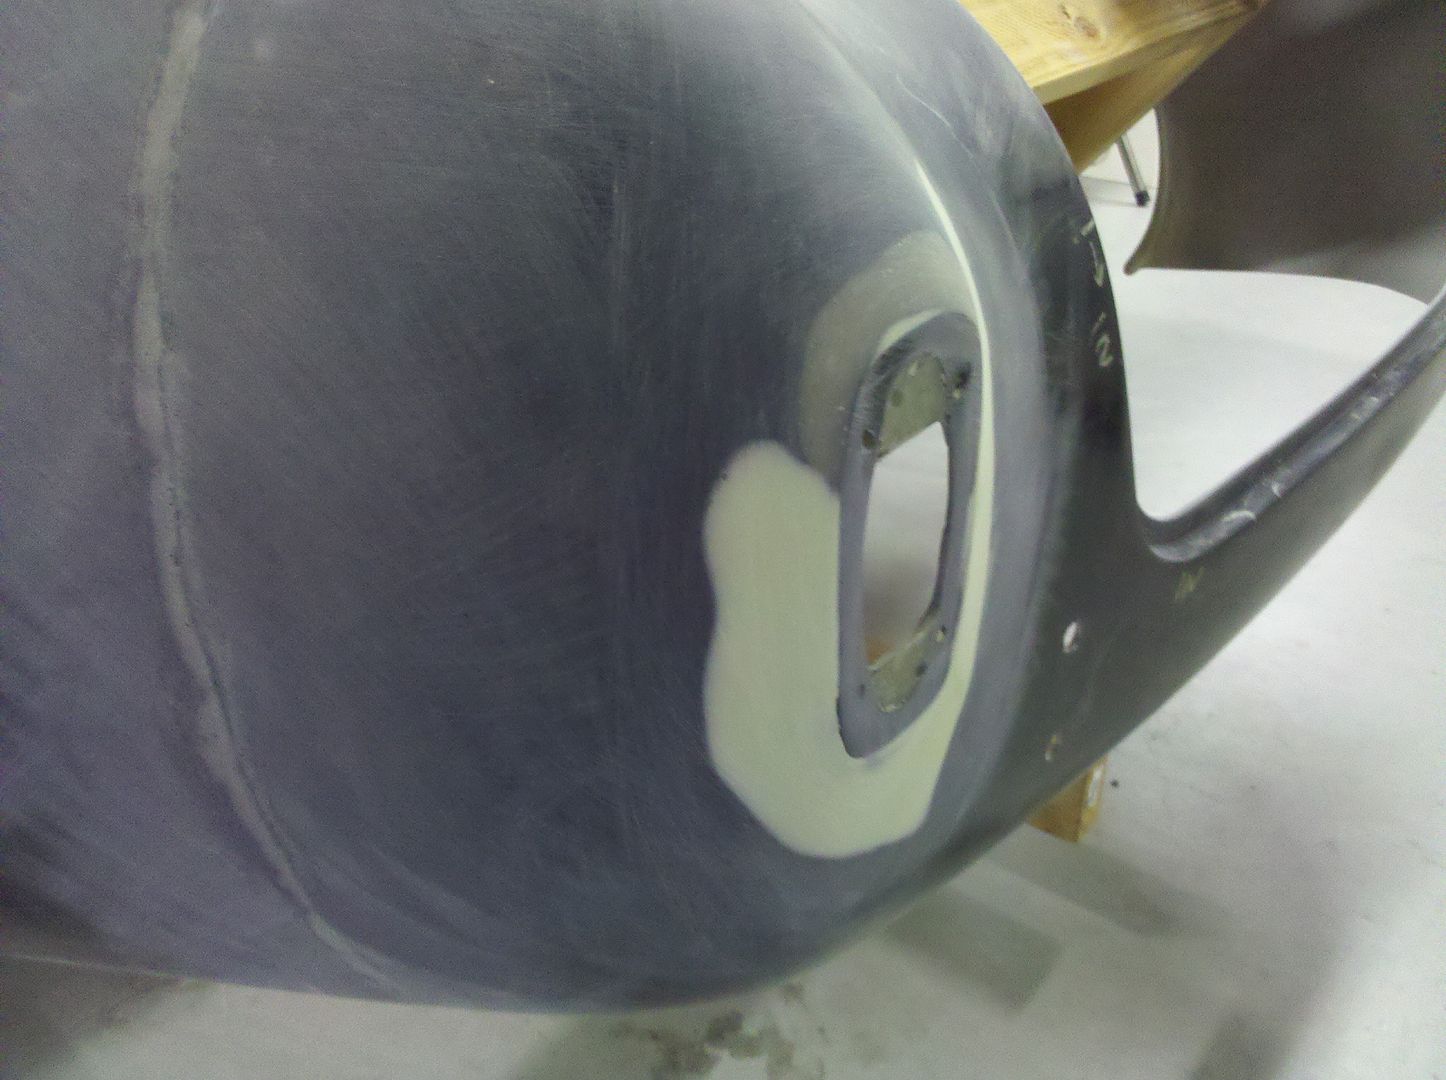
    As mentioned in my bodywork thread, it's important to back-up the body shell with additional fiberglass before grinding away material from the outside. I did so and clearly burned through the original FFR fiberglass in some spots down into the additional material I put on the inside of the body. This allowed me to really shape that area to fit the rectangular tail light pads.

    Also, it's a good idea to make a template of your lights rubber gasket so that you have an accurate foot print of how you want to shape the flat pads on the body - I made mine out of metal and left them in place while I did the grinding. Once removed, the surrounding area was perfectly shaped and the pad was just the right size.

    Here's a shot of the inside of the body showing the area at the top and bottom where I layered in additional fiberglass...


    In this pic, you can see the outline of the rectangular tail light pads done with a Sharpie marker...


    Another pic of the original pad area before any grinding...


    Profile of the steel template and a good indication of the amount of material to be removed...


    Initial knock-down of the upper and lower portions of the original pad area....


    Finishing off with some filler - sexy, sexy...

    Later,
    Chris

    "There are no more monsters to fear, and so, we have to build our own."
    Mk3.1 #7074

  3. #3
    Senior Member
    Join Date
    Oct 2012
    Location
    Tybee Island, GA
    Posts
    505
    Post Thanks / Like
    Thank you Chris. Your body thread is what I've been using as a guide. Great Details and it's been a huge help. HUGE!!
    It is one of the reasons why I'm taking on the body.

    I've done the fiberglass and made the template as you did in your thread.

    It's the contouring that I'm just unsure of. I don't know what the shape is. Today I put the car in the sun and sanded down the fiberglass until the transition was smooth all the way to the light/template.
    You had mentioned in your body thread that you had a kirkham next to you to be used as a reference. I don't have that.

    this mod is done often, so I thought there may be some more photos out there.


    Last edited by DadofThree; 12-15-2016 at 09:35 PM.
    Dave
    Mk 3.1 - #6882 - 5.0L 302 - FiTech EFI - 3-Link - 3.08 Ratio - 15" Wheels
    Greenhorn and doing the best I can
    My photos are at: My Flickr acct
    Videos are at: YouTube Videos

  4. #4
    Out Drivin' Gumball's Avatar
    Join Date
    Feb 2011
    Location
    Blackberry Township, IL
    Posts
    2,653
    Post Thanks / Like
    Yeah, the Kirkham was a good crutch... but it's really just something that you'll know is right when you feel it. Looking at it is one thing, but closing your eyes and caressing it (as with the rest of the body work) really will tell you all you need to know.

    A trick that I learned from a body guy is to do it with tight leather work gloves (very thin) or with a piece of blue paper shop towel - those things really help you feel shape and imperfections.

    More than any other part of the build, the bodywork phase is truly art - enjoy and let me know anytime I can help.
    Later,
    Chris

    "There are no more monsters to fear, and so, we have to build our own."
    Mk3.1 #7074

Posting Permissions

  • You may not post new threads
  • You may not post replies
  • You may not post attachments
  • You may not edit your posts
  •  

Martin's Dent and Collision Shop

Visit our community sponsor