-
05-30-2018, 12:31 PM
#441
Senior Member

Righteous build! Love it! Makes me wanna do one next, or just for a track car!
Gen3 Coupe - SOLD Arrival:
6/21/18 SOLD: 4/12/2019
Current Vehicle: 2014 SRT Viper (modded to the moon), 2022 TRX, 2014 RS6, E46 LS3 M3
Current Projects: Superlite/RCR GTR ***FOR SALE***
@madd_wrapps on IG or
www.maddwrapps.com
-
05-30-2018, 12:41 PM
#442
Well, that answers that! 
-
06-11-2018, 08:48 PM
#443
Senior Member

Headers Fixed!
Finally got some time to weld up the cracks in my header collectors. Turns out its really hard to weld down inside a small tube
Here is a shot looking down into the collector to see the weld I put in.
IMG_20180611_112228.jpg
Here is a pic from the outside showing the weld penetration. Man that ceramic coating is tough, didn't blister or peel! I did end up grinding it off to weld the crack from the outside as well.
IMG_20180611_112242.jpg
-
06-11-2018, 11:54 PM
#444
Did you MIG or TIG that? I'm guessing MIG?
The weld bead looks very nice, but I don't think you got good penetration. In this case it's kind of a blessing, since if you got full penetration, you would have pulled in the ceramic coating from the outside into the bead, which would have contaminated it and weakened it.
Here's a link to a professional welder who's been publishing welding advice on the web for years. The bottom of the page gives some pointers on penetration.
http://www.weldingtipsandtricks.com/...ding-tips.html
-
06-12-2018, 06:01 AM
#445
Senior Member

Originally Posted by
Zach34

Did you MIG or TIG that? I'm guessing MIG?
MIG, I could not fit the TIG torch down into the hole!
-
07-02-2018, 05:56 AM
#446
Senior Member
Some video of the finished product in action!
Well the first time I had the car on track at Watkins Glen I did not have video for you guys. But as promised I have video for my second track outing. This was my first time at the New York Safety Track so you'll have to excuse my terrible lines and timid driving 
The track is primarily a motorcycle track so its tight and twisty. I like that it is very technical with 18 turns, 16 of which are BLIND! I will definitely be returning.
-
Post Thanks / Like - 0 Thanks, 1 Likes
-
07-02-2018, 06:21 AM
#447
Senior Member
Some final issues to work out
There are a few things that still need to be addressed with my car before I can call it done.
- I have not gotten the Variable Valve Timing working yet so I'm losing some mid to top end power
- The aero needs to be sorted
- The suspension settings need to be sorted
- The trans mount needs to be redesigned
During the second session at NYST I broke the rear transmission mount. The polyurethane separated from the top plate and it made a clunking noise every time the engine/trans shifted weight front to back. This ended my 3rd session early. But the track marshal and I came up with a nice temporary fix. I took a ratchet strap and looped it around the tail of the transmission and the frame section below the mount and tightened it down. It held the transmission snug against the mount for the rest of the day! Now I need to think of a more permanent solution.
Last edited by Hobby Racer; 07-02-2018 at 08:11 AM.
-
07-02-2018, 07:06 AM
#448
Senior Member

That engine sings beautifully
-
07-02-2018, 08:03 AM
#449
Senior Member

Great video, thanks for sharing!
-
07-02-2018, 08:09 AM
#450
Car sounds great, enjoy the sorting and chassis tuning. I found the car responds really well to chassis changes.
-
07-02-2018, 08:32 AM
#451
Senior Member
It was real hot, around 95F with a feels like temp of 102F. I looked at the logs and max temps were great except for the intake air temp. I need to make a duct to grab air from one of the side scoops as it is just sucking engine bay air at the moment.
- Coolant: 192F
- Oil: 215F
- Trans: 205F
- Air: 104F
Really pleased with all the plumbing and cooling stuff I put in.
Last edited by Hobby Racer; 07-02-2018 at 03:02 PM.
-
07-02-2018, 09:56 AM
#452
I am using the right side scoop to draw intake air and is working well for my car.
Air box back 2.JPG
Air Box top.JPG
-
07-02-2018, 10:27 AM
#453
why do you think the trans mount separated? did you use there primer? was there a profile on the metal to help? car looks and sounds great!
-
07-02-2018, 11:32 AM
#454
Originally Posted by
Hobby Racer
During the second session at NYST I broke the rear transmission mount. The polyurethane separated from the top plate and it made a clunking noise every time the engine/trans shifted weight front to back.
What engine mounts are you running? It's possible that since you made a stiffer trans mount, if the engine mounts are stock or not stiff enough then more load will be carried by the trans mount (until it breaks of course). I don't know if that's the case for you, but if it is maybe look into matching the stiffness and range of motion for both the engine and trans mount so the load is balanced.
Car looks great on track!
-
07-02-2018, 03:02 PM
#455
Senior Member
Here is the separated trans mount.
IMG_20180702_134713.jpg IMG_20180702_134801.jpg
Originally Posted by
Samiam1017
why do you think the trans mount separated? did you use there primer? was there a profile on the metal to help?
No primer (instructions didn't call for it) and not really much profile for it to bite into, just media blasted. I think its not really meant to be used in tension.
IMG_20180702_135926.jpg
Originally Posted by
lsfourwheeler
What engine mounts are you running? It's possible that since you made a stiffer trans mount, if the engine mounts are stock or not stiff enough then more load will be carried by the trans mount (until it breaks of course). I don't know if that's the case for you, but if it is maybe look into matching the stiffness and range of motion for both the engine and trans mount so the load is balanced.
Using Subaru STI Group N motor mounts with custom top plates. They're plenty stiff but provide no real forward / back support. That is supposed to be handled by either the front dog bone, the trans mount, or both.
And here is my temporary fix as I need to be ready for the next track event at Watkins Glen in 2 weeks. Who knows, if it holds up well it could be my permanent fix
IMG_20180702_143708.jpg
-
07-02-2018, 09:10 PM
#456
one of the engine mounts I made did the same thing when I tightened it to the frame, but the top and bottom plates weren't exactly parallel, so torqueing the nut down pulled the lower plate away. I'm pondering that problem, too, and wondering if the others are problems waiting to happen. I kinda like your fix for the trans mount, though. Can still squish together, but not stretch apart. Actually, I kinda REALLY like it.
-
07-03-2018, 11:43 AM
#457
fasterer and furiouser

what about screwing a whole bunch of hex head screws into the top plate before pouring your urathane to really give it something to grab on to.
A well stocked beverage fridge is the key to any successful project.
-
07-03-2018, 01:26 PM
#458
Are you logging oil pressure? The oil control problem in the H6 is the main thing stopping me from jumping in with one.
"Good Judgement comes from Experience. Experience comes from Bad Judgement"
Owner: Colonel Red Racing
eBAy Store:
http://stores.ebay.com/colonelredracing
818R ICSCC SPM
2005 Subaru STI Race Car ICSCC ST and SPM
Palatov DP4 - ICSCC Sports Racer
-
07-03-2018, 02:19 PM
#459
i like the new solution for the trans mount. how about welding it solid and using a small piece of rubber under the mount for a little compliance? i have to run a thinner poured mount like yourself and have chosen the later. hopefully its not too stiff.
-
07-03-2018, 03:17 PM
#460
Senior Member
Originally Posted by
longislandwrx
what about screwing a whole bunch of hex head screws into the top plate before pouring your urathane to really give it something to grab on to.
That might work but its still a lot to ask putting an adhesive in tension and shock loading. I think my quick fix may turn out to be the easiest and best. I'll know for sure in two weeks when I track it again.
Originally Posted by
Samiam1017
i like the new solution for the trans mount. how about welding it solid and using a small piece of rubber under the mount for a little compliance? i have to run a thinner poured mount like yourself and have chosen the later. hopefully its not too stiff.
If I was starting from scratch with the knowledge I have now I would most likely do that.
-
07-03-2018, 03:21 PM
#461
Senior Member
Originally Posted by
Sgt.Gator
Are you logging oil pressure? The oil control problem in the H6 is the main thing stopping me from jumping in with one.
No oil pressure issues pulling up to 1.6G is the sweepers! I am logging pressure both before and after the accusump so I know for sure if / when the oil moves away from the pickup. But I only have two full track days so far. I'll report back after two more days at Watkins Glen. That is a very fast, high G track.
You know you want to join the H6 club
-
07-03-2018, 03:44 PM
#462
Senior Member
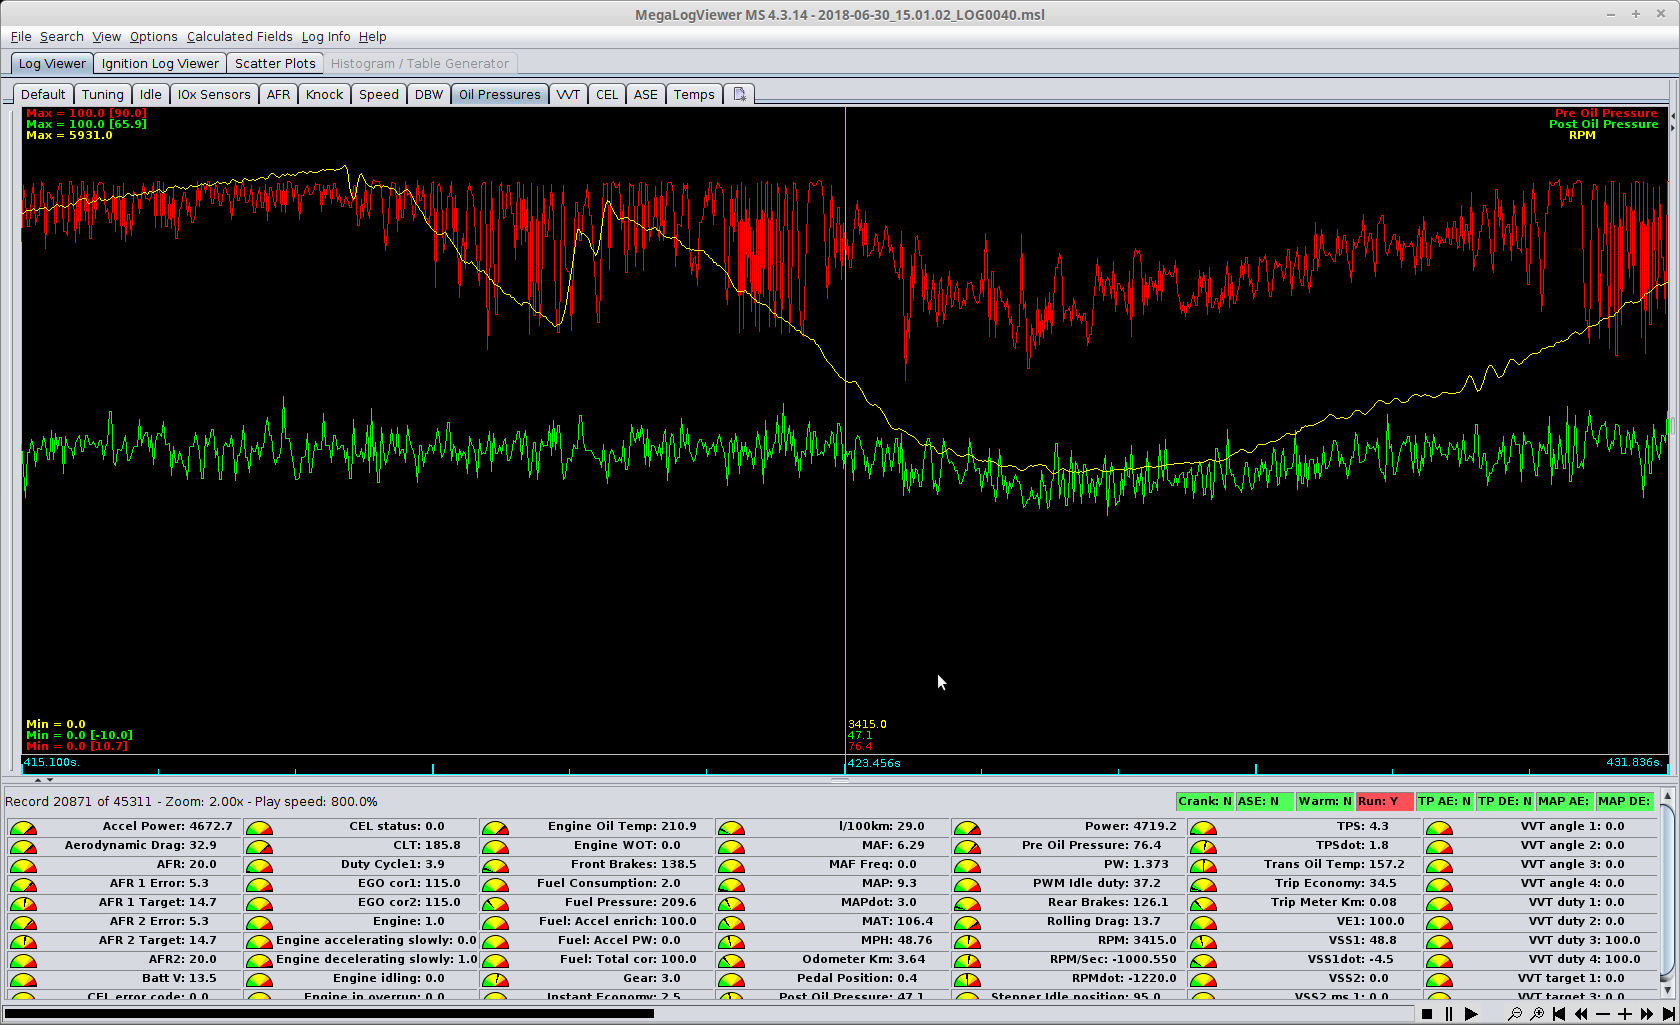
Oil Pressures During Track Session
Here is a scatter plot of the oil pressures during a 15 min track session with lateral G's in the 1.5 range. This plot shows the pre oil pressure (that's from the pump to the accusump) on the X axis and the post oil pressure (that's after the accusump to the motor galleys) on the Y axis. The color denotes RPM.
When hot, the pressures range from about 25 psi around idle to a max of 88 psi. That must be the internal pressure relief as you can see an abrupt cut off in pressure rise on the right side.
Everything looks pretty normal.

-
07-03-2018, 05:25 PM
#463
Interesting graph. I'm probably not reading it correctly because it looks to me like you have a lot of high rpm (Orange and Red dots) between 24 psi and 45 psi. I wouldn't think you should ever have a high rpm colored dot at such low pressures. And how do you tell a Pre Oil from a Post oil dot?
Can you do a straight oil pressure vs G graph all at a single rpm, like 5,500? Or eliminate the G and do a oil pressure vs time with a rpm overlaid? Like this:

Last edited by Sgt.Gator; 07-04-2018 at 01:08 AM.
"Good Judgement comes from Experience. Experience comes from Bad Judgement"
Owner: Colonel Red Racing
eBAy Store:
http://stores.ebay.com/colonelredracing
818R ICSCC SPM
2005 Subaru STI Race Car ICSCC ST and SPM
Palatov DP4 - ICSCC Sports Racer
-
07-04-2018, 02:55 AM
#464
Also interested in what Gator pointed out.
I'm unfamiliar with accusumps, but my eyebrow raised at what appears to be somewhere around a 33% oil pressure drop at the higher pressure ranges across the accusump. Is this a known tradeoff with those things?
-
07-04-2018, 06:46 AM
#465
Senior Member
Originally Posted by
Sgt.Gator
Interesting graph. I'm probably not reading it correctly because it looks to me like you have a lot of high rpm (Orange and Red dots) between 24 psi and 45 psi. I wouldn't think you should ever have a high rpm colored dot at such low pressures. And how do you tell a Pre Oil from a Post oil dot?
Can you do a straight oil pressure vs G graph all at a single rpm, like 5,500? Or eliminate the G and do a oil pressure vs time with a rpm overlaid? Like this:
You can't tell a pre dot from a post dot without hovering over it with the mouse pointer. I just use the scatter plot to get an overall picture of the entire log file all at once. This way I don't have to scan through a huge log if I'm just looking for say a large dip in oil pressure.
Here is a line graph like what you asked for, but as I mentioned its just a small time frame in the log. It does point out some things.
- You can see the red pre pressure trace bouncing off the pressure relief spring (that's why its top is flat at about 88 psi).
- The green post pressure trace is more evened out, that's the effect the accusump has evening out highs and lows.
- The green post trace also exhibits a pressure drop due to the cooler and additional plumbing.
Originally Posted by
Zach34
Also interested in what Gator pointed out.
I'm unfamiliar with accusumps, but my eyebrow raised at what appears to be somewhere around a 33% oil pressure drop at the higher pressure ranges across the accusump. Is this a known tradeoff with those things?
The accusump combined with the cooler and extra plumbing cause a pressure drop, this happens in all systems, its not unique to the accusump. Most people only log one oil pressure so they don't see the pressure drop in their system.
-
07-04-2018, 12:45 PM
#466
The next time you go out if you can log one flying lap then you can compare your oil pressures and RPM to particular corners and see if any of them are causing an issue.
"Good Judgement comes from Experience. Experience comes from Bad Judgement"
Owner: Colonel Red Racing
eBAy Store:
http://stores.ebay.com/colonelredracing
818R ICSCC SPM
2005 Subaru STI Race Car ICSCC ST and SPM
Palatov DP4 - ICSCC Sports Racer
-
07-04-2018, 04:08 PM
#467
Senior Member
Yeah, I'm trying to figure out how to get my ECU data and my telemetry data into one system so I can do easy direct comparisons. Have not found any way as yet, but I'm still trying.
-
07-19-2018, 10:33 PM
#468
Senior Member
One Lap of the Glen in the 818R
Well, still working out the kinks. Day one I broke the shifter cable that controls forward and backward motion. We cobbled it back together so we could salvage day two. Then on day two the oil catch can filled up and spewed oil everywhere, and I do mean everywhere! That ended day two early.
But I do have a lap from day 2 before the the oil bath. Enjoy 
-
Post Thanks / Like - 0 Thanks, 1 Likes
-
07-21-2018, 01:17 AM
#469
"Then on day two the oil catch can filled up and spewed oil everywhere, and I do mean everywhere! That ended day two early."
Classic Subaru track day!
"Good Judgement comes from Experience. Experience comes from Bad Judgement"
Owner: Colonel Red Racing
eBAy Store:
http://stores.ebay.com/colonelredracing
818R ICSCC SPM
2005 Subaru STI Race Car ICSCC ST and SPM
Palatov DP4 - ICSCC Sports Racer
-
07-21-2018, 01:57 AM
#470
"But I do have a lap from day 2 before the the oil bath. "
Nice lap...aren't oil baths only good for the Tin Man?
"trying to figure out how to get my ECU data and my telemetry data into one system so I can do easy direct comparisons" --- can the 2 be run off a master clock, if so then post processing based upon time stamps would be possible.
-
07-21-2018, 06:07 AM
#471
Senior Member
Originally Posted by
DetactGarageMech
"trying to figure out how to get my ECU data and my telemetry data into one system so I can do easy direct comparisons" --- can the 2 be run off a master clock, if so then post processing based upon time stamps would be possible.
They can't be run off the same clock. The GPS lap timer get time from GPS satellites and the ECU only records seconds since data logging began, its internal clock is only used to time stamp the log files it creates so inside the files there is no full time field.
-
07-21-2018, 08:15 PM
#472
Just finished reading your build from first post to last, thanks for taking us along! Very nice work both on the car and documenting the build and sharing with everybody. Two thumbs up, Makes me want to build one! Thanks again for a very enjoyable couple hrs
-
08-02-2018, 04:10 PM
#473
Senior Member
Shorter 5th gear needed in the 5MT!
In the short time I've been running my 818R on the track, I have noticed that the step from 4th to 5th gear is too large. The car falls on its face when going down the long straights after shifting into 5th.
The 06 WRX 5MT (and all USDM WRX 5MT's I think) have a 0.738 ratio 5th gear set. This is great for highway cruising and gas mileage but not so good for road racing. So I started looking for a shorter 5th gear set. My research uncovered that the 08-09 Outback with an EJ253 had a 5th gear ratio of 0.825. This close ratio 5th should be much better for the car.
Having rebuilt the 5MT once before I think I can replace the current 5th gear set with the transmission still in the car, only removing the center differential section. That's the section right behind the FFR block off plate.
I'll post pics when I do the conversion and let you know how it goes.
If anyone else is interested, the Subaru part number for the 5th gear set is 32315AA390. It is a special order part with limited quantities remaining so get them while they last!
IMG_2707.JPG
Last edited by Hobby Racer; 08-02-2018 at 04:13 PM.
-
08-02-2018, 06:24 PM
#474
Originally Posted by
Hobby Racer
In the short time I've been running my 818R on the track, I have noticed that the step from 4th to 5th gear is too large. The car falls on its face when going down the long straights after shifting into 5th.
The 06 WRX 5MT (and all USDM WRX 5MT's I think) have a 0.738 ratio 5th gear set. This is great for highway cruising and gas mileage but not so good for road racing. So I started looking for a shorter 5th gear set. My research uncovered that the 08-09 Outback with an EJ253 had a 5th gear ratio of 0.825. This close ratio 5th should be much better for the car.
Having rebuilt the 5MT once before I think I can replace the current 5th gear set with the transmission still in the car, only removing the center differential section. That's the section right behind the FFR block off plate.
I'll post pics when I do the conversion and let you know how it goes.
If anyone else is interested, the Subaru part number for the 5th gear set is 32315AA390. It is a special order part with limited quantities remaining so get them while they last!
IMG_2707.JPG
Hey yes you can do the converion in the car. You will need a thin wall socket to get one of the nuts off. Plus the upper gear is pressed on so I just cut a slot in the top gear and cracked the gear to get it off. The nut will push it back in place. I tried the .871 5th gear and ran into the rpm limiter at around 140 mph with my 4.11 final drive trans. I installed the .78 5th gear in mine to stay off the limiter and still push me over 150. Depending on tire size and if you have the 3.90 final ratio you should be happy with your choice. The rpms don’t drop much when you shift into 5th now so I find myself double checking that I shifted.
-
08-02-2018, 08:01 PM
#475
Senior Member
Originally Posted by
taco20
Hey yes you can do the converion in the car. You will need a thin wall socket to get one of the nuts off. Plus the upper gear is pressed on so I just cut a slot in the top gear and cracked the gear to get it off. The nut will push it back in place. I tried the .871 5th gear and ran into the rpm limiter at around 140 mph with my 4.11 final drive trans. I installed the .78 5th gear in mine to stay off the limiter and still push me over 150. Depending on tire size and if you have the 3.90 final ratio you should be happy with your choice. The rpms dont drop much when you shift into 5th now so I find myself double checking that I shifted.
With the top gear, do you think it will be possible to get a gear puller in there to pull it off?
I have the tallest final drive ratio, 3.70 so I think the shorter 0.825 will work great for me. Here is a chart showing the gear spreads.

Last edited by Hobby Racer; 08-02-2018 at 08:21 PM.
-
08-03-2018, 09:46 AM
#476
Originally Posted by
Hobby Racer
With the top gear, do you think it will be possible to get a gear puller in there to pull it off?
I have the tallest final drive ratio, 3.70 so I think the shorter 0.825 will work great for me. Here is a chart showing the gear spreads.
20180225_151025.jpg
20180225_155448.jpg
It is actually the lower gear that is pressed on. As you can see from my pics there is no real room to put a gear puller behind the gear. Plus with the shaft in the way it makes things even more difficult. Cutting the gear sucks but you have decided not to use the gear set anyway. With your short tire and tall final drive I think you will like the .825 ratio just fine.
-
08-03-2018, 09:57 AM
#477
Senior Member
Originally Posted by
taco20
It is actually the lower gear that is pressed on. As you can see from my pics there is no real room to put a gear puller behind the gear. Plus with the shaft in the way it makes things even more difficult. Cutting the gear sucks but you have decided not to use the gear set anyway. With your short tire and tall final drive I think you will like the .825 ratio just fine.
What tool did you use to cut the gear and in what location. It looks very close to the case so cutting in the teeth gullet seems risky. Also, how did you lock the gear set up to apply the torque to the nuts?
-
08-03-2018, 10:31 AM
#478
Originally Posted by
Hobby Racer
What tool did you use to cut the gear and in what location. It looks very close to the case so cutting in the teeth gullet seems risky. Also, how did you lock the gear set up to apply the torque to the nuts?
I just used a cutting wheel at an angle. I nicked the plate holding it in but not going to hurt anything.
Since it is still hooked to the motor just shove one of the shift levers in and put it in gear. Then use an impac wrench to take the nuts off. The aren't super tight. The big nut needs to be a thin wall sock other wise you have to grind down the tip of the socket until it fits. I believe it is a 35mm. I bought a cheap one form Autozone that worked fine.
-
08-16-2018, 07:42 PM
#479
Senior Member
@taco20
How did you get the big 50mm nut off? I have a 50MM socket but its no where near deep enough!
nut.png
-
08-17-2018, 12:22 PM
#480
39454578_2271223206245161_7483412624114188288_n.jpg
I bought a 50mm socket off the tool truck in 3/4 drive that just fits. Might find a 2" socket that is deep enough to do the job?
I could always mail you mine but shipping might cost more then a socket being shipped back and forth.


 Thanks:
  Likes:


 Reply With Quote
