-
Removing hub studs
Hi all, just started my build a few weeks back with my 9 year old son. Taking it slow and steady  . Mk4 complete kit with IRS.
So far we have been able to figure things out with a lot of help from this forum. So this is my first post asking for specific help. I have read several posts on recommendations for removing these stubborn studs from the rear hubs to get the kit provided stud replacements in. I have tried virtually all suggestions. I cant get the things to move. I think part of it is Everytime I put alot of force on the hub I am so nervous to damage it. Am I missing something? Not even my air sledge hammer gets them to move with hub properly seated and protected in my vice. Any advice is greatly appreciated!
Mike
-
Senior Member

Hi Mike. Welcome aboard! What a great adventure for you and your young son!
Guys who have access to a hydraulic press do well. That was my preference, but after making a dozen (not exaggerating) phone calls to local tire shops, machine shops, and mechanics it was clear liability was a big concern for them--no one wanted to take the risk. I finally found one shop who was willing, but quoted me something like $75-$130. No thanks. You may have a different experience.
My second preference was to press them out with my vise, but my 4.5" Craftsman was not able to get the job done. They didn't even budge.
So, I ended up following the F5 instructions. I used a two pound mini-sledge, and they popped right out with one to two solid blows per stud. I placed a piece of metal pipe on the back side to focus the force of the blow to the stud and around its circumference. At first I, too, was not crazy about applying that much force to the hubs, but after doing it my mind was eased a bit. I think it's an acceptable way to complete this task, but not my first choice.
When it comes to pulling in your replacement studs, an impact wrench will make quick work of it. I didn't even need to secure the hub in a vice while pulling in the studs; just held it by hand. I used Grade 8 hardened washers and nut (as recommended by many), and applied some lubricating oil between the washers and nut. If you don't have access to an impact, GTBradley was successful with a long handled driver to pull them in with the hub in a vice (and lubricating oil between the washers).
Hope this helps.
Last edited by 460.465USMC; 10-07-2021 at 04:49 PM.
Reason: Clarify and additional context to my approach
Chris
Coupe complete kit: arriving ~ 4/22/24!
Build Thread. Coyote. T-56. IRS w/3.55. Wilwoods. PS. HVAC. Side windows.
MK4 Complete kit.
Build Thread Index. Delivered: 10/15/2020. Legal: 7/25/23. Coyote Gen3. TKO600 (0.64 OD). IRS w/3.55. PS. Wilwoods. Sway bars. This build is dedicated to my son, Benjamin.
Build Thread.
-
I pressed it out with a vice by putting a large deep socket on the head end of the studs so when I press it out the head has room to go. i.e. one end of the jaw pushes on the socket, the other end pushes on the thread end of the stud. One stud at a time.
-
Post Thanks / Like - 0 Thanks, 1 Likes
 NAZ
NAZ liked this post
-
Senior Member

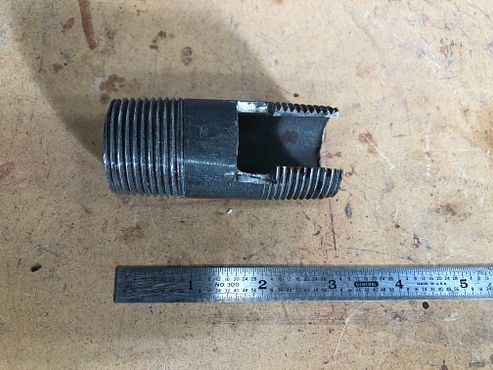
I've done several and press them out with my vise as well. Made this crude piece from a 3" piece of black pipe. The cut-out fits around the flat end of the stud and clears the step on the hub. A couple turns of the vise and the stud pops right out. Also have had very good luck pulling the new ones in with an impact wrench, washers, lube, and a sacrificial nut as already mentioned. A shop press is another good option. If you don't have one, it's typically quite inexpensive to have them pressed out and the new ones pressed in by a machine shop. I don't care what the instructions say. Leave the hammer in the toolbox. I personally don't like to see these kinds of parts treated that way.
Build 1: Mk3 Roadster #5125. Sold 11/08/2014.
Build 2: Mk4 Roadster #7750. Sold 04/10/2017.
Build Thread
Build 3: Mk4 Roadster 20th Anniversary #8674. Sold 09/07/2020.
Build Thread and
Video.
Build 4: Gen 3 Type 65 Coupe #59. Gen 3 Coyote. Legal 03/04/2020.
Build Thread and
Video
Build 5: 35 Hot Rod Truck #138. LS3 and 4L65E auto. Rcvd 01/05/2021. Legal 04/20/2023.
Build Thread. Sold 11/9/2023.
-
Post Thanks / Like - 0 Thanks, 1 Likes
NAZ liked this post
-
Seasoned Citizen

You can easily damage the hub by not supporting the hub flange close to the circumference of the stud head when pressing them out. That's what the two posters above have detailed -- their way of supporting the hub flange while using a vise to press the old studs out. You might be surprise how easily one of them little compact car hubs bend.
And using a hammer is a quick way to damage the hub -- this is the wrong tool for the application. And some Primitive Pete types use a BFH on the studs while the hub is still mounted on the spindle which has the potential of damaging the hub flange AND the inner bearing.
If you don't have the correct tool made for R&R of the studs, at least use one of the methods detailed above. And leave the hammer in your toolbox.
Dart Little M 406" SBC 800 HP N/A & 1,100 HP on nitrous, 2-spd Powerglide with trans brake, 6,000 RPM stall converter, narrowed Moser 88 3.90:1 spool with 35-spline gun-drilled axles & Torino bearings, custom parallel four-link, custom tube chassis & roll cage NHRA certified for 8.5-sec (only two FFR Hot Rods have this cert).
33 Hot Rod Super Pro Drag Racer Build:
33 HR NHRA Cert Roll Cage Build
-
Post Thanks / Like - 0 Thanks, 1 Likes
-
Excellent - thanks all for the feedback. I am going back at it in a bit. I am determined to get this job done today. While my boy is at school. And can’t see his dad swearing away at these things. Haha
-
BFH with the backside of the flange supported by vise jaws on either side of the back of the stud
-
I don't have IRS and didn't encounter this during my build, but wanted to point out that it's easy to find simple presses on Craig's List dirt cheap. I bought a 12-ton press for $50.00. It isn't something I use all the time, but nice to have in the shop. If you want something a bit more compact, Harbor Freight sells a 6-ton bench press new for $80.00.
https://www.harborfreight.com/6-ton-...ress-1666.html
-

Moderator

Funny that this comes up today, as I was planning on installing new studs.
I just received "new" axle shafts and unpacked them. They came with new bearings, seals and studs in a bag. And then I noticed that the axles already had studs.. partially installed. Some fully installed and some hanging out. In NEW AXLES? Very odd.. and makes me suspicious that they aren't new. Look at the state of this...
2021-10-07 08.38.39.jpg 2021-10-07 08.38.26.jpg
James
FFR33 #997 (Gen1 chassis, Gen2 body), license plate DRIVE IT says it all!
build thread
My build: 350SBC, TKO600, hardtop, no fenders/hood, 32 grill, 3 link, sway bars, 355/30r19
Previous cars: GTD40, Cobra, tubeframe 55 Chevy, 66 Nova, 56 F100
-
James that doesn’t look right (or new) at all. Threads on the seats of your studs even look worn??
-
Post Thanks / Like - 0 Thanks, 1 Likes
-
Btw I got it done with some old fashioned force. The new ones went in easy with the impact and this little install guideDE56BC07-608E-40F9-AF4C-0C7DD4A6DE2C.jpg9EA537EE-0FAE-420A-917D-66B2A39728A6.jpg ring I found.
-
Post Thanks / Like - 0 Thanks, 1 Likes
-

Originally Posted by
Hoooper

BFH with the backside of the flange supported by vise jaws on either side of the back of the stud
Worked like a charm. No expensive new tools. No trips to the machine shop. THANK YOU


 Thanks:
  Likes:


 Reply With Quote

