-


Frame Dolly and Body Buck Plans for the FFR MkIV Roadster
I have had two requests in the past week for my "Frame Dolly" plan. While I am honored that people seem to like it, and it works well, I must clarify that this isn't even close to "my" design. I got the basic idea from another forum member, sadly I can't remember who or I would give them credit. I started with their idea, modified it for my own needs and height, and this is the end product:
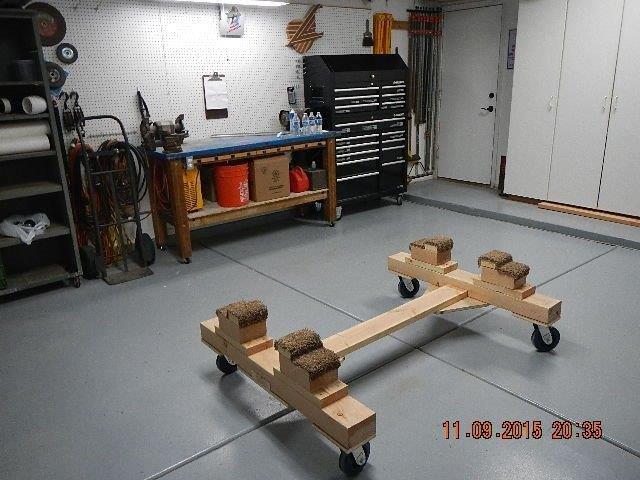
So for those that would like a "plan" for a simple frame dolly, here is mine.
Parts List:
1- 4"x6"x10'
1- 2"x6"x10'
4- Large casters with locks. I used 6", 600lb capacity, HF wheels with no locks. Good size choice, Good weight limit. (2400lbs total. Enough for the car, though it never supported the car with the engine or transmission installed.) BAD choice not getting locking casters. I fought this thing to stay in one place. GET CASTERS WITH LOCKS!!
1- 2'x4' piece of 3/4" plywood.
3 1/2" Deck Screws
2” Deck Screws
16 – 2 ½” hex head lag screws
Wood glue.
Scraps of carpet for padding.
1. Cut off the 4"x6" into two 44" long pieces.
2. Cut the remain 4x6 material into four equal pieces of about 8" each.
3. Cut 5' off the 2"x6".
4. Cut four pieces 2"x6"x12". (Make Eight of these if you are taller and want the frame to be higher off the ground, or if you use smaller casters. You will need an additional four feet of 2x6 for this.)
5. Cut the remaining 1' of 2x6 into four equal 2x6x3" pieces.
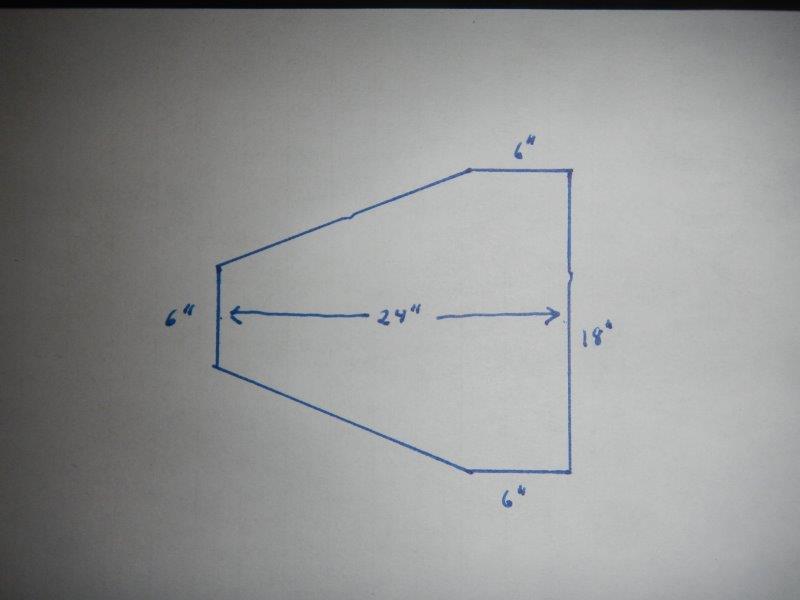
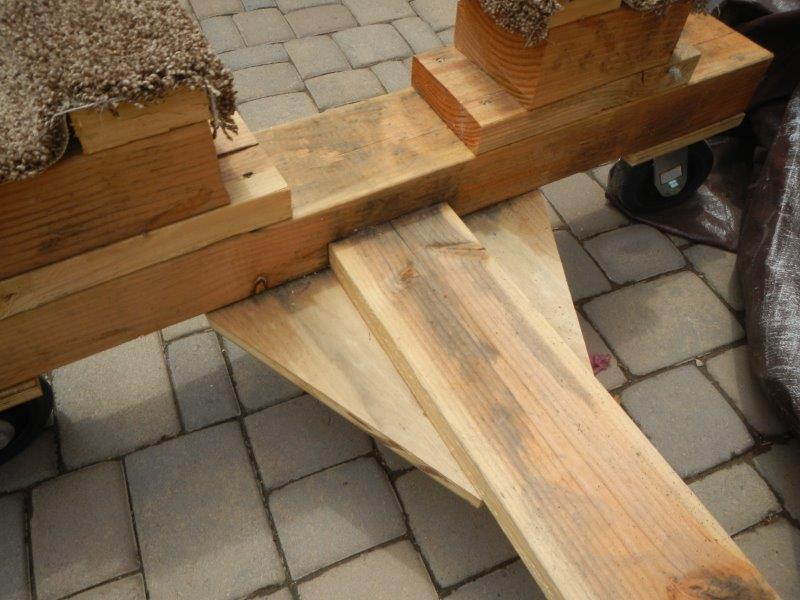
6. Cut the plywood into two pieces 18"x24". I cut the pieces in this way to create more workable space under the car next to the dolly:
7. Cut the remaining plywood into four pieces of ¾” plywood 6”x8” (Big enough to mount your casters to)
Start with the 44" long 4x6's. Find the center point at 22", then draw lines to create a half lap joint centered on the 44" length just wide enough for your 2x6x5'.
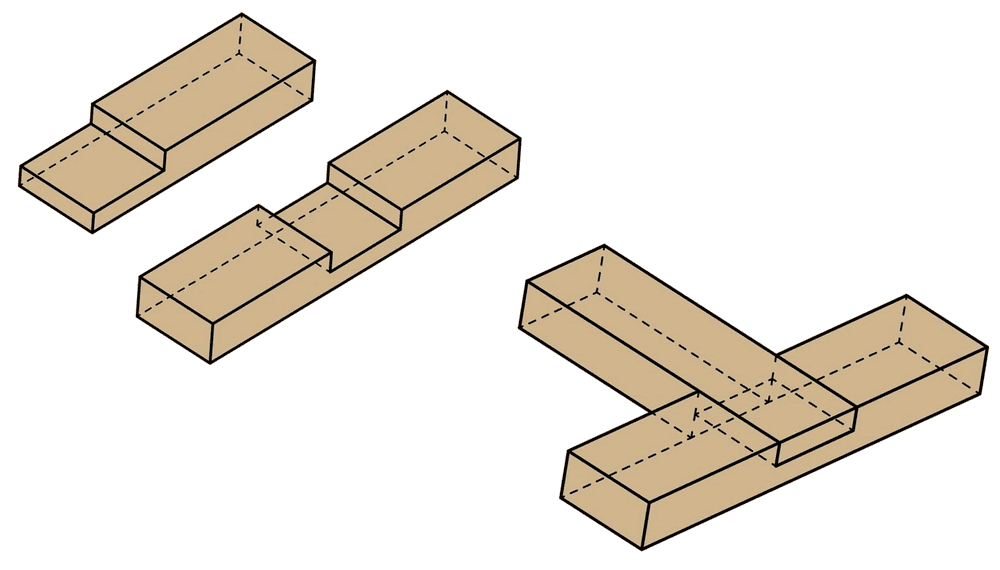
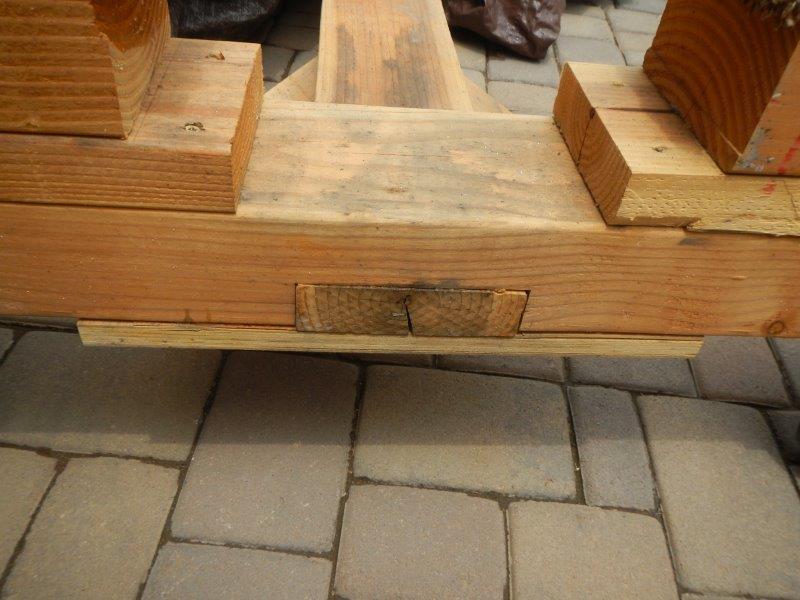
Cut out that lap joint area with either your circular saw or a table saw with a dado blade kit. (Be careful with this method! Ask me how I know!!  ) Cut this notch just deep enough to accommodate the thickness of the 2x6, approximately 1 5/8" deep. When you are done, your 2x6 should just fit into this notch. Glue and screw one end of the 5' 2x6 into each notch of the 4x6. While the 2x6 and notch are on the top (the dolly is upside down), Glue and screw the plywood pieces to the underside to completely encase the 2x6 and stabilize the dolly. When you have it all glued and screwed together, the end of your dolly should look like this:
While the dolly is still upside down, glue and screw the four ¾” caster plates to the ends of the 4x6 on the same side of the 4x6 as the larger piece of plywood. Use 2 ½” lag screws to attach your casters to the caster plates. Turn the dolly right side up so it is now sitting on it’s wheels. Lock the casters in place
Make the frame support pieces:
Center the 12" 2x6 on the 8" 4x6, leaving 2" of overhang on each end. Glue and screw these pieces together. Repeat this process four times, one for each corner. If you want the frame to be higher off the ground, add one more 12" 2x6 to the stack. Turn the stack over, placing the 4x6 at the top. Glue and screw one of the 3" 2x6's on top of the 4x6 to create a notch. your frame will sit on the 4x6 and will be kept from moving by the side of the 3" 2x6. Mount the frame support stacks by gluing and screwing through the 2” extensions of the bottom most plate into the top of the 4x6. The frame rails are 24” on center apart. The vertical edges of the top 3” piece that will be on the inside of the main frame rails should be 19” apart. This will create the flat spots that the 4” main frame rails will sit on at the correct 24” on center location. Put small pieces of carpet over the top to protect the powder coated finish of the frame.
That’s pretty much it. If you like this, use it with my blessing. If you want to modify it for your own purposes, again, go forth in peace. Much thanks to whomever initially created this design. If you will PM me, I would be more than happy to give you credit. I just hope this helps someone make an easy working frame dolly. I found it worked exceptionally well for me. (With the exception of the non-locking casters!! Don’t make that mistake.)
*** EDIT *** 1/1/2018
Bill Haas' Body buck plan which I used, modified, then modified again is shown on posts 14-16 in this thread. Thank you, Bill, for this very helpful and detailed post. Your work continues to help others.
Last edited by Jazzman; 01-01-2018 at 04:31 PM.
-
Post Thanks / Like - 3 Thanks, 3 Likes


 Thanks:
  Likes:


 Reply With Quote
