-
08-21-2022, 05:39 PM
#1561
Senior Member


Originally Posted by
Papa

Well, it seems that my thermostat housing is leaking again. I'm considering trying one of these:

Does anyone have any experience with them? Any other tricks to get a leak-free seal would be helpful. I've tried three different gaskets, three different types of sealer, all with no luck.
Have you looked at one of these? Nice thick billet flange with an O-ring.
https://www.summitracing.com/parts/csi-9111c
-
08-21-2022, 05:42 PM
#1562
Originally Posted by
Mike.Bray
I have. Billet Specialties makes one I like.
Billet Specialties 90620 0 Degree Swivel Thermostat Housing for Small Block Ford https://a.co/d/0Z2McbM
-
Post Thanks / Like - 0 Thanks, 1 Likes
-
08-21-2022, 11:37 PM
#1563
Senior Member

Papa sorry to hear about the water neck leak, FWIW I used a Felpro gasket and on both sides of the gasket applied this gasket sealer.
https://www.amazon.com/Fel-Pro-35440...41164282&psc=1
https://www.amazon.com/Permatex-2207...0007TQW60?th=1
I have the same Ford Motorcraft water neck as you and after 4000 miles has not leaked a drop. I also let it set up for 24 hours before running it. Keeping the thermostat in place is also key using a few drops of silicone on the t-stat to hold it in place on the water neck. After about an hour it will hold it and not move around when you set the water neck to manifold.
Has it leaked since you installed it or did it just start to leak? Have you tightened all the clamps around the hose on the neck, possibly could be coming from clamp rather than the water neck seal?
Last edited by Fman; 08-21-2022 at 11:39 PM.
-
08-22-2022, 06:56 AM
#1564
Originally Posted by
Fman
Papa sorry to hear about the water neck leak, FWIW I used a Felpro gasket and on both sides of the gasket applied this gasket sealer.
https://www.amazon.com/Fel-Pro-35440...41164282&psc=1
https://www.amazon.com/Permatex-2207...0007TQW60?th=1
I have the same Ford Motorcraft water neck as you and after 4000 miles has not leaked a drop. I also let it set up for 24 hours before running it. Keeping the thermostat in place is also key using a few drops of silicone on the t-stat to hold it in place on the water neck. After about an hour it will hold it and not move around when you set the water neck to manifold.
Has it leaked since you installed it or did it just start to leak? Have you tightened all the clamps around the hose on the neck, possibly could be coming from clamp rather than the water neck seal?
I did exactly what you described on the last instal and it seemed fine at first, but then started to leak after a few drives and the dyno tuning session.
-
08-22-2022, 01:42 PM
#1565
Senior Member

Originally Posted by
Papa
Well, it seems that my thermostat housing is leaking again. I'm considering trying one of these:
Does anyone have any experience with them? Any other tricks to get a leak-free seal would be helpful. I've tried three different gaskets, three different types of sealer, all with no luck.
I had a leaking housing and couldn't figure out for the longest time. Turned out one the bolts was a touch too long. It was bottoming out before getting fully tight. I tested it buy putting some washers in and it stopped. I eventually purchases a shorter bolt.
MK4 #10008 - Ordered 10/06/20, Delivered 03/03/21, First Start 7/22/21, First Go Kart 7/24/21
Paint by Metal Morphous 5/14/22, Legally registered 6/8/22, Graduated 7/20/22
Build Thread
https://thefactoryfiveforum.com/show...been-delivered
Complete Kit, Ford 306, Sniper/Dual Sync, T5, Hydraulic clutch
-
08-22-2022, 02:58 PM
#1566
Originally Posted by
Blitzboy54
I had a leaking housing and couldn't figure out for the longest time. Turned out one the bolts was a touch too long. It was bottoming out before getting fully tight. I tested it buy putting some washers in and it stopped. I eventually purchases a shorter bolt.
Thanks,
That's definitely not the cause in my case, but appreciate the help.
Dave
-
08-22-2022, 04:20 PM
#1567
Senior Member

I hate coolant leaks and have spent several months chasing my own so I feel your pain.
Is there any chance that the water neck bolts go into the manifold water passage and coolant is leaking out around the threads?
The only other thing I have had some success with is to lap both mating surfaces with some 180 grit wet/dry. You can lap the water neck on a piece of glass, a machinist surface plate or even the top of a table saw with some WD40. The manifold is trickier when it's on the car but can be done. I usually find a very flat hard piece of maple or birch about 8x4x1" and wrap it with a new sheet of 180 and staple it to the edge of the block. I use it dry and hold it flat on the manifold mating surface and only move the block an inch or two as there i s not much clearance. You have to be very careful that the block is sitting flat and you are not lapping at an angle. Give it a few passes (it shouldn't take much) and see if there are any low spots. Once you have a uniform surface you should be good to go.
Dry assemble the parts and use a light to see if there are any gaps between the two mating surfaces and to make sure the thermostat is seated properly.
Once you are happy with the dry fit, glue the gasket to the manifold first with some Right Stuff and clamp it in place with the water neck. Let that dry overnight and then come back and do the final install of the thermostat and the water neck again with a little Right stuff on the gasket. Wait 24 hours, top up the coolant, and pressure test for leaks. Hopefully, there aren't any.
I personally like the o-ringed BS water necks which I've had good luck with. The above process works for those as well but leaves out the headache of sealants. Just use a little grease on the o-rings.
Scott
FFR #3870 MK II, Spectra Blue/Arctic White, 1974 414W, 10:1, Eagle 4340 crank and rods, KB Pistons, Ported Performer RPM 2.02 heads & intake, QFT SS-650, Comp XR282HR, Quality Roadsters pan, Crane ignition, TKO600, 3.55 gears, 3 link, SA QA1's, Breeze LCA's, Heim joints & VPM F/R bars, Power steering with Hiedts valve, Power brakes, Fortes bump steer kit, 5 bolt axels, SSBC rear brakes, Oil cooler, Pusher fans, Halibrand Cobra III's with Nitto NT555 G2 245/285/17
-
08-22-2022, 06:36 PM
#1568


Originally Posted by
johnnybgoode
I hate coolant leaks and have spent several months chasing my own so I feel your pain.
Is there any chance that the water neck bolts go into the manifold water passage and coolant is leaking out around the threads?
The only other thing I have had some success with is to lap both mating surfaces with some 180 grit wet/dry. You can lap the water neck on a piece of glass, a machinist surface plate or even the top of a table saw with some WD40. The manifold is trickier when it's on the car but can be done. I usually find a very flat hard piece of maple or birch about 8x4x1" and wrap it with a new sheet of 180 and staple it to the edge of the block. I use it dry and hold it flat on the manifold mating surface and only move the block an inch or two as there i s not much clearance. You have to be very careful that the block is sitting flat and you are not lapping at an angle. Give it a few passes (it shouldn't take much) and see if there are any low spots. Once you have a uniform surface you should be good to go.
Dry assemble the parts and use a light to see if there are any gaps between the two mating surfaces and to make sure the thermostat is seated properly.
Once you are happy with the dry fit, glue the gasket to the manifold first with some Right Stuff and clamp it in place with the water neck. Let that dry overnight and then come back and do the final install of the thermostat and the water neck again with a little Right stuff on the gasket. Wait 24 hours, top up the coolant, and pressure test for leaks. Hopefully, there aren't any.
I personally like the o-ringed BS water necks which I've had good luck with. The above process works for those as well but leaves out the headache of sealants. Just use a little grease on the o-rings.
Scott
Thanks, Scott. I did scuff the surfaces as you described using emery cloth followed by lacquer thinner. I ordered the BS neck and will give it a try.
Dave
-
08-25-2022, 03:59 PM
#1569
The Billet Specialties housing came and so I took everything off and cleaned up the intake. The BS neck has two o-rings that are significantly different thicknesses. The bypass didn't come close to sealing and coolant just started dribbling out from below the bypass as soon as I started adding coolant. So, back to square one.
-
08-25-2022, 06:17 PM
#1570
Senior Member
If it's the same as mine there are two o-rings. The thicker one goes into the groove on the mating surface and goes around the bypass. It's a bit of a pain stretching it into the grove (you have to stretch it to get some slack that can then be pushed into the grove around the bypass and it will want to pop back out). It basically seals the entire outer edge of the water neck against the manifold. The second o-ring should already be installed and it sits on the inside edge of the water neck and seals against the flange which allows the neck to rotate. Once you have the thicker main o-ring stretched into position immediately clamp the water neck to the manifold and it will mold into position over a few minutes/hour. Be careful not to pinch the o-ring or let it slip out of the grove as this will cause a leak for sure. Once the o-ring has formed to the groove you can take it off, install the thermostat and bolt it up for good. Scott
I found an old o-ring vs a new one to show you how it molds to the groove.
IMG_0696 (1).jpg
Last edited by johnnybgoode; 08-25-2022 at 07:07 PM.
FFR #3870 MK II, Spectra Blue/Arctic White, 1974 414W, 10:1, Eagle 4340 crank and rods, KB Pistons, Ported Performer RPM 2.02 heads & intake, QFT SS-650, Comp XR282HR, Quality Roadsters pan, Crane ignition, TKO600, 3.55 gears, 3 link, SA QA1's, Breeze LCA's, Heim joints & VPM F/R bars, Power steering with Hiedts valve, Power brakes, Fortes bump steer kit, 5 bolt axels, SSBC rear brakes, Oil cooler, Pusher fans, Halibrand Cobra III's with Nitto NT555 G2 245/285/17
-
08-25-2022, 07:28 PM
#1571
Originally Posted by
johnnybgoode
If it's the same as mine there are two o-rings. The thicker one goes into the groove on the mating surface and goes around the bypass. It's a bit of a pain stretching it into the grove (you have to stretch it to get some slack that can then be pushed into the grove around the bypass and it will want to pop back out). It basically seals the entire outer edge of the water neck against the manifold. The second o-ring should already be installed and it sits on the inside edge of the water neck and seals against the flange which allows the neck to rotate. Once you have the thicker main o-ring stretched into position immediately clamp the water neck to the manifold and it will mold into position over a few minutes/hour. Be careful not to pinch the o-ring or let it slip out of the grove as this will cause a leak for sure. Once the o-ring has formed to the groove you can take it off, install the thermostat and bolt it up for good. Scott
I found an old o-ring vs a new one to show you how it molds to the groove.
IMG_0696 (1).jpg
That's way different than mine. I have a small o-ring that sits in a groove around the bypass, and a larger o-ring that fits around the thermostat. The bypass ring is barely taller than the surface of the housing. When I tightened the two bolts into the manifold, it sits flush along the top, but leaves a slight gap at the bypass.
-
08-26-2022, 08:39 AM
#1572
I went back to the Ford neck and decided to use the Hondabond HT without a paper gasket this round. I put a bit more sealer than I typically would and set the neck in place with hand-tight torque on the bolts. I'll let it sit for an hour or two then torque the bolts and let it cure overnight. Once it cures, I'll trim the excess from the outer edge of the seam. I will report back in a day after the stuff cures.
-
08-26-2022, 09:49 AM
#1573
Papa,
I can't recall if you already tried this or stated a preference on it, but when I got my motor originally the builder (Mike Forte) had used RTV (I believe black IIRC) to seal the water neck to the intake manifold. Maybe an option if your current course of action does not work out and that seems agreeable to you. I'm sure you'll find a solution!
-Brandon
FFR MKIV 8309, FMS 306 Crate w/Edelbrock EFI, T5, 3.55 Three Link, Wilwood Brakes
-
Post Thanks / Like - 1 Thanks, 0 Likes
 Papa
Papa thanked for this post
-
08-26-2022, 02:20 PM
#1574
Senior Member
Sorry to hear you are still having problems. I figured the BS housing would work for sure. Hopefully, the Ford housing will seal this time for you. Scott
FFR #3870 MK II, Spectra Blue/Arctic White, 1974 414W, 10:1, Eagle 4340 crank and rods, KB Pistons, Ported Performer RPM 2.02 heads & intake, QFT SS-650, Comp XR282HR, Quality Roadsters pan, Crane ignition, TKO600, 3.55 gears, 3 link, SA QA1's, Breeze LCA's, Heim joints & VPM F/R bars, Power steering with Hiedts valve, Power brakes, Fortes bump steer kit, 5 bolt axels, SSBC rear brakes, Oil cooler, Pusher fans, Halibrand Cobra III's with Nitto NT555 G2 245/285/17
-
Post Thanks / Like - 1 Thanks, 0 Likes
Papa thanked for this post
-
08-27-2022, 10:41 AM
#1575
Fingers crossed, reconnected all the hoses and filled it with coolant. Fired it up and ran it up to temp to get the thermostat open and burped the air from the system with no leaks. Waiting for it to cool now so I can put the filler cap back on and go for a test drive.
-
Post Thanks / Like - 0 Thanks, 1 Likes
-
08-29-2022, 08:43 AM
#1576
I went for a 40-mile drive yesterday and I still have coolant leaking. The good news is that it appears the water neck is sealed. I think the leak is now at the bypass hose on the water pump. With the clamp as tight as I can get it, the hose can still rotate on the nipple. I ordered a replacement that has the two different ID sizes for the neck and water pump.
-
Post Thanks / Like - 0 Thanks, 1 Likes
-
08-30-2022, 09:11 PM
#1577
My new hose is here, but it will have to wait until the weekend to swap and test.
I added a throttle return spring last week and forgot to mention it. On my 40-mile drive, not a hint of the throttle sticking! At least that issue is sorted.
-
09-02-2022, 12:28 PM
#1578
Okay --- Success, sort of. No more leaks at the water neck or the bypass from the intake to the water pump!!! But, I still see a small leak coming from a brass plug on the intake.  It's a 12mm Allen and I can't get my socket on it with the distributor installed. I just ordered a 12mm ball-end Allen wrench and I'll see if that works. I installed the plug with liquid PTFE thread sealer and may get away with just snugging it up since the threads are tapered. Almost sorted, but not quite.

Last edited by Papa; 09-02-2022 at 12:39 PM.
-
09-02-2022, 12:48 PM
#1579
Senior Member

Great to hear you are close to having it solved.
A word of caution - likely will not happen to you but I would feel terrible if it did and I had not mentioned it. I had a similar situation where I applied a bit too much torque to a ball-end Allen wrench at an awkward angle (it was a smaller size though so you may be fine). It broke off right at ball/neck of the Allen wrench and was stuck in the bolt. Ended up removing all the parts that were originally in the way and removed the bolt with vice grips.
Good luck with whatever approach you choose.
Geoff
Mk III 4880: 3:55 - 3 link, T-5, 347, Holley Sniper/dual sync distributor, Comp Cams XE274HR, Edelbrock RPM Heads
-
09-02-2022, 04:08 PM
#1580
Use a bolt with a 12 mm head, grind every other flat down minutely, where the bolt will come out after tightening.
Use two nuts jam locked for something to wrench on.
Good luck,
Last edited by Railroad; 09-03-2022 at 07:53 AM.
20th Anniversary Mk IV, A50XS Coyote, TKO 600, Trunk Drop Box, Trunk Battery Box, Cubby Hole, Seat Heaters, Radiator hanger and shroud.
-
Post Thanks / Like - 0 Thanks, 2 Likes
-
09-02-2022, 08:01 PM
#1581
Originally Posted by
Geoff H
Great to hear you are close to having it solved.
A word of caution - likely will not happen to you but I would feel terrible if it did and I had not mentioned it. I had a similar situation where I applied a bit too much torque to a ball-end Allen wrench at an awkward angle (it was a smaller size though so you may be fine). It broke off right at ball/neck of the Allen wrench and was stuck in the bolt. Ended up removing all the parts that were originally in the way and removed the bolt with vice grips.
Good luck with whatever approach you choose.
Geoff
I shouldn't need anywhere near the torque required to break the ball off the wrench. I just hope snugging it tighter will seal the threads.
Dave
-
09-03-2022, 09:02 AM
#1582
-
09-03-2022, 06:29 PM
#1583
Wow! This thread is over a million views!
-
Post Thanks / Like - 0 Thanks, 3 Likes
-
09-03-2022, 09:03 PM
#1584
YES!!! No more coolant leaks that I can see! I only did a short drive, but not a drop. I'll get out tomorrow and put a few miles on it to make 100% sure.
-
Post Thanks / Like - 0 Thanks, 5 Likes
-
09-04-2022, 12:25 PM
#1585
I'm declaring success. I just did a 20 mile drive and not a hint of any coolant leaks. What fixed it?
1. I used Hondabond HT sealant without any paper gasket. Like any liquid gasket, I ran a bead of sealant and assembled the part only tightening the bolts until sealant started to squeeze out. Then I let the sealant set for about 30 minutes before snugging the bolts down. I then waited a full 24 hours before putting coolant in the car.
2. For the bypass hose leak, my original setup had 5/8" nipples on both the water neck and water pump. The new Ford neck had a larger 3/4" nipple and I wasn't able to get the original bypass hose on the neck. I had a piece of 3/4" hose with a 90 degree bend and installed that, but I guess the clamp wasn't able to compressed the hose enough on the water pump's 5/8" nipple and leaked under pressure. Replacing that hose with one that fit properly on both connections fixed that leak.
3. Finally, the plug in the intake just needed a bit more snugging for the tapered threads to seal.
Next up, the breather I installed on my shiny new valve covers is creating a fine haze of oil residue directly under it. That's not gonna work for me, so I ordered the same breather but with the hose barb and an oil catch can that will let me put that oil someplace other than my valve cover.
PWR FEVER Upgraded Baffled Oil Catch Can Kit Aluminum Oil Reservoir Tank with 3/8" Strengthened NBR Fuel Line Black 400ml https://a.co/d/2eYGiQe
BILLET SPECIALTIES ROUND PLAIN ALUMINUM 1" PCV BREATHER,POLISHED,1" DIAMETER VALVE COVER HOLE,# 21125 https://a.co/d/9OUVBUK
Last edited by Papa; 09-05-2022 at 06:50 PM.
-
09-06-2022, 08:11 AM
#1586
Senior Member

Originally Posted by
Papa
I'm declaring success. I just did a 20 mile drive and not a hint of any coolant leaks. What fixed it?
1. I used Hondabond HT sealant without any paper gasket. Like any liquid gasket, I ran a bead of sealant and assembled the part only tightening the bolts until sealant started to squeeze out. Then I let the sealant set for about 30 minutes before snugging the bolts down. I then waited a full 24 hours before putting coolant in the car.
2. For the bypass hose leak, my original setup had 5/8" nipples on both the water neck and water pump. The new Ford neck had a larger 3/4" nipple and I wasn't able to get the original bypass hose on the neck. I had a piece of 3/4" hose with a 90 degree bend and installed that, but I guess the clamp wasn't able to compressed the hose enough on the water pump's 5/8" nipple and leaked under pressure. Replacing that hose with one that fit properly on both connections fixed that leak.
3. Finally, the plug in the intake just needed a bit more snugging for the tapered threads to seal.
Next up, the breather I installed on my shiny new valve covers is creating a fine haze of oil residue directly under it. That's not gonna work for me, so I ordered the same breather but with the hose barb and an oil catch can that will let me put that oil someplace other than my valve cover.
PWR FEVER Upgraded Baffled Oil Catch Can Kit Aluminum Oil Reservoir Tank with 3/8" Strengthened NBR Fuel Line Black 400ml
https://a.co/d/2eYGiQe
BILLET SPECIALTIES ROUND PLAIN ALUMINUM 1" PCV BREATHER,POLISHED,1" DIAMETER VALVE COVER HOLE,# 21125
https://a.co/d/9OUVBUK
Congratulations!
It must feel good to get that problem finally put to bed. You have been fighting that leak for some time.
-----------------------------------------
Jeff
-
Post Thanks / Like - 1 Thanks, 0 Likes
Papa thanked for this post
-
09-09-2022, 05:42 PM
#1587
-
Post Thanks / Like - 0 Thanks, 2 Likes
-
09-17-2022, 09:44 PM
#1588
Well, I found out that my strategy to prevent the oil haze on my valve cover was not the best way to go. With the new valve covers, I installed an oil fill cap (sealed) and the breather that was venting directly on the valve cover. I replaced the breather with the exact same style Billet Specialties PCV cap and routed the vent to an oil catch can. Today, I found out that that was a big mistake. Evidently, the PCV by itself won't let enough of the crank case pressure pass and I ended up pushing oil out of the dip stick tube! What a mess. So, I reverted to the Ford Racing breather cap that I was using before doing the stacks and that seems to be enough to let the pressure out and vent through the catch can. I'll put a few miles on the car tomorrow and will see if that fixed the issue.
-
09-18-2022, 01:34 PM
#1589
Good news! It looks like the oil issue is resolved; lesson learned.
-
09-18-2022, 05:28 PM
#1590
Senior Member
Originally Posted by
Papa
Good news! It looks like the oil issue is resolved; lesson learned.
It makes sense without the PVC valve connected to vacuum it wouldn't work. So you just have a breather in the valve cover without a PVC valve connected to a catch tank? That's what I'm thinking of doing.
-
09-18-2022, 05:59 PM
#1591
Originally Posted by
Mike.Bray
It makes sense without the PVC valve connected to vacuum it wouldn't work. So you just have a breather in the valve cover without a PVC valve connected to a catch tank? That's what I'm thinking of doing.
Yep -- breather vented through the catch can and no issue with over-pressure. Now I just need to be sure to monitor the catch can to be sure I'm not pumping a ton of oil through the breather.


Last edited by Papa; 09-18-2022 at 06:12 PM.
-
Post Thanks / Like - 0 Thanks, 1 Likes
-
09-24-2022, 10:00 PM
#1592
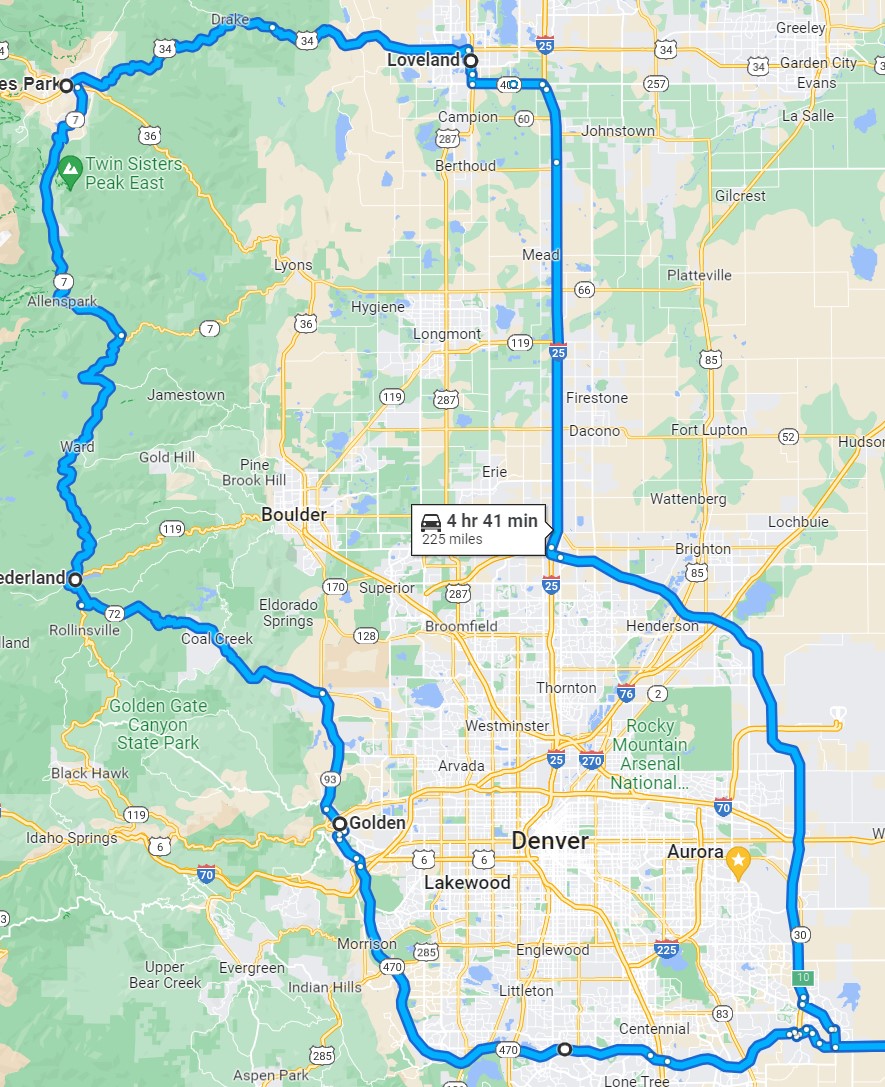
The weather is getting cooler and more comfortable here. I did a great Cars & Coffee this morning, and then put the car on a lift to work on a few things. First task was to wipe down the underside of the car as my oil problem made a mess. Next was to address a drooping passenger side pipe. The hanger mount bolt was loose and had seized. I had to cut it off and replace it, but it looks like that should correct the droop. Finally, I swapped the oil pressure sending unit with the new one that Speed Hut sent me a few months ago. My oil pressure reading had become erratic, and Speed Hut sent me a new sending unit. The new one is a bit different. Instead of the (+) and (-) posts, the new one has two spade connectors. One for the signal and one for a warning light. The ground is made through the threads, so I just wrapped up the unused ground wire. I may actually put a warning light in the dash for the oil pressure someday.
Tomorrow I'll be doing a long 200+ mile drive with the Mile-Hi Cobra Club. We're meeting in Golden and then heading up Golden Gate Canyon and over the Peak-to-Peak Highway into Estes Park to view the fall colors as the Aspens are blazing.

From there, we head down the Big Thompson Canyon into Loveland for lunch and back home. This will be a good test of the new injection setup and I hope to gain a little confidence in the car again after all the recent issues. The last few short drives have been trouble-free, and the car is running great.
Last edited by Papa; 09-25-2022 at 05:23 PM.
-
09-25-2022, 08:59 PM
#1593
The drive today was a pretty good test of the car with nearly five hours of drive time.
The car performed perfectly with one exception. The oil pressure gauge was still showing erratic readings. What else can I look at that would cause this? The pressure used to sit at about 40 PSI and go up to around 60 when driving at speed. The gauge now shows 60 PSI at idle and will come up to 80 and bounce between 80 and 100 PSI randomly. I'll be changing the oil next weekend and will get an oil analysis done as well as cut open the filter and inspect it. I suspect this may simply be a gauge issue.
Dave
-
Post Thanks / Like - 1 Thanks, 3 Likes
-
09-26-2022, 05:16 AM
#1594
Not a waxer

The one wire Speedhut oil pressure sender is notoriously unreliable and inaccurate. I believe the newer style 2 wire one is improved.
Jeff
-
Post Thanks / Like - 2 Thanks, 0 Likes
-
09-26-2022, 05:27 AM
#1595
Steve >> aka: GoDadGo

Papa Dave,
What Amazing Views You All Have Up There!
Our drives haven't been anywhere near as fun.
Thanks for taking us along for the ride.
Steve (GDG)
Last edited by GoDadGo; 09-26-2022 at 07:29 AM.
-
Post Thanks / Like - 0 Thanks, 1 Likes
 Papa
Papa liked this post
-
09-26-2022, 08:17 AM
#1596
-
Post Thanks / Like - 1 Thanks, 1 Likes
Papa thanked for this post
Papa liked this post
-
09-26-2022, 08:14 PM
#1597
Senior Member
What a beautiful drive! i have driven those roads several times, and the Cobra is the perfect car for them. I look forward to the day I can drive mine there.
Many congratulations on building a fantastic car! You inspire us all.
-------------------------------
Jeff
-
Post Thanks / Like - 1 Thanks, 1 Likes
Papa thanked for this post
Papa liked this post
-
09-26-2022, 09:35 PM
#1598
Always wanted to visit Denver/Boulder area. Hope to drive with you in my own Mk4 with you someday Dave! That drive looks like a blast!
-
Post Thanks / Like - 0 Thanks, 1 Likes
Papa liked this post
-
09-26-2022, 09:42 PM
#1599
Originally Posted by
facultyofmusic
Always wanted to visit Denver/Boulder area. Hope to drive with you in my own Mk4 with you someday Dave! That drive looks like a blast!
You have some amazing coastal drives near you that would be a blast! If you ever find yourself in the area, give me a shout. Looking at your avatar picture, we may be in the same line of work!
Dave
-
10-09-2022, 09:14 PM
#1600
I posted another part of the last Mile-Hi Cobra Club drive form 9/25/22 on YouTube:
I need to get a better mount for the camera that is a little more stable. My wife and I are going to Hawaii next spring, and I'm actually looking into upgrading the camera to a new GoPro Hero 11 Black since it is waterproof to 10m deep without a separate case and up to 60m with a separate case.


 Thanks:
  Likes:


 Reply With Quote

