-
02-24-2018, 07:06 PM
#441

Originally Posted by
Papa

Another go-cart ride today, this time with the new GoPro. Now if I can just get the mount to stay put.
Awesome man, I cant wait to get to the carting portion of my build, Its going to be so sweet.
-
02-24-2018, 09:18 PM
#442


Here's one more video from today's go-cart sessions. I passed my first car! Well, the car was actually stopped, but I can dream...
I have a couple of things I'm still sorting out before getting the body on the car.
1. The left rear brake is dragging - you can hear it when I'm applying the brakes to stop. I can freely move the car in spite of the noise, so I'm wondering if I just need to bed in the pads and get some wear on them or if I should try to adjust something.
2. My correct headers will be delivered this Thursday and I'll hopefully eliminate the backfires.
3. The front suspension is settling a bit and I've got a noticeable toe-out on the right side. Need to get that back in line.
4. I need to flush and refill the cooling system with clean coolant.
5. I'm running really rich without the O2 sensor in the exhaust and have fouled a couple of plugs already. My remedy for this until the O2 sensor is installed is just to be sure to get the engine to full operating temperature before shutting it off; no quick start-stop cycles.
Other than that, a final check on all the torqued bolts and I think I can get the body on the car. I do want to roll on some bed liner before it goes on. This is getting exciting!
Last edited by Papa; 02-24-2018 at 11:12 PM.
-
02-25-2018, 06:13 AM
#443
Senior Member

Great videos!! I'm getting excited for you!!
Higgy
-
02-25-2018, 10:37 AM
#444
Originally Posted by
HiggyMK4#????
Great videos!! I'm getting excited for you!!
Higgy
Thanks, Higgy. It is an exciting time in the build.
-
02-25-2018, 02:04 PM
#445
Dave-
Congratulations on the go karting. I am really excited for you, and know you must be stoked! The car looked and sounded good, and looks like she is handling great.
I forgot how pretty it was out there in Parker! It's been a while, but you sure don't forget how nice it is!
I also have a severe case of garage envy. Just thought I would share that...
By the way, you passed that guy like he was standing still. HAHA
Keep up the good work Sir!
Regards,
Steve
-
02-25-2018, 02:30 PM
#446
Originally Posted by
WIS89
Dave-
Congratulations on the go karting. I am really excited for you, and know you must be stoked! The car looked and sounded good, and looks like she is handling great.
I forgot how pretty it was out there in Parker! It's been a while, but you sure don't forget how nice it is!
I also have a severe case of garage envy. Just thought I would share that...
By the way, you passed that guy like he was standing still. HAHA
Keep up the good work Sir!
Regards,
Steve
Steve,
I love the area, especially when everything turns green in the late spring - early summer. This time of year is not so attractive with all the brown; so much for "Colorful Colorado". Thanks for the comments on the garage, too. I'm definitely spoiled with the garage space. The house has about 900 square feet (tandem 4-car), and the shop is 1200 square feet. A second building is definitely popular in the neighborhood. Some of the new homes being built are having them built right along with their homes.
Dave
-
03-02-2018, 05:18 PM
#447
Member

Originally Posted by
Papa
Not too much exciting to talk about today. I attached the cover on the passenger side F panel.
I also spent some time applying Thermo-Tec to the rest of the cockpit:
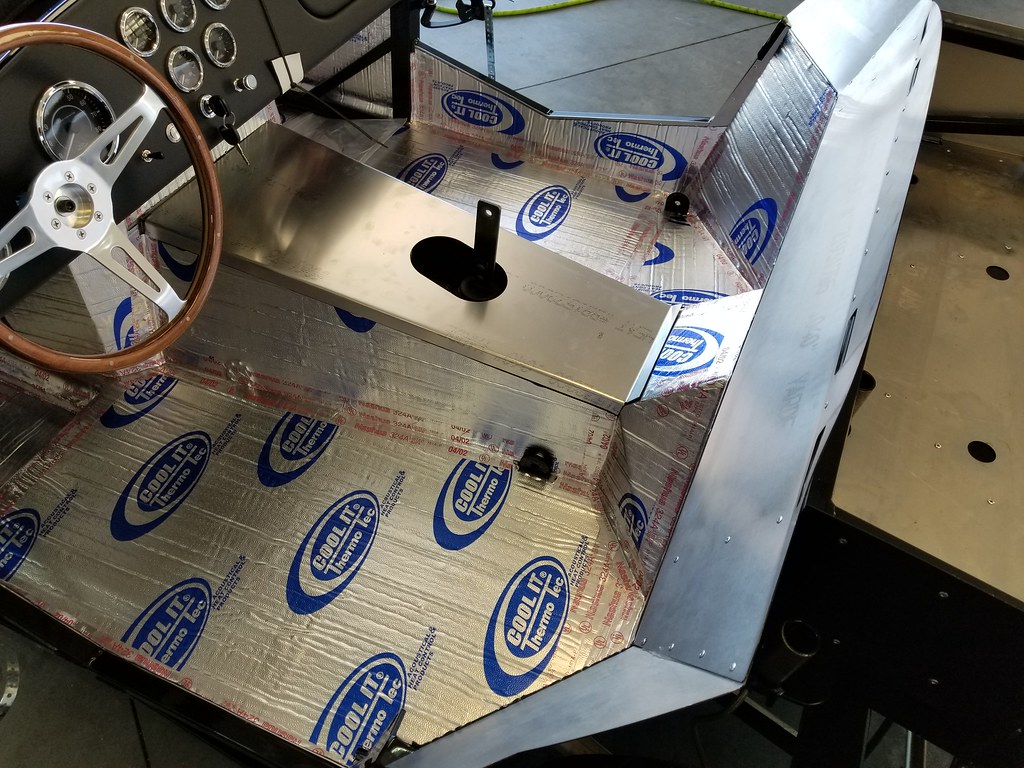
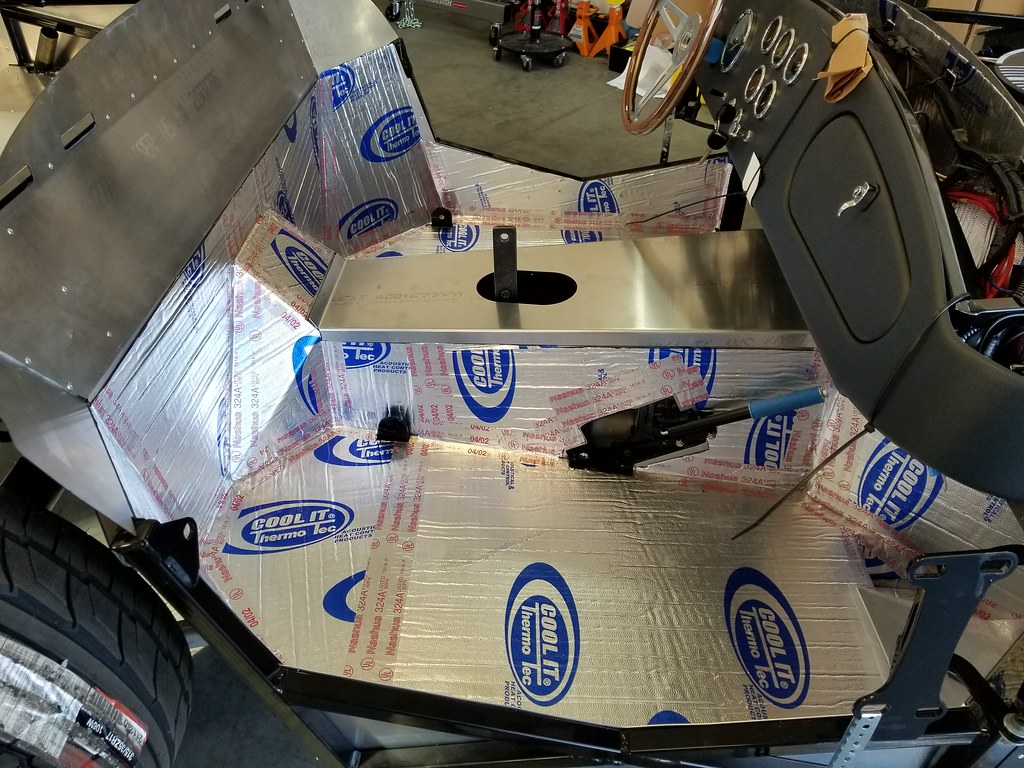
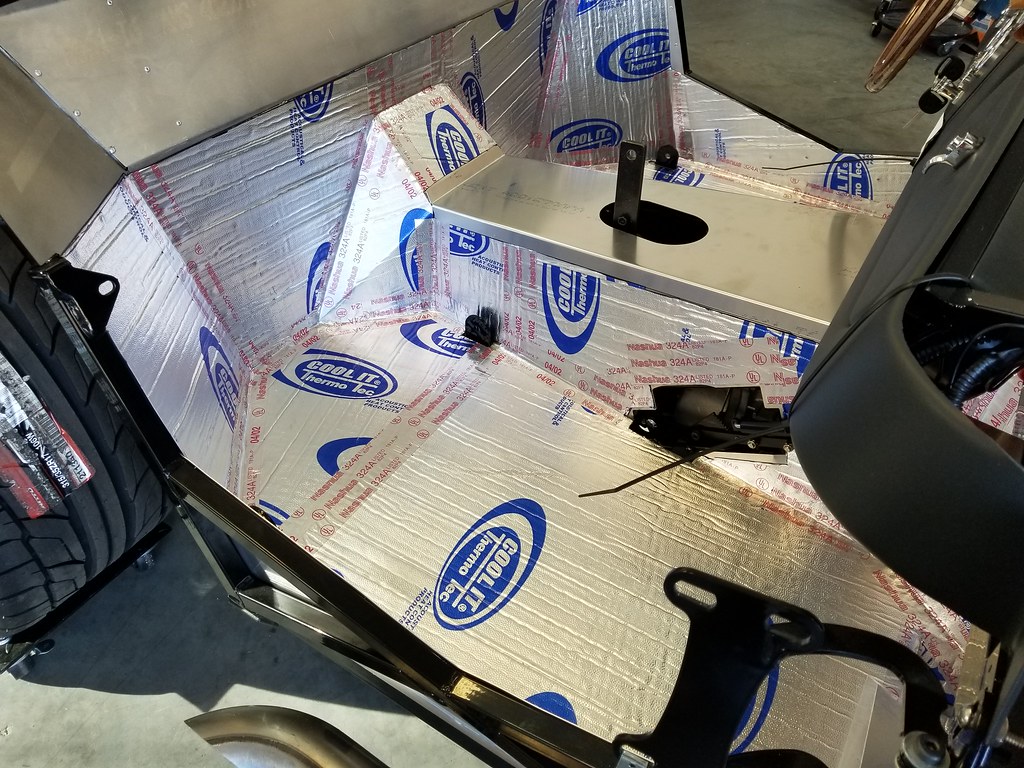
As you can see, I didn't take it all the way up on the rear of the cockpit. I'm undecided if I should or not. I still have another roll, so I can add the remaining pieces later. I also still need to do the outside panel on the driver's foot box that is still uninstalled for now.
Applying the mat is tedious, but a tip for those that are thinking about doing the same. As you make templates for each piece (I used paper from the boxes all the parts shipped in), keep in mind that your template for a panel on one side will likely be mirrored on the other. Just flip the template over and use it to do the other side.
Thanks for the GREAT build threads Papa!!!
I at eating this up as my MK 4 is coming in July!
Love the tips and the links!
Congrats on the awesome go cart rides!!
A sincere thank you
Jimmy
-
03-02-2018, 06:20 PM
#448
Senior Member

Originally Posted by
Papa
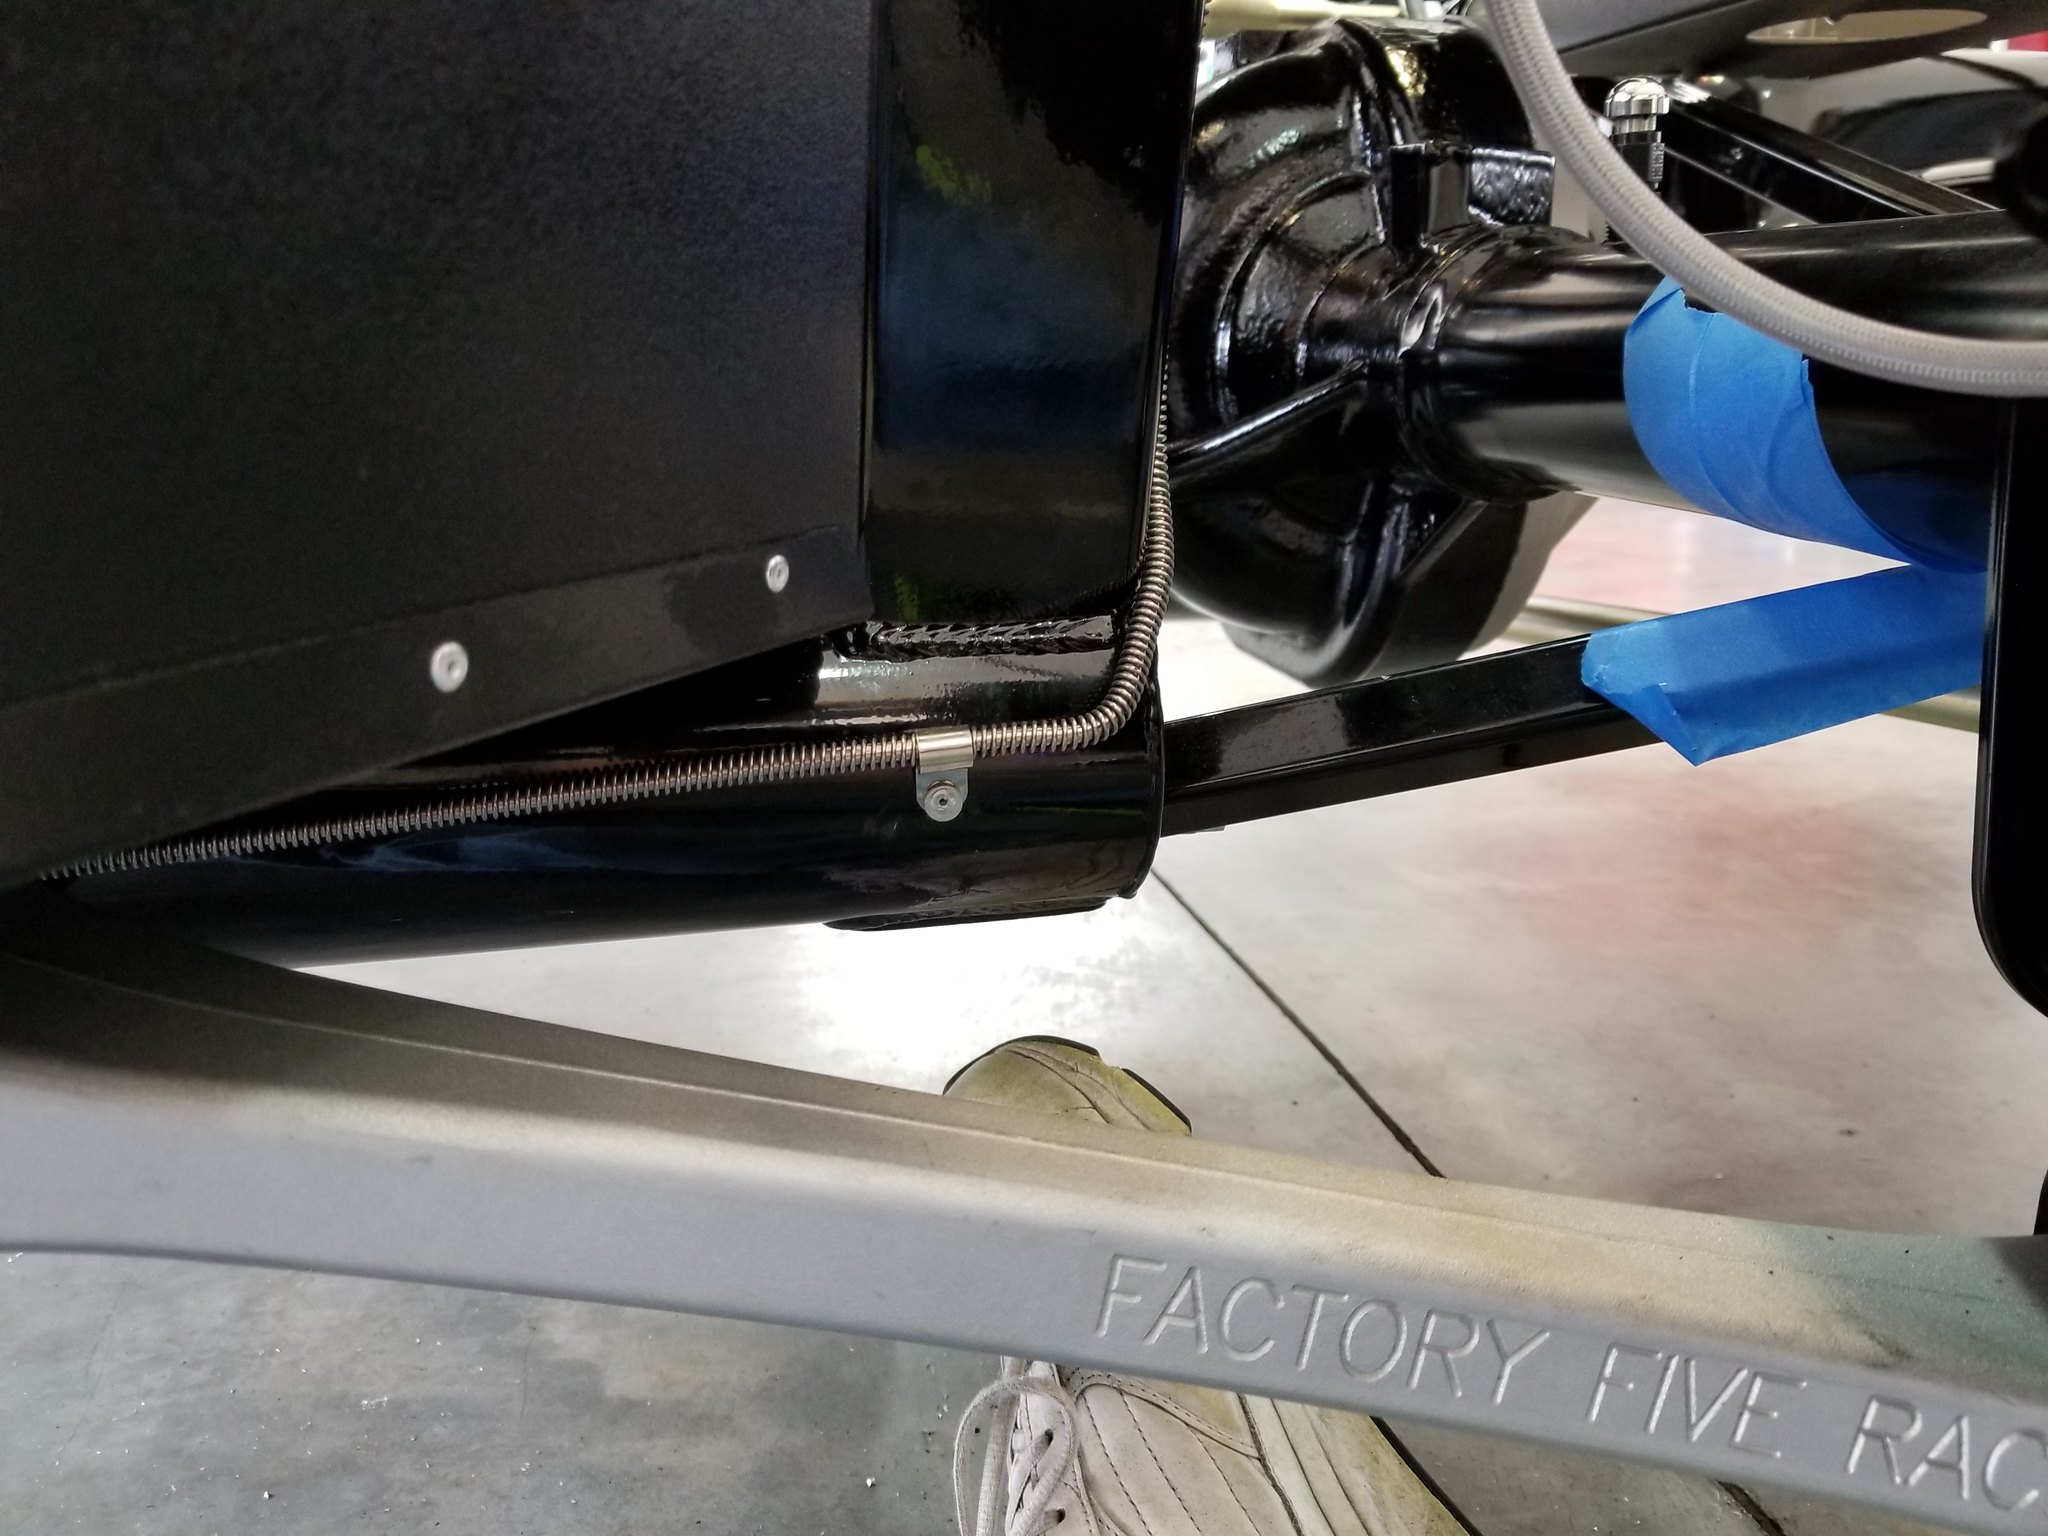
Looks great. Could you tell me what is the name of that spiral product on the outside of your lines on the underside of the frame? I assume that is to offer a bit more protection to the Nicopp line. Looks interesting, thanks!
David
-
03-02-2018, 06:32 PM
#449
Hey Dave, where did you find rubber grommets for your brake reservoir lines going thru the front drivers side wall? I'm having a hard time finding ones that will cover the thickness of the wall. Thanks, Don.
-
03-02-2018, 07:45 PM
#450
Originally Posted by
shark92651
Looks great. Could you tell me what is the name of that spiral product on the outside of your lines on the underside of the frame? I assume that is to offer a bit more protection to the Nicopp line. Looks interesting, thanks!
David
David,
The product you are looking for is called gravel guard. You can find it in various lengths (I used 8') on Amazon for very reasonable prices.
https://www.amazon.com/s/ref=nb_sb_n...6+gravel+guard
Dave
Last edited by Papa; 03-02-2018 at 09:20 PM.
-
03-02-2018, 07:47 PM
#451
Originally Posted by
Tex2131
Hey Dave, where did you find rubber grommets for your brake reservoir lines going thru the front drivers side wall? I'm having a hard time finding ones that will cover the thickness of the wall. Thanks, Don.
I got the grommets from McMaster-Carr. They have pretty much any size you could want.
https://www.mcmaster.com/#9307k887/=1bsw0a6
Dave
Last edited by Papa; 03-02-2018 at 09:15 PM.
-
03-02-2018, 10:38 PM
#452
[QUTE=Papa;315613]I got the grommets from McMaster-Carr. They have pretty much any size you could want.
https://www.mcmaster.com/#9307k887/=1bsw0a6
Dave[/QUOTE]
Thanks Dave. You are my hero, I'm following your build closely and it's given me some great advice, hints, and inspiration.
-
03-02-2018, 11:01 PM
#453
Originally Posted by
Tex2131
[QUTE=Papa;315613]I got the grommets from McMaster-Carr. They have pretty much any size you could want.
https://www.mcmaster.com/#9307k887/=1bsw0a6
Dave
Thanks Dave. You are my hero, I'm following your build closely and it's given me some great advice, hints, and inspiration.
No problem - happy to help.
Dave
-
03-04-2018, 06:25 PM
#454
-
03-05-2018, 07:39 AM
#455
Brandon #9196

can't wait to see the trans tunnel. Nice work and quick at that!
-
03-05-2018, 09:10 PM
#456
Originally Posted by
TexasAviator
can't wait to see the trans tunnel. Nice work and quick at that!
Thanks, Brandon. I hope to pick it up tomorrow or Wednesday. Congratulations on the first start!
Dave
-
03-06-2018, 10:11 PM
#457
I picked up my transmission tunnel cover today. It looks pretty good!

Last edited by Papa; 04-22-2018 at 07:55 PM.
-
03-06-2018, 10:31 PM
#458
Brandon #9196
-
03-07-2018, 02:04 PM
#459
I've been lurking here for a little while, and just wanted to say that I'm really enjoying your build thread. When I build my Roadster (some day!) I plan to use the same engine, so all the detail you've provided has been fantastic. The car is looking great!
~ Ron
-
03-07-2018, 02:19 PM
#460
Senior Member

That looks great Papa. All the small details are really paying off.
Started dreaming of a Cobra around 1987
Purchased Complete Kit 6/9/2017, Delivered 9/4/2017, Rolling Chassis 3/30/2018, Engine Dyno'ed 3/4/2022, Engine installed 8/27/2022
Click here for my build thread
Serial #9158
Design Engineer at BluePrint Engines
-
03-07-2018, 02:35 PM
#461
Enjoying the videos PAPA! Can't wait to hear that thing opened up a little more!!!!!!!!!!!!!
-
03-07-2018, 08:37 PM
#462
Originally Posted by
TexasAviator
nicely done
Originally Posted by
SirSmartyPants
I've been lurking here for a little while, and just wanted to say that I'm really enjoying your build thread. When I build my Roadster (some day!) I plan to use the same engine, so all the detail you've provided has been fantastic. The car is looking great!
~ Ron
Originally Posted by
Yama-Bro
That looks great Papa. All the small details are really paying off.
Originally Posted by
BluePrintEngines
Enjoying the videos PAPA! Can't wait to hear that thing opened up a little more!!!!!!!!!!!!!
Thanks fellas! I'm still having fun with the build, but my first couple of tastes of driving the car have me getting excited about getting it finished and on the road. The engine feels so strong yet very streetable. The handling even without a good alignment is amazing and the power steering feels just right.
Dave
-
03-07-2018, 10:10 PM
#463
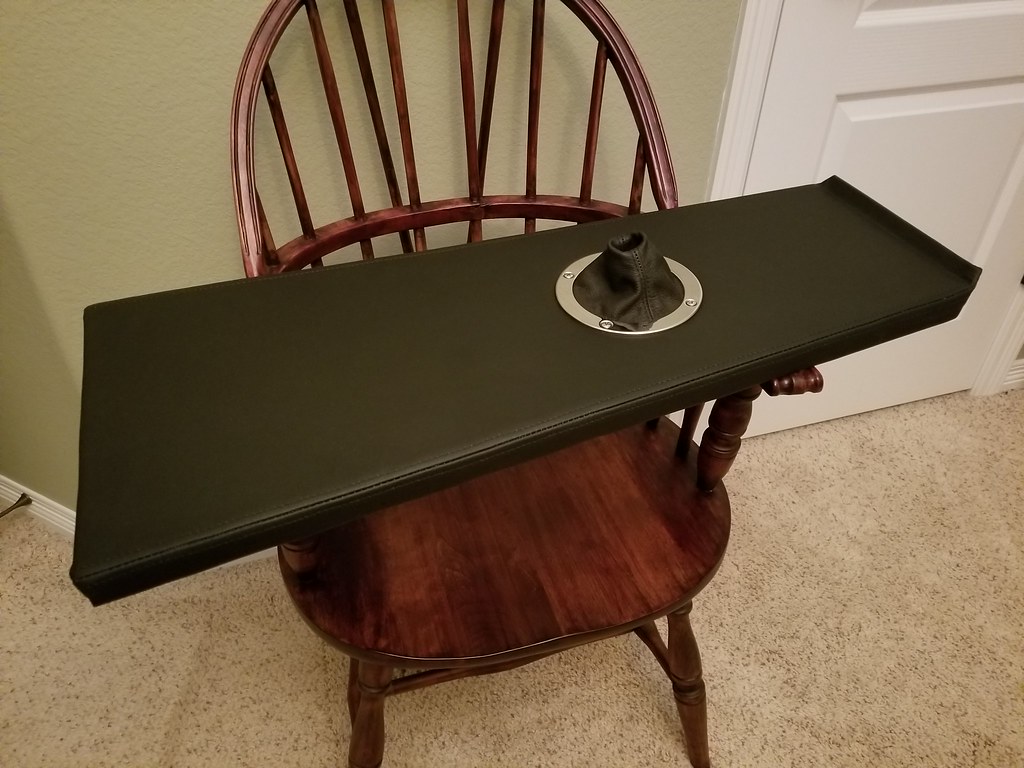
Aw man.....you've done it again with the upholstered tunnel. More $$$ coming out of my pocket. By the way, I couldn't help but take a small shot at you today. See "This is starting to get serious" posted in the roadster forum today.
Last edited by Tex2131; 03-07-2018 at 10:13 PM.
-
03-07-2018, 10:21 PM
#464
Originally Posted by
Tex2131
Aw man.....you've done it again with the upholstered tunnel. More $$$ coming out of my pocket. By the way, I couldn't help but take a small shot at you today. See "This is starting to get serious" posted in the roadster forum today.
Ha! I've spent more than enough of my money, so I'm happy to help others spend theirs! Awesome engine! By the way, it only cost me $135.00 to have the tunnel cover done.
-
Post Thanks / Like - 0 Thanks, 1 Likes
-
03-10-2018, 11:33 AM
#465
I installed the seat heater switches into the newly upholstered tunnel cover.


Now off to the garage to run the rest of the wiring.
Last edited by Papa; 04-22-2018 at 07:57 PM.
-
Post Thanks / Like - 0 Thanks, 1 Likes
-
03-10-2018, 03:36 PM
#466
-
03-10-2018, 05:59 PM
#467
 Administrator

Originally Posted by
Papa
I picked up my transmission tunnel cover today. It looks pretty good!
Not just pretty good, that looks GREAT!

FFR 5369 Pin Drive, IRS, Trigos, Torsen, Wilwoods, FMS BOSS 302 "B" cam , Mass-flo. CA SB100 (SPCN) Registered
Delivered 4/23/06. "Finished" 4/2012 (still not done!)
-
03-11-2018, 10:20 AM
#468
Member
Originally Posted by
Papa
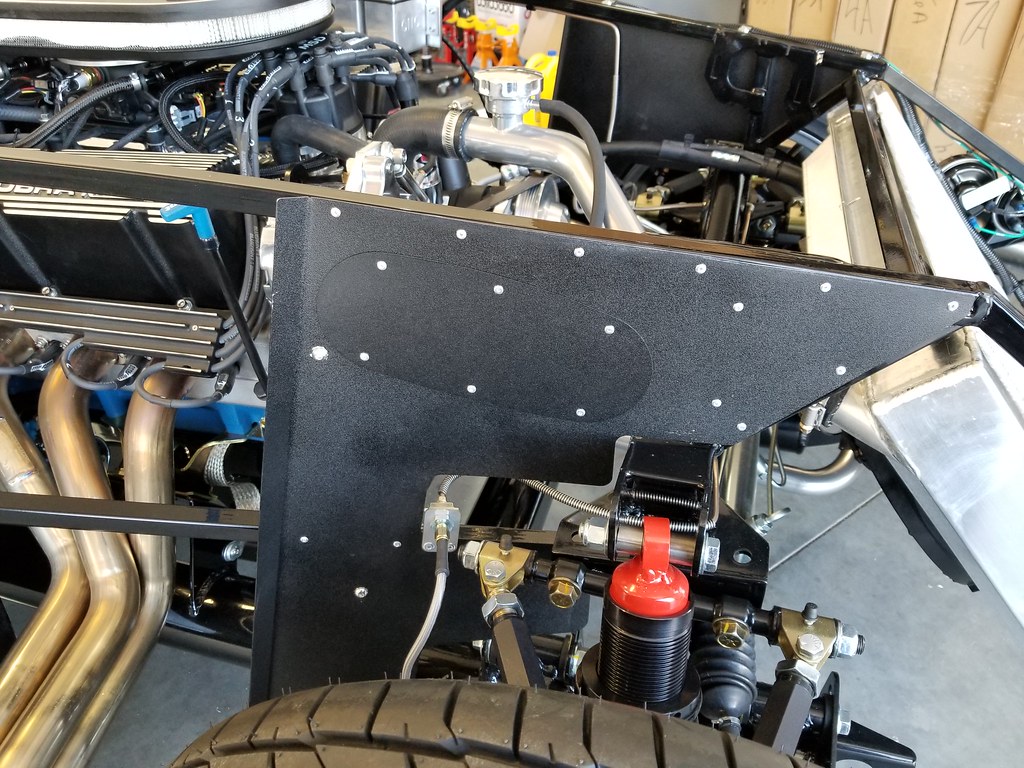
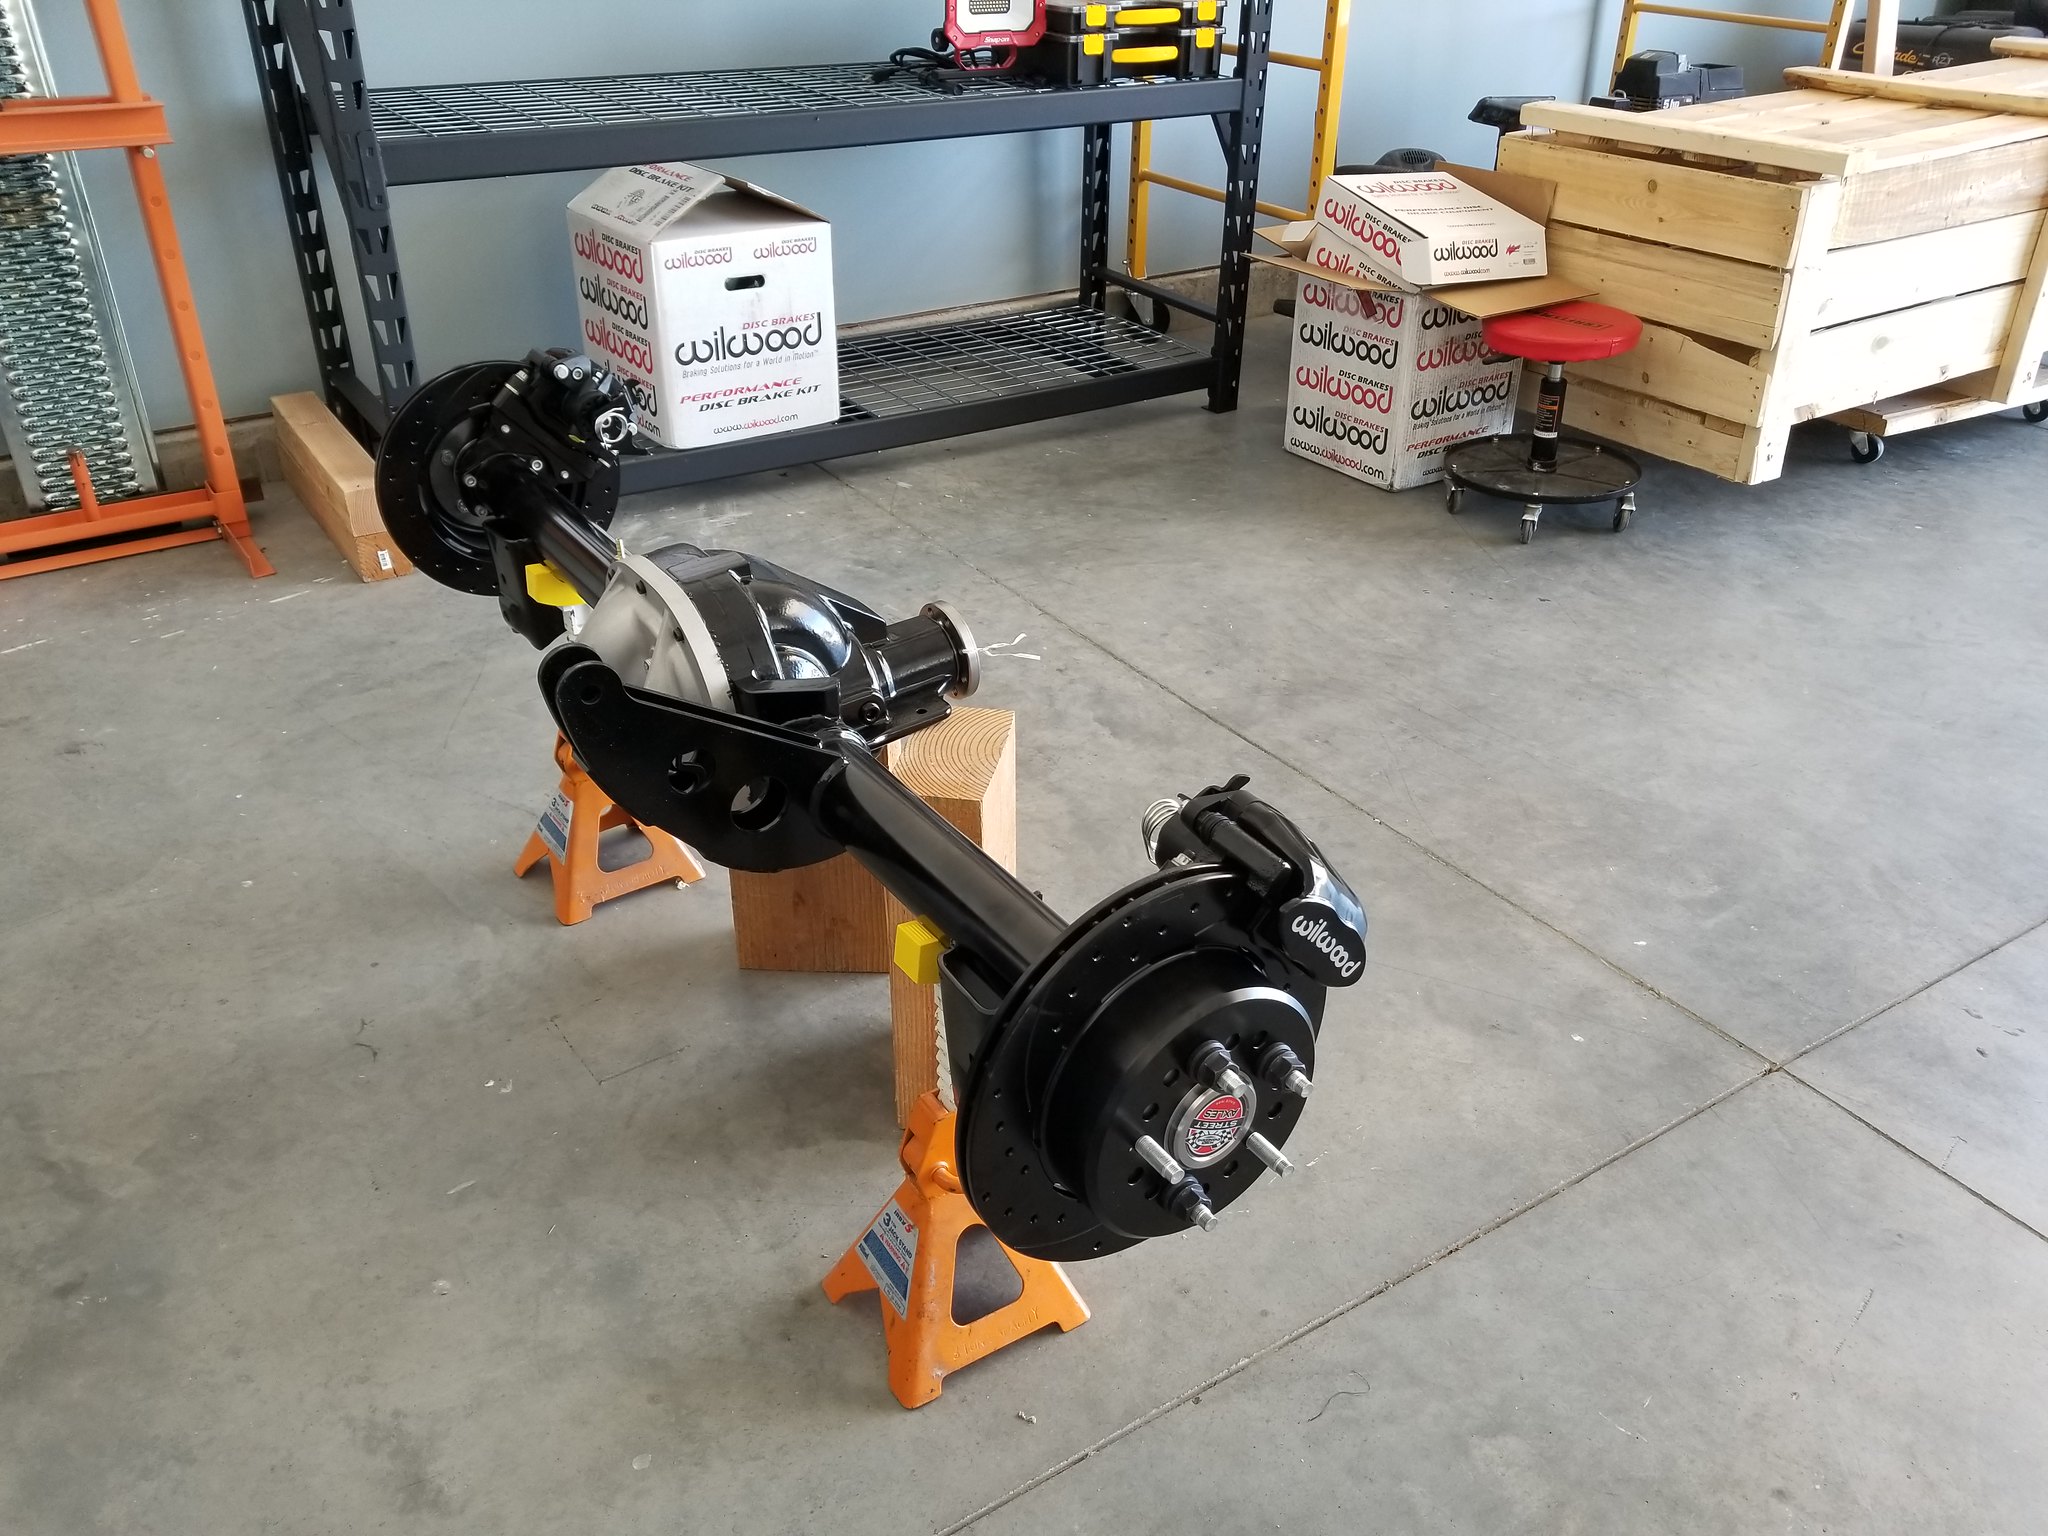
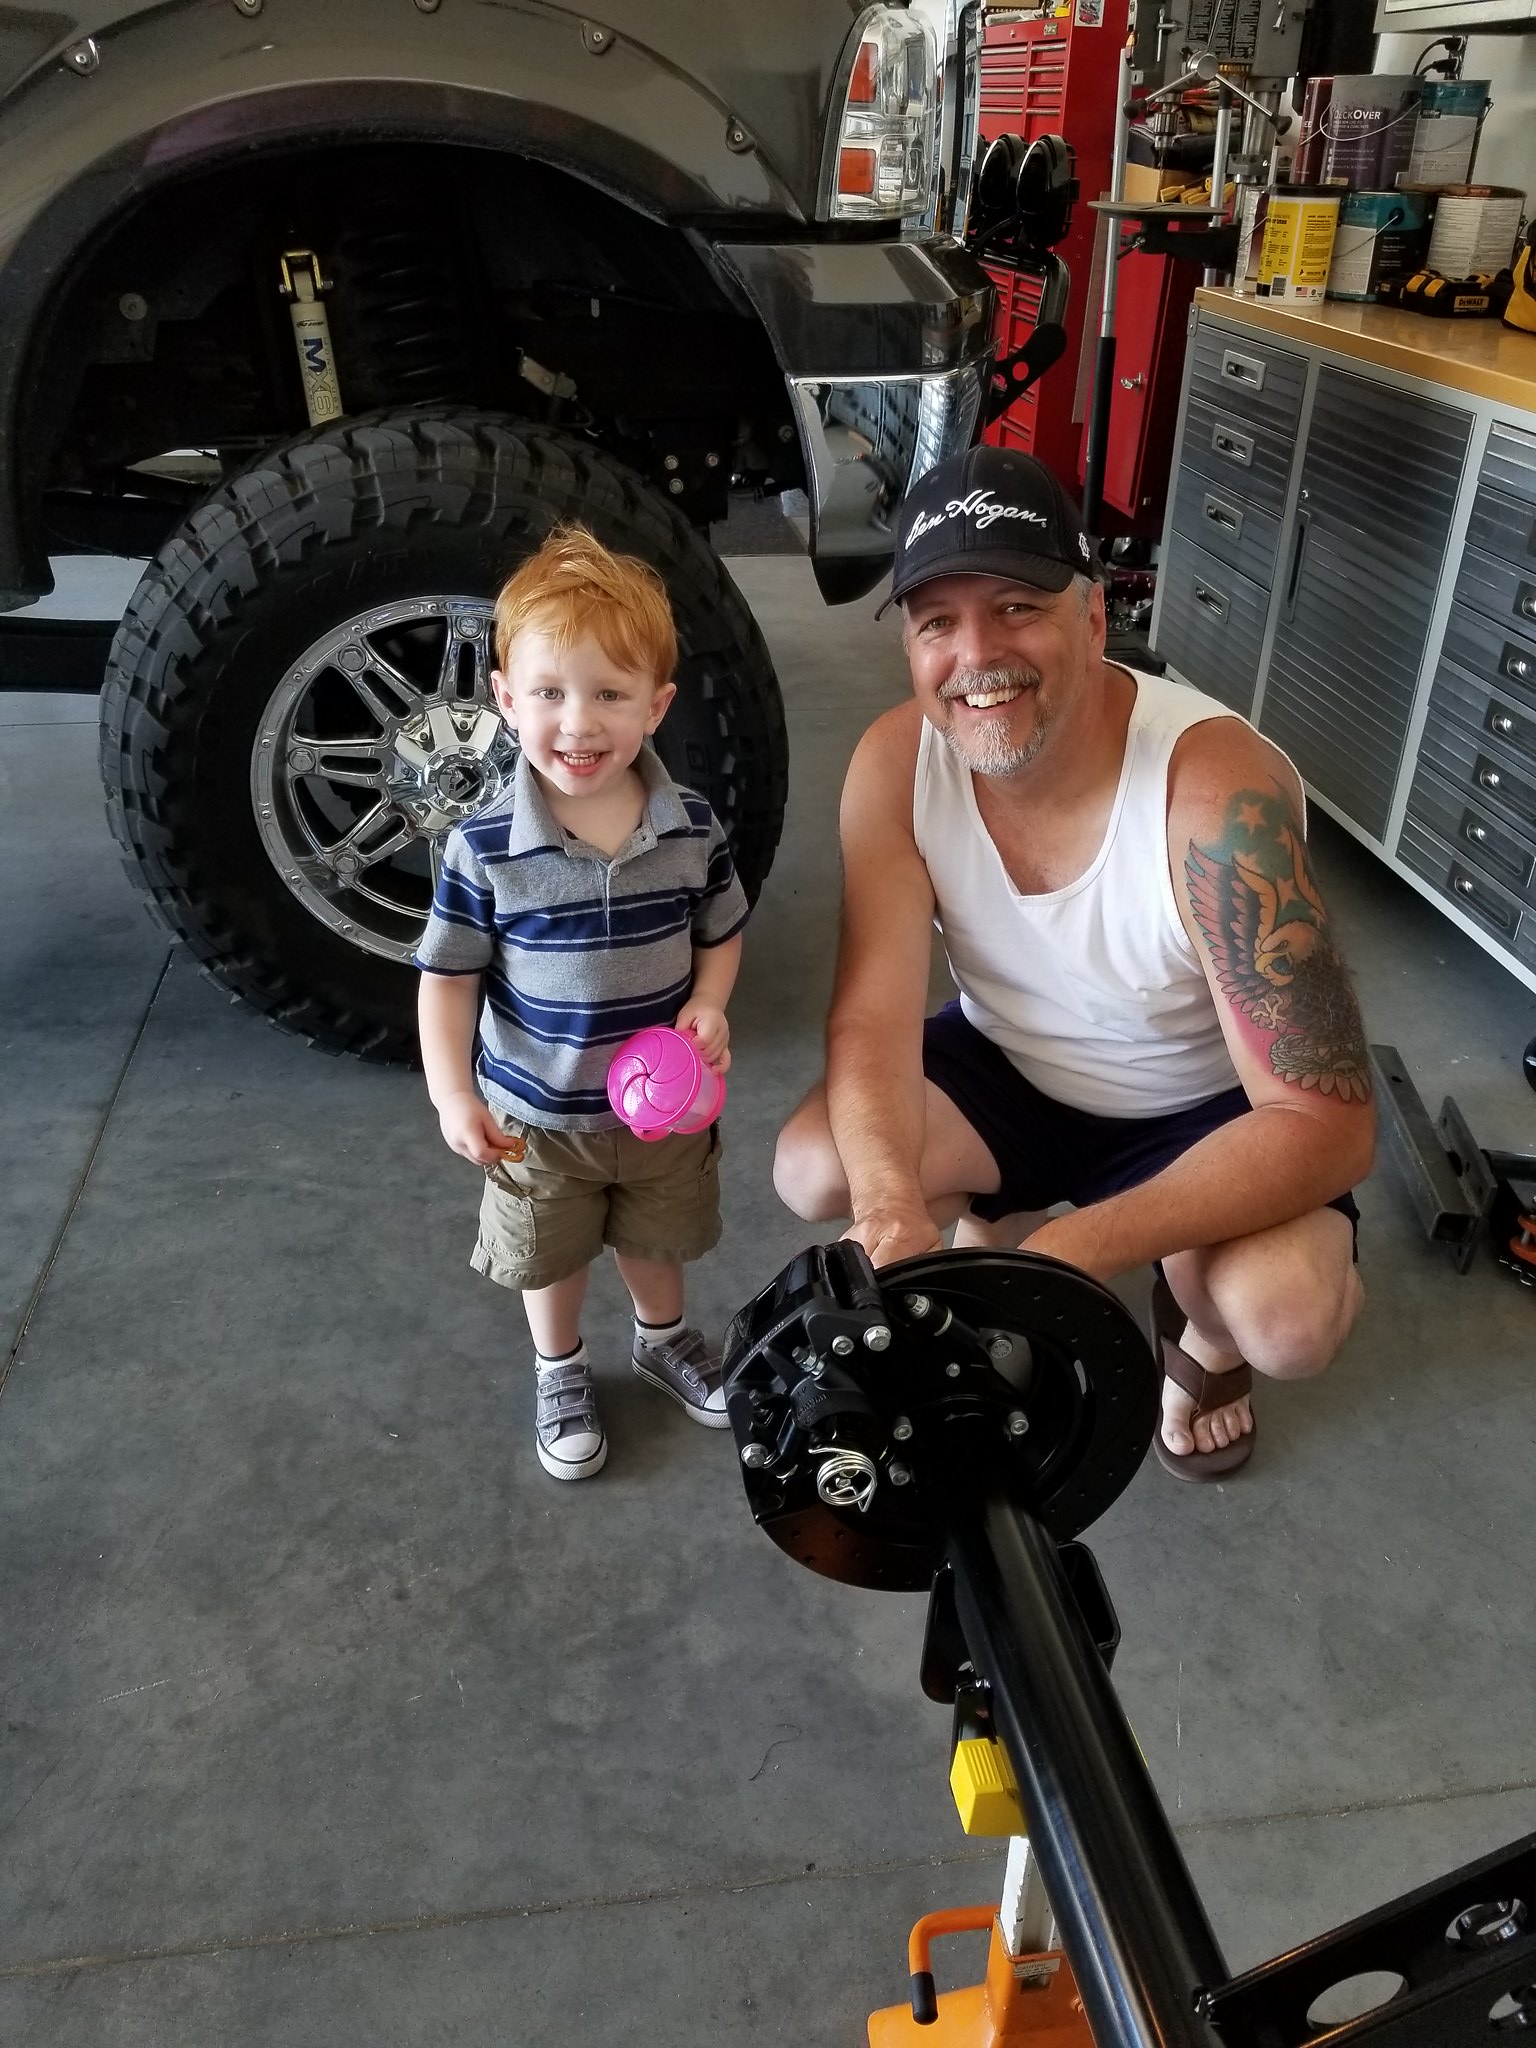
Thank you all for the kind words of encouragement! So, to catch this new thread up, I received my rear axle and Wilwood brakes a couple of weeks ago. I installed the brakes on the axle and replaced the chrome diff cover with the cast cover.

I also had my grandson "help" me. He installed a lug nut for me and was so proud of himself!
Last Saturday, the bulk of the kit arrived and my wife and I spent about six hours doing inventory. I found a few missing items and e-mailed Courtnie. She was right on getting the parts ordered for me. I also have several back ordered parts that should hopefully start arriving soon. Today, I got a shipping notification for two boxes coming from FFR.
Papa
In your first post you stated My car will use a Moser 8.8 3-link rear axle with Wilwood brake upgrade front and back.
Did you upgrade the brakes through Factory Five and what did you upgrade them to????
I purposely delayed my kit order a couple months cause I was undecided on a few things ( this being one).
Thanks and have a great day
Jimmy
-
Post Thanks / Like - 0 Thanks, 1 Likes
-
03-11-2018, 12:53 PM
#469
Originally Posted by
Scubasommer
Papa
In your first post you stated “My car will use a Moser 8.8 3-link rear axle with Wilwood brake upgrade front and back.”
Did you upgrade the brakes through Factory Five and what did you upgrade them to????
I purposely delayed my kit order a couple months cause I was undecided on a few things ( this being one).
Thanks and have a great day
Jimmy
Jimmy,
The kit comes with brakes for the front axel, but not the rear. I wanted Wilwood brakes, so the upgrade was for the front (eliminates the standard and delivers the Wilwood), and then a matching set for the rear. I ordered them with my kit from FFR. All you have to do is select the color of caliper you want (red or black) and then pick the type of rear axle you have. If you want black calipers and have a solid rear axle, check the following:

Note that the Wilwood brakes on the FFR configurator are designed to work with 17" or 18" wheels only. If you plan to run a more vintage 15" wheel and want Wilwood brakes, contact Gordon Levy for options.
Dave
Last edited by Papa; 04-22-2018 at 08:01 PM.
-
03-11-2018, 05:54 PM
#470
-
03-17-2018, 10:07 PM
#471
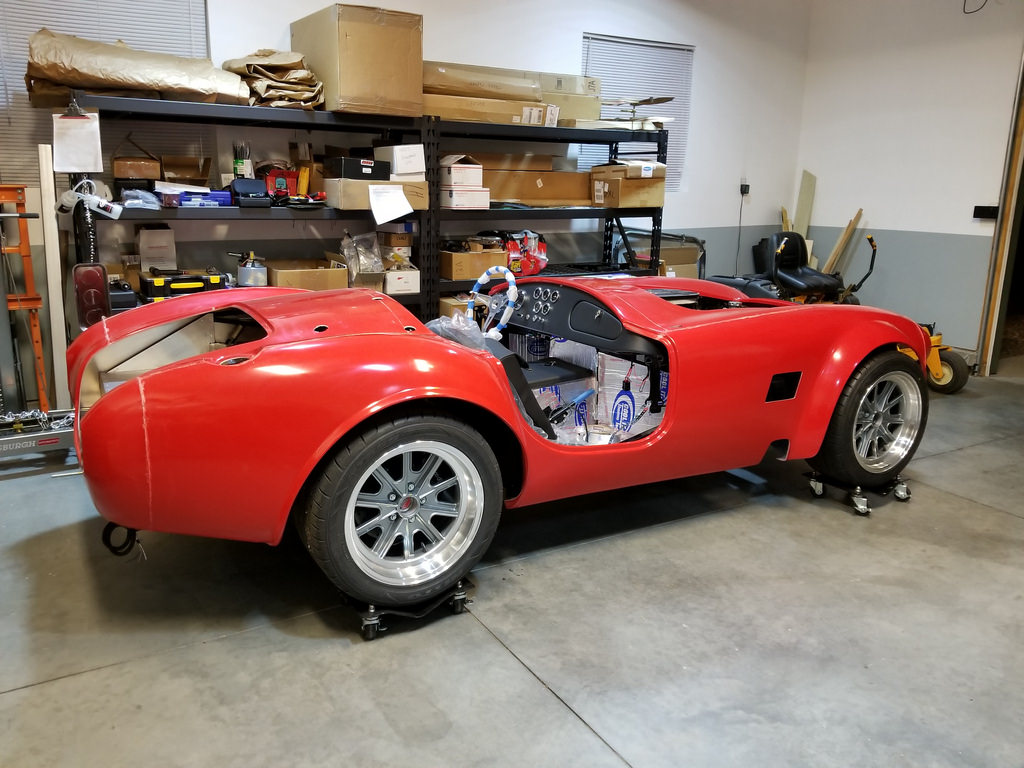
The body went back on today for the first time since the car was delivered last June. Overall, it fit's pretty good. I'll have some additional trimming to do in a couple of spots.

Last edited by Papa; 04-22-2018 at 08:05 PM.
-
03-17-2018, 11:34 PM
#472
Hi Dave
Your workmanship is great and the car reflects it. Its getting closer and closer to me seeing you driving it around town
Ron
-
03-18-2018, 11:48 AM
#473
#9160

Originally Posted by
Papa
Here's one more video from today's go-cart sessions. I passed my first car! Well, the car was actually stopped, but I can dream...
I have a couple of things I'm still sorting out before getting the body on the car.
1. The left rear brake is dragging - you can hear it when I'm applying the brakes to stop. I can freely move the car in spite of the noise, so I'm wondering if I just need to bed in the pads and get some wear on them or if I should try to adjust something.
2. My correct headers will be delivered this Thursday and I'll hopefully eliminate the backfires.
3. The front suspension is settling a bit and I've got a noticeable toe-out on the right side. Need to get that back in line.
4. I need to flush and refill the cooling system with clean coolant.
5. I'm running really rich without the O2 sensor in the exhaust and have fouled a couple of plugs already. My remedy for this until the O2 sensor is installed is just to be sure to get the engine to full operating temperature before shutting it off; no quick start-stop cycles.
Other than that, a final check on all the torqued bolts and I think I can get the body on the car. I do want to roll on some bed liner before it goes on. This is getting exciting!
Hi Dave,
Did you ever get an answer about your dragging brake? I have the exact same symptoms on my right rear. I remember it was very tight on the install. Thinking it will wear in but it would be nice to hear what others have done.
Brien
MK4 - complete kit - Blueprint 427W - Holly Sniper EFI - TKO 600 .64 - 3.55 3 link - 17" Halibrands
-
03-18-2018, 04:31 PM
#474
Originally Posted by
BB767
Hi Dave,
Did you ever get an answer about your dragging brake? I have the exact same symptoms on my right rear. I remember it was very tight on the install. Thinking it will wear in but it would be nice to hear what others have done.
Brien
Brien,
I can rotate the wheels by hand with no problem, so I think I may just need to wear in the pads. For now I'm not going to do anything.
Dave
-
03-18-2018, 04:31 PM
#475
Originally Posted by
rrrose
Hi Dave
Your workmanship is great and the car reflects it. Its getting closer and closer to me seeing you driving it around town
Ron
Thanks, Ron. I appreciate the kind words.
Dave
-
03-24-2018, 02:51 PM
#476
Senior Member

Hi Dave,
I just installed the body today. Not really sure what to look for or do next. I agree, overall the body fits very good.
Please share some hints/tips. Much appreciated!
Martin
-
03-24-2018, 03:10 PM
#477
Originally Posted by
broku518
Hi Dave,
I just installed the body today. Not really sure what to look for or do next. I agree, overall the body fits very good.
Please share some hints/tips. Much appreciated!
Martin
Martin,
I'm paying close attention to the "Jeffs" on the body fitment advice.
Link to my initial fitting questions thread: https://thefactoryfiveforum.com/show...ting-Questions
The following was taken from another thread:
I don't use the inside spacer tubes and let the trunk lid dictate the final rear distance as one of the last positioning adjustments. Here's my order---
Drop the body over the chassis and send it forward so that the body's door flange is just ahead of the chassis' striker tab as seen here:
body_fit.jpg
If you haven't trimmed back the underside return of the cowl roll you may find that it hits the dash and won't let you get that far forward without doing so.
Once the body is draped on I run lengths of all thread through the body and into the couplers at the rear. These are not tightened yet; they are just holding the tail up.
I then move on to the front to install the QJ bolts and spacers and button them down to locate the nose (makes no difference whether you're using the early split type or the full length tubes).
Next is the windshield and front splash panels.
Now comes the fun part...the doors. Notice that I have not mentioned anything about locking down the body on the underside along the rocker panels. This is where lots of give & take comes into play because you are trying to strike a balance at 4 different places; the upper front of the door where it meets the cowl, the upper rear where it meets the rear cockpit opening, plus the lower front and lower rear. To further complicate things we're dealing with both horizontal as well as vertical interfaces along the upper part of the doors. Adjusting for one invariably affects at least one other. And people wonder why body men drink I've had the best luck adjusting for the door tops first. While dealing with the top area of the doors do not completely ignore the lower door edge's intersection with the main body but keep in mind that the lower body can be moved in/out independently with little to no effect to the upper cockpit openings. On both Mk3s and Mk4s I've found that the passenger door has been easier than the driver's side; once the adjustments were made to get the tops in order it just took a bit of outward movement to the lower body to have it meet the bottom edge of the door. On the other hand with the drivers side once the tops were fitting the bodies had to go in at the lower front corner of the doors and move out a great deal at the rear. I've found that these cars and bodies are quite consistent and one of those constants is that you'll need to push the rocker panel in as far as possible in front of the driver's door and pull it out at the rear. I can assure you that you aren't going to get all 4 corners to meet perfectly but your goal is to get them as close as possible so that they operate without interference and to minimize the bodywork necessary to match contours between the main body and moveable panels.
Once you've accomplished that you lock down the body along the rocker panels and move on to the hood and trunk lid. The Mk4 trunk hinges allow movement in all axis so it's pretty straightforward to get it adjusted on the top and by using the coupler method for the bumper/QJ attachments along with nuts rather than spacers on the backside of the body you can move the valance in or out as necessary to match the bottom edge of the lid by adjusting the nuts on the inside in conjunction with spacer tubes outside. You may find that you need to trim back the rearmost lip of the trunk floor aluminum, and perhaps also the vertical edge of the trunk side aluminum to allow the valance to pull inward to meet the lid. For the hood I leave the hinges just loose enough to allow them to move somewhat freely then close and position it in the hole and get underneath and tighten the nuts.
That's what works for me---your mileage may vary
Jeff
I hope to pull mine back off and start making the first adjustments over the next week or so.
Dave
Last edited by Papa; 03-24-2018 at 03:14 PM.
-
03-24-2018, 06:01 PM
#478
Senior Member

You are at this point with 9 months under your build? Great job Papa! I hope to be as expedient and detailed as you are with my build. I'll use yours as a reference staple. Thanks for the detailed thread!
-
03-24-2018, 07:41 PM
#479
Originally Posted by
cv2065
You are at this point with 9 months under your build? Great job Papa! I hope to be as expedient and detailed as you are with my build. I'll use yours as a reference staple. Thanks for the detailed thread!
Thank you. No need to rush through the build as it is probably the best part of the FFR experience. I originally assumed that it would take me two years to build the car, but even as a complete novice, with the help of this forum I've cruised right along. As the end of the year approached, I set a goal to get to first start before the year ended. That artificial goal put a lot of stress on getting it done and after that I decided that I wouldn't set any artificial deadlines. My issue now is that my painter is waiting and has room to do my car and I'm not ready to give it to him. So, if I miss his window, I'll drive it in gel coat until he slows down again.
Dave
-
03-25-2018, 05:10 PM
#480


 Thanks:
  Likes:


 Reply With Quote