-
09-30-2019, 06:59 AM
#401
Senior Member

I worked on two of the under-dash support brackets today. They came out pretty good. This is one of the things you'll never see unless you are laying under the dash...so consider yourself lucky if you are reading this post. 
These Factory Five supplied aluminum brackets had a square hole in them to hold some mustang parts that I'm not using, so I re-purposed them to house the foot box heater vents. The driver's side will also have the switch for the driver's seat heater. I installed nut-serts into them so they can be easily removed for behind the dash access and removal of the dash.

Here's the bracket installed. This picture is looking up at the underside of the dash on the passenger side. Notice the heater in the background. It's a short run for the heater duct to this vent. I also put the nut-serts in the frame.

Here's looking down from the top. I had a lot of the #10 decorative screws and finish washers left over from attaching the dash to the frame. I figured they'd look good fastening these brackets too. I'll probably shorten the screws later.

Here's a view of the driver's side from underneath. Adding these brackets really stiffened up the dash.
This is a picture from two weekends ago that I never posted. I added a hole for the push button that controls the speedometer on the bottom lip of the dash under the high beam switch. This lets you control the GPS functions (like 1/4 mile times) and reset the trip-meter.

I put the button that controls the clock on the opposite side...
Last edited by Yama-Bro; 09-30-2019 at 09:16 AM.
Started dreaming of a Cobra around 1987
Purchased Complete Kit 6/9/2017, Delivered 9/4/2017, Rolling Chassis 3/30/2018, Engine Dyno'ed 3/4/2022, Engine installed 8/27/2022
Click here for my build thread
Serial #9158
Design Engineer at BluePrint Engines
-
09-30-2019, 11:24 AM
#402
#9160

Hi Frank,
Still following your progress, looks like really nice work! I've been on the road now about a year, love my BluePrint engine! Hey, if I'm not mistaken you have the fuel pump safety switch mounted upside down. I was told to mount it with the button down but I am sure someone more knowledgeable will chime in with either confirmation or correction. Keep up the great work!
Your (almost) sister car, #9160
(Brien)
MK4 - complete kit - Blueprint 427W - Holly Sniper EFI - TKO 600 .64 - 3.55 3 link - 17" Halibrands
-
10-01-2019, 08:43 AM
#403
Senior Member

Originally Posted by
BB767

Hi Frank,
Still following your progress, looks like really nice work! I've been on the road now about a year, love my BluePrint engine! Hey, if I'm not mistaken you have the fuel pump safety switch mounted upside down. I was told to mount it with the button down but I am sure someone more knowledgeable will chime in with either confirmation or correction. Keep up the great work!
Your (almost) sister car, #9160
(Brien)
Hi! I'm glad you are liking your BPE engine! Thanks for pointing out my fuel pump switch. I thought I put this in the way the manual calls out, but maybe I was looking at the manual upside down. LOL. The wiring for it would be a lot nicer the other way around. I did a search to see if I could find any other posts about it, but I couldn't find much. If no one replies, I'll post it in the main roadster section and get the straight poop on it.
Started dreaming of a Cobra around 1987
Purchased Complete Kit 6/9/2017, Delivered 9/4/2017, Rolling Chassis 3/30/2018, Engine Dyno'ed 3/4/2022, Engine installed 8/27/2022
Click here for my build thread
Serial #9158
Design Engineer at BluePrint Engines
-
10-01-2019, 09:11 AM
#404
David aka Ducky2009

Originally Posted by
Yama-Bro
...... fuel pump switch.
Frank, If you turn the switch over and hit a hard bump in the road, it will kick out and shut off the engine. You have it installed correctly.
Nice way to install your heater vents!
MK4 Build #9035 Delivered 2/17/17, First Start & Go-Kart 6/2/17, Licensed 9/1/17
Paint - Lightning Blue Metallic, No Hood Scoop, No Stripes
Gen 2 Coyote Engine & TKO-600. Solid Axle, 8.8-3.55, Power Steering, Power Brakes, Dual Roll Bars
Heater and Glove Box, Drop Trunk, Wipers, Radio, FFR Vintage Gauges, Custom Dash
Build Thread:
http://thefactoryfiveforum.com/showt...MK4-Build-9035
-
Post Thanks / Like - 0 Thanks, 1 Likes
-
10-01-2019, 10:26 AM
#405
Senior Member
Originally Posted by
Ducky2009
Frank, If you turn the switch over and hit a hard bump in the road, it will kick out and shut off the engine. You have it installed correctly.
Nice way to install your heater vents!
And there we have it. Love this forum. Thanks Ducky!
Started dreaming of a Cobra around 1987
Purchased Complete Kit 6/9/2017, Delivered 9/4/2017, Rolling Chassis 3/30/2018, Engine Dyno'ed 3/4/2022, Engine installed 8/27/2022
Click here for my build thread
Serial #9158
Design Engineer at BluePrint Engines
-
10-01-2019, 07:42 PM
#406
#9160
Originally Posted by
Yama-Bro
And there we have it. Love this forum. Thanks Ducky!
Totally agree, I stand corrected!
MK4 - complete kit - Blueprint 427W - Holly Sniper EFI - TKO 600 .64 - 3.55 3 link - 17" Halibrands
-
10-01-2019, 10:07 PM
#407
Senior Member
Originally Posted by
BB767
Totally agree, I stand corrected!
No prob. You had better flip yours over. Thanks for bringing up the concern though. It never hurts to double check.
Started dreaming of a Cobra around 1987
Purchased Complete Kit 6/9/2017, Delivered 9/4/2017, Rolling Chassis 3/30/2018, Engine Dyno'ed 3/4/2022, Engine installed 8/27/2022
Click here for my build thread
Serial #9158
Design Engineer at BluePrint Engines
-
10-11-2019, 08:29 PM
#408
Great job on the glove box! Keep up the good work!
-
Post Thanks / Like - 1 Thanks, 1 Likes
-
10-21-2019, 07:26 AM
#409
Senior Member
I had a couple hours to spare this weekend and installed the "dash support" in the car. This piece mimics the look of the visible frame members in the original cars. This was an upgrade option that I had to have. I suspect Factory Five designed this part for thier FIA Cobra replica. I put it in the location as described in the FFR instructions, but I'm assuming there's something different between the two cars, because it didn't line up to the dash at all. I almost scrapped the idea of using it and considered using the space for some inset cup holders instead, but after a quick review of my Cobra books, I came to realize all the originals had these tubes and mine should too. So, I fab'ed a simple bracket to extend the dash support's flange to reach the bottom of the dash. It's in there now, is solid, and looks great.
The extension bracket...

The dash support with bracket in place...
Here's the support with the dash in place. I also took the opportunity to move the buttons for the speedometer and clock more towards the center and under their respective gages. You can see them in this picture. Where they were at before I was worried they would easily get bumped by people's knees.

Last edited by Yama-Bro; 10-21-2019 at 07:29 AM.
Started dreaming of a Cobra around 1987
Purchased Complete Kit 6/9/2017, Delivered 9/4/2017, Rolling Chassis 3/30/2018, Engine Dyno'ed 3/4/2022, Engine installed 8/27/2022
Click here for my build thread
Serial #9158
Design Engineer at BluePrint Engines
-
Post Thanks / Like - 0 Thanks, 1 Likes
-
11-04-2019, 01:01 PM
#410
Senior Member
This weekend I fabricated the last under dash bracket. This one isn't so much for dash support, but to hold the passenger side seat heater switch and the 12volt receptacle for charging phones and powering other electronic devices. In a previous career I held the role of an industrial designer. Industrial designers not only have the job of making the companies' products look good, but also laying out ergonomic and intuitive controls. I've tried to keep most of my controls on the dash and visible because that's the way I'm programmed  . But I did want to hide the modern controls under the dash and only have the vintage looking stuff visible up top. So with that, I'll have the two seat heater switches, the two gauge control buttons and the 12VDC receptacle under the dash.
I had a little help from the Red Baron to do some prototyping...

Here's the finished bracket under the dash...

Started dreaming of a Cobra around 1987
Purchased Complete Kit 6/9/2017, Delivered 9/4/2017, Rolling Chassis 3/30/2018, Engine Dyno'ed 3/4/2022, Engine installed 8/27/2022
Click here for my build thread
Serial #9158
Design Engineer at BluePrint Engines
-
11-04-2019, 01:47 PM
#411
Steve,are you the cobra I've been seeing runnibg around HWY 190. Sure like to talk to you as I am retiring soon and planning on ordering complete it shortly....
-
12-02-2019, 10:46 AM
#412
Senior Member
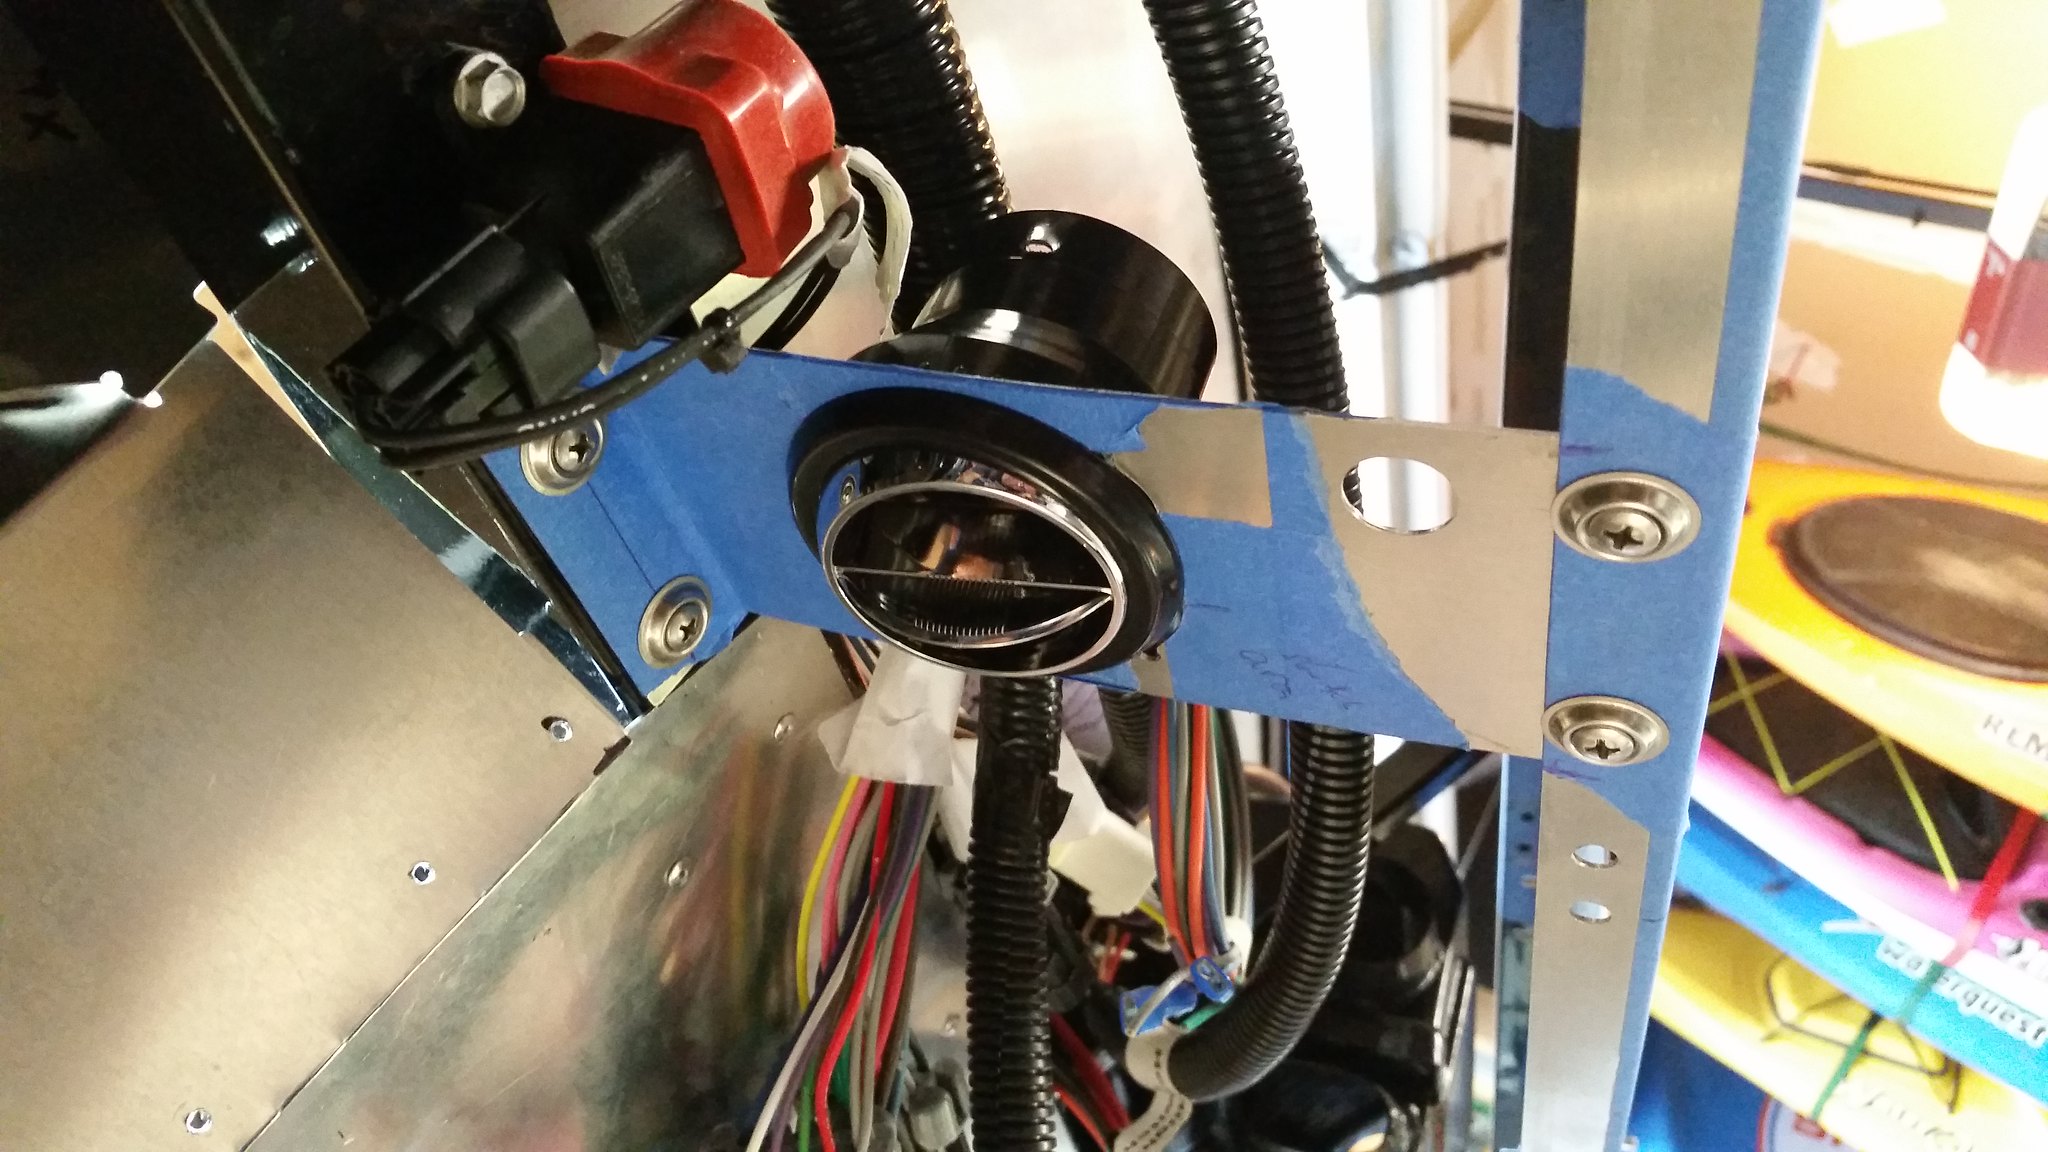
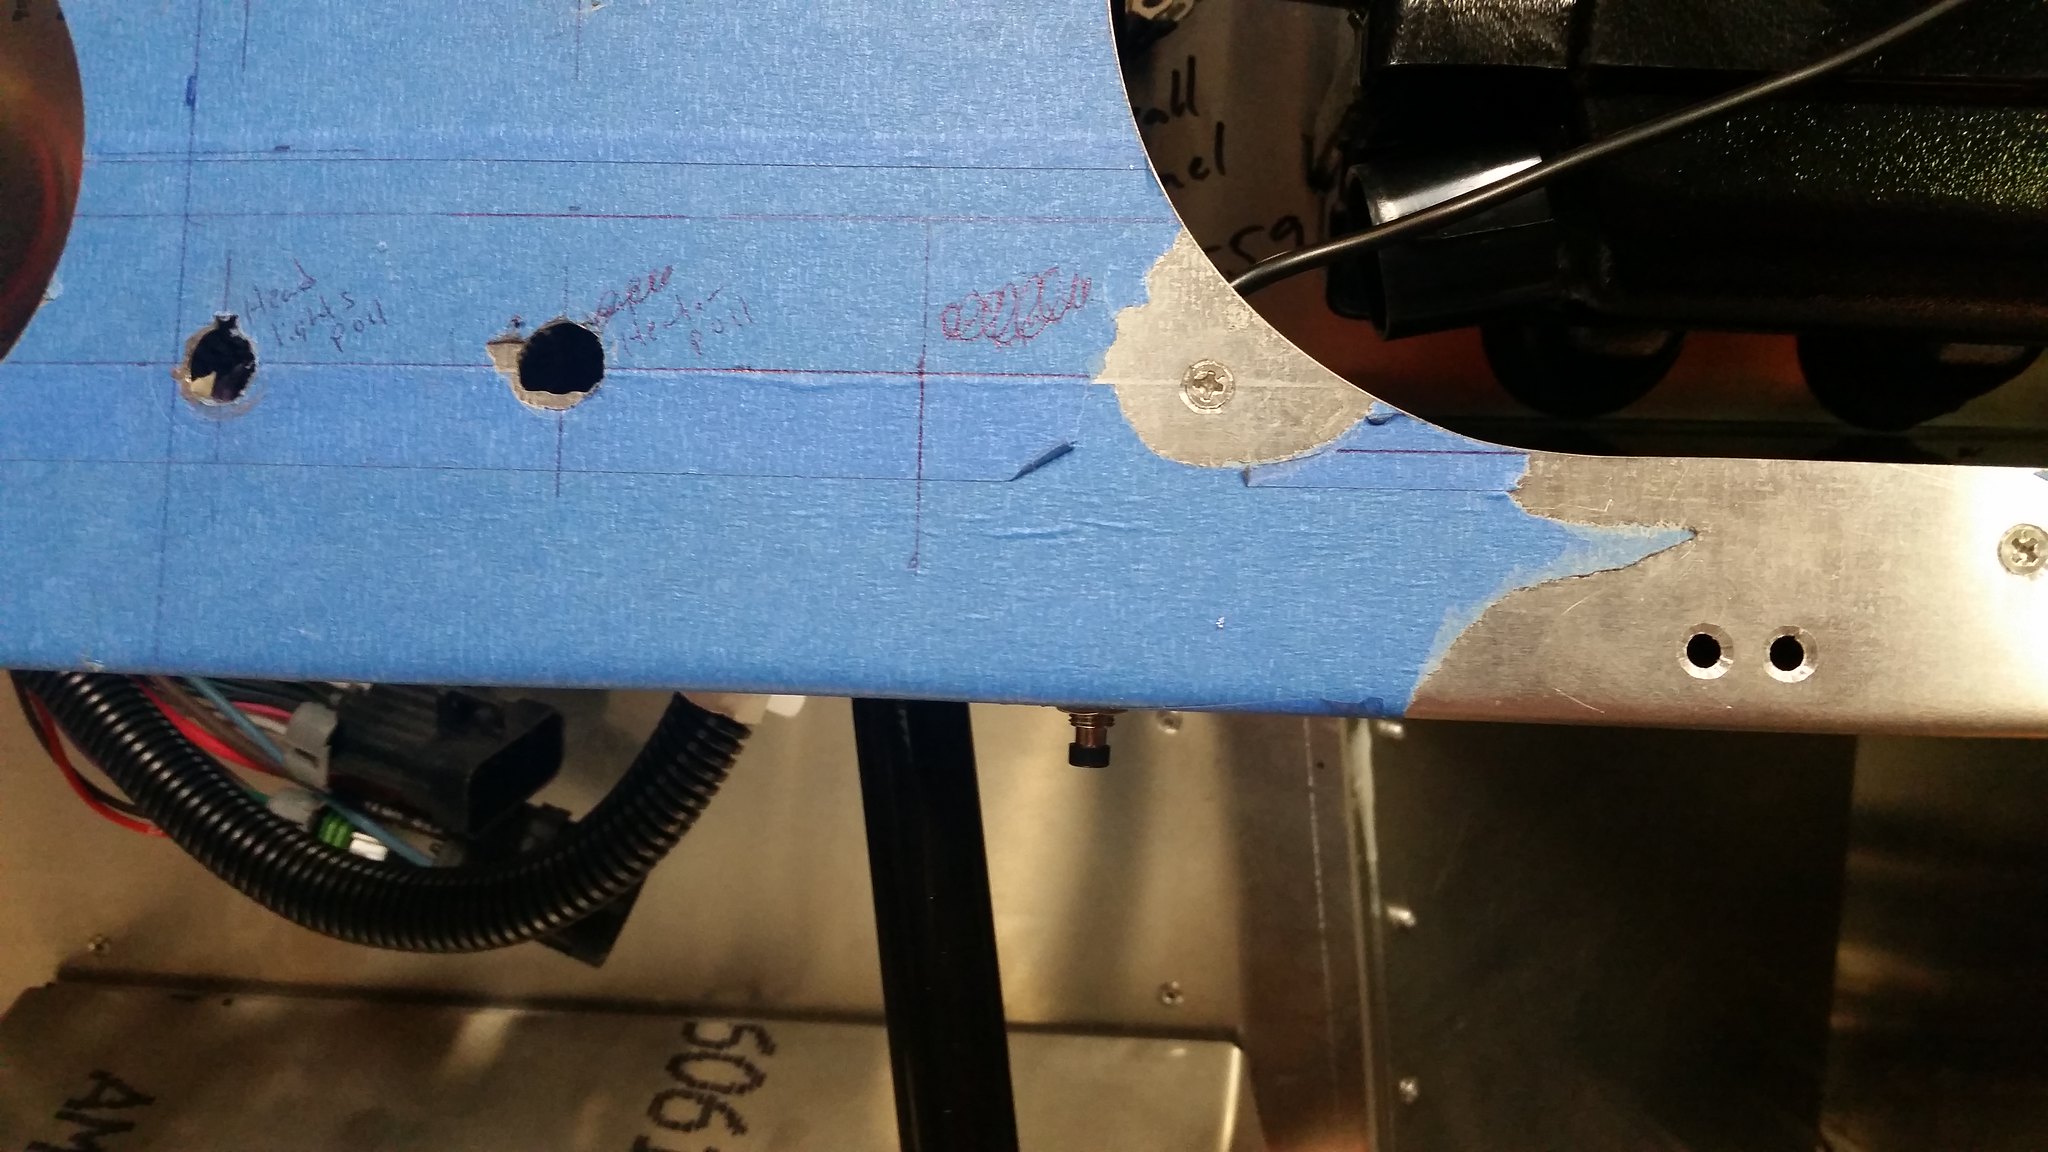
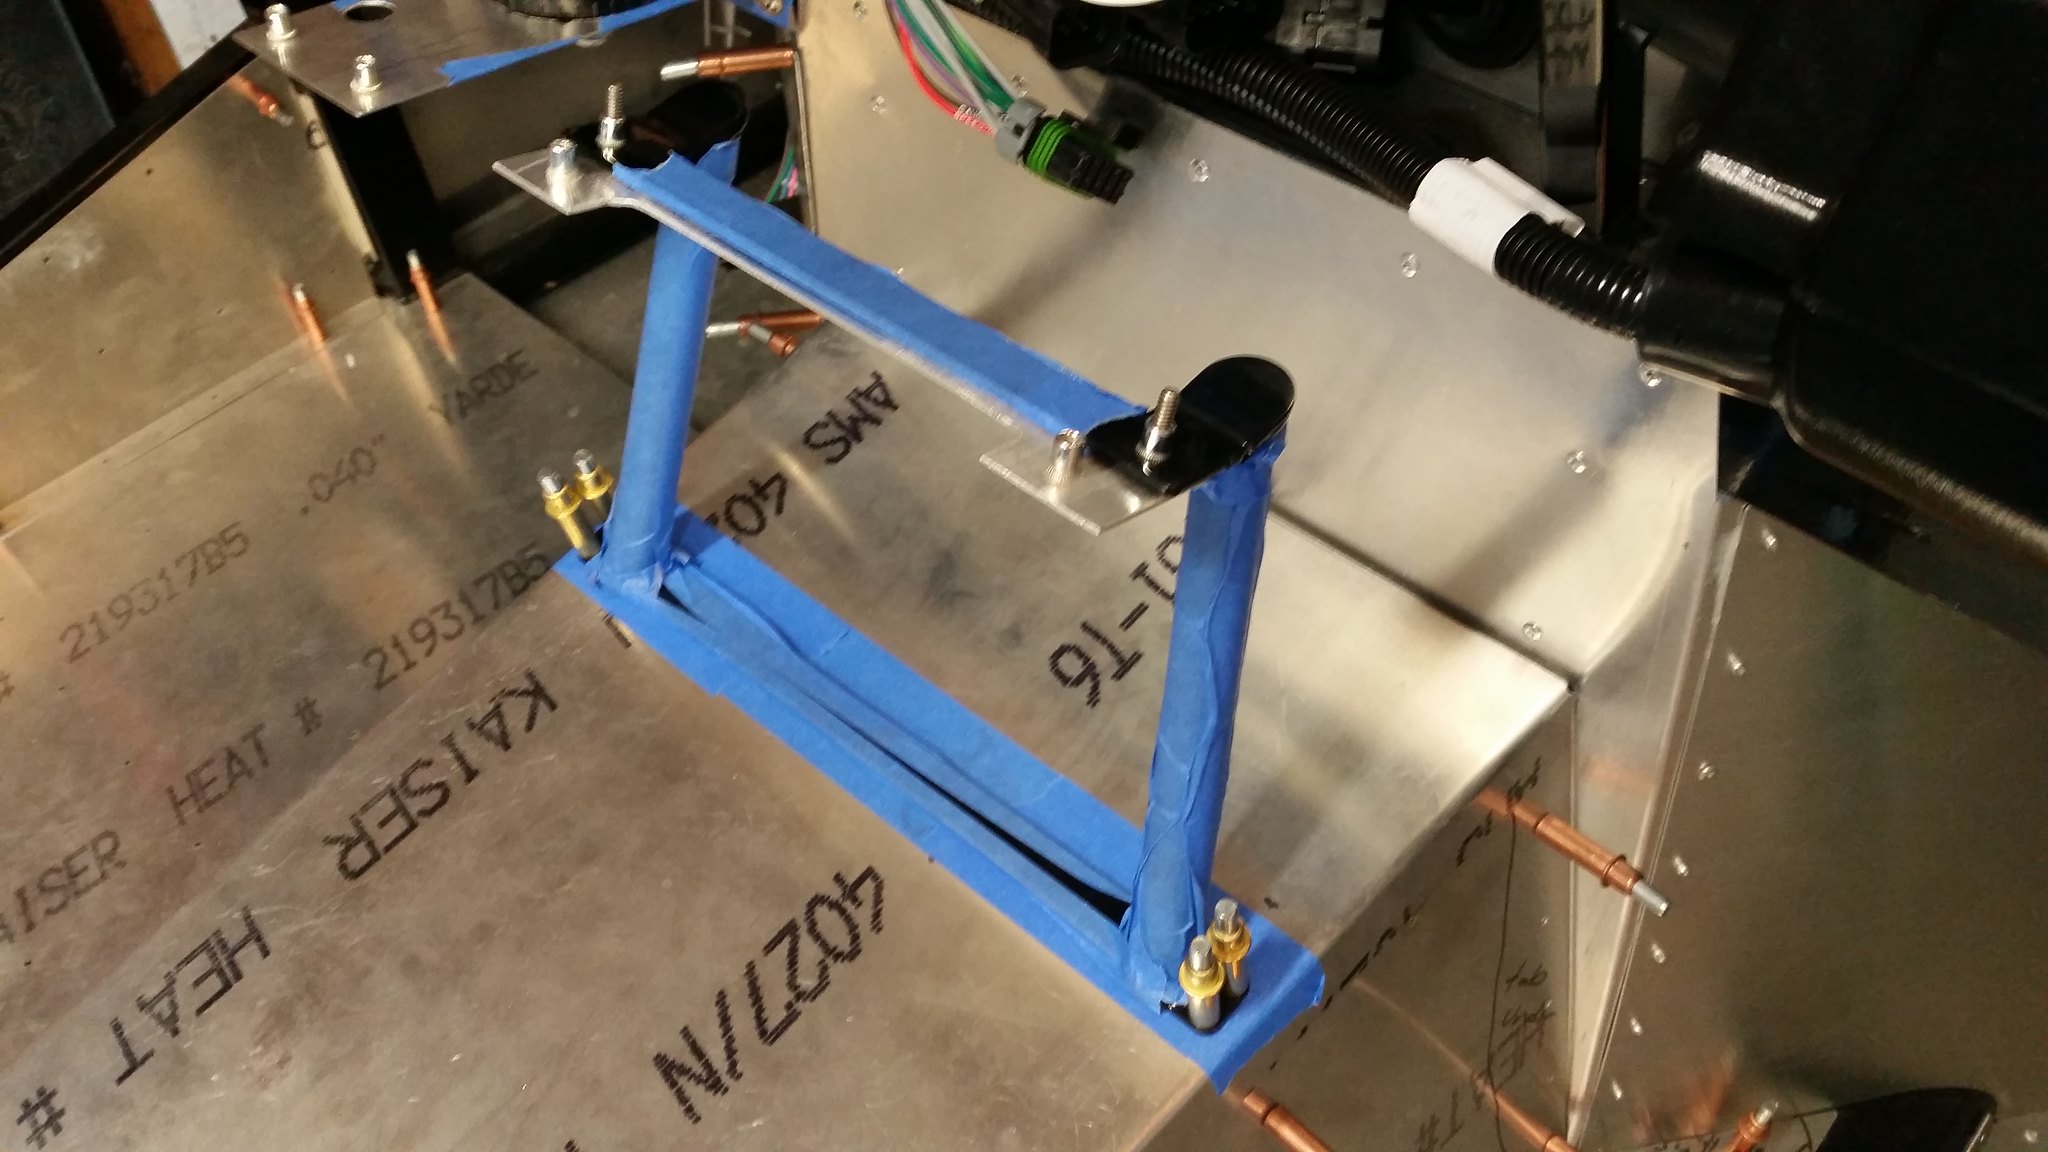
I lied in my last post about the doing the last under dash bracket. My friend, Lance and I did a final fit of the body to the frame with the dash to check for any issues and to mark where the body needs to be trimmed. During that process I discovered that I didn't like the way the passenger side end of the dash sat under the body. So we made a little bracket to attach that end to the frame. Here it is. I'm pretty sure if I would've just bent the end of the dash where there are the small notches I could've done without the bracket...sigh...hindsight is 20/20....

 [/url]
Started dreaming of a Cobra around 1987
Purchased Complete Kit 6/9/2017, Delivered 9/4/2017, Rolling Chassis 3/30/2018, Engine Dyno'ed 3/4/2022, Engine installed 8/27/2022
Click here for my build thread
Serial #9158
Design Engineer at BluePrint Engines
-
12-02-2019, 10:52 AM
#413
Senior Member
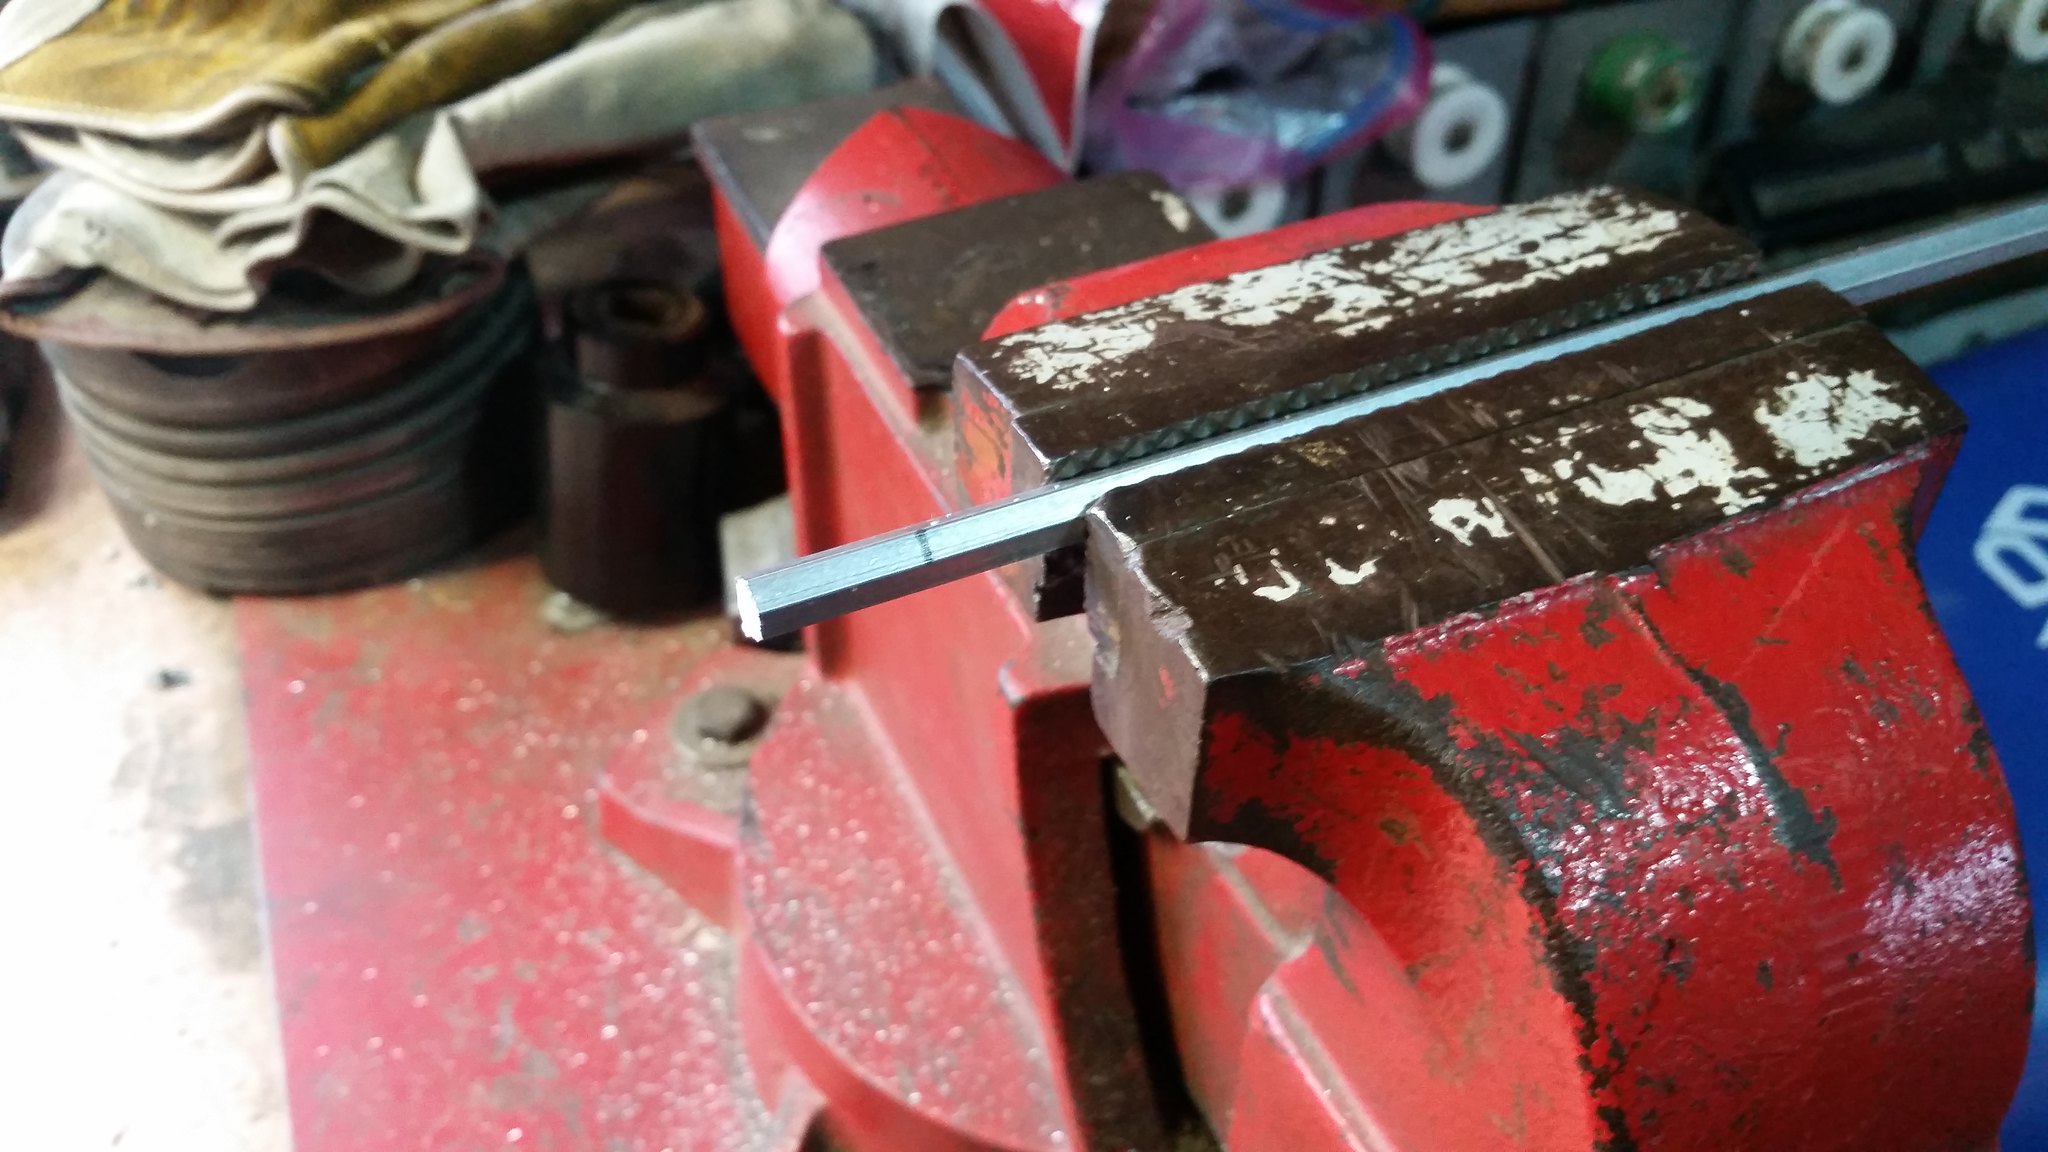
Next up, I did some customizing to my vintage style knobs so they'd mount on the dash controls...
The knobs came with a .25 hex for mounting to the controls. Unfortunately, that doesn't work, because all my controls are smaller round shafts. I purchased a bar of .25 hex alum fro McMaster Carr to fill the holes in the knobs. I cut them into lengths just long enough to fill the knob without sticking out the end...
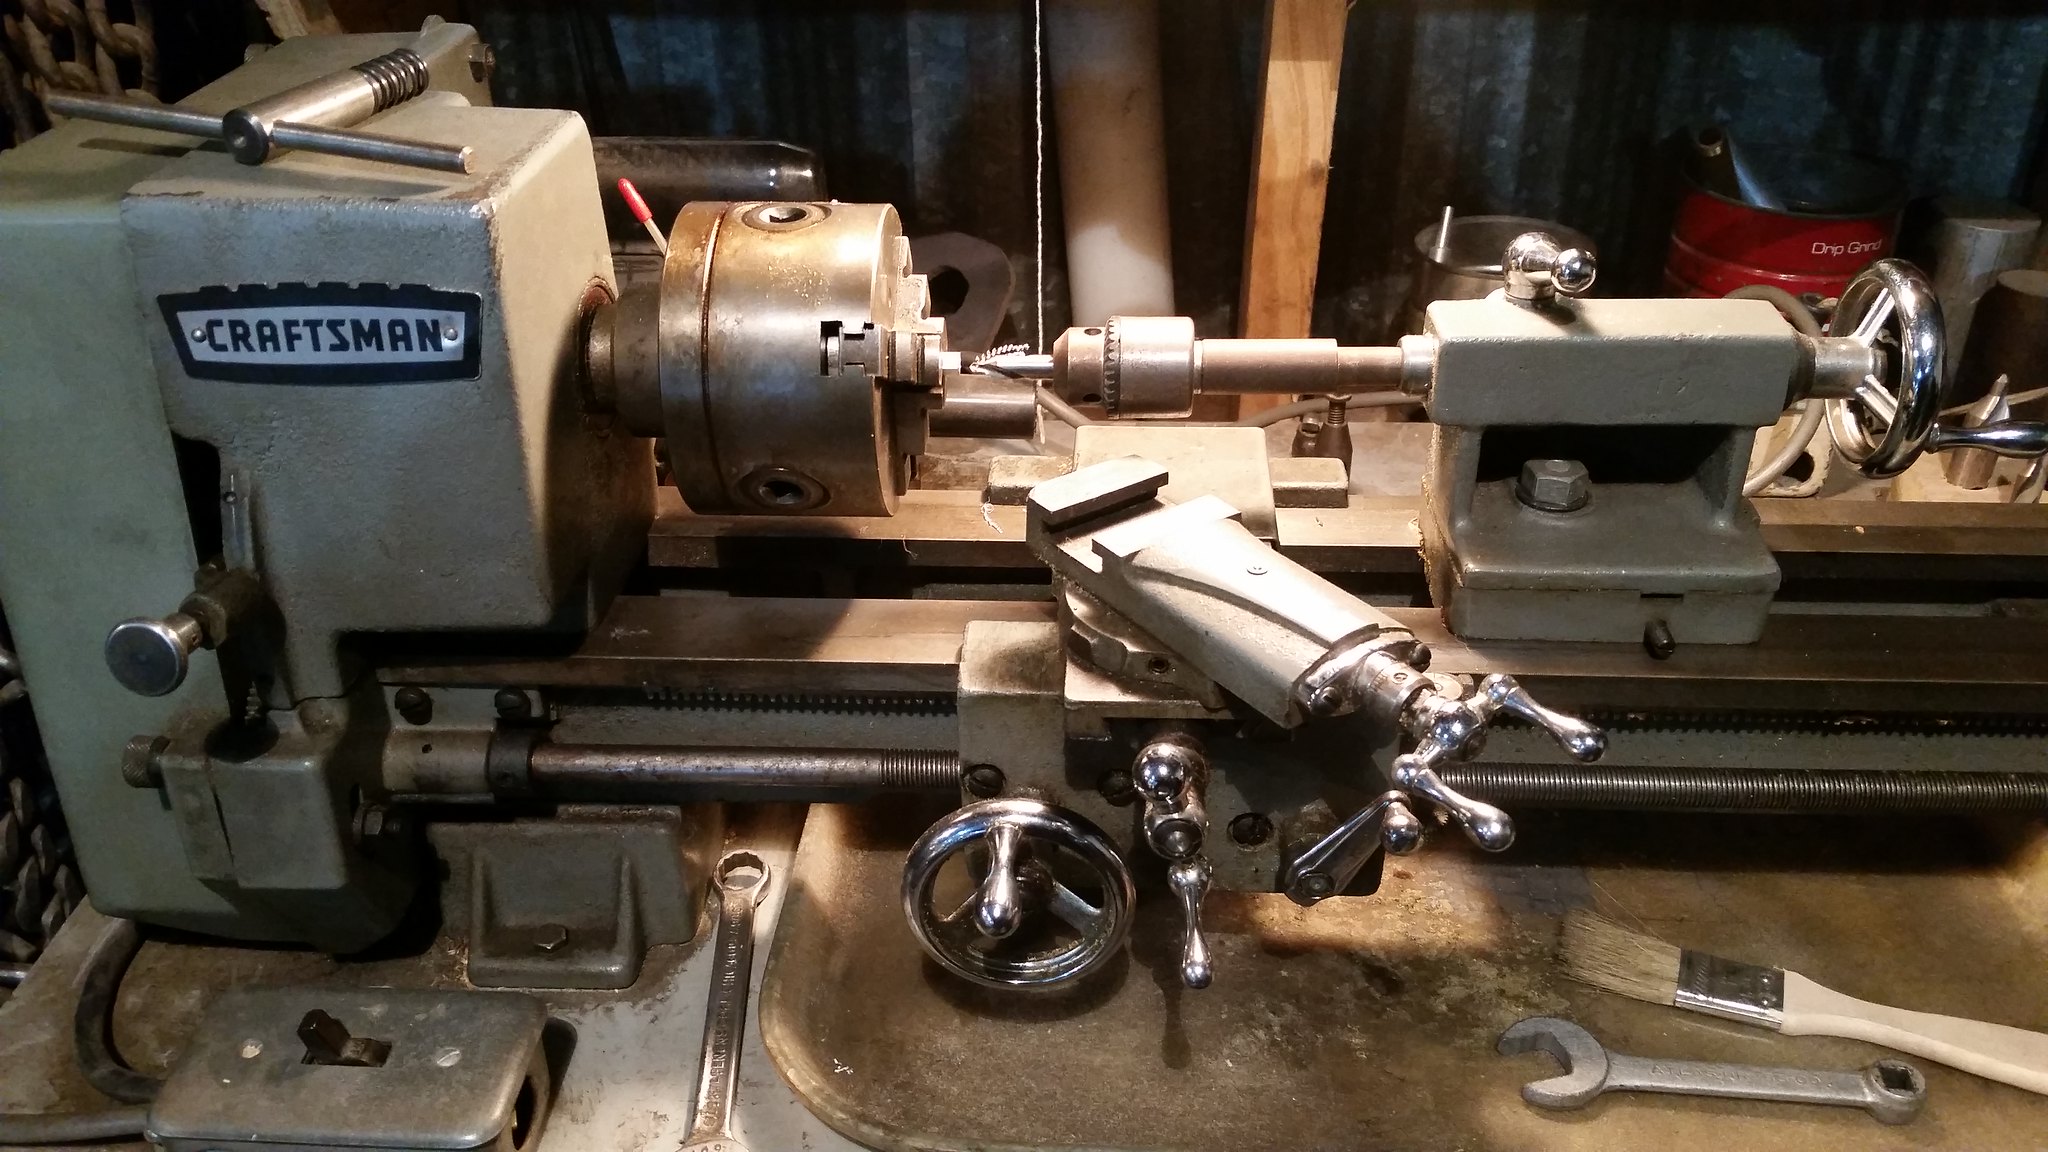
Next, I chucked the cut pieces of hex into my Dad's lathe and drilled perfectly centered holes thru the hex filler pieces...
I inserted the filler pieces into the knobs, then drilled and tapped holes for set screws. I put #8-32 threads thru both the knob material and the alum hex material. I also filed a flat on the shaft of the controls, if they didn't have one already. It seems to work great. Here are the two fresh air pulls...

The one odd ball I had was the dash dimmer control. The shaft was to big for the hex alum and the hole in the knob was to big for the shaft of the dimmer control. I decided to fill the hole in the knob with JB weld and drill out to the desired size...

And here it is. The dimmer control actually has a press fit for the knob, so I just sized the hole in the new knob to match the one I'm replacing...

A perfect press fit...

And here they are, ready to go in the dash, once it's covered, which is coming soon...

Started dreaming of a Cobra around 1987
Purchased Complete Kit 6/9/2017, Delivered 9/4/2017, Rolling Chassis 3/30/2018, Engine Dyno'ed 3/4/2022, Engine installed 8/27/2022
Click here for my build thread
Serial #9158
Design Engineer at BluePrint Engines
-
Post Thanks / Like - 0 Thanks, 1 Likes
-
12-09-2019, 08:40 AM
#414
Senior Member
Before covering the dash, the holes for screw heads need to be filled in, so they don't show thru the vinyl. Like several others have done, I placed my glove box and hinge screws in the dash, red loctited the screws/nuts in place and then filled the recess of the heads with JB weld. I sanded the JB weld filler down to be flush with the front of the dash.


Started dreaming of a Cobra around 1987
Purchased Complete Kit 6/9/2017, Delivered 9/4/2017, Rolling Chassis 3/30/2018, Engine Dyno'ed 3/4/2022, Engine installed 8/27/2022
Click here for my build thread
Serial #9158
Design Engineer at BluePrint Engines
-
Post Thanks / Like - 0 Thanks, 1 Likes
-
12-09-2019, 09:00 AM
#415
Senior Member
Over the last few weekends, My friend and I have been covering the dash. The kit includes a roll of vinyl with foam backing material for covering the dash. I reviewed pictures of original Cobras and didn't see many with padded dashes, so I separated the foam from the vinyl. The two materials came apart surprisingly easy. So much so that I really question how it stays together once it's on the car. We used 3M Super Trim adhesive to bond the vinyl to the aluminum dash. Its like a contact cement, in that you apply it to both sides, let it setup a little, then put them together and apply pressure. Its very sticky stuff. It was suggested to me by a local upholstery shop over the DAP Landau Top product. His reasoning was mostly due to it being in a spray form vs the DAP being brush or roll on and that it doesn't dry up while sitting on the shelf. He thought performance was equal between the two products. We applied the vinyl in stages. We let each stage cure for several days before moving onto the next. I've read many horror stories of the vinyl coming loose after installation, so I took many precautions to avoid that happening; such as surface prep, application temp, curing temp, and curing time & pressure.
Step 1...this was the easiest part...

The glove box door...

Lance manned the heat gun to help keep the parts in the ideal zone for adhesion, since it's getting a little chilly in the garage this time of year...

Step 2.5. We cut reliefs in the vinyl, so it wouldn't bunch up when folded over in the curves...

The final step. This one was pretty involved. We did the ends and everything in the middle all at once.

The weight applied during the final step. I think we used everything we could find LOL...

Last edited by Yama-Bro; 12-09-2019 at 09:09 AM.
Started dreaming of a Cobra around 1987
Purchased Complete Kit 6/9/2017, Delivered 9/4/2017, Rolling Chassis 3/30/2018, Engine Dyno'ed 3/4/2022, Engine installed 8/27/2022
Click here for my build thread
Serial #9158
Design Engineer at BluePrint Engines
-
Post Thanks / Like - 0 Thanks, 1 Likes
-
12-09-2019, 09:20 AM
#416
Senior Member
This weekend I also did a few finishing touches on the glove box.
I spray painted the inside of the glove box with textured paint. I was hoping to cover up the 3d print layer marks, but it didn't really work, despite the sanding before hand. It has a nice solid color now, though. I guess I won't leave the glove box open in car shows.

Since the back of the glove box is in close proximity to the heater, I thought it would be worth putting some heat reflective material on the back of the box...

Started dreaming of a Cobra around 1987
Purchased Complete Kit 6/9/2017, Delivered 9/4/2017, Rolling Chassis 3/30/2018, Engine Dyno'ed 3/4/2022, Engine installed 8/27/2022
Click here for my build thread
Serial #9158
Design Engineer at BluePrint Engines
-
12-09-2019, 09:21 AM
#417
Great work, Frank. This is like watching a movie and getting the dreaded "To be continued" right when it's about to reveal the mystery!
Dave
-
12-09-2019, 10:26 AM
#418
Senior Member
Originally Posted by
Papa
Great work, Frank. This is like watching a movie and getting the dreaded "To be continued" right when it's about to reveal the mystery!
Dave
HAHAHAA...That's a good one, and I totally see where you are coming from.
Started dreaming of a Cobra around 1987
Purchased Complete Kit 6/9/2017, Delivered 9/4/2017, Rolling Chassis 3/30/2018, Engine Dyno'ed 3/4/2022, Engine installed 8/27/2022
Click here for my build thread
Serial #9158
Design Engineer at BluePrint Engines
-
12-14-2019, 07:17 PM
#419
Senior Member
And now for the exciting season finale!!!!
I feel like we hit a milestone last night. My friend, Lance, and I assembled the dash and put it in the car. I've been working on the dash since the end of April. Some guys build their whole car in that time. Haha. I knew exactly what I wanted and went for it. It turned out really good. There are still a few small tweaks I want to do to it, but I'm satisfied with it at this point. I wanted to invoke the feeling of sitting in an original Cobra before you even fire it up. I think the dash plays a major part in that.


Started dreaming of a Cobra around 1987
Purchased Complete Kit 6/9/2017, Delivered 9/4/2017, Rolling Chassis 3/30/2018, Engine Dyno'ed 3/4/2022, Engine installed 8/27/2022
Click here for my build thread
Serial #9158
Design Engineer at BluePrint Engines
-
Post Thanks / Like - 1 Thanks, 5 Likes
-
12-14-2019, 07:26 PM
#420
That looks fabulous, Frank!
Dave
-
12-14-2019, 07:57 PM
#421
Senior Member

MK IV - #9586, Gen 2 Coyote, TKO 600
-
12-15-2019, 08:22 AM
#422
Senior Member

Looks awesome Frank. Nice work!
-
12-15-2019, 09:32 AM
#423
Congrats. Really well done.
-Steve
-
12-18-2019, 10:59 AM
#424
Senior Member
Started dreaming of a Cobra around 1987
Purchased Complete Kit 6/9/2017, Delivered 9/4/2017, Rolling Chassis 3/30/2018, Engine Dyno'ed 3/4/2022, Engine installed 8/27/2022
Click here for my build thread
Serial #9158
Design Engineer at BluePrint Engines
-
12-20-2019, 09:41 AM
#425
Awesome build thread so far. Sent you a PM.
-
01-18-2020, 12:45 PM
#426
Senior Member
Nathan and I made some progress on something that isn't the dash...we installed the radiator and fan. I've read quite a bit of criticism on the forum concerning this area of the kit, so I had to do some upgrades. I bought a Breeze Automotive upper (70558) and lower (70551) radiator support and one of their nice shrouds (70772).
To put the hinged upper support on, you need to remove the two short pieces of tubing that are welded on the upper radiator support tube by Factory Five. I ground off the welds and my friend took the rest off with a hammer and a chisel.
You can also see the sub assembly of the shround and radiator on the floor in the background. The upper support kit mostly consists of a large stainless piano hinge, that rivets to the radiator's flange which in turn, gets screwed to the radiator support tube of the frame.


We used my ever-handy ATV jack to hold up the radiator assembly, while we lined it up to the frame and set the angle.

Once you have the assembly lined up where you want it, drill and tap holes to attach the hinge to the upper radiator support tube.

The lower radiator support kit consists of a tube with rubber hose for isolating the radiator. And some nice laser cut brackets that bolt to the frame and allow some adjustment of the radiator angle.

We completed it on a Friday night with enough time leftover to kick back and enjoy our handy work while enjoying a cool beverage.
Overall I thought the Breeze kit was a nice kit. Great instructions...very clear. It all went together without an issue. I'm very happy with it. Excluding the shroud, I think the support kits are something I could've of made myself to save a little money, but after recently finishing up the dash (which was fairly customized), I was ready for a quick bolt in project...and this fit the bill nicely.
Last edited by Yama-Bro; 01-20-2020 at 04:05 PM.
Started dreaming of a Cobra around 1987
Purchased Complete Kit 6/9/2017, Delivered 9/4/2017, Rolling Chassis 3/30/2018, Engine Dyno'ed 3/4/2022, Engine installed 8/27/2022
Click here for my build thread
Serial #9158
Design Engineer at BluePrint Engines
-
02-04-2020, 08:21 AM
#427
Senior Member
Sometimes instead of moving forward, you take a couple steps backwards. That's what I've been doing lately. After installing the radiator, we discovered the tape that I put on to protect the frame from scratches is stuck like 100 year old wall paper. The blue tape came of much better than the green tape. Major bummer. With the help of WD-40 and a heat gun, I've peeled off quite a bit, but still have the really difficult areas left. Not fun at all. I think I'll do the rest on another day, my knees and fingernails need a break. It seems to be stuck worse in the front. I suspect it's that way because it may have got some brake cleaner spray on it when I was bleeding the brakes.
And then to top it off, I noticed one of my Girling Brake reservoirs is leaking around the bottom seam...darn it!

Started dreaming of a Cobra around 1987
Purchased Complete Kit 6/9/2017, Delivered 9/4/2017, Rolling Chassis 3/30/2018, Engine Dyno'ed 3/4/2022, Engine installed 8/27/2022
Click here for my build thread
Serial #9158
Design Engineer at BluePrint Engines
-
02-04-2020, 08:34 AM
#428

Steve >> aka: GoDadGo

Brother Bro,
While you are dealing with some issues know that we all have set backs so don't let this stuff get you down.
Even if the powder coat peels in some spots you can touch it up with some rattle can black with some rattle can clear.
You've got this brother, because we've all been there so hang in there.
Steve
Maybe these little videos will give you a little pick me up.
https://youtu.be/IGYtX-3p7xk
https://youtu.be/Vhbftk4AP4k
https://youtu.be/-nVDzIjSjh8
Last edited by GoDadGo; 02-04-2020 at 08:41 AM.
-
Post Thanks / Like - 1 Thanks, 0 Likes
-
02-04-2020, 12:01 PM
#429

Originally Posted by
Yama-Bro
Sometimes instead of moving forward, you take a couple steps backwards. That's what I've been doing lately. After installing the radiator, we discovered the tape that I put on to protect the frame from scratches is stuck like 100 year old wall paper. The blue tape came of much better than the green tape. Major bummer. With the help of WD-40 and a heat gun, I've peeled off quite a bit, but still have the really difficult areas left. Not fun at all. I think I'll do the rest on another day, my knees and fingernails need a break. It seems to be stuck worse in the front. I suspect it's that way because it may have got some brake cleaner spray on it when I was bleeding the brakes.
And then to top it off, I noticed one of my Girling Brake reservoirs is leaking around the bottom seam...darn it!
That stinks. I used the blue tape in certain areas but not nearly as much as you did. For the most part, it came off easily. But it never came off leaving little pieces everywhere like your green tape did.
I'm really digging the way you brushed the aluminum and left it visible. I used spray on bedliner aerosol cans and am unhappy with how easy it is to scratch off of the aluminum. If I could do another car, I think I would prepare the aluminum the way you did.
MK IV Build #9659, 3 link, 17's, Forte 347, Sniper EFI, power steering, built for a freak sized person with 17" Kirkey Vintage seats, RT drop trunk, RT turn signal, lots of stuff from Breeze Automotive, Wilwood brakes, paint by Jeff Miller
-
02-06-2020, 02:58 PM
#430
Senior Member

Hey Frank,
Still following your build as I inch my way forward on my own, and also take a few steps back along with gradual forward progress. My latest was making a rookie mistake as I made my access panel into the DS footbox to get to the upper pedal box / master cylinder area (older MK4 kit) ... looks great on the outside, Rivnuts too close to the opening without the hatch in place. Will bug me until I fix it. Yup, we've all been there!
For some encouragement, just cover up the bottom 1/2 of your photo with the 'problem' - everything you've done looks top notch. You have a right to be proud of your work!
Hang in there!
Cheers,
-- John
MK4 #7838: IRS 3.55 TrueTrac T5z Dart 347
The drawing is from ~7th grade, mid-1970s
Meandering, leisurely build thread is
here
-
02-11-2020, 03:52 PM
#431
Senior Member
Thanks for the words of encouragement guys! I ended up getting an excellent suggestion from a friend at work. He loaned me an Astro smart eraser tool, that is designed to remove pin-striping. It worked great. It made a heck of a mess and smelled like burnt rubber, but it saved me a ton of time. It didn't leave any marks in the powder coating either. This picture was taken after I wiped some the eraser dust off the frame, so it was a lot dirtier.

If you ever run into a similar situation, I recommend one of the these tools...
https://www.astrotools.com/smart-era...de-in-usa.html
Started dreaming of a Cobra around 1987
Purchased Complete Kit 6/9/2017, Delivered 9/4/2017, Rolling Chassis 3/30/2018, Engine Dyno'ed 3/4/2022, Engine installed 8/27/2022
Click here for my build thread
Serial #9158
Design Engineer at BluePrint Engines
-
02-11-2020, 08:52 PM
#432
Senior Member
Nice! Glad it worked out. There's a tool everyone wants to know about, and no one wants to use ")
Onward!
Cheers,
-- John
MK4 #7838: IRS 3.55 TrueTrac T5z Dart 347
The drawing is from ~7th grade, mid-1970s
Meandering, leisurely build thread is
here
-
03-07-2020, 10:33 PM
#433
Senior Member
I got all my tape off the frame and my leaky break reservoir replaced so now I'm back to forward progress.  ...Putting together the emergency brake lever. I thought this was a fun little sub assembly project.
I remember reading on the forum that the ratcheting teeth tend to wear down if used frequently. I decided to dig into that a bit. I measured the hardness of these two parts and analyzed the material. It's no surprise they wear out. The material is a low carbon steel and the hardness is 75 HRB, which is pretty soft. To remedy this, I had the parts carburized, which is a process that case hardens the parts by basically infusing carbon from the atmosphere into the heated steel. This brought the outer skin (approx .030") of the part up to 60 HRC, which is much harder. The hard outside surface will reduce wear greatly and the softer inside of the part will still allow it to flex slightly. I think it'll be the perfect solution for these pieces.

Here's the complete emergency brake assembly. I will tear this back apart to paint it.

Installed in the car. It's a tight fit, but it all went in. There is a little interference with the aluminum tranny tunnel panel. I may have to trim that slightly (see the black marker marks forward of the lever). Has anyone else ran into this?

Started dreaming of a Cobra around 1987
Purchased Complete Kit 6/9/2017, Delivered 9/4/2017, Rolling Chassis 3/30/2018, Engine Dyno'ed 3/4/2022, Engine installed 8/27/2022
Click here for my build thread
Serial #9158
Design Engineer at BluePrint Engines
-
03-07-2020, 10:51 PM
#434
Senior Member

Nice improvement on those teeth. I haven't seen mine wear after three driving seasons. I do us the e-brake some. But probably not enough to cause wear like some apparently do. Yes, it's common to have to tweak things a bit to swing the handle away from the transmission tunnel side. Like most you'll probably have insulation and carpet under there too. So it needs to move out. Grind or file a little material from the slots in the mounting brackets on the handle and the chassis so it can move. Out at the front and in a bit in the back. Easy fix.
Build 1: Mk3 Roadster #5125. Sold 11/08/2014.
Build 2: Mk4 Roadster #7750. Sold 04/10/2017.
Build Thread
Build 3: Mk4 Roadster 20th Anniversary #8674. Sold 09/07/2020.
Build Thread and
Video.
Build 4: Gen 3 Type 65 Coupe #59. Gen 3 Coyote. Legal 03/04/2020.
Build Thread and
Video
Build 5: 35 Hot Rod Truck #138. LS3 and 4L65E auto. Rcvd 01/05/2021. Legal 04/20/2023.
Build Thread. Sold 11/9/2023.
-
03-08-2020, 12:30 AM
#435
Senior Member

Installed in the car. It's a tight fit, but it all went in. There is a little interference with the aluminum tranny tunnel panel. I may have to trim that slightly (see the black marker marks forward of the lever). Has anyone else ran into this?
I actually just went through the process of trying to re-fit the E-brake last evening, now with insulation and panels final riveted. Definitely more interference than I recall. Looks like an easy fix with adjusting the mounting brackets a bit though. The other thing I noticed is that I can’t really reach the handle from the seat, and I anticipate may be impossible to when harnessed in. I hadn’t noticed it before so thought I would mention it.
Last edited by MSumners; 03-08-2020 at 12:32 AM.
-
03-09-2020, 11:56 AM
#436
Senior Member
Originally Posted by
edwardb
Nice improvement on those teeth. I haven't seen mine wear after three driving seasons. I do us the e-brake some. But probably not enough to cause wear like some apparently do. Yes, it's common to have to tweak things a bit to swing the handle away from the transmission tunnel side. Like most you'll probably have insulation and carpet under there too. So it needs to move out. Grind or file a little material from the slots in the mounting brackets on the handle and the chassis so it can move. Out at the front and in a bit in the back. Easy fix.
Thanks Paul, I was going to cut some out of the aluminum, but I'll do what you are saying and open up the holes in the brackets. Good insight.
Originally Posted by
MSumners
Installed in the car. It's a tight fit, but it all went in. There is a little interference with the aluminum tranny tunnel panel. I may have to trim that slightly (see the black marker marks forward of the lever). Has anyone else ran into this?
I actually just went through the process of trying to re-fit the E-brake last evening, now with insulation and panels final riveted. Definitely more interference than I recall. Looks like an easy fix with adjusting the mounting brackets a bit though. The other thing I noticed is that I can’t really reach the handle from the seat, and I anticipate may be impossible to when harnessed in. I hadn’t noticed it before so thought I would mention it.
I have read that it is difficult, if not impossible, to reach the emergency brake lever when strapped in. For the sake of making progress, I decided to leave it as designed by FFR. I was considering making a different handle housing that angles the handle up more towards vertical. I don't know if that would be enough to make it within reach though. I'll have a better idea, once I get my seats in. I've seen some pictures on the forum where the handle is sticking up way past the top of the tranny cover. Those look a lot more accessible. Not sure what they are doing to get that to work.
Started dreaming of a Cobra around 1987
Purchased Complete Kit 6/9/2017, Delivered 9/4/2017, Rolling Chassis 3/30/2018, Engine Dyno'ed 3/4/2022, Engine installed 8/27/2022
Click here for my build thread
Serial #9158
Design Engineer at BluePrint Engines
-
03-13-2020, 07:08 AM
#437
Senior Member
I wasn't completely happy with my glove box door, so I made some changes to it....the way it was it seemed to blend in with the dash. I wanted it to be a little more noticeable / three dimensional, without going overboard.
I went down to my local upholstery shop, Huerta's Upholstery, the owner Tim, knocked out a nice strip of welting to wrap around the outside of the glove box door.
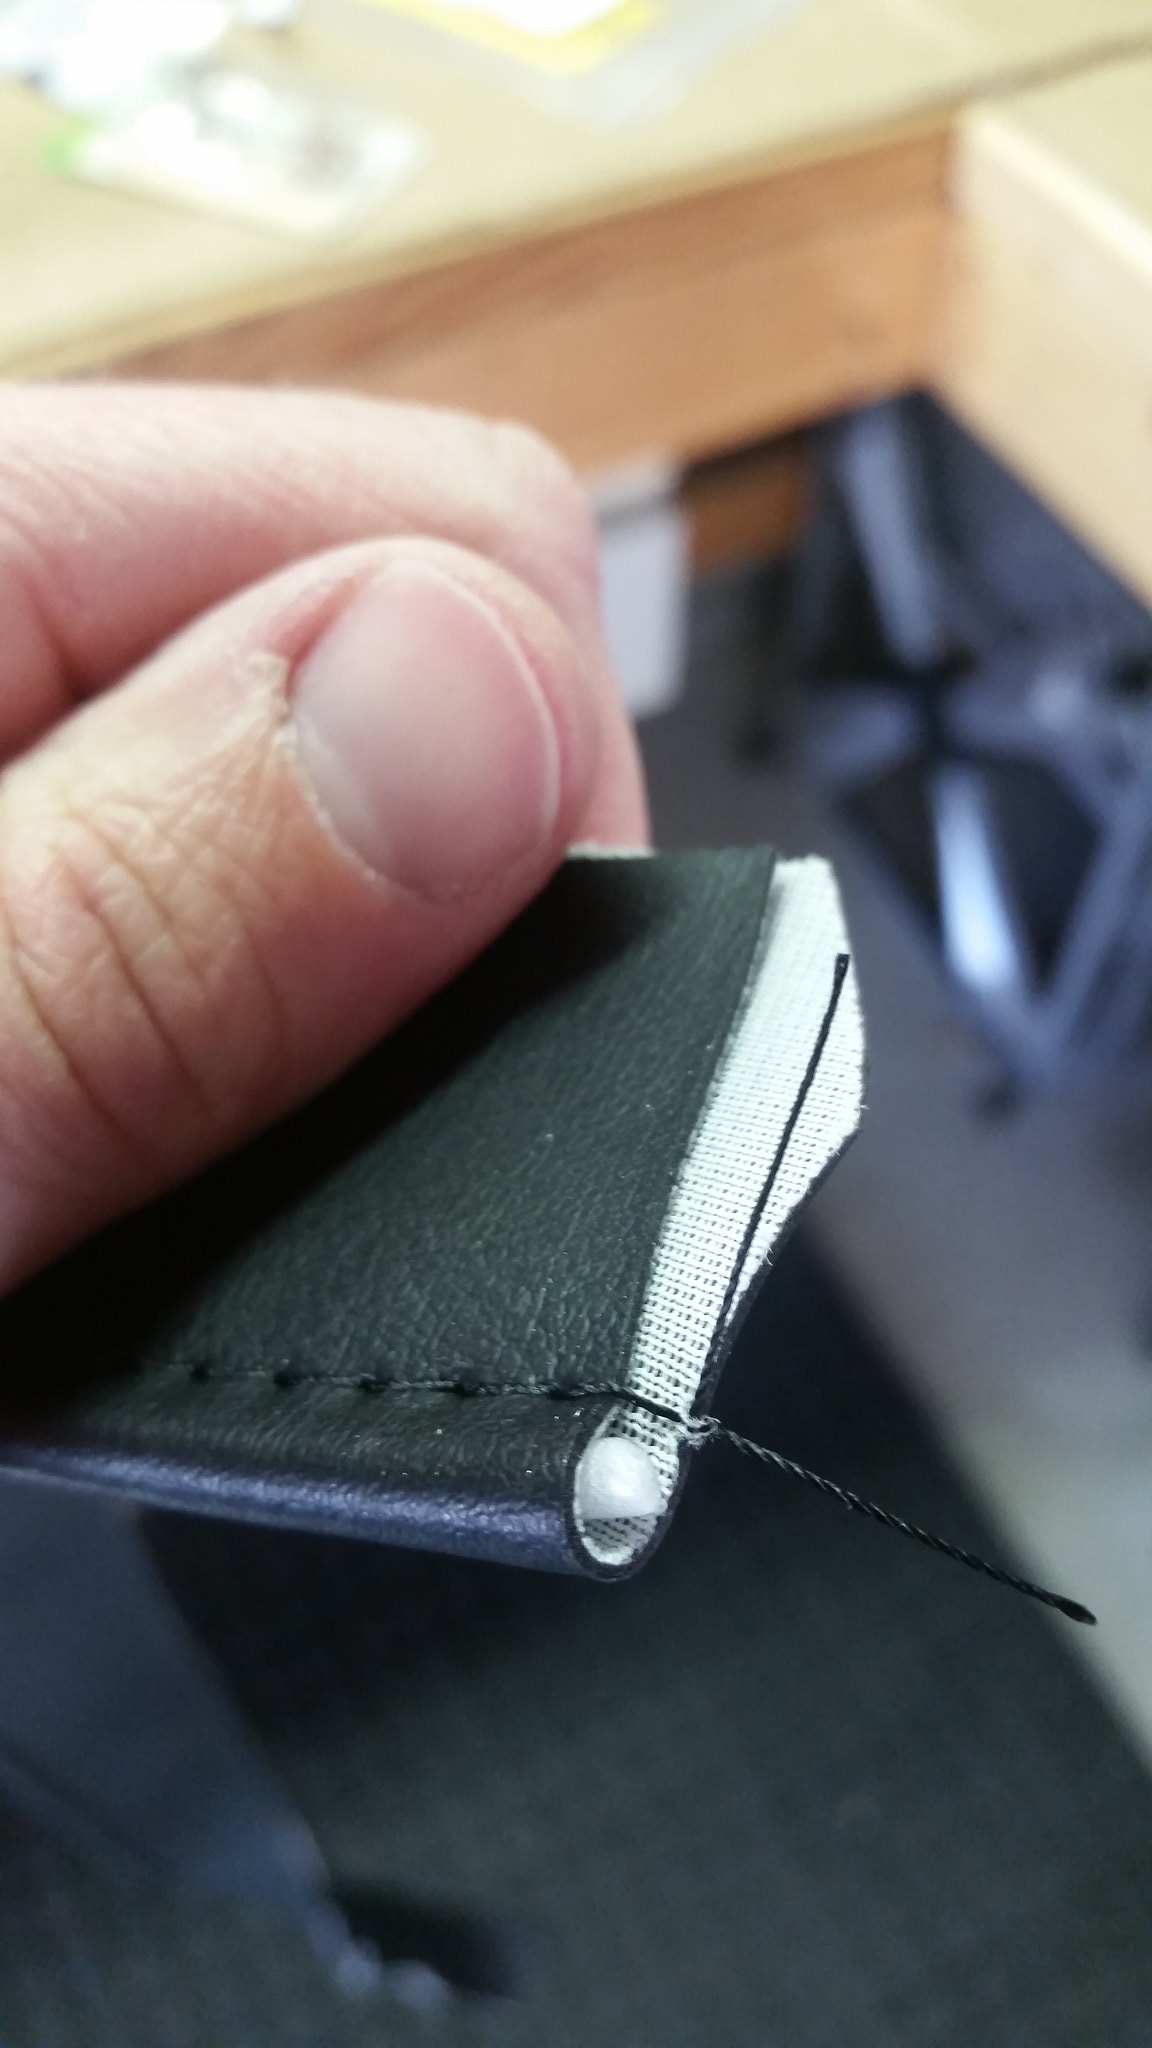
I was told the pretty side of the vinyl wouldn't stick down with the vinyl top adhesive that I was using, so I decided to try the silicone caulking we use on the aluminum panels of the car. It seems to stick to everything. LOL. What you see in the pic will be sandwiched between the front glove box panel and the rear, so you won't see any of the triangular cuts, even with the door open.
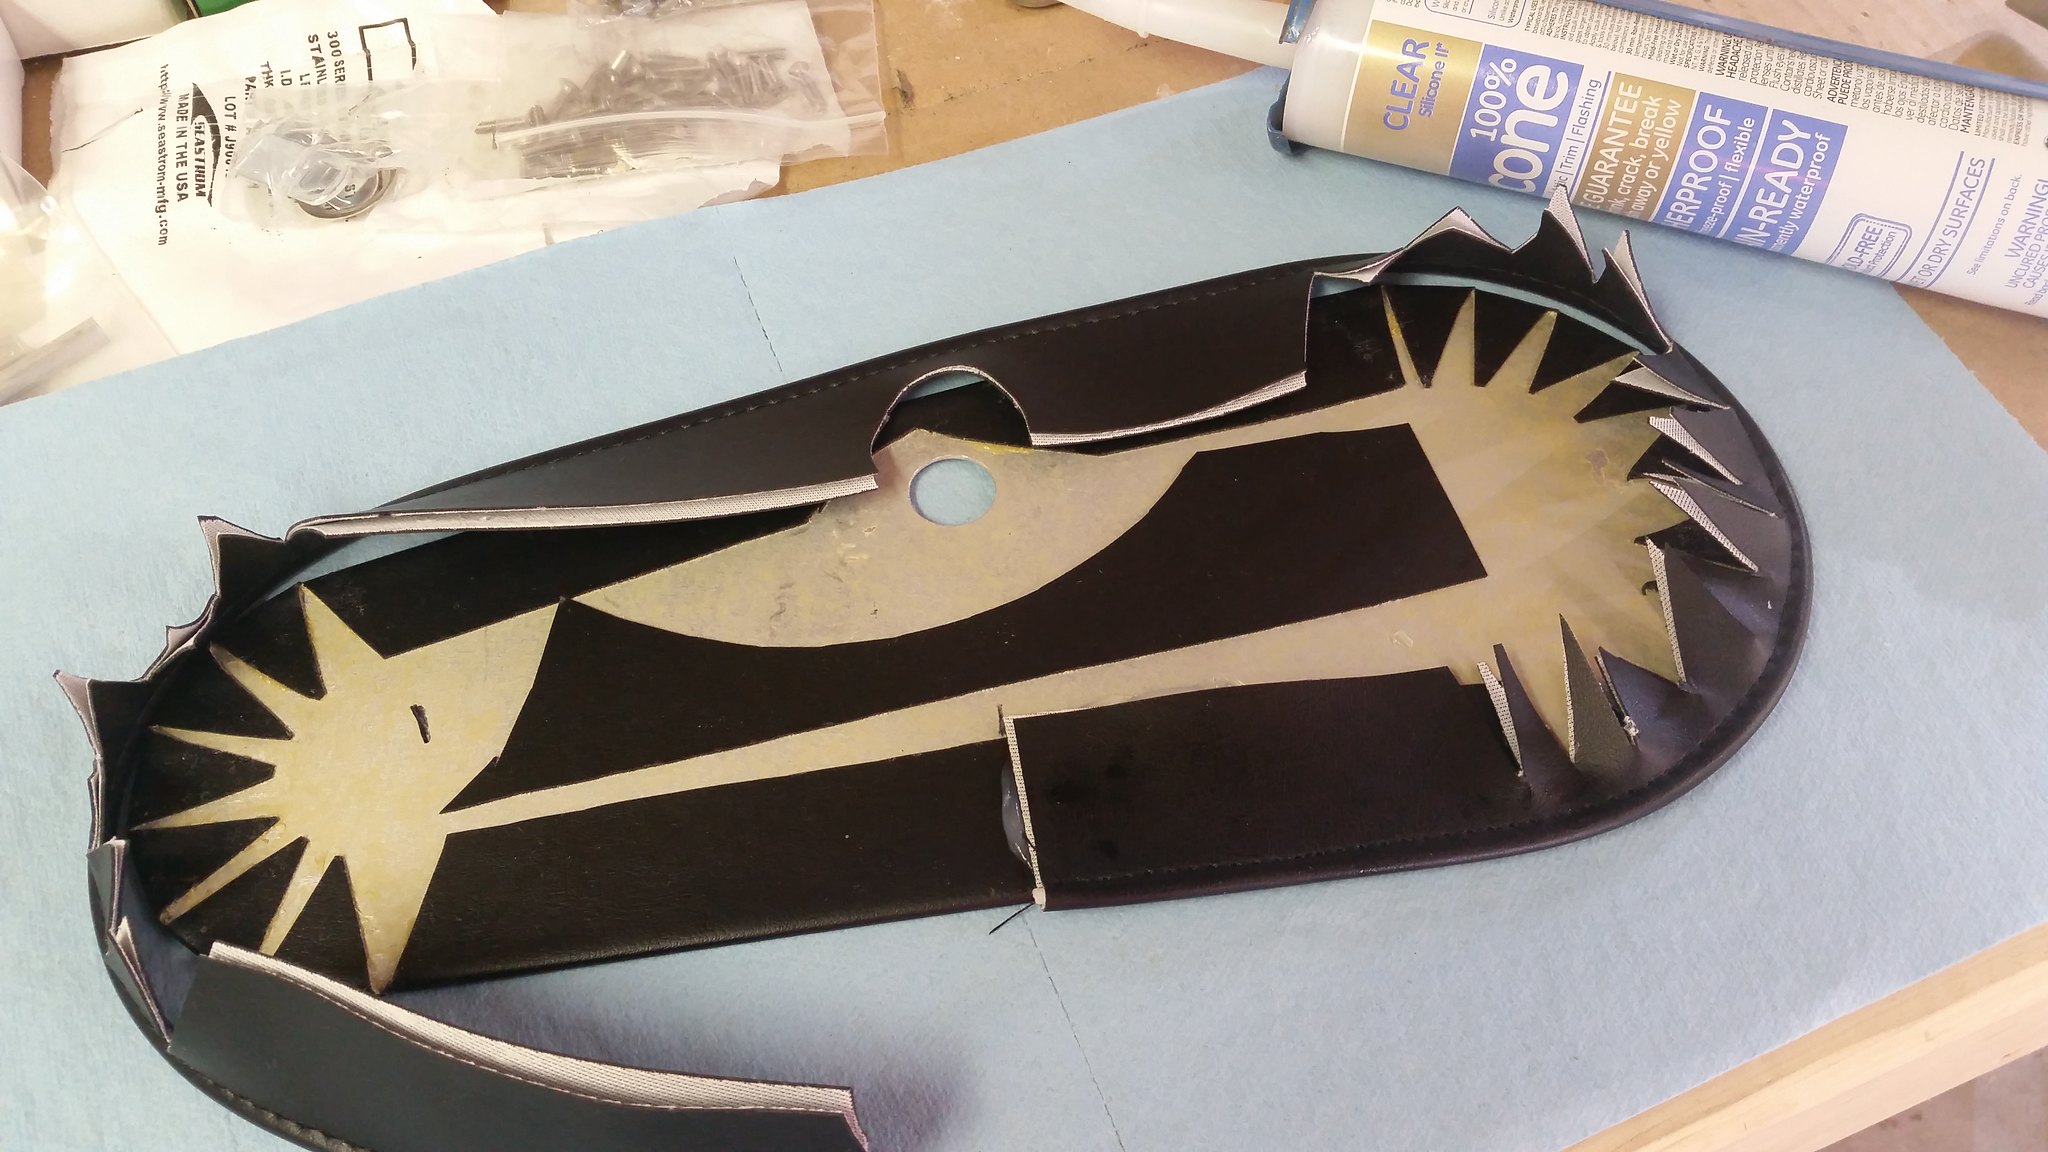
Here it is with the welting attached. This was more the look I was after in the first place. I'm happy with this for now. If the silicone caulking gives me troubles later on, the whole door system may get a redesign after the car is on the road.

Started dreaming of a Cobra around 1987
Purchased Complete Kit 6/9/2017, Delivered 9/4/2017, Rolling Chassis 3/30/2018, Engine Dyno'ed 3/4/2022, Engine installed 8/27/2022
Click here for my build thread
Serial #9158
Design Engineer at BluePrint Engines
-
Post Thanks / Like - 0 Thanks, 1 Likes
-
04-20-2020, 10:10 PM
#438
Senior Member
I've been working on the seats for a few weekends. I decided instead of taking the easy route of bolting them directly to the floor, I would install seat sliders, because it seems like a nice feature to have in a car. Most race tracks require dual locking sliders, so I opted to not get the FFR sliders (which are single locking) and picked up two sets of dual locking universal sliders from Summit Racing. A lot people post that this is upgrade is not worth the effort. Now that I've done it, I can definitely see where they are coming from. If you are thinking of putting them in your car, seriously consider bolting your seats directly to the floor before spending the time and money on this upgrade. If you still decide to do it, check out my pictures and dimensions below and use them as a guide, but be sure to double check everything in your own car, because I can't guarantee it will be the same.
I'll start off by saying, the Summit sliders that I used are very similar to the FFR set. That fact they are similar made the FFR instructions useful as reference during assembly. The sliders I used are part number SUM-G1153. They are about half the price of the FFR sliders. Here's one set of the sliders. They had pressed in and crimped studs, that required me to hack saw, grind and press them out (which is also required on the FFR set).

Here's the driver's side bolted to the floor. Even though the floor is flat, there aren't a lot of options for solid mounting on the bottom side of the aluminum floor panel. I did a lot of laying out to get the sliders bolted down solid.
I modified the sliders so that the locking lever is in the center. It was designed to be on the outer left side. To get this to work, I fab'ed up the cross bar that goes between the two sides out of .125" thick steel strip.

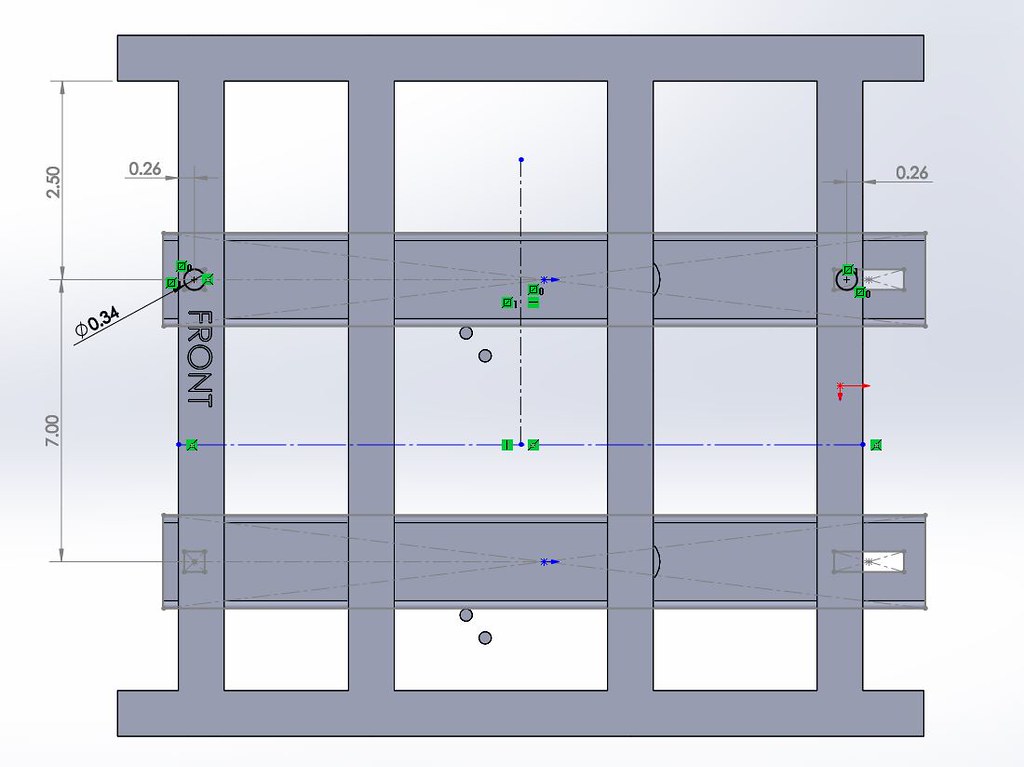
Here's the layout and dims for the holes. I didn't find to much info on this when I was searching, so I thought I'd share mine. Please double check all your measurements before cutting any metal. The images below are for the driver's side. The passenger side is mirrored.
Hole A is drilled directly into the 4" tube and the 2" square tube and then tapped for 5/16-18
Hole B is drilled thru the panel. Make sure to watch out for brake or fuel lines on the under side.
Hole C is drilled all the way thru the 2" square tube. Make sure this doesn't run into the 3 link mounting brackets on the underside.
Hole D is drilled thru the panel.
I used 5/16 hardware for mounting. I used stainless socket head cap screws to hold the sliders to the floor. Carriage bolts could also work for three of these if the sides of heads of the bolts were ground down to fit between the slides rails. There are stainless nyloc nuts on the underside of the 3 that go thru. I used carriage bolts up thru the sliders into the seats, with nuts on top.

This shows the drilling in the seat. Please note this doesn't show the first tube in the very front of the seat. The one you drill is the 2nd tube. The passenger side ended up being 2.38" vs 2.50". Also, I noticed I left off an important dimension...the distance between the holes in the seat from front to back. That dim is 10.70".
Here's a video of the slider in action. Note that I also bent the lever to miss the opposite side slider. Sorry for the shakiness. At each bolt, I used the spacers (that came with the sliders) and two 5/16" washers to space the seat up above the the locking mechanism.

Both seats in the car. The sliders have about 6" to 7" of travel. Unfortunately, due to the limited options for mounting locations, they don't go as far back as I had hoped. The farthest back position is about perfect for me (I'm 5'7"), but anyone taller would want it back farther. Each seat could go about 2" to 3" farther back. They are going to work for now, but I'm pondering an adapter/bracket that will allow the seats to go all the way to the back of the cockpit. It will allow it to fit taller people, plus make it easier to get in and out of for us short people. Stay tuned for part two.

Here's a top down view. I got the seats angled slightly outwards, like the originals.

Last edited by Yama-Bro; 05-08-2020 at 01:14 PM.
Started dreaming of a Cobra around 1987
Purchased Complete Kit 6/9/2017, Delivered 9/4/2017, Rolling Chassis 3/30/2018, Engine Dyno'ed 3/4/2022, Engine installed 8/27/2022
Click here for my build thread
Serial #9158
Design Engineer at BluePrint Engines
-
04-21-2020, 09:14 AM
#439
Put your door latch strikers on and make sure they clear the seats. It looks like they will. I used F5 sliders, a lot of work and my drivers seat just touches the striker. It was worse, but I had a little wiggle room after loosening the seats and retightening. Nice work!
20th Anniversary Mk IV, A50XS Coyote, TKO 600, Trunk Drop Box, Trunk Battery Box, Cubby Hole, Seat Heaters, Radiator hanger and shroud.
-
04-21-2020, 09:38 AM
#440
Senior Member
Originally Posted by
Railroad
Put your door latch strikers on and make sure they clear the seats. It looks like they will. I used F5 sliders, a lot of work and my drivers seat just touches the striker. It was worse, but I had a little wiggle room after loosening the seats and retightening. Nice work!
Dang, Thanks for the heads up. I'll check that. Do I need to check the latch part that is on the door, or just the striker that is attached to the frame? I came up with my side to side location by centering my seats between the seat belt brackets.
Started dreaming of a Cobra around 1987
Purchased Complete Kit 6/9/2017, Delivered 9/4/2017, Rolling Chassis 3/30/2018, Engine Dyno'ed 3/4/2022, Engine installed 8/27/2022
Click here for my build thread
Serial #9158
Design Engineer at BluePrint Engines


 Thanks:
  Likes:


 Reply With Quote


