-
08-07-2022, 10:22 PM
#521
Senior Member

Inching ever closer to cramming this between the frame rails. With the help of my friend Lance, we mated the tranny to the engine this afternoon. And what a beautiful day it was to be in the garage!
-Liberty's Gears modded TKO-600
-McLeod clutch
-Quicktime steel bellhousing
-Speedmaster flywheel


Started dreaming of a Cobra around 1987
Purchased Complete Kit 6/9/2017, Delivered 9/4/2017, Rolling Chassis 3/30/2018, Engine Dyno'ed 3/4/2022, Engine installed 8/27/2022
Click here for my build thread
Serial #9158
Design Engineer at BluePrint Engines
-
Post Thanks / Like - 0 Thanks, 1 Likes
-
08-29-2022, 08:54 PM
#522
Senior Member
Big weekend on the car. The engine is finally resting happily in the chassis and I'm really satisfied with how it went in and turned out. It will most likely need to come back out to do final assembly of the surrounding components, but this install should let me figure out the next steps, get us to the first start, and then onto the exciting go kart phase. Big thanks to my Dad, friend's Jon G & Lance L, and my son Cody for helping shoe horn this thing in there. It went in so nicely, that we managed to knock off a few other tasks as well.
To get it in, we put the front wheels on car ramps and put the back end on some tall jack stands. We needed the front wheels raised to get the cherry picker's out riggers under the chassis and the back was raised just to help increase the angle to get the transmission in. It went well.

It was nice having 5 sets of eyes on every corner as it went in. We managed to avoid scratching anything.

The engine nestled in the frame. After getting the engine in we also installed the headers & installed and adjusted the clutch cable.

Started dreaming of a Cobra around 1987
Purchased Complete Kit 6/9/2017, Delivered 9/4/2017, Rolling Chassis 3/30/2018, Engine Dyno'ed 3/4/2022, Engine installed 8/27/2022
Click here for my build thread
Serial #9158
Design Engineer at BluePrint Engines
-
Post Thanks / Like - 0 Thanks, 4 Likes
-
08-29-2022, 08:54 PM
#523
Senior Member
Here's a shot of the A frame that supports the back of the tranny.

We put the stubby driveshaft in it's place. It fit perfect. FFR nailed this one.

We installed this add on to the kit...a Metco driveshaft safety loop. Well worth the money in my opinion. If one of the universal joints ever goes out I'm going to want some thick steel between my hip and the driveshaft. I don't think the thin aluminum cockpit skin will stop much. The safety loop bolts onto the tranny a frame. No extra drilling required, although we did need to use a large Cresent wrench to gently persuade it not to interfere with the e brake cables.

Shift lever installed. Vintage style with faux reverse lock out. Another add on to the kit. Need to find a shift knob that fits, unfortunately the one that came with the kit didn't fit. Not a big deal. I'm trying to decide between the vintage look or something custom...

At one point we even threw the body on to check the alignment of the headers to the the openings in the body. The headers seem awfully high...like a whole inch over the marked opening on the body. Something I'll need to look into. Either way, its nice to see it with the body on. Here you can see the ramps in the front and the large jack stands in the back that we used to position it just right for the engine install.

Getting ever closer to go kart day!

Wyatt helping with a few finishing touches the next day.

Last edited by Yama-Bro; 08-29-2022 at 09:03 PM.
Started dreaming of a Cobra around 1987
Purchased Complete Kit 6/9/2017, Delivered 9/4/2017, Rolling Chassis 3/30/2018, Engine Dyno'ed 3/4/2022, Engine installed 8/27/2022
Click here for my build thread
Serial #9158
Design Engineer at BluePrint Engines
-
Post Thanks / Like - 0 Thanks, 2 Likes
-
08-30-2022, 01:45 PM
#524
I may have missed it if you posted...
What was the final size of your particular engine?
I know it's based on the new BPE 302 block, but didn't know if you went 289, 302, 306, ...
-
08-30-2022, 09:05 PM
#525
Senior Member

Originally Posted by
Windsor

I may have missed it if you posted...
What was the final size of your particular engine?
I know it's based on the new BPE 302 block, but didn't know if you went 289, 302, 306, ...
I went with the 347, the 289 sticker on the air cleaner is a lie. 
Started dreaming of a Cobra around 1987
Purchased Complete Kit 6/9/2017, Delivered 9/4/2017, Rolling Chassis 3/30/2018, Engine Dyno'ed 3/4/2022, Engine installed 8/27/2022
Click here for my build thread
Serial #9158
Design Engineer at BluePrint Engines
-
Post Thanks / Like - 0 Thanks, 1 Likes
-
08-30-2022, 09:43 PM
#526
Originally Posted by
Yama-Bro
I went with the 347, the 289 sticker on the air cleaner is a lie.
I noticed the 289 sticker and figured it was a means of sandbagging.
Who de-strokes a 302? 
-
08-30-2022, 10:02 PM
#527
Senior Member

Nice job, Frank. Satisfying to see that engine sitting in its final home, isn't it?
MK4 #7838: IRS 3.55 TrueTrac T5z Dart 347
The drawing is from ~7th grade, mid-1970s
Meandering, leisurely build thread is
here
-
08-31-2022, 07:18 AM
#528
Senior Member
Originally Posted by
Windsor
I noticed the 289 sticker and figured it was a means of sandbagging.
Who de-strokes a 302?
Haha, I know, right!? I'm trying to get a vaguely vintage look thru out the whole car. I've seen several pictures of originals that had similar air filters with the same sticker. I figured the originals had 289s and there isn't much difference between a 302 block and a 289 block, so I thought I could get away with it. If nothing else it's a conversation starter...although, I'm not sure you really need that with these cars no matter what stage of completion they are in.
Started dreaming of a Cobra around 1987
Purchased Complete Kit 6/9/2017, Delivered 9/4/2017, Rolling Chassis 3/30/2018, Engine Dyno'ed 3/4/2022, Engine installed 8/27/2022
Click here for my build thread
Serial #9158
Design Engineer at BluePrint Engines
-
08-31-2022, 07:19 AM
#529
Senior Member
Originally Posted by
John Ibele
Nice job, Frank. Satisfying to see that engine sitting in its final home, isn't it?
Yes it is! It feels great. One giant step forward!
Started dreaming of a Cobra around 1987
Purchased Complete Kit 6/9/2017, Delivered 9/4/2017, Rolling Chassis 3/30/2018, Engine Dyno'ed 3/4/2022, Engine installed 8/27/2022
Click here for my build thread
Serial #9158
Design Engineer at BluePrint Engines
-
08-31-2022, 08:11 AM
#530

Steve >> aka: GoDadGo

Looking Good Billy Ray, https://youtu.be/sCkiHxcBgXg I Mean Yama-Bro!
-
Post Thanks / Like - 1 Thanks, 0 Likes
-
09-18-2022, 08:16 PM
#531
Senior Member
I installed a mechanical throttle linkage on my car this weekend. FFR supplies a cable linkage with the kit. I've read of a lot of complaints about the cable setup, so I opted for Mike Forte's mechanical linkage. Its much easier to install with the body off, so it was a good time to do it. It also has more of the vintage Cobra vibe, which I'm all about. There's a ton of adjustment to it, so it took some fiddling to get it just right. Now that I have it, it seems absolutely perfect. It's super smooth with just the right amount of travel and resistance. I'm pretty happy with this linkage.
Here's an overhead shot of the whole linkage from the gas pedal (middle right) to the Sniper EFI (lower left). The top of the foot box is removed in this picture.

This shot shows the linkage connection to the EFI from the drivers side. Not shown in this picture, I ended up connecting some extra throttle return springs, that came in Forte's kit, from the throttle back to a bracket attached to the middle post in the intake.

This view from the passenger side shows the footbox aluminum in place, but I took that out to make assembly easier. I put a hole in the side of the footbox where the pivot bar penetrates the panel. I placed a rubber grommet in the hole to give it a nice finished look.

Here's another overhead view showing the linkage up by the firewall. There's a large 2" frame member behind the aluminum firewall that I attached the ball ends to. It made for a super solid mounting point, which will have zero flex when stomping the throttle. The slots in the arms allow you to adjust the ratio of gas pedal movement to throttle movement. I started off at approx 1:1. Like I said, it feels perfect right now, but I may adjust it once I start driving it.

Here's a view looking up from inside the footbox. You can see the gas pedal and the linkage going up from there to the pivot shaft.

Last edited by Yama-Bro; 09-18-2022 at 08:19 PM.
Started dreaming of a Cobra around 1987
Purchased Complete Kit 6/9/2017, Delivered 9/4/2017, Rolling Chassis 3/30/2018, Engine Dyno'ed 3/4/2022, Engine installed 8/27/2022
Click here for my build thread
Serial #9158
Design Engineer at BluePrint Engines
-
Post Thanks / Like - 0 Thanks, 1 Likes
-
09-18-2022, 08:30 PM
#532
Senior Member

nice pics of the throttle linkage. I also did a rubber grommet but put a brass bushing in the grommet to prevent that grommet from getting cut up over time.
-
09-20-2022, 03:50 PM
#533
Senior Member
Originally Posted by
egchewy79
nice pics of the throttle linkage. I also did a rubber grommet but put a brass bushing in the grommet to prevent that grommet from getting cut up over time.
Good idea!
Started dreaming of a Cobra around 1987
Purchased Complete Kit 6/9/2017, Delivered 9/4/2017, Rolling Chassis 3/30/2018, Engine Dyno'ed 3/4/2022, Engine installed 8/27/2022
Click here for my build thread
Serial #9158
Design Engineer at BluePrint Engines
-
10-09-2022, 04:56 PM
#534
Member

The engine looks awesome and so does the rest of the build!
I’ve been following closely as my build is very close to yours as I am waiting on the new blueprint blocks for my 427, and I also bought a Levy Racing brake kit.
Thanks for the detailed build thread it’s helped a lot!
-
11-04-2022, 02:22 PM
#535
Senior Member
Originally Posted by
red.barchetta
The engine looks awesome and so does the rest of the build!
I’ve been following closely as my build is very close to yours as I am waiting on the new blueprint blocks for my 427, and I also bought a Levy Racing brake kit.
Thanks for the detailed build thread it’s helped a lot!
Thank you sir! I'm glad the build thread is helping others! You are going to love your BPE 427!
Started dreaming of a Cobra around 1987
Purchased Complete Kit 6/9/2017, Delivered 9/4/2017, Rolling Chassis 3/30/2018, Engine Dyno'ed 3/4/2022, Engine installed 8/27/2022
Click here for my build thread
Serial #9158
Design Engineer at BluePrint Engines
-
05-13-2023, 12:30 PM
#536
Senior Member
I did some work on the cooling system. Installed the radiator hoses. As many of you know, the kit comes with a stainless steel corrugated hose that you cut to length and also comes with "adaptors" to do the end connections to the engine and radiator. It's meant to be a universal fit to work with whatever engine a builder might go with. I'm not super crazy about this setup and I've heard of leak issues. So I looked into other options. I didn't want to spend the money on the formed metal tubes, so I went with preformed rubber hoses for existing vehicles that have just the right bends. With just a quick search of the forum, I found some of Jeff Kliener's suggestions, that I started with...read on for more details...
Here are the parts for the upper hose. One hose is for an old fox body mustang and the other is just a Napa generic 90 degree hose. I got the inline filler from Amazon. I liked the fabricated look it has going on. It does have a smaller sized radiator cap than what I was expecting, but it should work fine. If not, it's an easy thing to swap out later.
1990 Fox body Mustang hose: Napa 8028 or NBH7865
90 Degree hose: Napa 777
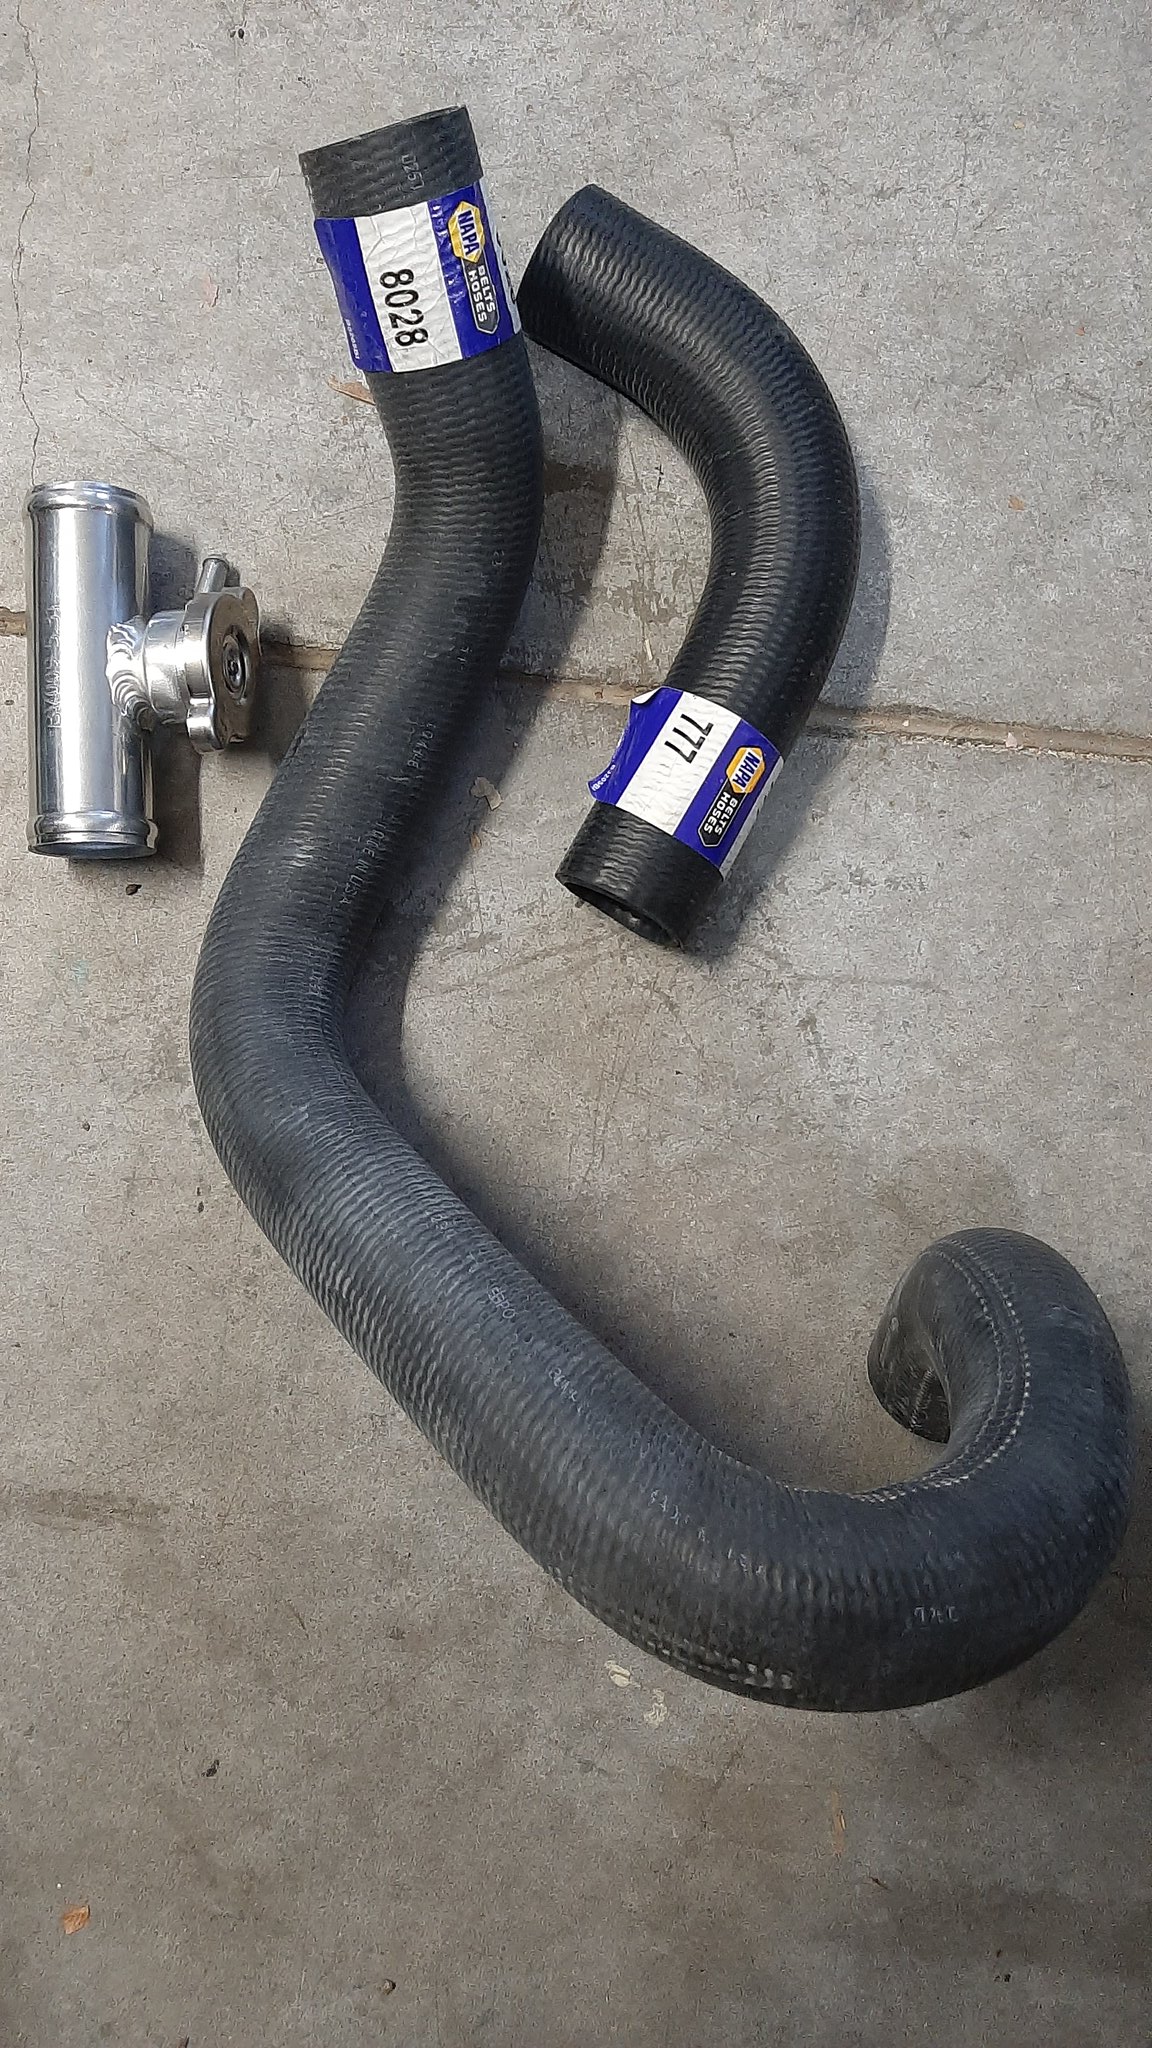
Upper hose installed (pre radiator clamps). It came out very nice. Note: I had to cut both hoses to get the fit I was after. I only took a little bit off each end of the 90 degree hose, but with the larger hose I ended up removing some past the first two bends on one end.

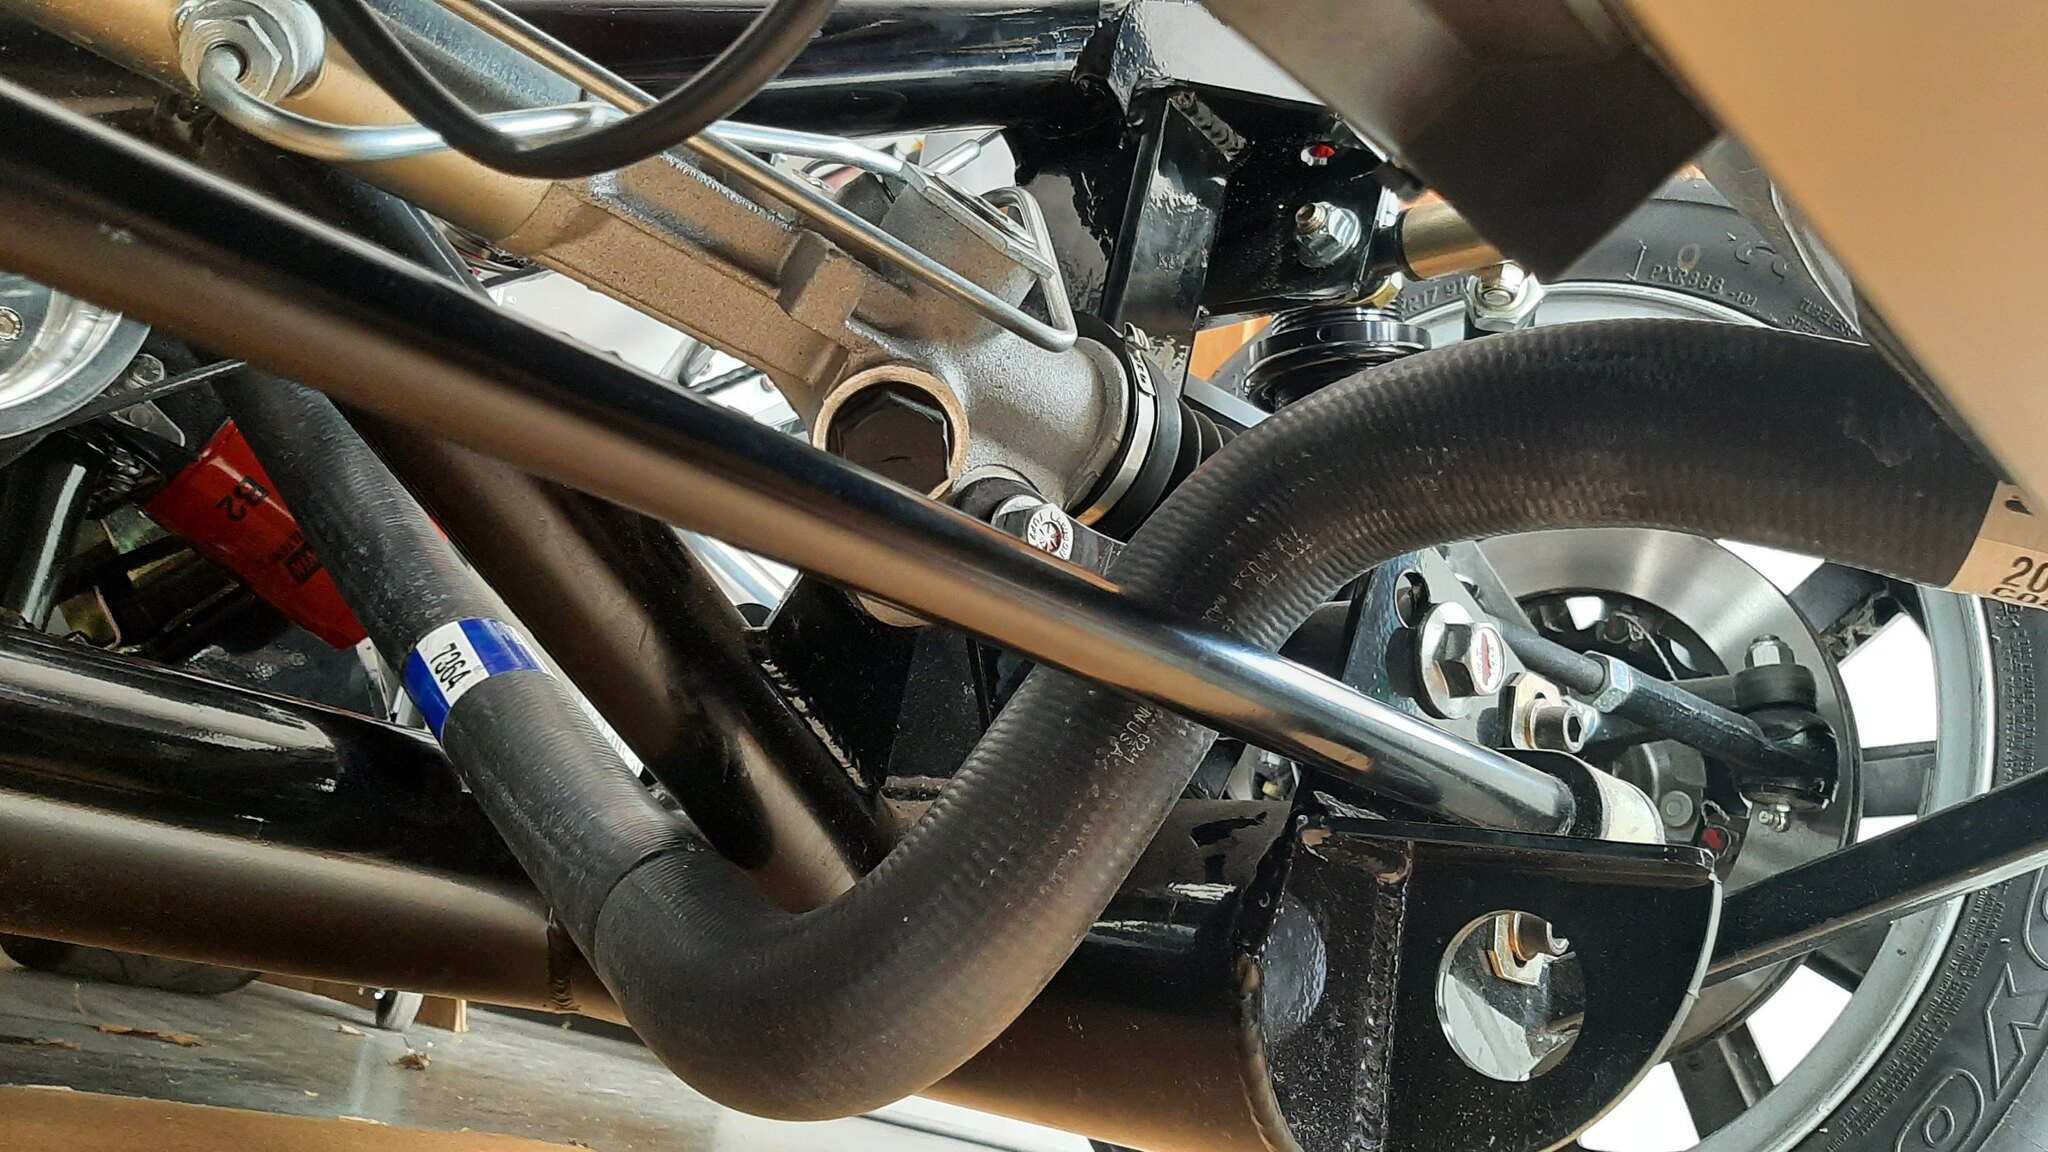
Lower hose parts. One hose is from an old Ford Thunderbird, the other is a common hose used on several Chevys of the 70s and 80s. I got the aluminum in line connector from Amazon. Nice piece.
Early 1990's V6 Thunderbird hose: Napa 7364 or NBH7364
For the front lower hose, I bent a wire in the shape of the hose I was after and took it to Napa and Oreilly's. They let me look thru the hoses until I found one that matched the bends I was needing.
Orielly's part number: 20827

It was hard to get a good picture of the bottom hose assembly, but I think this one shows it pretty good. The Thunderbird hose didn't require any trimming, but I had to cut about 6 to 8 inches off the Chevy hose. Once I got the length dialed in this came out perfect. I don't think there could be a better hose setup for these unless it was custom made. It manages to snake around the frame members, steering components, sway bar and suspension. All with out touching any of them. I plan to clamp the hose to the 'X' member of the chassis to keep the vibrations to a minimum.
Last edited by Yama-Bro; 05-13-2023 at 12:39 PM.
Started dreaming of a Cobra around 1987
Purchased Complete Kit 6/9/2017, Delivered 9/4/2017, Rolling Chassis 3/30/2018, Engine Dyno'ed 3/4/2022, Engine installed 8/27/2022
Click here for my build thread
Serial #9158
Design Engineer at BluePrint Engines
-
Post Thanks / Like - 1 Thanks, 3 Likes
-
06-17-2023, 07:09 PM
#537
Senior Member
Next up was the radiator overflow tank. The kit comes with a long stainless steel canister. Its nice, but a little too much bling for my tastes. Way to modern and custom looking for what I'm going for. I went with this universal Dorman tank. Its basic and doesn't draw attention to itself. Plus, as a bonus, you can see thru it to see how much fluid you have in your system!
The Dorman tank...

I installed it on the upper half of the passenger side F panel. I originally installed it on the lower part of the same F panel, but I had a couple friends tell me it wouldn't let the fluid flow back into the radiator that low. After looking for other places to mount the tank, I realized I could install the elliptical shaped patch panel in the F panel, which created a nice place to place the tank. As long as it doesn't hit the hood hinge mechanism, I should be good.

Started dreaming of a Cobra around 1987
Purchased Complete Kit 6/9/2017, Delivered 9/4/2017, Rolling Chassis 3/30/2018, Engine Dyno'ed 3/4/2022, Engine installed 8/27/2022
Click here for my build thread
Serial #9158
Design Engineer at BluePrint Engines
-
Post Thanks / Like - 0 Thanks, 1 Likes
-
06-17-2023, 08:14 PM
#538
Senior Member

Maybe your friends have never had a drink through a straw. You can mount the overflow tank anywhere below the radiator high point. As long as your hose connections are sealed, vacuum will do the work.
Mk.4 FFR supplied Right hand drive
Received 12/2012 completed 12/2019
Gen1 Coyote / TKO600 / IRS
Lots of mods to make compliant for Australian design rules
-
Post Thanks / Like - 0 Thanks, 1 Likes
-
06-20-2023, 09:14 PM
#539
Senior Member
Originally Posted by
Nigel Allen
Maybe your friends have never had a drink through a straw. You can mount the overflow tank anywhere below the radiator high point. As long as your hose connections are sealed, vacuum will do the work.
Yes, I was thinking that when I mounted it low. They are telling me that vacuum has a limitation on how far down you can go. I left the holes there, so I can move the tank back. Maybe I'll try it once I get it on the road.
Started dreaming of a Cobra around 1987
Purchased Complete Kit 6/9/2017, Delivered 9/4/2017, Rolling Chassis 3/30/2018, Engine Dyno'ed 3/4/2022, Engine installed 8/27/2022
Click here for my build thread
Serial #9158
Design Engineer at BluePrint Engines
-
06-23-2023, 01:45 PM
#540
Senior Member

Great build thread! I can't get over how many great tips I keep seeing after reading so many of these already...keep it coming! I'm also sending you a PM
-
06-27-2023, 10:03 PM
#541
Senior Member
More weekend progress...I assembled the flexible fuel lines that connect to the Holley Sniper EFI and figured out the engine bay mounting for the hard lines. Check out post 329 on how I pressed the ends in without the expensive tool. I did the same this time, but didn't use the heat.
In the assembly I used:
4X Fragola straight fittings, p/n: 20010-BL
2X Russel adaptors, p/n: 640610
Fragola Push Lock hose 815006 (24" for one and 18" for the other)

Looking up from the front passenger side tire at the hard lines that are secured to the passenger side foot box. Those gold clecos will be rivets in the final assembly. I'd do it now, but I can't get the rivet gun in there with the engine in the way.
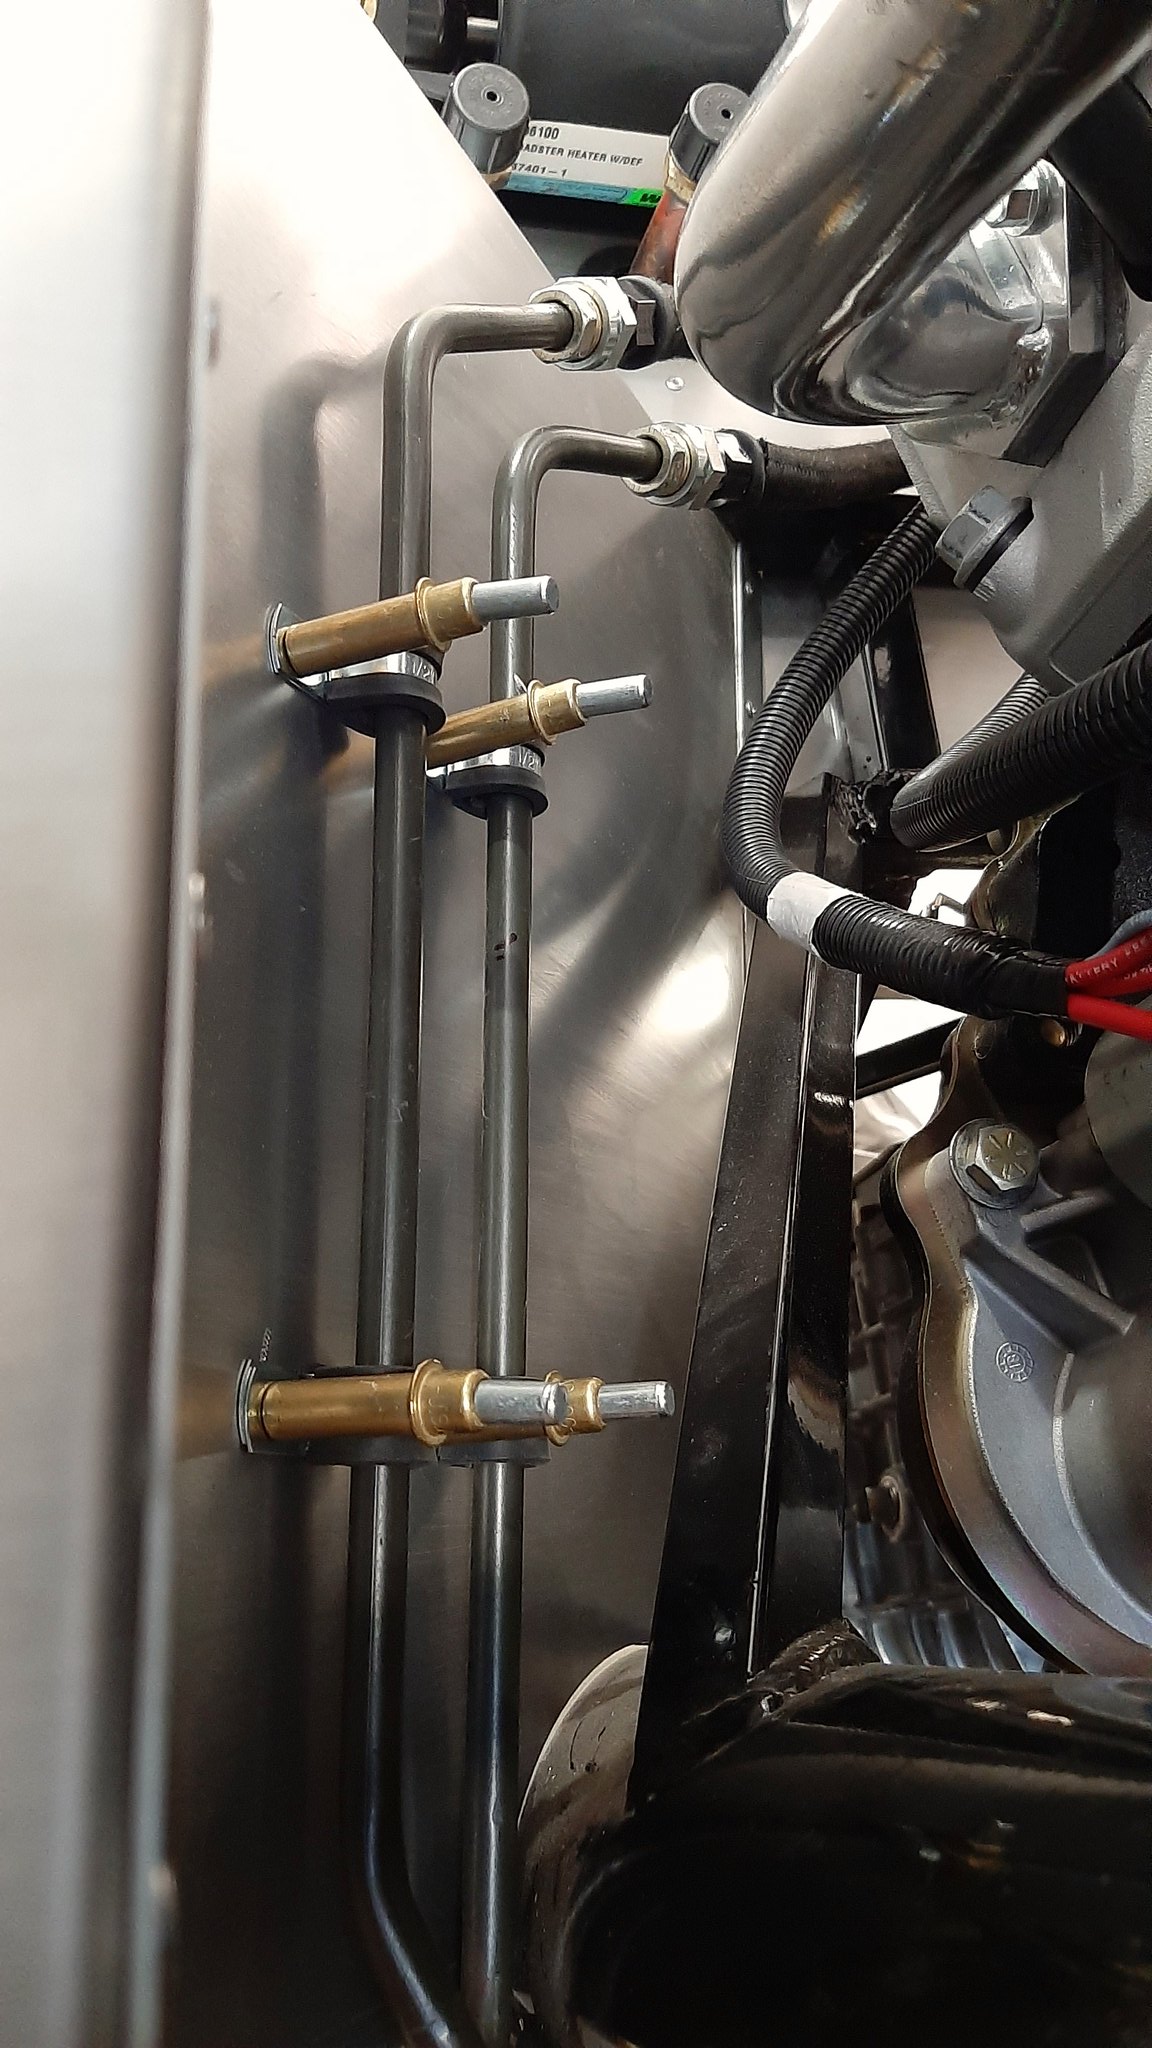
Kind of a wiring mess now, but you can see the connections of the flexible hoses.

Last edited by Yama-Bro; 06-28-2023 at 07:24 AM.
Started dreaming of a Cobra around 1987
Purchased Complete Kit 6/9/2017, Delivered 9/4/2017, Rolling Chassis 3/30/2018, Engine Dyno'ed 3/4/2022, Engine installed 8/27/2022
Click here for my build thread
Serial #9158
Design Engineer at BluePrint Engines
-
07-04-2023, 10:15 AM
#542
Senior Member
I had an issue where the clutch cable interfered with the oil filter and the motor mount causing the cable to make a couple slight bends, thus making the clutch pedal harder to push in than normal. FFR supplies an oil filter relocation kit, but I didn't have a good place to mount the filter and the reports on the forum is that it has a tendency to leak. A gent in this forum recommended a nifty Ford Performance 90 degree oil filter adaptor (Ford Performance P/N: M-6880-B50). See the thread here...https://thefactoryfiveforum.com/show...ation-location It was a simple install, however I spent way more time researching the perfect filter to use with it, only to find that the instructions for the 90 degree adaptor listed three options and one just happened to be the perfect filter. Read the instructions first, kids!  Either way, I'm happy with the results. I had a Baldwin B2 filter but switched to the smaller Motorcraft FL-500-S.
Here's a shot from the side showing the installation. The large black "bolt" threads onto the filter adaptor that is in the block. The blue machined piece is the adaptor. It pivots around the bolt, so you can mount the filter just about any direction you want. I tilted it forward about 45 degrees. This makes for great access when changing oil. You can see the black clutch cable in this picture. It no longer runs into the filter. It now has a nice uninterrupted run from the clutch quadrant down the the clutch fork...and its easier to push in!

Last edited by Yama-Bro; 07-04-2023 at 10:26 AM.
Started dreaming of a Cobra around 1987
Purchased Complete Kit 6/9/2017, Delivered 9/4/2017, Rolling Chassis 3/30/2018, Engine Dyno'ed 3/4/2022, Engine installed 8/27/2022
Click here for my build thread
Serial #9158
Design Engineer at BluePrint Engines
-
09-26-2023, 07:56 AM
#543
Senior Member
My friend Lance and I tackled the power steering lines on the roadster last night. I wasn't content with the lines that were supplied from Factory Five Racing, so I purchased a really nice kit from Breeze Automotive, p/n: 70781. The kit includes everything you need to painlessly connect the supply and return lines from the pump to the steering rack. The kit came with excellent instructions. I forgot to get a pic of all the parts before the install, but there's a pic on Mark's website. Once installed, they look great! A short direct run and very clean looking. I'm pretty happy with them.


We also filled the tranny with fluid. My suggestion is to fill the tranny before putting it in the car, as it is very tight quarters in the tranny tunnel.
Started dreaming of a Cobra around 1987
Purchased Complete Kit 6/9/2017, Delivered 9/4/2017, Rolling Chassis 3/30/2018, Engine Dyno'ed 3/4/2022, Engine installed 8/27/2022
Click here for my build thread
Serial #9158
Design Engineer at BluePrint Engines
-
Post Thanks / Like - 1 Thanks, 0 Likes
-
09-26-2023, 08:14 AM
#544
And....in order to follow-thru with your suggestion, some sort of plug or driveshaft input needs to be installed so the fluid doesn't leak out during the install?
Craig C
-
09-26-2023, 01:54 PM
#545
Senior Member
Originally Posted by
cc2Arider
And....in order to follow-thru with your suggestion, some sort of plug or driveshaft input needs to be installed so the fluid doesn't leak out during the install?
Craig C
Yes, you are correct. Good point. We pulled my son's truck's tranny twice recently. To plug the output shaft hole we dug thru the recycle bin and found a plastic hairspray bottle that was just about the same size as the driveshaft stub. I cut off the bottom of the bottle so only a .25" or so protruded from the tranny once it was inserted. It worked perfect.
Started dreaming of a Cobra around 1987
Purchased Complete Kit 6/9/2017, Delivered 9/4/2017, Rolling Chassis 3/30/2018, Engine Dyno'ed 3/4/2022, Engine installed 8/27/2022
Click here for my build thread
Serial #9158
Design Engineer at BluePrint Engines


 Thanks:
  Likes:


 Reply With Quote

