FormaCars

Visit our community sponsor

Thanks Thanks:  0
Likes Likes:  0
Page 2 of 3 FirstFirst 123 LastLast
Results 41 to 80 of 104

Thread: 65 coupe Gen 3 "Phoenix" build

  1. #41

    Join Date
    May 2011
    Location
    Pittsburgh, PA
    Posts
    728
    Post Thanks / Like
    That looks great; keep the pictures coming.

  2. #42
    nkw8181's Avatar
    Join Date
    Sep 2013
    Location
    Dallas, TX
    Posts
    762
    Post Thanks / Like
    edwardb,

    The main thing we are keeping the same as what was on the prototype but different from the manual is where the wiring comes into the cabin. We are using the prototype as a good reference and then trying to improve on it. The rear is completely different as the prototype was a 3 link verse the reincarnated car has IRS. As far as the sway bar manual I didn't see that manual we just installed it the way everything fit. I'm not sure it there is a reason that you would need to cut them. With them longer the angle isn't that extreme and if something is able to "hit" it you have a problem with how close it is to the wheels. I think you would have to be driving over a curb or something of the sort to hit the sway bar.

    AMSigurd,

    I hadn't given much thought to splitting the brakes apart. The 818 was a single reservoir and we didn't have any brake issues.

    Thanks for the support everyone!
    Nolan
    65 coupe Gen 3 "Phoenix" build
    http://thefactoryfiveforum.com/showt...032#post297032

    818 s (with r windscreen ) 350 rwhp. Registered and street legal (SOLD)

  3. #43
    nkw8181's Avatar
    Join Date
    Sep 2013
    Location
    Dallas, TX
    Posts
    762
    Post Thanks / Like
    Ok I'm getting the hang of this photo album. Got a few more pics. We installed quite a few of the interior panels. We are waiting on an e-brake mounting part before we mount the large trunk panel and the rest of the center console. Someone speak now if we will run into any issues installing all the panels before the motor and trans are installed. We have all the wires and tubing that will run through the tunnel ran. Secondly the cab side panels are installed as well. I couldn't see any reason to wait on these. I want all the panels installed sooner then later so that I can paint the lizard skin before putting on the body or even the wiring in.
    Last edited by nkw8181; 01-02-2018 at 12:09 PM.
    Nolan
    65 coupe Gen 3 "Phoenix" build
    http://thefactoryfiveforum.com/showt...032#post297032

    818 s (with r windscreen ) 350 rwhp. Registered and street legal (SOLD)

  4. #44
    nkw8181's Avatar
    Join Date
    Sep 2013
    Location
    Dallas, TX
    Posts
    762
    Post Thanks / Like
    Nolan
    65 coupe Gen 3 "Phoenix" build
    http://thefactoryfiveforum.com/showt...032#post297032

    818 s (with r windscreen ) 350 rwhp. Registered and street legal (SOLD)

  5. #45
    nkw8181's Avatar
    Join Date
    Sep 2013
    Location
    Dallas, TX
    Posts
    762
    Post Thanks / Like
    Nolan
    65 coupe Gen 3 "Phoenix" build
    http://thefactoryfiveforum.com/showt...032#post297032

    818 s (with r windscreen ) 350 rwhp. Registered and street legal (SOLD)

  6. #46
    Senior Member q4stix's Avatar
    Join Date
    Jul 2016
    Location
    Seattle, WA
    Posts
    466
    Post Thanks / Like
    Nice progress!
    Gen 3 Type 65 Coupe builder

  7. #47
    Waiting for my 65 Coupe nskaats's Avatar
    Join Date
    Nov 2017
    Location
    Hebron, Ky
    Posts
    144
    Post Thanks / Like
    Nice progress and absolutely beautiful build! This is making me even more anxious for my coupe to show up.

  8. #48
    nkw8181's Avatar
    Join Date
    Sep 2013
    Location
    Dallas, TX
    Posts
    762
    Post Thanks / Like
    It seems like the more time I go between updates, that harder it is to capture it all. So I got the fuse box mount made and mounted. As I mentioned before the panel above is secured with rivetnuts and 10-32 screws. Got the brake reservoir fully plumbed and the ebrake installed. After Wayne’s suggestion I made the center trans panel removable with rivetnuts. The wiring is in the car just not fully routed, plugged in or secured. The engine is in the car though we did find another change from the prototype. The new frame requires a spacer kit that modifies the motor mount while the proto had none. Also the transmission mounting bracket was quite different. I want to note that Factory Five has been great about getting me the required parts when I find things like this. We knew things like this would pop up as unknown variables. After the engine was in we taped up the interior and painted it with to coats of Lizard skin sound and thermal insulation each. I didn’t do the back of the car on first coat as I was afraid of running out. I did do the back with both coats of thermal. So I can say it takes a little under two gallons of Lizard skin Sound and two gallons of Lizard skin thermal to cover the inside of a Daytona. For those who wanted to know.

    here are the pics
    Attached Images Attached Images
    Nolan
    65 coupe Gen 3 "Phoenix" build
    http://thefactoryfiveforum.com/showt...032#post297032

    818 s (with r windscreen ) 350 rwhp. Registered and street legal (SOLD)

  9. #49
    nkw8181's Avatar
    Join Date
    Sep 2013
    Location
    Dallas, TX
    Posts
    762
    Post Thanks / Like
    And pics cont.
    Attached Images Attached Images
    Nolan
    65 coupe Gen 3 "Phoenix" build
    http://thefactoryfiveforum.com/showt...032#post297032

    818 s (with r windscreen ) 350 rwhp. Registered and street legal (SOLD)

  10. #50
    nkw8181's Avatar
    Join Date
    Sep 2013
    Location
    Dallas, TX
    Posts
    762
    Post Thanks / Like
    and yet more
    Attached Images Attached Images
    Nolan
    65 coupe Gen 3 "Phoenix" build
    http://thefactoryfiveforum.com/showt...032#post297032

    818 s (with r windscreen ) 350 rwhp. Registered and street legal (SOLD)

  11. #51
    nkw8181's Avatar
    Join Date
    Sep 2013
    Location
    Dallas, TX
    Posts
    762
    Post Thanks / Like
    and yes. still more
    Attached Images Attached Images
    Nolan
    65 coupe Gen 3 "Phoenix" build
    http://thefactoryfiveforum.com/showt...032#post297032

    818 s (with r windscreen ) 350 rwhp. Registered and street legal (SOLD)

  12. #52
    nkw8181's Avatar
    Join Date
    Sep 2013
    Location
    Dallas, TX
    Posts
    762
    Post Thanks / Like
    And the last for now
    Attached Images Attached Images
    Nolan
    65 coupe Gen 3 "Phoenix" build
    http://thefactoryfiveforum.com/showt...032#post297032

    818 s (with r windscreen ) 350 rwhp. Registered and street legal (SOLD)

  13. #53
    nkw8181's Avatar
    Join Date
    Sep 2013
    Location
    Dallas, TX
    Posts
    762
    Post Thanks / Like
    Time for an update again and lots and lots of pictures. We got the Ac system plumbed and most of the wiring done. The AC compressor gets really close to the supercharger pulley bracket. The AC condenser got trimmed to fit. Finally worked out where to put the electro-hydraulic power steering pump after multiple tries and making a new bracket though I haven't mounted it yet. The AC is fully plumbed. I used a 90 at the top of the condenser to avoid the structure on the prototypes hood though others could do the same. The current condenser needs to be trimmed and shifted all the way to the drivers side if you want the lower running inside with the radiator hose. I would suggest considering lifting the motor a bit when installing the headers. some of the bolts are a real pain to get in. I wish we would have thought if this while we where doing it. I'm sure there is alot more I am forgetting to mention and will add as I remember. Next we need to finish hooking up all the wires and then START the CAR!! Here is the picture album. There are close to 80 pics so I didn't want to post 8 times to show them all. I hope this way works.

    http://thefactoryfiveforum.com/album.php?albumid=1248
    Nolan
    65 coupe Gen 3 "Phoenix" build
    http://thefactoryfiveforum.com/showt...032#post297032

    818 s (with r windscreen ) 350 rwhp. Registered and street legal (SOLD)

  14. #54
    Senior Member
    Join Date
    Apr 2017
    Location
    Atlanta, GA
    Posts
    247
    Post Thanks / Like
    All these pics are unbelievably helpful. Thanks so much and keep them coming.

  15. #55
    nkw8181's Avatar
    Join Date
    Sep 2013
    Location
    Dallas, TX
    Posts
    762
    Post Thanks / Like
    Glad it helps jdavis500.

    Here is another walk around video.

    https://youtu.be/iw4c11llUqE
    Nolan
    65 coupe Gen 3 "Phoenix" build
    http://thefactoryfiveforum.com/showt...032#post297032

    818 s (with r windscreen ) 350 rwhp. Registered and street legal (SOLD)

  16. #56
    Senior Member q4stix's Avatar
    Join Date
    Jul 2016
    Location
    Seattle, WA
    Posts
    466
    Post Thanks / Like
    As always, great pictures and documentation. I love how clean it all looks.
    Gen 3 Type 65 Coupe builder

  17. #57
    Member Dlirium's Avatar
    Join Date
    Sep 2017
    Location
    San Jose, CA
    Posts
    90
    Post Thanks / Like
    Yes, fantastic pictures! What supercharger are you using? I'm interested in any info on fitment as well, as I am running A/C too and considering what options I have to eeek a little more HP out of the Gen 2 Coyote...

  18. #58
    nkw8181's Avatar
    Join Date
    Sep 2013
    Location
    Dallas, TX
    Posts
    762
    Post Thanks / Like
    Thanks guys.

    Dlirium, it is an Edlebrock E-force supercharger. The clearance to the hood is tight. In fact Factory five had to trim the fiberglass to keep from hitting the motor. We will see what if any demons arise from this on the new frame. Will keep you posted as we get close. Things look good for an engine start this week. Still working on the power steering and chasing down wires for gauge power and the Speedo wires. The prototype didn't have any lights hooked up in or outside. Chasing wires....... this is where time can disappear lol.
    Nolan
    65 coupe Gen 3 "Phoenix" build
    http://thefactoryfiveforum.com/showt...032#post297032

    818 s (with r windscreen ) 350 rwhp. Registered and street legal (SOLD)

  19. #59
    Senior Member
    Join Date
    Jun 2013
    Location
    Bowling Green, KY
    Posts
    1,382
    Post Thanks / Like
    Fantastic build.

  20. #60
    Member Dlirium's Avatar
    Join Date
    Sep 2017
    Location
    San Jose, CA
    Posts
    90
    Post Thanks / Like
    Quote Originally Posted by nkw8181 View Post
    It seems like the more time I go between updates, that harder it is to capture it all. So I got the fuse box mount made and mounted. As I mentioned before the panel above is secured with rivetnuts and 10-32 screws. Got the brake reservoir fully plumbed and the ebrake installed. After Wayne’s suggestion I made the center trans panel removable with rivetnuts. The wiring is in the car just not fully routed, plugged in or secured. The engine is in the car though we did find another change from the prototype. The new frame requires a spacer kit that modifies the motor mount while the proto had none. Also the transmission mounting bracket was quite different. I want to note that Factory Five has been great about getting me the required parts when I find things like this. We knew things like this would pop up as unknown variables. After the engine was in we taped up the interior and painted it with to coats of Lizard skin sound and thermal insulation each. I didn’t do the back of the car on first coat as I was afraid of running out. I did do the back with both coats of thermal. So I can say it takes a little under two gallons of Lizard skin Sound and two gallons of Lizard skin thermal to cover the inside of a Daytona. For those who wanted to know.

    here are the pics
    Love that fuse panel location!! I'm going to straight up steal that idea :-)

  21. #61
    Member Dlirium's Avatar
    Join Date
    Sep 2017
    Location
    San Jose, CA
    Posts
    90
    Post Thanks / Like
    Quote Originally Posted by nkw8181 View Post
    Thanks guys.

    Dlirium, it is an Edlebrock E-force supercharger. The clearance to the hood is tight. In fact Factory five had to trim the fiberglass to keep from hitting the motor. We will see what if any demons arise from this on the new frame. Will keep you posted as we get close. Things look good for an engine start this week. Still working on the power steering and chasing down wires for gauge power and the Speedo wires. The prototype didn't have any lights hooked up in or outside. Chasing wires....... this is where time can disappear lol.
    Thanks Nolan, can't wait for the fire-up video!!

  22. #62
    nkw8181's Avatar
    Join Date
    Sep 2013
    Location
    Dallas, TX
    Posts
    762
    Post Thanks / Like

    First Start!

    The car lives! So after finding that the brake/ clutch sensor wasn't grounded and that the inertia switch was tripped the car runs!

    https://youtu.be/nvUWCqRfxoE
    Nolan
    65 coupe Gen 3 "Phoenix" build
    http://thefactoryfiveforum.com/showt...032#post297032

    818 s (with r windscreen ) 350 rwhp. Registered and street legal (SOLD)

  23. #63
    nkw8181's Avatar
    Join Date
    Sep 2013
    Location
    Dallas, TX
    Posts
    762
    Post Thanks / Like
    I have alot of pictures to add. the man thing of note "besides getting the car running" was I created sub-frames for the dash to stiffen it up. I mounted the gauge cluster to the frame to make getting to the wires easier. With the structure it the side panels will be permanent so the ac vents there don't have to move. The defrost may stay attached to the dash unless I figure another way. So until I get the pics here is a walk around after we ran the engine.

    https://youtu.be/N5Q3gglHBuw
    Nolan
    65 coupe Gen 3 "Phoenix" build
    http://thefactoryfiveforum.com/showt...032#post297032

    818 s (with r windscreen ) 350 rwhp. Registered and street legal (SOLD)

  24. #64
    nkw8181's Avatar
    Join Date
    Sep 2013
    Location
    Dallas, TX
    Posts
    762
    Post Thanks / Like
    So here are all the pics. One other thing to note. The dash cross member had a slight bow s when I mounted the gauges I put washers behind it to space it out. i also used angle iron that was straight as a reference for where to mount my sub frames.

    http://thefactoryfiveforum.com/album.php?albumid=1257
    Nolan
    65 coupe Gen 3 "Phoenix" build
    http://thefactoryfiveforum.com/showt...032#post297032

    818 s (with r windscreen ) 350 rwhp. Registered and street legal (SOLD)

  25. #65
    Senior Member
    Join Date
    Apr 2017
    Location
    Atlanta, GA
    Posts
    247
    Post Thanks / Like
    A very satisfying first start. I think hitting the horn to scare your buddy is always standard operating procedure.

  26. #66
    nkw8181's Avatar
    Join Date
    Sep 2013
    Location
    Dallas, TX
    Posts
    762
    Post Thanks / Like
    Thanks for the confirmation. I knew that was in a manual somewhere
    Nolan
    65 coupe Gen 3 "Phoenix" build
    http://thefactoryfiveforum.com/showt...032#post297032

    818 s (with r windscreen ) 350 rwhp. Registered and street legal (SOLD)

  27. #67
    Senior Member
    Join Date
    Feb 2011
    Posts
    208
    Post Thanks / Like
    Quote Originally Posted by nkw8181 View Post
    The car lives! So after finding that the brake/ clutch sensor wasn't grounded and that the inertia switch was tripped the car runs!

    https://youtu.be/nvUWCqRfxoE
    This is a great build!

    Engine sounds great!

  28. #68
    nkw8181's Avatar
    Join Date
    Sep 2013
    Location
    Dallas, TX
    Posts
    762
    Post Thanks / Like
    Progress doesn't ever seem as big as in the beginning. regardless alot has been done. Seat brackets where made to stiffen up the seat mounting and allow the use of sliders. It was made so that I can mount it straight to the floor or with the sliders. with the sliders in I have to have foam on the side roll bars otherwise i hit my head. For reference I am 6'"1. when the seat is mounted to the floor directly my head clears.

    Started installing the carpet. we got the piece tat goes under the dash, ie the hard one, and the back. if you look close at the pics you can see that I cut-out the fuel tank openings so if i need access I only pull up the small pieces.

    I can't decide what I want to do on the switches on the dash. I really want them stationary. I have considered cutting a rectangle out of the gray dash and having a panel behind that is securing the switches. the signature will be attached like that I just can't make up my mind. Any suggestions? If I do the black panel i would attach the A/C panel to it. I also want some stiffness around the headlight switch since it pushes and pulls. Working on that pending the switch setup.

    OOOOOO I got the car aligned!!! Yes I am getting a bit excited!!

    got the electro hydraulic power steering installed and it feels really good. ( well sitting still and the little driving around the neighborhood.

    I think that sums things up. hoping to finish up the carpet this week and a bit of miss wiring.

    Oh almost forgot the album link

    https://thefactoryfiveforum.com/album.php?albumid=1269
    Nolan
    65 coupe Gen 3 "Phoenix" build
    http://thefactoryfiveforum.com/showt...032#post297032

    818 s (with r windscreen ) 350 rwhp. Registered and street legal (SOLD)

  29. #69
    nkw8181's Avatar
    Join Date
    Sep 2013
    Location
    Dallas, TX
    Posts
    762
    Post Thanks / Like
    Time for another update. All the carpet is in,
    Seats are in as well and I had the heated seat elements installed

    20180224_213633.jpg20180224_213608.jpg20180224_213604.jpg20180223_074932.jpg20180223_074926.jpg20180223_074906.jpg

    I got the dash mounting, switches and signature figured and and done.

    20180224_214505.jpg

    With that I made one more dash support that goes close to the headlight switch.

    20180224_213630.jpg
    Still need to run the ac ducting. Oh and a big one... Got the body on!!!
    20180225_171055.jpg20180225_171023.jpg

    it isn't fully secured yet but we are getting there. I am having to trim alot from under the front of the hood to clear the radiators when opening. I knew of this would be needed before hand.

    here are the above pics and a few more.

    https://thefactoryfiveforum.com/album.php?albumid=1279
    Nolan
    65 coupe Gen 3 "Phoenix" build
    http://thefactoryfiveforum.com/showt...032#post297032

    818 s (with r windscreen ) 350 rwhp. Registered and street legal (SOLD)

  30. #70
    Junior Member
    Join Date
    Feb 2018
    Posts
    5
    Post Thanks / Like
    Loving following this build - seems to go so quick and effortlessly - guess thats what happens when you know what you doing!

  31. #71
    nkw8181's Avatar
    Join Date
    Sep 2013
    Location
    Dallas, TX
    Posts
    762
    Post Thanks / Like
    Quote Originally Posted by Safrican13 View Post
    Loving following this build - seems to go so quick and effortlessly - guess thats what happens when you know what you doing!
    Thanks! I'm glad I'm making it "look" easy lol. One of my friends and I are working on it 5 to 6 days a week since we started. That and we both took a week off work after Christmas. I will say having built one car does help you know what to look for.
    Nolan
    65 coupe Gen 3 "Phoenix" build
    http://thefactoryfiveforum.com/showt...032#post297032

    818 s (with r windscreen ) 350 rwhp. Registered and street legal (SOLD)

  32. #72
    Member Dlirium's Avatar
    Join Date
    Sep 2017
    Location
    San Jose, CA
    Posts
    90
    Post Thanks / Like
    Quote Originally Posted by nkw8181 View Post
    Oh and a big one... Got the body on!!!
    Looking great, we all appreciate the volume of pictures! I have the same 18" wheels coming and will go with the same tires. Are you pretty happy with the look and fit of the rear wheels with the 1" spacer?

    brent

  33. #73
    nkw8181's Avatar
    Join Date
    Sep 2013
    Location
    Dallas, TX
    Posts
    762
    Post Thanks / Like
    It looks pretty good but I reserve final judgement for when the body is fully mounted and I test the wheel travel. It looks like it is close. I know others have said you could run 1.25 but that doesn't look to be the case but I will know soon enough. I'll be sure to share my findings
    Nolan
    65 coupe Gen 3 "Phoenix" build
    http://thefactoryfiveforum.com/showt...032#post297032

    818 s (with r windscreen ) 350 rwhp. Registered and street legal (SOLD)

  34. #74
    nkw8181's Avatar
    Join Date
    Sep 2013
    Location
    Dallas, TX
    Posts
    762
    Post Thanks / Like
    Still haven't checked the wheel travel but here is a video of where the car is at.

    https://youtu.be/T4BRfsmg34A
    Nolan
    65 coupe Gen 3 "Phoenix" build
    http://thefactoryfiveforum.com/showt...032#post297032

    818 s (with r windscreen ) 350 rwhp. Registered and street legal (SOLD)

  35. #75
    Member Zots's Avatar
    Join Date
    Sep 2017
    Location
    Montgomery TX
    Posts
    63
    Post Thanks / Like
    I recently stopped by and visited with Nolan to check out the coupe. What a spectacular car!!!!! Thanks, Nolan.

  36. #76
    nkw8181's Avatar
    Join Date
    Sep 2013
    Location
    Dallas, TX
    Posts
    762
    Post Thanks / Like
    Quote Originally Posted by Zots View Post
    I recently stopped by and visited with Nolan to check out the coupe. What a spectacular car!!!!! Thanks, Nolan.
    Thanks it was great meeting you and I hope I was able to help you on your decision: )

    On the topic of the car we find ourselves hitting a few road blocks. First we found that either the striker bolts needs to be longer or the striker mounting brackets need to be elongated. Second after we got that done we found we need to put some spacers inside the door between the door frame and hinge in order to pull the door in closer to the body. Lastly the driver exhaust is sitting to high so we elongated the driver side motor mount. We got a small amount of clearance and hope it is enough. We really don't want to take the exhaust off again!

    Oh I did get the dash installed. ( Pictures to come later ) I will say that if you are putting a.c. on I do not recommend putting the engine computer behind the dash. Actually put as little as possible behind the dash. The a.c. hours take a lot of space. I made my dash removable but with absolutely no desire to "EVER" remove it is possible.
    Nolan
    65 coupe Gen 3 "Phoenix" build
    http://thefactoryfiveforum.com/showt...032#post297032

    818 s (with r windscreen ) 350 rwhp. Registered and street legal (SOLD)

  37. #77
    Member Dlirium's Avatar
    Join Date
    Sep 2017
    Location
    San Jose, CA
    Posts
    90
    Post Thanks / Like
    Quote Originally Posted by nkw8181 View Post

    Oh I did get the dash installed. ( Pictures to come later ) I will say that if you are putting a.c. on I do not recommend putting the engine computer behind the dash. Actually put as little as possible behind the dash. The a.c. hours take a lot of space. I made my dash removable but with absolutely no desire to "EVER" remove it is possible.
    Really interested in what you find here, please keep us posted as I am going to tackling this project next month...

    Also, how did you make the dash removable? Love to see more on that!

    Thanks for all the info!

    brent

  38. #78
    East Coast Speed Machines Erik W. Treves's Avatar
    Join Date
    Feb 2011
    Location
    Huntsville, Al
    Posts
    2,105
    Post Thanks / Like
    hey... I think there are new rear splash guards you need to get from FFR... they close up the whole in front of the rear tire up high and wrap around the roll bar to seal it off nicely... might double check that piece and the new front splash guards as well.
    FFR 1879, Blown DSS 306,REDLINE management, VeryCoolParts Tuned 460RWHP

    FFR 818S, The Flash, Chassis #5, 2.0L, LSD, Electromotive TEC-S, VCP Tuned, 278RWHP 265 RWTQ

    FFR 6651, Green Lantern, 408W Crate, Hellion 66mm Turbo, JGS Waste gate / Blowoff valve, Tec-GT management, VCP Tuned, 575 RWHP, 690 RWTQ

    FFR 8335, Black Mamba, 289 FIA CSX 2001 tribute car, 347, 48 IDA webers, VCP Tuned, 311 RWHP 386 RWTQ, 3-link, Trigo's

    FFR 0004, Gen 3 , Hawk Coupe, Coyote twin turbo, 683 RWHP 559 RWTQ, IRS, VCP Tuned. "not too shabby"

    US ARMY Maintenance Test Pilot (CW4 Retired)

  39. #79
    Senior Member edwardb's Avatar
    Join Date
    Feb 2011
    Location
    Lake Orion, Michigan
    Posts
    10,567
    Post Thanks / Like
    Quote Originally Posted by Erik W. Treves View Post
    hey... I think there are new rear splash guards you need to get from FFR... they close up the whole in front of the rear tire up high and wrap around the roll bar to seal it off nicely... might double check that piece and the new front splash guards as well.
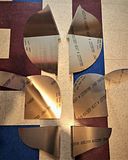
    These are the front and rear splash guards that came with #59 delivered several months ago. I'm assuming these are the latest versions. Hope so anyway. Top two are the rear, bottom four are for the front. I haven't tried fitting them yet. (Sorry for the colorful floor.)

    Build 1: Mk3 Roadster #5125. Sold 11/08/2014. Build 2: Mk4 Roadster #7750. Sold 04/10/2017. Build Thread
    Build 3: Mk4 Roadster 20th Anniversary #8674. Sold 09/07/2020. Build Thread and Video. Build 4: Gen 3 Type 65 Coupe #59. Gen 3 Coyote. Legal 03/04/2020. Build Thread and Video
    Build 5: 35 Hot Rod Truck #138. LS3 and 4L65E auto. Rcvd 01/05/2021. Legal 04/20/2023. Build Thread. Sold 11/9/2023.

  40. #80
    Member Dlirium's Avatar
    Join Date
    Sep 2017
    Location
    San Jose, CA
    Posts
    90
    Post Thanks / Like
    Quote Originally Posted by edwardb View Post
    These are the front and rear splash guards that came with #59 delivered several months ago. I'm assuming these are the latest versions. Hope so anyway. Top two are the rear, bottom four are for the front. I haven't tried fitting them yet. (Sorry for the colorful floor.)

    What is the plan for treating these? Powdercoat, or some sort of other undercoating?

Page 2 of 3 FirstFirst 123 LastLast

Posting Permissions

  • You may not post new threads
  • You may not post replies
  • You may not post attachments
  • You may not edit your posts
  •  

Stewart Transport

Visit our community sponsor