Thank you fellas!!! Means a lot coming from the super talented regulars on the group here.
It was great to cut my teeth so to speak on this fairly straight forward CF project as my first one. So far it is turning out exactly how I imagined it in my head and I can't wait to start wiring it up. Waiting on orders from Prowire (Crash's recommendation, thank you by the way) and racespeconline.com and I should have most of what I need to wire this up.
Still need to settle on how to connect the wires to the clock spring. I need to see if a Deutsch AutoSports connector will fit inside the Momo adapter or I'll just have to butt-splice everything and make it permanent. I'd prefer to have a Deutsch AS connector so I can take it on and off for maintenance and build purposes, but it may be too darn tight.
Looking good, really like the way it came out. Your bypass looks great also, I am still using the heater control valve with the vintage air unit but if I have any problem I am going to switch it out for a manual valve. The issue for me was living in Wyoming, I can have the air on during the hot part of the day hen the heater later on at night all in the same day so was hoping the heater control valve would do its job so I did not have to manually open and close everyday. Again, one nice job on both the bypass and the CF switches and plate fore the wheel.
The AC works just fine....even with full flow to the heater core.....there would be no real reason to open and close the valve every day. The biggest advantage is going to be on cars like the one I'm building that is going to CA...or like Shoeless which is in FL. Hardly a need for heat the vast majority of the time the car is going to be used and you want the most cooling you can get. For Wyoming weather, I'm guessing you could just leave the heater core hooked up year round and be fine.
Shane Vacek
VRaptor SpeedWorks, LLC www.vraptorspeedworks.com
Turn-key GTM, SL-C & Ultima GTR Built to Your Specs!
Offering a full line of GTM Upgrades and Custom Parts
The AC works just fine....even with full flow to the heater core.....there would be no real reason to open and close the valve every day. The biggest advantage is going to be on cars like the one I'm building that is going to CA...or like Shoeless which is in FL. Hardly a need for heat the vast majority of the time the car is going to be used and you want the most cooling you can get. For Wyoming weather, I'm guessing you could just leave the heater core hooked up year round and be fine.
I plan to have a mechanical valve with an actuator cable like this, easy to hide under the dash...
Remember, the issue that the heater control valve addresses is not only cutting flow to the heater core when max A/C is needed, that is what is accomplished with the standard VA control valve. The issue is maintaining flow when the heater core is shut off so that the thermostat works properly. From what I understand by reading and looking at the pictures, Shane's solution will bypass fluid 100% of the time. The upgraded heater control valve from My Race Shop does not work like this. It only bypasses when the heater core is shut off. If you wanted to do what Shane is doing you could just drill a hole in the thermostat and achieve the same constant bypass, no tees and tubing required.
Any idea of how many/what size holes would have to be drilled in order to prevent the engine from overheating and also still provide proper t-stat operation? I guess I never really understood the design of the t-stat/WP in that regard....what is the purpose of having the t-stat seal off that other part of the WP? Why not just make that a solid casting?.....or make the proper sized opening/bypass there in the first place to always provide enough flow so that engine doesn't overheat? I've always viewed the whole thing as completely bass-ackwards from what it should be.....which is why this whole thing is such an issue in the first place. One of those things that GM should have used 100 years worth of "this is what works" and stuck with it instead of making some thing so simple into something that doesn't work right.
Shane Vacek
VRaptor SpeedWorks, LLC www.vraptorspeedworks.com
Turn-key GTM, SL-C & Ultima GTR Built to Your Specs!
Offering a full line of GTM Upgrades and Custom Parts
One of those things that GM should have used 100 years worth of "this is what works" and stuck with it instead of making some thing so simple into something that doesn't work right.
Any idea of how many/what size holes would have to be drilled in order to prevent the engine from overheating and also still provide proper t-stat operation? I guess I never really understood the design of the t-stat/WP in that regard....what is the purpose of having the t-stat seal off that other part of the WP? Why not just make that a solid casting?.....or make the proper sized opening/bypass there in the first place to always provide enough flow so that engine doesn't overheat? I've always viewed the whole thing as completely bass-ackwards from what it should be.....which is why this whole thing is such an issue in the first place. One of those things that GM should have used 100 years worth of "this is what works" and stuck with it instead of making some thing so simple into something that doesn't work right.
I think the problem was likely packaging once the fuel injection throttle body was put where the thermostat housing was on a small block Chevy. It should be noted that the stock thermostats DO have a small hole in them, presumably to keep water flowing in slight amounts to the other side of the thermostat, and to also keep air from being trapped as the proper placement of the stock thermostat is to place that hole at the top of the housing. That said, it is important to note that the original design of the LS engine always, as far as I know, incorporates the use of a heater bypass valve. It is simply part of the systems design. You can find cheaper and easier ways around the problem, heck I tell people constantly that a heater bypass valve really isn't needed, and neither would your solution be for that matter, if they just want to pay attention to what they are doing and make sure that the Vintage Air control valve is not closed during a warm up cycle. Simple as that.
If you don't want to go to that trouble, and you want the solution that the OEM designed into the system, then that is the use of the correct heater bypass valve components.
Thanks for the discussion on the bypass topic fellas, that's what makes this forum great, we have very talented and knowledgable builders/racers to discuss items just like this.
I'm going to give it a shot as is. Once I get #501 to the go cart stage there will be plenty of road tuning, since I will be attempting all the tuning myself and will be able to really flex this and test it out. If I see unusual signs (higher temps, odd V/A functioning,...whatever) I'll be able to adjust. It will be a bit of a pain to change later, but since I live in S FL, I'll hardly ever use the heat anyways. Maybe I'll just hold onto the bypass valve just in case.
That looks good. I have been wanting to simplify the kit and wanting to use a 12V valve instead of the two valve vacuum system. Unfortunately all the electric valves I have tried had various issues. What valve are you using, specifically?
I did this a long time ago, the valve by vintageair was made by Horton and I they have the 3 way version of the same part, they told me they only sell to OEM, so I could not get the part, but what she did for me was send me the third port that is missing on the valve and I just attached it and made the 2 way to 3 way, it screws to the back, so may be since you are a vender/OEM call them up and buy it from them or just get the third port and sell that.
Great work! Are you using spacers for the screws, or does the wheel clamp down on the CF?
Originally Posted by Shoeless
Picked up my CF steering wheel plate earlier today. Did a little filling to knock back some of the gloss coat and all the buttons fit perfectly. I'm waiting on one more trim pot switch and wiring supplies, and will then wire it all up. Enjoy the eye candy.
Custom LCD Gauges , Data Loggers, Control Touch Screens www.LCDdash.com \\ 647-522-9953 \\ Voice & Text Proud new owner of GTM Gen 1., #105 - 08/27/11
LQ9 Powered, G96.00 6 speed transaxle
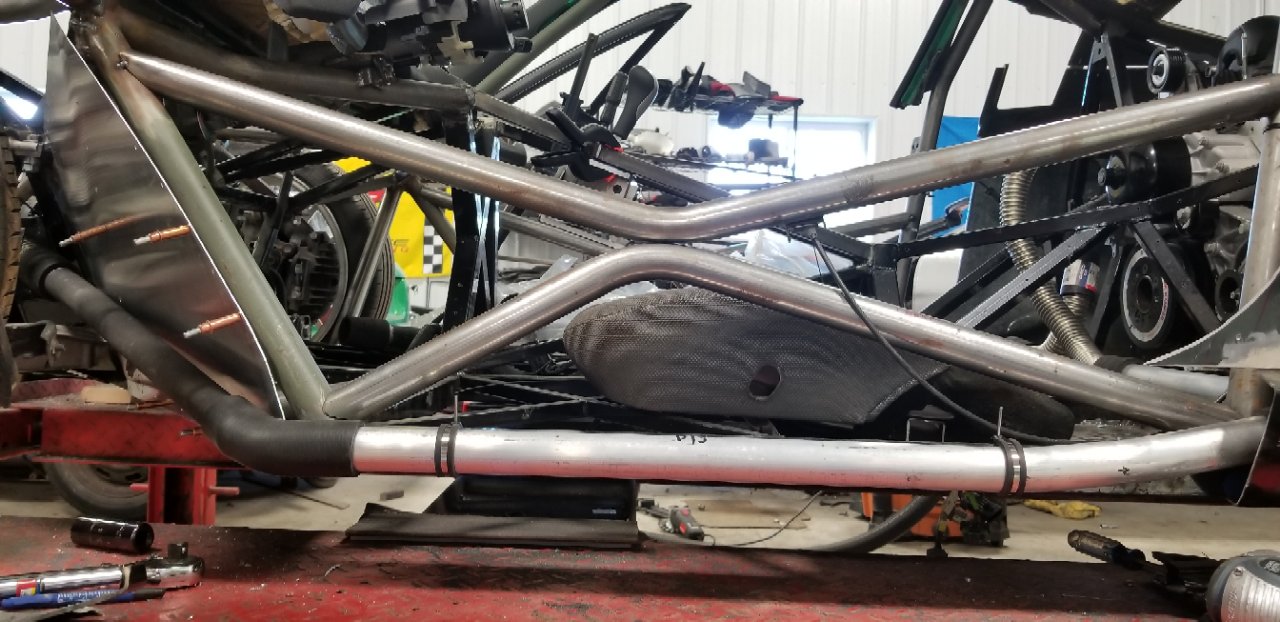
Been a bit since an update and in normal fashion, I'm jumping around knocking a few things out here and there. I got in my new e-brake cables as I just didn't like any of the OEM solutions. I threw in a strip of aluminum to hold the distribution block and shortened the front cable to 5 1/4" from the handle. I then routed the rear cables outside of the motor mounts, added some heat shielding, and ran to the spindles. I ordered up some more p clips to secure the cables in place and made sure they will clear the rear rims. As soon as the clips come in I'll secure these in place and check that off my list finally.
I also had the wife help me drop the motor back in, this is the first time she has helped on the car at all in the 2 year process so far LOL. Little does she know, I'll need her help today to install the floor AC vents, there is no way I can put them in and secure them by myself.
I threw the headers on and dang there is no space whatsoever in there. Glad I threw the AC compressor line on before I tried to put the headers on as that would have been impossible with them in place. Off to the garage to see what I can knock out today. I've got some family in town next weekend so I'll be running down to Key West then CT for a business trip, so maybe no so much getting done over the next couple of weeks.
Also finished up mocking up the radiator hoses in the front. I always liked the look of the all black silicone hoses and this turned out just like I wanted. The hoses sit naturally just to the left of the battery box.
I second the idea of routing the cooling pipes outside the cockpit. I built an early GTM and the heat inside from the cooling pipes was unbearable! Heavily insulated the pipes and left the closing panel off the bottom to make it acceptable. Prior to those changes the tunnel became so hot you couldn't rest your hand on it. If I built another, I would route the pipes through the rocker panel/ door sill area and then foam the pipes in place.
I second the idea of routing the cooling pipes outside the cockpit. I built an early GTM and the heat inside from the cooling pipes was unbearable! Heavily insulated the pipes and left the closing panel off the bottom to make it acceptable. Prior to those changes the tunnel became so hot you couldn't rest your hand on it. If I built another, I would route the pipes through the rocker panel/ door sill area and then foam the pipes in place.
IMO, the tunnel heat has very little to do with the coolant pipes....especially if you have them insulated. All of the heat in the tunnel is from the engine bay. If the engine bay is unbearably hot, the tunnel will be unbearably hot. The heat from the engine bay gets pulled forward into the tunnel and exits out the front. This is why it is absolutely critical to provide as much air flow thru your engine bay as possible with multiple paths for fresh air to get in and multiple ways for the hot air to be evacuated.
Shane Vacek
VRaptor SpeedWorks, LLC www.vraptorspeedworks.com
Turn-key GTM, SL-C & Ultima GTR Built to Your Specs!
Offering a full line of GTM Upgrades and Custom Parts
I'm taking Shane's approach on this, airflow in and out of the engine pay in order to cut it down as much as possible. I'll have the roof scoop and side 1/4 window scoops for airflow in. Then I plan on attempting to make my own carbon fiber louvered/open hear hatch to replace the glass. Probably add a few others when I get to that stage of the build, but I think I have my bases covered.
Regardless, I've got my coolant pipes insulated with 300 deg. foam tube insulation and all panels in this area are coated with Lizard Skin heat insulation.
Just a heads up on the foam insulation, I also used this and it did end up melting. Ended up making a big mess and then trying to get it off the lines was impossible.
GTM #370
Car was completed and I have SOLD my car http://edgemansgtm.weebly.com/index.html
Doing what you like is freedom - liking what you do is happiness
later,
Doug
I'd be interested in what the temps are measuring in the tunnel. The foam shouldn't be melting at coolant temps, and probably much higher than that. As Shane suggests, header heat must be coming forward...but how much?
Just a heads up on the foam insulation, I also used this and it did end up melting. Ended up making a big mess and then trying to get it off the lines was impossible.
Hey Edgeman,
Did you get the standard insulation, which I think is good to 210 deg or so, or did you go with an increased temp product? I went out of the way to get the increased temp stuff for my build. Add to this Shane's louver parts and I should have some airflow in there to keep heat going out the back.
It wouldn't surprise me if some header heat is moving forward causing issues, but as Beeman states, how much?
That made a SERIOUS difference in the cockpit temps. Granted we don't have the tunnel to begin with on this car, but moving two tubes that run around 200 degrees out of the inside of the car made a HUGE difference in driver comfort. I would HIGHLY recommend this mod.
Crash's setup is ideal with the coolant line running behind the firewall but you can't do that without moving the fuel tanks. So you have the option of routing behind the seats in front of the firewall (like I am doing through an insulated tunnel) or a longer less efficient route over or around the fuel tanks... Or if you make custom aluminum tanks, have your fabricator make a 2x2" channel in the front lower corners of the tanks.
Did you get the standard insulation, which I think is good to 210 deg or so, or did you go with an increased temp product? I went out of the way to get the increased temp stuff for my build. Add to this Shane's louver parts and I should have some airflow in there to keep heat going out the back.
It wouldn't surprise me if some header heat is moving forward causing issues, but as Beeman states, how much?
It must have been the lower temp stuff because it did not take long before it melted. Just a heads up and hope it works out for you.
GTM #370
Car was completed and I have SOLD my car http://edgemansgtm.weebly.com/index.html
Doing what you like is freedom - liking what you do is happiness
later,
Doug
Back from out trip and trying to get caught up on things, so though I would add to the discussion on insulation for the hard lines in the tunnel. I used a ceramic tape like header tape and covered it with reflective aluminum tape. I looking at the foam or soft type of insulation for the coolant lines the specifications for this type of insulation indicate it will melt at around 210 degrees F for most of this type of insulation but there are some forms that say they will reach a higher temperature before melting. There is also the issue of the gas produced if it burns or melts that can be hazardous to breath, so I opted for the different way to insulate the lines. I insulated both radiator supply and return lines and the heater lines supply and return in the same manner, the gold covered lines are the A/C hard lines insulated with refrigerant line insulation and covered with reflective film. Below is a picture of how I insulated the hard lines in the tunnel.
And agreed the key to keeping the header heat from migrating back up the tunnel is good air flow through the engine compartment to remove heat via the rear of the car.
Hope you enjoyed your trip James and thanks for the additional feedback. that's what makes this group of builders great, we all have creative solutions to the known problems at hand.


 Thanks:
  Likes:


 Reply With Quote