-
Hey Paul, Where did you locate the split for the rubber trim. On the center in the top or the center in the bottom between the wipers. I cant tell its so nicely done.
Nelson
-
Senior Member


Originally Posted by
Automan

Hey Paul, Where did you locate the split for the rubber trim. On the center in the top or the center in the bottom between the wipers. I cant tell its so nicely done.
Nelson
Bottom center. Less noticeable than the top and better for sealing if that matters. At least that was my thinking. Started with a clean straight cut. Then installed all the way around and made another clean straight cut leaving it just slightly long. Not a lot, but a little to compress the joint just a bit. Got lucky and turned out pretty well. Used the same technique on the side window molding.
Build 1: Mk3 Roadster #5125. Sold 11/08/2014.
Build 2: Mk4 Roadster #7750. Sold 04/10/2017.
Build Thread
Build 3: Mk4 Roadster 20th Anniversary #8674. Sold 09/07/2020.
Build Thread and
Video.
Build 4: Gen 3 Type 65 Coupe #59. Gen 3 Coyote. Legal 03/04/2020.
Build Thread and
Video
Build 5: 35 Hot Rod Truck #138. LS3 and 4L65E auto. Rcvd 01/05/2021. Legal 04/20/2023.
Build Thread. Sold 11/9/2023.
-
Senior Member
Last Details, Gen 3 Oil Pressure
Big day today. I literally crossed off the last items from my punch list. I’ll take one last pass at detailing under the hood for Autorama (still finding remnants from the time at the paint shop…) and probably smear some wax on the body. Then when the weather warms up, need to charge the A/C. Planning to have another learning experience with that. But I have nothing else on my list and no leftover parts in the basement. My plan is to take a bunch of pictures and probably a walkaround video at Autorama. Then will close out this build thread. I’ll start the title and license process after that, and it should be ready to drive when the weather changes. Looking outside at the snow coming down right now, seems that could be a while. But the time will come. So, here are some of the final details completed.
No pictures, but I noticed not long after receiving them that the acrylic in the side windows had rough unfinished edges. Looks like cut with a router or CNC and pretty much left as is. Aside from appearance, some edges were dangerously sharp. So took each one apart, sanded and polished the edges of everything including the openings, and put back together. Used 600, 1000 and 1500 grit paper, then plastic polish. Didn’t get crazy but broke the edges while using the 1000 and 1500 paper. Looks much better, not going to hurt anyone, and the windows glide open and closed effortlessly. Nice. A recommended detail for others.
While under the car tweaking the front coilovers and ride height just slightly, noticed that the upper radiator hose was contacting the KRC water pump pulley. The KRC power steering kit includes a new water pump pulley that replaces the stock one. Drives the added belt for the power steering pump. Others have reported that the underside of this extended pulley hits the upper radiator hose where it leaves the engine. My Roadster with the same setup is close but doesn't touch. This one however was making a mark in the hose fitting. Did a search and found several possible solutions. The connection is keyed with a push on fitting. The solution I liked was to cut a new slot for the key so that the hose rotated slightly. Used a 1/8-inch burr in my Dremel, cut a new slot about 3/8-inch away from the existing one (it doesn’t take much) and pushed back together keying on the new slot. Rotated the hose enough that now I have about 1/4-inch clearance. Took all of 15-20 minutes and a perfect solution. Didn't even lose or drip any coolant. So, thanks to the forum and forum member who posted.
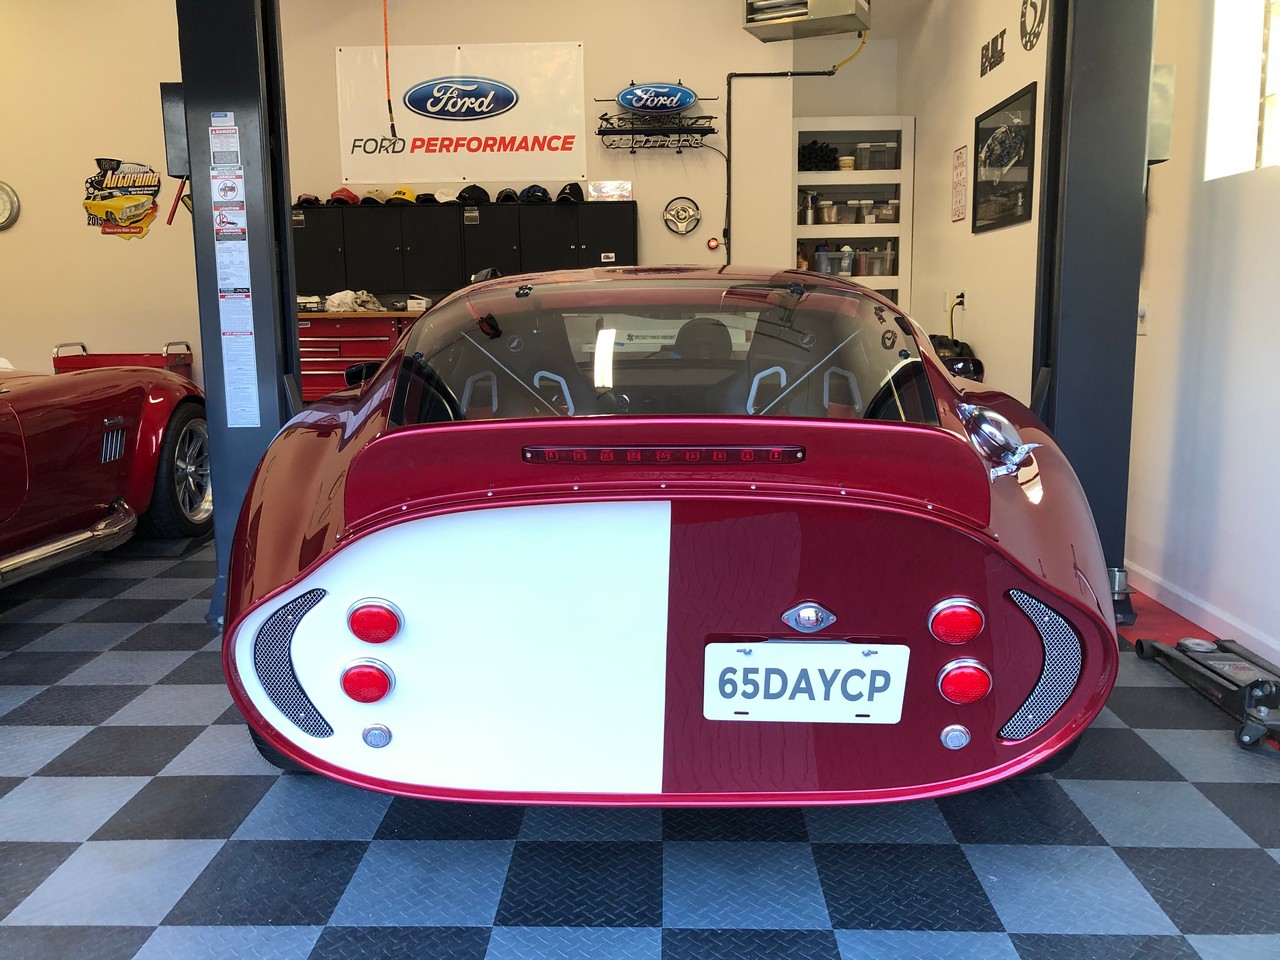
After staring at them for a few weeks now, decided I wanted to black out behind the rear grilles. The red side wasn’t bad. But the white side just stood out and reminded me (and maybe everyone else) that these are fake. I really didn’t want to paint. But someone suggested using black vinyl and that was a great idea. Just happened to have some on hand left over from the #8674 build. I did paint the heads of the body mounting bolts black as the vinyl wouldn’t have gone over them very neatly. Then cut vinyl pieces that were the same size as the grilles, cut holes for the mounting bolts, and wet applied the vinyl. It’s subtle but I like the difference.
 \
\
With the windshield installed, time for wipers and washers to be finalized. Washers were simple enough. Installed the nozzles, hooked up the hoses, and sprayed enough to get the nozzles adjusted. The ones I used, shown earlier, have little swivel balls on the nozzles. So stuck a needle in the holes and tweaked to where they hit the center of the windshield. All good. Hope my safety inspector appreciates the effort with those. Don't expect to actually use much. For the wipers, checked to confirm the 120-degree sweep I had set up when installing the Specialty Power Windows WWK-2 wiper kit. As luck would have it, too much. Took three times in and out with the wiper system to get it right. Could have been only once because I determined the right 110 degree new sweep angle. But didn’t follow the directions correctly the first two times for how to set it. Good grief. With that fixed, snapped on the wipers after putting some rattle can satin black on the arms. They came an industrial grey that wouldn’t have quite fit my color scheme. I used ANCO 44-01 Adjustable Wiper Arms and ANCO 5215 15-inch 52-Series Clear-Flex wiper blades. I found these referenced on a pretty old build on the other forum and they worked well. The 15-inch blades give a nice sweep of the windshield, although the outside tip of the passenger side isn’t quite flat when parked. But no big deal. The arms adjust in length as well as the angle of the blade. So, it’s possible to get them decently lined up. My whole wiper and washer system, with the Cole Hersee 75600-04 switch, which integrates the washer, provides an intermittent function as well as two speeds and works well. Very happy with it. The only thing missing compared to a DD is automatic rain sensing. I think I have that personally covered. ")

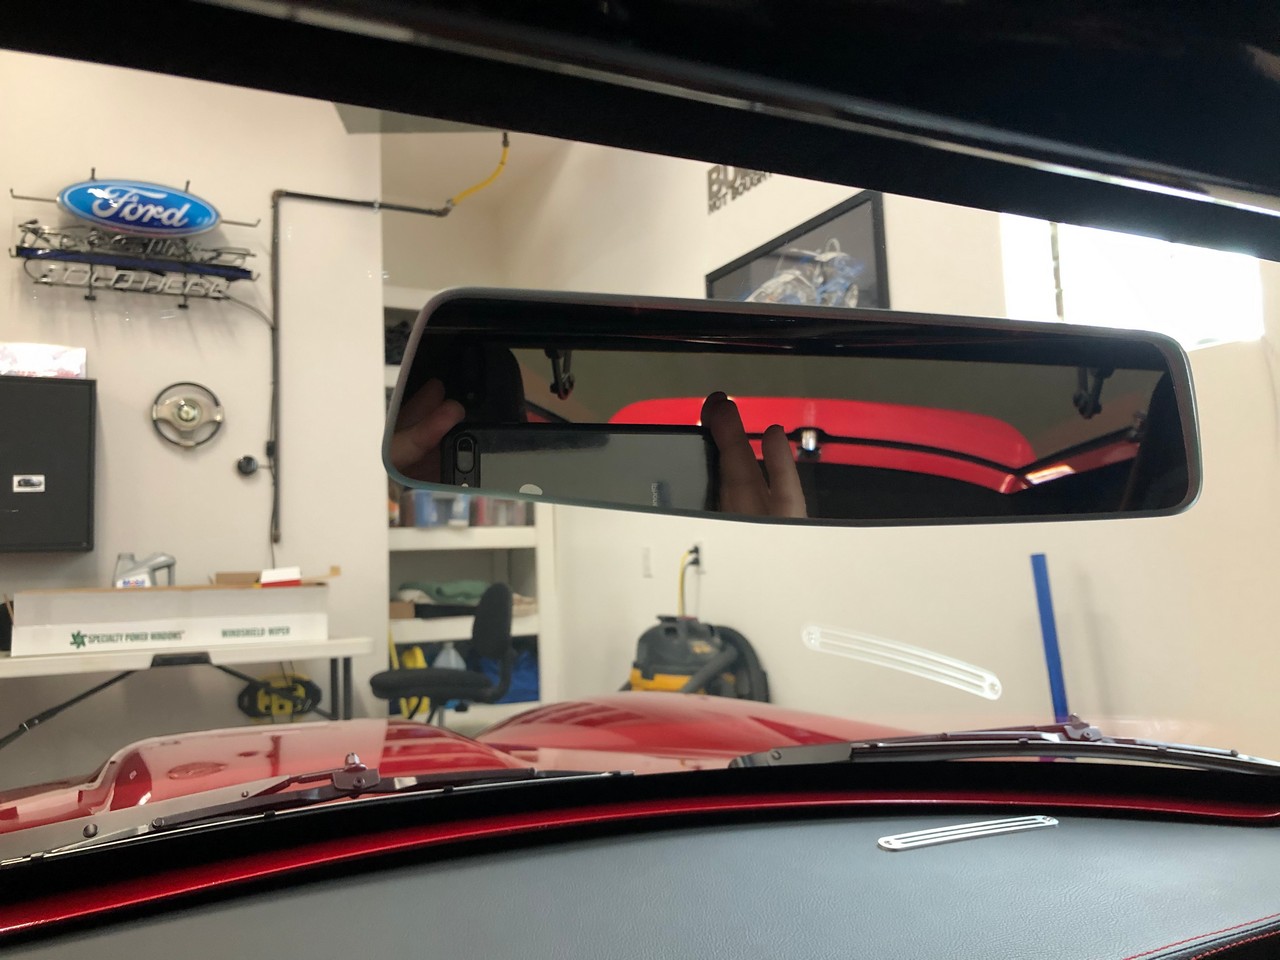
Also, now with the windshield installed, mounted the center rear view mirror. I chose to use a windshield mounted mirror versus a roll bar mount like some. Discussed previously. But I wanted one with a bit wider angle than the one provided in the kit. So, picked up a Brandmotion 9002-9701 Infinity manual dimming mirror. Very nice piece. I thought about extending the black border on the windshield down to where it would attach. That would be more OE looking. But that needed to done while doing the rest of the border and wasn’t exactly sure where the right location would be. Plus, really didn’t want to trust gluing that little button to the black painted on frit material. So, now with the windshield installed and after determining the best location, glued the button directly to the glass with the provided Loctite adhesive kit. You can see the silver button in the picture above. That’s how it’s going to be. Here’s a picture of it installed. I tried to take the picture to show what you can see out the back. It’s a pretty narrow opening. But with the two side mirrors plus this, it’s about as good as it’s going to get. Doesn’t look like it, but the mirror is well in front of the roll bar and a pretty natural feeling location.
Mounted the Factory Five nameplate on the driver’s side footbox. Must be almost done now.

So, my final update is about the Gen 3 Coyote. Earlier I mentioned (maybe a couple times) that the Gen 3 Coyote needs to have the OE oil pressure sensor installed. Otherwise the system starts throwing error codes (DTC’s). This is different than the Gen 2 where the OE sensor could be removed and replaced with the aftermarket sensor for the gauge. Also different than what Ford Performance told me when I first asked. Grrr. Although if you call and ask now they will say the OE sensor has to be there. Factory Five will tell you the same thing. Sometimes it hurts a little to be early in the game. The solution is to either modify the PCM calibration, which some have done. Or install a T fitting so both the OE and aftermarket sensor are in the circuit. I’ve been stalling on this one because I kind of made a mess of things. When I installed my Gen 3 Coyote, I found that Ford had changed the oil pressure sensor from NPT to M12x1.5 threads. The Speedhut oil pressure sensor is 1/8 NPT. So, thinking a metric to NPT adapter wouldn’t be easy to find, I removed the JR3Z-6881-A oil filter and oil pressure sender housing from the block (pretty easy, just four bolts) and tapped the metric hole to 1/4 NPT. Then used a 1/4 to 1/8 NPT adapter I had on hand and installed the Speedhut sensor. Thought I was being clever. But in hindsight was an incredibly dumb thing to do. Turns out the proper metric to NPT adapter is widely available. Just had to look, which I didn’t. Then when I ran the engine without the OE sensor started to get the error codes and the rest is history. So fast forward to now. Decided that rather than messing with the housing that I butchered I bought a new one. What’s another $100+ part at this point, right? Installed it the other day and started looking at options for a T fitting and the two sensors. Also talked to a couple other builders to see what they had done. I tried to keep it as simple as possible. Found a fitting on eBay that was M12x1.5 threads on each end (one male, one female) with a 1/8 NPT tap in the side. Perfect. But the 1/8 NPT was too close to the block to fit the large Speedhut sensor. So used a 1/8 NPT female to male 45-degree fitting from Summit. Today put things together and it worked. It’s a tight fight, and a little fiddly to get the angles right. Sanded on a crush washer to get the large fitting to clock into the right position. But now it’s installed. Cleared the codes. Ran my engine multiple times. No leaks. No codes. I hope this is fixed. This is what I installed. Speedhut sensor is the one at the top. The OE (smaller) one at the bottom.

Final comment on the oil pressure situation. I’m seeing where Speedhut has changed their latest oil pressure gauges to a 3-wire voltage output sensor versus this larger 2-wire resistive sensor they’ve been using for some time. These sensors don’t have the best reliability record, so I’m guessing that’s why the change. But my gauges are a couple years old now so aren’t this newer type. The solution might be different for those with newer gauges and a different sensor.
That’s it! My next update will be from the show in a couple weeks.
Last edited by edwardb; 02-15-2020 at 11:02 PM.
Build 1: Mk3 Roadster #5125. Sold 11/08/2014.
Build 2: Mk4 Roadster #7750. Sold 04/10/2017.
Build Thread
Build 3: Mk4 Roadster 20th Anniversary #8674. Sold 09/07/2020.
Build Thread and
Video.
Build 4: Gen 3 Type 65 Coupe #59. Gen 3 Coyote. Legal 03/04/2020.
Build Thread and
Video
Build 5: 35 Hot Rod Truck #138. LS3 and 4L65E auto. Rcvd 01/05/2021. Legal 04/20/2023.
Build Thread. Sold 11/9/2023.
-
Post Thanks / Like - 0 Thanks, 3 Likes


 Thanks:
  Likes:


 Reply With Quote
